Onoff
-
Posts
21125 -
Joined
-
Last visited
-
Days Won
206
Everything posted by Onoff
-

How does your garden grow?
Onoff replied to recoveringbuilder's topic in Landscaping, Decking & Patios
Can anyone advise what that plant is, second from the left in the border?
-
How does your garden grow?
Onoff replied to recoveringbuilder's topic in Landscaping, Decking & Patios
Good Lord the fermenting bucket of nettle based fertiliser don't arf chuck up! The whole garden stinks. The garlic spray seems to be working. Egg shells.....I'd like to use them but I've read to wash them or they can attract predators that eat eggs. The last thing I want is a badger traipsing through the beans. I've washed the egg shells, they're quite slimy inside. Once that's gone it leaves like a membrane you can peel off. I wonder does that need to be removed? The shells just to deter the slugs and snails. Also read they add calcium to the ground. Is that necessary given the chalk I have here? -
Discount Offers of the Week
Onoff replied to Ferdinand's topic in General Self Build & DIY Discussion
Not a problem if you've taken 3100 photos & 29 videos... 😉 -
8bar here as previously measured and mentioned, now tamed with a pressure reducing valve. Unusual I guess but an old smallholding in farming country at the end of a remote valley.
-
How does your garden grow?
Onoff replied to recoveringbuilder's topic in Landscaping, Decking & Patios
His sister was fit though... -
How does your garden grow?
Onoff replied to recoveringbuilder's topic in Landscaping, Decking & Patios
The Range do nice canes @pocster: https://www.therange.co.uk/garden/seeds-bulbs-and-propagation/plant-support-and-stakes/plastic-coated-garden-stake/#976180 -
I think you should retrofit Sageglass.
-
Washers! 😂
-
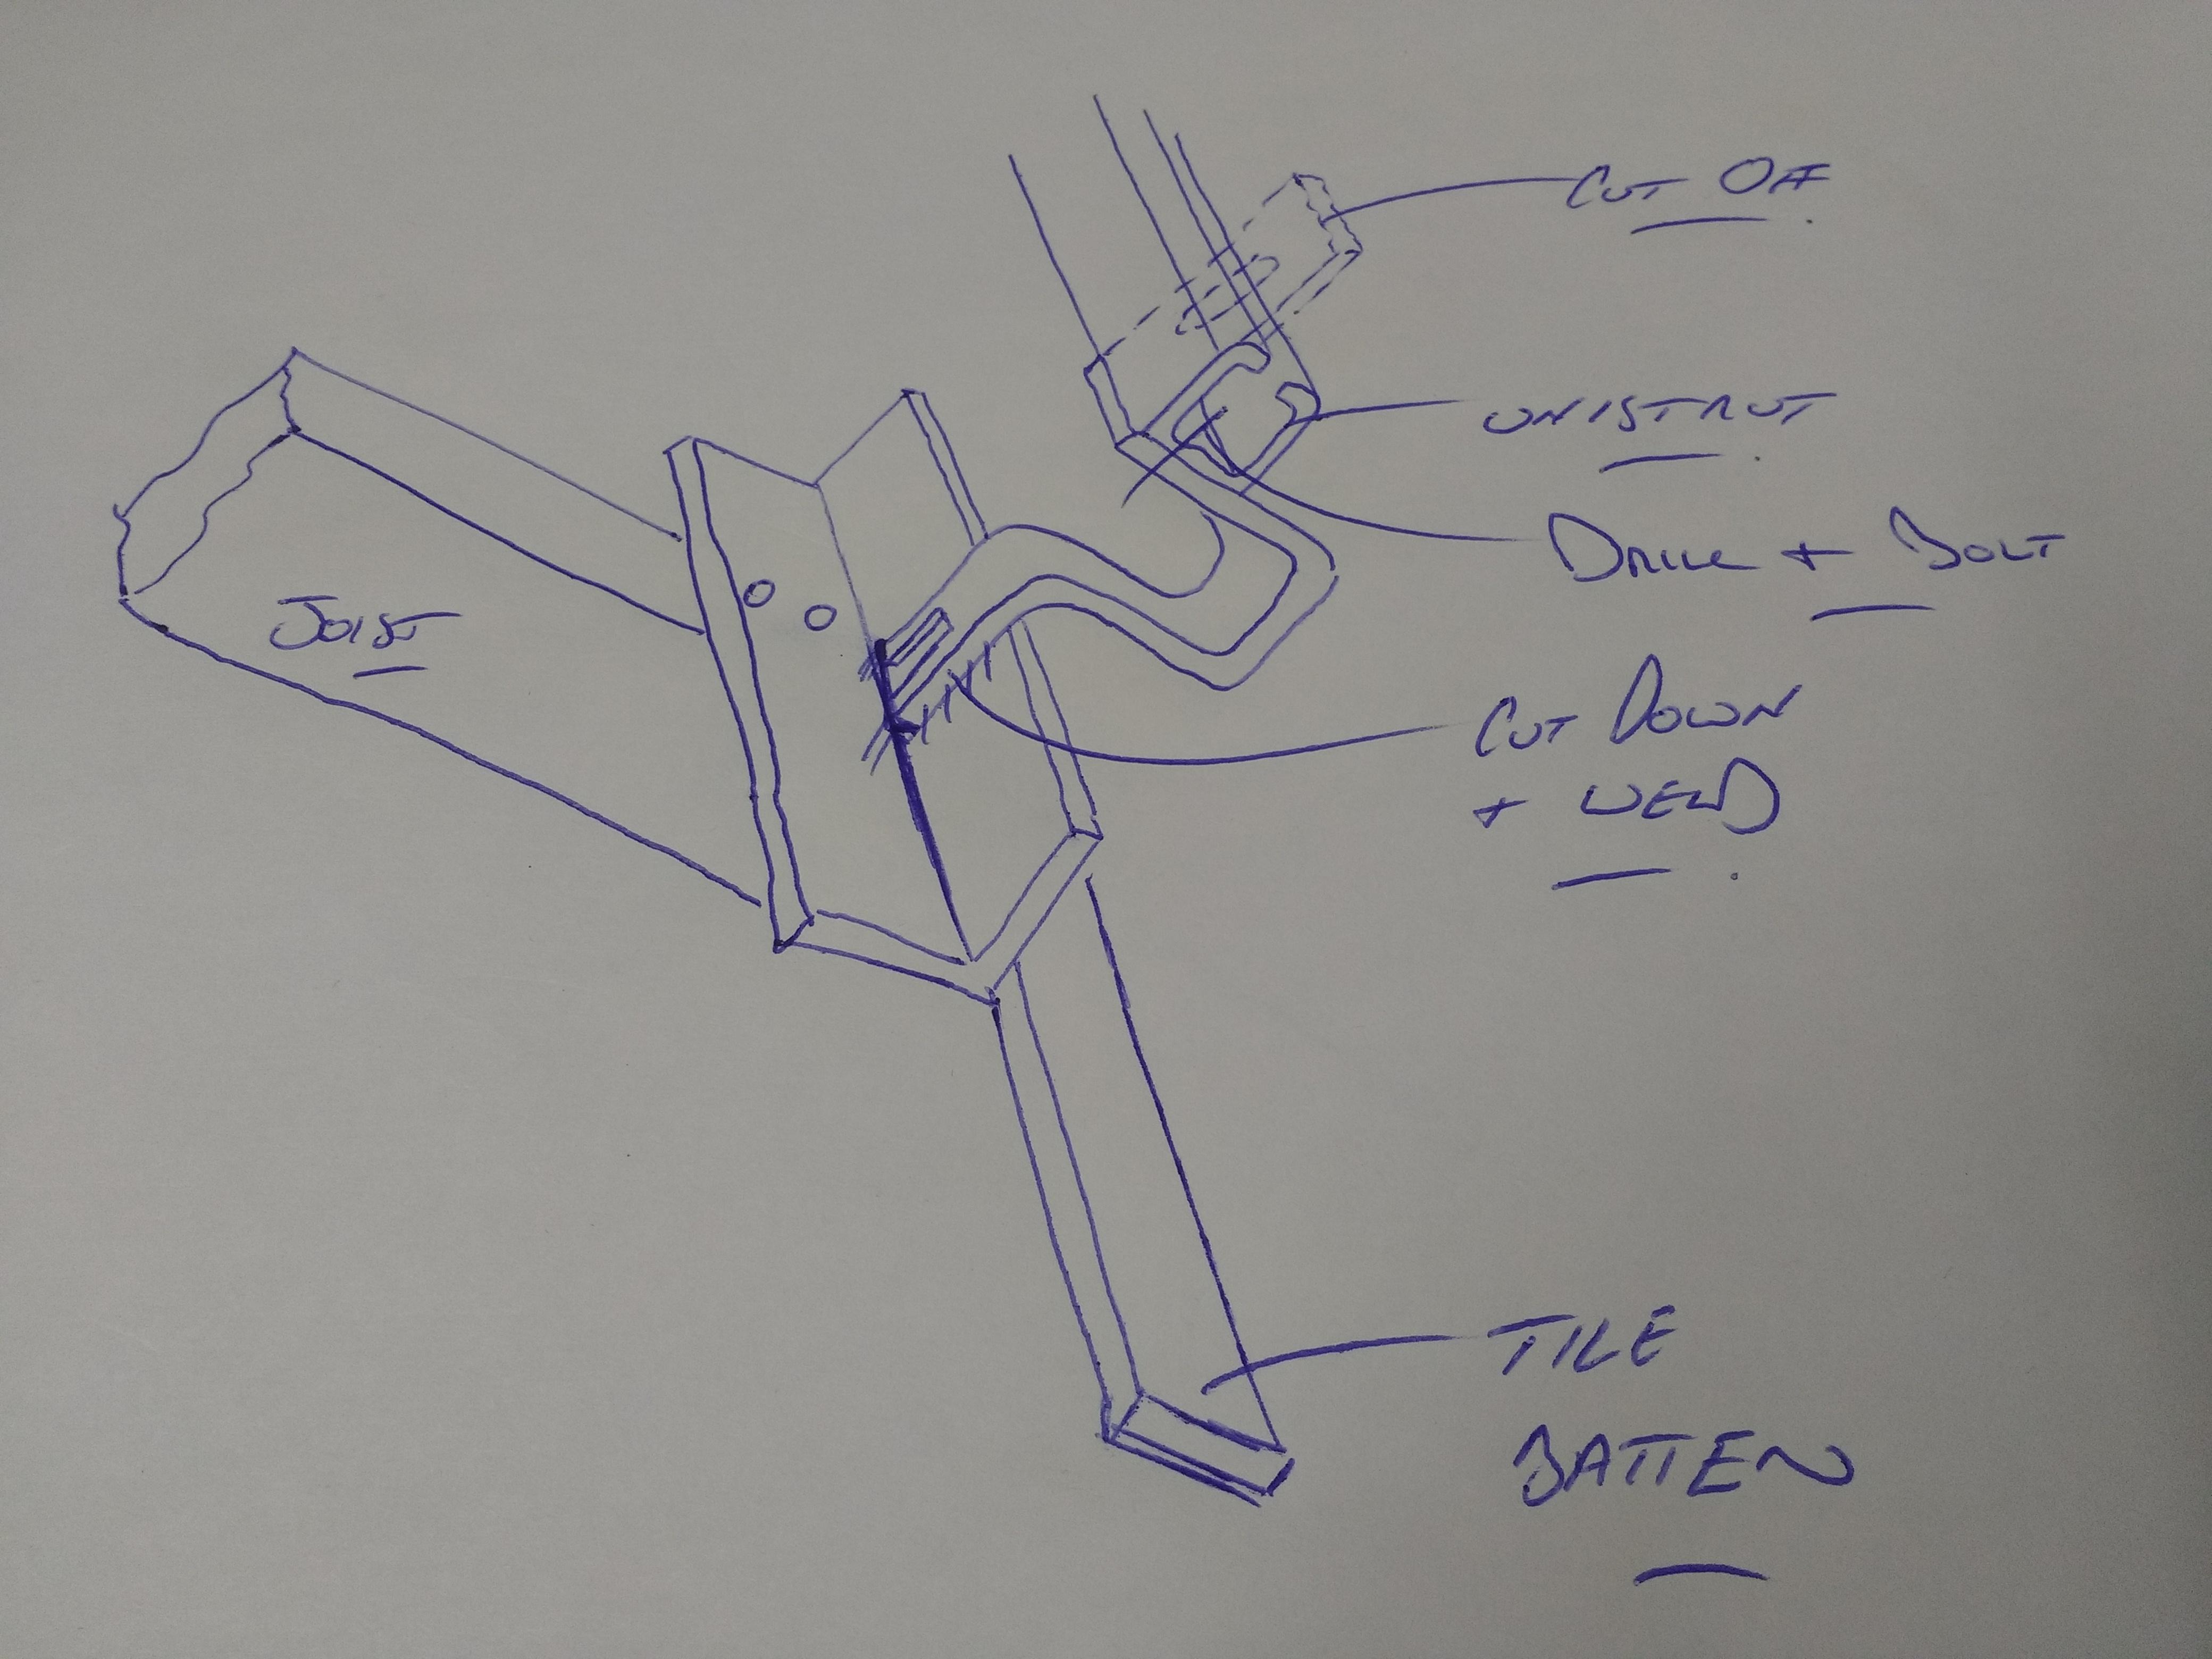
I don't think it's feasible to re-drill. There's not the meat plus when I trim to lower it, I'll end up with the slot open at the bottom. More likely a cut and shut job something like this:
-
It's sitting on a rafter. Can't see the point of the noggin idea. It's not done like that.
-
To show how far off the tile the bracket is.
-
Picked up the 14 stainless brackets earlier. At a fiver each, new old stock, I had to. I'll need to cut and shut to get them to sit down on the bottom tile: 18mm at the top, 16mm at the bottom: Rough plan is something like this and lop off the top L bit:
-
How does your garden grow?
Onoff replied to recoveringbuilder's topic in Landscaping, Decking & Patios
Garlic water may be the future! 😂 No signs this morning. Rinsed out an old de-icer spray last night, sprayed the plants and the ground around them. Only worry is whether the garlic mist will burn the leaves of the beans? -
Belt and braces! I ordered some stainless brackets today to cut and shut as required. Collecting tomorrow all being well. https://www.ebay.co.uk/itm/224993609728
-
Anyone cleverer than me?
Onoff replied to Mulberry View's topic in General Self Build & DIY Discussion
I would get a piece of the same size black flex, slit along it's length, remove the cores and use the resultant outer sheath to go over your exposed cores. Then wrap the whole lot in a decent self amalgamating tape. -
How does your garden grow?
Onoff replied to recoveringbuilder's topic in Landscaping, Decking & Patios
Bit of a microclimate down here in this valley. Total sun trap in Summer when the Sun is high. A damp, frost pit in the winter when the Sun is low. Get a Northerly wind and it rips up it because of the orientation and can be horrendous. -
How does your garden grow?
Onoff replied to recoveringbuilder's topic in Landscaping, Decking & Patios
The above photo with the red flowers, was taking late last night whilst out slugging. This of the potted runners. There were 3 or 4 snails of various sizes in the pot. 2 on the soil, one climbing a cane and one munching on a leaf. No slugs oddly. Saying that they seem fairly healthy. This morning I noted one runner has grown so long it would likely be up near 2m had the canes been long enough. It's grown like the proverbial bean stalk and doubled back on itself. SWMBO has just culled some bamboo so I might attempt to swap out the short sticks in the pot for these longer ones or transplant the whole lot into the ground and make a wigwam. As for the trenched beans. I've been lining the inside of the sleeper frame with 300mm dpc. To keep moisture in what is in effect a raised bed and protect the sleepers which aren't in the best condition rot wise anyway. Yesterday I started digging over and levelling. Plan is to de-stone and sieve that chalky pile on the right. Both to fill the enclosure up and clear the ground to the right. This ready to maybe extend the veg patch. With that dug over, moist soil last night I had maybe 4 slugs in the enclosure but none on the beans. There may be a reason for that. For the past couple of nights I've been applying "garlic water". A couple of cloves chopped & crushed, a litre of boiling water in a jug then left to steep and cool. You're supposed to strain and use a plant sprayer. I just strained and used this watering can ended bottle as SWMBO didn't want her plant sprayer stinking of garlic. I just doused the rough periphery of the bean patch. It's possibly working, time will tell. Last night the lawns looked like something from Tremors meets Riddick with the amount of slugs but the bean patch was pretty much devoid. The 3D printed, PETG connectors are not fairing well, delaying the netting going on. The whole frame is leaning and I've had one corner connector break twice. ABS might have been better but we haven't cracked printing that yet. I'm thus now using scrap steel sheet, zintec where possible, to reinforce all the junctions. -
How does your garden grow?
Onoff replied to recoveringbuilder's topic in Landscaping, Decking & Patios

-
We should have installed air conditioning… now what?
Onoff replied to Adsibob's topic in Other Heating Systems
That's not Windolene... -
We should have installed air conditioning… now what?
Onoff replied to Adsibob's topic in Other Heating Systems
Stops "them" listening in too 👍 -
Thanks for reminding me I need to go slugging tonight.
-
That's it, constructive criticism at it's best. Your technical insights are always welcome...
-
We should have installed air conditioning… now what?
Onoff replied to Adsibob's topic in Other Heating Systems
Could you not build another house with AC from the off? -
Anyone cleverer than me?
Onoff replied to Mulberry View's topic in General Self Build & DIY Discussion
"Shrink N Repair" if you can get it. Various tape round / heat up / shrink options: https://hilltop-products.co.uk/heat-shrink/heat-shrink-cable-repair-sleeves-tape.html -
Again local, I can get these brackets and quite a few too, for reasonable £5 each. I'm thinking might give me more cutting and shutting options. Says they're for plain tiles though?