Onoff
-
Posts
21052 -
Joined
-
Last visited
-
Days Won
206
Everything posted by Onoff
-
You can get a post level: https://www.screwfix.com/p/post-level-5-125mm-/6872V?
-

How does your garden grow?
Onoff replied to recoveringbuilder's topic in Landscaping, Decking & Patios

-
As I've said before the Yanks have been using pex to make bfo collectors for years. https://www.builditsolar.com/Projects/PoolHeating/TomCollector/TomPEXCollector.htm
-
Just seen that Anycubic have the i3 Mega S on a back to school sale. @PeterW put me onto Anycubic when I wanted a printer for my lad's 21st. To say he's had fun with it and learnt, whilst at the same time producing practical prints is an understatement. With hindsight I might have gone for an Ender but at this price you can't go wrong. https://www.anycubic.com/collections/anycubic-mega-3d-printers/products/anycubic-i3-mega-s
-
Time will tell! PETG stands up better to heat than PLA so far. Some stuff we've plastic primed and spray painted.
-
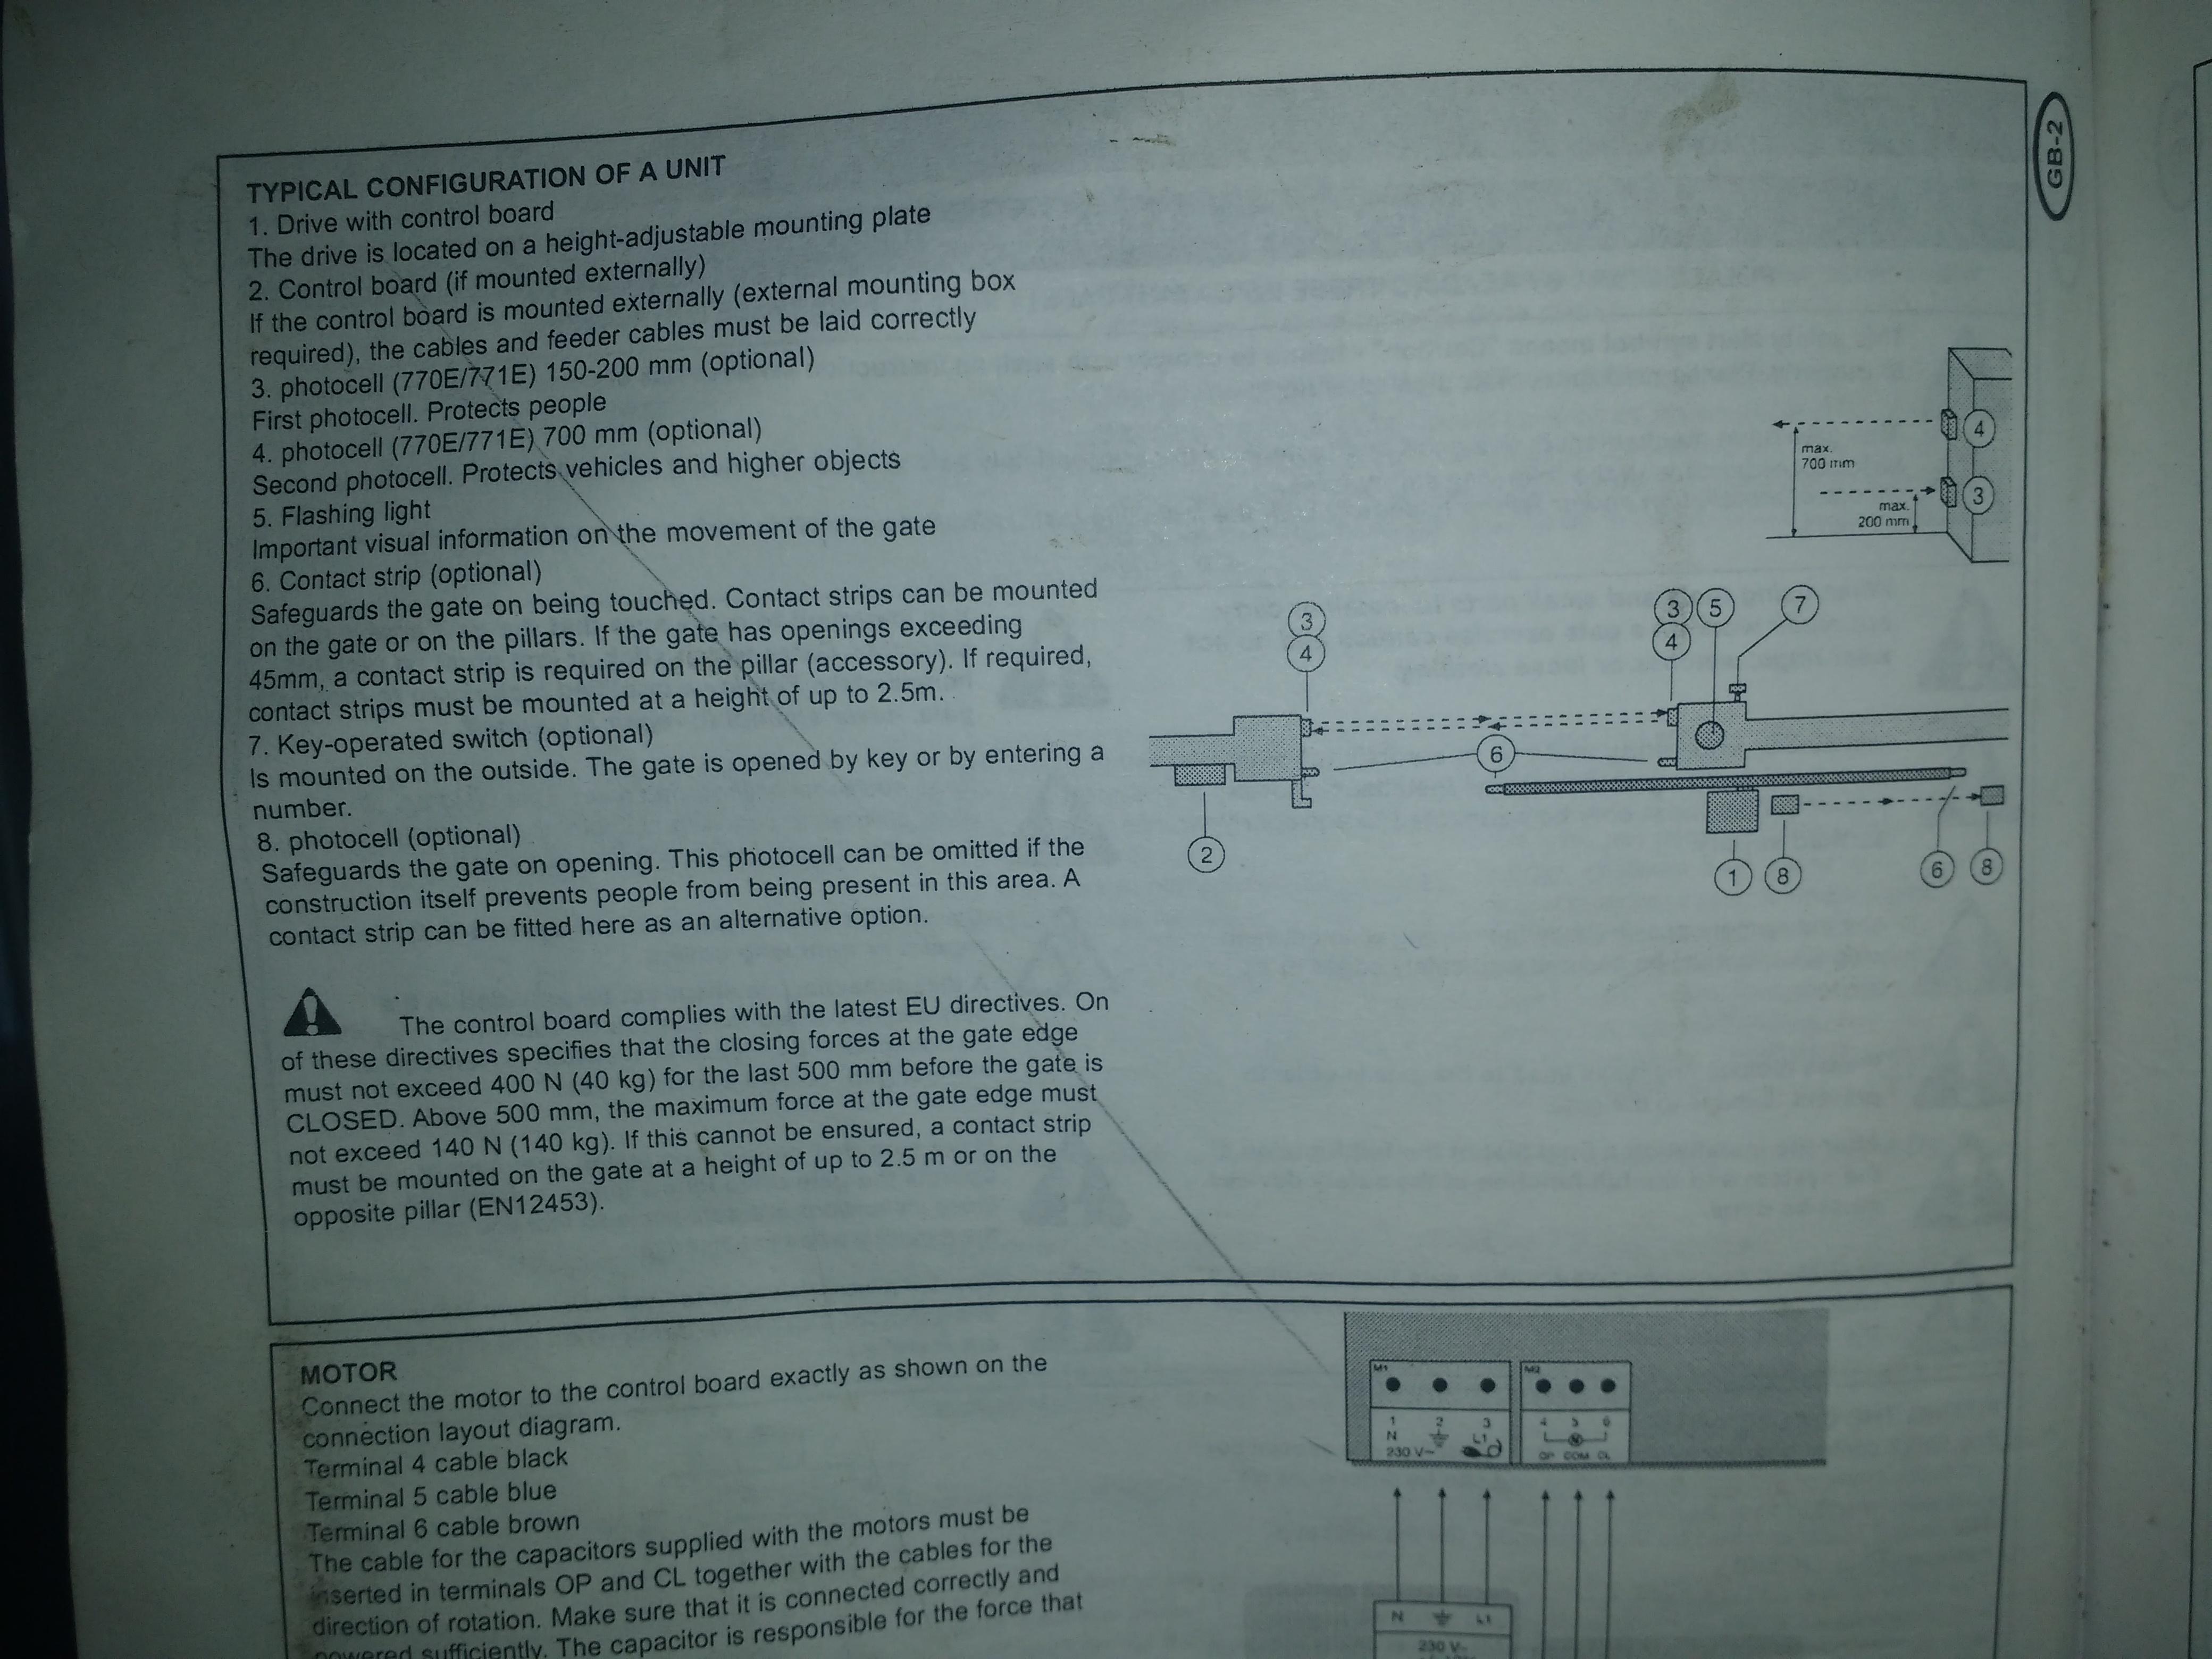
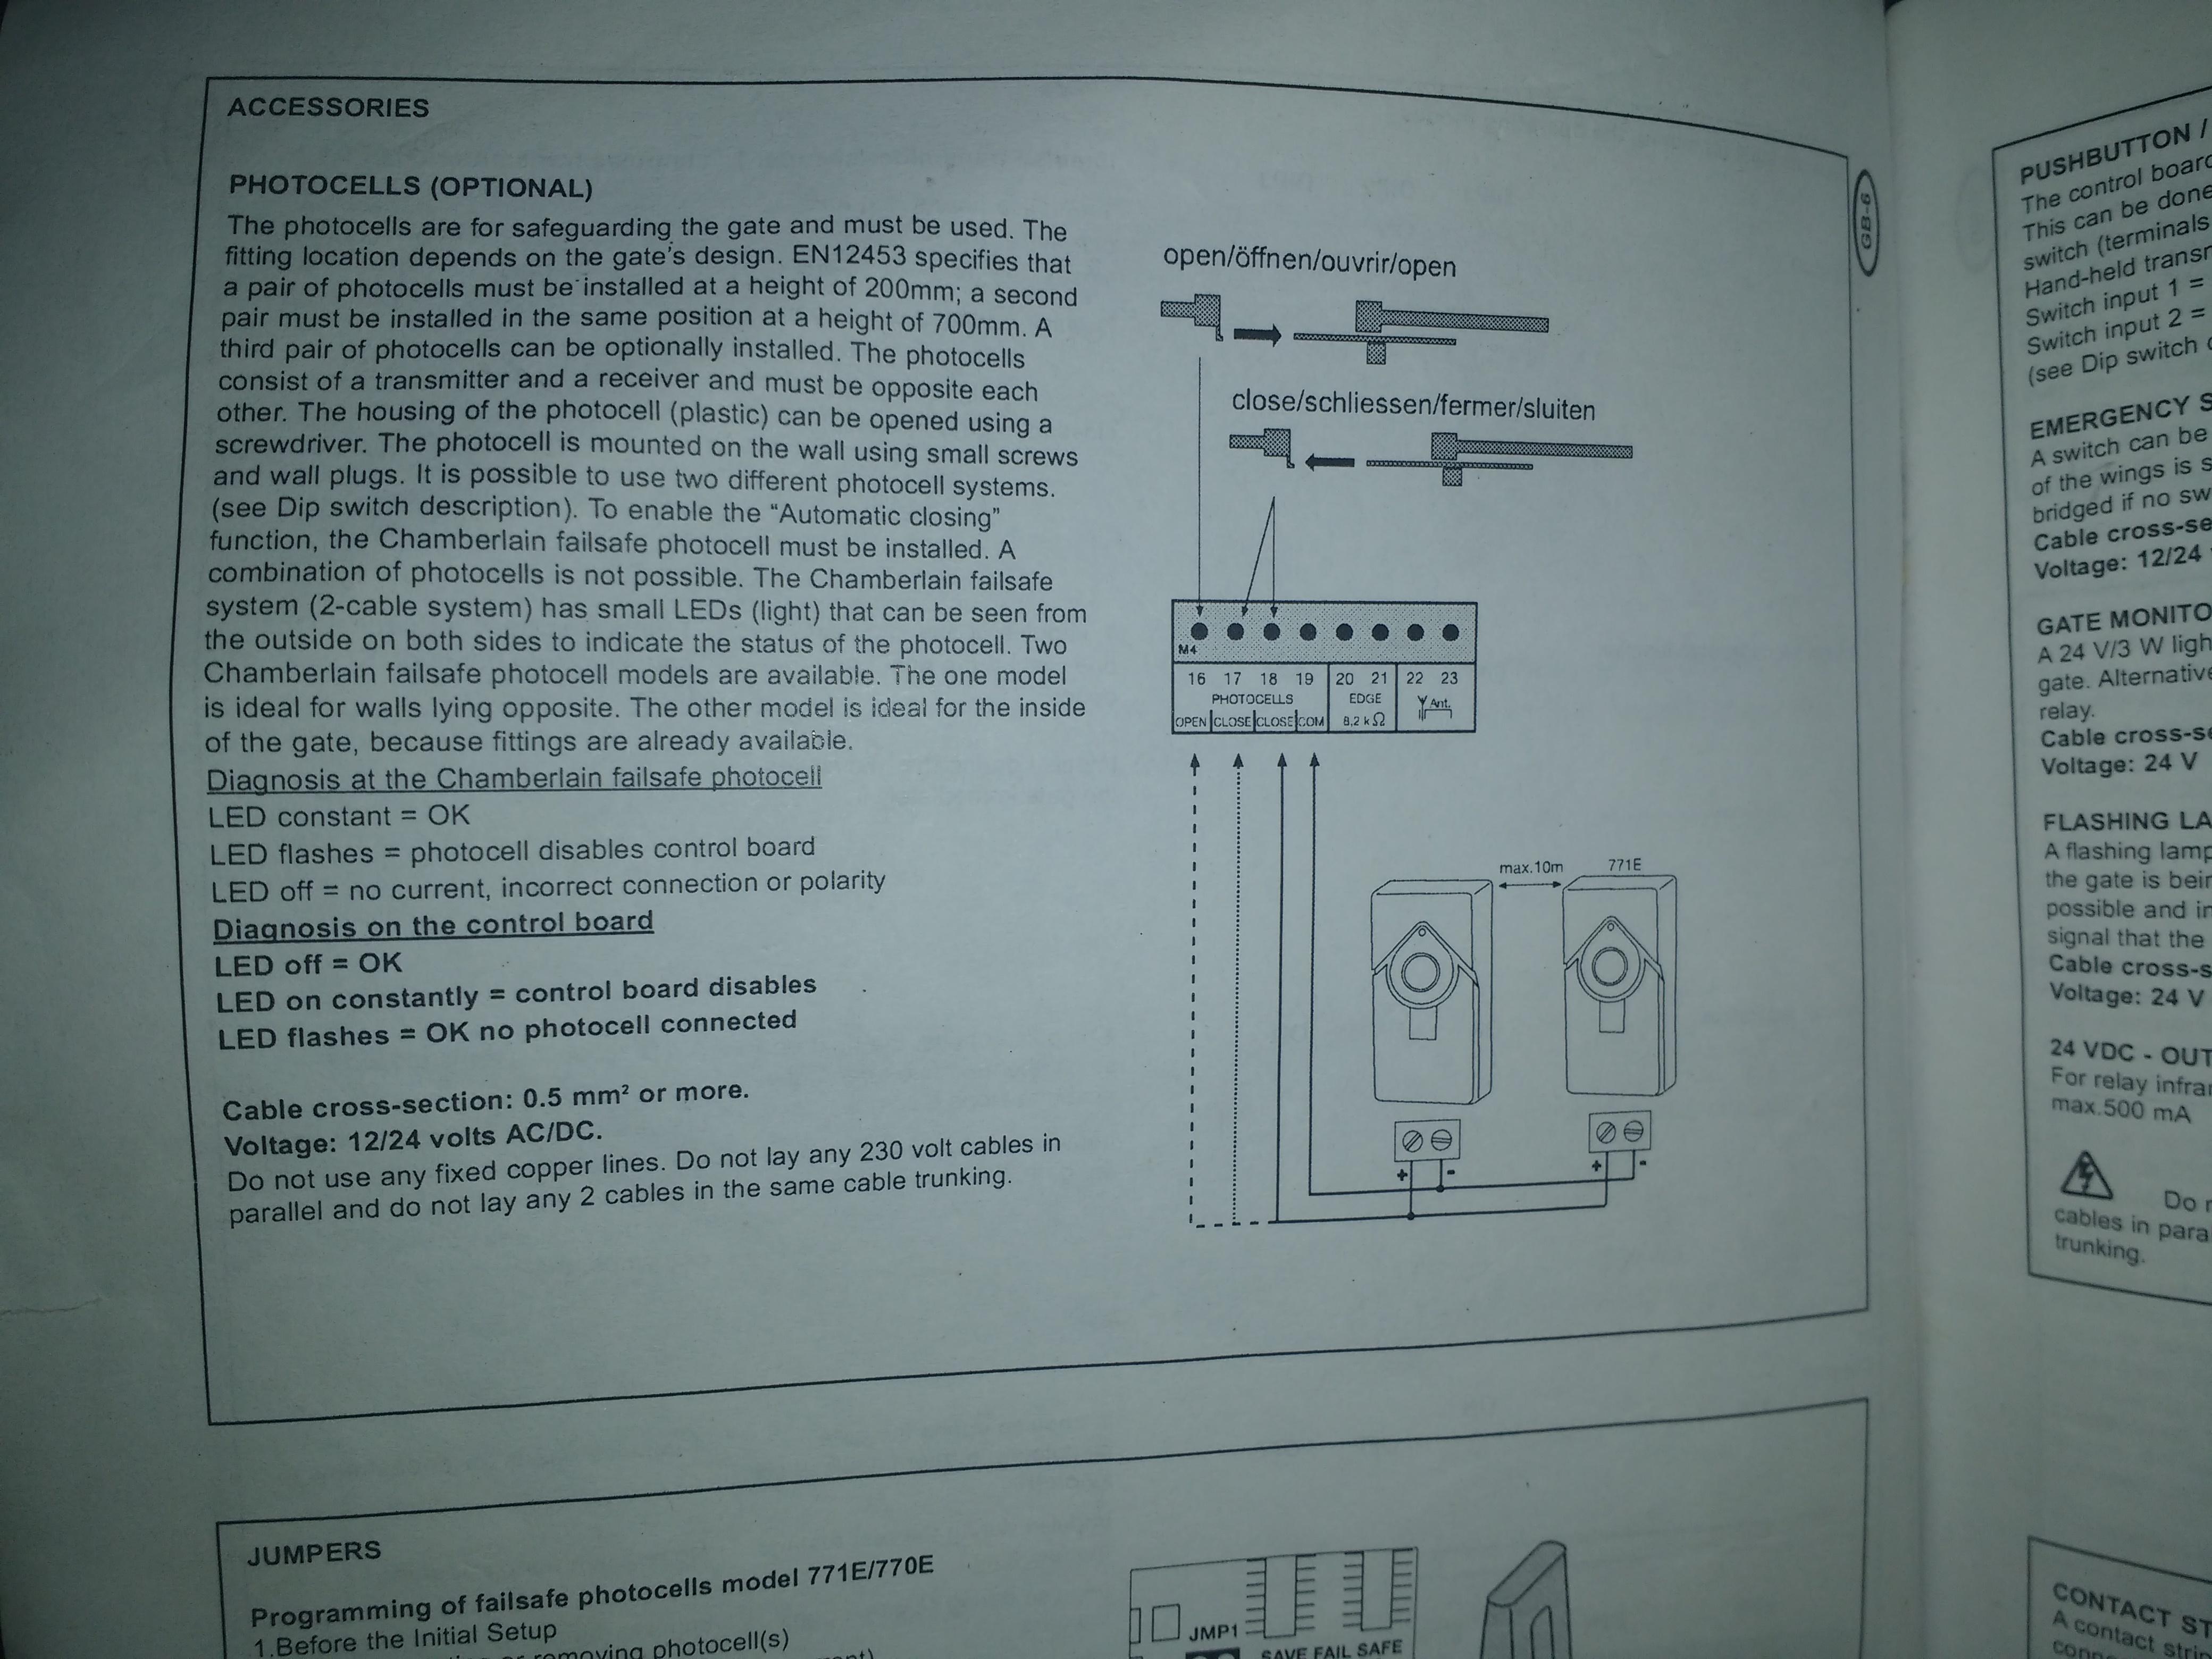
Just two wires here to each photocell. I've had them connected to the board on the bench and checked their function: As it stands I've just got photocells 3 & 4 fitted. The aforementioned red/black is if I fit a pair of photocells as "8" on the diagram. I'll likely get some wireless contact strips instead:

-
Plagiarist! 😂
-
Silicone render at night with lights on. Is this normal?
Onoff replied to Piggybagpop's topic in Plastering & Rendering
Ginger beer with rhubarb here. -
Silicone render at night with lights on. Is this normal?
Onoff replied to Piggybagpop's topic in Plastering & Rendering
Or cared! 😂 -
What is considered to be short cycling
Onoff replied to Johnnyt's topic in Boilers & Hot Water Tanks
The corner shop and back? -
Silicone render at night with lights on. Is this normal?
Onoff replied to Piggybagpop's topic in Plastering & Rendering
Illuminate with daylight lamps? 😂 -
A 3-core SWA to the motor, a 3-core CY for the mag switch. The red & black is for a possible extra set of photocells. All travels underground, through reinforced concrete, in the 3" pipe, to the other pillar. I cut a piece of wide dpc to isolate between the stainless mounting plate and cast aluminium motor base. Attached with contact adhesive and holes trimmed with a scalpel. Reprinting the PETG block the cables come up in for a few mm more clearance. It's just cooling down now.
-
Loads of M10 nut caps, in the black PETG. The standard, bought ones weren't deep enough for the longer, stainless coach bolts: Before: After:
-
Softer ground needs a bigger surface area to spread the load.
-
Wondering at a custom 3D printed nozzle: https://www.thingiverse.com/thing:4215459
-
Should have "siliconed" it before the ledger went on. Oh well!
-
Exactly how much space is there between the back of the ledger and the wall? A picture says a thousand words, even better hold a tape measure up as you take the picture.
-
Likely have to be a bloody big nozzle, it's spaced up to 50mm off the wall! The whole idea was to promote air flow around the back.
-
Also see comments made on 12th & 15th June ref "siliconing" around the spacer. This was before you'd gone I think with recessing the spacer into the render. Assumed you'd done this already. Will you be able to get in there to do it with the ledger board in the way?
-
Haul it up with a rope each end looped over the ledger. Get the ends in the joist hangers as close as. Then lever up from the front with a clothes prop esque pole...maybe.
-
I do believe this was gone over in great detail before when a cheap 50mm flat wood bit was proposed (and probably even linked). This to drill up the centre of each 6"x6" post. Scaffold poles...erm a local scaffold will have off cuts lying around. They cut poles down on site with gay abandon and bin the off cuts. Ditto someone doing a self build and so on. Here for instance: BLISS Scaffolding LTD · Aberystwyth SY23 4EB, United Kingdom Pretty sure if you asked nicely a nice hairy scaffolder would slip you a length... Personally I'd want to bear over as much of the bottom of the 6"x6" with any supporting plate and reduce point loading. I'd fear spitting the post over time if using say a bit of re-bar. Less so with a scaffold tube. If you do shove anything up the end of the timber I'd make sure it's at least galvanised and paint the end with some zinc rich paint.
-
Buy two cheap builders buckets, the 99p jobs, cut the bottom out with a jigsaw. Instant round pad formed. Dig holes, check some rubble in the base and whack it down. Drop the bucket in and set it level. Fill with concrete. Cut the bucket off when set. Use that cheap laser I linked you to way back that you then went out and bought as it was such a good deal 😂 Seriously now... Use that cheap laser I linked you to way back that you then went out and bought as it was such a good deal 😂😂
-
2 of these? Galvanised Concrete in"U" Shape Post Support Heavy Duty for 150mm / 6" Inch Posts https://amzn.eu/d/16tAkXe

-
Oh yeah! 😂 Even more important those supports are secure on the ledger.
-
I'd still be worried about the 3 hangers under the cill not hooking over the top of the ledger. You might be able to skew a screw up from the bottom at 45deg or screw some neat plates up from underneath... What way are your decking boards running?