


Onoff
-
Posts
21125 -
Joined
-
Last visited
-
Days Won
206
Everything posted by Onoff
-
When I find where I put it, connect it up etc I'll let you know! Oh I hoard, it's like a disease. Probably why one of the kids is special. Down to 1m2 of floor space in the double garage now.
-
Yes. Best applied from a hawk with a small trowel. Force it in, overfill a bit & when it's going off but not gone off, rub it level with the original reveal using a bit of sawn timber. Like 4"x2"x1/2" thick.
-
Waterproof PVA is better. Tbh use some PVA wood glue if desperate. Mix 5:1 as the liquid for the cement mix. Getting the right consistency is the key.
-
Mix up some 4 or 5:1 builders sand / cement with waterproofer in and render it. Try and match the pattern as best as by stippling with a paint brush or something. Paint to match. That's what most normal people would do. I can hear you whining now that you can't get it to stick! 😂
-
" You sh!t on floor, ,€50 fine... each time!"
-
Until the next window then!
-
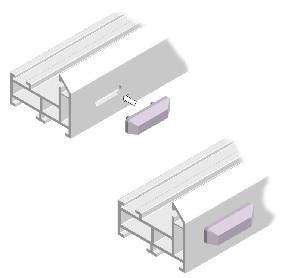
Bridging packers they are. They should just snap in and stay there. How many have you got?
-
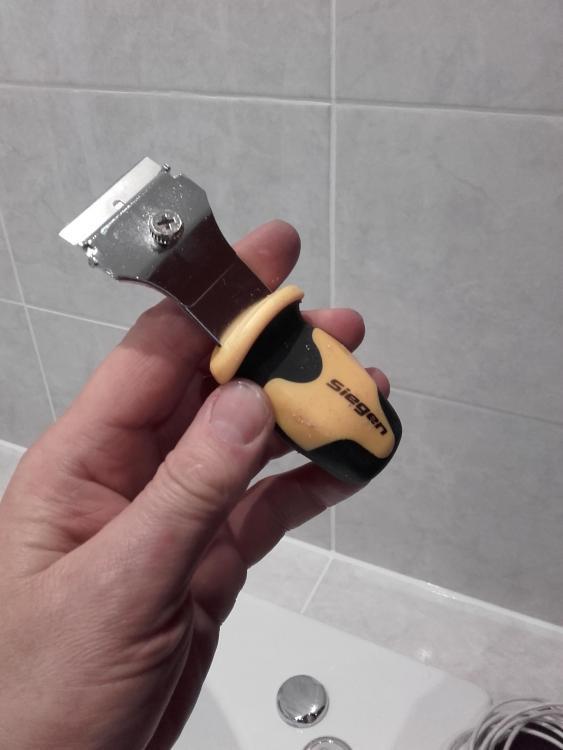
This is the scraper I rate. Bought from the local motor factors:
-
I genuinely found the No Nonsense Silicone Remover from Screwfix pretty good. Leave to soften them take off with a blade like the above. C-Tec Multisolve to finish off. Quite impressed too with the heavy duty Big Wipes that come in the yellow tub with red lid.
-

How does your garden grow?
Onoff replied to recoveringbuilder's topic in Landscaping, Decking & Patios
Getting quite a crop of runners. I think the neem oil is having some repellent effect as I've some nice beans. Some however are a bit chewed/diseased/infested. Should I pick and discard these or leave in the hope that whatever pest/predator carries on with those and leaves the others alone? -
How does your garden grow?
Onoff replied to recoveringbuilder's topic in Landscaping, Decking & Patios
& Bingley -
Indeed, as @joe90 says, short ones in first then the long. Ask me how I know? Especially on say a fanlight like this, there's just not enough flex in the short trim. It was then I found how useful a sharp chisel is for removing trims!
-
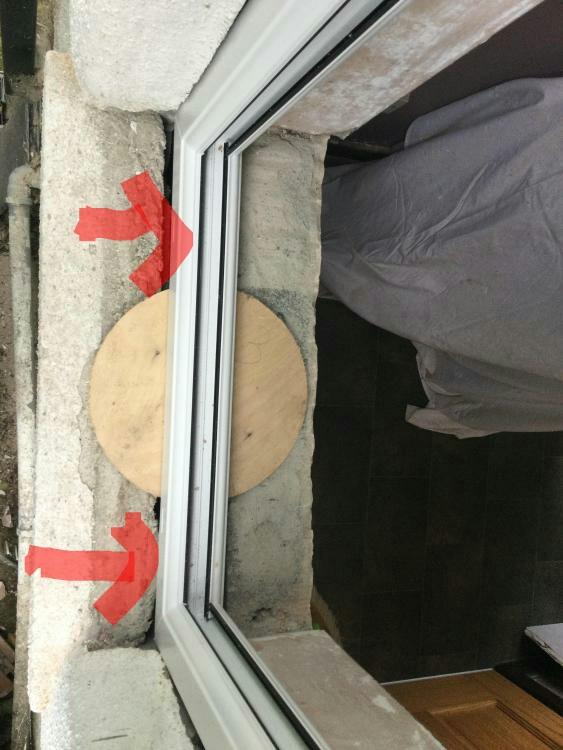
Erm no... This is a face drained set up: This is @zoothorn's window. The arrows point to the face drains, though my crap arrows are obscuring them maybe. Look at the original photo on page 4. It's face drained.
-
The cover plates clip into the slots you can see? He must have them lying loose somewhere. @Tempput up typical pics on page 3.
-
It's face drained see the picture on page 4.
-
Like this?

-
Multitool?
-
Solar power payback takes much longer than you think
Onoff replied to Radian's topic in Photovoltaics (PV)
Is that a huge issue if the losses are within the thermal envelope? -
No need for @Onoff or @joe90 to reply then! 😂
-
Where is the kWh price heading in 2022?
Onoff replied to epsilonGreedy's topic in General Self Build & DIY Discussion
Do they really make great chips? -
I thought all yours came in bottles especially flown in?
-
There are also window fixing cleats you can get that clip or screw into the outside edge of the frame, then get screwed to the block / brickwork, like this:

-
Remove beads with a chisel in the crack line, sharp tap, it works.
-
If your glass is ready fitted you need to remove the beads in order to drill the frame. Take note of where any factory fitted packs are between glass and frame.
-
Wedge it and pack it on all 4 sides. Drill through your frame into the wall and fit your hammer fixings. Use expansion foam to fill the gaps. Illbruck FM330 is amazing. Airtight and remains elastic. Streets ahead of anything you'll get at SF/TS. (Don't go bleating it has to be from SF or you haven't got such and such a drill, couldn't give a toss). You might want to mask up your frame to avoid getting foam on it. Trim the foam off. Buy some uPVC cover strips, neatly cut and stick on with mitre bond (basically 2 pack super glue).

