Onoff
-
Posts
21126 -
Joined
-
Last visited
-
Days Won
206
Everything posted by Onoff
-
I think they do now. If you recall I thought it might work like this and queried it at a TLC branch (Medway). They admitted they didn't know but that it was a good question. They then proceeded to get all the parts out and we tried it on the bench. The guy who did it was calling the other staff over saying "Come and look at this!". Sure they've updated their bumpf since.
-
No sorry don't know. What I'll do though is give one of my spare Quinetic switches to a mate who's bought a Qunetic "copy" and get him to try it with his receiver.
-
A number of us here use Quinetic. All good. I've one next to the bath: Bloody typical, when I bought it the only IP67 switches came in this grey. Not too obtrusive with the grey in the mosaics but I might have gone for white had it been available. You've only just now mentioned a 3-gang switch unless I'm mistaken? Quinetic do a 3-gang IP67 switch btw. (IP67's better than IP65 ) https://www.tlc-direct.co.uk/Products/QUWS3W.html As an aside I THINK that ENER-J stuff might be made in the same factory and use the same protocols as Quinetic: https://www.ener-j.co.uk/products/cat/wireless-switches- Also that they might (could be wrong) both be made by Baydo IOT Technology Shenzhen Co.Ltd
-
I'd throw the BG switch away. You can do it all with the Quinetic stuff. Could do it with one 1-gang switch in the kitchen and a 2-gang switch with built in receiver under the covered area (where the BG one was going to go). But.....if you use a 2-gang with built in receiver it needs hard wiring. Do you fancy having the 4 downlights dimmable? Then one 1-gang switch in kitchen. A 2-gang under the covered area. One switched receiver for garden lighting + one dimmable receiver for downlights.
-
Shed loads more procrastination before this is over.....
-
If going 6x6 then these or similar: https://www.ebay.co.uk/itm/BOLT-DOWN-HEAVY-DUTY-GALVANISED-Fence-Post-Holder-3-4-6-75-100-150-mm/264431928442?

-

Today's delight: making holes in concrete
Onoff replied to ToughButterCup's topic in General Construction Issues
Modest too I've heard. -
Just to clarify on my "why" on the 8x2 instead of 6x2..... 6x2 at nom. 400mm ctrs is good all day long for the main span between plinths but I'd be going out a good 4' on the cantilever like half the cabin depth or more (you can always trim back). Could likely avoid the diagonal brace from deck to leg maybe? Would look better? You want to be able to sit there with a bit of space for a deck chair, table etc otherwise what's the point. Just my humble opinion. (Tbh that American Wood Council link I posted earlier in the thread suggests even deeper than 8x2 for a 4 foot 'ish cantilever!)
-
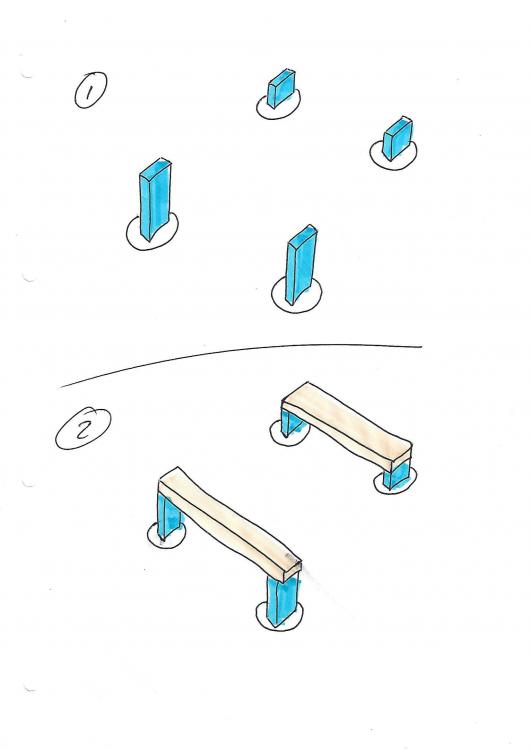
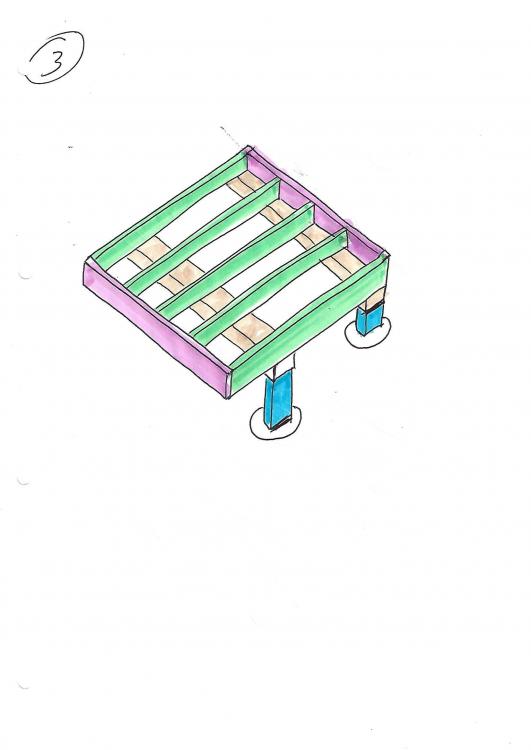
HTF is it difficult? Meant as an idiot's guide. I even coloured it in! Slope in same direction as green ones. Short of coming up and doing it for you... OK, dispense with short vertical legs at rear. Sleeper sits straight on plinths. Joists front to back, in line with slope imo, all day long. Much better support for cantilevered deck. The irregular number of joists, 7, will allow noggins to be staggered nicely. Once the base frame is made and screwed together, then spike it with screws driven in at 45deg into the sleepers. Use the bfo green, timber screws (with an impact driver ideally) to connect horizontal sleeper at front to vertical legs. Some guidance here for example: Come on now, you struggled but followed my kitchen scribblings and that worked out well!
-
I had visons of you doing something like this. 7 green ones btw. Not shown, a line of staggered noggins/dwangs down the middle of the 2.5m span in the same direction as the pink beams. Tbh for the cost difference I'd be going 8'x2". If it doesn't feel sturdy enough then you can always double up the outside green ones later. And I'd be using bfo screws not nails, like this: https://www.toolstation.com/forgefast-timber-fixing-screw/p88268
-
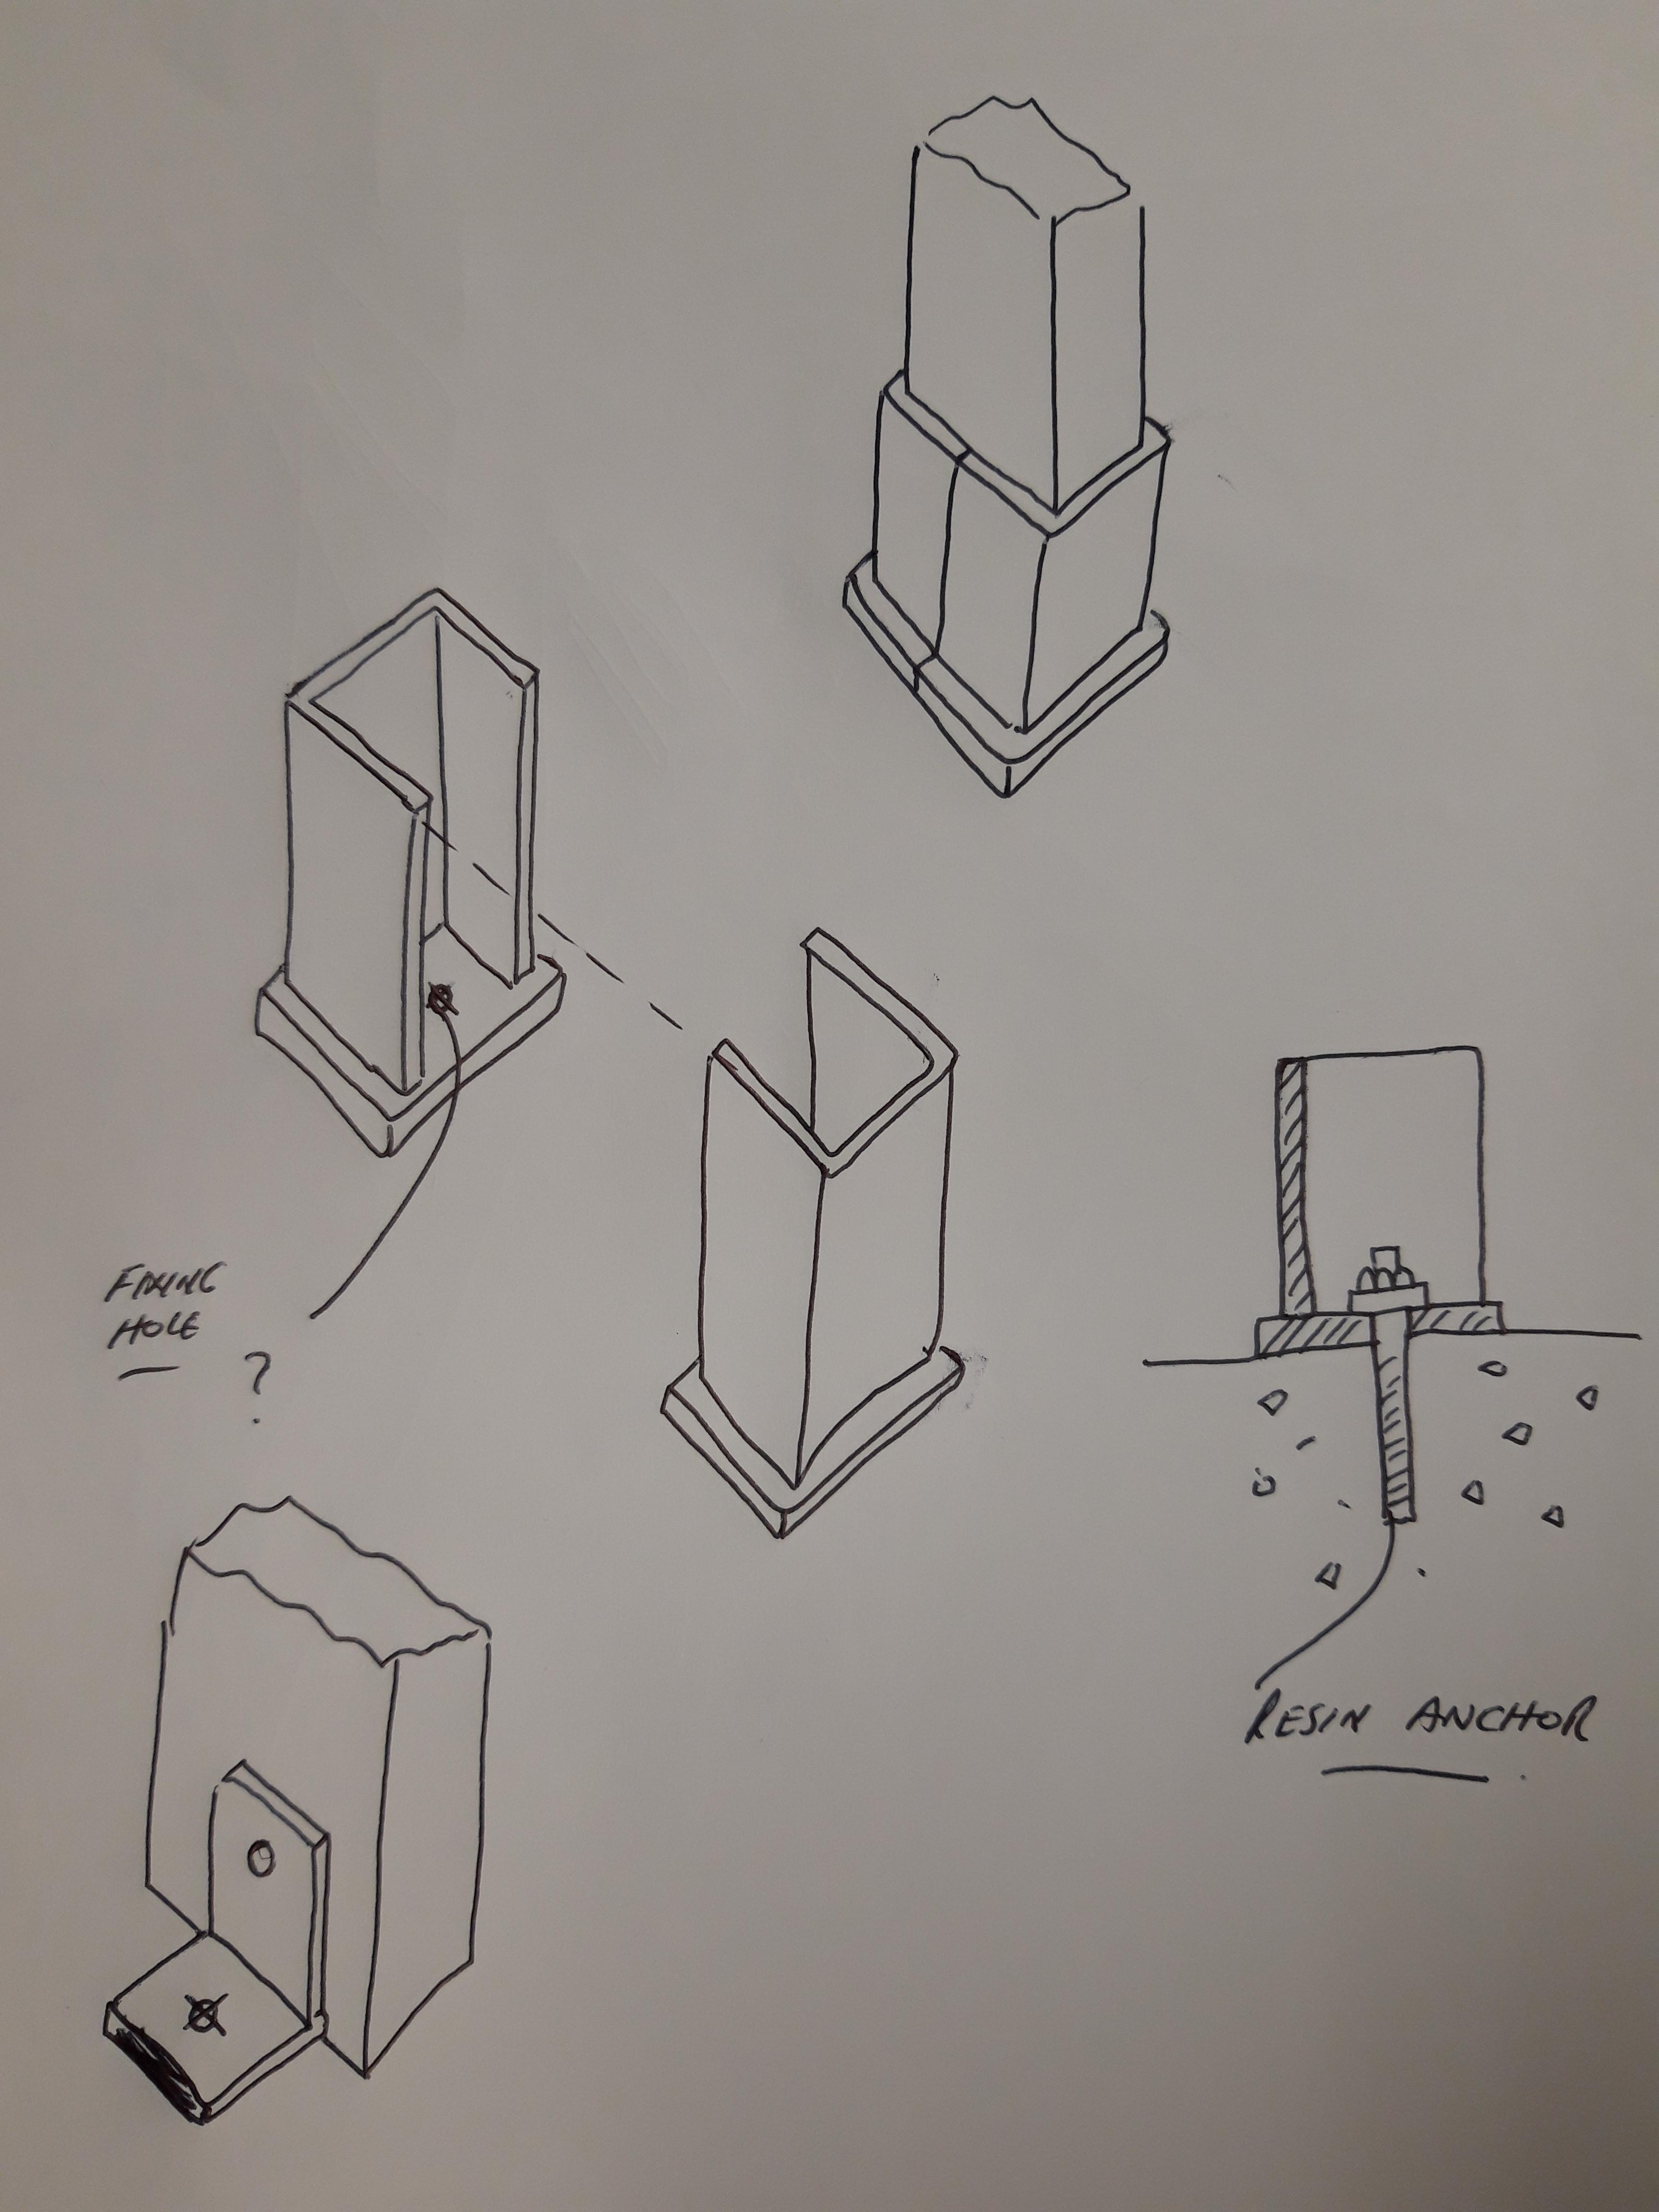
If a couple of this fit nice around the sleeper then go for it. Can't really see where the fixing holes are so guessing with this drawing. MUST be galvanised, anything else and you're wasting your time. Alternative is chunky angle brackets. How big are these upright sleepers, 9x5? For a start I'd have the 9" dimn aligned with the slope. Sods Law you'll hit those cut of rebars when you drill for your resin anchors! ? Quite a few different brackets here: https://www.indooroutdoors.co.uk/collections/railway-sleeper-accessories Must admit when I did the kids treehouse I just had some brackets knocked up and galvanised to keep the whole thing off the deck then concreted them in. Not the best pic: So are you planning sleeper uprights, then two sleepers across and your deck sits on that?
-
Wot I said...
-
Discount Offers of the Week
Onoff replied to Ferdinand's topic in General Self Build & DIY Discussion
The only good thing to come from Essex. Tbf though one was made in Halewood and the other two in Cologne! -
Shipping container??
Onoff replied to gc100's topic in Self Build VAT, Community Infrastructure Levy (CIL), S106 & Tax
I suppose the ideal is a shipping container where the door locks behind them and then you can introduce a couple of rotties. You've all got diggers, just have the graves ready dug and the jet wash handy! -
Discount Offers of the Week
Onoff replied to Ferdinand's topic in General Self Build & DIY Discussion
I'm looking for a V6 to go in one of my Capris... -
I bought an Electra Elecheib induction hob from Comet as they were going bust in 2012. That well known make designed in Israel and made in Turkey! ? Started at £399...reduced to £199 and then found a 15% off code. So £169.15 all in. Schott Ceran glass etc. Figured for the money we'd take a chance. Fanbloodytastic it's been too! Hasn't missed a beat. Pause button, power boost, excellent simmer function. Roll on Christmas dinner No.8. If anything I'd like slightly bigger rings but hey ho. Tbh a pan with a lid tight on is basically a little pressure cooker irrespective of the heat source. As good as a simmer function is, if the pan isn't losing heat faster than it's coming into it, then boil over is inevitable. The auto switch off on the induction is a boon. Rarely happens tbh, just crack the lid a tad. The rep just didn't want to criticise your cooking technique! ?
-
I'll line 'em up, you knock 'em down!
-
What I did find out is that the gun doesn't like a sharp sand mix! I cracked the barrel trying to squeeze it out.
-
A question for the expert...what's the "trick" with mortar guns? Using 4:1 building sand / opc, quite wet and sometimes it "blocks". Well mixed, no lumps etc. Sometimes works if you just shake the gun a bit. Is it redistributing the water or something? Cheers
-
I'd be painting that table to match...
-
Kevin Cashin at C-Tec said something to me about white CT1 on the lines of it can be cleaned with a mild bleach solution I think to bring back the white.
-
Clear is fine. White CT1 goes "near custard yellow" to quote the Welsh Wizard.
-
No CAD last night, omfg the headache that came on. Like something trying to get out! Not sure if it was cutting bricks with the Evolution saw, cutting stainless plate for lintels with the 9" grinder or the Mythos that did it.....
-
Saw this article about the Deans South estate in West Lothian. Seemingly 240 homes condemned for demolition due to improper construction with a concrete called Siporex. Have to wonder what prompted this, cracks? Did one collapse. https://www.edinburghnews.scotsman.com/news/people/this-west-lothian-ghost-town-was-earmarked-for-demolition-15-years-ago-but-some-families-still-live-there-1-5001139 Now if they had earmarked them for destruction for being seriously awful to look at then fair enough! ? Or is it just a nice spot someone wants?
-
Forgot about them I'll give them a try thanks. I've local contacts who do plasma, laser, water. Often I can get stuff done at mate's rates but I have to wait until they can tag it onto something. As an aside I recently got a load fixings re-plated for an R1, free, but again had to wait.