


Hastings
-
Posts
290 -
Joined
-
Last visited
Everything posted by Hastings
-
Was the condensation forming inside or outside the duct ?
-
@2Declan52, thank you for the reassurance. Insulation seems like a much better way to fix condensation if it happens, than draining it.
-
I wonder if @Stones has a similar installation?
-
I have got my 1st fix install kit - everything except the MVHR unit itself (Vent Axia Advance S) - from BPC. They have been great. I have never installed MVHR before. It will be sited in a cold roof loft, above a corridor/landing that separates two bedrooms. Supply and exhaust vents (supplied by BPC) in a new sarking boarded slate roof. BPC provide a very good install guide pdf and almost everything about how to install seems clear except for some of the detail of how to connect the unit to roof vents. There are 2 bits in the guide that puzzle me: 1/. "Roof vents: In addition, roof vents must be installed at a higher level than the MVHR unit or condensation will form in the pipework. We recommend the installation of an in-line drain with waterless trap be fitted to the air extract roof vent to prevent water damage to the unit " Under the "Wall Vents" section however, it is says just to add a small FALL in the duct run from MVHR unit to the outside. No drain needed. I would like to understand why a wall vent needs no drain but a roof vent does. Why with roof vents the ducting goes upwards but with wall vents it goes down? How is an in-line drain fitted to 150 pipe? Is it just a tee-ing in of, say a 32mm waterless trap, into the 150 pipe at the lowest point and nearest the MVHR unit? 2/. "A short section of Insulated flexible ducting will be required to install roof vents..." Is this in combination with rigid 150 PVC piping which can only do set angles? If yes, then does it matter where in the run it goes - before or after the rigid PVC section(s)? If anyone knows of a photo of a standard loft to roof vents install, that would hopefully explain it all without a word!. Thank you, in advance.
-
A cheap DIY version of masonry stoves as used in Scandinavia.
-
Really prefer not to interrupt the insulation envelope, particularly so close to the only heat source in the house. in fact I wondered about increasing the insulation behind the stove, using the unused void of the old fireplace. Another idea: building inside the insulation envelope an entire concrete block wall, as a thermal store. The chimney flexi-liner is fairly/partly insulated with that stuff you pour down around it from above. But there must have been a hole linking to another flue because it wouldn't fill entirely to the top.
-
Hmmm. Just checked the HETAS register and he is not listed. Nearest one is 50miles, as a crow would fly across the sea to the mainland. Trying to avoid asking Building Control as I already have other questions for them that have gone unanswered for many months now.
-
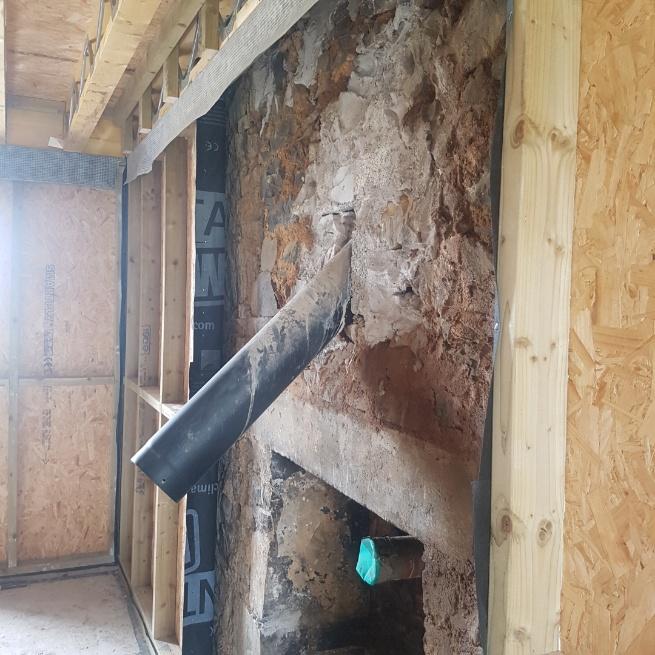
If I wanted to complete the installation with the single-wall flue pipe as it is on the photo above, how would I do it? Just would like to know why it was done that way. When it was done (a year or so back) I didn't pay much attention. I was just very relieved that the liner went in okay without needing to open up the gable wall to clear blockages, and is why I got it done before the stonework became inaccessible behind the timber frame. I just took it that it was correct because I had gone to the expense of hiring someone to do it that could provide a certificate when all done.
-
It's going be very hard to design for inspection of that joint. Is that a regs requirement? Thanks @ProDave for the heads up on the non-combustible collar - looks perfect. Yes. But it was also put there for venting of the wall cavity (which is open to the cold roof void) - I am thinking it is simpler to supply air to the stove from the cavity (which has multiple vents to outside around 3 sides of the house) as I have read that BC allowed for @ProDave 's installation.
-
I need to install a stove pipe at an angle, out through a timber frame airtight MVHR build wall, and on through 150mm rubble stone, joining 5" flexi-liner fitted in an existing old chimney. The wall make up (inside to out) is not unusual: 12.5 p/board, 45mm woodfibre insulation, Intello+ membrane (the airtightness), 100mm woodfibre, 11mm OSB3, Solitex Fronta roof membrane, 50mm gap, 700mm old stone gable wall with chimneys (flexi liner already in place). My thinking is that in effect, I treat the wall as it were a roof: I get two standard EPDM rubber/aluminium roof flashing boots to fit around twin-wall pipe and tape the aluminium plates to both membranes, leaving a 5-8cm (depending on manufacturer) air gap distance to everything else including the plasterboard? Probably give support/fixing to the first aluminium plate by inserting 2x2 noggins between studs. The outer flashing plate probably can be screwed to the OSB. Finally, cover the decorated plasterboard/skim gap with a shiny oval metal cutout plate you can buy for such eventualities? Local builder who has already installed the flex-liner joined it onto 6" single walled pipe coming through wall into the living room (leaving it for me to build the t/frame up to and around shortly), but that seems to go against everything I have read about stove installations and I assume will need to be replaced. Thanks in advance.
-
Thanks, very helpful. Love this forum!
-
I am a first-time DIY renovator building a new timber frame house inside a completely stripped out old stone house. How can I keep new OSB or chipboard floorboards clean for when it comes to gluing down vinyl tiles or other final finishes, during 1st and 2nd fixes, plastering etc? I don't want to put polythene down for risk of ladders and people slipping on it. Upper floor (18mm OSB) is fitted already - it made building the upper storey timber frame easier and safer. But ground floor is still just the foundation slab concrete. How long can I practically delay installing the final ground floor layers (OSB or chipboard on top of 100mm PIR insulation) in order for it to stay clean? I am guessing there will always something that will cause dirt build up, so maybe I have to accept it will need cleaning and so not bother about until then. I have seen some chipboards that come with a film covering that you peel off just before laying final finishes. Thanks in advance.
-
@doigan Did you find an answer? I am about to buy a Vent Axia Advance S for a house on a Argyll island by the sea - also lots of high humidity.
-
Joining PIR insulation under floating plywood floor
Hastings replied to Hastings's topic in Heat Insulation
Thanks Russell - didn't know Illbruck did the foam stuff though I had been looking at their tapes as an option a while back. I've been using Pro Clima tapes and VCLs and it'd be interesting to know why they don't offer a chemical type expanding foam in their range. -
Joining PIR insulation under floating plywood floor
Hastings replied to Hastings's topic in Heat Insulation
That's not a bad idea, thanks. Did you try and join them together with anything other than tape? -
Joining PIR insulation under floating plywood floor
Hastings replied to Hastings's topic in Heat Insulation
The floor grade product doesn't seem to be offered in T&G, by any manufacturer. -
Joining PIR insulation under floating plywood floor
Hastings replied to Hastings's topic in Heat Insulation
I don't have a target of 100% airtightness for the whole building, just in all the places I can reasonably achieve it. -
Joining PIR insulation under floating plywood floor
Hastings replied to Hastings's topic in Heat Insulation
I have been advised by specialist suppliers of airtight building products not to use it. There is quite a bit of information on the subject eg. https://foursevenfive.com/blog/foam-fails-reason-5-excessive-shrinkage/ Hence the use of pre-compressed foam tape in airtight building construction. -
Joining PIR insulation under floating plywood floor
Hastings replied to Hastings's topic in Heat Insulation
Yes, that's the official method but it allows heat to easily move between the warm and cold sides of the insulation - effectively you provide a nearly continuous airway around all surfaces of each insulation sheet. It's known as thermal bypass. -
Joining PIR insulation under floating plywood floor
Hastings replied to Hastings's topic in Heat Insulation
I'm in the camp that doesn't trust expanding foam from a can. I did wonder about a non-setting building mastic but I don't trust them not to 'dry' and shrink later either. -
Anyone know the best way to join PIR to itself to prevent thermal bypassing caused by even very tiny air gaps? Is it practically possible to tape the underside edges together? I am thinking of using the same expanding foam tape that I have used in between all my insulated timber-frame wall panels. Kingspan's Thermafloor TF70 product installation guide says to lightly butt together, which would surely reduce its effectiveness considerably. I would rather not use PIR at all (I'm not using it anywhere else in the build) but it seems the only option due to difficulty of excavating the ground floor deep enough without disturbing the ground under the existing old stone walls.
-
Amber Control unit is about £100.
-
As another poster in another topic pointed out, bear in mind that as far as acoustics go (not thermal) in Mitek's published lab tests Posi Joists benefit by only a 5% (difference of +1dB Rw) in sound transmission when 100mm rockwool is added, compared to when zero insulation fitted between. So maybe don't try and put too much in there.
-
Very basic question that I haven't been able to find the answer to online but in Scotland... What exactly is the "principal living level"? My build is: ground: entrance kitchen/living room shower/toilet Upper: 3 bedrooms I think the "principal living level" is the ground floor and therefore that there is no requirement to comply with regulations on future fitting of a chair lift. The problem with fitting a chair lift is that I can't provide the stated 200mm clear wall to park the chair at the top without it slightly obstructing a doorway into a bedroom.
-
Embodied Carbon costs of future PV installations in UK
Hastings posted a topic in Photovoltaics (PV)
Sobering article by Circular Ecology, UK based experts in things like embodied carbon in building construction (provided the data to carbon footprint the construction of the London 2012 Olympics), that points to the idea that in the UK we are close to the point when new PV installations may never recoup their embodied carbon cost, let alone contribute to any reduction. http://www.circularecology.com/solar-pv-embodied-carbon.html#.XinkGhfLcU- So for anyone installing PV with the primary intention of carbon emission reduction, we maybe are not currently being offered the appropriate type of technology in this country.
