
marshian
-
Posts
1590 -
Joined
-
Last visited
-
Days Won
6
Everything posted by marshian
-

Bonus edition - Garden landscaping
marshian commented on Benpointer's blog entry in Contemporary build in north Dorset
Lovely european feel to that - Bravo- 11 comments
-
- 1
-

-
- landscaping
- garden
- (and 2 more)
-
^ This 100% When I applied for planning permission for a 2 storey house extension and a single storey garage extension I had 5 objections to planning from neighbours - all were over-ruled (3 because the extensions wouldn't be visible so them) and 2 other the reason for objections were already covered by the plans (obscured glass in one window for one side and no window on another wall for the other) Having gained planning I then had to put up with further complaints from the two all thro the build - people can just be knobs about the pettiest things. Final complaint was related to the boundary fence which I was re-instating to 6ft as per original and planning were advising that it could only be 3ft and I ended up telling the planning officer to take me to court if they wanted (in the meantime I made the 6ft fence into a 6ft gate ) which really pissed the neighbour off
-
Heat Pump Running Cost Poor Reporting And Misinformation
marshian replied to PhilT's topic in Air Source Heat Pumps (ASHP)
If I got an EPC done it would state that with a gas boiler the heat energy required is 18,000 kWh for CH and 3500 kWh for HW We heat 24/7 with a weather compensated flow temp that peaks at 35 at -2.5 Deg C outside and actual kWh is 8000 for CH and 2000 kWh for HW Just as bonkers - EPC's aren't worth a toss IMO if I was looking to buy a house I'd want to see the last years worth of energy statements - far better guide than an EPC -
Interesting topic - Heat Geek have just released a video on the subject and there was one thing that got my attention bearing in mind I am all rads (no UFH) and they are almost all converted to TBOE from a flow perspective - I will one day convert to heat pump but when the boiler dies or Gas v Electricity cost perspective drives the change. Anyway here it is
-
Perfect solution - glad I could help
-
Put another concrete block in a non visible area so you can test it there?
-
Well I have a new HW tank to fit soon but I've been trying to optimise the HW a little more - Average consumption is 4kWh per day to do the water heating for two people occupancy. Flow temp is typically 66 Deg C return temp peaks at 61 Deg C, 115 Litre tank and 30 Min Cycle with the tank ending up at 52 Deg C (I've tried the lower and slower approach and to be honest it actually uses more gas but I think that's because of overshooting the target temp when I did it) However because of the X plan set up it does mean even in the summer I put a slug of 68 deg water into the rads straight after the HW cycle is finished. In winter no issues - it helps make up for the HW cycle time out of CH - summer it contribute to heat gain in the house...... I decided to do an experiment.......... If I run the HW for 30 mins and ten kill the boiler and continue to circulate the HW system with no boiler activity I can get an increase in the tank temp of 2 deg C and the water hitting the rads is down to 50 deg C I'm now thinking about putting a delay timer on the HW valve closing 10 mins after HW cycle is completed to extract the last bit of energy out of boiler and circuit Mad idea?
-
Bad roofing job: how should I proceed?
marshian replied to David001's topic in Roofing, Tiling & Slating
What @Nickfromwales said although I wouldn't even give it a 1/10 -
Insulation in renovation, Suspended timber floor
marshian replied to andreas's topic in Heat Insulation
Kingspan K70 from memory. ordered it thro insulation4less -
Insulation in renovation, Suspended timber floor
marshian replied to andreas's topic in Heat Insulation
I was in a similar situation and 75mm ended up as the sweet spot cost wise but it's always worth working out cost per m2 for various thicknesses as well as pack sizes. Pound for pound it's the best thing I've ever done to the house from an energy reduction perspective Did mean I had to add a PIV into the mix as humidity levels sky rocketed due to the reduction in uncontrolled air ingress but it's still been the best thing I've done you may need to consider additional ventilation options/solutions -
I'm confused by the need to run Biocide (even if cooling) - if the circuit is shared with HW coil? surely the temp required to occasionally heat the HW via a coil would be enough to provide some sterilisation?
-
ASHP schematic - Noddy question - CCT
marshian replied to crispy_wafer's topic in Air Source Heat Pumps (ASHP)
Proper had a laugh at that - thank you -
Probably in your cache - I can't see it either
-
Exactly my thoughts - there is a company doing brick-weave drives locally but I'm not impressed with their prep work - I reckon those drives will soon suffer with tram-lining where cars are repeatedly parked in the same place
-
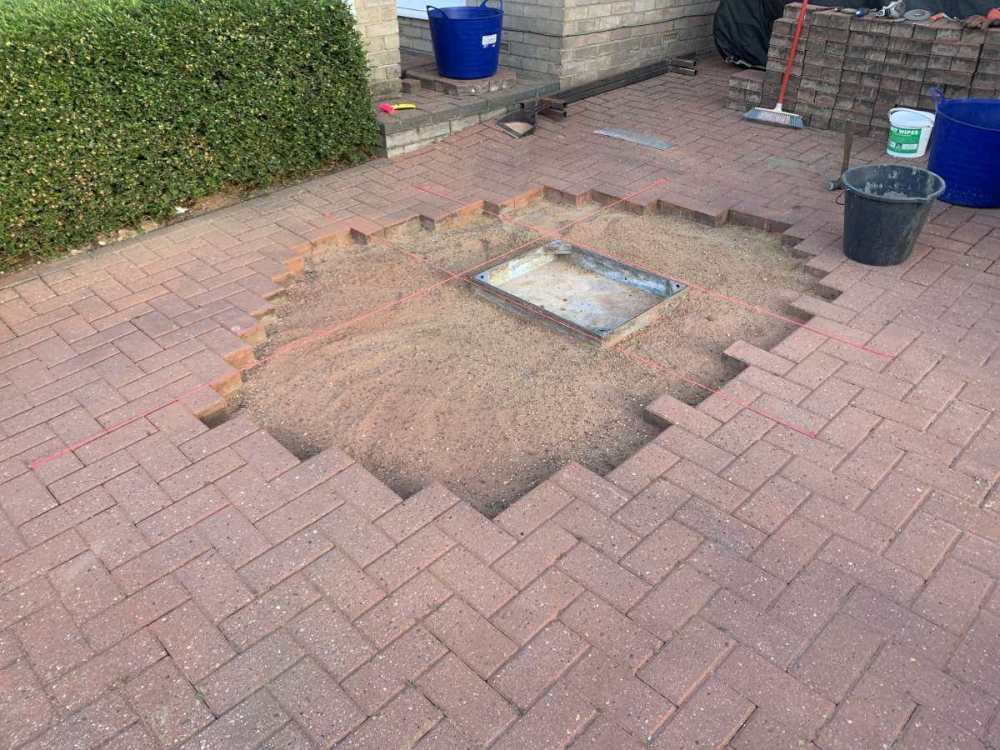
For the lol's or alternatively why I DIY rather than pay people to do things I had the drive brick-weaved about many years ago - but in the last few years the manhole cover seems to be rising out of the drive Of course that's pretty unusual and I suspected that it was actually the area around it was getting lower but wondered how that was happening So I removed a load of blocks and then the manhole cover and found my issue - the frame was sitting on what remained of the original mortar a very uneven mess - bedded down on 4 blobs of silicone!!! FFS So there was my smoking gun - the sand was being washed into the manhole when we had a downpour and there wasn't a car on top of it. So I got the concrete grinder out and leveled the top off Bedded it down on some mortar and threw the sand back in - a few sting lines to get the level and the pile of blocks can go back in All done


-
I've got to tile a utility and kitchen floor - actual m2 is 14.5 - I'll order 16.5 - In the past I've found 10% just too tight - running before the job is finished and then having to get more is a PITA
-
In the same way houses lose heat - "Hot always moves to cold" - like cold rooms steal heat from warm rooms, the outside steals heat from a heated house - it might not be as effective as say AC but the rule is just the same - warm room - cool floor the hot is going to go to cold.
-
Have you fixed your leak yet ? 😉
-
Yeah that aligns with my efficiency calcs based on Gas usage and Condensate collected over the same period Running 35/29 I'm not expecting the boiler to meet the same claimed min output at 50/30 (or it's 2.9 kW at 80/60) I think 4kW is probably a realistic expectation and I'm OK with that. Do you mean min gas consumption when It ramps up (from min modulation) or It actually starts cycling because I don't have an issue with the boiler cycling When the Avg OAT in winter are at or below 5 Deg C it cycles one an hour (24 cycles per day) When the Avg OAT in Autumn or Spring are above 5 Deg C (but below 10 Deg C) the number of cycles per day jumps to High 30's Once OAT gets above 10 Deg cycles per day are around 5 to 7 cycles The bold above is where the boiler IMO miss-behaves (It's a characteristic according to the Viessmann Technical team)
-
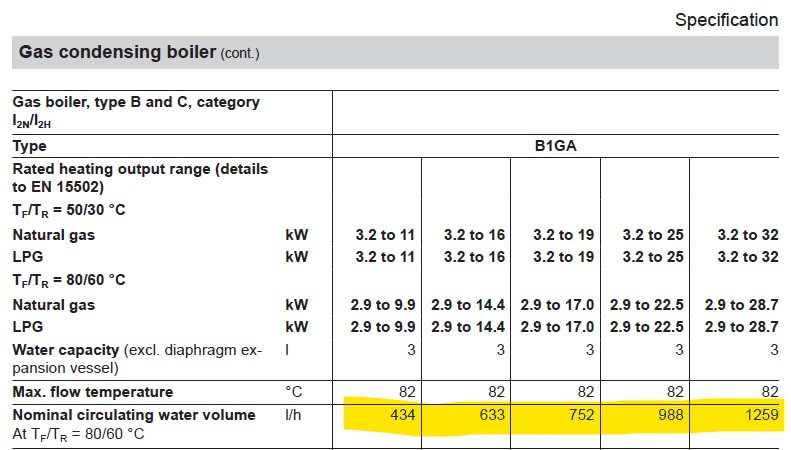
I was trying to avoid Thermostat intervention if I could but I may well do this when the next heating season arrives with us As illustrated by the Boiler Installation manual (Ignore the highlighted bit) and just look at the min boiler output at 50/30 and 80/60 I've had a long think about this comment - I think you are right the boiler is protecting itself but gut feel is it's not as a result of going below the min modulation - I think it's program has a min difference/delta between flue temp and flow temp and once it goes below that min delta it ramps up the modulation to drive up the flow temp to correct the difference between flow temp and flue temp In anticipation of my HW cyl change (where I should be able to run lower flow temps) I did a trial at the weekend where the flow temp was 60 deg for the HW cyl recharge - this is 8 deg lower than I have ever run before and I needed to extend the re-heat schedule time from 30 mins to 50 mins. It worked fine from initial fire up all the way to near the end of the reheat window when at a stated modulation of 10.8% the boiler ramped up the modulation level despite all the parameters being stable - the flue temp was just 3 deg lower than flow temp (all the way thro the cycle it had been much higher but gradually dropping) .
-
Shocking Snagging Inspection Finds at NEW BUILD HOMES....
marshian replied to MAB's topic in Housing Politics
I've only had 3 houses in 40 years - only 1 was a new build back in the late 80's. House had no issues was nicely built and good plot but there was one issue - The planners stipulated window frame colour to be brown or white, my house got brown - south facing garden - within the first summer the paint had bubbled up on the windows - I complained and they repainted them brown - I told the builders this is a bit stupid they will just bubble again paint them white and it'll be fine. They bubbled again and they repainted again, brown!!! I was in the house 4 years and at the end of summer every year I got my windows repainted for free - the last time they finally relented and painted them white!!!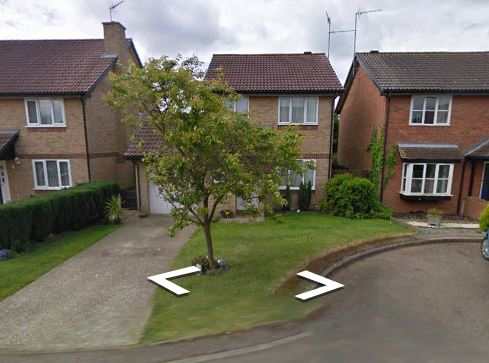
-
Is this a reasonable cost for plumbing first fix?
marshian replied to Great_scot_selfbuild's topic in General Plumbing
I need another hobby -
Is this a reasonable cost for plumbing first fix?
marshian replied to Great_scot_selfbuild's topic in General Plumbing
When I re-do my downstairs circuit I'm still going to "reverse return" the flow and returns from all the rads ie FIrst Rad "flow" is last Rad "return" etc -
Coming back to this - I don't think it needs a floor plan type arrangement - I was think more a "Is room above heated Yes/No" Target temp = "X" Then the dt function for internal differences takes this into account?
-
Quote for 7kw Vaillant - surely not enough?
marshian replied to Michael_S's topic in Air Source Heat Pumps (ASHP)
So the quote is £13,700 before the BUS Grant Contribution and for that they are going to Install an ASHP and link into existing pipework commision and set up There is no Rad or HW Tank upgrade or UFH involved? I think I'd be getting several other quotes or considering replacing the gas/oil boiler for another!!!