


pudding
-
Posts
192 -
Joined
-
Last visited
-
Days Won
2
Everything posted by pudding
-
https://amzn.eu/d/anJn0ET
-
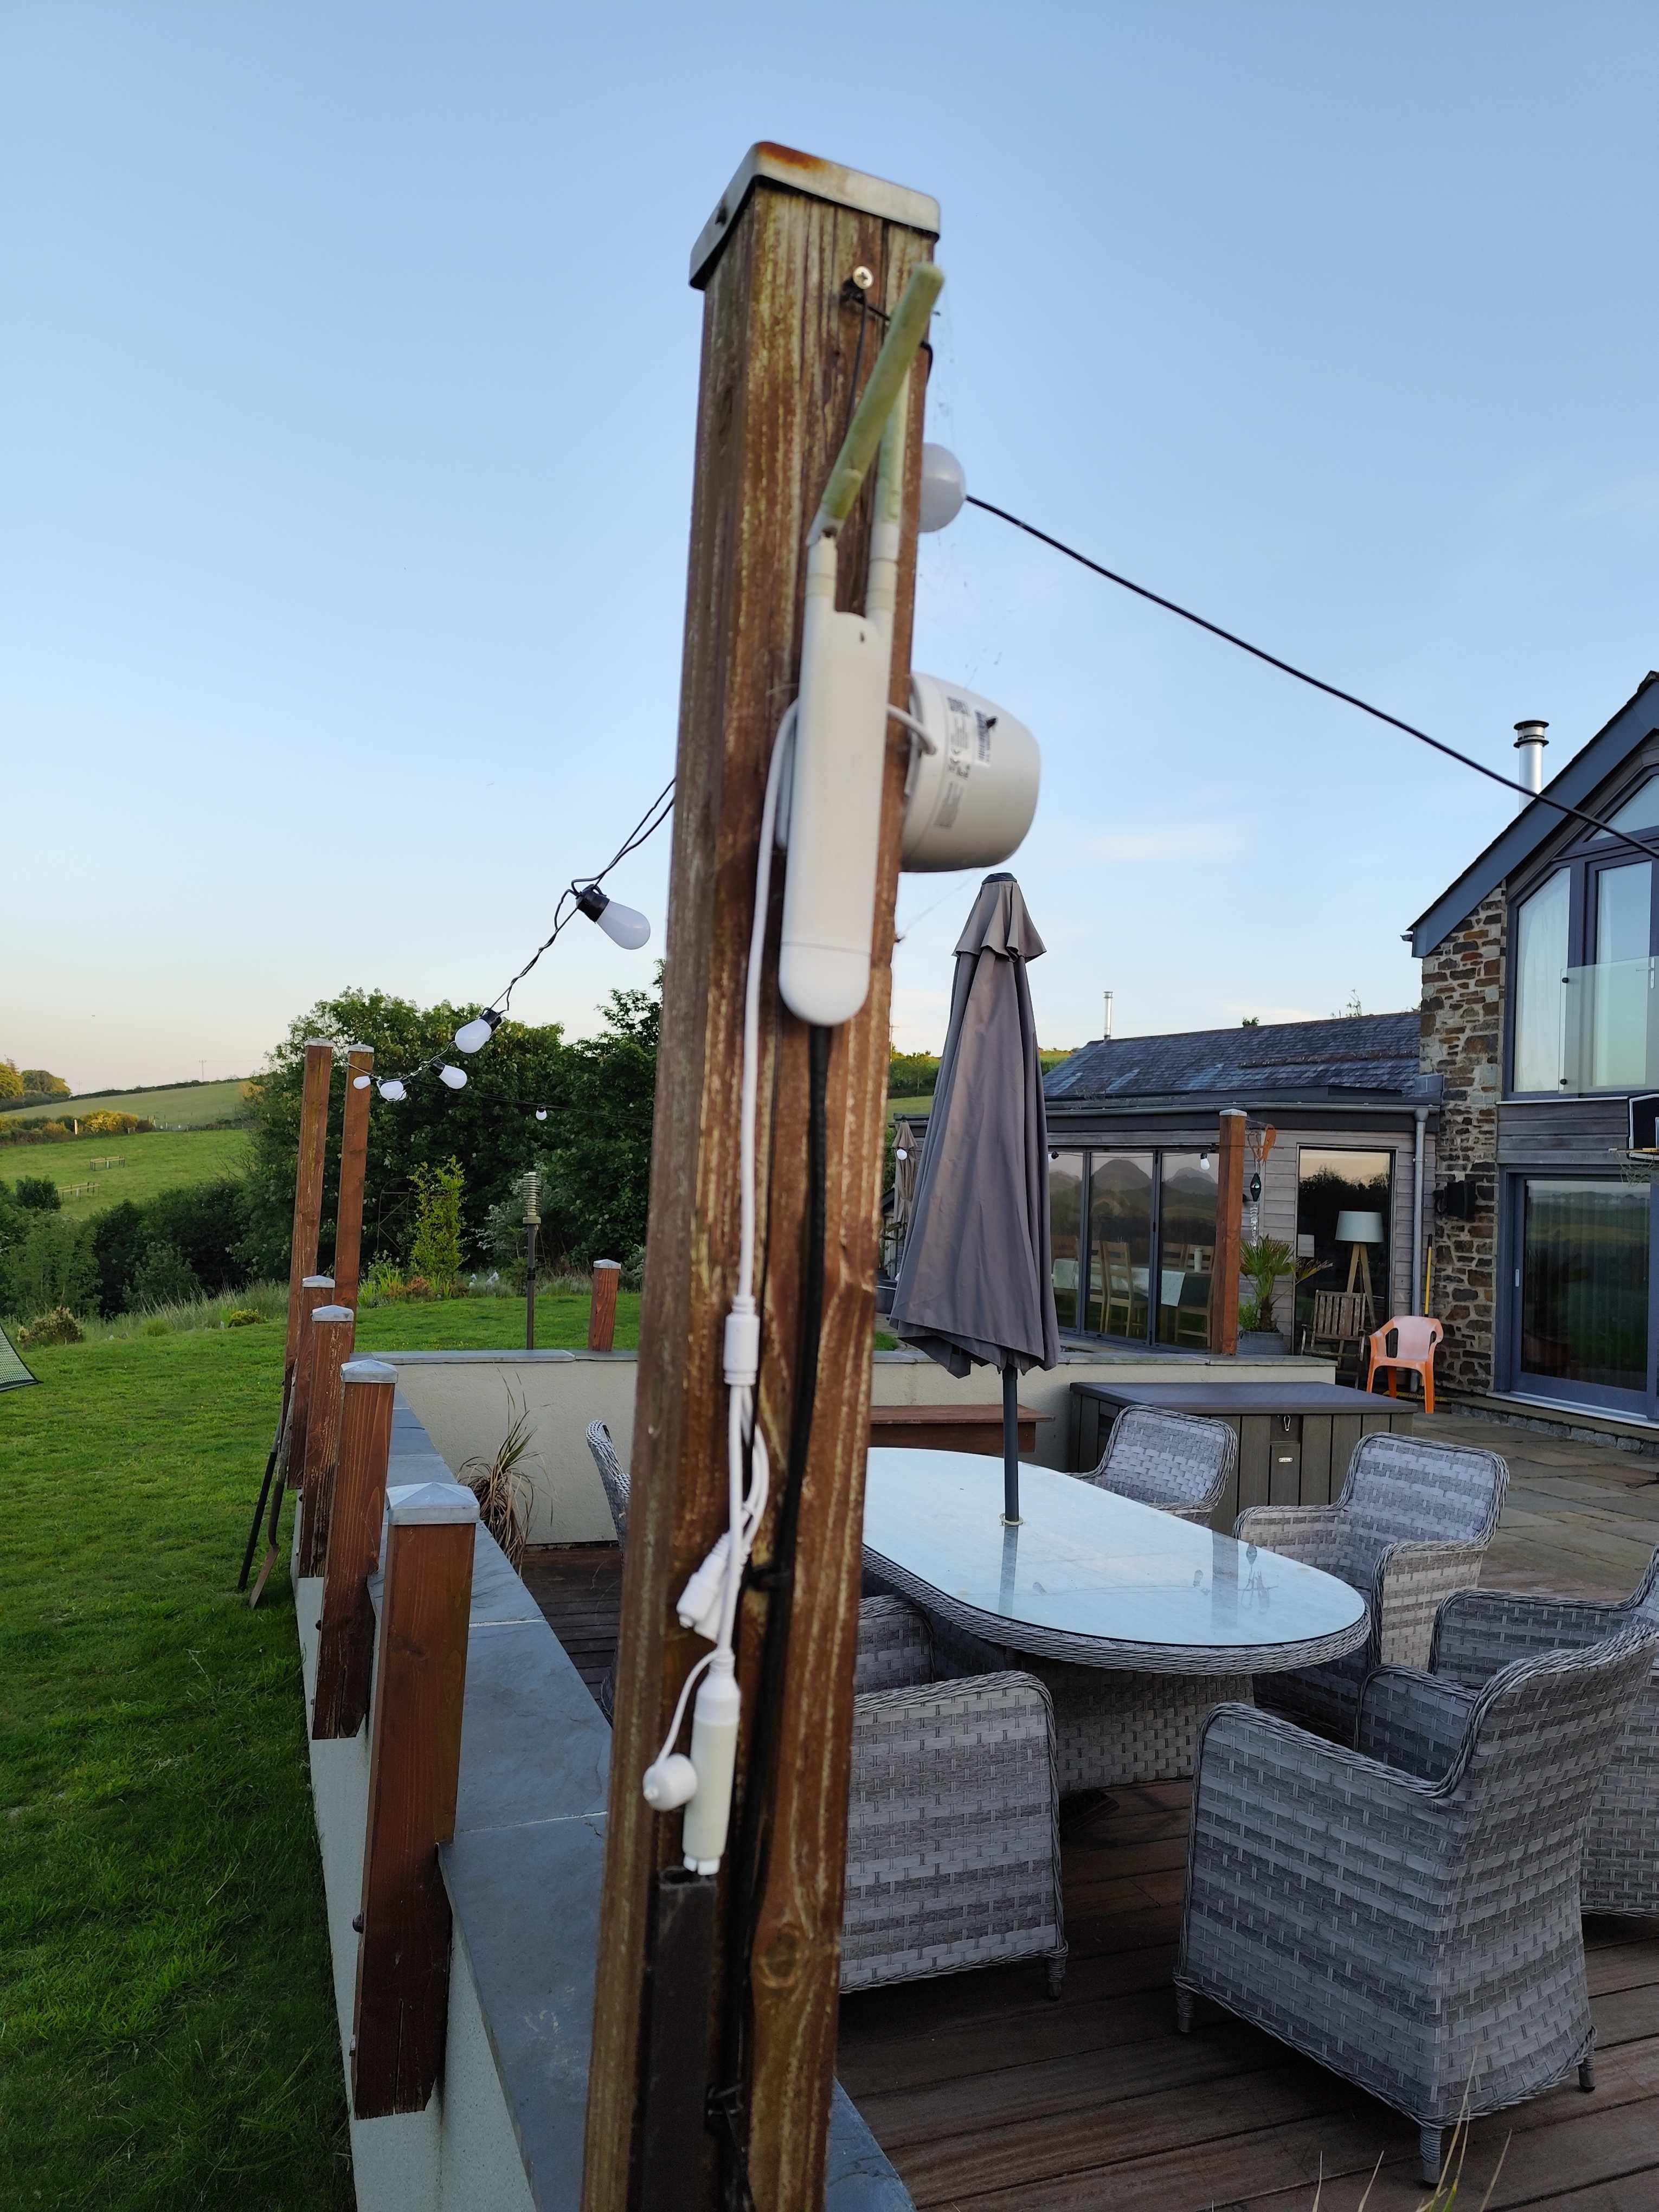
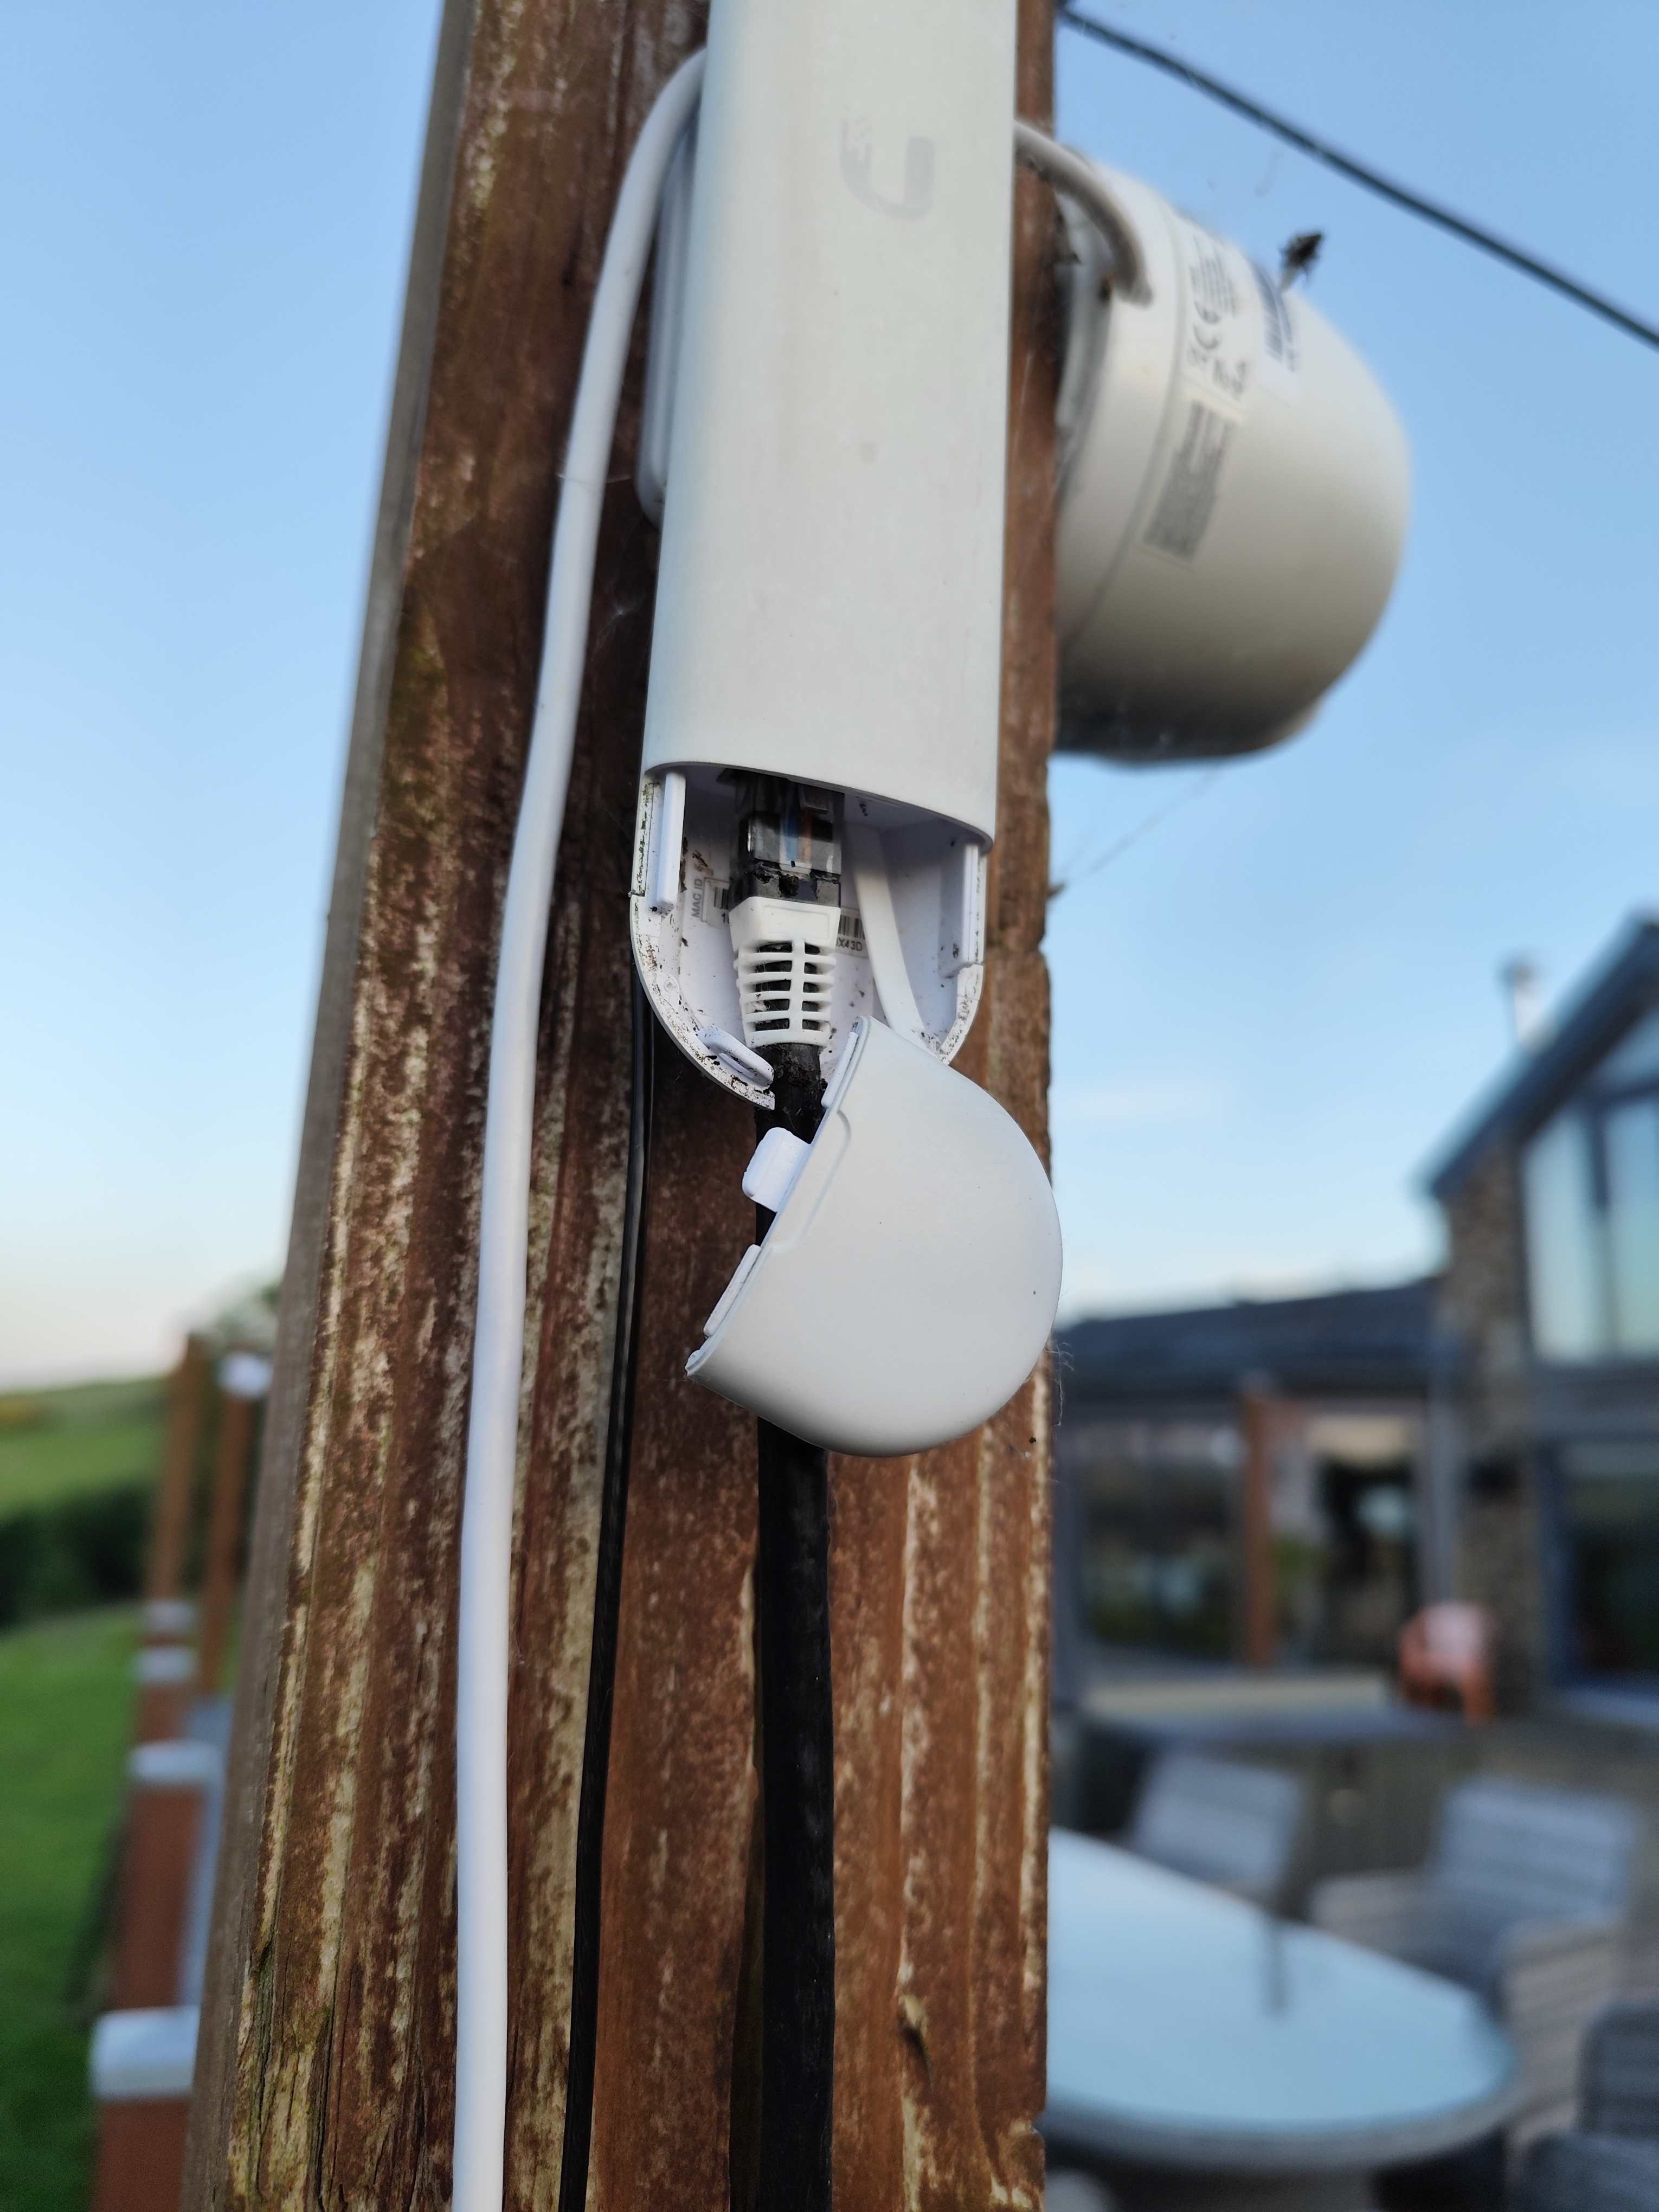
Hmm weird. I've had my AC Mesh with the RJ45 plugged into the bottom for probably 2years now just outside on a 4x4 post about 2m high, completely exposed and no issues. Got any other plugs to try, cut the old one off and crimp a new one on? Just been outside to take these 2 pics of it, and remember the cable I used was outdoor rated CAT6, which had some gel stuff surrounding the 8 cores, maybe that makes a difference?


-
Whats in the plastic box, the Swiss army knife? Don't you just put the cable straight into it, and then mount it on a wall or post?
-
Absolutely no way you can you drill a hole through a wall somewhere and poke a CAT 6 out for POE and data and avoid the mesh? Makes it so much simpler. I've got an AC Mesh on my decking via POE and its worked great, nice long range coverage up to the garage.

-
Help with first solar PV system shopping list using Victron kit
pudding replied to Alexx's topic in Photovoltaics (PV)
Have a look on here. Expand the GB specs to see if theres a G100. https://connect-direct.energynetworks.org/device-databases/search-gen?manufacturer_id=66 -
Help with first solar PV system shopping list using Victron kit
pudding replied to Alexx's topic in Photovoltaics (PV)
Ah yes, no smart meter and no variable tariff changes things massively. Is that the case for you @Alexx or do you have a smart meter and can take advantage of variable tariffs? -
Help with first solar PV system shopping list using Victron kit
pudding replied to Alexx's topic in Photovoltaics (PV)
You certainly can expect to make decent money. I'm over £50 in profit this month already, that's with a GSHP& all electric house and an EV. Camelot forum might be better suited to your requests and plan, lots of similar setups and ideas there. -
Undercapacity A2A outdoor unit - possible? advisable?
pudding replied to puntloos's topic in Air Source Heat Pumps (ASHP)
Yeah, fire off an email to a technical dept address if you can find one to get clarification, then you can try and persuade any installer it'll be fine with hopefully a good email reply. If you can reassure any installer it'll all be fine and you're not likely to be harassing them to come back because the units are not all working full chat at the same time, then they'll hopefully be happy to go ahead with that unit. -
Undercapacity A2A outdoor unit - possible? advisable?
pudding replied to puntloos's topic in Air Source Heat Pumps (ASHP)
I think it'll be absolutely fine, even if Mitsi dont have the page like I had in the Daikin manual. With the 11.2kW outdoor unit you mentioned above with 6 connections, is it even possible to connect 6 units and stay under 11kW? Even with small 2kW indoor units, that's 12kW and over the 11.2kW max from the outdoor unit. All that will happen is the outdoor unit just wont be able to keep up with the demand on that 0.0001% chance all indoor units are running and demanding max cooling/heating at the same time. -
Undercapacity A2A outdoor unit - possible? advisable?
pudding replied to puntloos's topic in Air Source Heat Pumps (ASHP)
I installed a Daikin System a few years ago in my extension. I went for a 5kW outdoor unit, feeding 3 indoor units, 2x2.5kW and a 3.5kW, and its fine. Theres actually a page in the Daikin manuals that tells you what actual effective cooling/heating power you'd get if you were to run them all at the same time full power, which obviously is not the 2.5/3.5kW, but that just never happens and it's all good. Here's a screenshot -
-
I installed an em3 last week. Fitted it inside the consumer unit, popped the power back on. Simply opened the Shelly app on my phone and it popped up straight away and said new device found & did i want to add it. Couldn't have been easier in my case.
-
Thanks. So it seems its an A3-2 form, and then as you say as its export limited to 5kW overall, there is an extra Export Limitation Scheme & Commissioning test form to do too. Has anybody ever done these forms themselves? I'm more than happy to do the physical swap of my inverters and setup as I did most of it on the current one as the sparky hadn't fitted a Sunsynk before so wasn't sure, (no extra cabling needed at all), but there's a few q's on these forms I'm not 100% sure of (of course I can just tick yes to each Q to satisfy it, as my 3.6kW inverter is installed and has been working fine for 2+years, so bumping up to the 5kW 'shouldnt' make a huge difference.) Hmmm, I'm just loathe to spend £100's for an install fee for nothing more than I'd do myself...
-
Well, the G99 approval was received this morning after I sent an updated A1-2 form with more details of the Export limitation scheme, and specified on there the 5kW export the guy at National Grid told me I can have. So nice quick response! He said to reply with the commissioning docs once its installed. Now, I've no idea whats docs these are. Any clues? Anybody have examples of refs for which docs are required after a G99 install?
-
Yes, the site plan/line drawing were the same, I just the changed the labelling of the inverter, and obviously sent them a different link to the inverter on the ENA register. I'm in Cornwall, so it was Western Power, but now National Grid.
-
I'm going through this myself at the moment. Currently have an old 3.6kW inverter, and added another 3.6kW hybrid with batteries a couple of years ago with G99 fast track and overall 3.6kW export limitation. Now looking to upgrade the 3.6kW hybrid to a 5kW and hopefully increase export limits, so have recently submitted the G99 form myself and plan on doing the straight swap of the inverters myself, so any docs used would be excellent.
-
Just a pair from a CAT5/6 cable? I've using a pair in a CAT6 cable from an Eastron power meter to my PV inverter to carry a modbus signal.
-
Hello, I'm wanting to replace my front and back doors, and replace 6 windows in my place, near Bristol. 5 windows are approx 1.3m wide by 1m high, split into 3 with outer 2 opening, and 1 is 60cmx1m. Plain double glazed white casement windows. The front door replacement would be composite, with a single double glazed panel in the top half, and back door uPVC white and full height glazed. Just had my first meeting and quote back, and was a bit shocked at the price. They'd come recommended by a couple of colleagues so I was expecting and hoping this would be the only quote needed. Price for the 2 doors (front door was an Endurance door, rest is Rehau Total 70 profiles) came to £3656, and then including all windows too if I opted for those aswell, the total came to £7170 all fitted etc. Are these the current realistic fully fitted prices? Last time I had window/door fitted on another property were 4 years ago for Ali frames and triple glazed, and I was expecting quite a bit less. Am I just a bit out of touch with current prices since the rampant inflation of the last few years? Thanks.
-
Ground array: future project, what cables
pudding replied to Post and beam's topic in Photovoltaics (PV)
https://www.tradepipes.co.uk/black-twinwall-duct-40mm-x-25m-coil?search_string=PM398 There you go, comes with a drawstring wire inside ready for future use. -
Certainly UFH to get best efficient use of the ASHP, but not necessarily a thick screed? As it's a new build, lots of insulation and good air tightness and it'll retain the heat without the need for the 'storage heater' of the thick slab? Of course it won't do any harm though.
-
ASHP, and go big on solar and battery. 10kWp+, 20kWh+ battery, do it at this stage as cheaper. Then you can take full advantage of cheaper ToU tariffs and run majority if not all of the year on cheap rates/free PV electricity.
-
All good. No issues. I removed the vertical bit of wood on the left next to the wall earlier this year when I took it apart to clean the filters/remove leaves etc, which may have let in slightly more air to the back of the fan unit, apart from that, still running as when it was fitted.
-
The driveway serves 3 properties. The top one, the old farmhouse owns the land, we just have access rights down it to our property. The drain is right at the top of the driveway, then public highways for the lane, so the plan of tarmac bump behind the ACO is right at the top. I'll try my best to get them to share costs, hopefully they're feeling receptive to that, as the issue doesn't affect them, just us at the bottom of the driveway/courtyard. More importantly hopefully they'll be happy with me building a bump at the top of what is their land and their driveway! I could try and contact highways, but I thought they wouldn't be interested as the road isn't flooding so it's not their problem? Bitumen tack paint or paint sounds great, will look into that. Also, where's best to get bags of tarmac and any particular kinds/brands to get/avoid? Also, would it be worth cutting grooves or holes in the existing tarmac to help the new key/stick in and not flatten and spread, particularly going downhill?
-
So, best plan seems to be a speed bump. Is tarmac the best option, laid directly onto the tarmac behind the ACO drain? What kind, any in particular? And just a pile of tarmac moulded into shape or anything in/under it to form the bump? Ok to lay it straight onto the driveway tarmac? I guess I'll give it a good jetwashing to clean it, and then maybe blowtorch to warm it up and get it sticky before putting on the new tarmac to try and get them to stick together?
-
I tried leaving the top grills of the aco off, makes no difference when there's heavy rain, it just fills with water too quickly before it drains away and is then bypassed. The lowest point of the ACO currently comes out of a pipe onto the road, which then flows away fine carrying on down the lane. You can just see the top of the pipe in the puddle of water near bottom of first pic. So just need the best method of stopping the water getting onto the driveway and getting it to a similar point and it'll just continues to flow down the lane. I'd like to get something in place so that I don't need to worry about what the farmer is doing. I could speak to him, and he might change his ways and plough the countours for a while, but then in future/new tenant farmer, who knows..? I want to take them out of the equation.
-
Hey all, I've had a longstanding issue with our driveway and rainwater runoff from the fields above us on the hillside. When we bought our plot and built our house about 10years ago, the fields were grass and had livestock in them. We had a channel drain put in at the top of the new driveway to catch rainwater running down the road. This was all fine for a couple of years, rain soaked into the grassy fields and just the rain falling on the road went into the channel drain which coped fine with that amount of water. Then the tenant farmer changed in the field, he now plants crops, which drastically increases the amount of rainwater that runs off the fields, through hedges and onto the roads, as half the time, such as the last few months, the fields are just mud with nice trenches in from ploughing and the tractor wheels which channel large amounts of water from the whole field and dumps it onto the road. This water is usually muddy and full of silt which clogs up the drain and slotted grills on top. I removed the grills and cleared all the mud last week thinking that might sort it, but despite that, the sheer amount of rain water that runs off fills and overwhelms the capacity of the drain which happened the very next day after clearing the mud out. This muddy water then flows down our driveway, and unfortunately we're the bottom of the 3 properties on the site, the water now goes straight down to our front door and house. There is another channel drain in front of our house, but that again doesn't cope with the huge amount of water that's now filling it. It was only designed I think to take the water falling directly on the tarmac driveway. This drain then overflows right in front of our house giving rise to a few inches of water, and has in the past been just cm from entering our front door. Now in the last couple of weeks, the soakaway where all this water goes has been backing up and water coming up and out of the metal lid, so I assume the soakaway is getting clogged with all the silt and crap going into it. Here's some pics of the area. This is looking up the lane, fields on the right, and channel drain in the middle with a few grills off from when I cleared the mud. Looking down the lane. Here's the channel drain full and the water is just flowing over the top. This was before the mud was cleared out and it was just lightish rain. When it rains heavy, a LOT more water flows at this drain and even with the mud cleared, just fills it and then flows straight past it as if it weren't even there. We then get a nice stream going down our driveway down to our house at the bottom around the corner there. Then the ACO drain, hidden beneath the muddy water, in front of our house just fills up before this amount of water can drain away, and theres a couple of inches or water up against the stone wall there. So, I need to come up with a solution to stop this before the soakaway is completely buggered, and so our front door can be used without having to navigate a stream and sludge with the potential flooding, and ensure the water doesn't get into our house. My thinking is some kind of hump/lump/slope at the top of the driveway to completely stop the water getting onto the driveway in the first place, although I'm not sure of the best way to build that. Tarmac/concrete/granite setts/speed bumps/something else? And then build the bump in front of the drain, or behind it? Or, dig the channel drain out completely and put in something else better? Or..... Any suggestions and comments appreciated. Would love to get this sorted soon before the next deluge. Not too nice wondering if the next downpour is going to make its way into the house. Pretty stressful and anxiety inducing as I work away from home and can't always be there to put concrete blocks and things in the way to try and divert the water away from the house and front door. Also slightly complicated by the fact the driveway isn't owned by is, its the neighbours and we just have access rights over. They're not affected by this problem, so cheaper solutions the better in the hope of splitting costs. Cheers.
.thumb.jpg.a37f75fd7544bbde08231a92c81414f5.jpg)
.thumb.jpg.cfb0bf9c09eb87ab35a0492653a8e338.jpg)
.thumb.jpg.f57049c959ae76517a496440275ff66b.jpg)
.thumb.jpg.b731917ec883863965babd09bbd8fa4f.jpg)
.thumb.jpg.9c484b96cb78594e1589f75b59491671.jpg)


.jpg.aad1fdce81e1872e21e106ef7273f45b.jpg)
.jpg.54c202abd1779ae78252ab1880b37a42.jpg)
.jpg.5c5cc980d3c9be425a927478de580f00.jpg)
.jpg.89700d8d036bc7adcefddba72109186c.jpg)
.jpg.62fb698606289b69d26a6cd03615158b.jpg)