


Square Feet
-
Posts
275 -
Joined
-
Last visited
-
Days Won
1
Everything posted by Square Feet
-
I honestly don't have answers for you other than to say that my car can be charged from a 3 pin plug socket and would come supplied with the cable for that. It's free road tax for EVs so keeping it as a battery that could also be driven if needed would only cost you the insurance and annual MOT. I pay roughly £1 a day for insurance. I forgot to say that mine has MOT till October.
-
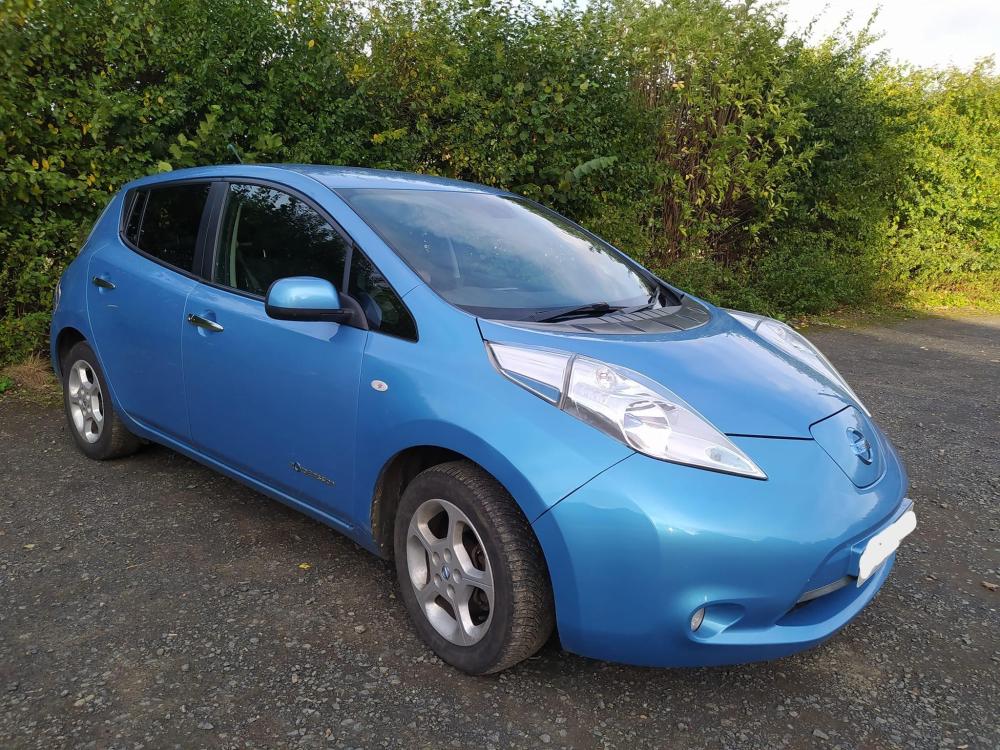
I have a Nissan leaf for sale for £4k. It has 10 out of 12 bars of battery health remaining. It's a 2013 so a Sunderland-made one (much better than the earlier Japanese ones), has a 24 kwh battery and has high miles (168k) but has been well maintained and looked after. EV's don't have a lot of components that wear out so it's really just the brakes, suspension, tyres etc that need done every now and then and I've had all that overhauled on mine recently. It has the usual minor parking scuffs from other people's poor parking but they are genuinely minor. I can take more photos or a video if anyone wants one. Also happy to supply the reg in a message. It's a cracking wee motor, but I just really need a van. It will break my heart to sell it though, I do really love this car. It goes like a rocket and is such a pleasure to drive. I get 70-80miles range when fully charged, dependent on outside temperature. It's in Hawick in the Scottish borders, but I could meet in Carlisle or Edinburgh and take the bus back home if that worked for someone.
-
I find that with twin taps the plughole gets very manky long term. A single tap that empties out directly into the plughole keeps everything a lot cleaner and more hygienic.
-
Classy support equipment now for sale.
Square Feet replied to saveasteading's topic in Tools & Equipment
Thanks yeah. I've no intention of trying to do ceilings without one, but unfortunately a lower one is half the price and that's all I need for now. -
Classy support equipment now for sale.
Square Feet replied to saveasteading's topic in Tools & Equipment
Ok. A bit out of my league but thanks. I'm sure they are worth it though! -
Classy support equipment now for sale.
Square Feet replied to saveasteading's topic in Tools & Equipment
What's the price of these please? -
Offer accepted, but funds wiped out from land purchase.
Square Feet replied to flanagaj's topic in Self Build Mortgages
I haven't used these people, but I am currently in discussions with them. They seem to know their stuff. https://www.buildstore.co.uk/mortgages-finance -
Do you have a page somewhere that shows photos of these? I'd be very interested as it's something I am looking to get into.
-
new year - it was supposed to get better
Square Feet commented on LSB's blog entry in Little Stud Barn
I didn't mean click bait in that it is a virus or anything - I just meant the title and claims the guy makes might not be completely true. He does sound plausible though and does show you the screen with the figures on. -
new year - it was supposed to get better
Square Feet commented on LSB's blog entry in Little Stud Barn
Very sorry to hear about your bereavement. The redundancy also sounds very tough. The only thing I can offer is that this guy seems to have made enough to keep the wolf from the door by youtubing his build, even though it wasn't a proper build at all - he just renovated an old static. I was genuinely shocked at how much he was pulling in - it might all be clickbait, but you never know. You are doing the build anyway so you will have plenty of 'content'. -
BBC Accidental Renovators - the auction house in Dunoon
Square Feet replied to Square Feet's topic in Property TV Programmes
-
Are you all done piling on or does anyone else want a pop? Well gosh, I've got so much more respect for you all now.
-
Lots of women too.
-
When I have had this issue in the past it has been because the flexi pipe from the WC wasn't the correct diameter for the soil pipe and there was a tiny gap that the smell came back through. Even if it is the right diameter I think this is fairly common with flexi pipe as you can't always see what is happening once you shove the pan back into place.
-
I can't find this blog post (I have looked) but would be very interested to know more.
-
I just got something in a tub from Wickes and slapped it on. It looked fine, at least till I had sold the place.
-
Self-Build Mortgages for people on fixed-term contracts
Square Feet replied to AnnaKH's topic in Self Build Mortgages
Phone Buildstore. I have been amazed at what they are able to offer. They are really focussed on this sort of lending. https://www.buildstore.co.uk/ -
Have a watch of this and see if you can get all the way to the end without laughing. The bit at the end when the reporter loses it is priceless. I'd love to know what happened in the end. https://fb.watch/pB3rfs68L3/
-
Hi, I am looking at doing this too - did you buy the sampling kit for £45 or just send them some to be tested? (£15)
-
I'd love an ASHP but I can't afford one - with a grant I might just do it though. We won't shift the dial on climate change without grants and subsidies.
-
Article in The Guardian today https://www.theguardian.com/business/2024/jan/08/greener-cheaper-much-warmer-heat-pump-owners-laud-their-new-system
-
Toolstation have a few Wagner spray units in their sale just now. For example the 150m which would be £299 if you have a trade card. https://www.toolstation.com/search?q=wagner
-
These guys are self-building a timber frame house in Pennsylvania. They are doing a pretty thorough job of vlogging every stage of the build. They are young millennials with a background in engineering who are doing as much as possible of the construction themselves. They did exactly what I wanted to do - bought land and got planning for a house + garage with flat above, then built the garage first so that they have somewhere to live while they build the main house. The difference seems to be that their garage and flat is pretty massive, but it's interesting to see how they made it and they also share all the costs in full, which is also pretty interesting, though I suspect that US materials prices are a lot cheaper than here. It's also all in feet and inches which is really frustrating, but that's to be expected. https://www.youtube.com/@MasonDixonAcres/playlists
-
Naturally I had taken battery degradation into account. I prefer that term by the way, as opposed to 'knackered'. 😉
-
Battery storage via a used EV really isn't that expensive. 15kwh would be about a third of what you are talking there Steamy Tea, ie £2.5k


