Square Feet
-
Posts
275 -
Joined
-
Last visited
-
Days Won
1
Everything posted by Square Feet
-
I discovered this guy recently - The Crazy Framing Guy. There's hundreds of videos on his channel but this one is a taster. He is completely mad - he builds timber frame houses solo without scaffolding or lifting machinery. It's bewildering that H&S haven't shut him down, but maybe things are more lax in Canada where these are filmed. He also works right through the Canadian winter without a coat! It's all completely insane, but interesting to see how it can be done if you really find yourself stuck and the crane hasn't showed up or something. There's also some good lessons on his channel on how to build up framing panels, frame a window etc, though unfortunately these are in inches (which surprised me as I thought Canada was metric). https://www.youtube.com/watch?v=sUtyAA7Hr8o&t=106s&ab_channel=TheCrazyFramer
-
You can buy downlight hoods fairly cheaply for just this thing.
-
It might I suppose, but it looks ok so far. It wouldn't be a big deal to freshen it up if it did start to look odd, but I think that would be many years off, if at all.
-
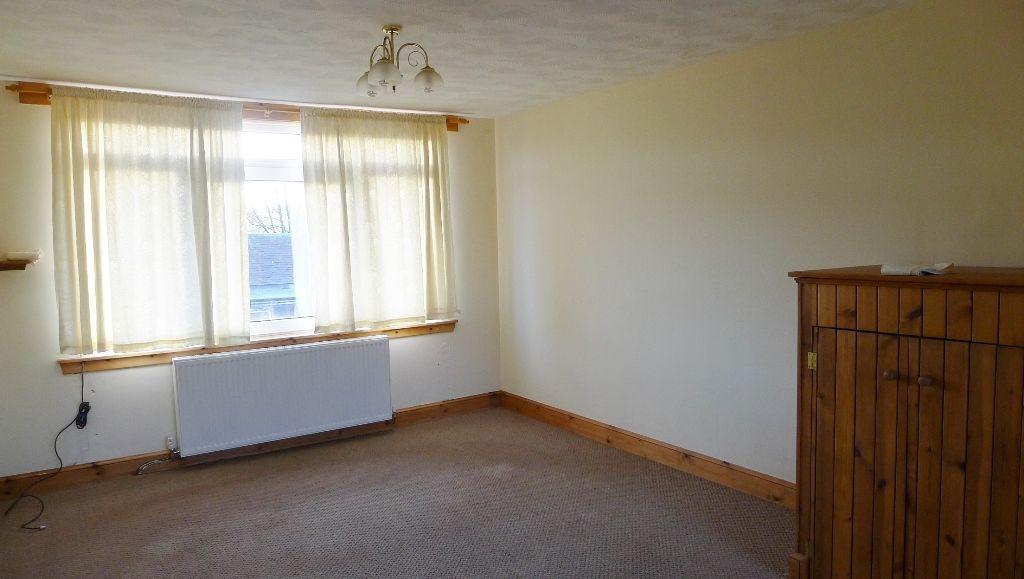
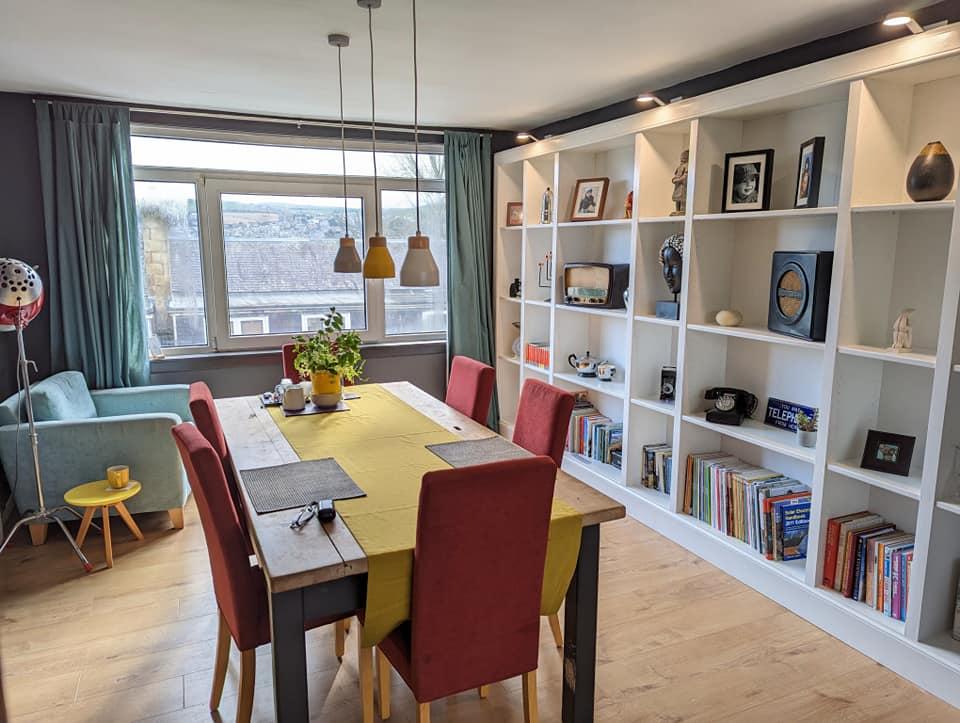
I thought I would post a pic of a Billy bookcase hack that I finished recently in case it is of interest to anyone. The total cost was under £500 - £200 for the bookcases, then architrave, skirting, paint, facing strips, lights, caulk etc came to a bit under £300. Billy's are pretty ugly on their own, but if you cover the edges up with proper wood then they don't look so bad. If I was doing this for my forever home I would use a solid wood bookcase like a Hemnes instead. The first job was to figure out how to get the bookcases to completely fill the wall recess that I wanted them to go in. This involved calculating how wide the spaces between the bookcases needed to be to work with the available Billy sizes, which are 400mm and 800mm wide. A lot of this was dictated by what facing stripwood I could get straight off the shelf without having to rip it down along the full length. It was a lot of headscratching and I had to make a spreadsheet in the end to figure it all out. I then moved the electrical socket outlet that was on that wall to the top of the bookcase so that it could be accessed after the bookcases were fitted. I made up all the bookcases, screwing the shelves through from the sides and back to keep them from bending. This will mean they can't be moved about but I am fine with that. Billy's often look bad because the shelves go bendy and I wanted to avoid that. I then took my time levelling the bookcases on a base of CLS framework, then screwed the bookcase units together with spacing strips in between so that the facing strips which covered the edges of the Billy's were the exact right width without needing cut down. The whole unit was secured to the wall with angle brackets. I fitted CLS right around the outer edge of the bookcase unit to give the architrave something to fix to. I then cut strips to cover the front of the shelves and painted those, along with the vertical edge facing strips, architrave and skirting and then fitted them all. I did start filling in the unneeded shelf support holes with caulk, but it was a massive faff and didn't make it look that much better so I gave up on that. The lights were bathroom cabinet lights out of the B&Q bargain bin for £3 each but were much too cold with fixed leds, so I bought a piece of theatre lighting gel in orange for a couple of quid and cut wee discs to fit into the lights to warm them up. The lights are wired together and plug into a smart plug that is powered from the relocated socket at the top of the bookcase. You can't see it behind the architrave and the lights can be turned on by telling Google to 'turn the bookcase lights on'. A good party trick. Here's the finished article, with the 'before' pic at the bottom for context. I'm pretty pleased with it, given the cost. The edge facing strips give the impression that it has been made with solid chunky timber and the round edge shelf cover strips also hide the fact it is made with particleboard. I've done a wee bit of other decorating in the room too. 😉


-
That's what I did yes. Any moisture that is trapped in the bricks should then exit outwards over time rather than wicking inwards on the plaster.
-
You can get a damp patch like that from condensation if there is furniture up against the wall which is restricting the airflow. The gennel (vennel in Scotland) will be very cold so insulating that wall should sort the issue. You'd need to strap and line the wall with an airgap and then use insulated plasterboard. In Scotland there are government funded schemes to get this done - I am getting just this done on a similar property just now and the vennel wall counts as an external wall for the insulation grant. Otherwise using a damp proof membrane like this one should keep the damp at bay, but the condensation issue might still occur as there is less insulation value in the membrane. You then have to plaster over the top. Slapping damp-blocking paint over it is a temporary bodge that will really only work if you intend to sell the property very soon.
-
I saw this on eBay today. Here's what the text says to save you having to translate it: " V2H, 5 kVA (4 KW), CHAdeMO, station allowing you to power receivers from a car battery, only EV with CHAdeMO charging socket It changes the direct current from the electric car battery (CHAdeMO socket). Through transformations in the V2H inverter, we obtain alternating current for home or business use. It can only work with cars equipped with a CHAdeMO charging socket It is a portable device, suitable for use in a company or household emergency power source on board the vehicle as a power source camping, family trip in service cars where an alternating current source is needed Invaluable in the era of autumn and winter interruptions in electricity supplies - "blackout" Basic information: Country of origin: China Business ; ELECTWAY Model: V2H Certification: CE, UL Warrants: 1 year Weight 25 kg Wooden transport packaging Delivery time: device in stock
-
Thanks that's interesting, if disappointing.
-
When I have used sprays before it has just meant a very thin coat. It's much better to use a brushed on one - you will get a thicker coat that way.
-
If you are just bodging it to sell then liberal applications of stain blocker and then put some furniture in front of it 😂
-
That looks like an old property with solid stone walls. If that is correct then it can take up to a year for a wall to fully dry out after it has been soaked right through. I had to get a wall tanked for this reason - that then allowed the wall to dry outwards rather than inwards as yours is trying to do. Damp proof paint like zinsser will basically seal that part of the wall to some extent, but it may keep coming back though a wee bit until it's completely dry. For a bodge to get it sold I would just slap more damp proof paint on and then paper over it with thick lining paper. There is another possibility that it isn't damp but some other sort of staining ie tobacco, but I assume you have discounted that already.
-
Great, thanks. That's very helpful.
-
Thanks. Is that a flanged one or flush? I can't tell and I am not sure which to get. I think I want flush as its a solid wall. Yeah, I could do that, but it's a property that will be let out so I need to make sure it is fit-and-forget as it may not be treated as well as I would look after my own stuff. It's an internal wall but it has been a slight concern. There will be a permanent ventilation fan running though so hopefully that will keep the moisture down.
-
Mine is going into a solid wall. The bathroom was converted from an old cupboard many years ago. The cupboard had an internal window to bring in light from the hallway, so I am going to use this blocked off window to create part of the niche to save having to chop into the wall. I will just have to put noggins into two edges of the cavity. So has anyone used a moulded tray to line the niche and if so which one and how was it? Cheers
-
Hi, I am looking to fit a wall niche into a shower for shampoo etc. I like the idea of the ready made niche lining kits that you tile over. Anyone used one before and can recommend what to go for? I have never fitted one before so I am a bit clueless. The recess part isn't a problem as I know there is a hole in the wall that has been previously tiled over at that location - I just need to chop it out and line it with something before tiling.
-
Then it would be bypassing the gas meter and supplying me for free, which just isn't happening. It probably hasn't been live for about 100 years - it was more a question of whether there would be residual gas in the line, but there wasn't.
-
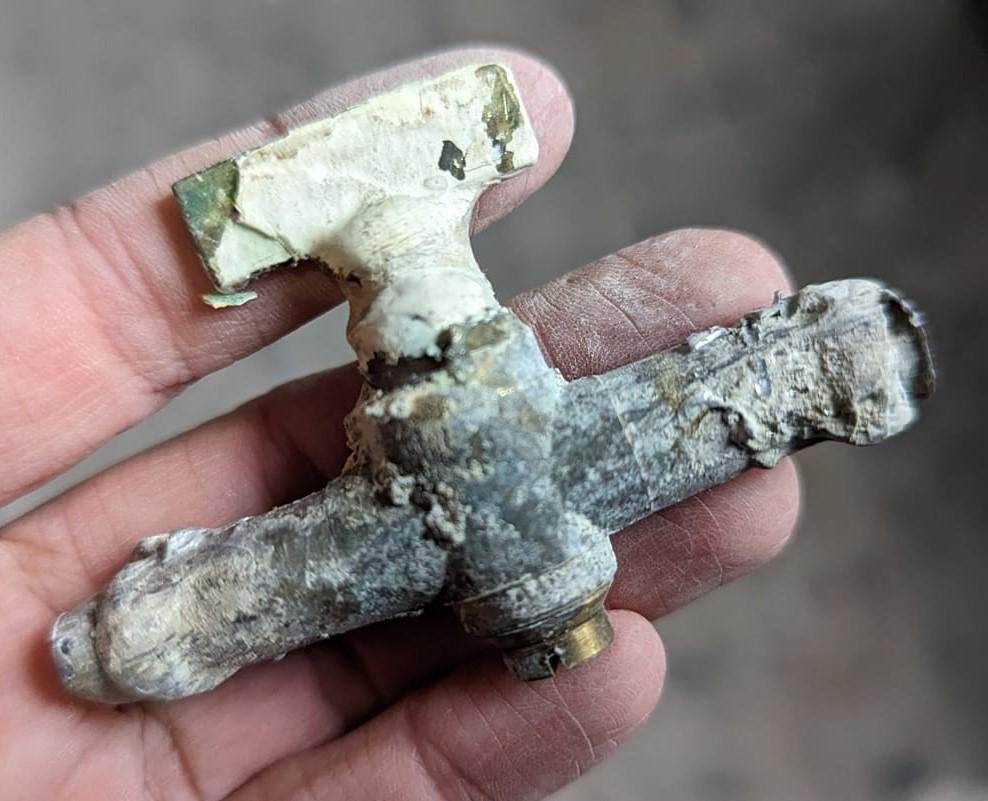
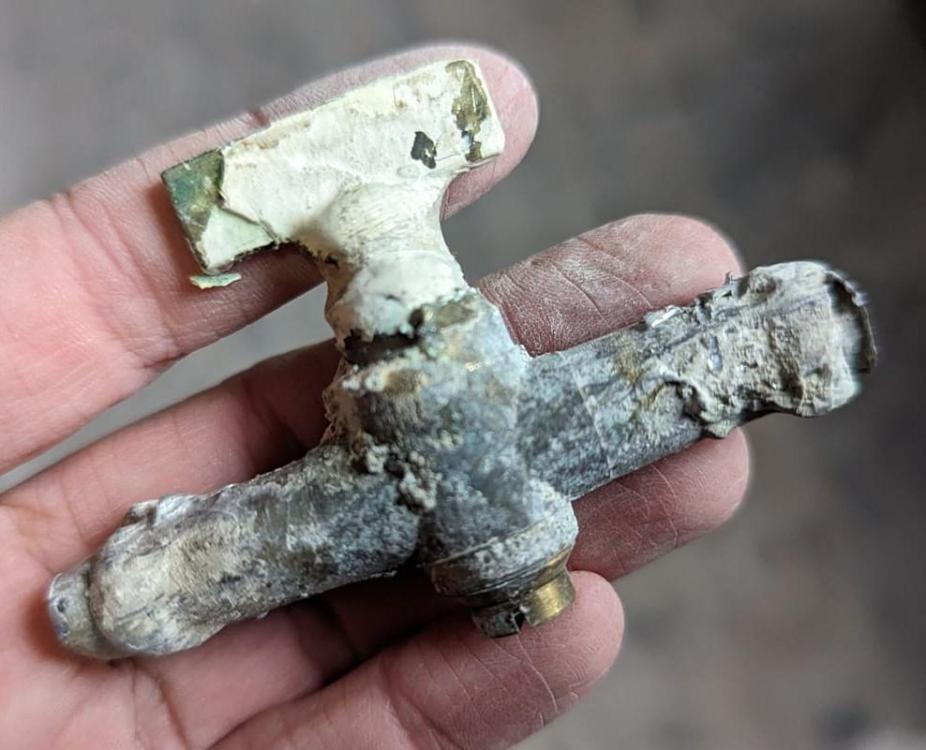
It wasn't live. All is good and I still have my eyebrows. I drilled a wee hole in it and nothing came out, so I went ahead and cut out the brass tap from the lead lines.
-
Thank you all for the sage advice. However I am thinking of ignoring it all and drilling a hole in the pipe. 😂 The pipe seems to be lead, so it is not likely to spark. I really can't see this being a live gas line, so it's just residual gas in the pipe that I have to worry about. Drilling a hole would let it out and then I could just grind away without having to worry about losing my eyebrows.
-
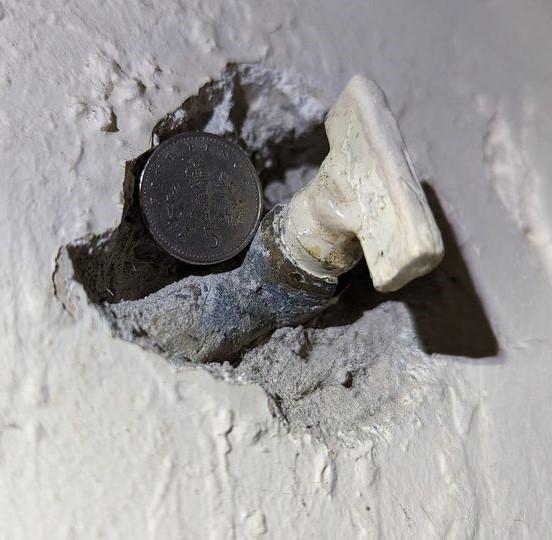
I have this thing sticking out of the wall of a Victorian-era property I am renovating. I think the pipes are lead. The tap is about 180cm up the wall behind the front door. Is it the old gas supply line? It's not the modern one. I want to grind the tap off so that I can decorate over it, but I'm not quite brave enough without knowing what it is. Does anyone recognise it? Cheers. 5p is for scale.
-
Good progress. Could you explain the skim thing again to someone at numpty level? It's something I am interested in as I would like to minimise wet trades on site. Cheers
-
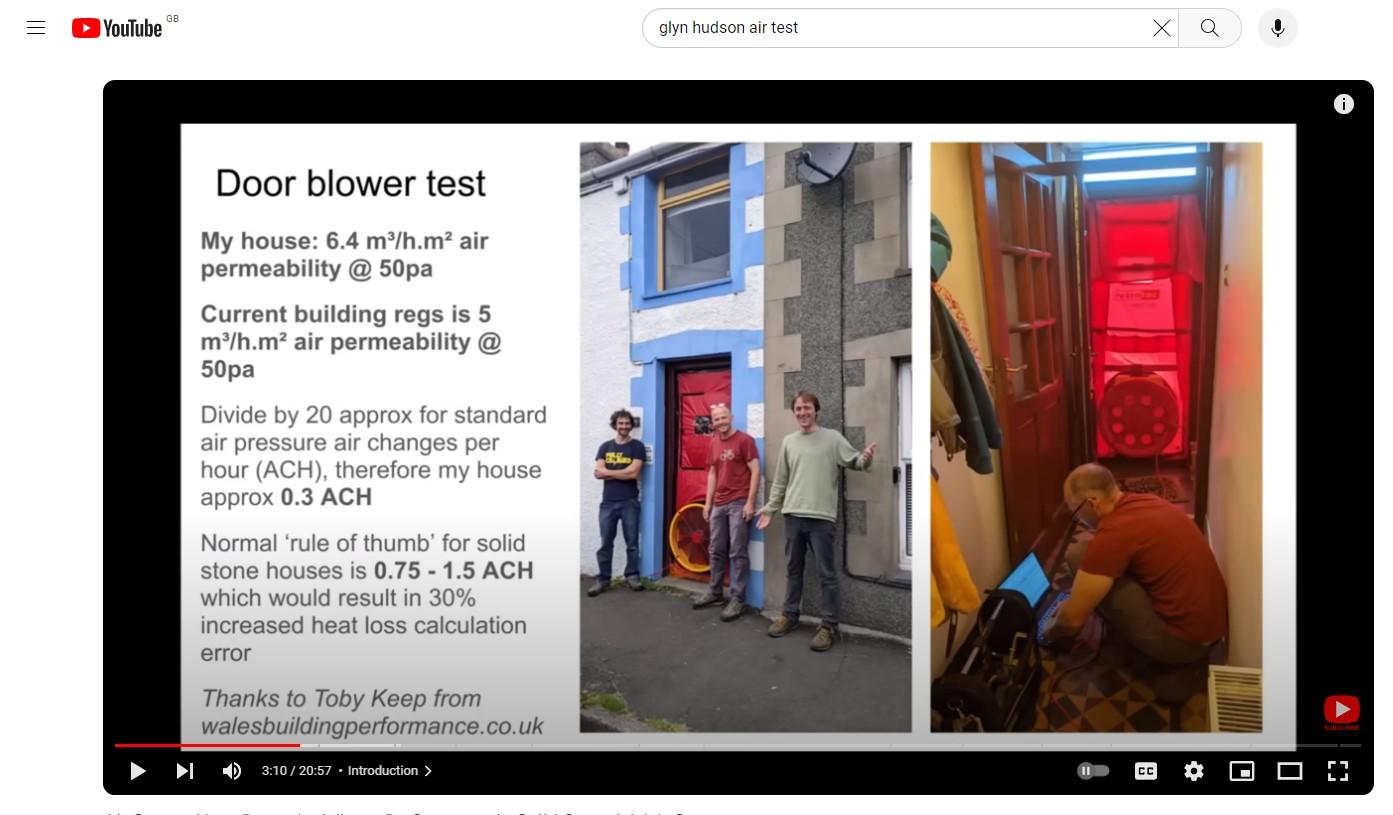
0.45 if I remember correctly. I think Glyn Hudson's was even lower, which was very strange. Here's the links. https://www.youtube.com/watch?v=tFMlJmRiaqo&list=PLzJHPUKEmzWVlbuMLwIeT_52SooH5ROrB&index=4&ab_channel=Booglehead I think Glyn has done the numbers wrong tbh, though he is a techiehead and loves this sort of thing so it seems unlikely, but I just can't wrap my head around how he has calculated it - he claims it's 0.3Ach. https://www.youtube.com/watch?v=kkNx2oSO-S4&t=383s&ab_channel=GlynHudson

-
I've been very surprised that Booglehead (a guy I follow on YouTube) and Glyn Hudson (same) both passed their pressure tests without doing what I would have thought necessary. Booglehead hadn't taped around his windows at all it seemed and hadn't taped the insides of his SIPS. The outsides didn't look very carefully taped either. He also put a lot of screws right through everything in a way that I thought would have caused leaks. Glyn Hudson got his regular town house (not sure when built, but quite old) pressure tested and that passed too. I was really surprised by that one. Made me wonder what all the fuss is about.
-
I've been doing a lighting rewire of an 1890's flat this week and it's been a miserable job. I've just been chasing out raggles and running cables for the spark to connect but it's an awful lot of mess, as you know already. The laths are attached to counterbattens that are then fixed to the joists, so there is a bit of space up there for new cables, though this is restricted in some places where the plaster has pushed up through the laths when wet. I tried pulling the old lead-sheathed cable through but it was stuck fast, so I had to feed the new cable through being careful not to snag on the many obstacles. It took a while and was a bit of a pita but it can be done. The wire itself was in a shocking (ha ha) state and crumbled and fractured very easily in my hands so I am glad it is gone now. If you pull the whole ceiling down it will be some incredible mess. I have done that before and it took a huge number of bags and trips to the dump to dispose of. The dust was incredible. I've also got one property where the kitchen ceiling has just been lowered and the old lath and plaster left above it and quite a lot has fallen down over the years. The framework of the new ceiling has taken the weight so far, but I do worry that it won't always and at some point more lime plaster will fall and bring the plasterboard ceiling down.
-
This isn't quite what I was looking for as it's basically battery to house, but it's done with a Leaf battery and is quite interesting.
-
Oh I do 😂 they still go on way too long though.