zoothorn
-
Posts
4752 -
Joined
-
Last visited
-
Days Won
3
Everything posted by zoothorn
-

Help with kitchen renovation/ 1st house.
zoothorn replied to zoothorn's topic in Bathrooms, Ensuites & Wetrooms
No understood- its another day of prep anyway tho, 2 days so far.. I need to get completely sorted before taking this sink unit out. I need to replace isolator valves, late tmrw before I get them > so thurs before I can contemplate starting. I hate to think how long until the new top/ sink can be put in once Ive started tho.. maybe best part of 2 weeks I'll have to account for to do this: not easy at all to live like so. I need to go right back & establish how the tops will fit together before too.. so best I start the whole thing next week now. If I rememebr to I'll put cam batts on charge each ev.. it takes a few pics, then AA's need to charge for most of a day again (old SLR). -
Help with kitchen renovation/ 1st house.
zoothorn replied to zoothorn's topic in Bathrooms, Ensuites & Wetrooms
Yes will do once AA cam batts charged/ end of day. Plus pic of the mixtap hex connector ends. Actually the plumbing is the best work bit of the house.. seems properly done, thank god. Thanks chaps. -
Help with kitchen renovation/ 1st house.
zoothorn replied to zoothorn's topic in Bathrooms, Ensuites & Wetrooms
The main reason I'm using the external cable thru the window frame (as it were), as it was before, is bc fitting an eternal socket will ruin the look of the front of the house. Its a stone cottage, an ugly socket on the stone face now I'm thinking on it more.. is a no-no. Ok what I'll haver to do is cut this cable at the hole in the PB I made/ fill, & cut at the external exit point (reluctantly as I use it daily). Then feed an extension thru the damn fkn window: Exactly what I didn't want (the very reason for this cable) but now have no choice it seems. It'll take me a week to do that socket externally too via the back of the 2G socket as I'm not proficient enough plus it means one heck of a powerful drill + a whopping long large bore bit.. I just don't have, or will cost me a fortune. I want to forget this cable for now. Its causing me stress now. -
Help with kitchen renovation/ 1st house.
zoothorn replied to zoothorn's topic in Bathrooms, Ensuites & Wetrooms
No, only a single socket high above LHS, which extends out.. so I may be lucky as it is. Understood/ good idea. I do get mice behind here/ no idea where they come from mind you.. so quite possibly this. I got these valve jobs https://www.screwfix.com/p/isolating-valve-15mm-2-pack/65251 so maybe I should swap for hp20.. I am a bit hampered under the sink, plus there are copper r-angles before the ~under tap upright bit, which need as much care as poss not to mess up: alot more chance with compression joints now I think on it. What I need, ideally, is to attatch the mixtap metal hex connections (presume std), onto something ontop the h20 joint thing. Can this be done directly onto them? or do I need to add another 15mm copper pipe section (I guess as short as poss) between the two? maybe theyre olive-based hex connectors anyway.. -
Help with kitchen renovation/ 1st house.
zoothorn replied to zoothorn's topic in Bathrooms, Ensuites & Wetrooms
As I did ask for an opinion on my cable it seems, I accept your point (I thought I didn't ask for advice on it.. maybe I did then). Ok I'll redo it last/ when I take off this pb3. Maybe I can think of adding an outside socket instead, if that is the main job is drilling an angled-down hole through. Surely though any hole will need foam-fill sealing, which is foam next to cable itself-? the only socket it can go from, is this double under pb3 Im yet to extend tho. -
Help with kitchen renovation/ 1st house.
zoothorn replied to zoothorn's topic in Bathrooms, Ensuites & Wetrooms
Ok onoff I see the point of the Hep2O vs mine. So instead of using that presumably std pvc 15mm pipe cutter.. I just use my copper pipe cutter? ie these hep20 jobs don't need that specifically prior to fitting the valve on? I guess I can go to screwfix & change these metal isolators for 2 of those if so. But plastic vs solid metal heavy jobs.. over time-? -
Help with kitchen renovation/ 1st house.
zoothorn replied to zoothorn's topic in Bathrooms, Ensuites & Wetrooms
Polystyrene insulation.. this isn't polystyrene insulation tho! If you start you could very well not go in the house at all out of total fear. What about the loft insulation running over the cables? that's what the pro loft insualtors did.. what about the old stuff they put it ontop of? what about the deterioration of pvc cable ontop of treated wood? what about this, that, the other.. you could go on until you're a nervous wreck sleeping in a ditch to be safe (& then the flippin jet lands on your head). -
Help with kitchen renovation/ 1st house.
zoothorn replied to zoothorn's topic in Bathrooms, Ensuites & Wetrooms
Hi Peter, yup got a good pipe slice/ easy job. What Ive got is these https://www.screwfix.com/p/isolating-valve-15mm-2-pack/65251 as I thought to permanently put on (maybe the 2 new mixtap flex jobs connected up ready too?) with compression joints. -
Help with kitchen renovation/ 1st house.
zoothorn replied to zoothorn's topic in Bathrooms, Ensuites & Wetrooms
JSHarris, you've said your thing on this/ you are just repeating. If I am concerned about this cable, then this is my perogative, & I am not. There are FAR greater things of concern in this dreadful 20 yr old DIY disaster of a house than this, which Ive lived with for 2 yerars now! You -could- argue that a jet will land on my house, no point doing anything to it, or even sleeping in it as a jet -could- land on my house. Argue till the cows come home. I'm in a training area, its a feasable argument isn't it? But you wouldn't. Why not? bc the likelihood is so miniscule as to be negligeable. The chance of a jet landing on the house is higher than some muppet 1st plugging this plug into the socket then deciding to drill around it, 1st without checking with a tester for hidden cables, metal, or xyz. It is unconnected. When I post a photo of it connected.. then by all means pipe up with all the advice. This PB isn't even finished yet, it has to come out again so I can change abc, as the extension boxes are proving hard to source (w'out spending £8 on post). This PB is last job now. I have to crack on. Please, I need help with the new wall Im about to start, my kitchen's in a terrible state & its becoming a huge burden to live as it is. If you can help with the work I'd be very grateful as I've said many times to all who have posted helpful posts. I have asked a Q today, can you help? thx -
Help with kitchen renovation/ 1st house.
zoothorn replied to zoothorn's topic in Bathrooms, Ensuites & Wetrooms
Can anyone please help me out on the 2nd wall. I have a sink to undo 1st, obviously, which I have never done before. My theory is to add isolation valves onto the water pipes @ points I can then add the new 2x flex mixtap connectors from, so extra shut-off points in future as a bonus. So water off to cut the pipes/ add the ISO valves. But is this a sufficient-enough barrier to safely turn on water again? It'll be best part of the week for me to do the 2nd wall batten/ C'tex/ sink & worktop prep/ then PB esp tricky @ plumbing area its seems, & other water pipes to negotiate LHS up the wall.. so I can't have the water off for the whole week. And @ the 15mm pipe cut points, will there be alot of water spill to deal with? any way of stopping/ mitigating against this prior to cutting? thanks zootH -
Help with kitchen renovation/ 1st house.
zoothorn replied to zoothorn's topic in Bathrooms, Ensuites & Wetrooms
It is disconnected. You can see it is (& 99% of the time it will be too). So how, if its not plugged in, is it dangerous?!!!!! do tell me. If you can't help me with the topic of the thread, please don't post. It may not be up to your design or standard, but it is my house- not yours. thx -
Thanks all for the replies- I'll go over again once Ive rethought the whole idea. As simple (a box addition) it is, its still overwhelming for me to understand how it could get built as the complexities of abc are just too much for me. Eg, if I can't establish where the road starts/ where my boundary relative to it actually is (by way of a property map I paid for which is so vague/ small as to be totally useless) & these exact boundaries are anyway are vague being wales.. then I cannot get past step 1 to even establish if I need, or even needed PP to start with. I'll have to start afresh next year- I just can't cope & feel totally lost.. not the correct place to be whatsoever to evaluate the 2nd biggest £outlay in my life. I need to be sure on what is needed, sure on the builder, & sure on the design. I currently cannot tick even one of these 3 boxes.
-
Help with kitchen renovation/ 1st house.
zoothorn replied to zoothorn's topic in Bathrooms, Ensuites & Wetrooms
Hi Newhome- yes new sink + mix tap. Sink needs a flamin hole drilled, 35mm or s'thing, a major pita, so I need to do that ready before I unhook sink. What I'd planned is to turn off mains water/ cut existing 15mm pipes/ take out sink & units/ add 2 isloating valves.. so In can turn water back on for rest of house whilst sink's out of action. Is that the right idea? But then I need all steps ready/ clear re. this wall so I waste as little sink time as poss. I've never done sink waste plumbing stuff, but looks mostly placcy so hopefully easier than compression joints. I'm just thinking about the 2 tops' joining too.. the sink's top needs to slide into the other, I think. So does that mean top 1 needs to be fixed in final place beforehand? -
Help with kitchen renovation/ 1st house.
zoothorn replied to zoothorn's topic in Bathrooms, Ensuites & Wetrooms
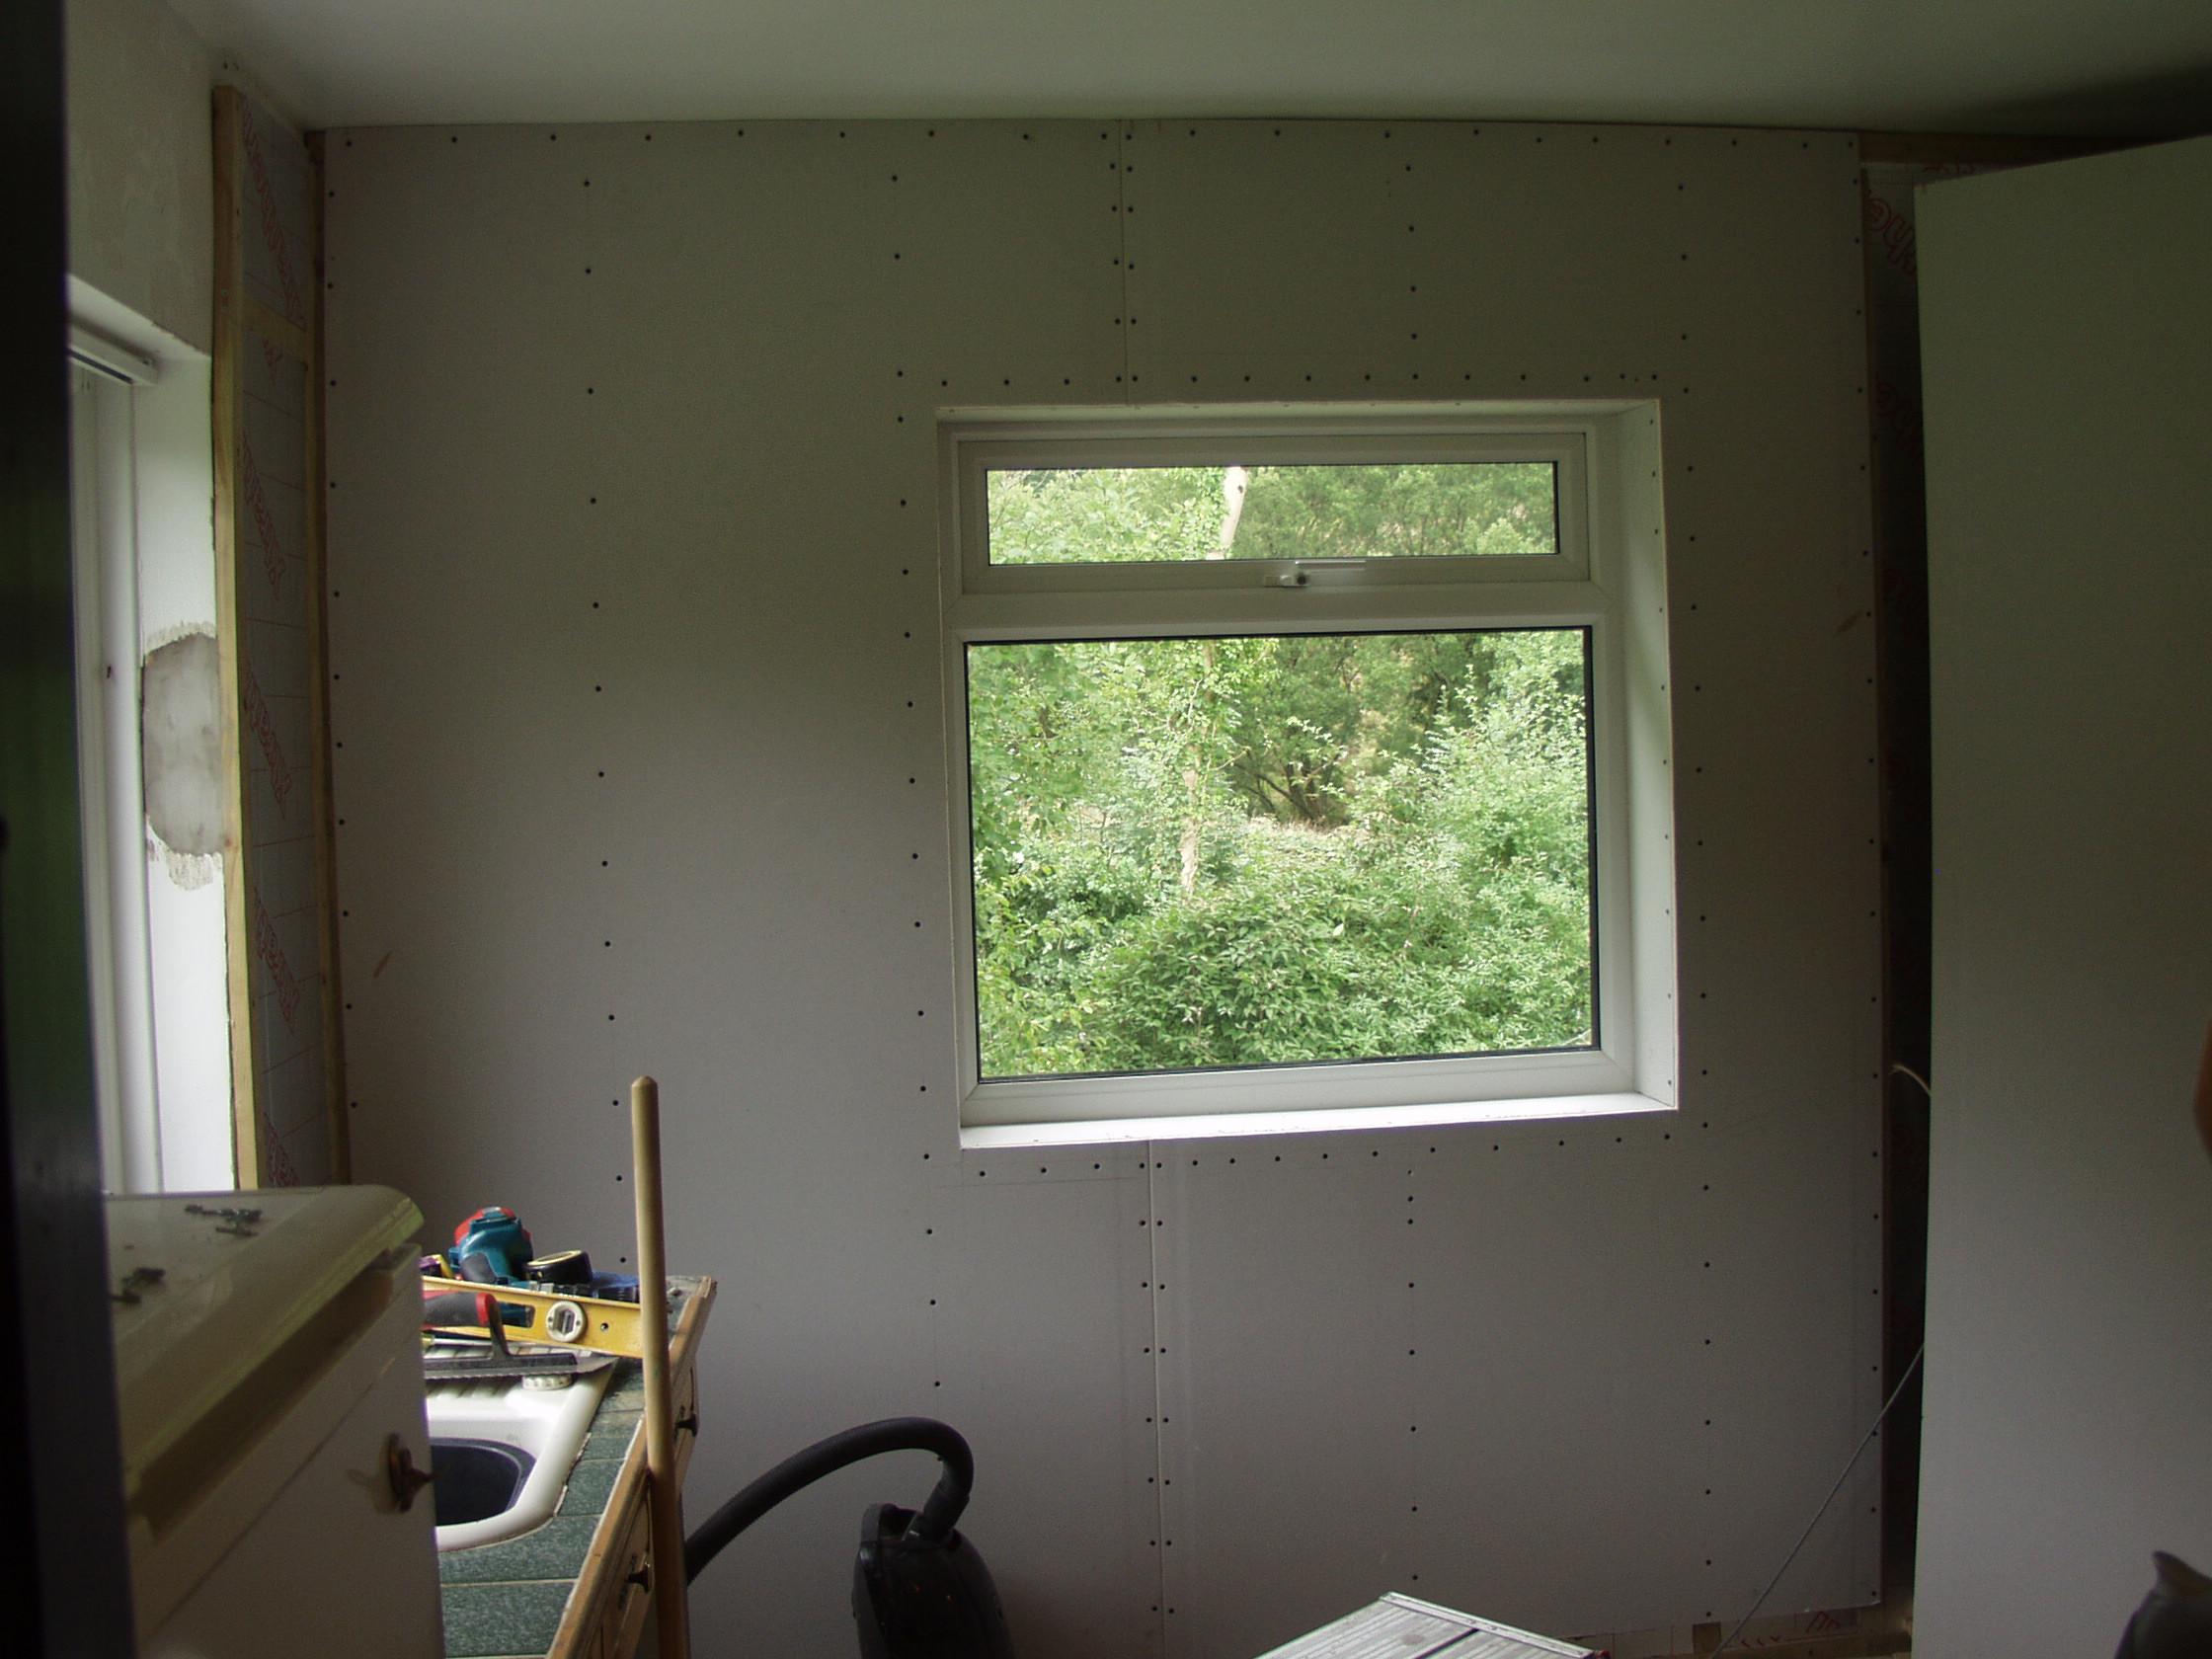
Very much doubt it! I'm back from surgery & pondering again. The cable that's so concerning.. is not plugged in remember: it gets plugged in -only- when one thing is used outside, mower, router, or chopsaw. I just don't have skills or tools to fit an outside socket. Still no extension boxes- nowhere to buy so I'll leave this PB for last. Ok onto the 2nd wall.. What I have is a bigger window area, so how to do the outline onto the PB (RHS) once the sills done..? I'd need to train a squirrel or small gibbon to use a pencil > get in > then fk off out my kitchen. I need to unhook the sink too/ put 2 isoltating valves on.. which will be a trial to live without, so I need to carefully plan how to PB etc this wall. Its also got H/C water pipes @ LHS near microwave (along with the plumbing pipes to sink). cheers, zootH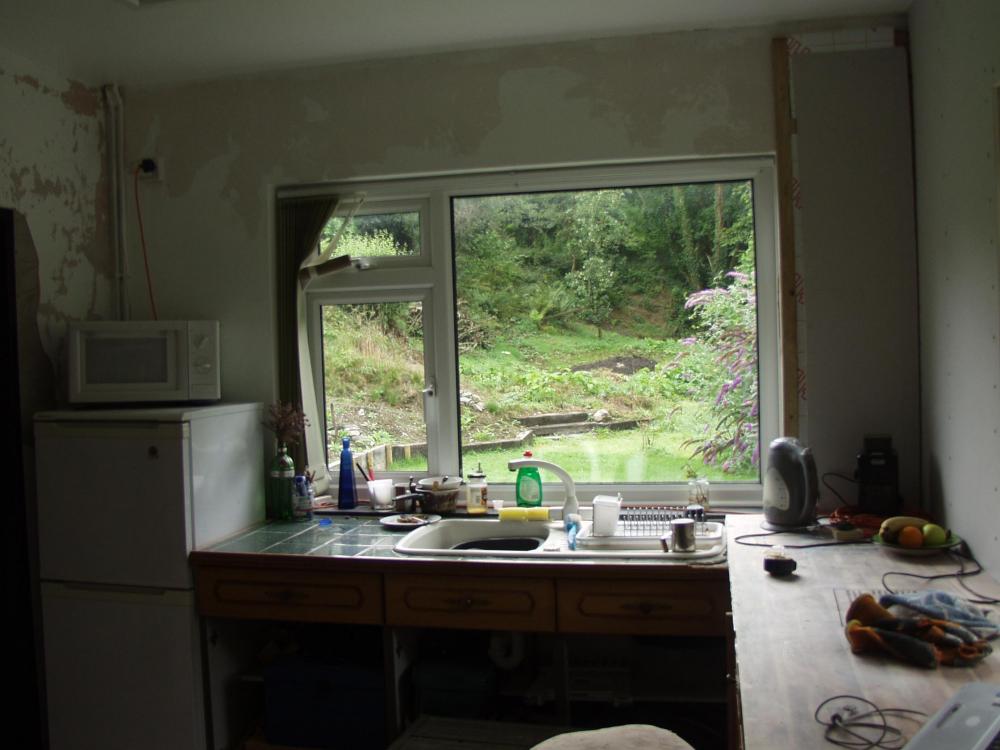
-
Help with kitchen renovation/ 1st house.
zoothorn replied to zoothorn's topic in Bathrooms, Ensuites & Wetrooms
Thanks onoff (I'm not the slightest bit concerned about the cable as 1) this is only plugged in when outside work needed, 2) this bit will be be tiled anyway 3) if anything IS shorting -totally unlikely anyway-.. it'll trip this spur's fuse) appreciate the help. I'll be back once my surgery few days over & with those extensions to hand- I might well do this pb3 last/ crack on with the other wall.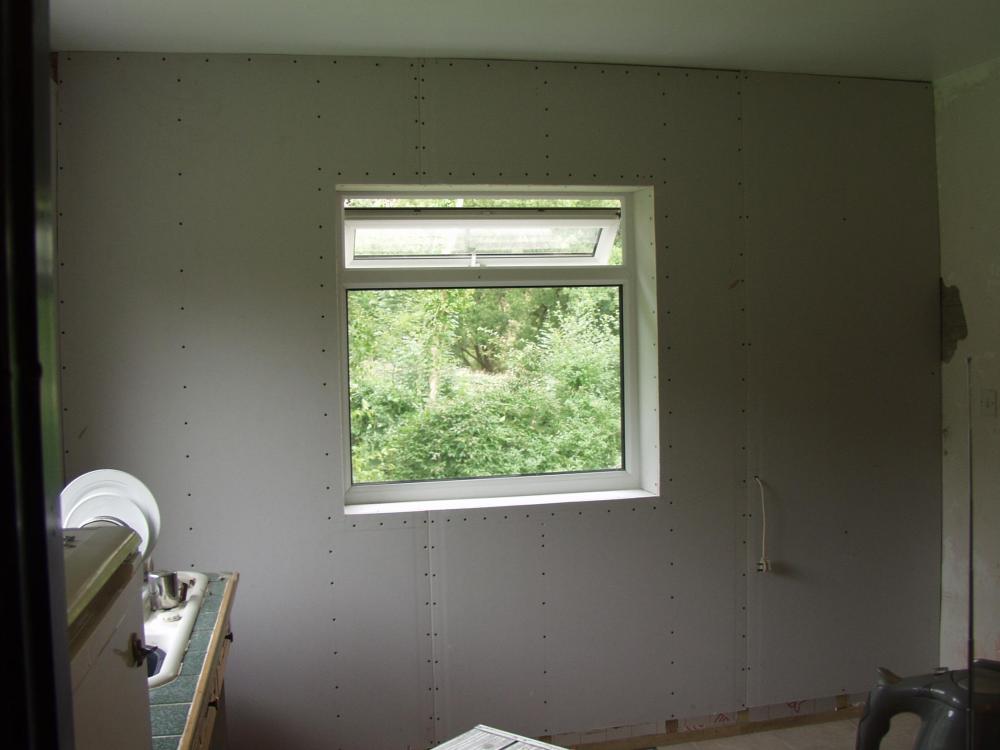
-
Help with kitchen renovation/ 1st house.
zoothorn replied to zoothorn's topic in Bathrooms, Ensuites & Wetrooms
Y Thanks- look if you can't contribute with anything positive or any help just negative remarks, just don't. please. -
Help with kitchen renovation/ 1st house.
zoothorn replied to zoothorn's topic in Bathrooms, Ensuites & Wetrooms
But this idiot severed through the mains cable with his 'leccy hedge trimmer tho last month.. & nothing happened. IT just went dead, not the idiot. -
Help with kitchen renovation/ 1st house.
zoothorn replied to zoothorn's topic in Bathrooms, Ensuites & Wetrooms
Yup roger that onoff.. so just confirm will you for a muppet: you say go taper edge pb2 meets taper edge pb3? Can you see tho how much easier it would be, to use the other side of pb3? I can get a much more accurate fit most probably. is this just a no-no? Anyway look here.. closing in on codeine+beer o'clock for the week me.. one more to go!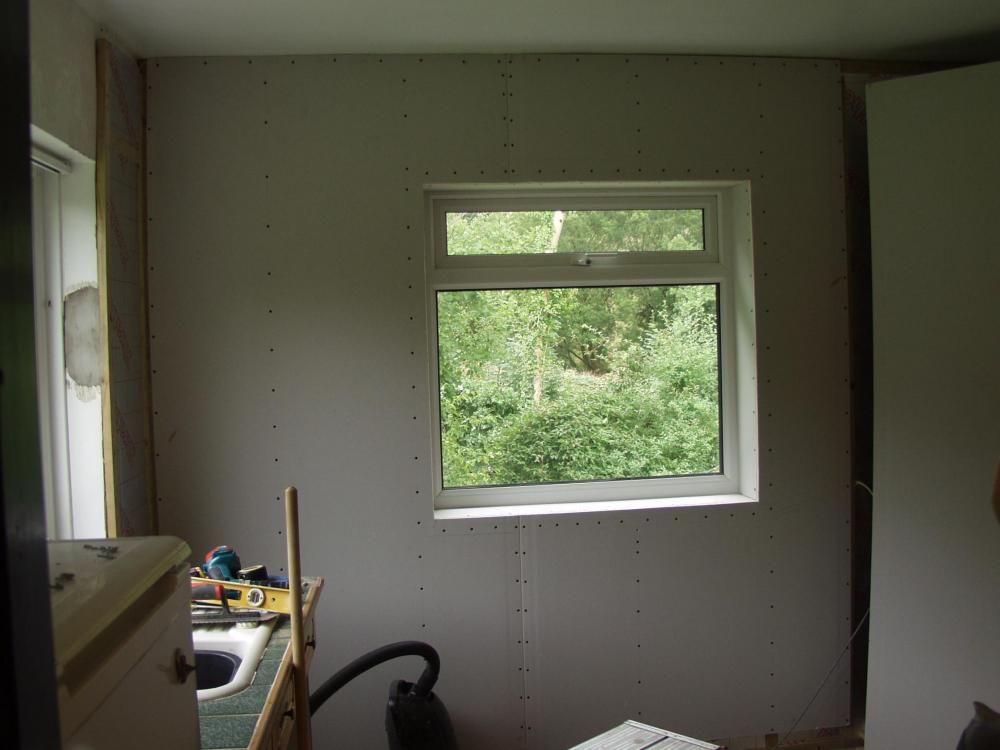
-
Help with kitchen renovation/ 1st house.
zoothorn replied to zoothorn's topic in Bathrooms, Ensuites & Wetrooms
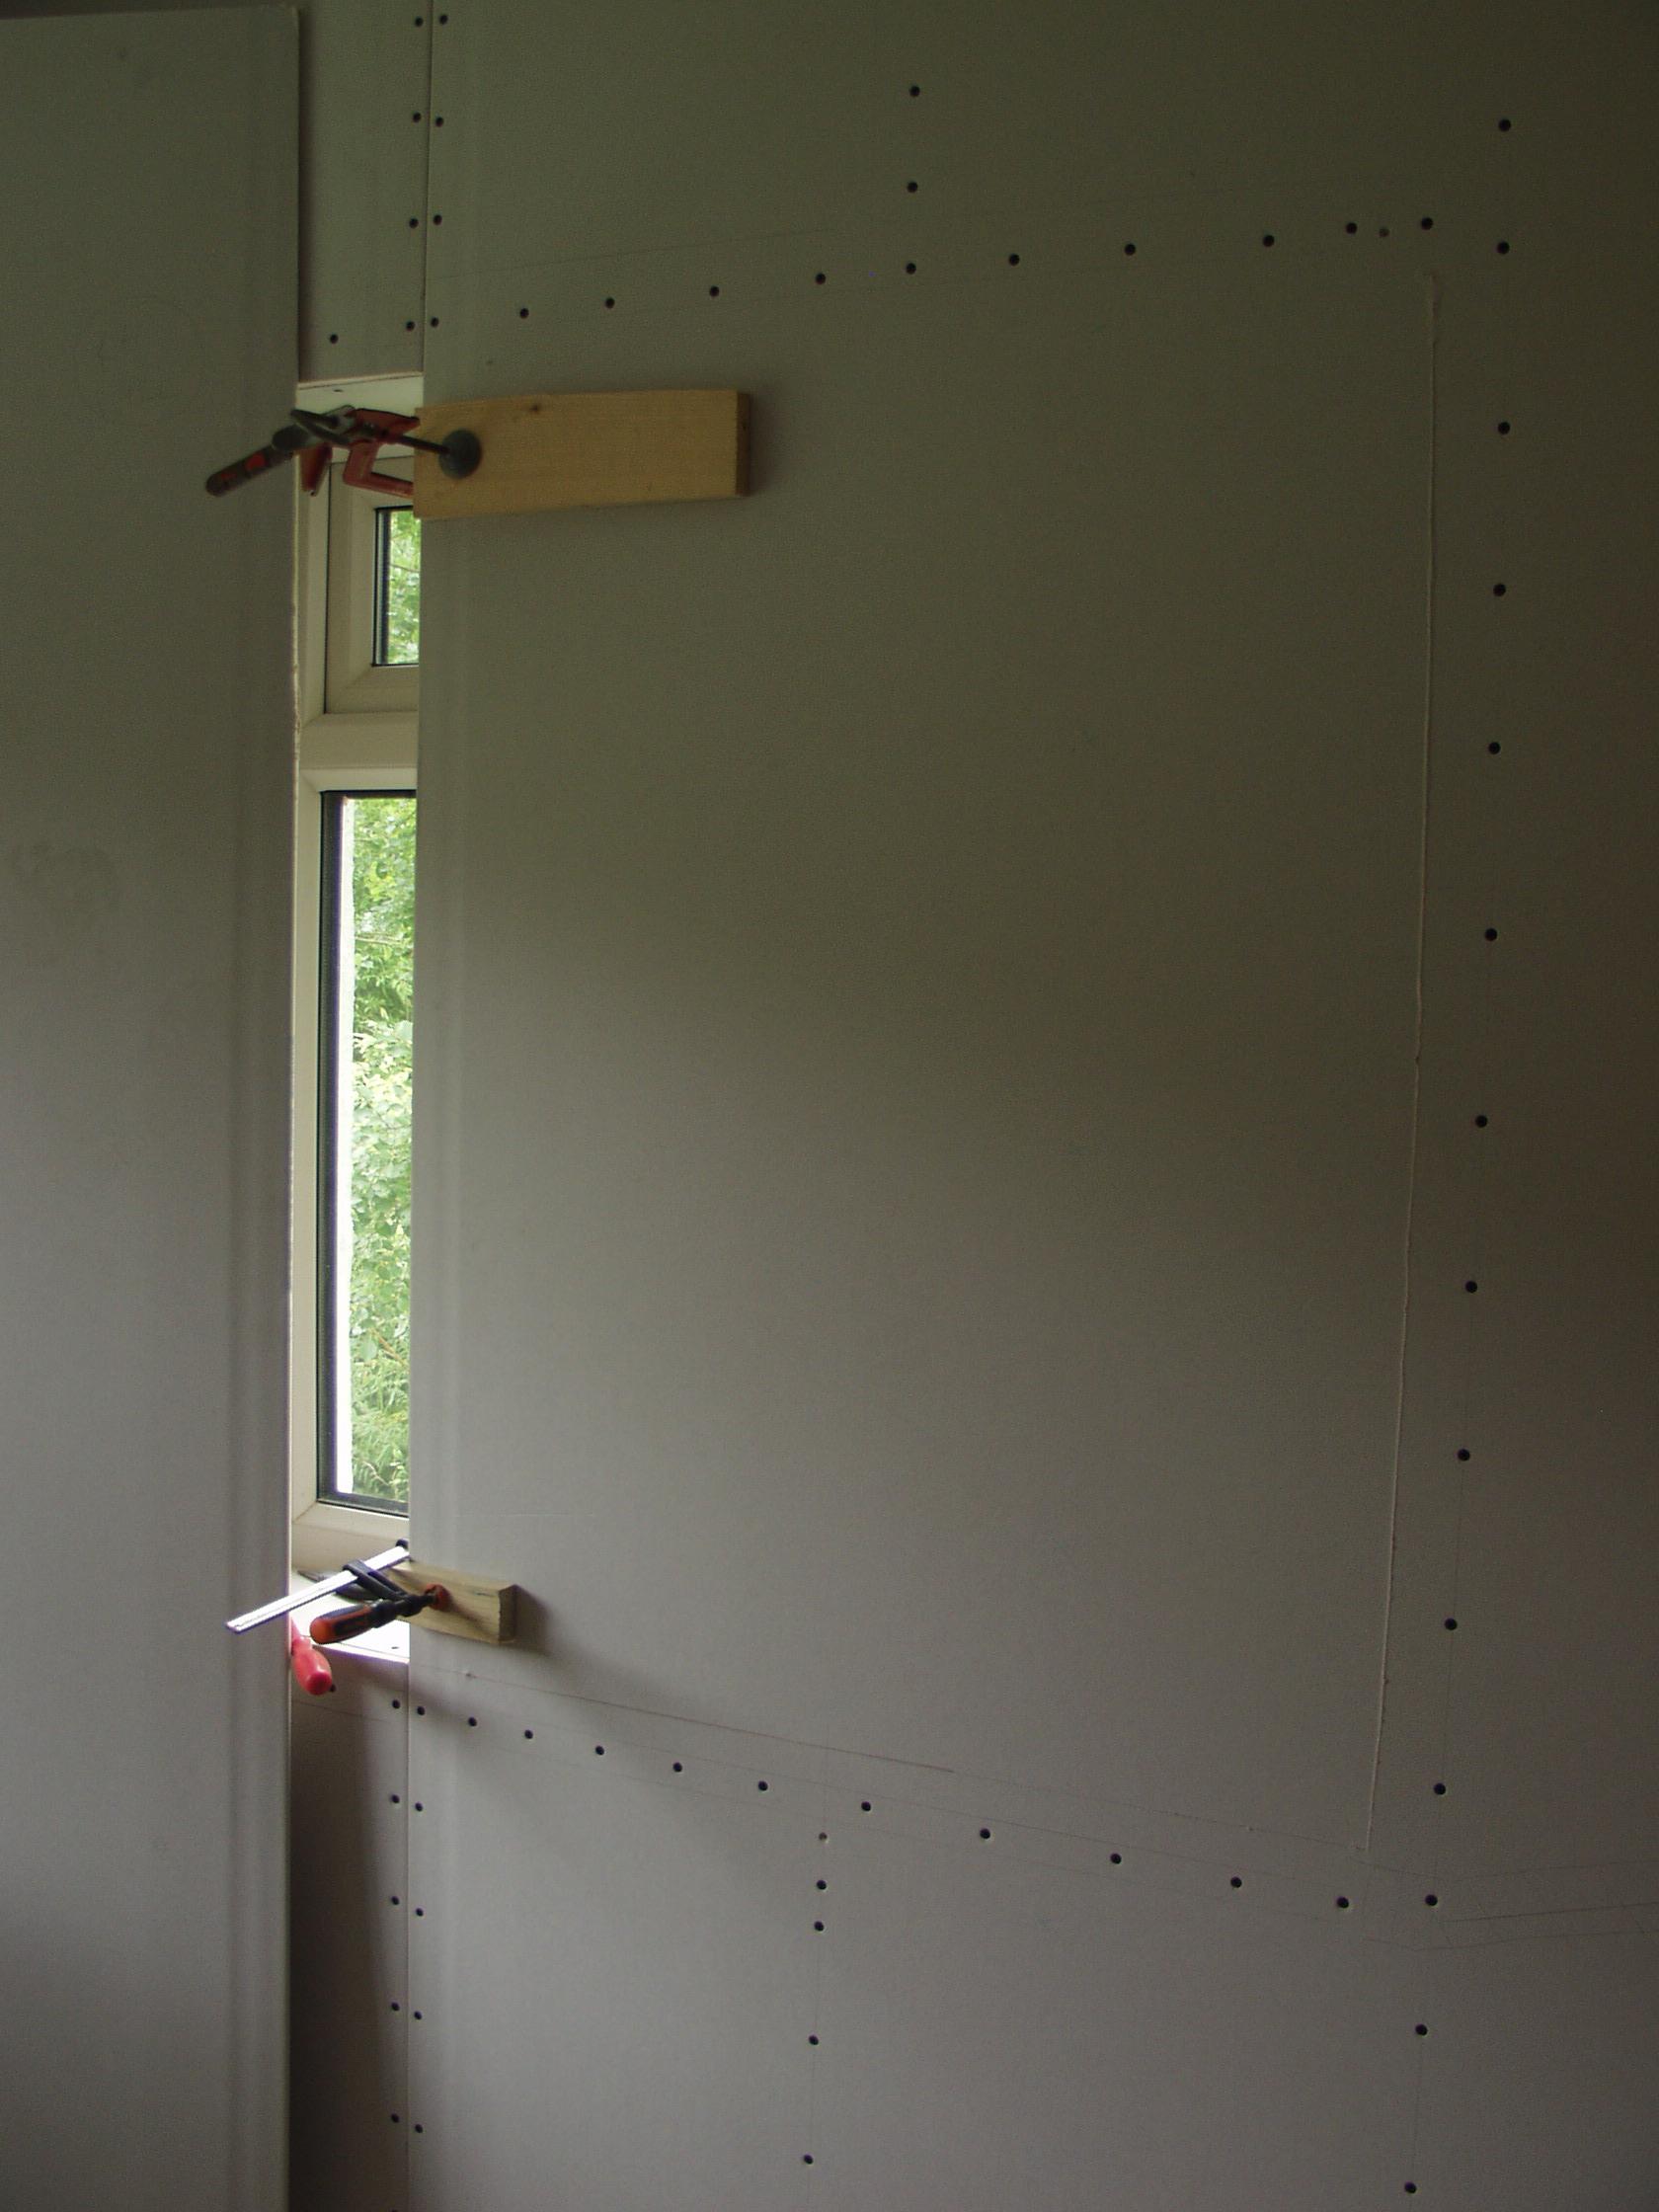
Ok so my clamps pic is wrong then! So the clamps span across the 'rough cut' line -AFTER- its been made!? if so- bingo! I had no idea the clamped ditties weren't actually facilitating the cut s'how (then my clamp back rest-on idea to confuse matters must be total bllx then!). Right must clear head. Thanks! now I can finish it today. If I can just cut & pin pb3 on, I'll call it finished for the week. So last Q is this: which taper edge do I go with on pb3? & if LHS, how do I best mark/ get the pB's RH edge to fit the wall-? much appreciated- zootH -
Help with kitchen renovation/ 1st house.
zoothorn replied to zoothorn's topic in Bathrooms, Ensuites & Wetrooms
Sorry back to this.. is this right onoff: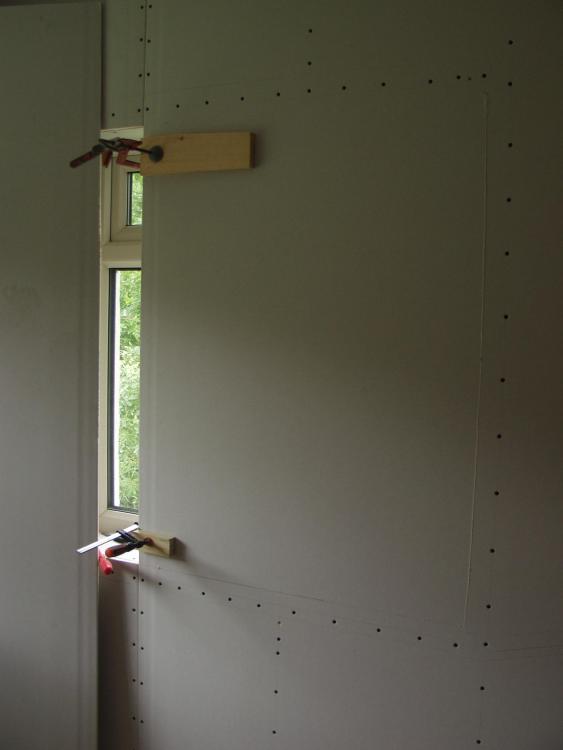
-
Help with kitchen renovation/ 1st house.
zoothorn replied to zoothorn's topic in Bathrooms, Ensuites & Wetrooms
Can you just help with pb3, which way to put.. the Q is valid: if I go taper L edge, it meets another taper edge of pb2 yes.. but not easy to mark the pB to get a good cut/ fit.. unlike if I go taper R edge which means I can just offer up a new pB & mark top & btm points/ cut. -
Help with kitchen renovation/ 1st house.
zoothorn replied to zoothorn's topic in Bathrooms, Ensuites & Wetrooms
Ah ok. Then I'm happy where it is.. there's nothing you could drill into near here anyway/ you can't use the studs, so you'd just never likely do so. I'll just make a note of it- it'll be fine for me. -
Help with kitchen renovation/ 1st house.
zoothorn replied to zoothorn's topic in Bathrooms, Ensuites & Wetrooms
Why is that dangerous? -
Help with kitchen renovation/ 1st house.
zoothorn replied to zoothorn's topic in Bathrooms, Ensuites & Wetrooms
Its no problem to come back to this later, maybe it'll emerge from my haze! not totally happy I'm on board just yet still.. sorry onoff! Ok pb3 (next/ last of this wall). What Ive got is a cable running to outside (an extension reel under roof in woodstore- I use nearby for one circ saw, router etc.. or lawnmower/ one thing- no major load: damn handy) which Ive tucked in the C'tex [below] > then out near the double socket to be neat, & twds LH edge of pb3 so just nip a bit away here. Is this ok? Am I going pB3 LH edge taper, RH straight cut? or taper on the other side where it meets the wall?
-
Help with kitchen renovation/ 1st house.
zoothorn replied to zoothorn's topic in Bathrooms, Ensuites & Wetrooms
The principle of having help at this bid for freedom stage I understand. It would be helpful, I defo agree. I'm still not getting the difference between having the clamps on, & not. The clamps aren't clamping one piece of PB to another, so they're not keeping anything in place. Afaict they're clamping a piece of timber to the front, which I can't establish if its doing something, or just spreading the clamp point pressure. The only thing Im thinking of now, is that the backs/ the long protruding part of the clamp is being used as a rest, to keep the whole piece in place.. but that doesn't seem up to onoff standard I must admit.. that's zoothorn on codeine standard. I think I might have to go a different route! I think Ive exhausted your every explanation onoff! can you think of another way?