Iceverge
-
Posts
4387 -
Joined
-
Last visited
-
Days Won
31
Everything posted by Iceverge
-
 Forgive my formatting. Spreadsheets on my phone isn't my forte. Here are two examples. The first is UFH electric mats and an immersion. The second is an ASHP and UFH with what I think are realistic install and running costs. This first sheet is for 1000kWh/year and 1800kWh of DHW. Say a 100m2 passive house with 2 occupants. Line #4 is direct electric UFH and an immersion.. Line #5 is ASHP. Break even looks about 12-13 years. This second sheet is with 6000kWH space heating and 3650kWh DHW. Maybe a good Bregs new build with 2 adults and 2 children. This breaks even much earlier, I guess about 2.5 years. ASHP might make sense eventually in the first example but I reckon it'd have cost more in maintenance or needed to be replaced before it ever got the chance to pay itself back.

-
Before we all pile on..... Below a certain annual heat demand the capital cost of the ASHP will never outweigh the higher running costs of direct electric heating. The last time I checked it was circa 1000kWh for an A2AHP. An UFH mat may not be such a bad choice for a small building. Especially if it's excellently insulated/airtight/MVHR/3G etc etc.
-
Orkney long house - concept drawings
Iceverge replied to westbound's topic in New House & Self Build Design
As I understand this its the horizontal distance so you could have a 10m wide house (2x5m) with 7 meter (ish) long rafters. -
Orkney long house - concept drawings
Iceverge replied to westbound's topic in New House & Self Build Design
I think you need to compare apples to apples. I did a rough calculation with the same floor areas and U values of 0.13 for the walls/floors/ceilings and 1.0 for the 40m2 of windows. The 221 m2 floor area (excluding the eves) "Big Box" came out at 553m2 external area + 40m2 of windows and a peak heat loss of 2240W. Adjusting the other design to 221m2 floor area it was 819m2 of external area with 40m2 of windows and a peak heat loss of 2900W. -
Are you over ventilating? Maybe you could turn down the PIV flow rate a little.
-
Orkney long house - concept drawings
Iceverge replied to westbound's topic in New House & Self Build Design
Another point that crossed my mind, given your location, is transport costs for trusses and posijoists. Perhaps look at keeping the spans of the roof and first floor to that which can be accommodated economically by sawn lumber which are off the shelf in your merchants. 4m is a good guide for first floor joists and 5m for rafters. It'll require some fiddling for MVHR and waste pipes but you seem well on top of that. https://www.taylormaxwell.co.uk/uploads/files/D.100.02-01_C24-Span-Tables_Design_Span-Tables.pdf -
Orkney long house - concept drawings
Iceverge replied to westbound's topic in New House & Self Build Design
For our interest assign a nominal U value of say 0.15w/m²K per m² to the wall floor and roof of both designs and have a look at how much heat you loose in each design on a 5 deg day for both designs and post is the results. There's nothing stopping "plain" houses being pretty if it's a well balanced design. HebHomes have some good examples. If you MUST add complications I would do it in the form of external pergolas, car ports and porches. Keep the insulated envelope simple.
-
You could do from the top 100mm concrete+fibers with UFH Insulation Hardcore Put a DPM in there somewhere. Alternatively forget the UFH and put in large rads. And a thin layer of insulation on the current floor.
-
Good point. If the building was first insulated as well as fitted with an appropriate ventilation system and allowed to "settle" before battens would that suffice? Most contraction and expansion happens in response to variable temperatures and humidities and a nice layer of EWI should eliminate most of this. In an ideal world Rockwool Front rock or similar mineral wool. However as I expect nobody will listen to me, PIR could be used instead.
-
Alu Clad Northern Ireland Options
Iceverge replied to North Coast Self Builder's topic in Windows & Glazing
Why not uPVC? -
This would work well. With any building, espically a timber one I would be keen to see a robust drainage design so I'm disagreeing with @Redbeard here and saying that a vented cavity is required. If you're building for longevity and comfort I would attach a membrane to the walls, tape it to the base and the roof membrane if you can. Tape it to the windows and doors too to get a completely airtight building. Something cheap like this will be fine. Add your insulation over the top. Anything will help but more will be better. Ideally use 2 x layers of 50mm with the joints staggered, foamed and taped. Then use 25*75mm strapping as battens held on with 6*160mm screws. Add your cladding over the top. Don't forget to add ventilation to the building as with the Airtightness you'll get a lot of moisture build up otherwise.

-
Orkney long house - concept drawings
Iceverge replied to westbound's topic in New House & Self Build Design
Just from my sketching the additional 5deg doesn't really gain much head room for the extra ridge height and the planners near me are very keen on making houses as low as possible. However from an ease of carpentry and materials use point of view it absolutely makes sense. What other benefits have you got in mind? @westbound a ridge beam carrying the roof as mentioned above is a really good way to build in airtighess etc. Much easier than trusses and wouldn't need a crane. With this in mind you'll need some central support column to carry the load of the roof to the foundation. You could also do it like this by having a lintel carrying the load to two walls. Just make sure that the walls line up upstairs and downstairs.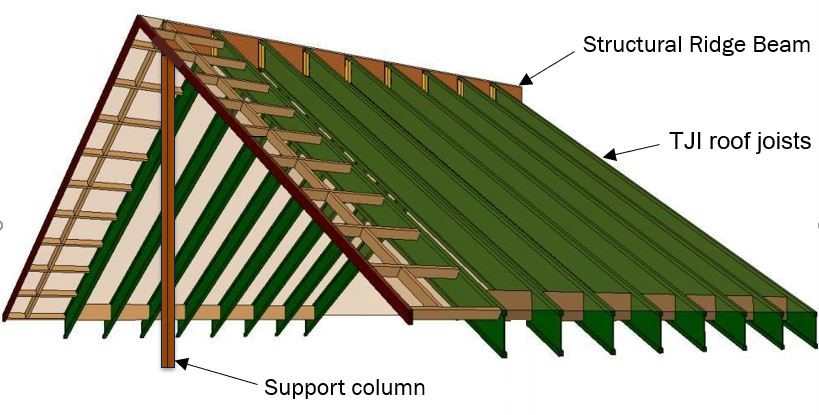

-
Orkney long house - concept drawings
Iceverge replied to westbound's topic in New House & Self Build Design
I would put the MVHR further away from the bedroom. They are quiet but you'll hear it in that bedroom if it's there. A few tricks to make a house feel more spacious. Put windows on 2 walls on a room if possible. South and west walls for example in the ground floor SW bedroom. It also helps with cross ventilation. Have a window at the end of a corridor or room or stairs makes it more inviting. "Light at the end of a tunnel effect". Before you commit to ICF, consider visiting the local builders merchants and find out what they have on the shelf. Being able to grab a few blocks or Hep2O junctions or timbers at 5 mins notice can mean the house gets finished months earlier over waiting for a specialised bit of material from far far away. That gable window is going to be a mare. It'll cook the kitchen or freeze you in winter. The best windows are still 5 times worse than the worst wall in a new house, in terms of heat loss. Perhaps a couple of pairs of french doors with side lights and a few fixed rectangular units up high. It might save you £25k. -
Orkney long house - concept drawings
Iceverge replied to westbound's topic in New House & Self Build Design
O V E R H E A T I N G Too low in my opinion. 2.5m minimum. Great. Top class. Our plumbers didn't charge less though, just went home earlier. It's one aspect I would deffo DIY if doing it again. Why not? Don't bother with certification but a proper passive class house isn't that dear if done right and is very nice to live in. Timber is dear! Plasterboard is cheap and better for sound fire/resistance etc. Cool but unlikely to be cheaper if done to a good standard. Plastic pipes and MVHR ducting might be a matter of taste. I did this and it didn't actually save any money. Consider cross ventilation. Ours all open despite MVHR. You can clean them from inside and sometimes it's nice to just let a summer breeze blow through the house. You can comfortably walk to 1500mm as our heads tend to be central on our bodies! Down to 1200mm I would consider useable space. A 40deg roof I found the best compromise for room in the roof. Even at 160m² footprint it's still very large for the total area IMO. Have a go at paring everything to the minimum and see where you get to. Then selectively increase the rooms you want to feel more luxurious. -
1st floor beam and block v timber floor Price comparison
Iceverge replied to Canski's topic in Floor Structures
Have you considered normal lumber. It's straight off the shelf in most cases and much cheaper than pozis. Add a run of resilient bars underneath and you have a nice service cavity for wires. Obviously waste pipes and MVHR ducting won't fit but design dependent you might be able to work around this. -
Kingspan / Insulated Panel Store - Fire ratings
Iceverge replied to jeli's topic in Building Regulations
https://globepanels.com/insulation-products/globe-wall-mineral-ei/ This may be a solution. -
Kingspan / Insulated Panel Store - Fire ratings
Iceverge replied to jeli's topic in Building Regulations
PIR sandwiches panels (Kingspan) have their place. I'm just not sure its in areas that require strict fire controls. I would be of the mind to pursue a methodology that didn't involve them. What about a standard cavity block wall with Rockwool (or similar) full fill insulation. -
Timber frame spans a whole plethora of abilities. In the states they often build with single "4*2"s at 16" oc and cardboard sheathing. Literally cardboard is stopping the walls from collapsing like a house of cards. Then they nail vinyl siding straight onto that and asphalt shingles onto the roof deck. Couple it to some absolute basement level Home Depot vinyl sliding single pane windows and you truly have a pile of junk. Compare it to a timber frame of 225*45mm timbers with 11mm OSB racking, proper airtight detailing, a battened services cavity, blown cellulose insulation and a proper ventilated rainscreen and it's a million miles away. Would you consider concrete blocks for the house, that's what we did. There was concrete trucks needed for the foundations and the floor but that can be minimised without too much trouble.
-
When I priced it 6 years ago it was very expensive. More than double the cost of a wide cavity wall. It requires a hire of specialised bracing. It needs to be externally clad or rendered like EWI. Synthetic renders were 3 times the price of sand/cement when I looked.amd I wouldn't consider them as durable as sand and cement over blocks in a wet location. You typically need a concrete skip and crane/excavator or a concrete pump on site to pour the walls. Off the shelf ICF blocks are often just about there regarding U values and often need additional insulation. Lots of steel is needed for the walls. As the ICF blocks are a specialised material the option of just popping to a local merchant for an extra one isn't there. More if a problem if you live in a more remote area. To be balanced I did say there were advantages. Good airtighess. Excellent thermal bridging. Quick in the right hands. Very strong. Somewhat diy-able Can work well for awkward shapes.
-
Depends on the unit. Around a corner is probably ok. Beside a patio probably isn't. You could always leave space to fit a rigid silencer.
-
I like the idea of trench fill foundations here. Mainly because you could dig and pour them in a few hours if you had a good ground works team and digger man. Thinking out loud here and assuming the site is very wet indeed...... I would get a digger in and dig 4 trial/monitoring holes onsite well outside the foot print of the house. Based on the advice of your engineer I would agree a depth for the bottom of the foundations. Then monitor the water level in the holes. When you were confident it was low enough, and there was zero rain forecast swiftly get a digger in, dig the trenches, consolidate the bottom, drop in some rebar and pour the trenches off a laser level. You'd only need a window of 2-3 dry days. It would need nothing near the level of accuracy of a raft or insulated raft and you'd be out of the woods regarding the major risk of the ground turning into a quagmire. I wouldn't even get rid of the topsoil beforehand as you'd be exposing yourself to getting caught out by a shower of rain that could turn your site into a swamp. That could all be done after the foundations were poured. Even if the top of the foundations weren't perfectly level the imperfections could be taken out with a secondary pour or some blockwork. Someone please tell me why this wouldn't work.
-
Welcome to the forum, I hope it'll be helpful. Do you have planning permission or are you just at the concept stage? In any case we'd love to see some sketches. ICF has plenty of advantages but also some drawbacks. What's pulling you towards this method of construction?
-
Depth of Hearth in front of Wood Burning Stove
Iceverge replied to benben5555's topic in Stoves, Fires & Fireplaces
Practically I wouldn't go below 500mm from the front of the stove in any case. Stuff can fall out and you don't want it destroying your nice floor. -
If you included an appropriate insulated cavity it'd be fine surely.
-
Any drawings of this raised brick sole plate. Sounds like a method of fixing one issue by introducing a terrible thermal bridging.