Iceverge
-
Posts
4462 -
Joined
-
Last visited
-
Days Won
32
Everything posted by Iceverge
-
Similar route here. We have a block built passive class house. It's been running abour 17 kWh/m2 per year since we moved in. I was hoping for better but some of the bridging details around the windows etc aren't mega. During the build there was some things that you just give up on. We've just installed an A2A unit which has reduced our heating usage to about 1/3. Prior to that we were just using a single plug in resistance heater. In short if you make a very good job of the fabric you can forego a conventional central heating system. Its an approach I woudl only take if I was all over the airtightness and thermal bridging details however.
-

Timber Frame with no blockwork - any downsides?
Iceverge replied to North Coast Self Builder's topic in Timber Frame
Most of North American houses are built this way. It's nice and clean and most can be done by carpenters which cuts down your spread of contractors. Blocks however are quite cheap and can take sand+cement render which lasts an era. Some on an unpainted Westerly facing farm building here is in excellent condition after 70 years with zero maintenance. I don't know the projected lifespans of synthetic renders. -
At the risk of making @Indys life more complicated would you mind starting a new thread concentrating on the fabric as it's a slightly different issue than the heating/cooling and it might keep things a bit tidier.
-
Well done.
-
Fairly easy to calculate. All you need is the specific heat capacity of the screed to get a rough estimation. @TerryE has chapter and verse. However it was far down the line of perfections at the end of a very very low energy demand house.
-
Show me the triple compression seals please!
-
1. Yes 2. You can charge the slab on TOU tariffs and allow it to slowly release through the day. Beware this is unlikely to be a successful technique if you don't have a passive class house. 3. Jeremy Harris did some numbers on this. Beyond a couple of mm it makes almost no difference. When it comes to keeping a house warm without the heating switched on it's almost entirely down to airtightness and insulation. Otherwise castles would be notoriously warm.(Spoiler, they're not)
-
Your choices. A. Get a proper chaser with proper dust extraction for a morning. B. Use a grinder and spend 3 years getting the dust out of your house and get silicosis for you trouble.
-
If I behaved like that in my job I wouldn't last a month.
-
Was this because you had carpets? I think @Indy has wood and tiles. Fan cools run at about £300. I reckon it'd work out more expensive than UFH.
-
The internal walls aren't too critical if you model them. Of course it's no excuse and frankly accepting any easily preventable heat loss is negligent in my view.
-
He's right. The meaningless phrase "thermal mass" isn't hated by people just out of pedantry. It's a term used to con those who don't understand physics out of their hard earned money. It really is a hateful expression that has resulted in too many honest people being conned. It's snake oil of the highest order. Phrases like "heat capacity" "thermal battery" and "energy store" "decrement delay" all actually mean something and can have quantifiable numbers attached to them.
-
Agreed. Whoever drew these up would be using basic details from 20 years ago.
-
Another option is to include UFH on the first floor.for cooling mainly . What is it constructed from timber or concrete? As an aside do you have more drawings. The suggested roof methods may not be the best.
-
The design appears to have bifold doors and a chimney still. My advice is to change these to a pair of french doors with fixed side lights and to get rid of the fireplace. You'll save thousands of pounds and the house will be far less drafty.
-
Sorry for not picking this up earlier. The thread got a bit hijacked and I must have skipped it. Ok. I'll do my best, you'll have to widen the wall slightly but it'll save you thousand's and perform much better. 1. Standard MVHR. 2. Monoblock ASHP to UFH ground floor only. Cooling if possible. 3. UVC as you say is ok. Bigger is better. 4. UFH on ground floor is good. 5. I don't like fan coils. Unnecessary complexity in my opinion. Provide space for A2A is easier in my opinion. 6. Don't know. 7. No wet UFH upstairs just UFH electric under tiles. On ground floor bathrooms too. 8. Include an electric spur for towel rads if you want them . ASHP runs too cold to do much with them. 9. Don't know. 10. No thermostats in individual rooms. Build well and the house will all be similar temp. Architect is talking nonsense and spitting out Celotex's imaginary U values from their sales book. Floor 0.13W/m²K 65mm screed. Separation layer. 200mm of PIR or 300mm of EPS insulation DPM Block beam. Walls. 0.18w/m²K Sand cement Render. Dense concrete blocks. (13N preferably) 200mm cavity full fill with EPS beads or mineral wool batts. Stainless steel wall ties. Dense concrete blocks. Wet plaster Skim Pitched roof. U value 0.12 Roof tiles. 38*50mm tile batten. 25*50 batten up the rafters. Glidevale vp300/400 membrane taped at all joints and sealed to outer wall woth render over expanded mesh over membrane. 11mm OSB sheathing 220mm rafters full fill with blown cellulose insulation or mineral wool. Airtighess membrane 50mm or 75mm or 100mm battened service cavity insulated with mineral wool. 2 x 12.5mm plasterboard and skim. Pitched roof with insulation at ceiling level. U value 0.12 Roof tiles. 25*38mm tile batten. 25*50 batten up the rafters. Glidevale vp300/400 membrane taped at all joints and sealed to outer wall render with render over expanded mesh over membrane. 11mm OSB sheathing. 150mm rafters. Invented loft space. 22mm Caberdeck or OSB flooring. 450mm blown cellulose or mineral wool insulation. Airtighess membrane. 22*70mm service cavity 2*12.5mm plasterboard and skim. Flat roof Construction U value 0.11. GRP 18mm OSB deck. 38*50 batten across the rafters. 25mm x 50mm battens up the rafters. To create 63mm ventilated space. Breather membrane 11mm OSB sheathing. 220mm full fill rafters installed with 1:40 fall with cellulose/mineral wool. Airtight membrane. 100mm service cavity full fill with cellulose/mineral wool. 2 x 12.5mm plasterboard.
-
Is there time to change much of the fabric spec. This will perform worse in reality than on paper.
-
Is this built? Someone has been wined and dined by the celotex salesman🥴
-
I chased our whole house with a 9"grinder. I would prefer to have a house with no electricity than do that again.
-
If you're going to the effort of re plastering you could use the time to insulate the wall too? If you don't want to I would hire a proper wall chaser and dust extractor for a day and chase it that way. There's some rules on where the cables run. @ProDave will have chapter and verse.
-
Provided you have adequate internal mechanical ventilation I wouldn't sweat it as moisture won't be trapped in the timber. It's the susceptibility to rodents and insects, the shrinkage of the boards, the fire performance, the performance loss over time, the thermal bridging through the foil, the waste and dust when cutting are the the reasons I that I don't like PIR.
-
Out of interest, I've done this with lots of combos. I think A2A and solar PV plus divert is probably the cheapest lifetime install for a building that is well enough insulated not to need central heating.
-
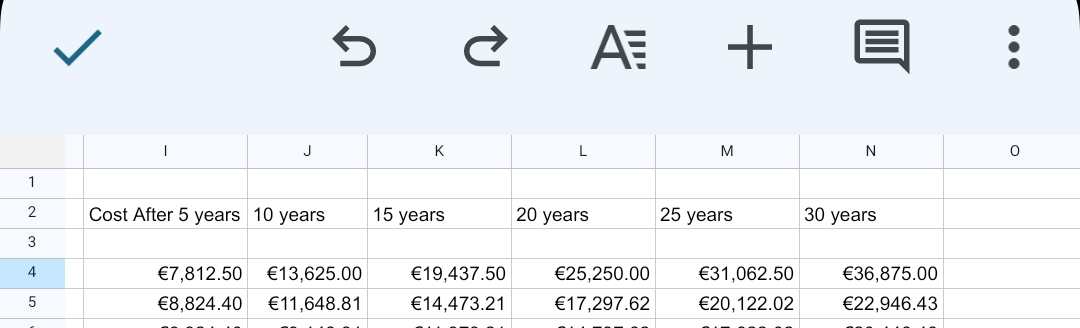
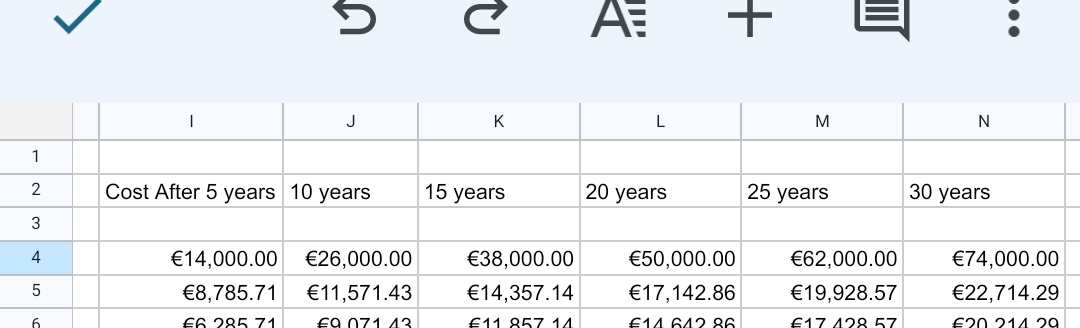
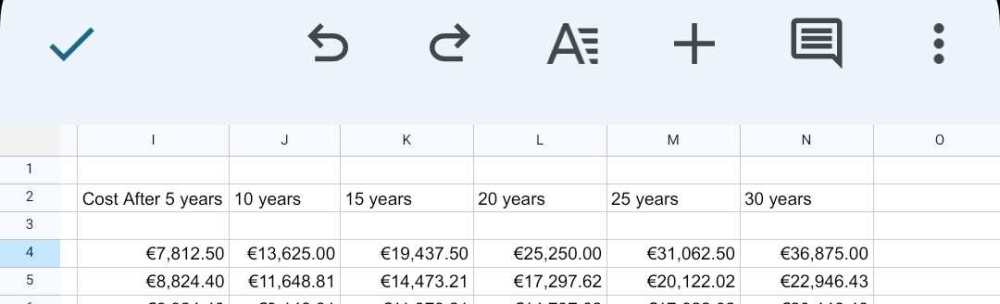
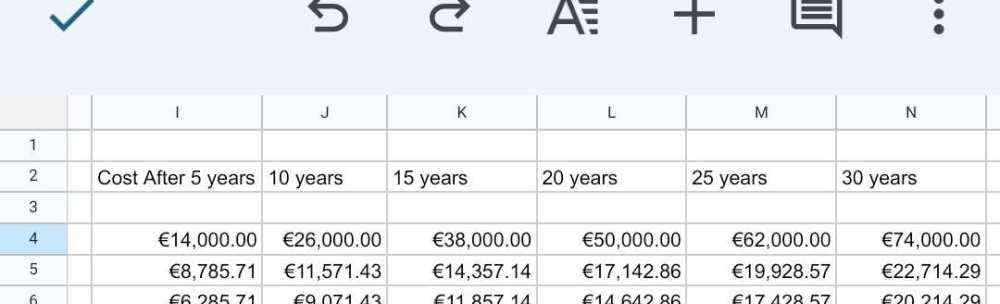
Forgive my formatting. Spreadsheets on my phone isn't my forte. Here are two examples. The first is UFH electric mats and an immersion. The second is an ASHP and UFH with what I think are realistic install and running costs. This first sheet is for 1000kWh/year and 1800kWh of DHW. Say a 100m2 passive house with 2 occupants. Line #4 is direct electric UFH and an immersion.. Line #5 is ASHP. Break even looks about 12-13 years. This second sheet is with 6000kWH space heating and 3650kWh DHW. Maybe a good Bregs new build with 2 adults and 2 children. This breaks even much earlier, I guess about 2.5 years. ASHP might make sense eventually in the first example but I reckon it'd have cost more in maintenance or needed to be replaced before it ever got the chance to pay itself back.
-
Before we all pile on..... Below a certain annual heat demand the capital cost of the ASHP will never outweigh the higher running costs of direct electric heating. The last time I checked it was circa 1000kWh for an A2AHP. An UFH mat may not be such a bad choice for a small building. Especially if it's excellently insulated/airtight/MVHR/3G etc etc.
-
Orkney long house - concept drawings
Iceverge replied to westbound's topic in New House & Self Build Design
As I understand this its the horizontal distance so you could have a 10m wide house (2x5m) with 7 meter (ish) long rafters.