Nick Thomas
-
Posts
383 -
Joined
-
Last visited
Everything posted by Nick Thomas
-
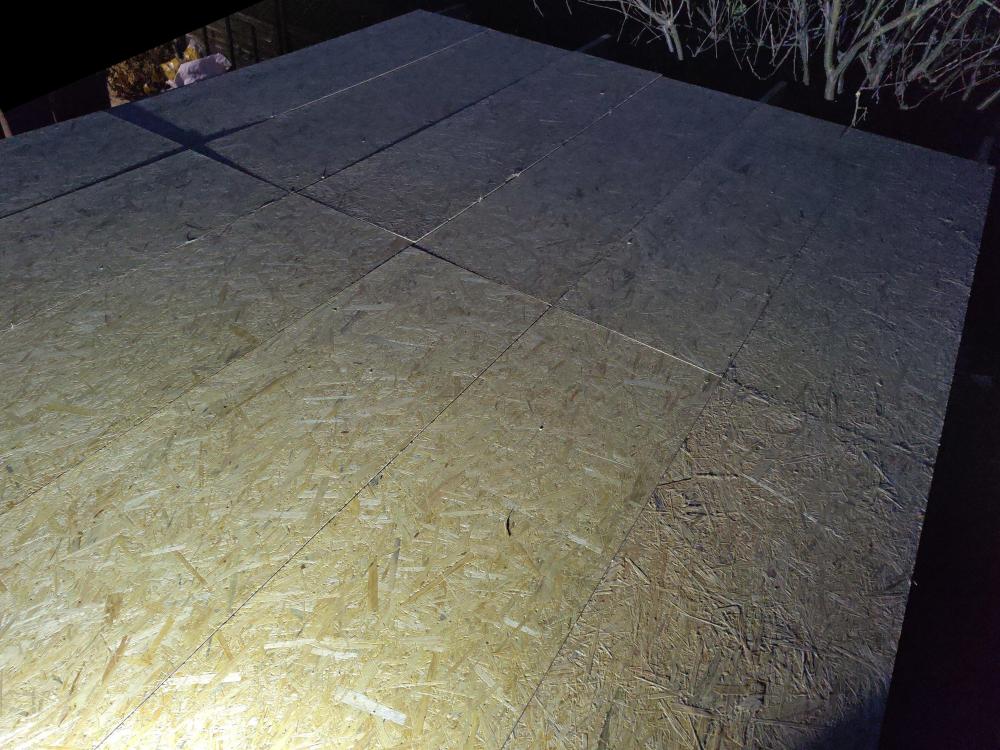
The roof deck needs to be dry. Two reasons for that - First, any water up there will be pretty much trapped once the EPDM is on. Second, the glue - certainly for the kit I used, it was water-based for most of the roof, with something stronger for the edges. The water-based stuff will definitely fail if the base is wet-wet - it just won't stick. What I ended up doing was flipping the OSB sheets that made up my roof deck over, so the wet face was pointing down and the dry face up. Might not be an option for you.
-
 I put up one of these last year: https://www.screwfix.com/p/smith-locke-compact-post-box-black-powder-coated/8161p It's not amazing, and it doesn't have the anti-theft lip, but it does fit A4 letters in - 26cm total width, and definitely tall enough.
 -
More foundation fun - straw bale garden room on clay
Nick Thomas replied to Nick Thomas's topic in Foundations
OK, EPDM installed - Ordered it from Rubber4roofs / Optagon, which turns out to be employee-owed, so that was a nice surprise. Reasonably easy to fit, although I made my life difficult by not having a completely flat roof deck. Just a few bits of trim waiting on a tube of superglue to go up. I guess I can't put it off any longer - time to start tidying the garden and trying to rescue the turf.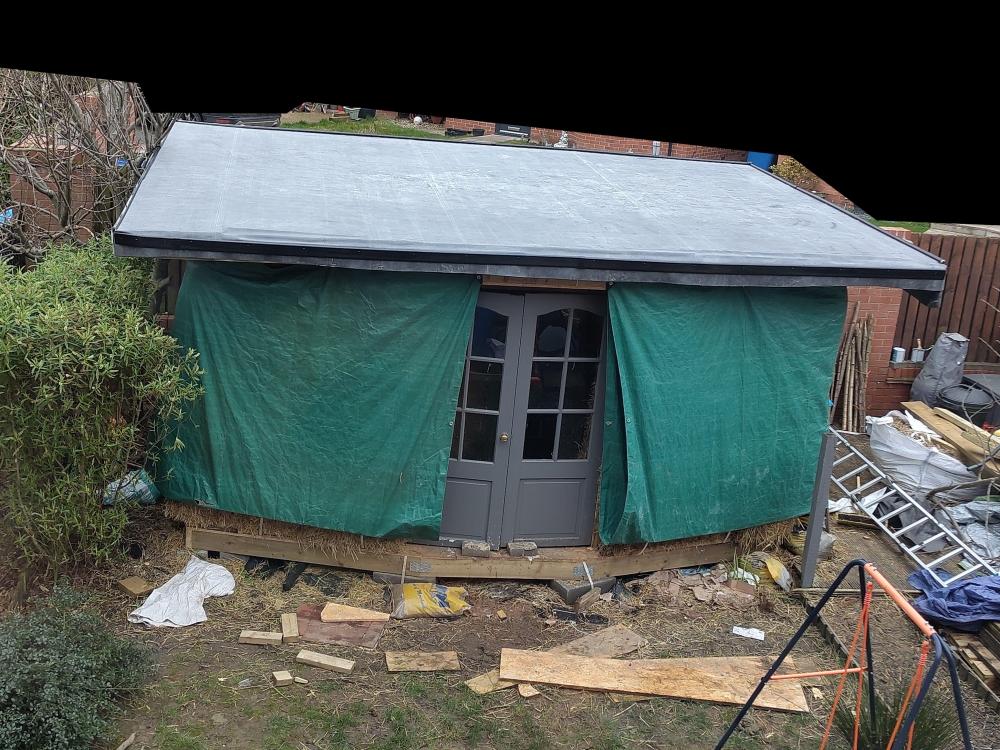
-
More foundation fun - straw bale garden room on clay
Nick Thomas replied to Nick Thomas's topic in Foundations
Clearly I should've used some plastic sheeting instead -
More foundation fun - straw bale garden room on clay
Nick Thomas replied to Nick Thomas's topic in Foundations
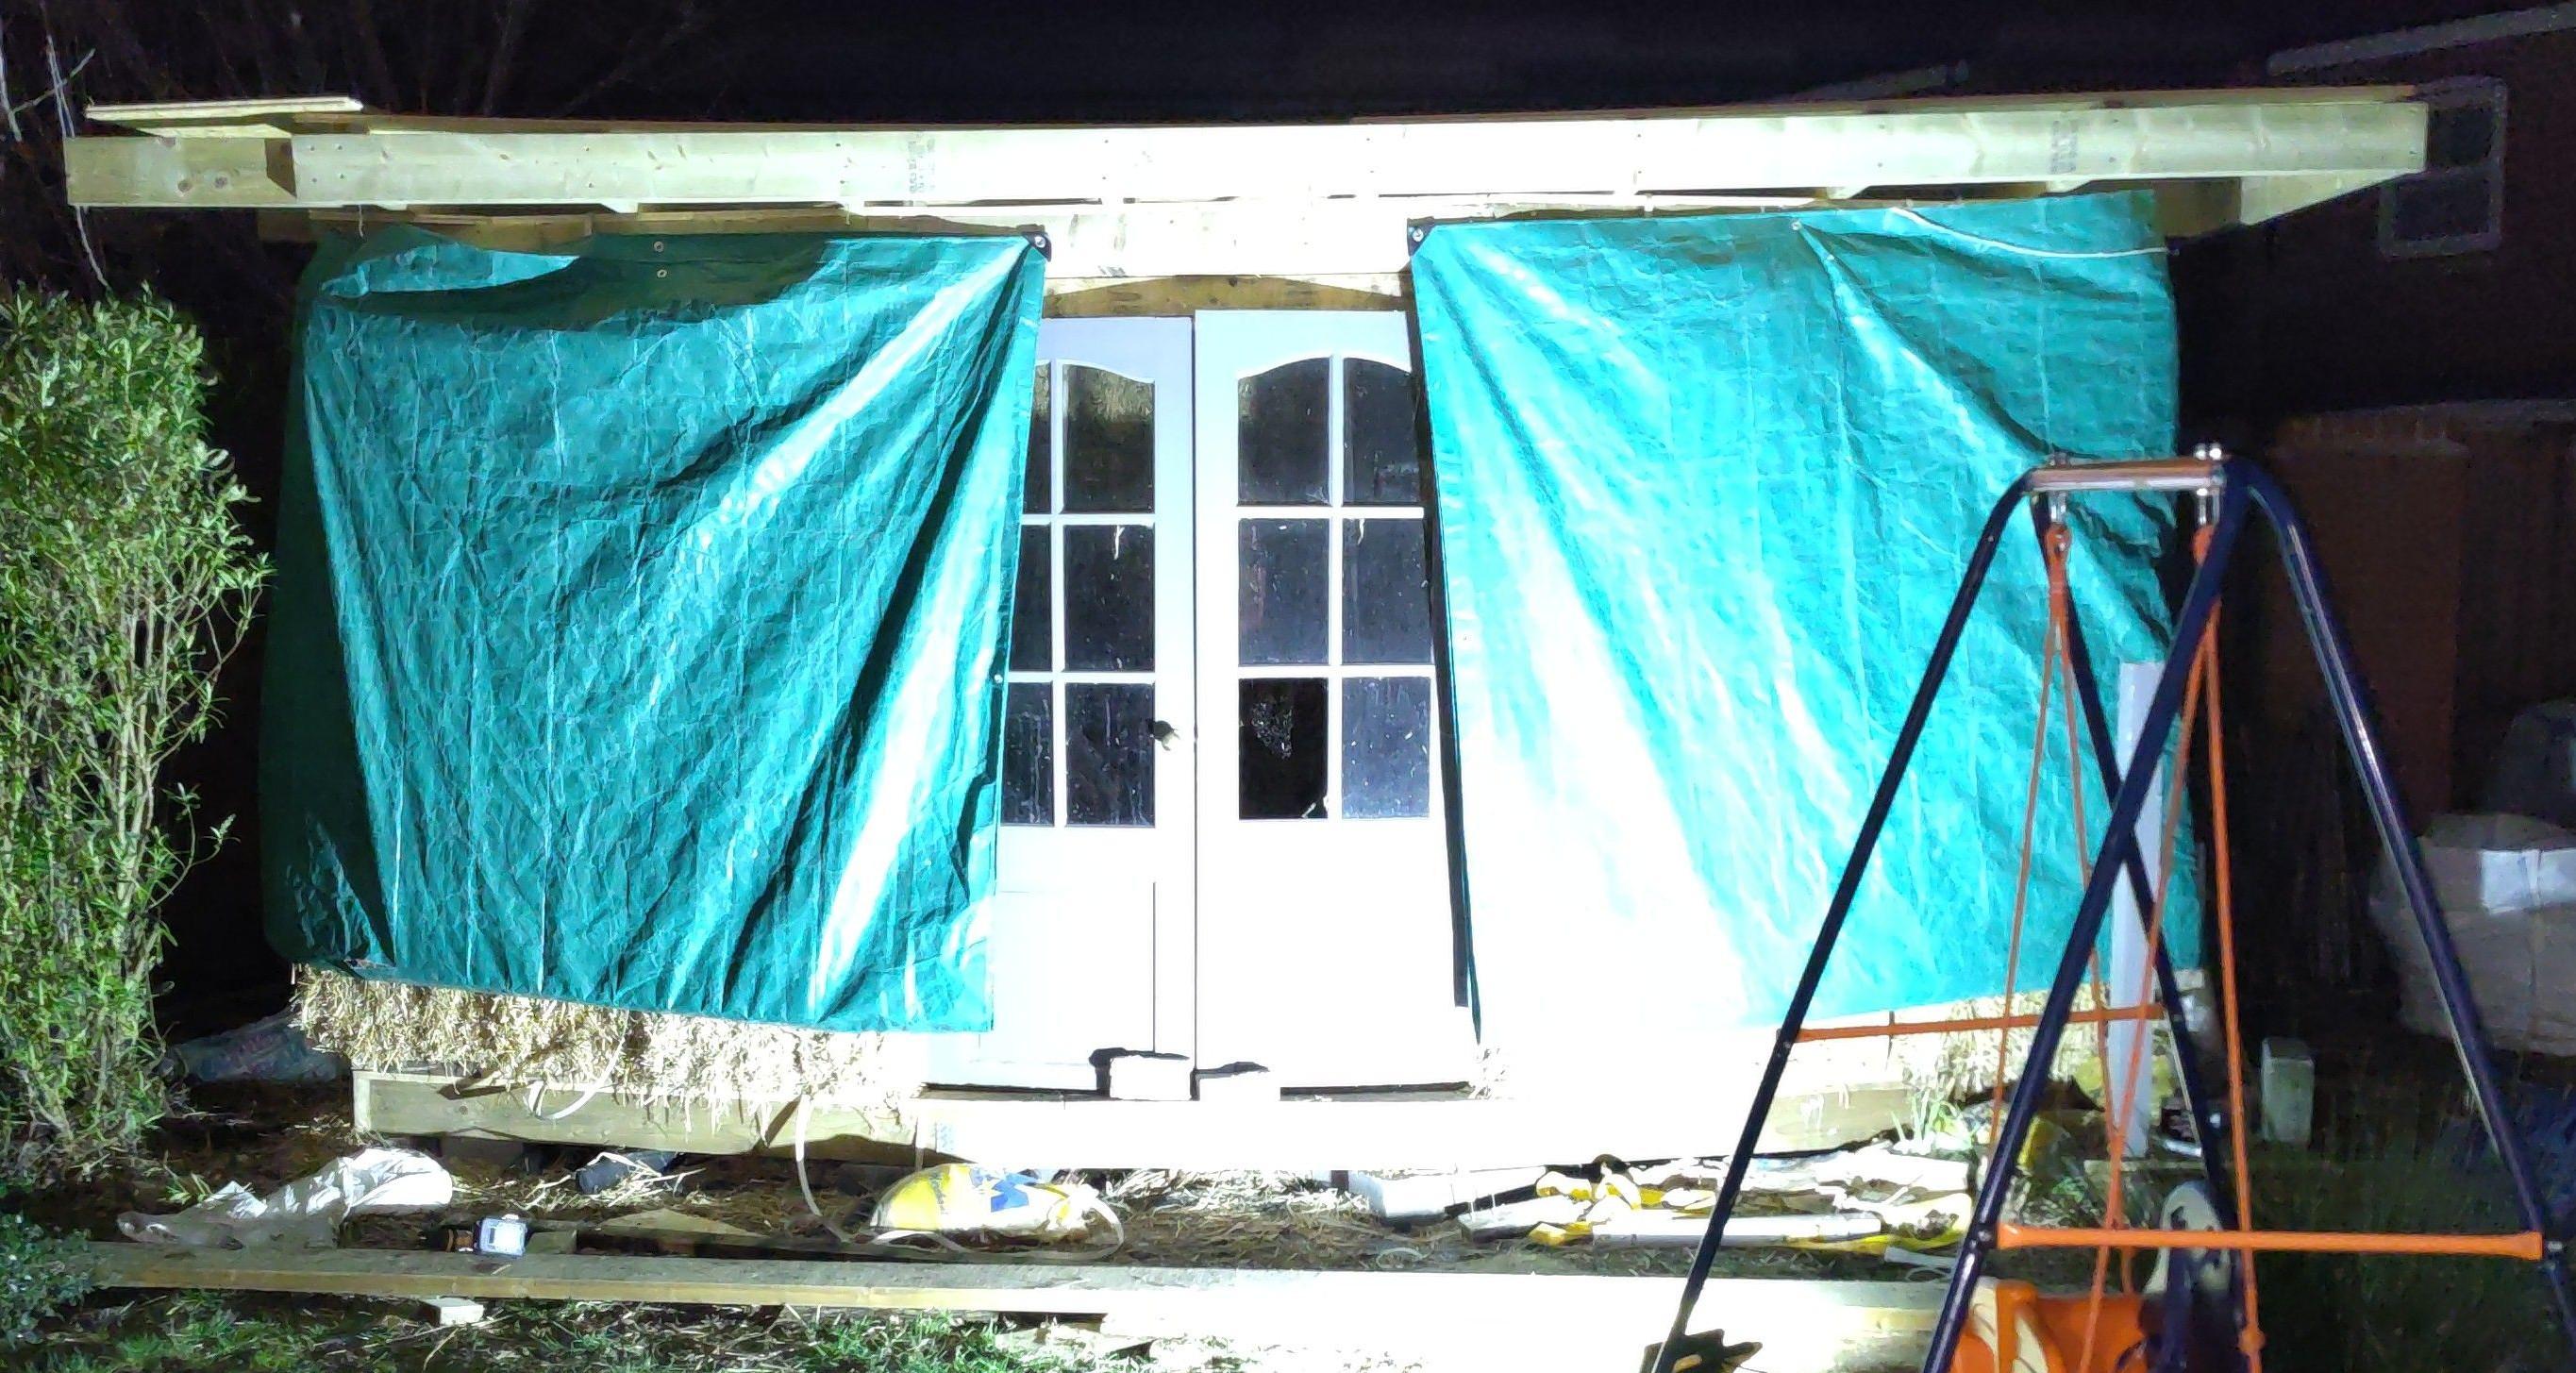
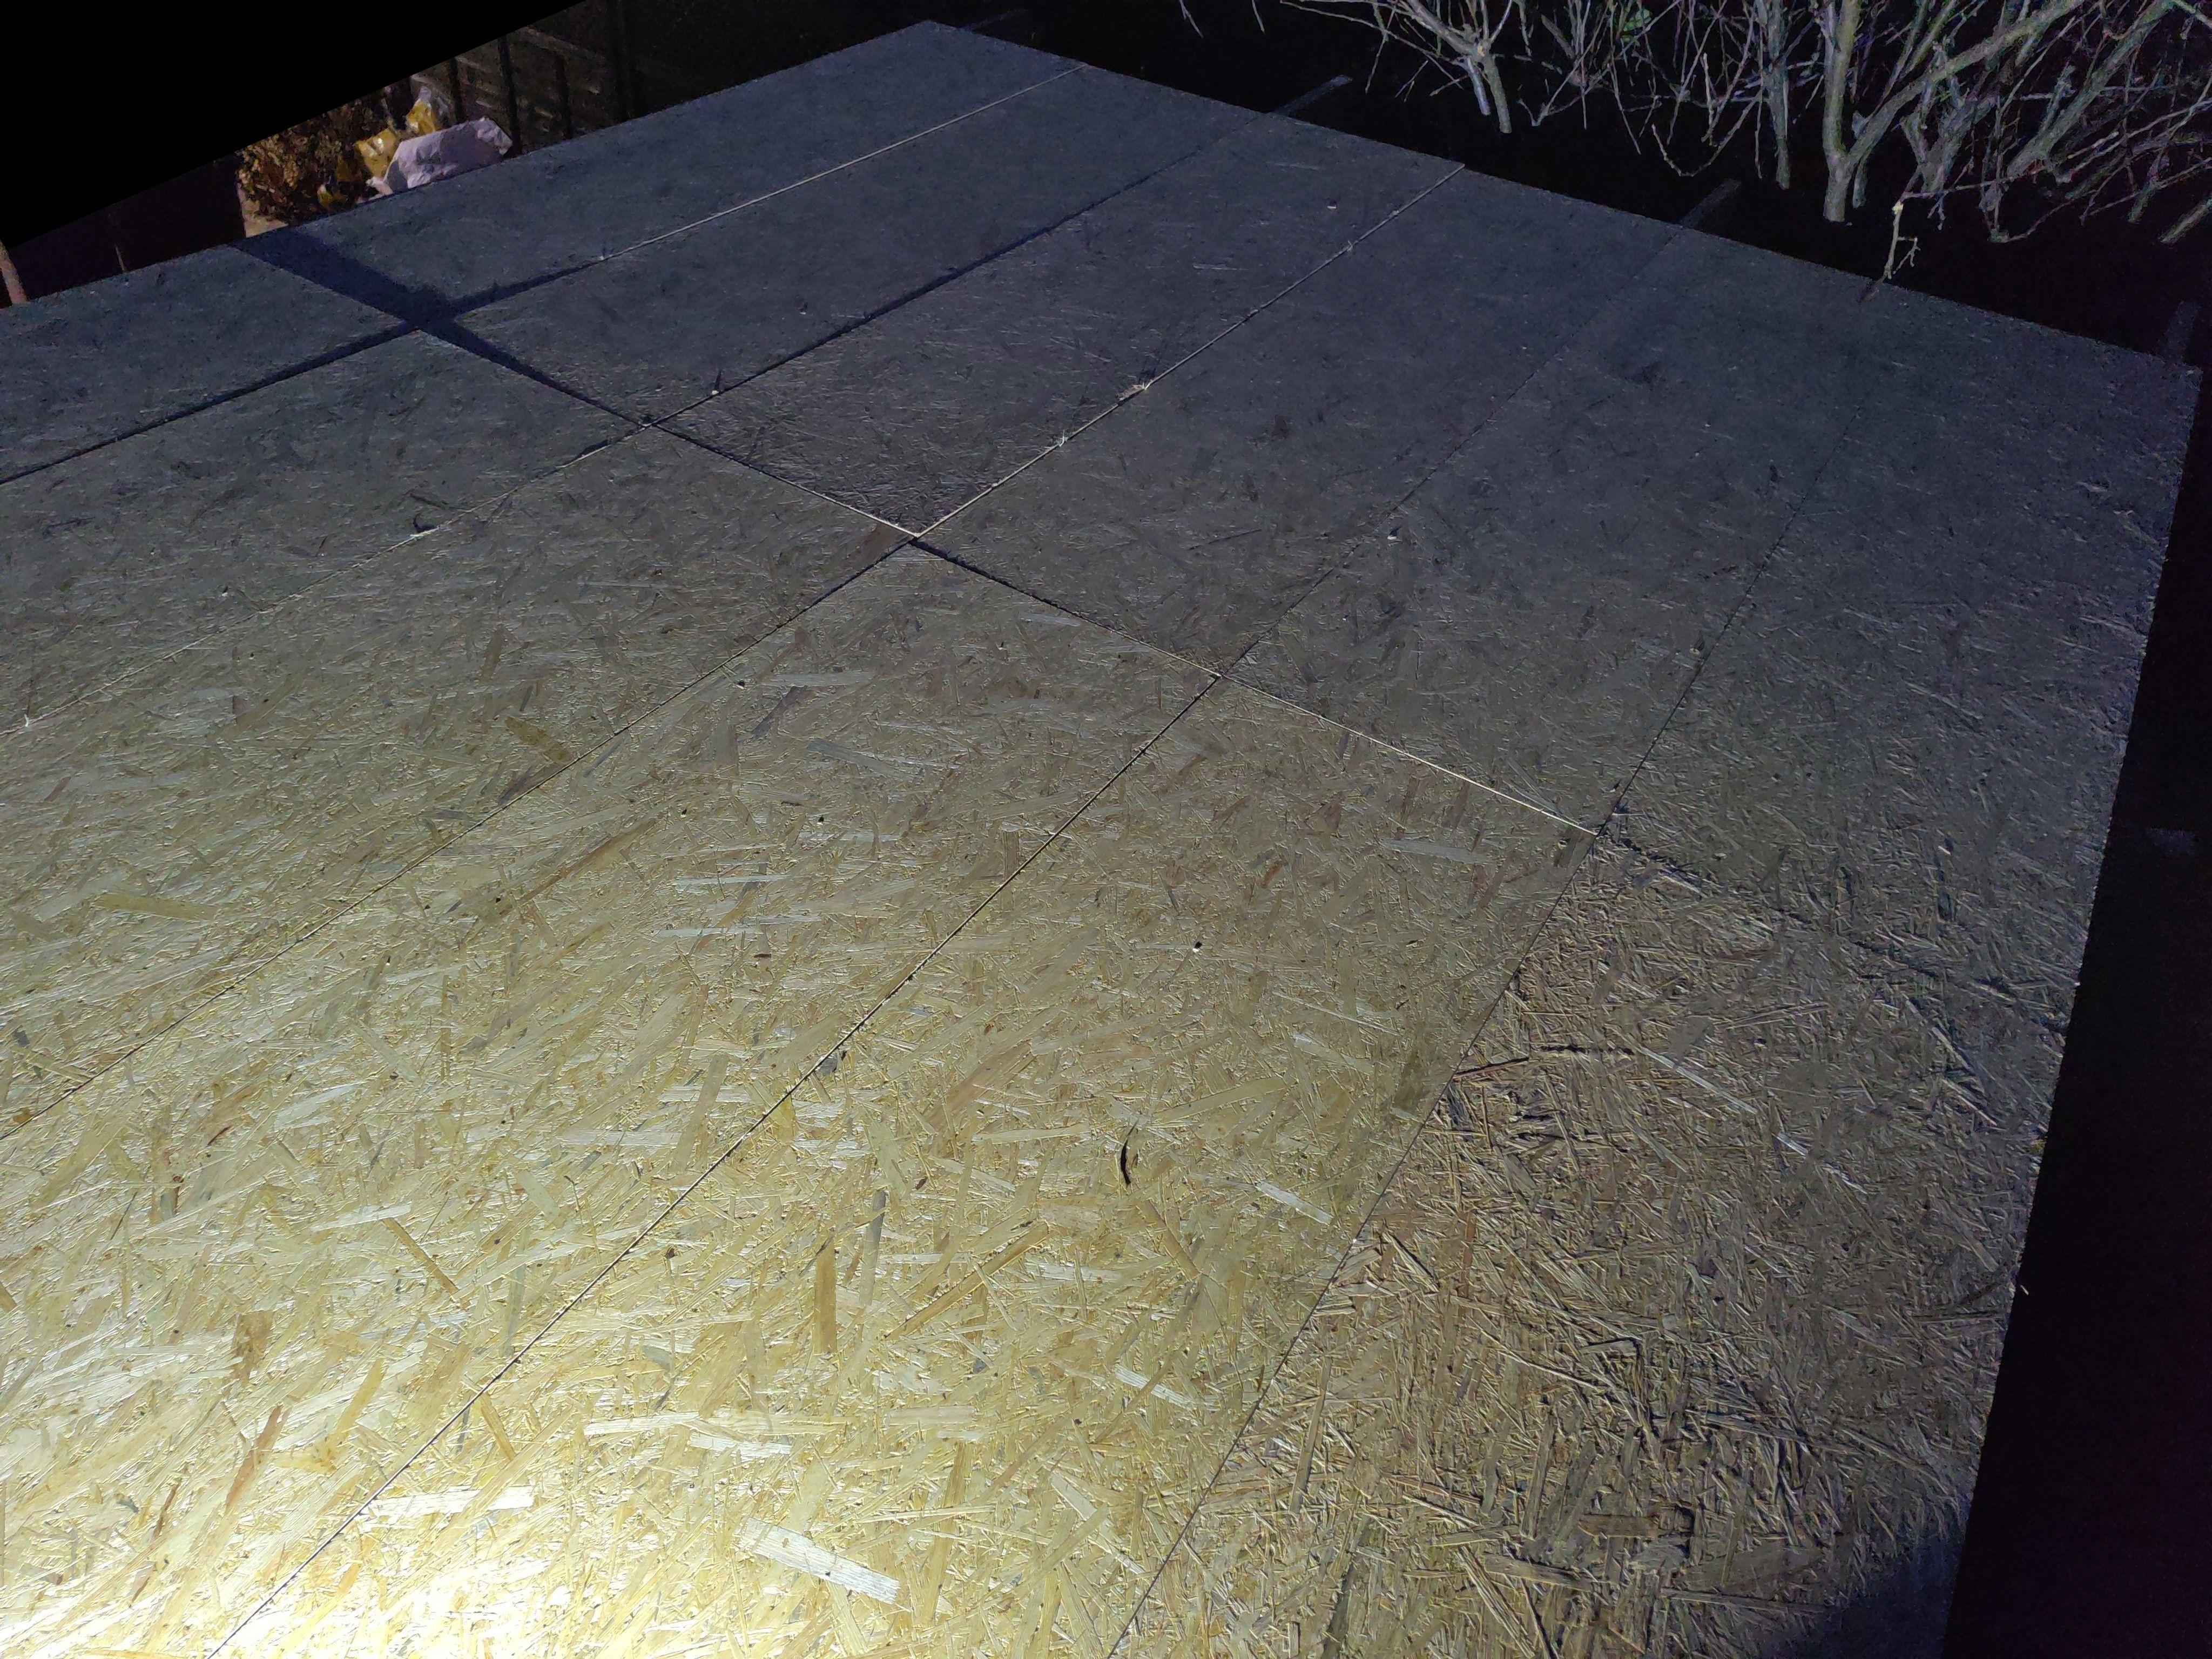
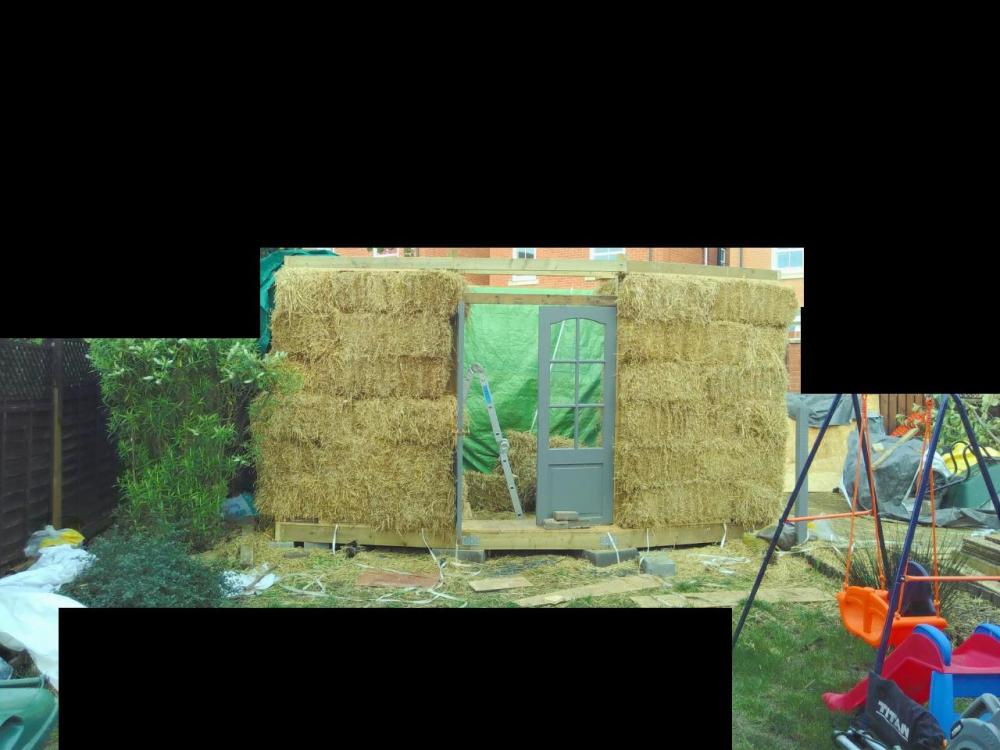
Bit of a winter, eh. Took the chance of a break in the weather this weekend to finish the roofplate and get (some of) a flat roof up there. Pics: Ended up working in the dark at the end, which was all sorts of fun. The OSB3 isn't glued&screwed properly yet, and I've got some wood of the structure left to do, but the tarping situation is much improved - two wrapped around, and one laid flat on top of the roof, since it's not quite watertight yet. Now there's space in the garage, I've placed an order for EPDM so should be able to finish the roof properly soon. The two wall-protecting tarps can stay like that until it's time to render, they're great. I've been a bit worried the whole time about how a square roof might look on top of the D-shape of the building, but it's coming across as quite cute in the end - to me, anyway. It's like a little guy with a big hat (and sleeves at the moment, too!) Managed to take a knock to the temple while building the roof though - screwing a short bit of wood below a joist to support another joist, holding it in place with my head to stop it from spinning round, I was getting frustrated and put the drill into reverse. So it spun around and clocked me one. No concussion, but a good reminder to slow down. More time, more people, maybe nails instead of screws for the final piece I need to get up in that way.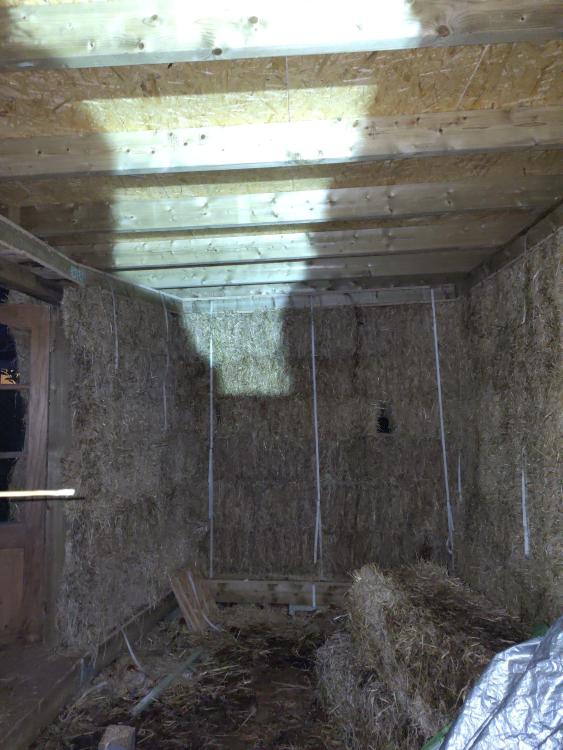

-
More foundation fun - straw bale garden room on clay
Nick Thomas replied to Nick Thomas's topic in Foundations
Oh hey. EPDM roof adhesive needs 5°C temperatures as well. That might end up being fun. -
More foundation fun - straw bale garden room on clay
Nick Thomas replied to Nick Thomas's topic in Foundations
Yeah, lateral compression does nothing. Took the wall down, trimmed some bales, put it back up, and now have a wallplate running all the way around: The bottom 3 bales on the SW corner could still be narrower, but it's not structurally fatal, and I'm pretty sure I can trim them back any time - so, on to compression: this little section of wall is separated from the rest by window and door, so makes a nice test bed. Even very light compression has turned it solid, but the more the better. I'd like to squash by at least 10cm so the straw is 2M high - but if I can get the wallplate parallel with the door header, even better. Wood for the roof has arrived, so I can get on with that once compression is done. I'd like it to have a waterproof roof on well before christmas, so I'm on a bit of a deadline now. Fortunately, the weather seems to be cooperating... all except for temperature. I'd been using D4 wood glue to put the wallplate together, but that says it doesn't work below 10°C. PU glue says it needs 5°C. Today was 3°C, so I ended up using some "sticks like sh*t" that claims to be fine down to -40 or so. Bit of a learning moment, and proof, if proof were needed, that I should've had this finished long ago.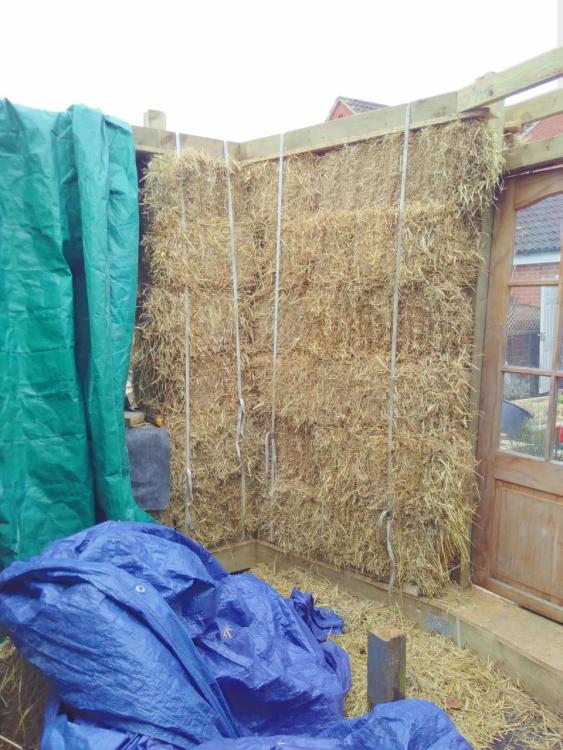
-
More foundation fun - straw bale garden room on clay
Nick Thomas replied to Nick Thomas's topic in Foundations
Welp, a week of big sighs. Got the two side sections of wallplate on and they demonstrated, rather clearly, that the walls weren't straight enough. Here's the SW corner: And the SE corner (fiddling a week later after sorting out the SW one): Fortunately, not fatal - I "just" have to take down bales, resize them, and restack until everything's within tolerance, which is about 5cm for quality load-bearing construction (at least, according to the Canadian building code. Might be able to get away with more than that, but I definitely can't get away with half the wallplate hanging in space). The usual way to keep this from happening is to put up some vertical timber braces at each corner and use them to guide you as you go up. Obviously, I didn't bother. Lesson learned 😅. I've sorted out the NW corner, at least in terms of how it kicked out W - it might still be too long, as the SE corner is, but I know it's not *as* bad, at least. Vaguely considering putting some of the strapping horizontally along the wall and compressing laterally, to see if that might straighten it all up, but that might be madness compared to just redoing it. Bleurgh. Chances of getting to the roof next week diminishing rapidly, anyway.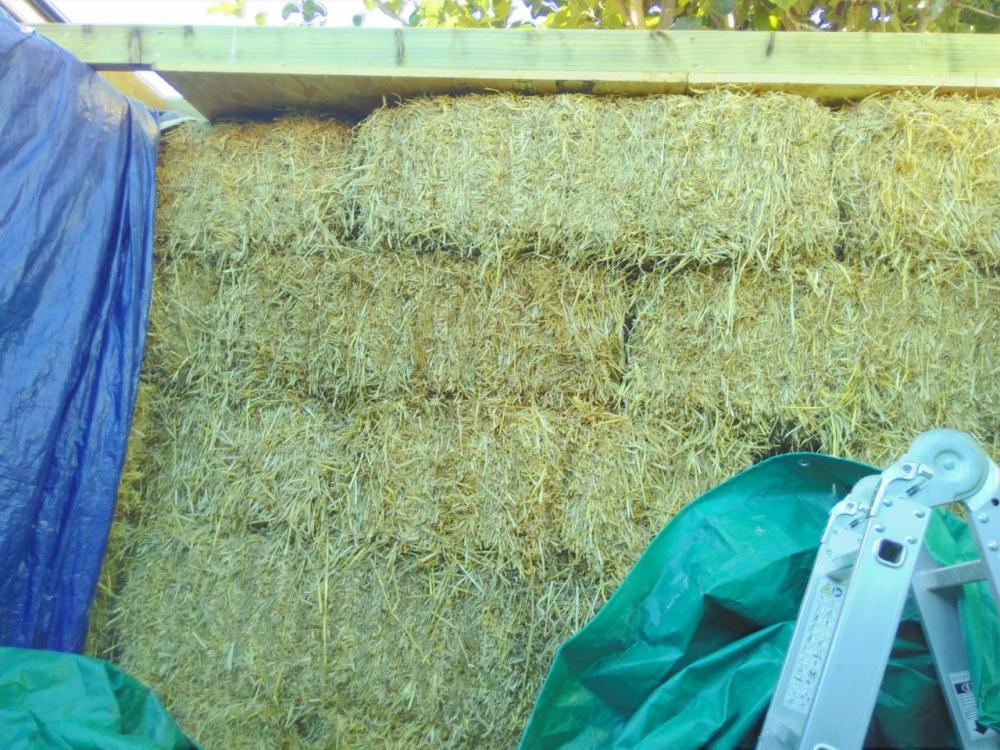

-
I'm not really set up to make long straight cuts. Although, since my wallplate is pretty wide (450mm), I did think last night that I could apply firrings to the bottom, rather than the top, of the joists, just where they meet the wallplate. 10x450mm cuts to get 20 bits of wood seems doable enough with the circular saw. The only downside I can see is that the underside of the joists would be sloped as well as the top - a bit unusual, but not the end of the world, unless it allowed water to run intp the building from the high side 🤔 If this place gets back to me with cheap delivered firrings, I'll just go with that, though. I've self-imposed a deadline for getting the roof finished, so there is a bit of a time crunch ^^.
-
So what's the market for these tapered boards if they're so uneconomic compared to firrings? I don't get it. If they were half-to-a-quarter of the price, I'd snap them up. In my head, they make them by squirting foam into a mould... it can't be that much more expensive to have the mould be wedge-shaped rather than square, can it? Or do they make giant cubes of the stuff before slicing it?
-
Still waiting to find out what the locals can do it for, but yeah, I'm getting that sort of price from various online places that won't deliver to me.
-
I'm close to being able to pop a roof on my garden room now, so starting to price up options for a 4.8x3.6M flat roof, which I think is the best I can do this year. Currently thinking a cold deck, uninsulated, perhaps adding insulation below the joists later, preserving ventilation. Getting the fall on the roof is irritating me, though. Managed to find a local-ish supplier of firrings, and waiting to hear back from them with a price for 10x3.6M firrings to run along the top of the joists, but the timber bill already has my eyes watering a bit, honestly. Hunting for alternatives I came across this seeming magic: https://ukflatroofing.com/tapered-insulation-boards - anyone used it? Thoughts good or bad? Is it OK to walk on after laying? Cheaper suppliers? I couldn't find a mention of tapered insulation on previous buildhub posts. The price from this lot does feel unattractive - I'd need 12 boards, 4 each of different heights. Say https://ukflatroofing.com/kingspan-tt46/ecotherm-ecofix-tapered-foil-faced-pir - they'd want £308 + £247 + £277 = £832, with a couple of sheets wasted. 100mm regular PIR to cover the same area is a third of that - I can't see any world where adding the firrings pushes it over to being the cheaper option?
-
If it's plumbed in an "S plan" and you have both heating and hot water on at the same time, heat will be robbed from the cylinder to power the central heating. Mine is plumbed like this, and it's quite annoying - but apparently it's not "wrong", just not ideal. The solution when it's like this is to just ensure heat and hot water are never scheduled at the same time. If that's already the case for you, it'll be something else - pics of the cylinder and plumbing might help someone who knows more about plumbing than me (not hard!) to work out what.
-
Oh yeah, it's been around for a while. At around 2:30 you get a quick look at the actually interesting part of the system - "B-CORE": http://en.broad.com/ProductShow-76.aspx . It's not shipping containers stacked on top of each other, in short.
-
Farmers know how to recycle
Nick Thomas replied to nod's topic in General Self Build & DIY Discussion
It gets rid of the paper. If you got it really hot, conceivably you'd get lime out of it which would increase soil alkalinity. I'm not recommending it, mind 😅 -
More foundation fun - straw bale garden room on clay
Nick Thomas replied to Nick Thomas's topic in Foundations
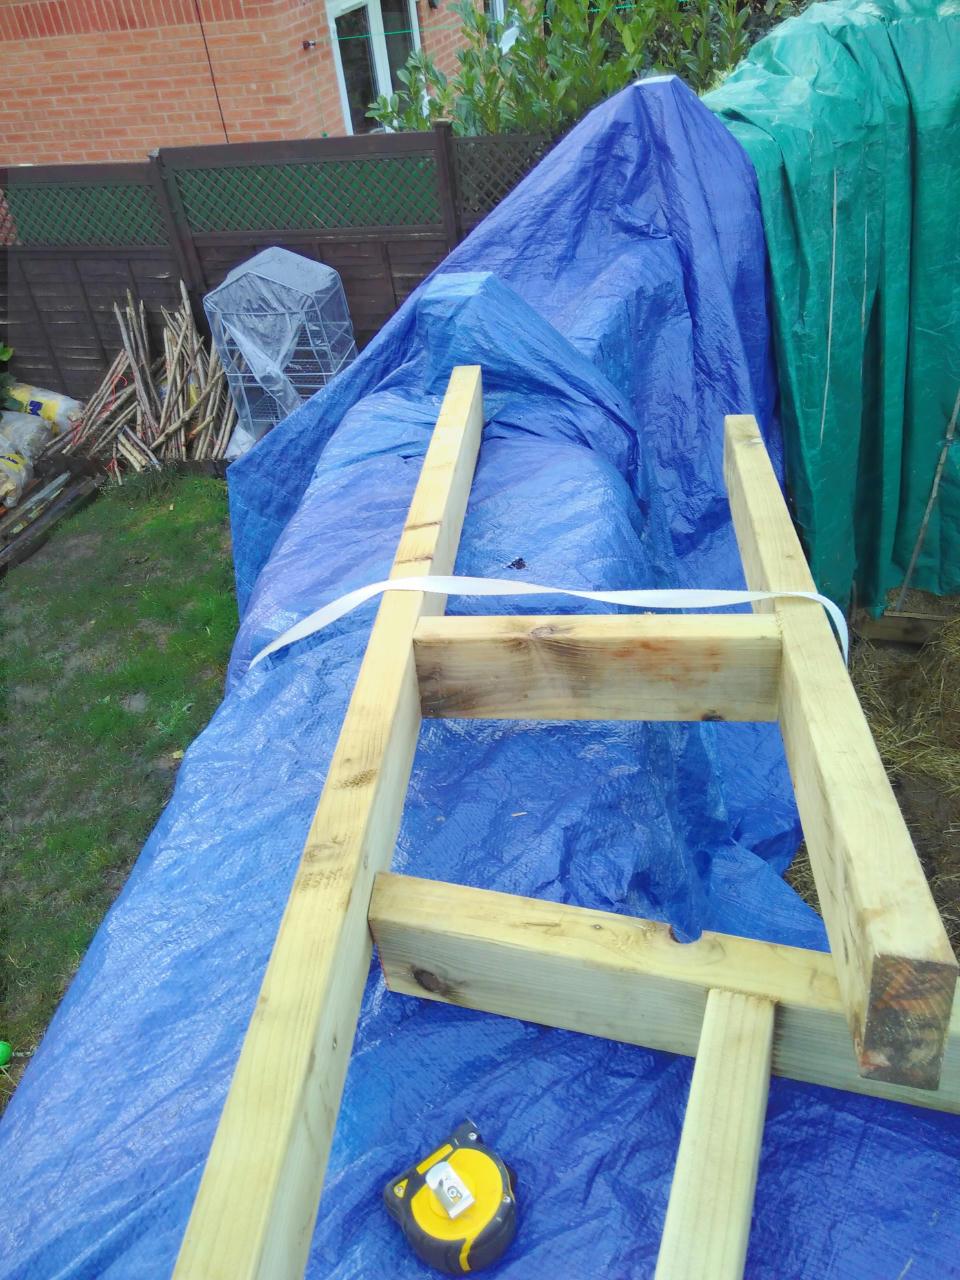
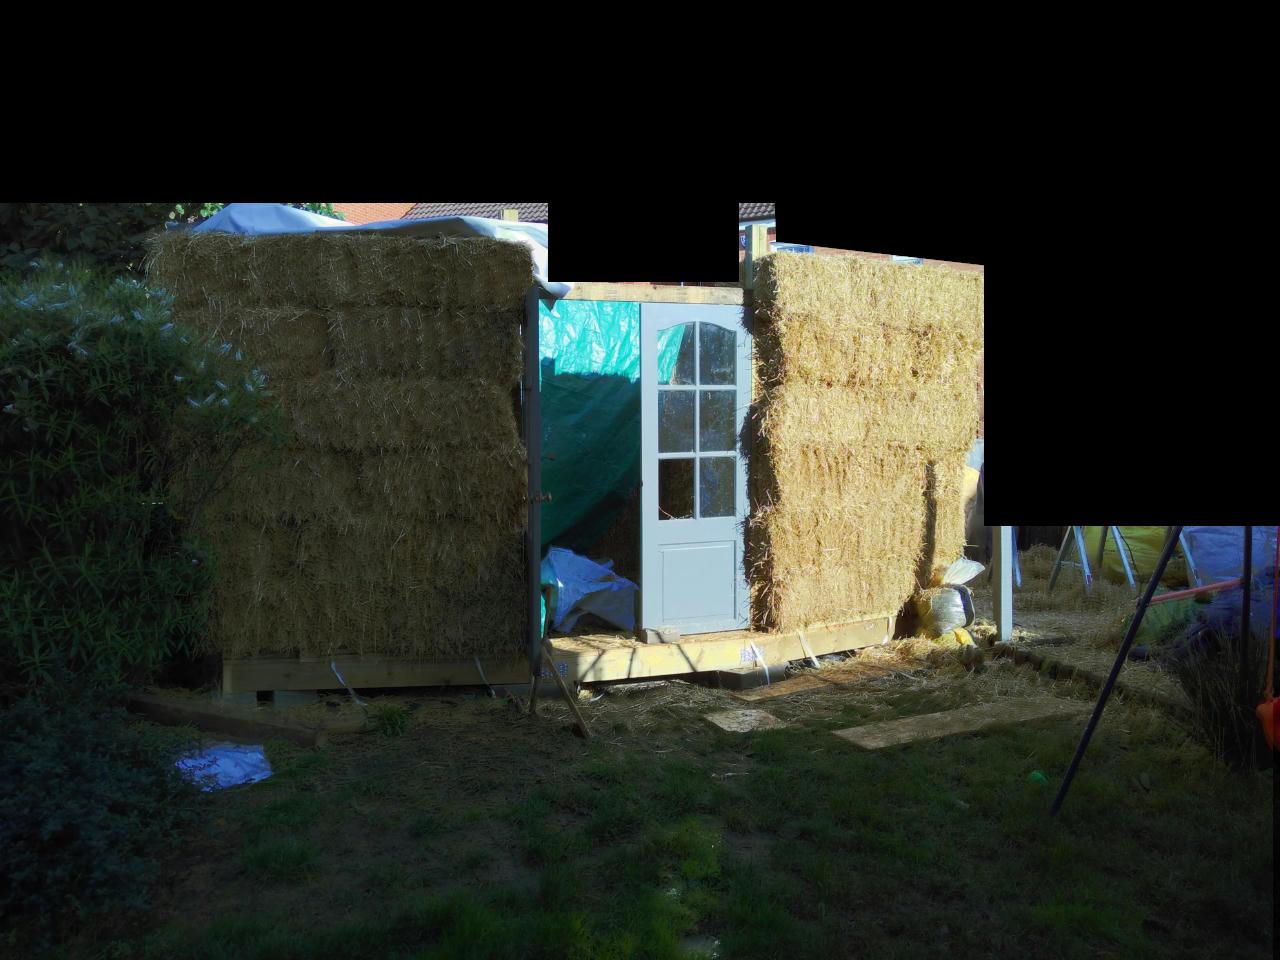
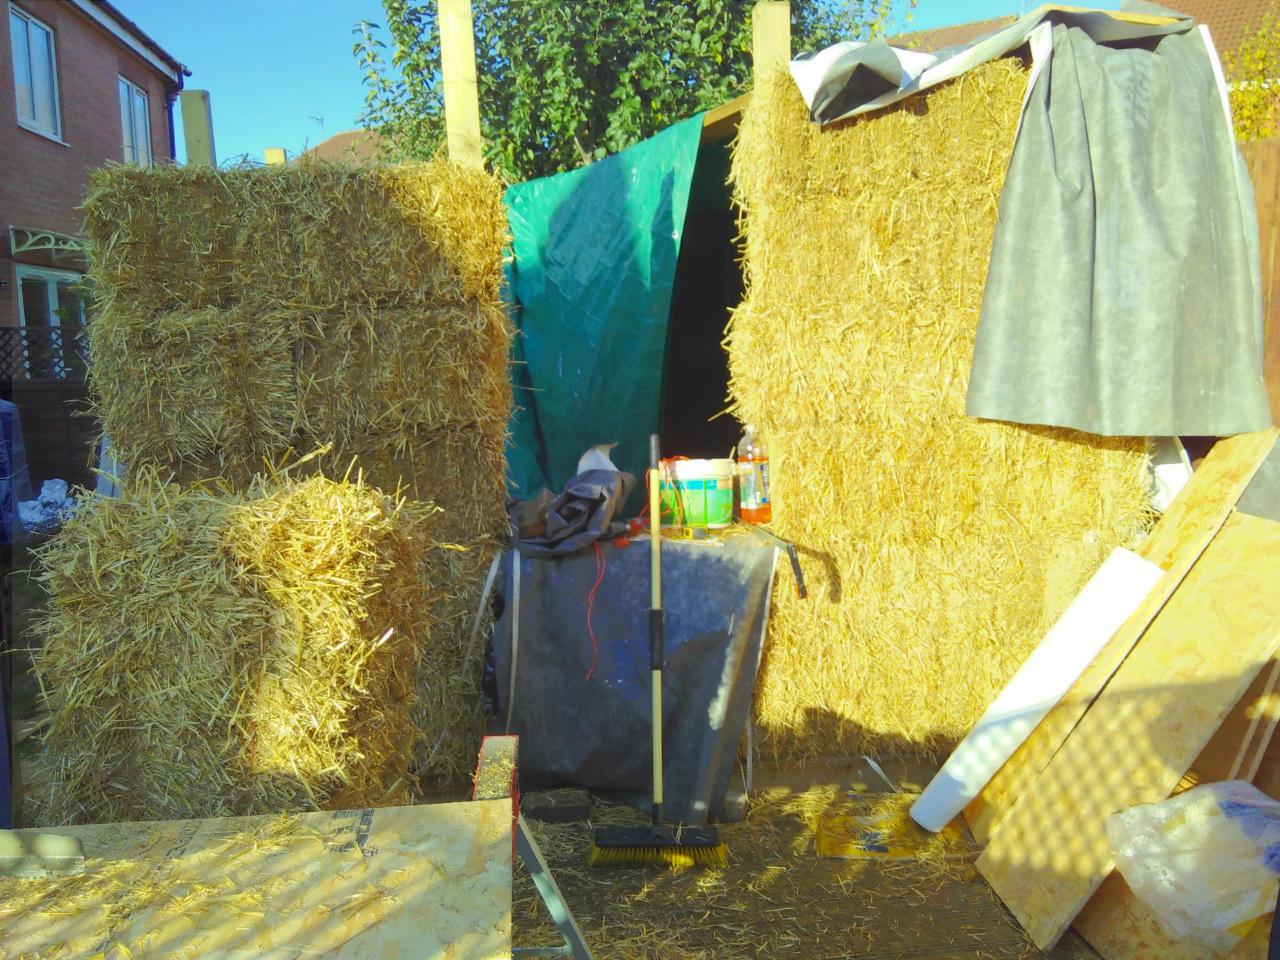
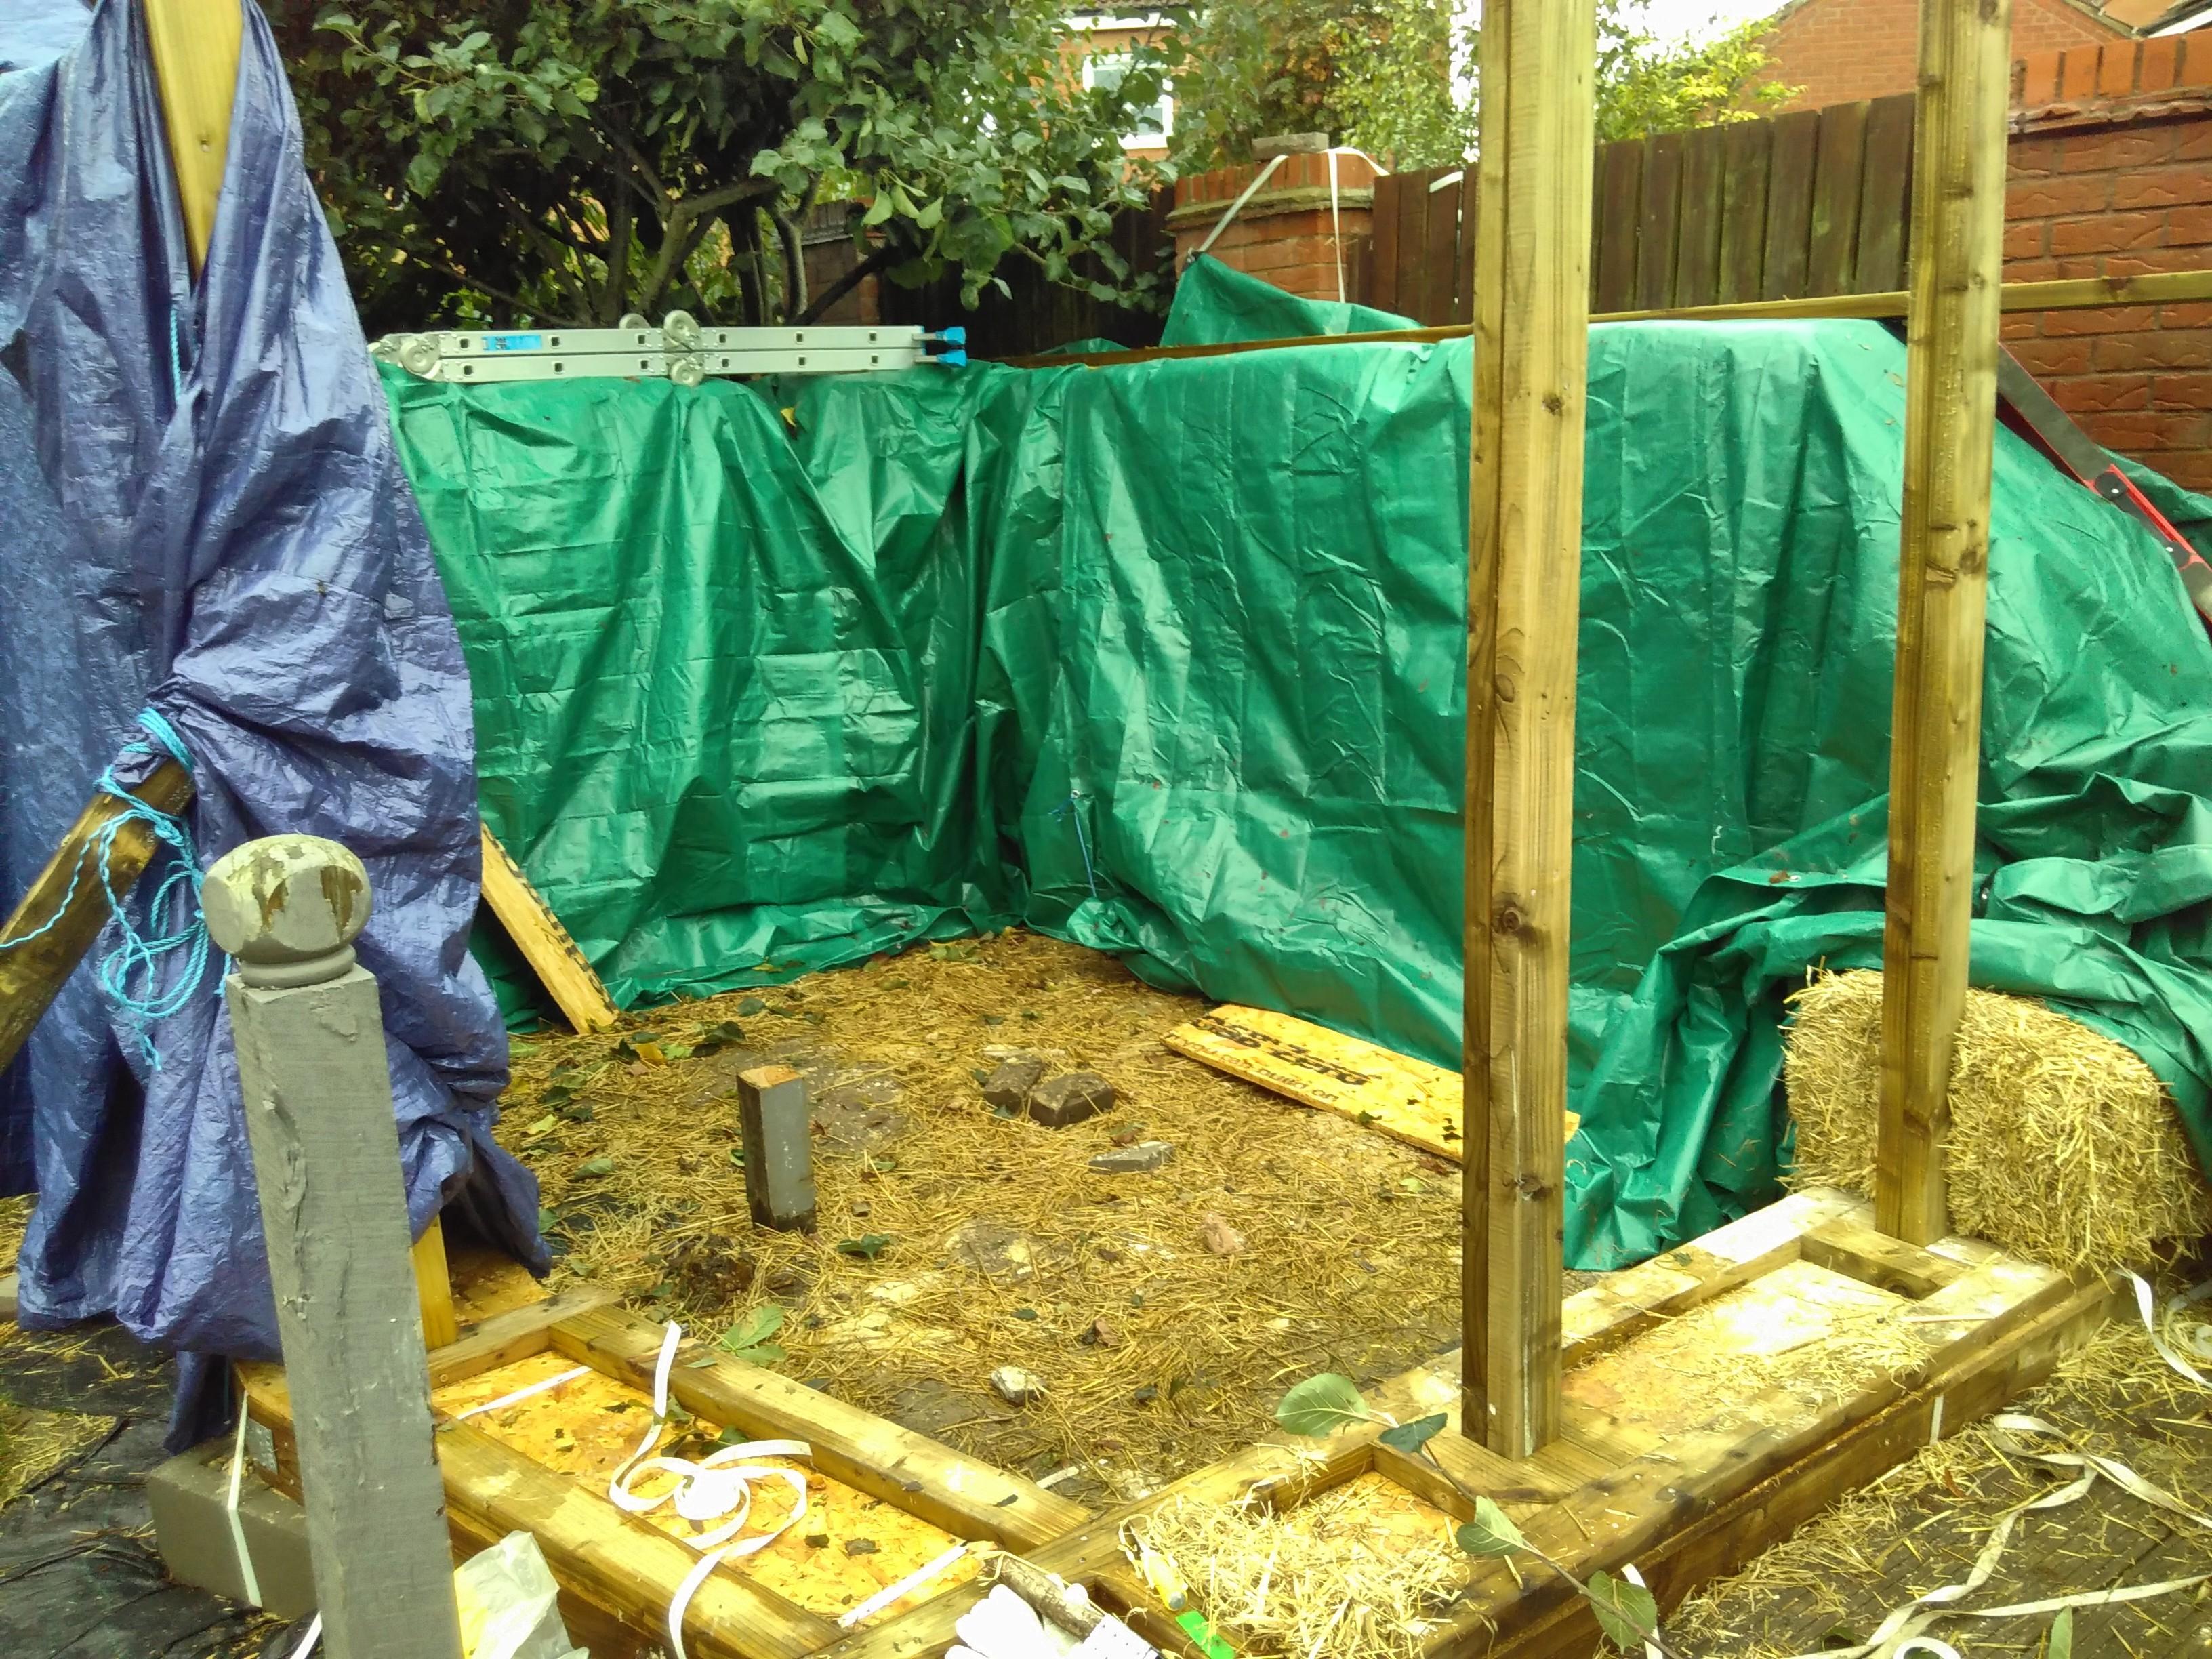
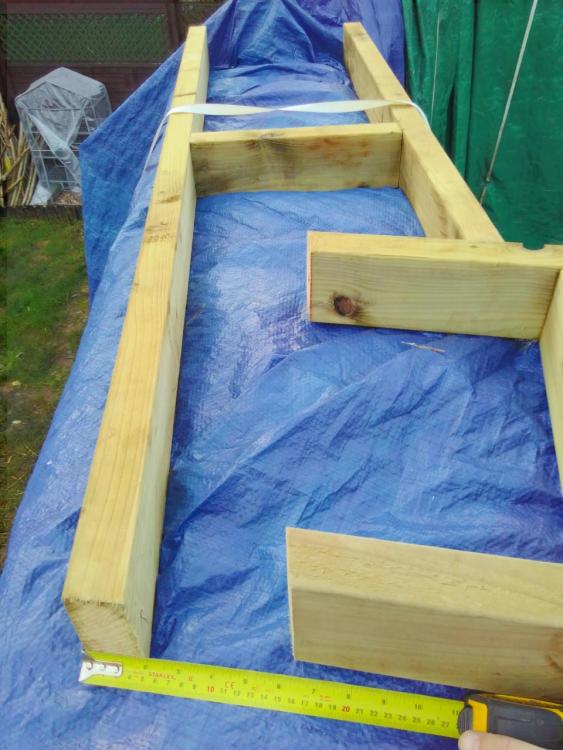
Been a while since my last update - lots of rain. We had a clear few days this weekend though, and I managed to make some progress. -> (scuse censorship; imagine it's a starry night sky) That's all the bales up now, although I'm eyeing the left corner a bit unfavourably; I *think* it's OK but there's a bit of an overhang situation going on, and the fourth course particularly is dodgy. Worst case, I'll have to take it down and re-size a few bales, but it might be within trimming range in-situ. Worth a try, anyway. Similar for around the door and window posts - they get vigorously trimmed before the lime plaster goes on, which should improve how it looks significantly. There are still 24 bales in the garage - so I over-ordered by about a third. I've got some wall-shaped projects in mind for them come spring, though, they won't go to waste. Next is the wallplate/roofplate - just another timber box beam round the top of the bales, only harder because it's more than two metres up ^^. I got the back wall section put together today, and it's up there - weight was a problem so I ended up doing the timber ladder on the ground (40kg?), getting that up, cladding it with the OSB (30kg/side?) then flipping it so that side was on the bottom. A bit sketchy, honestly. The remaining sections are shorter, so I might be able to get more done on the ground for them. Regretting not at least cutting the timbers back when I had access to the baseplate now, of course, but if I'd spent time on that back then, I might still have straw to do now. I've explored the hip roof idea a bit more but increasingly feeling like I just don't have the vertical space for it. So probably a flat roof over winter, keep an eye on it , maybe explore guy ropes if we get any wind forecasts above 80mph. The roof deck *looks* simple enough, timber-wise - 2x5 joists, use firrings to get the fall, T&G OSB on top of that and finish with EPDM. Maybe add insulation under the joists later. More rain is forecast, but the walls are all tarped up and should be fine like that indefinitely. I can build the rest of the bits of wallplate in the half-empty garage and uncover one wall at a time whenever there's a clear moment to put one up.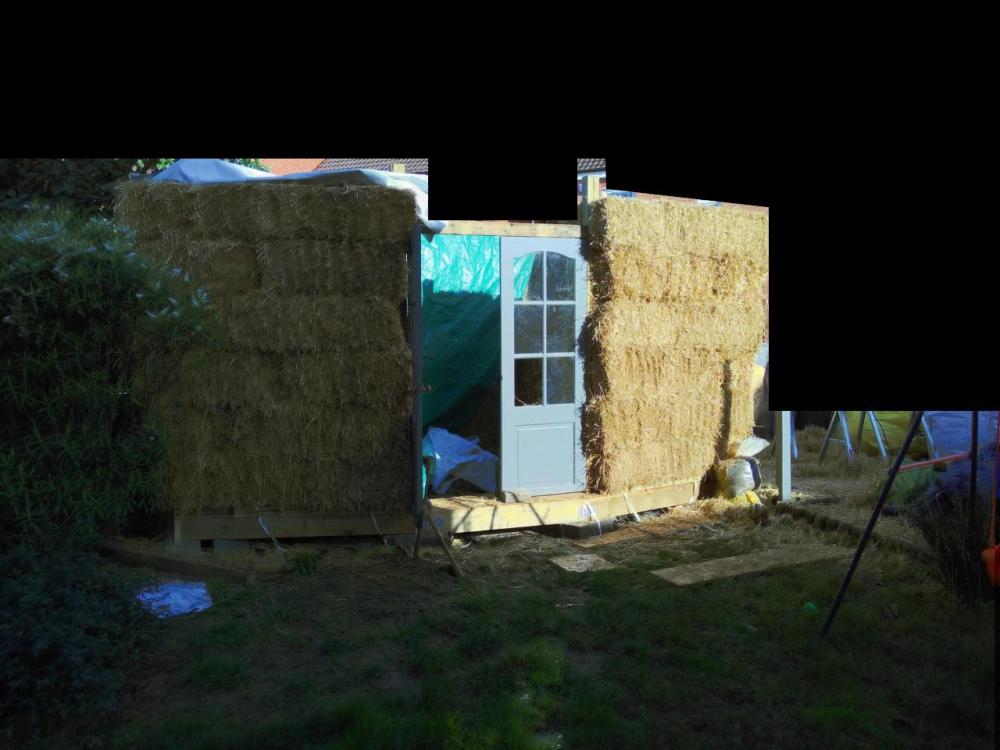

-
More foundation fun - straw bale garden room on clay
Nick Thomas replied to Nick Thomas's topic in Foundations
Welp, storm babet has been and gone and it's all still standing.We got winds of ~50mph and plenty of rain, but it wasn't particularly noticeable in the garden - it really is sheltered. Got to four bales high on the bit I've been working on, drove those hazel spikes in, then got it all tarped up. Once the storm passed, I got the uprights for the window in, and (no pic of this) got the first bale down between them. Lots of notching. Managed to pick up an alligator saw cheaply, which is helping a lot with that part. Plan now is to get the rest of the walls up to four high and staked; get the windows in; then build the wallplate while the top of the wall is still fairly accessible. Ideally you do it while the floor plate is still accessible so you can use it as a template, but I was pretty tired of wood at that point ^^. I've got the dimensions written down somewhere. Once that's ready, I can haul up the bales for the final two courses; wallplate on; compress; build the roof; re-compress; build the floor. Then in spring, lime render inside and out. Pics - two before the storm, one after: The gap in the fourth course on the west side is *hopefully* going to turn into my bubble window, with a lot of shaping. I expect it'll be porthole-sized by the time I'm done.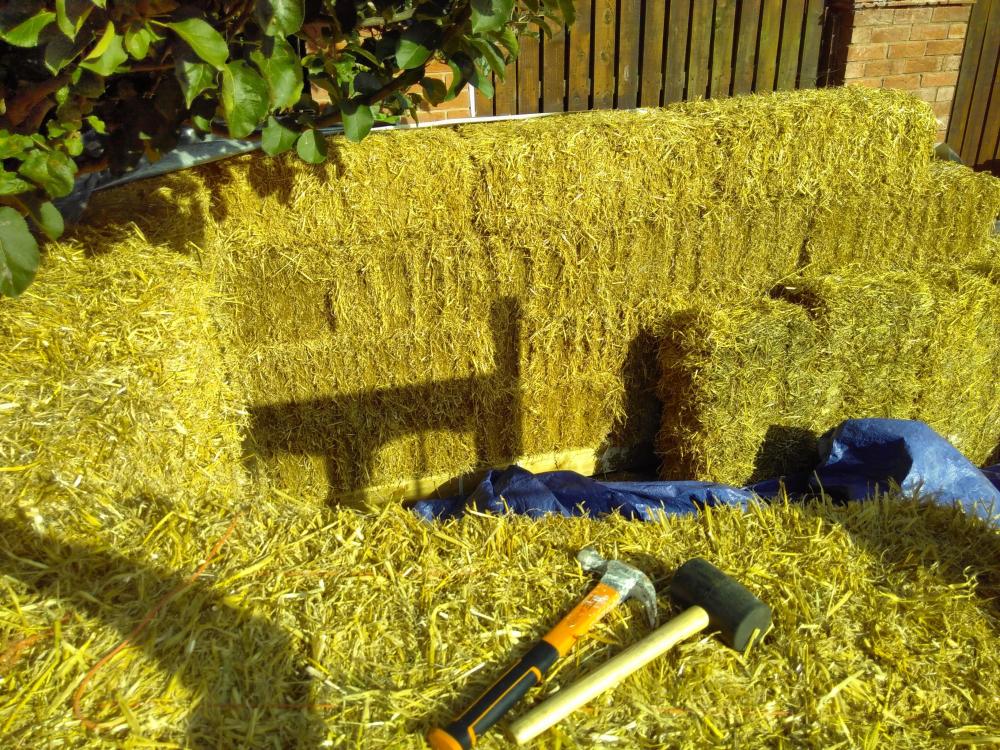

-
This is not news to most of us on here
Nick Thomas replied to Buzz's topic in General Self Build & DIY Discussion
Took me a while to realise the illustrated house was not a photo, honestly -
More foundation fun - straw bale garden room on clay
Nick Thomas replied to Nick Thomas's topic in Foundations
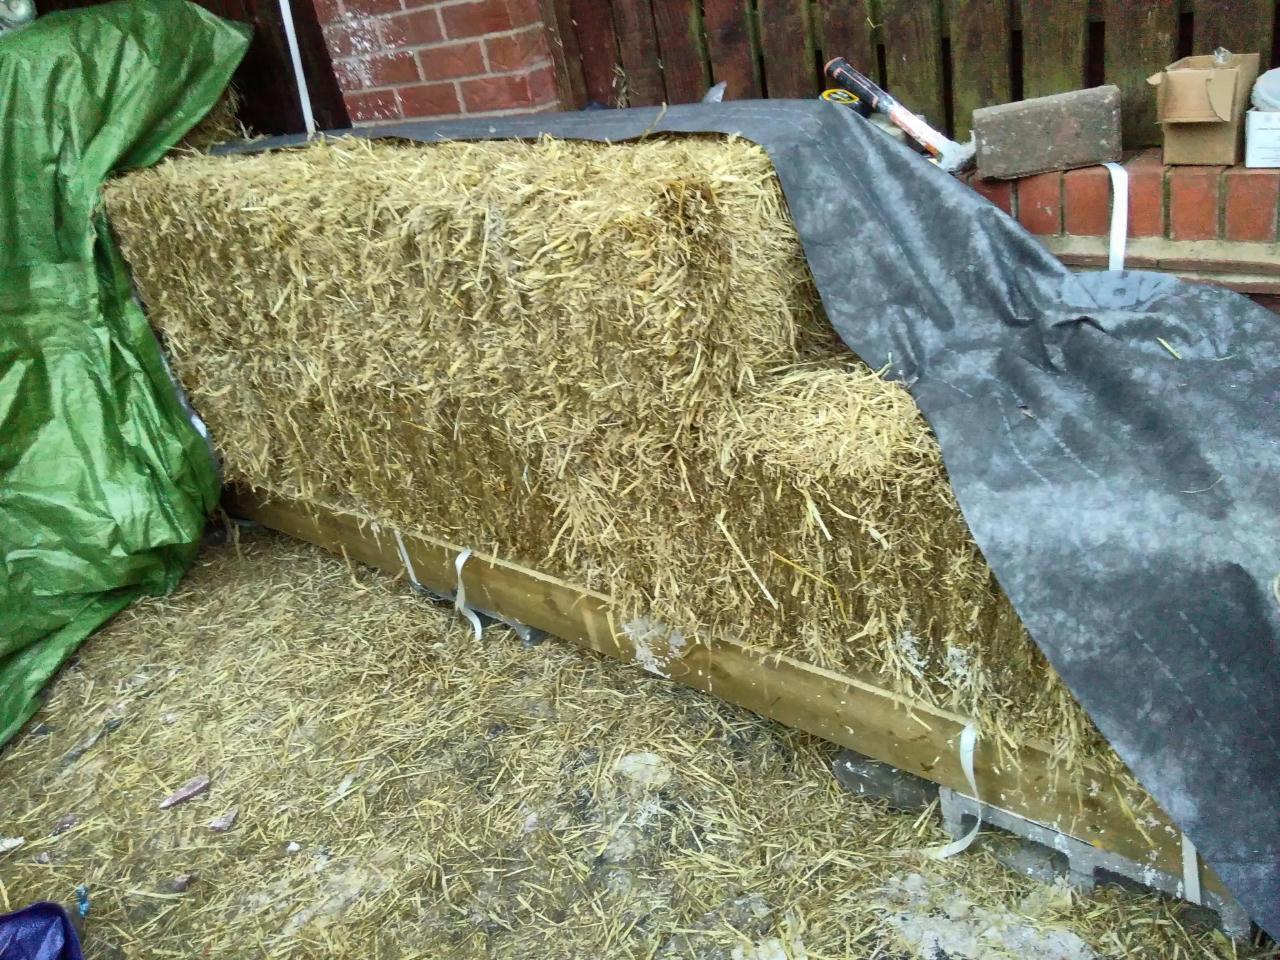
Maybe I can train some mice to carry the mesh down the hole for me. In theory I can just lower a 4.5M strip of the stuff down the cavity once the wall is complete to protect the bottom, then put some up at the east and west edges, but I'm pretty sure the implementation is going to be a pain ^^. Everything about this brick wall is, honestly. Paddle mixer arrived, so I got a fair bit more done along that brick wall - The membrane is going in longwise, lapped in every two bales (they're 350mm high, the membrane is 1M wide, so it works out nicely. The packing straps, once tightened, and with a lot of gentle tugging either side of the building before it's secured permanently, should hold it taut against the bales, keeping the cavity clear. This bottom strip of it will need its height adjusting so it's not baggy around the bottom of the straw post-compression, which will be faffy, but doable. Originally I was going to have 5x2M strips going vertically, but that seemed even more faffy. Pretty sure the lime won't cure properly - we're late in the season for it and it's a pretty wet mix that's being denied further water - but its main job is to make the outermost layer of straw unpalatable, and I reckon it'll manage that. Will probably give it a miss for the top 2-3 courses. Sunny weekend coming up, and I've got a friend round to help, so hopefully we can make decent progress on it together.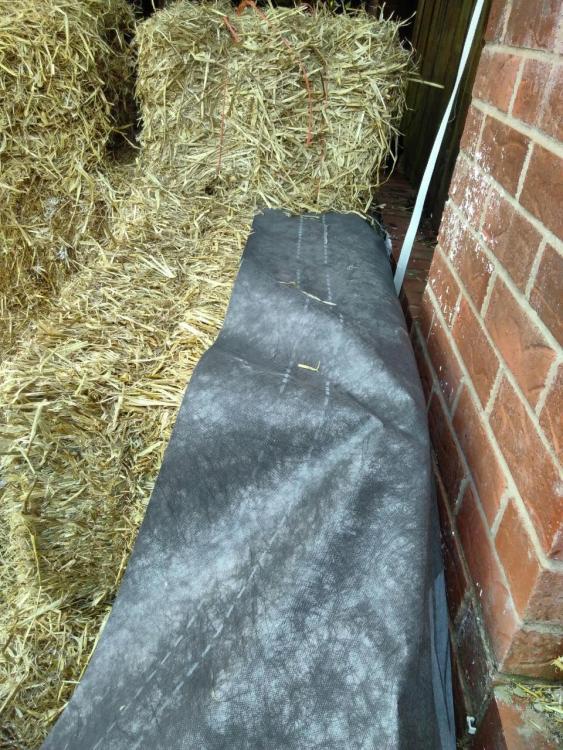

-
Any YIMBYs on here? Keir Starmer is.......
Nick Thomas replied to ToughButterCup's topic in Planning Permission
Sane urban planning, one imagines. -
Any YIMBYs on here? Keir Starmer is.......
Nick Thomas replied to ToughButterCup's topic in Planning Permission
Something like 5% of the UK is built on. France is a bit less at ~4%; Germany a tiny bit higher at ~6%. Japan is close to 8% and the Netherlands is more like 14%. Be bold, double provision. Think of the jerbs it'd provide. -
Any YIMBYs on here? Keir Starmer is.......
Nick Thomas replied to ToughButterCup's topic in Planning Permission
Quite a few years ago now, I lived somewhere that was getting a large housing estate built directly behind my back garden. The lib dems came a-knocking with a petition to get it stopped and just could not comprehend the idea that I was actually in favour of it being built. Poor souls. -
More foundation fun - straw bale garden room on clay
Nick Thomas replied to Nick Thomas's topic in Foundations
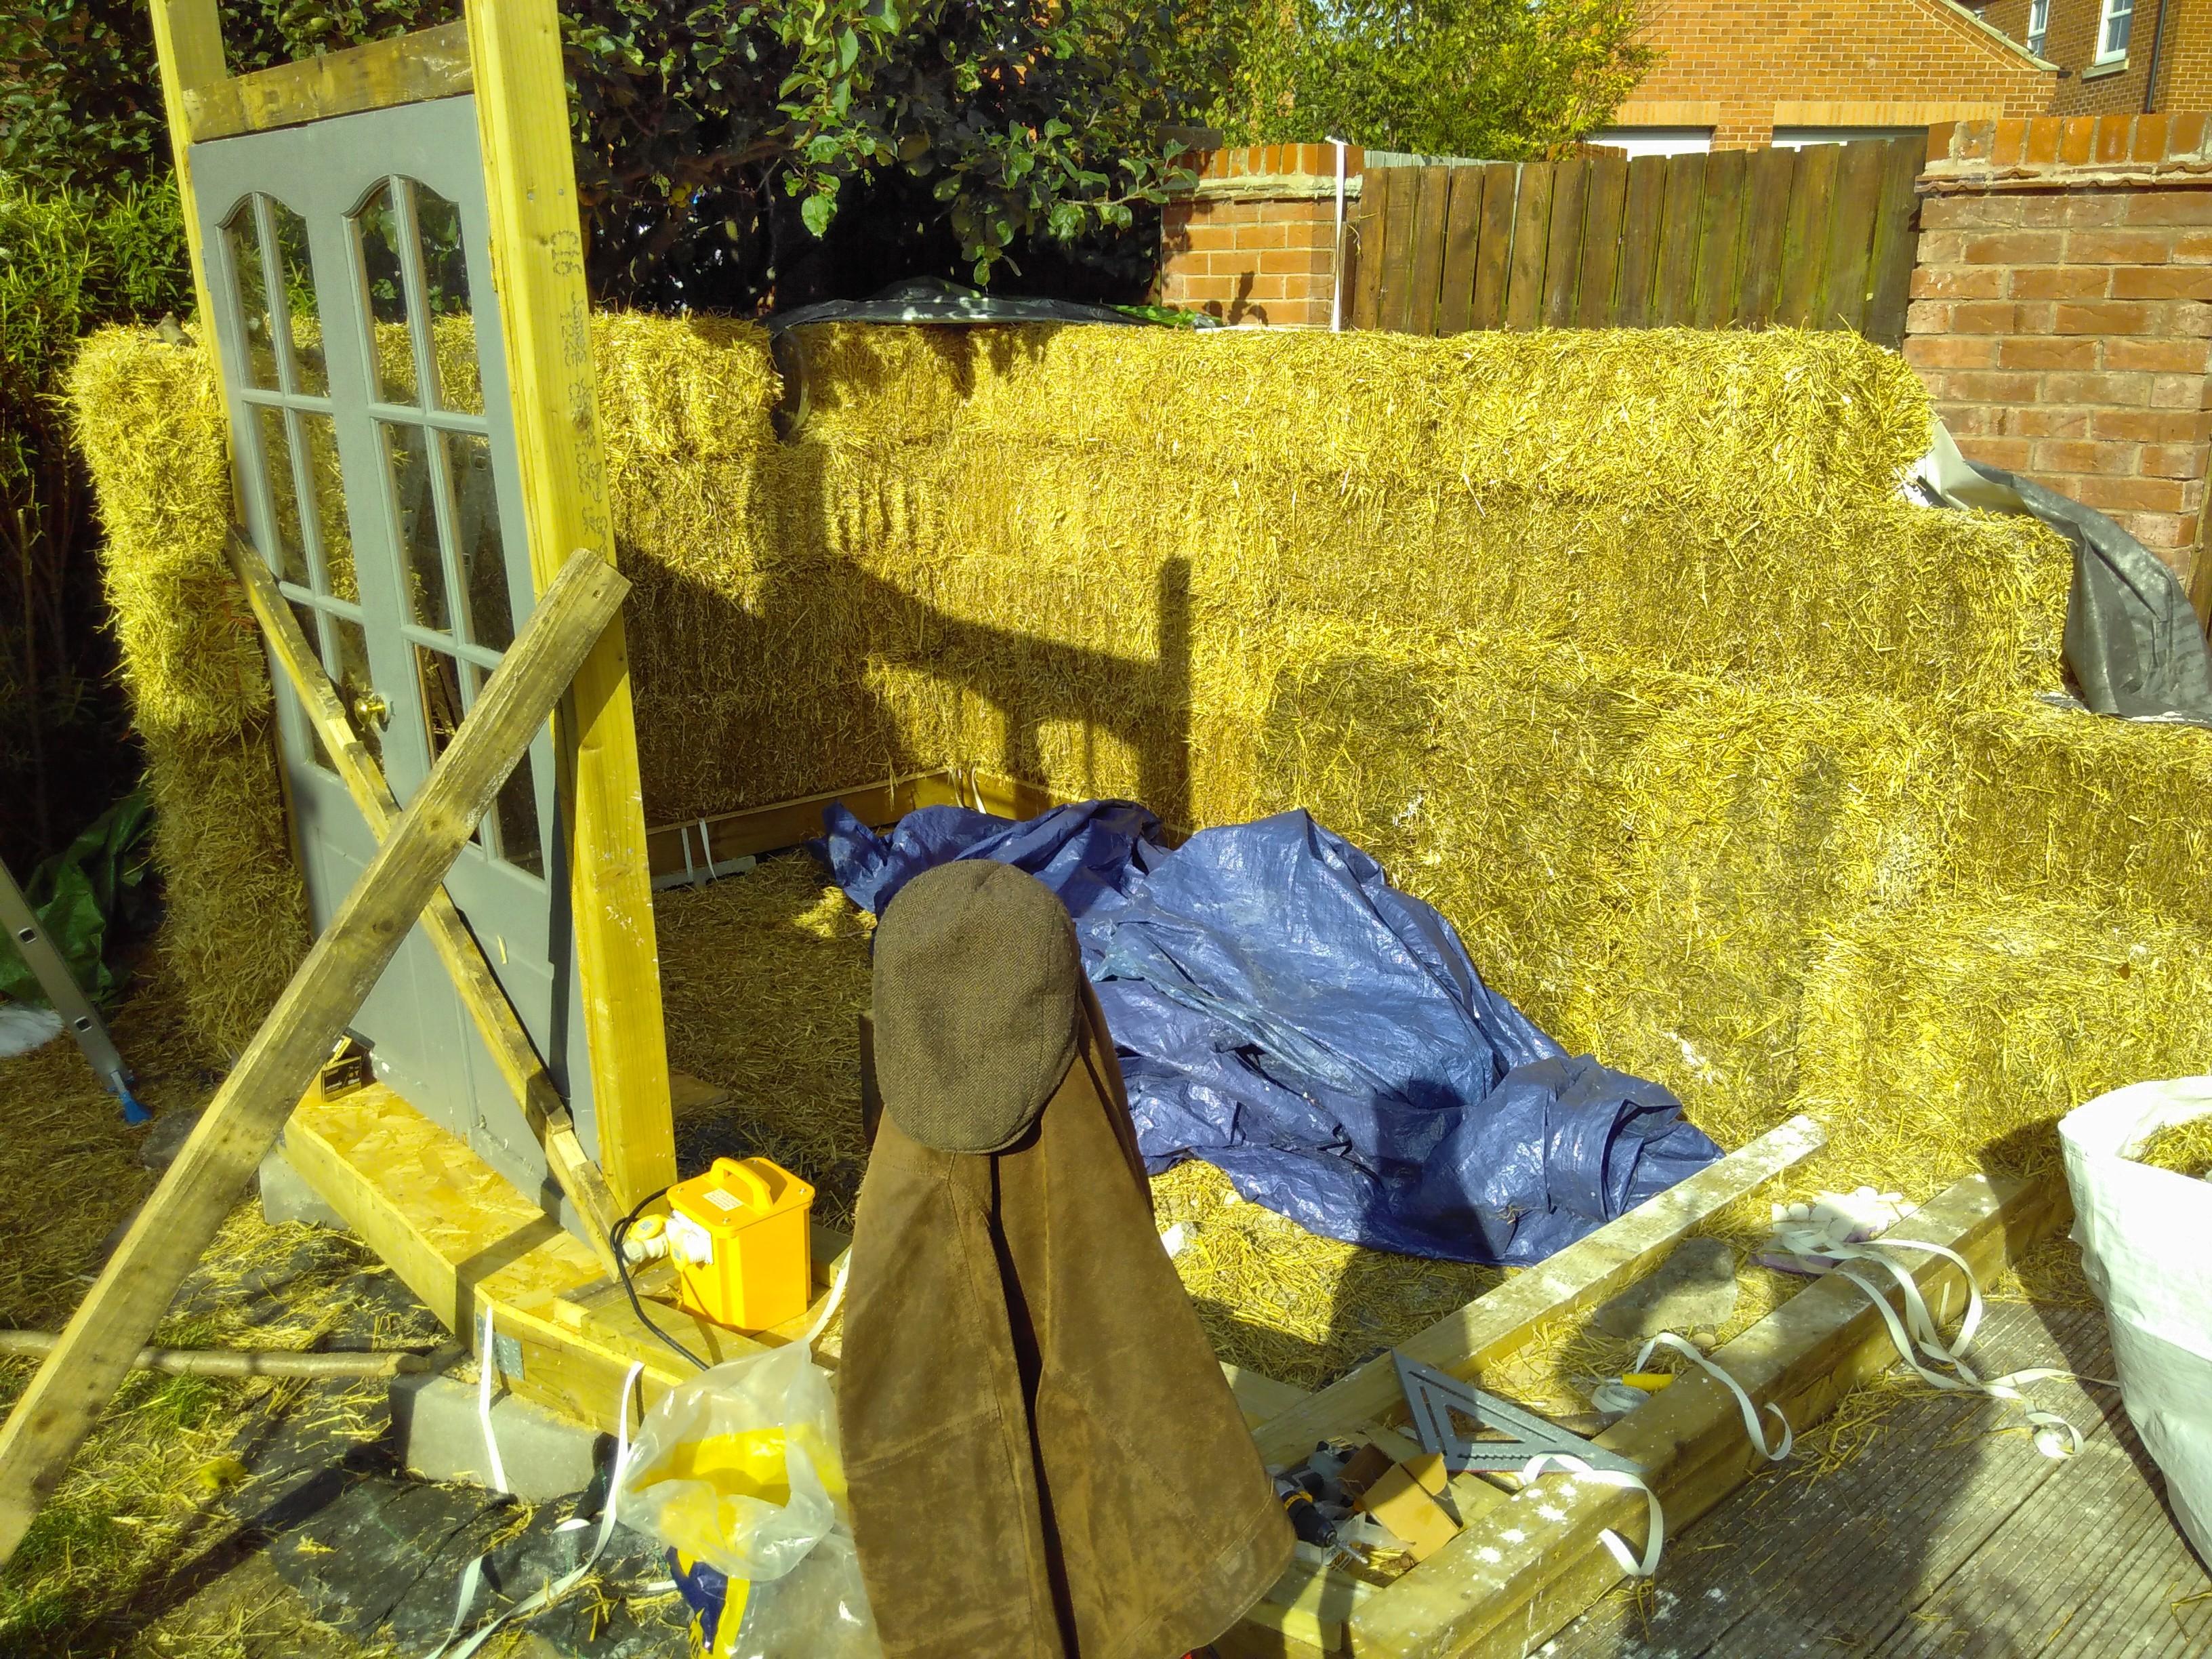
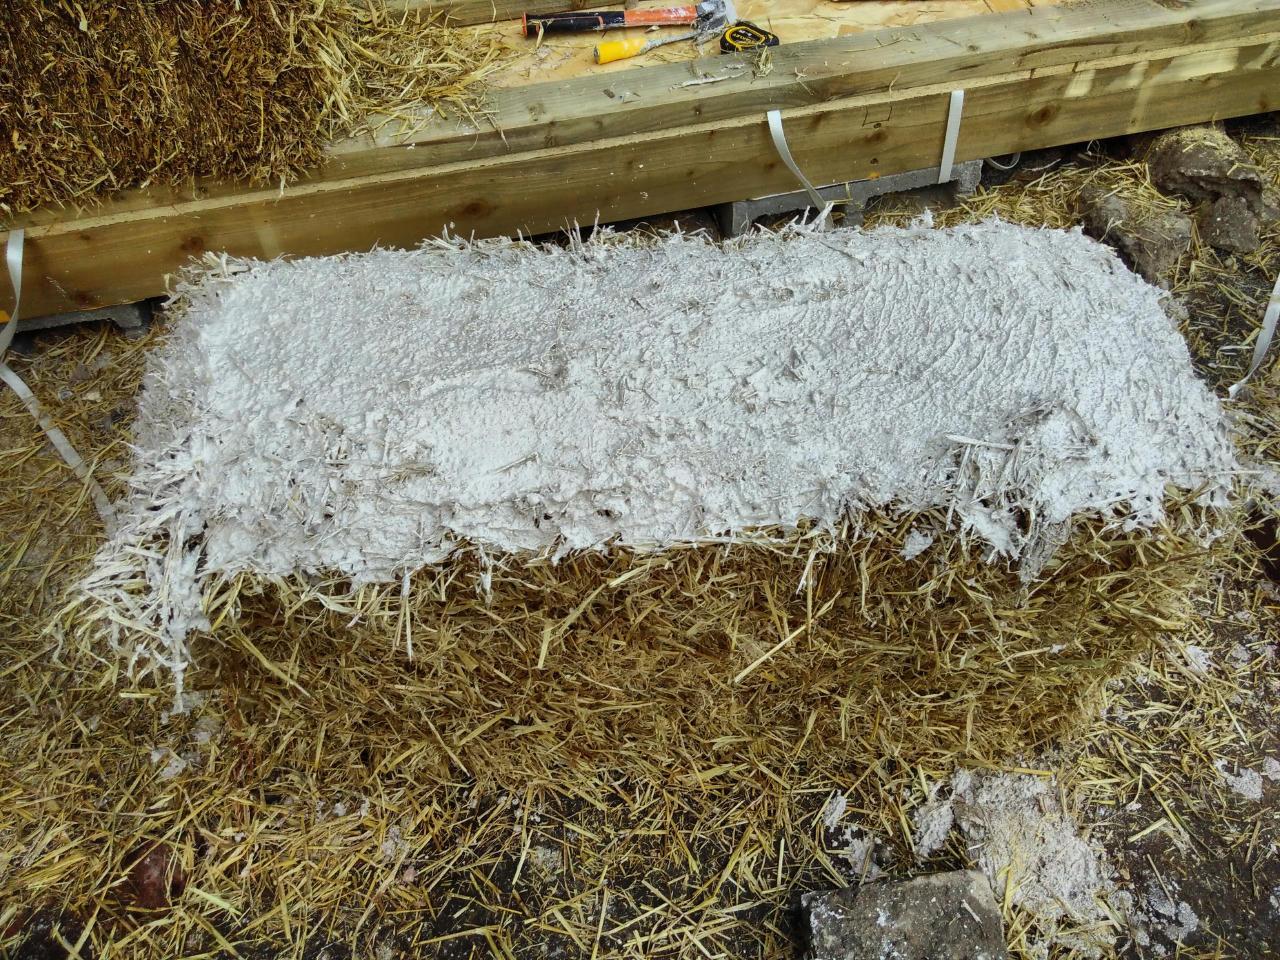
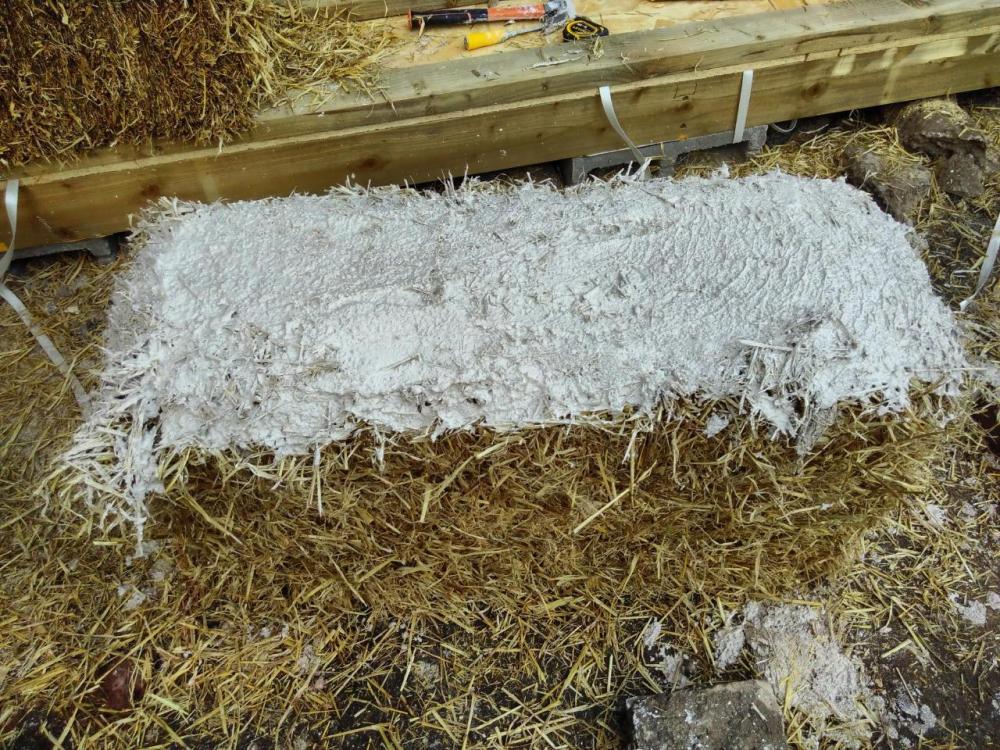
Sorry, yeah, I should have mentioned this. The two bales there are coming back out shortly - the plan is a 50mm gap, with the bales "french dipped" in lime render before final installation, and then covered over with Tyvek/etc vapor-permeable membrane, held taut, in case there's run-off. You're quite right about the risk of condensation; the ubackus calculator picked it up while i was designing. A 10mm ventilated cavity was enough for its concerns to go away. I 5x'd it but that was about all the space i could make. Its assumptions seemed conservative for my case though - what do you think a 150mm cavity would do that a 50mm wouldn't? I'm less worried about rain; there'll be a little getting in from the east edge, but I can't see it penetrating far. From the north, the roof overhang (once designed!) and wall should do a reasonable job of keeping it out; I'm expecting the membrane and render to protect the straw enough from what does get in. If I'm wrong, the straw - and quite possibly the wood too - will rot, so it's pretty high stakes and thoughts are definitely appreciated! Critters-wise, my main concern is mice and rats. Once the walls are compressed, only gnawers will be able to get through, and the lime should discourage them; I'm also planning on anti-rodent mesh along the bottom and lower sides of the cavity and probably all round the outside of the building. It' going to be a pig to install but if I do it now I won't be able to compress round the box beam if needed. Wasps are an ever-present danger. Again, i'm hoping the lime will keep them away. I'm paying attention to the underside of the base plate and box beam to make sure they can't set up a nice home in the straw from there. On the roof - i've started fiddling with the idea of a hipped roof, which I'm reading can minimise wind uplift with the right pitch. I've not made life easy for myself with the "curved" wall though. Not sure if it's fine with four planes, or if i need to break up the front plane into 2 or 3 to make it work. Might get a professional to work this bit out ;-). This assumes I can get the lawful development certificate though - if I submit plans with a noddy hip on top it'll give them something concrete to evaluate against the ground level, at least. -
More foundation fun - straw bale garden room on clay
Nick Thomas replied to Nick Thomas's topic in Foundations
Bit more progress \o/ Straw goes onto baseplate, hazel stubs in noggins to pin the first course. Loose straw gets packed into the gaps in the baseplate, and stuffs any gaps between bales. Dressing the bales (with a hedge trimmer) generates plenty of that. Got the doors in as well but that's a botch job so won't show it yet 😉. Once the paddle mixer is here i can whiz up some render for the bales along the brick wall and get those in permanently; have a strong urge to get the posts surrounded by straw before strong winds come along, though. Packing straps pre-installed under thebaseplates,ready for conpression time. Unsure juat now whether I can use them to do the compression, or if I'll be running truckers straps under the box beam and around the wall for the extra beefiness.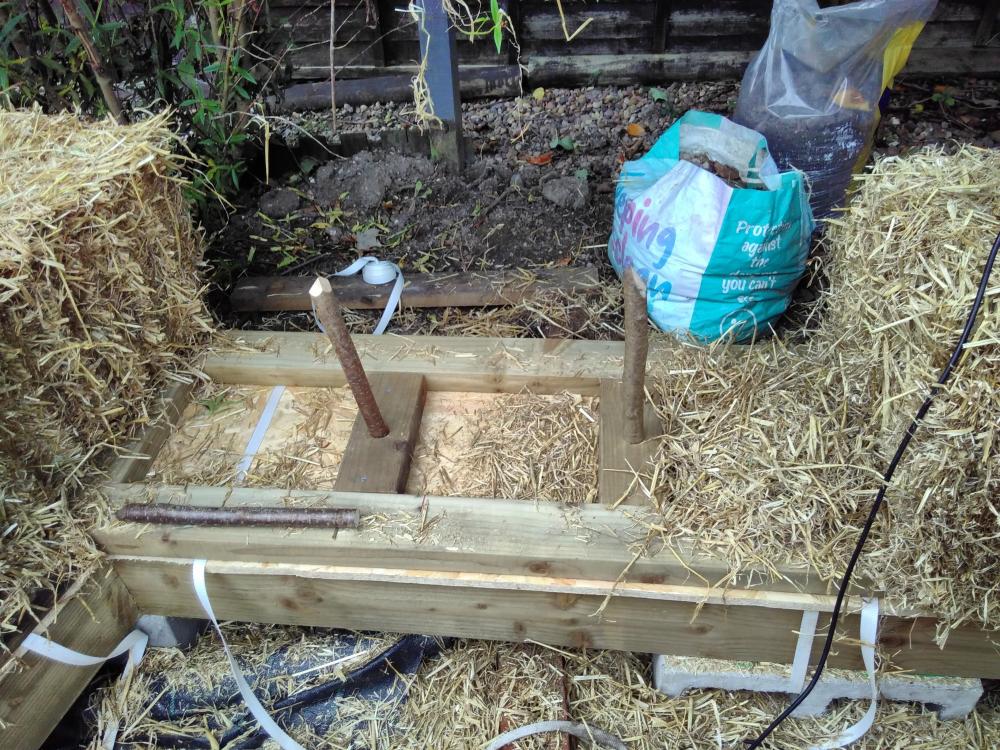

-
More foundation fun - straw bale garden room on clay
Nick Thomas replied to Nick Thomas's topic in Foundations
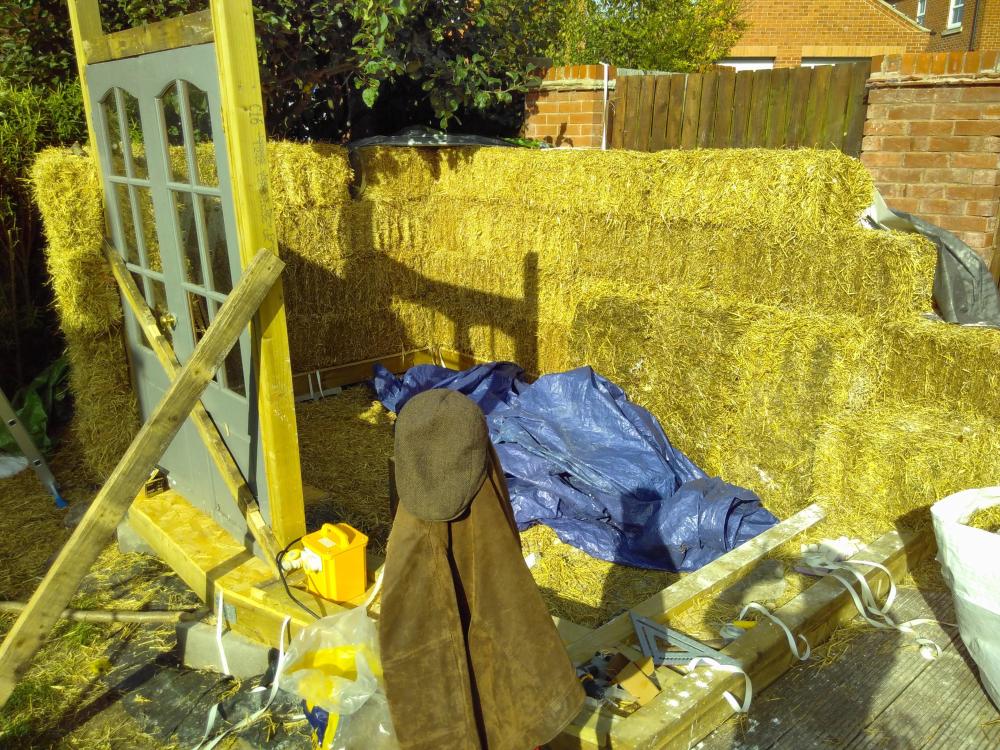
Sadly, there are quite a lot of them and we don't know them very well - only moved here recently. They'd only have the road level as a point of reference themselves, but my feeling is better safe than sorry. Although my backup plan if I ran out of room for a roof was to just apply for the planning anyway - can't see any reason why it wouldn't be granted, but I'd rather avoid the admin if possible. A certificate of lawful development seems easy by comparison. We were told that spraying render onto straw - certainly the first coat - is inferior to getting it on by hand, to the point where sometimes they spray it on but have a team of people going along behind the sprayer to really rub it into the straw. Our practical was with clay slip, but we were (engloved, to protect fingernail beds) pulling the straw fibres apart and really rubbing it in, in a way I couldn't see a spray gun matching. It was messy enough that I was thinking about toothed rollers to emulate the action though. Really need to get on with pre-rendering / french dipping the ones that're going up against the brick wall; today I cut more OSB and got it nailed down, so ~¾ of the box beam is complete, giving me a platform for those bales to stand while they dry. I mixed up some lime putty from hydrated lime last week. It's really meant to age for months and months, but a good session with a paddle mixer apparently replicates some of the chemical process of ageing (more complete hydration and smaller, flatter Ca(OH)₂ crystals result in a stickier putty that forms a superior render). I just need the sand, now I've got a place for the bales to sit. 2:1 sand:lime for this coat, apparently; the other coats are more usually 3:1. Bit busy over the weekend but I'm hoping to get the posts up and doors installed Sunday or Monday. The windows are going to be a fair bit more work - I've just got the glazed panels with half the hinges (the lift-off type), so I need to build a square frame for them to sit in and either replace the hinges or find something whose pin will fit the existing barrel. Hopefully the mitre saw will make short work of it all ^^. The HDPE window is so light it won't need any posts, I've decided. Time will tell whether that's a good decision or not. The windows in question: (Didn't pay £120 for them though)