Nick Thomas
-
Posts
383 -
Joined
-
Last visited
Everything posted by Nick Thomas
-

More foundation fun - straw bale garden room on clay
Nick Thomas replied to Nick Thomas's topic in Foundations
Got any space in your garden? -
More foundation fun - straw bale garden room on clay
Nick Thomas replied to Nick Thomas's topic in Foundations
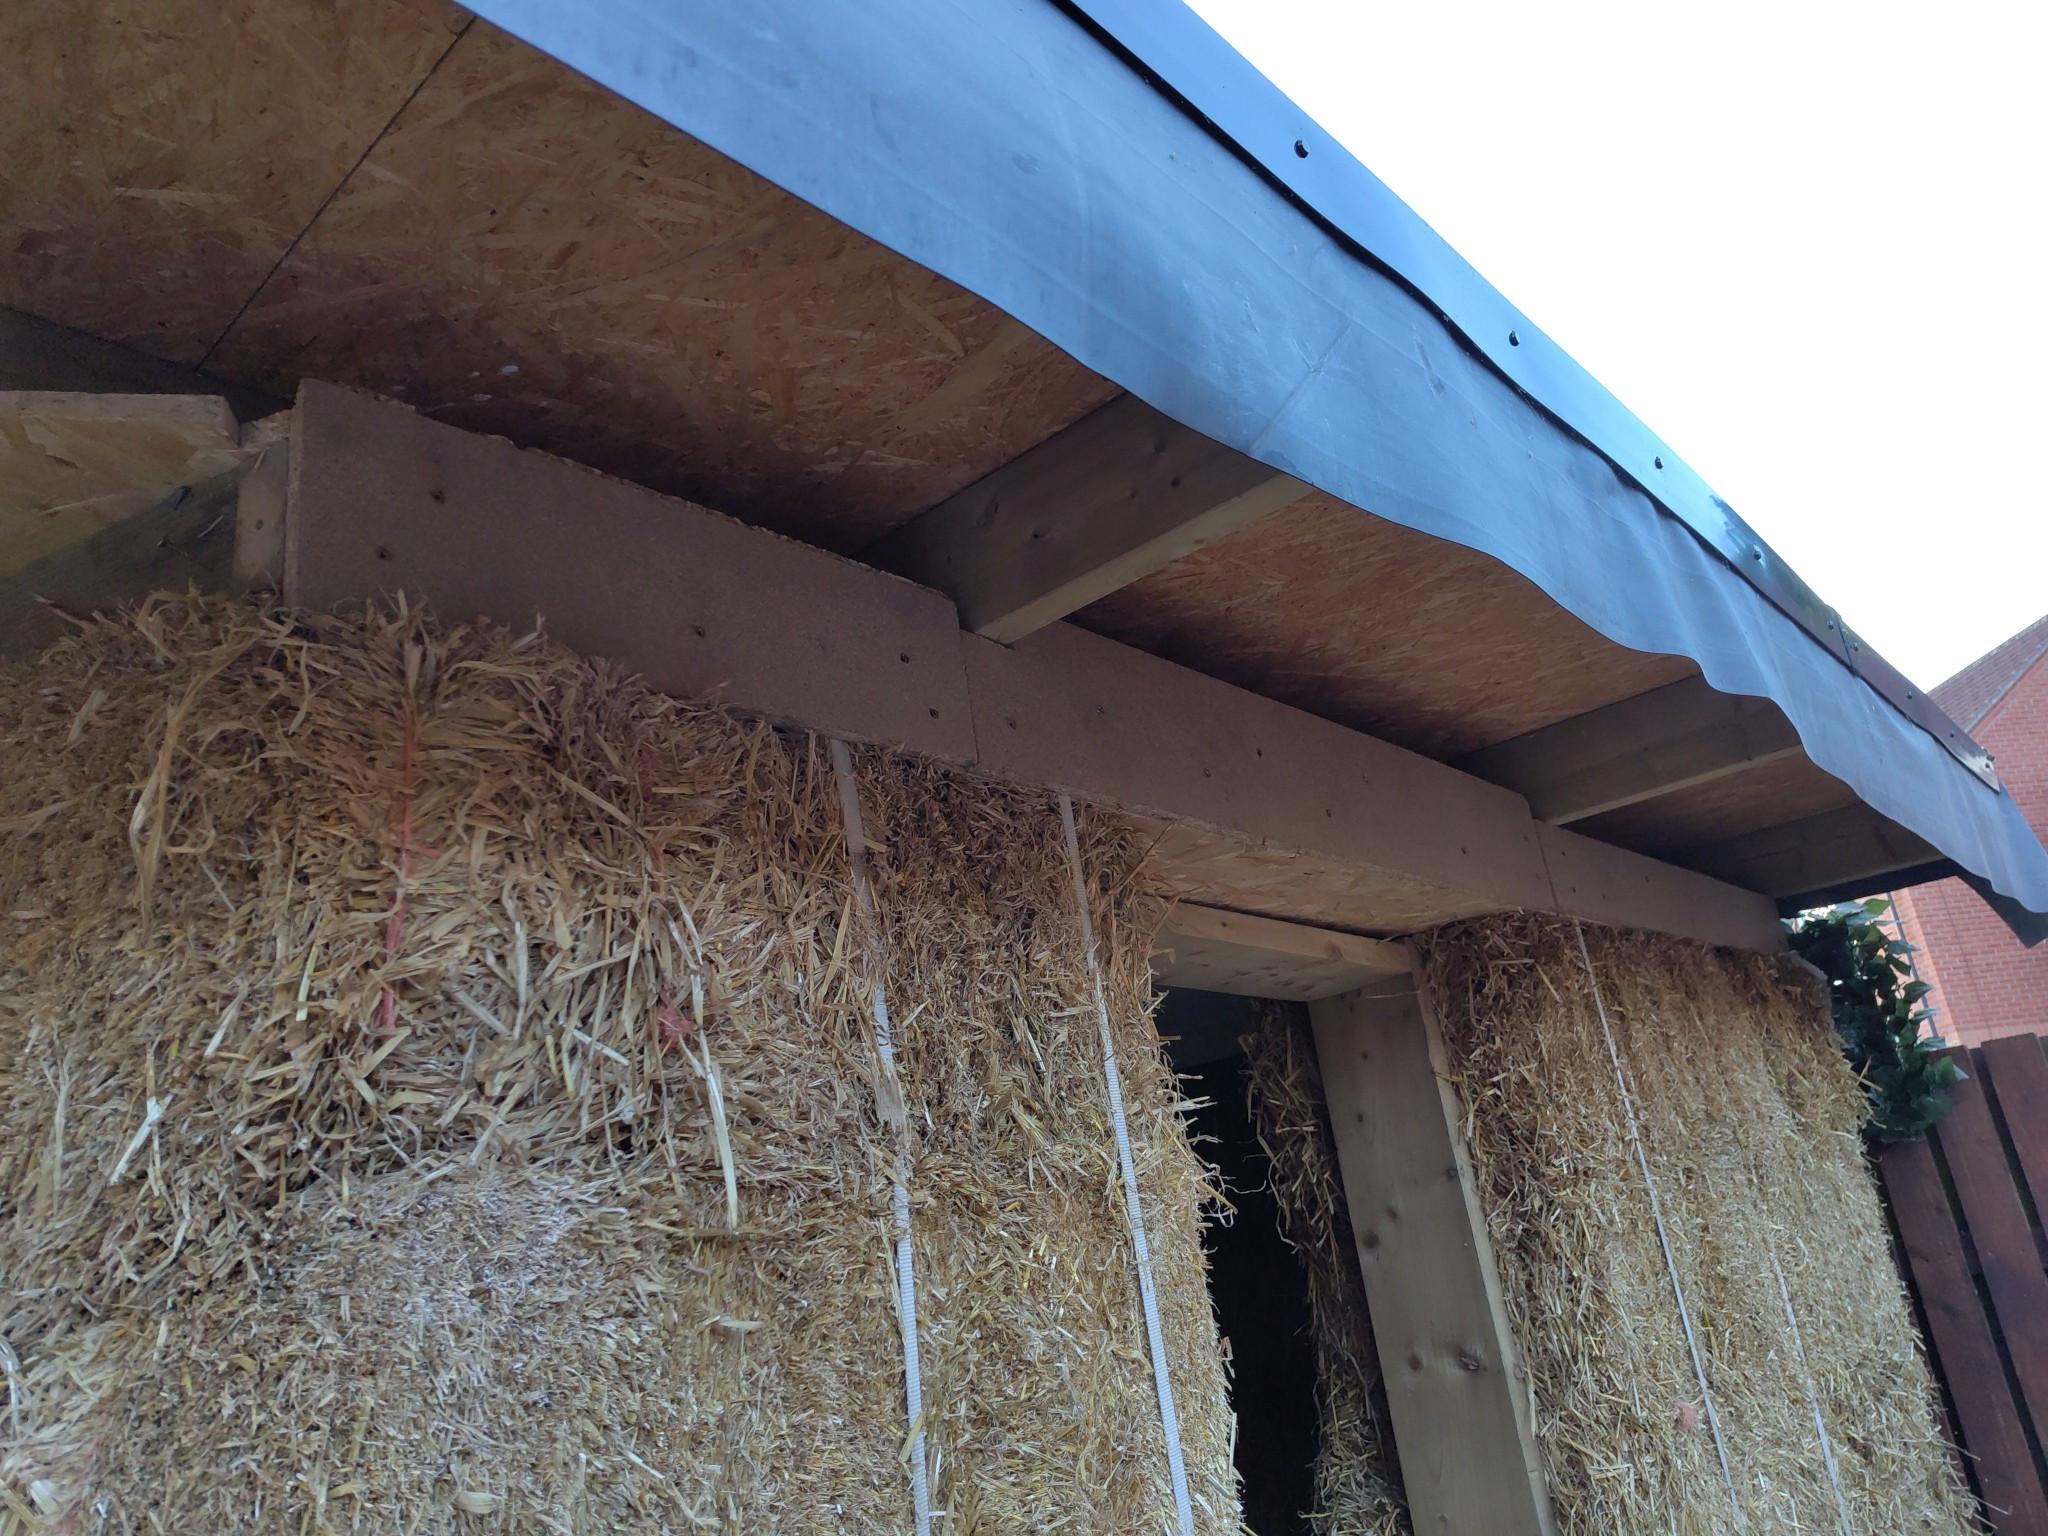
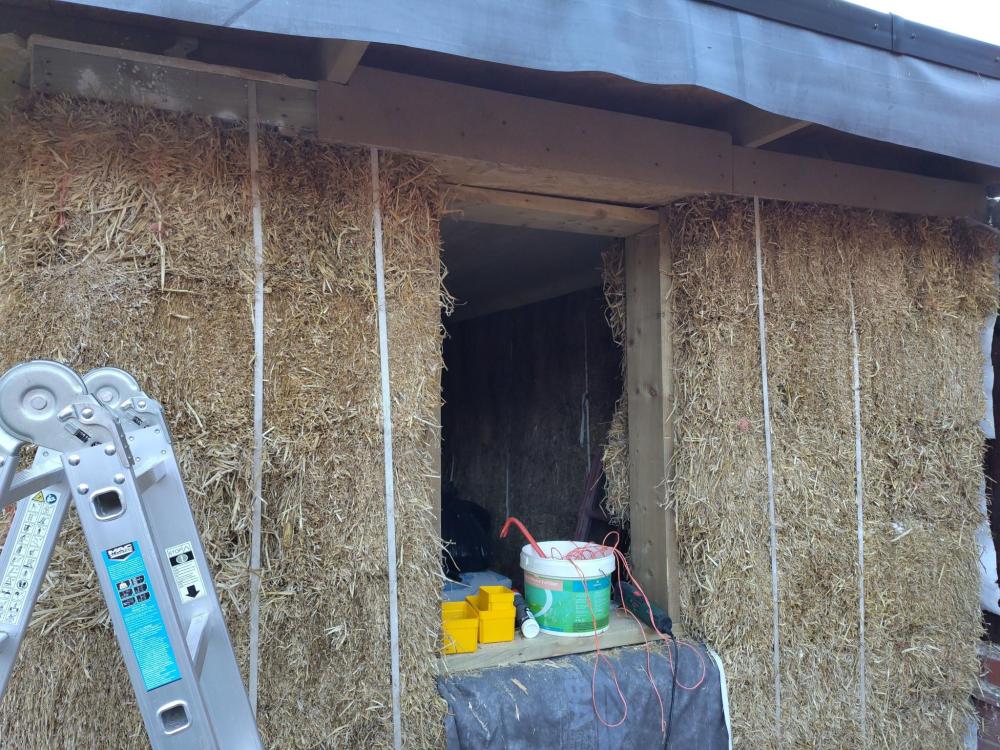
I don't really know how obvious the differences are in the photos, but that's all the straw trimmed now. I'm onto boarding along the roofplate. (The white powder is pyrethrin-based wasp killer, I had a rather persistent visitor in an unfortunate spot ^^). I've belatedly realised that I need to do... something... above the window. I'm told proper houses generally get seven bales high per storey, so you get a whole bale above the window to hang render off, but I'm six high and so straight up to the roofplate. I need to hide the OSB as well. Once the T&G roof underside cladding is in place (12.5mm thick, treated pine) there will be ~130mm of the board still showing. I guess I clad the OSB with offcuts of the same stuff the roof underside is getting, have render bead / a bit of wood covering the edge of that and make that support the render over the span? It'll have the mesh to help it stay together too. I guess I could skip the render by having the cladding come up vertically too - perhaps double up the board behind it to get it to ~30mm thick, so it sits flush with the render either side. That feels a bit weird though.
-
What to do with Excess/Cheap Power?
Nick Thomas replied to puntloos's topic in General Alternative Energy Issues
I woke up this morning thinking that the 300% efficiency thing is a bit of a red herring here ^^. If you export at 25p (peak) in summer, then buy at regular prices in winter (again ~25p) to put into your heat pump, it still gets the CoP boost - it ends up being the same number of kWh of heating or cooling, the only difference is that you actually need the heating in winter, whereas the cooling in summer is marginal at best. If your export is at the regular 15p in summer, then importing at 25 or even 35p (peak) in winter, then you take a loss - but it's 50%ish, rather than 300%. -
More foundation fun - straw bale garden room on clay
Nick Thomas replied to Nick Thomas's topic in Foundations
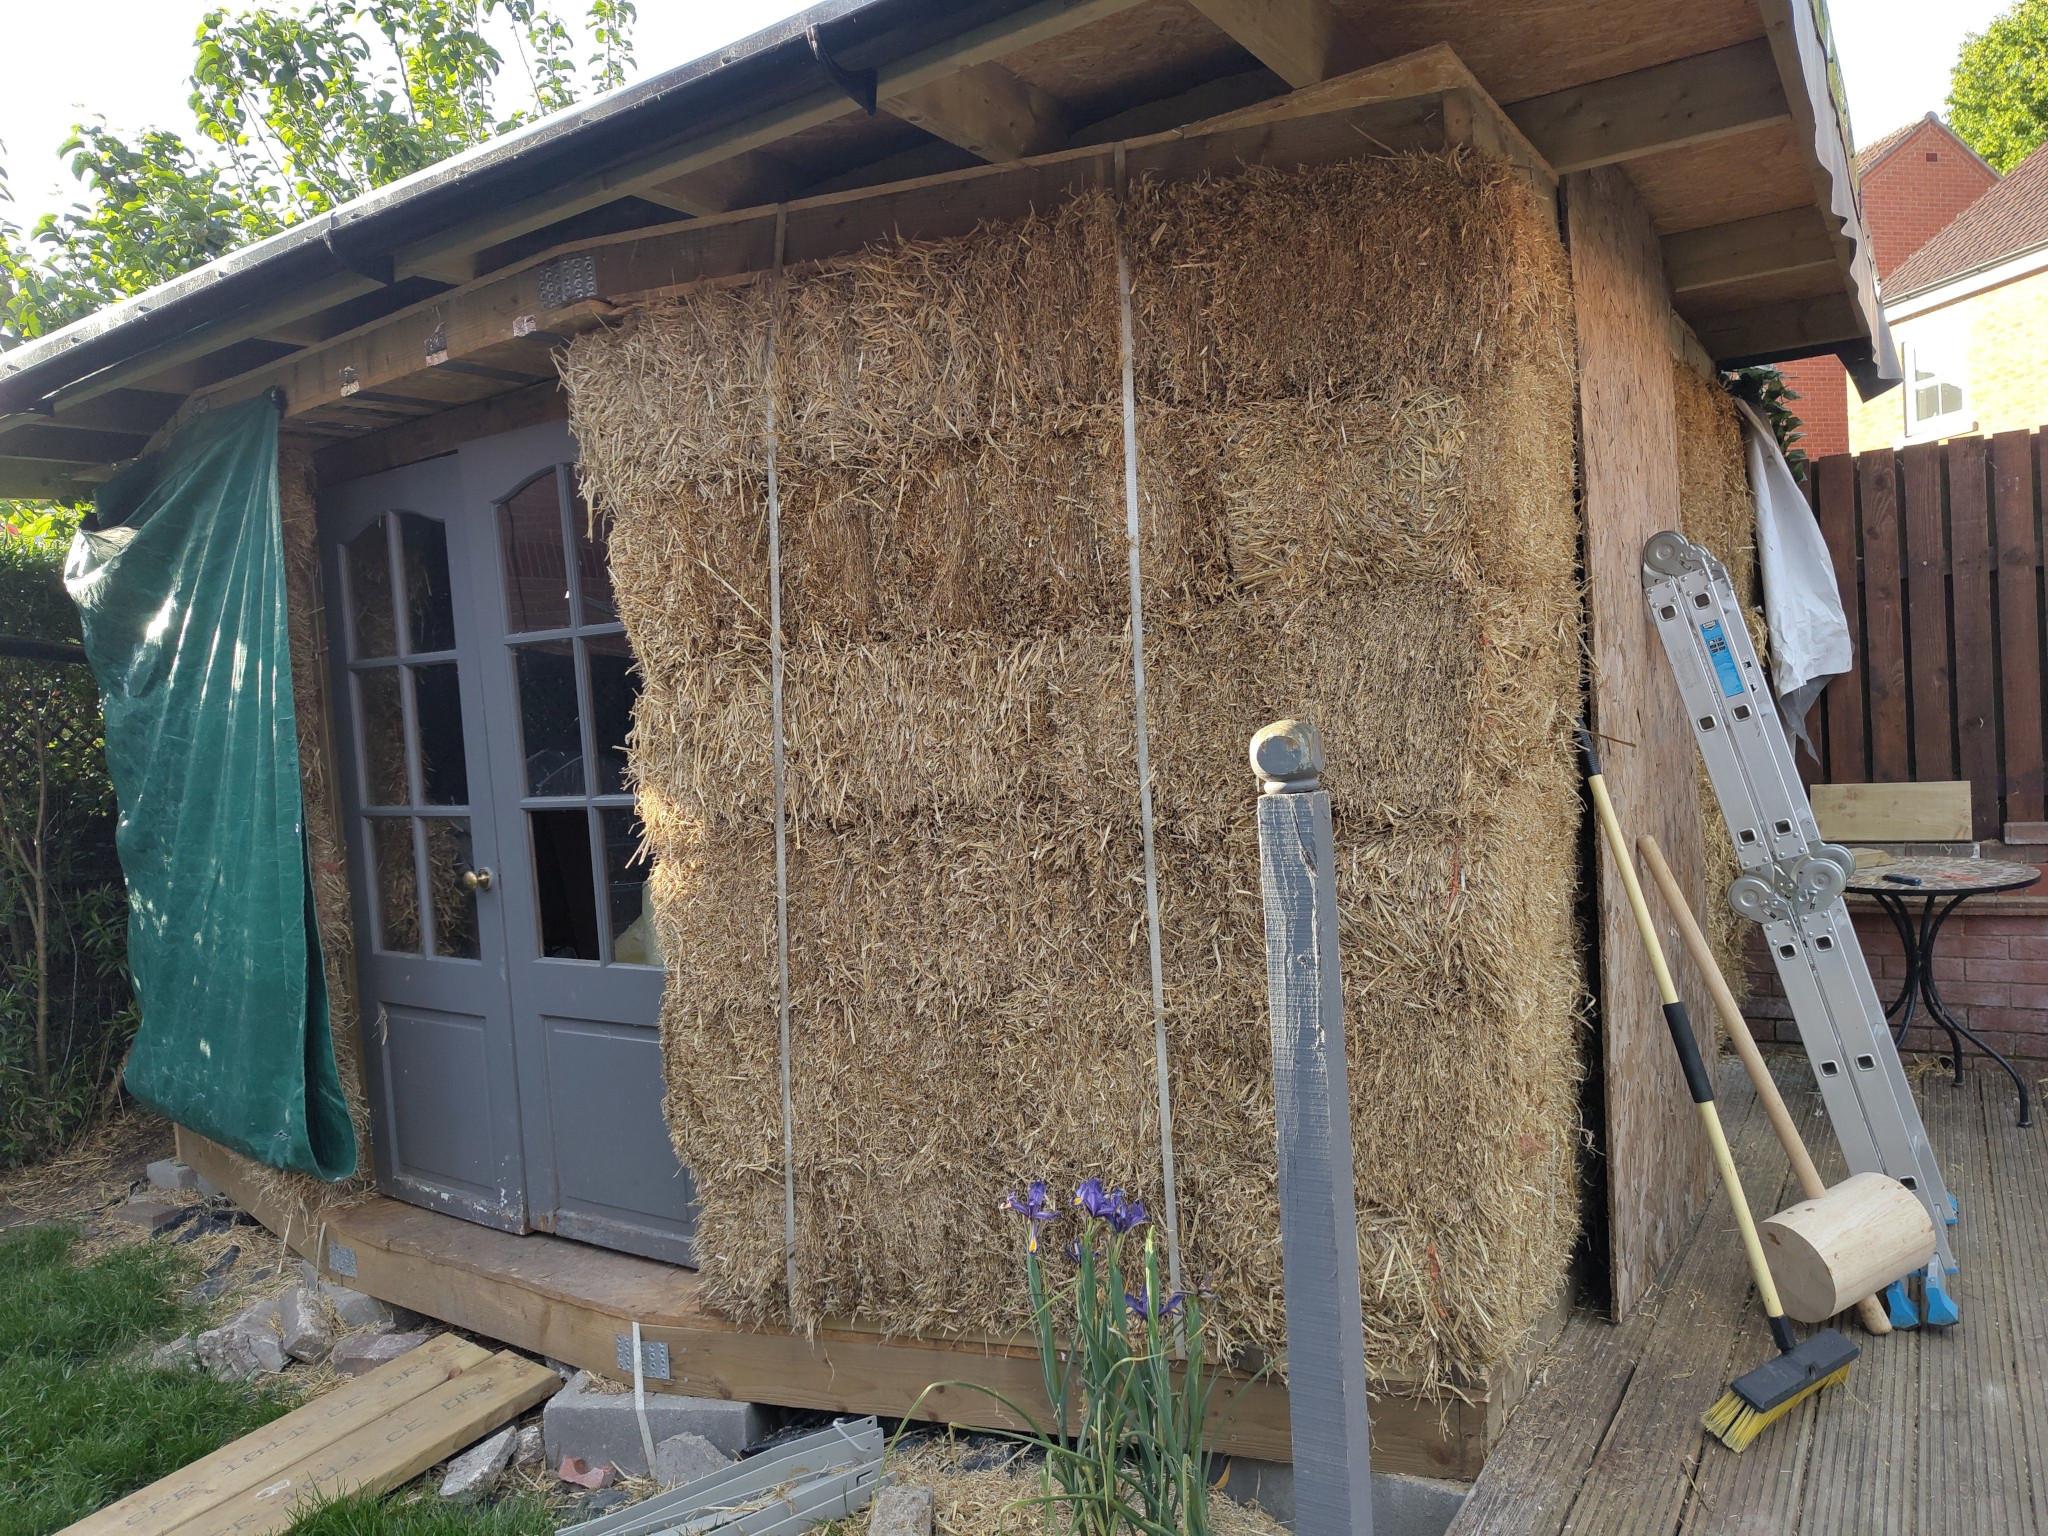
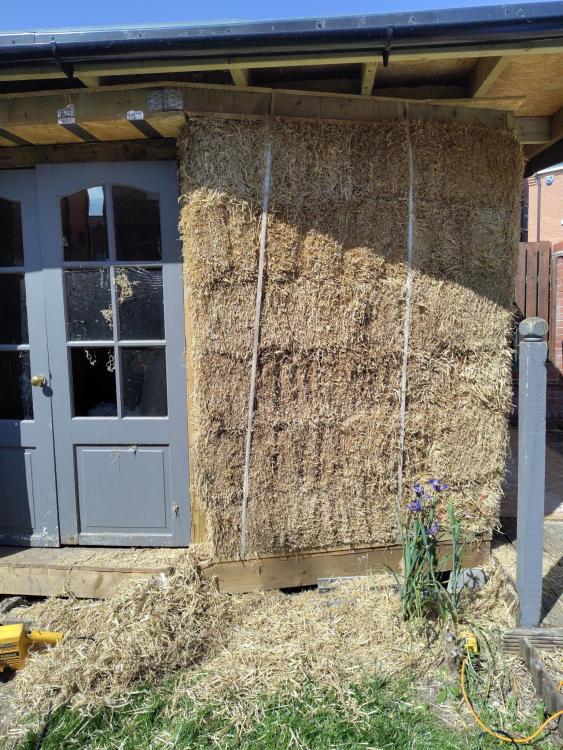
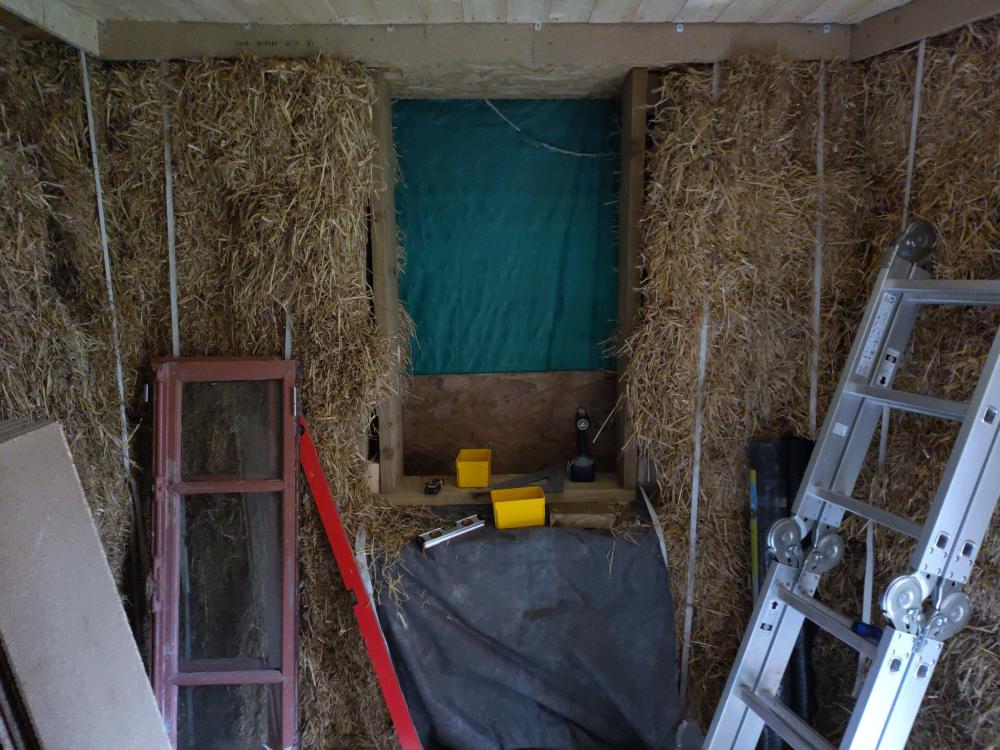
Just adjusting and trimming the bales to prep for rendering. The persuader ended up being very effective - the walls are a lot more level than when I started. Dug out the hole for the circular window more as well - it's looking pretty convincing, although it's not fixed in place yet. I got the left hand side done last weekend, and the right hand side (mostly) done this weekend. The hedgetrimmer works (but isn't amazing) for the middle of the wall; the alligator saw works wonders at the corners. At the corners, you're alternating between bale end (where there's strings) and bale side (where there isn't), so trimming off overhanging straw is a bit involved. For the ends, you can cut the strings, rip a load out with your hands and retie; for the sides, you can cut ~15cm off without encountering them, and not even I'm that far out. It generates a lot of loose straw; it's very pleasant to be able to take a good proportion of that and stuff it back into gaps in the wall ^^. More details expose themselves... before I render, I need to cover over the sides of the baseplate and roofplate, where all the raw edges and fixings are, with wood fibre board; put up the wood underside to the roof; sort out eaves ventilation; and get some kind of bead fixed close to the top of the baseplate. I also need to put down chicken wire to cover the gaps, and I was thinking about getting a roll of 600mm wide DPC - like https://mkm.com/product/pvc-damp-proof-course-600mm-x-30m-b012378 - and using it to fashion a skirt, fixing it behind the render bead and allowing it to go down to the ground, maybe with a bit of wood at the bottom of the box beam to encourage it to 'belly out' a bit. That'd hide the chicken wire and the blocks and the void quite tidily, I think. The replacement square window has been ordered - pine, double-glazed, bottom-opening, toughened glass. Nothing fancy; apparently it will either take ~7-10 days to arrive, or 6-8 weeks. Maybe twice the price of an equivalent uPVC window, but I just couldn't pop one of those in. Render mesh (10mm openings, which is better for lime apparently) and hessian has also arrived. I've got enough mesh to do a layer over all the walls, inside and out, so will probably do that. I've not rendered before, so I'm looking for every bit of help possible to keep it from shrinking, cracking, and falling straight back off the walls.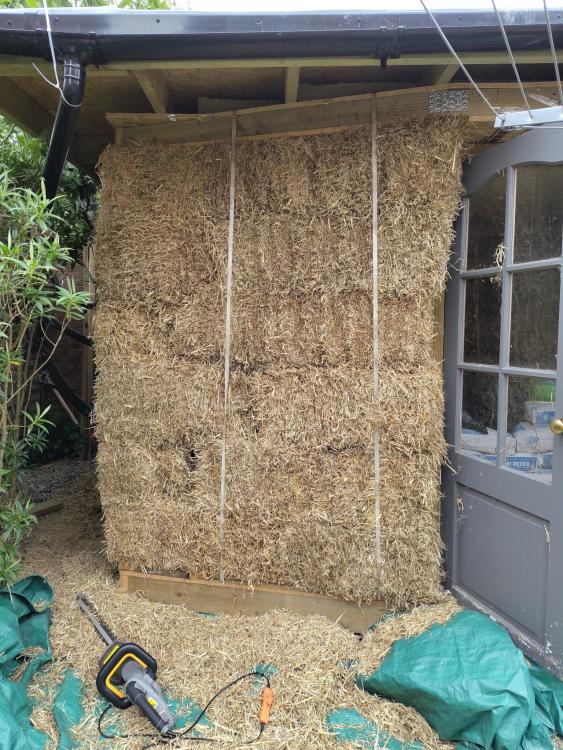


-
Scottish government declares national housing emergency
Nick Thomas replied to Guest28's topic in Housing Politics
Well, it's a good thing for the landlord ^^. It'd be nice for social housing to be for everyone again, but there's not much work on that in Scotland or England. -
What to do with Excess/Cheap Power?
Nick Thomas replied to puntloos's topic in General Alternative Energy Issues
I export the excess at ~15 or 25p/kWh (octopus flux). That builds up credit that pays for a good chunk of what I import in winter. Totally worth it. -
Who says Timber Frame buildings don't last!
Nick Thomas replied to MikeSharp01's topic in Timber Frame
The less posh buildings can do alright too: https://www.visitnorway.com/listings/stålekleivloftet-one-of-the-oldest-wooden-buildings-in-the-world/207516/ -
I've got an LXP inverter now: https://luxpowertek.com/hybrid-inverter-lxp3-6k. I'm quite happy with how I've managed to set it up, and it wasn't *awful* out of the box, but I don't have any basis for comparison with, say, GivEnergy. In practice you might find your options are limited by the installers available to you.
-
Hey hey. A few thoughts - I'm sure others will be along shortly. One hybrid inverter is probably cheaper than an inverter for the panels, and a separate inverter for the batteries, depending on which brands you go for. Solax is junk, for me. Mine was insecure out of the box and not possible to secure to my satisfaction, even after a chat with solax engineers. I have an X1 Boost sat in a box in the garage as a result. For grid export, if you have two separate inverters then you're meant to sum their capacities when it comes to DNO approval. IME, installers of AC-coupled systems aren't that interested in dealing with DNO approval, so just disable grid export. Presumably that changes if you splash out on powerwalls or whatever, but even if you found one that permits it, you'd still be looking at G99 for a simple install when a hybrid inverter could go in under G98. If you get an inverter that can do more than 3.68kW out, it'd need G99 anyway - or maybe G100 (export limitation - I don't know whether that would allow you push, say, 6kW when the house demand in 3kW, or not). It used to be the case that the batteries were only VAT-free if you got them installed at the same time as the solar, but they're now VAT-free regardless, which makes AC-coupled slightly less bad. My hybrid inverter comes with an EPS circuit which can run from the batteries, and in my head, the batteries will continue to charge from the solar in the event of a power cut. I don't know if this actually works, and it's a pretty marginal benefit, but I like the idea of it ^^.
-
Random thought: housing is a lemon market, surely? https://www.sciencedirect.com/science/article/abs/pii/B978012214850750022X
-
Not quite *any* condition, anyway. There are legal requirements on the sale of properties - in-date EPC, the fire alarm situation (in Scotland), the property charge system, the various forms of restriction on who can own various houses, like agricultural tenancies, etc. Still, we all love a good soundbite. Back on concrete cancer, I'm amazed at just how many different types of it there are. Up in shetland we got "sullom blocks", which just dissolve after a while. Complete demolition and rebuild seems to work out cheaper and more convenient than repairs.
-
More foundation fun - straw bale garden room on clay
Nick Thomas replied to Nick Thomas's topic in Foundations
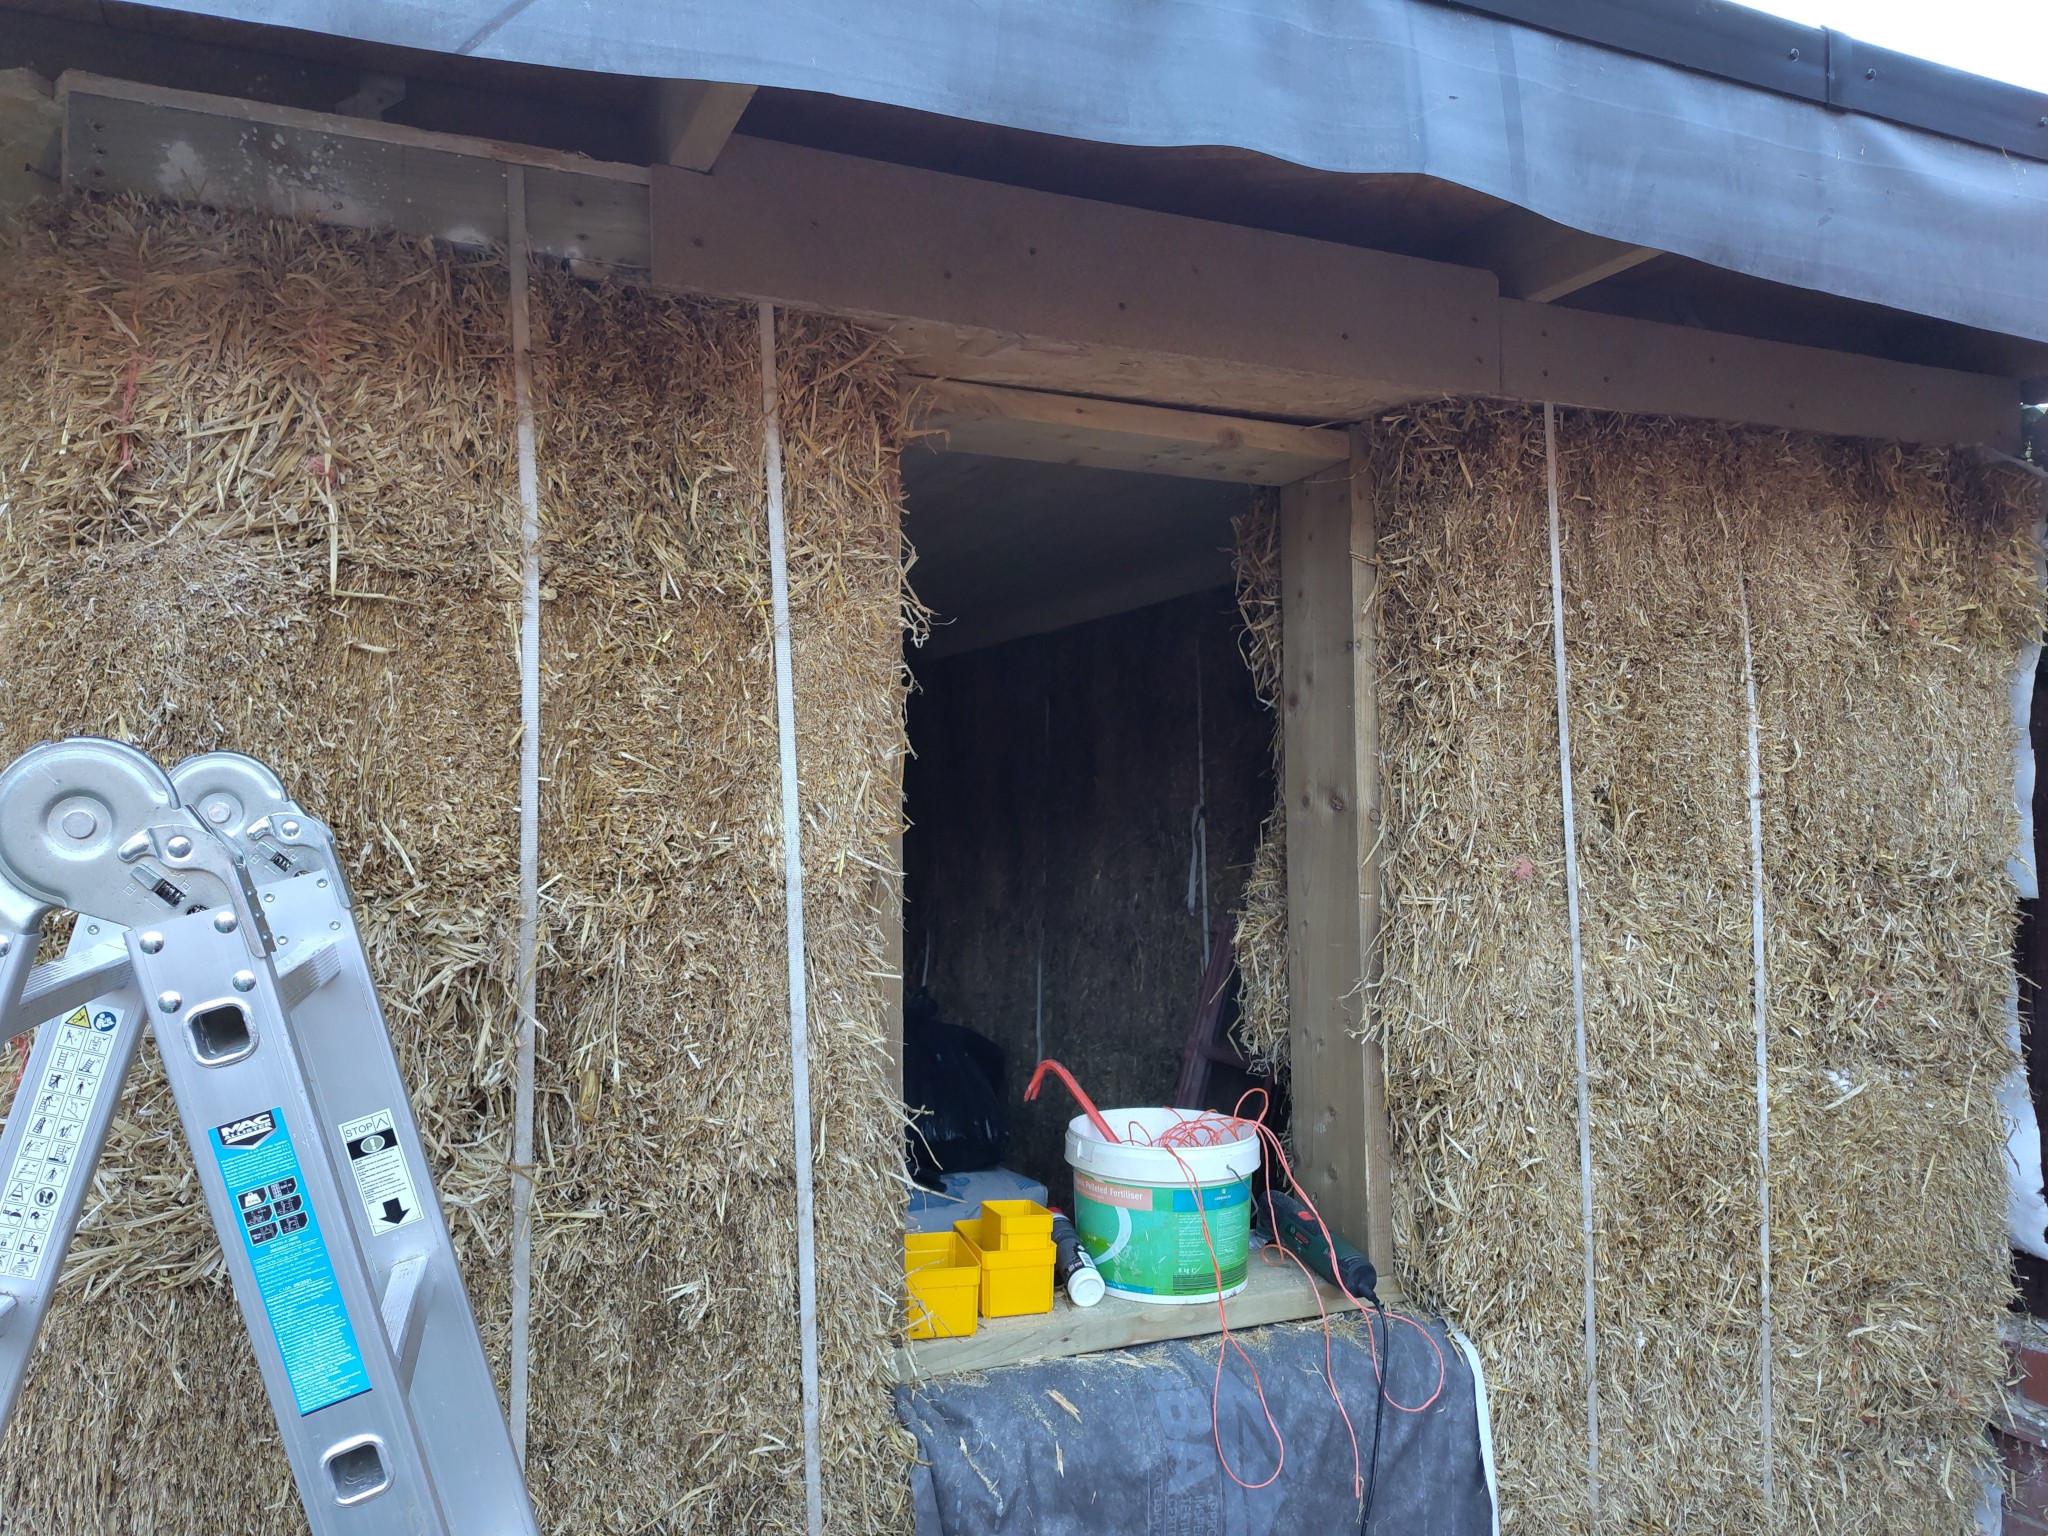
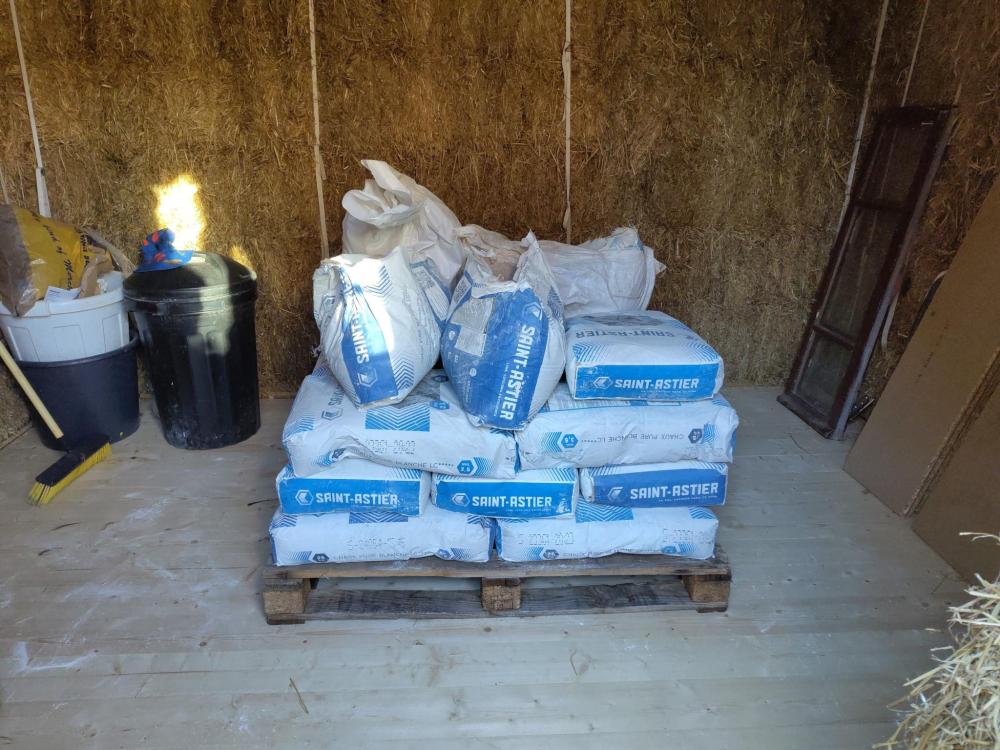
Just fiddling around with the window openings. Turns out the window posts I put in for the "big" window got knocked out of line when I compressed the bales, and I didn't correct it in time. So, they're about 2° out of level :S. Squaring the opening off is fine enough - I was going to build a window box anyway - but means the opening is much narrower now - around 745mm instead of the expected 860(!). I'm just going to order a premade timber unit of the right size. Bit of a blessing in disguise actually, since it'll come with a frame and be double-glazed to boot. Still on the fence about whether I should have a top piece of 2x8 for the box, or just let the window go up to contact the roofplate. It'll open from the bottom, so there's no possible issues with clearance. Over on the opposite side, I've got that round window to fit. I've decided to build a mostly-circular sleeve out of lengths of 2x8 offcuts, hold that into the wall with more hazel stakes and/or strapping, then screw the bubble window to it on the outside. Simples. I cut the timber today - 12x 121mm long pieces, 15° angles either side. It's glued up and strapped together now, and is hopefully going to work exactly as imagined. Inside, I can have the wall taper in to meet the timber sleeve, which should help to make it feel bigger than it actually is. I'll need something between the plastic and the timber, and was originally thinking a rubber gasket of some kind, but they turn out to be very expensive. So maybe it'll just end up being a bead of transparent silicone, or maybe some weatherstripping compressed by the screws that'll hold the plastic in place 🤷♂️. In parallel, I've had some lime delivered - I went for 500kg St Astier NHL3.5 in the end, from Lincolnshire Lime, on the strength of a phone call with them. More foolproof than the putty and, after accounting for the fact that the bags of premixed rough stuff contain sand and the bags of lime don't, about the same price. A few of the bags were split on the pallet, but they refunded for those without quibbling, and say it should still be good to use. Fingers crossed. I still need to order the sand, but regular coarse sharp sand should be OK and I need to finish sorting the walls out and make sure I'm happy with windows and doors first. It's all feeling pretty close now, though. Oh, and I finally managed to get a persuader - 7.5kg wooden mallet - so the walls will be getting a literal beating as I try to improve how level they are. In particular, the one that's due to take the round window is still pretty far out.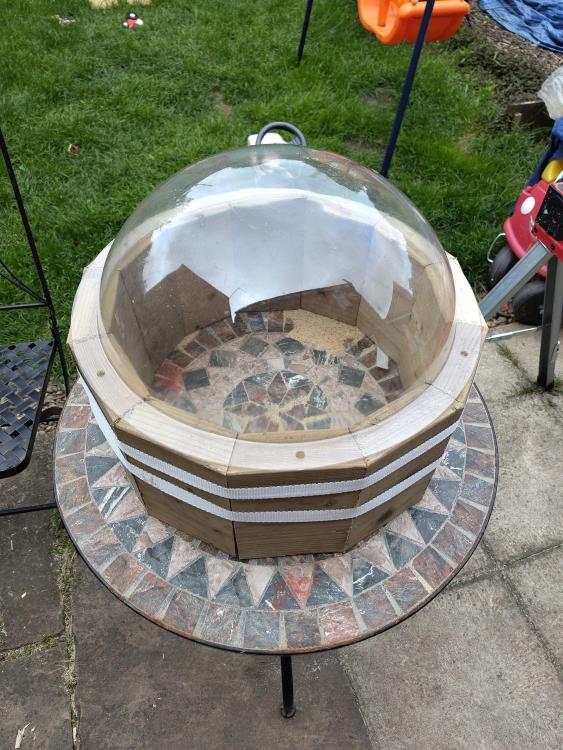
-
More foundation fun - straw bale garden room on clay
Nick Thomas replied to Nick Thomas's topic in Foundations
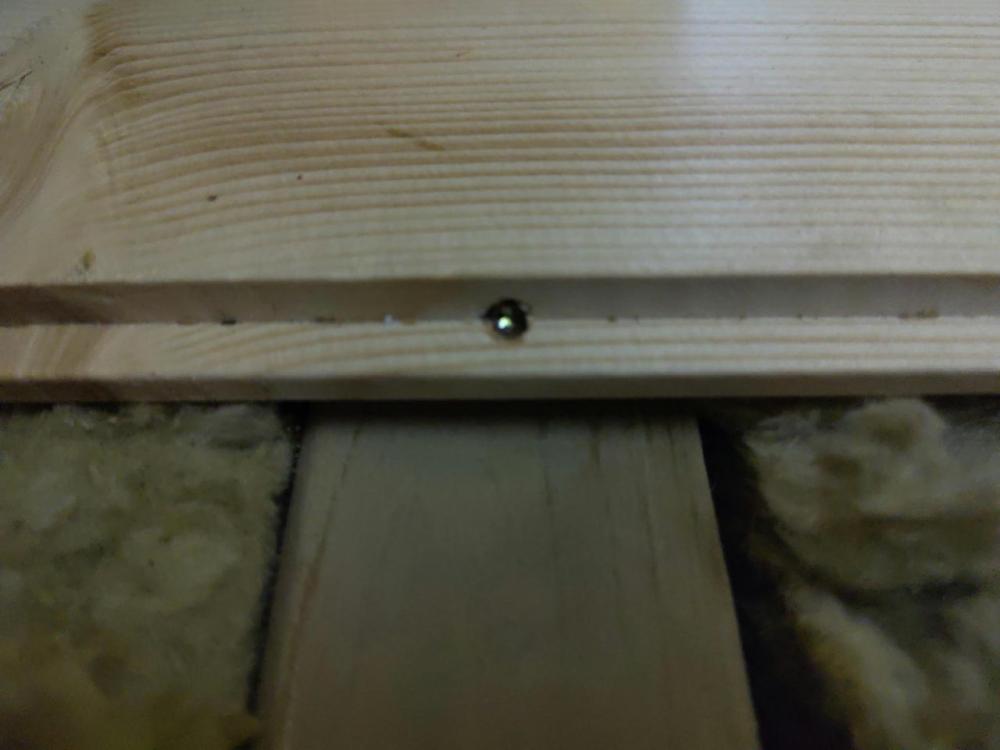
Oh yeah, there is a bit of a rush to get the render done now. This little danger ball fell out of the gap between tarp and straw on the outside of the garden room while we were working on the insulation: There was definitely something gooey inside when I crushed it; unsure if queen or eggs, but I'm very sure I don't want another to show up. I've been walking around slapping on the tarps every week or two since I got them up, being quite paranoid about the straw's (in)hospitability to critters, but this is the first time something has come of it. I very much do not like wasps.
-
More foundation fun - straw bale garden room on clay
Nick Thomas replied to Nick Thomas's topic in Foundations
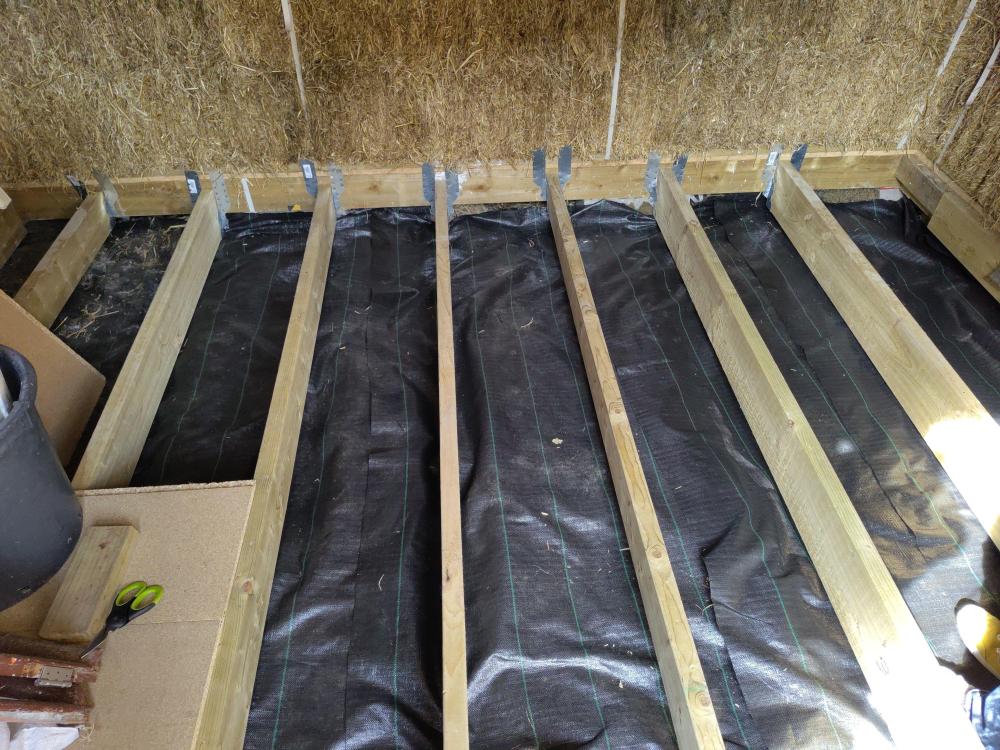
Hah, modest designs it is. Sometimes I think I put too much detail into these posts, but, it's details all the way down. Had a friend over this week so we tackled the insulation, after filling the concrete blocks and getting some geotextile down. The datasheet and some experimental testing confirmed that the rockwool (RWA45) was definitely non-wicking - and surprisingly (to me) hydrophobic too, but we still wanted it off the ground if we could. I'd picked up some chicken wire with the idea of stapling it around the bottom of the joists to support the battens from below. Absolute disaster, couldn't get it fixed properly any which way. In the end, we gave up and went for a friction fit. I'm not super happy with it, but at least it's in. Will be interesting to take a look in a year or so and see if it's stayed in place or slid down to contact the ground; if it has, I expect I'll just pop another 50-100mm on top to make it flush with the top of the joists again. Originally I was going to use some old decking boards I'd saved, but I ended up deciding I wanted a nicer finish, so splashed out on some new redwood PTG floorboards - 150x22mm nominal, trimmed to ~3.6M long so there's no joints in the middle of the floor. Those arrived today; I've got the first seven down and they're looking pretty nice, if I say so myself. I was struggling to choose between nails and screws as fixings, before coming across these lovely little things: https://www.screwfix.com/p/tongue-tite-tx-countersunk-thread-cutting-floorboard-screws-3-5mm-x-45mm-200-pack/85991 They screw the boards to the joists where the tongue is, so no nail or screw heads on show. The groove side of each board is a little springy, since there's only the previous board's tongue holding it down there, but it seems OK - and a lot prettier than the mess I made of the ceiling. I've decided to try for a tung oil finish on both floor and ceiling, so 5L of "pure tung oil" is arriving tomorrow - but I'll just experiment with some offcuts for now, then give the ceiling a go. I expect rendering is going to be messy, so I can sand and treat after that's complete. Tomorrow or Friday I should finish the floor - then I can fir the windows, sort out the doors, and prep the walls for rendering. I'm trying to decide between an NHL2 or simple lime putty render, with a particular eye towards what's going to be closest to foolproof for someone with no practical experience. We only really played with clay plasters on the course, so I'm more out of my depth than usual on this one ^^. Initial investigations suggest the lime putty stuff will be easier to apply but require more aftercare - but it's also half the price, which might swing it, being honest. I need a couple of tonnes of the stuff, it adds up.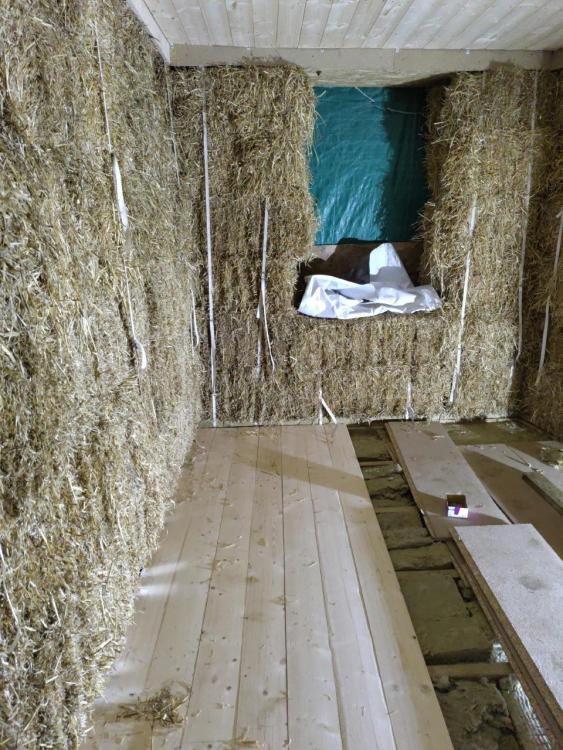
-
Mud hut damage repair advice needed.
Nick Thomas replied to Mud Hut Learner's topic in Bricklaying, Blockwork & Mortar
That's some intentional-looking damage . People rather than animals? I've seen one video where voids in a straw bale wall were filled in with expanding foam, but I don't know that it's wise. You'd want them filling with *something* though? Stuff straw in tightly, mesh over it again and then render over, perhaps? Is it lime render on the outside? If it feels like mud then it's probably actually a clay render, and you'd be quite lucky to have earth you dug from the ground next to the hut match it ^^. I've done a little bit of clay plastering onto straw, and it went on easily, but the detail escapes me right now. Poking at books, I found https://www.amazon.co.uk/Clay-Lime-Renders-Plasters-Paints/dp/0857842692 - I haven't read it, but will do so this week. I've got some lime rendering to do soon anyway. -
Slaying the demon chimney stack
Nick Thomas replied to Nick Thomas's topic in General Self Build & DIY Discussion
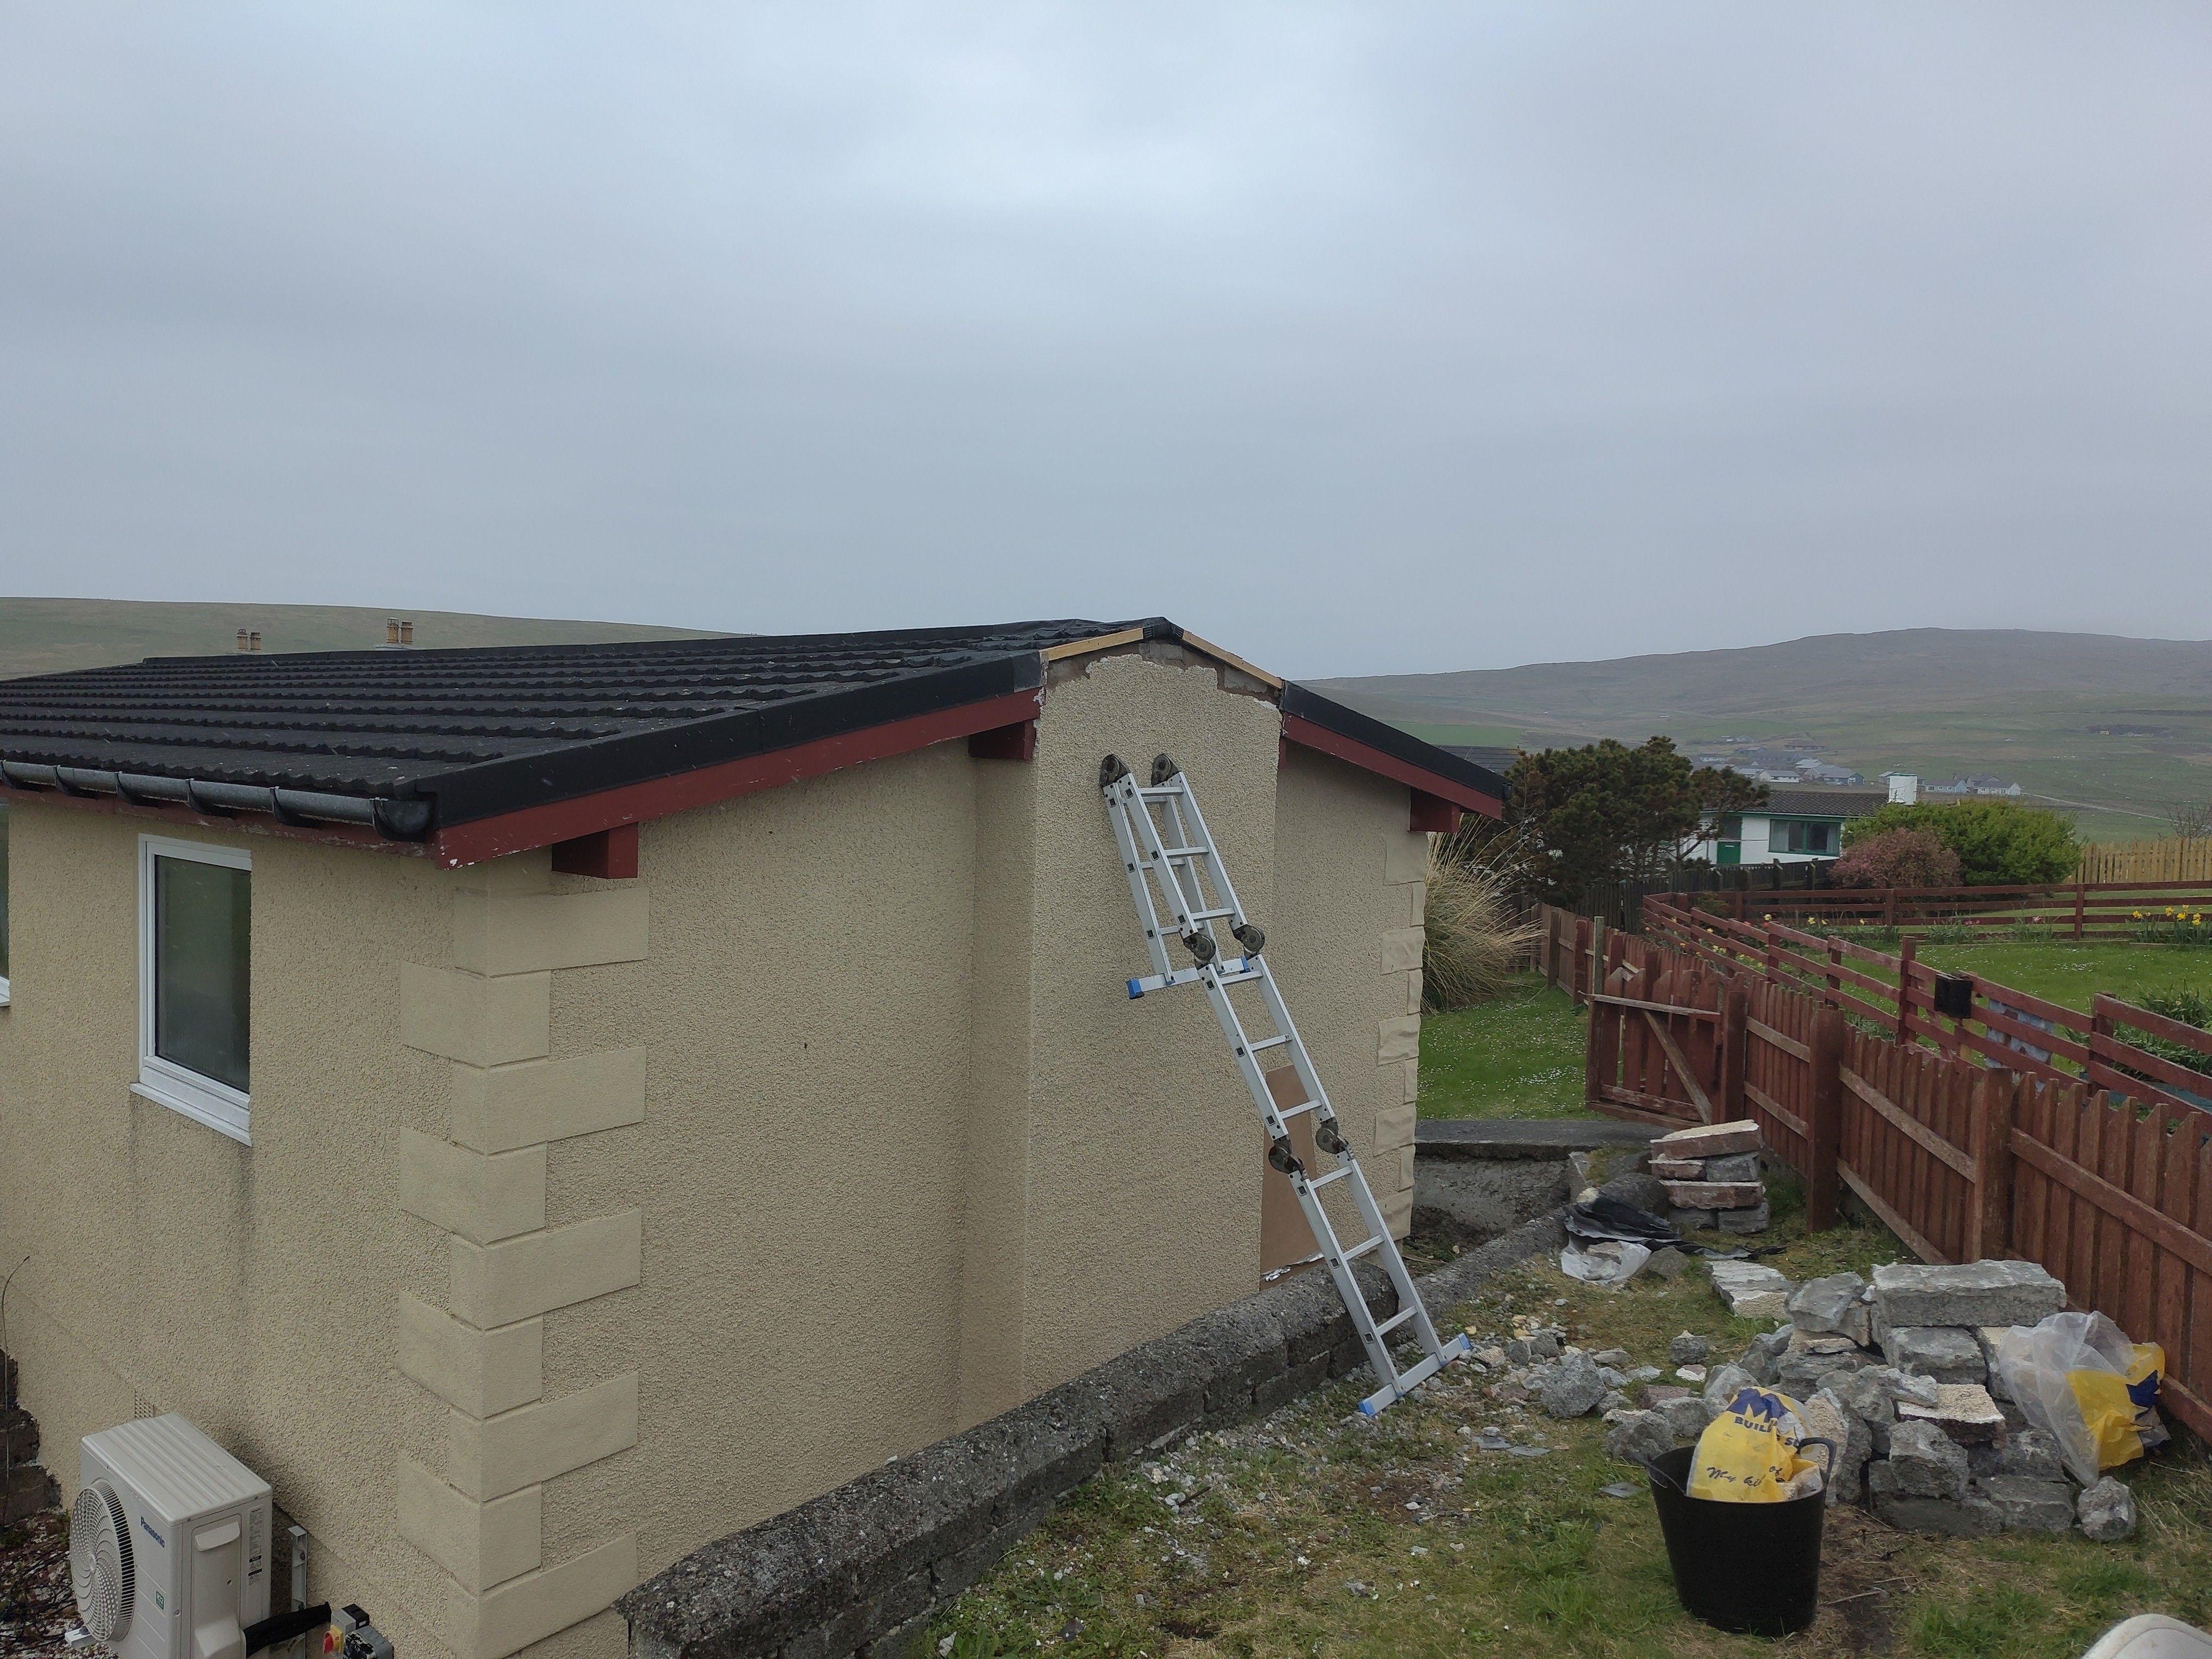
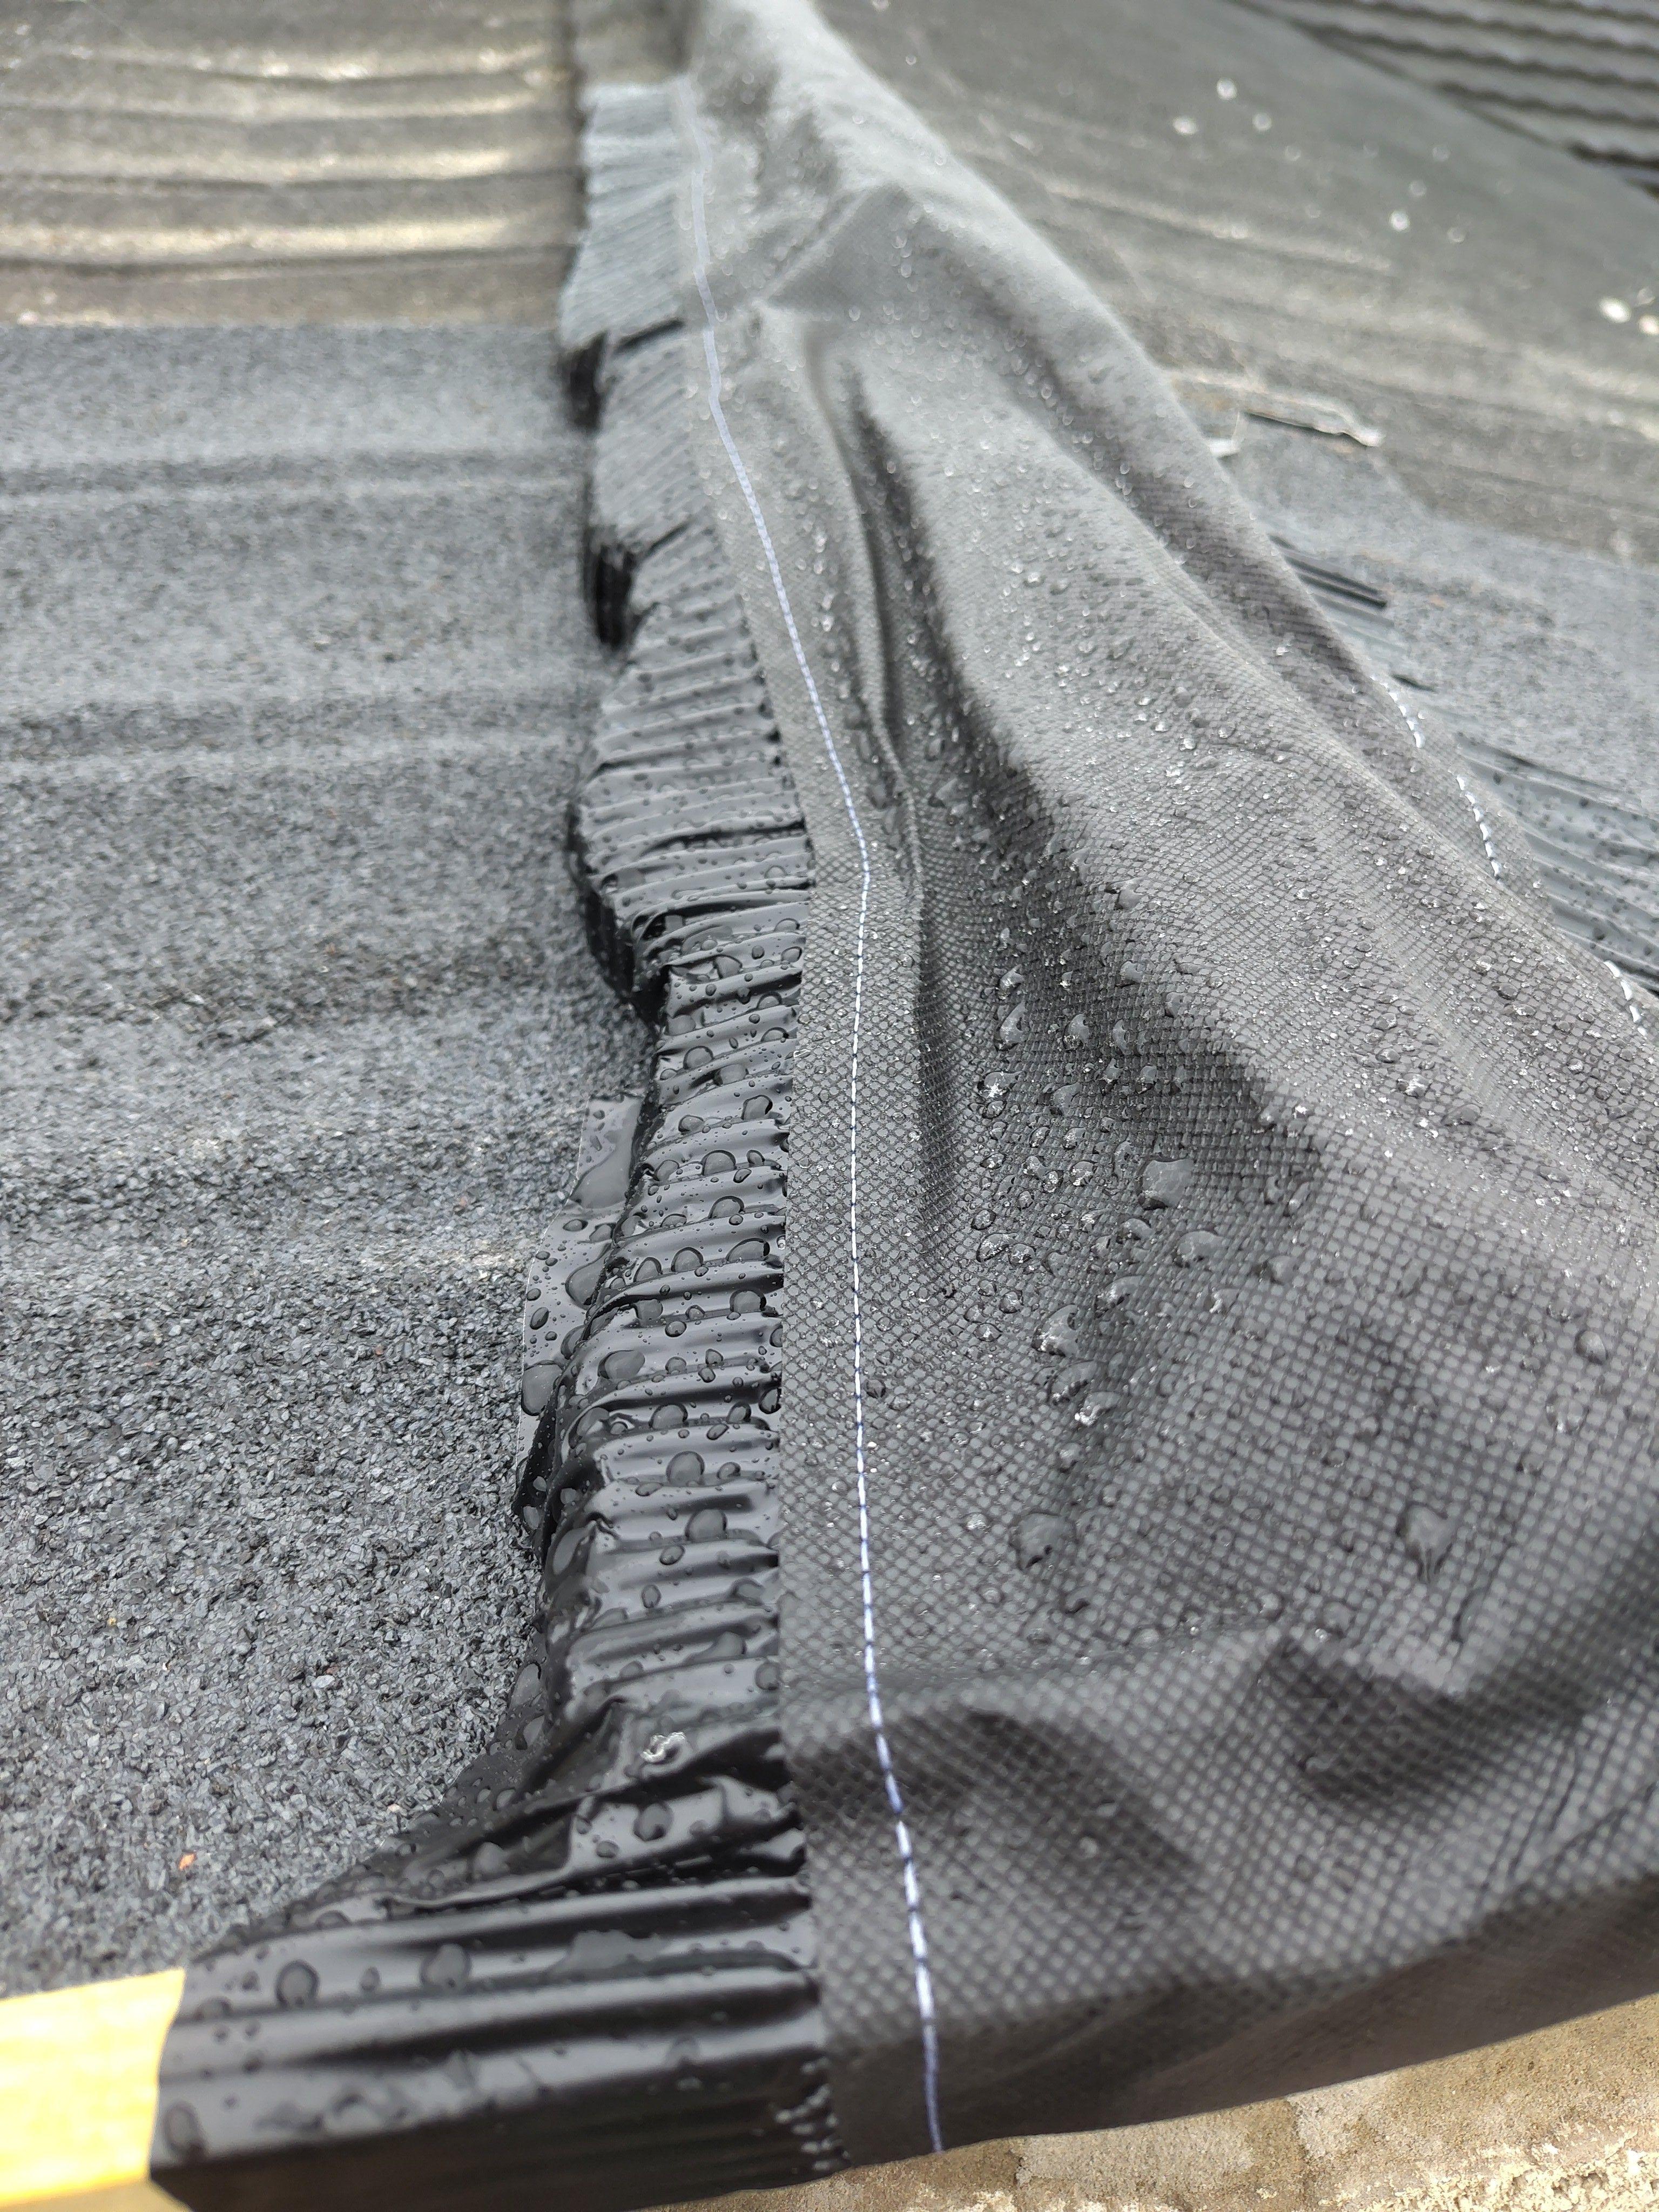
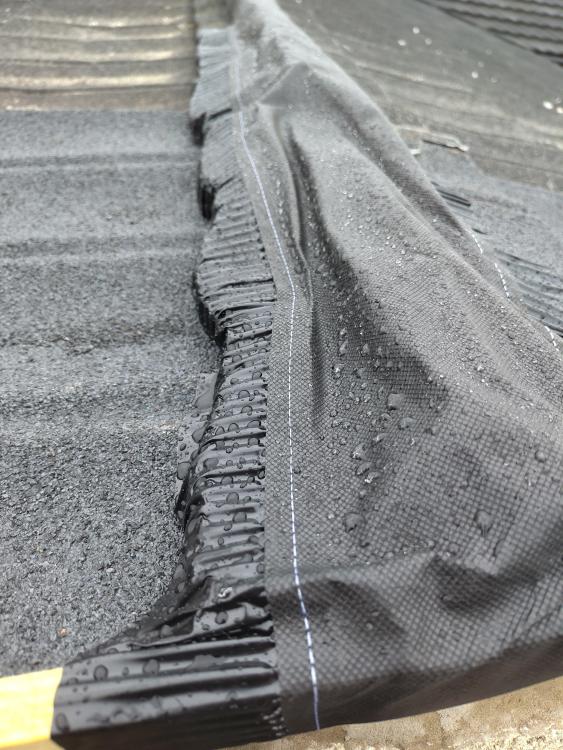
OK, I'm watertight - and it is very conveniently raining, so I'm just sat waiting to see if I get a leak or not . The dry ridge membrane is less sturdy than I imagined, but in fairness it's designed to go under a real ridge, rather than being the ridge itself. I'm happy enough leaving it like that until I can get back in the summer with the real metal pieces, though. The bargeboard is really just a placeholder, below that very skinny wood will go some 8x1, and if I'm lucky that might hide all the missing render - if not, there'll be a small patch to reinstate. Since i need to cut away some of the other render to install it, I won't be getting to it on this trip either, but I'm happy to call it a success overall. Take that, chimney!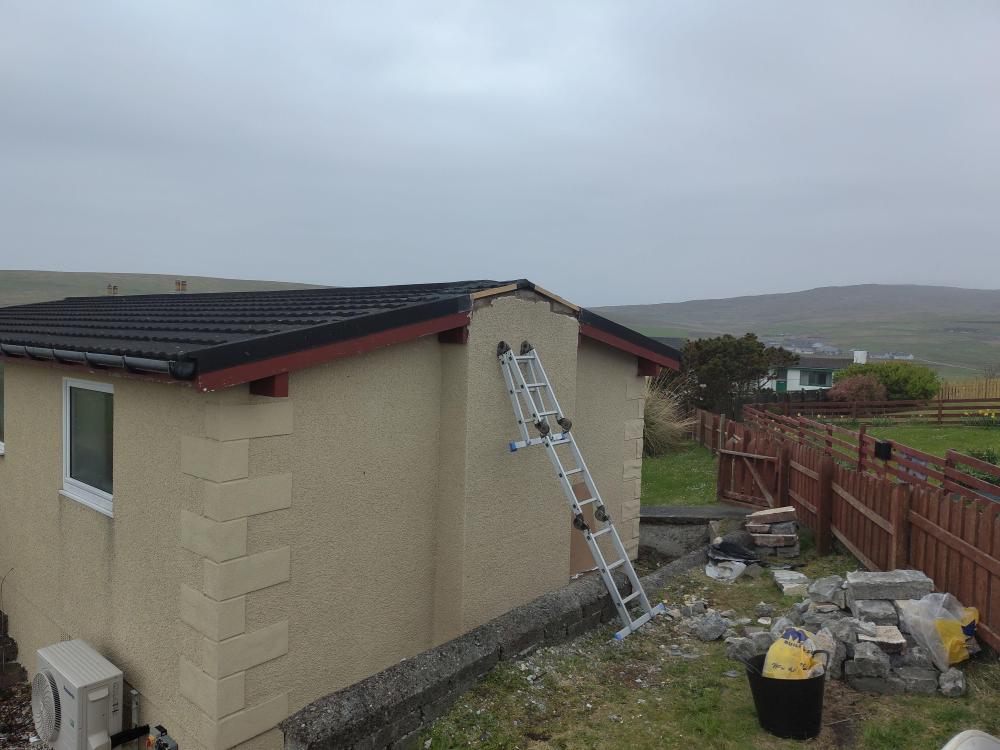
-
Slaying the demon chimney stack
Nick Thomas replied to Nick Thomas's topic in General Self Build & DIY Discussion
Oh, turns out it's not decra - it's metrotile. Seems to be more or less the same stuff though. -
Slaying the demon chimney stack
Nick Thomas replied to Nick Thomas's topic in General Self Build & DIY Discussion
1 done, working on 2 ^^. For 3, I've grabbed a "timloc dry ridge kit". I'm not very interested in most of it, but it comes with a nice membrane with sticky stuff either side that can pretend to be the ridge *and* edge trim - hopefully. If not, I've got lots of offcuts of panel, I suppose I could try to fabricate the required bits. Turns out lead is absolutely not wise to use on these metal roofs, due to the risk of bimetallic corrosion. I could really see it when I took the chimney flashing off, too - rust everywhere. We're pretty close to the sea, of course.
-
Slaying the demon chimney stack
Nick Thomas replied to Nick Thomas's topic in General Self Build & DIY Discussion
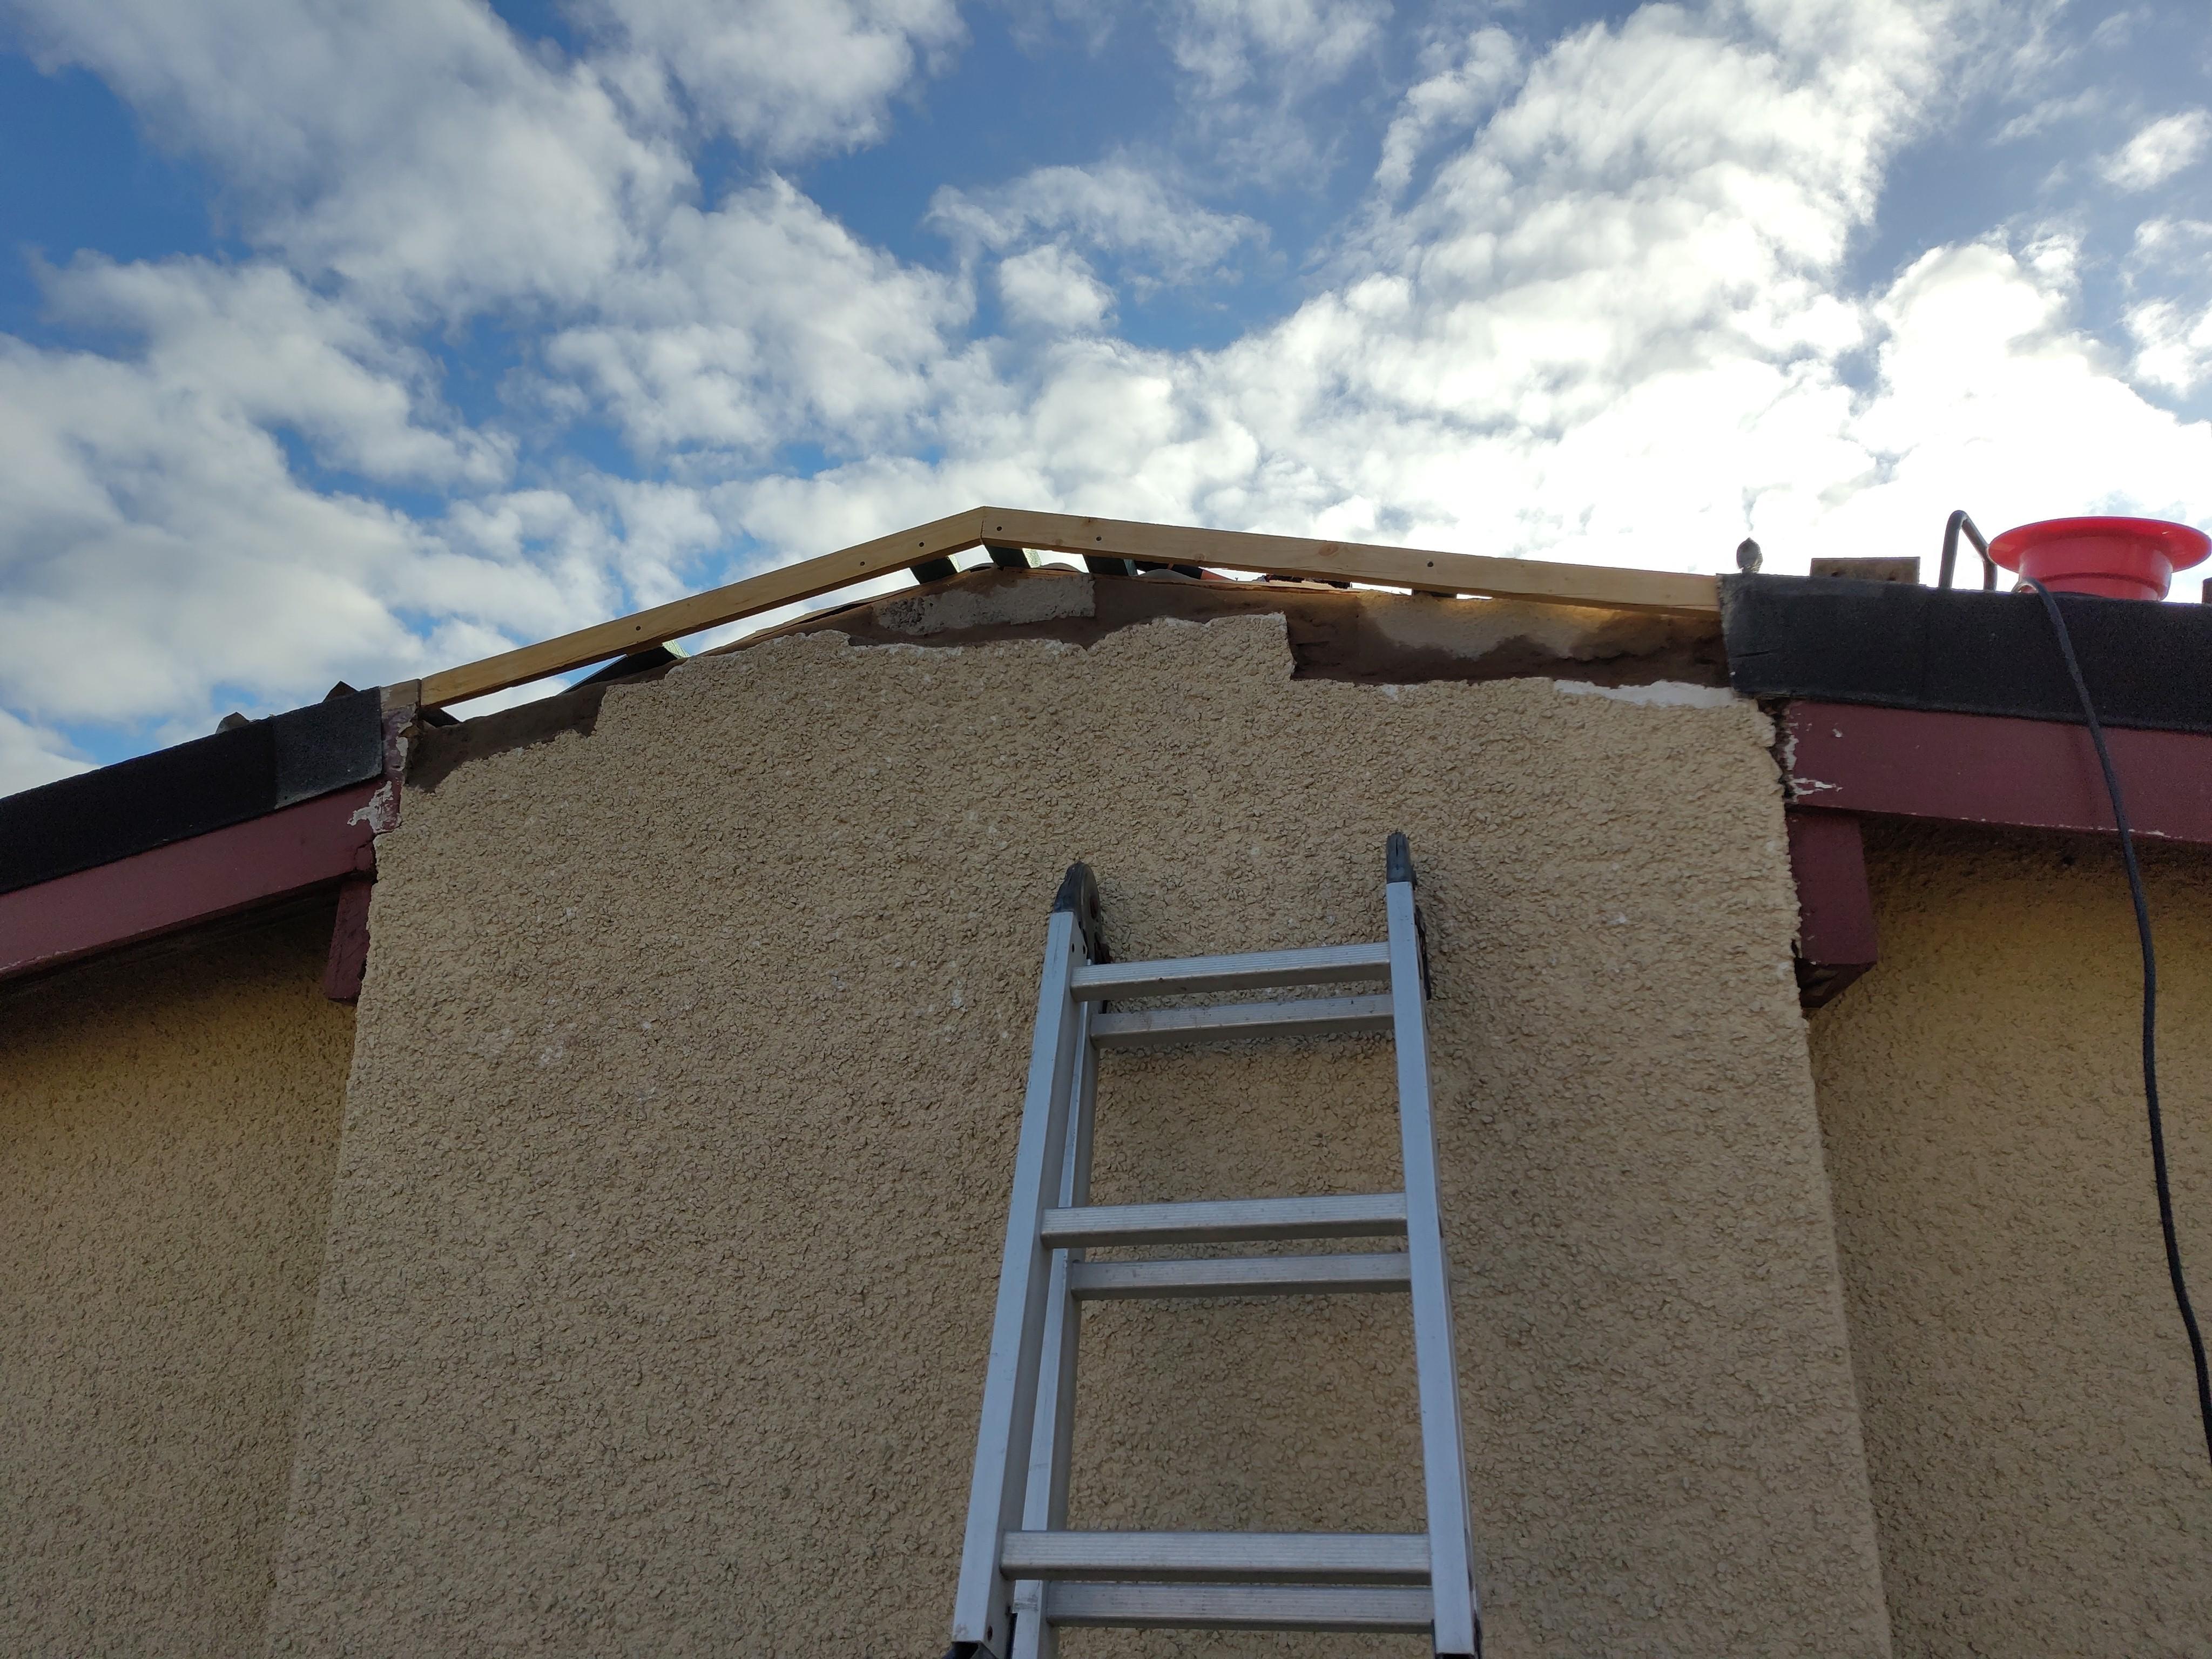
I rather liked the artist impressions - especially back when they were watercolours! I spent the day fiddling with mock-up formwork and not really getting anywhere; the height requirement is just so impractical, I think the concrete requirement was up from 80 ->240kg or so. Fortunately, a neighbour with the same roof system happened by and just happened to have a stock of spares, so I've got a new plan A: 1. Get some timbers and battens put together, fastened to the blocks making up the outside of the stack - those are new and not crumbly at all. 2. Nail the decra into place 3. ??? 4. Celebrate Still working on 3, as I don't have the ridgepole-shaped bits or the edge trim bits, but even if they end up being lead, there'll be a lot less of it than my original plan C! The island life is great sometimes, it really is. -
Slaying the demon chimney stack
Nick Thomas replied to Nick Thomas's topic in General Self Build & DIY Discussion
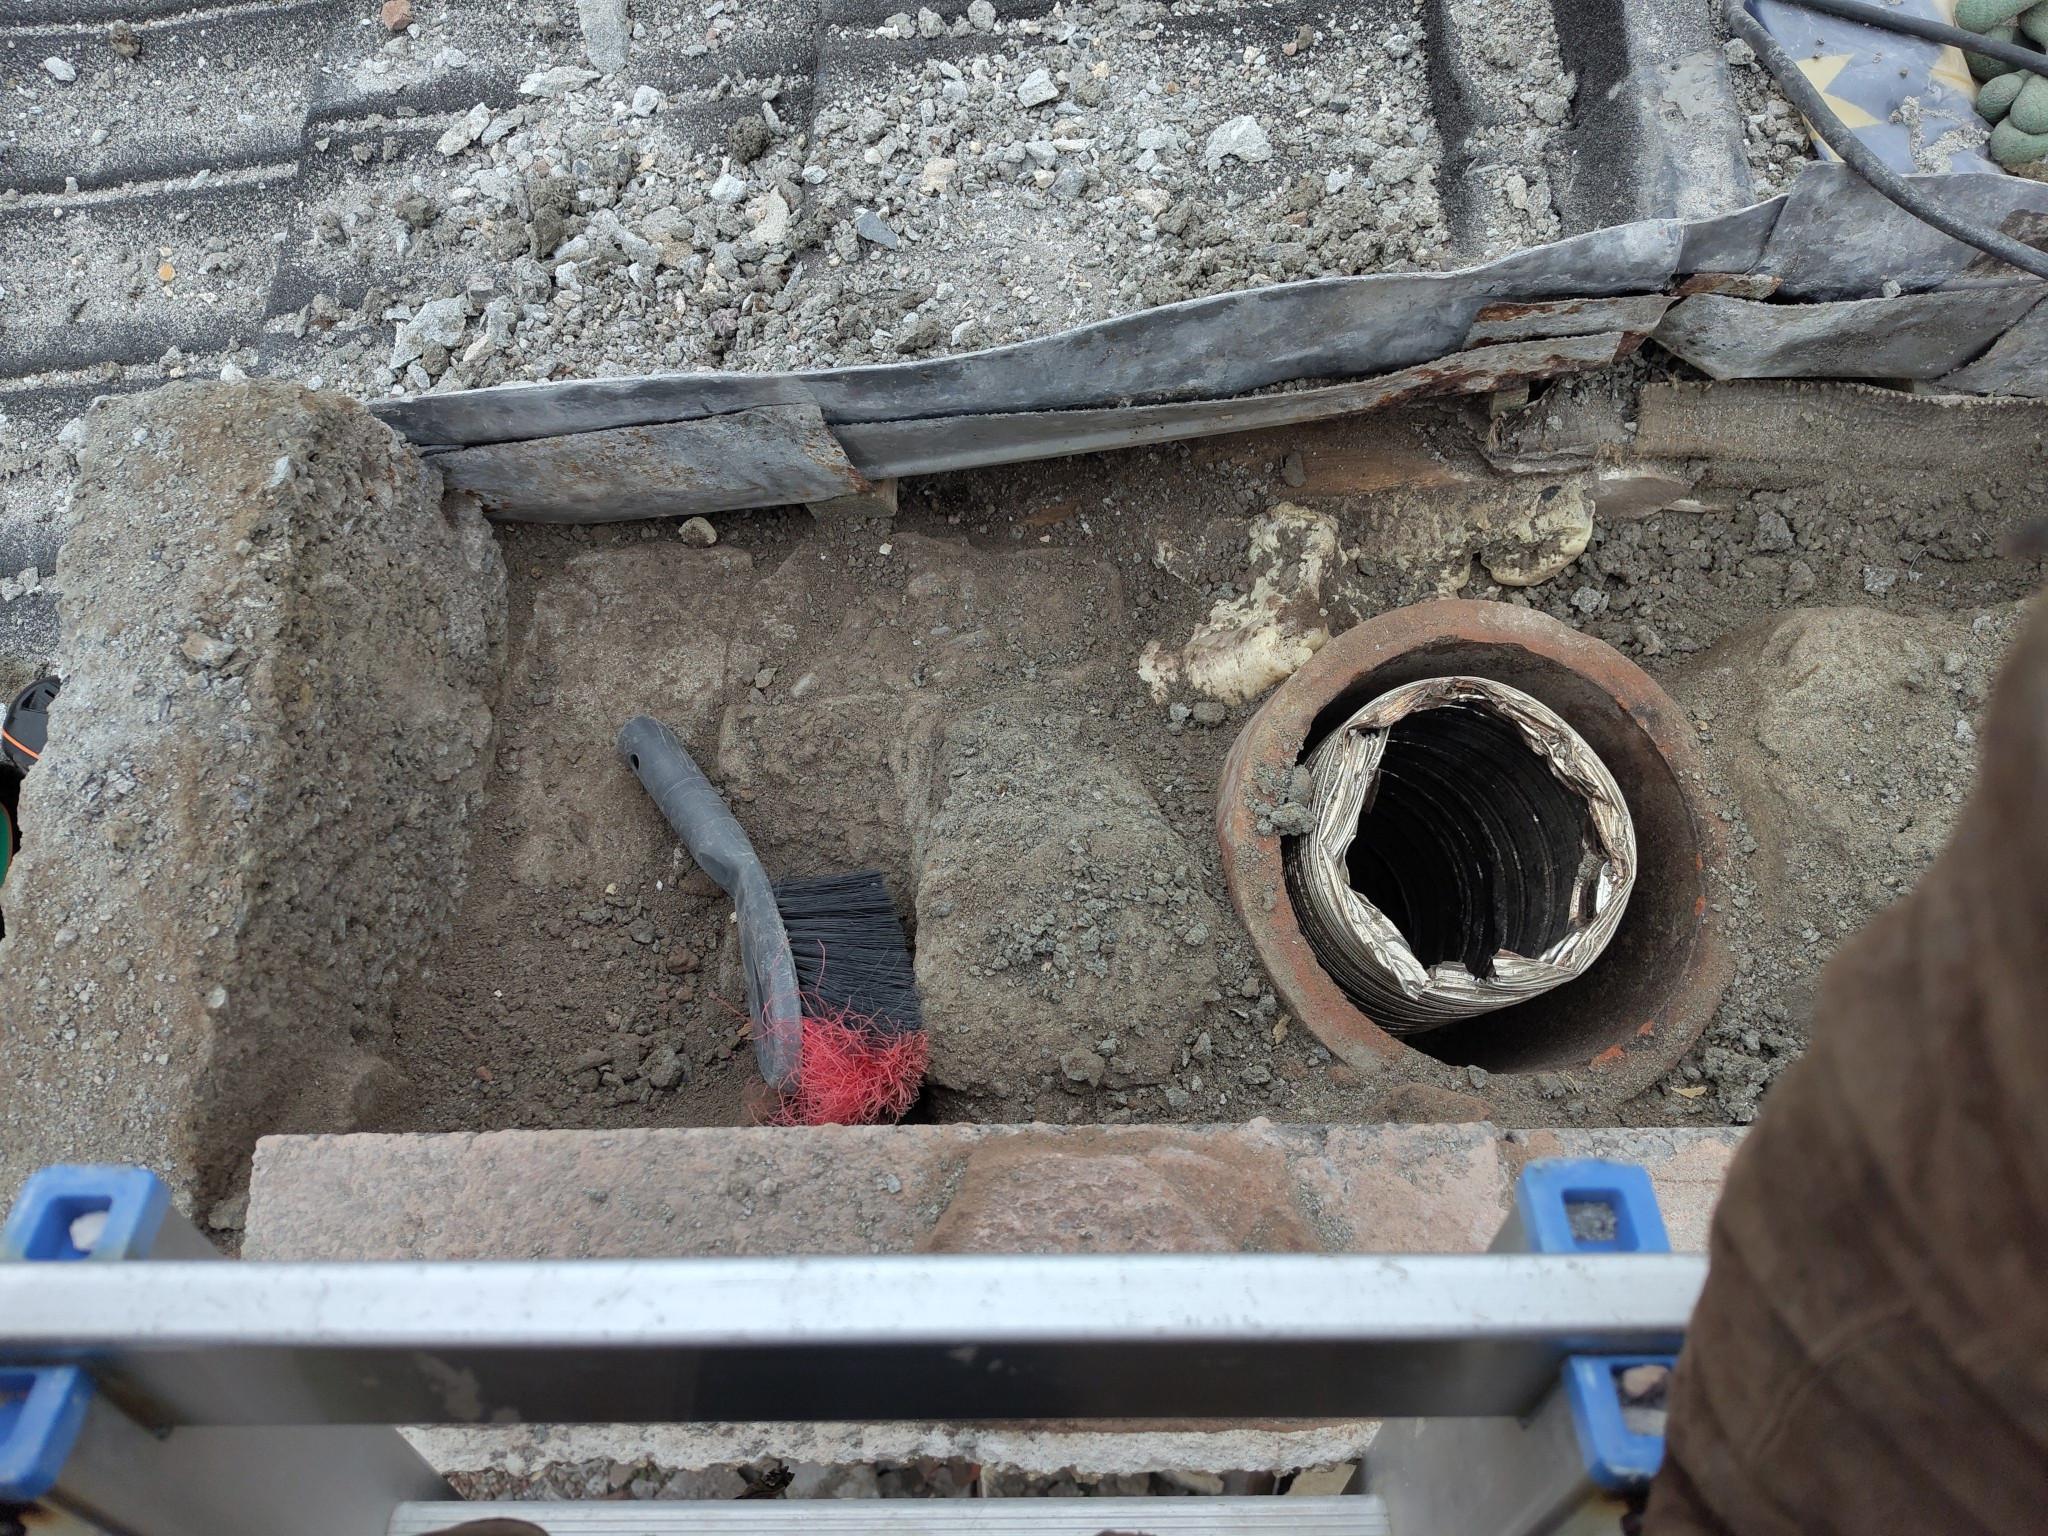
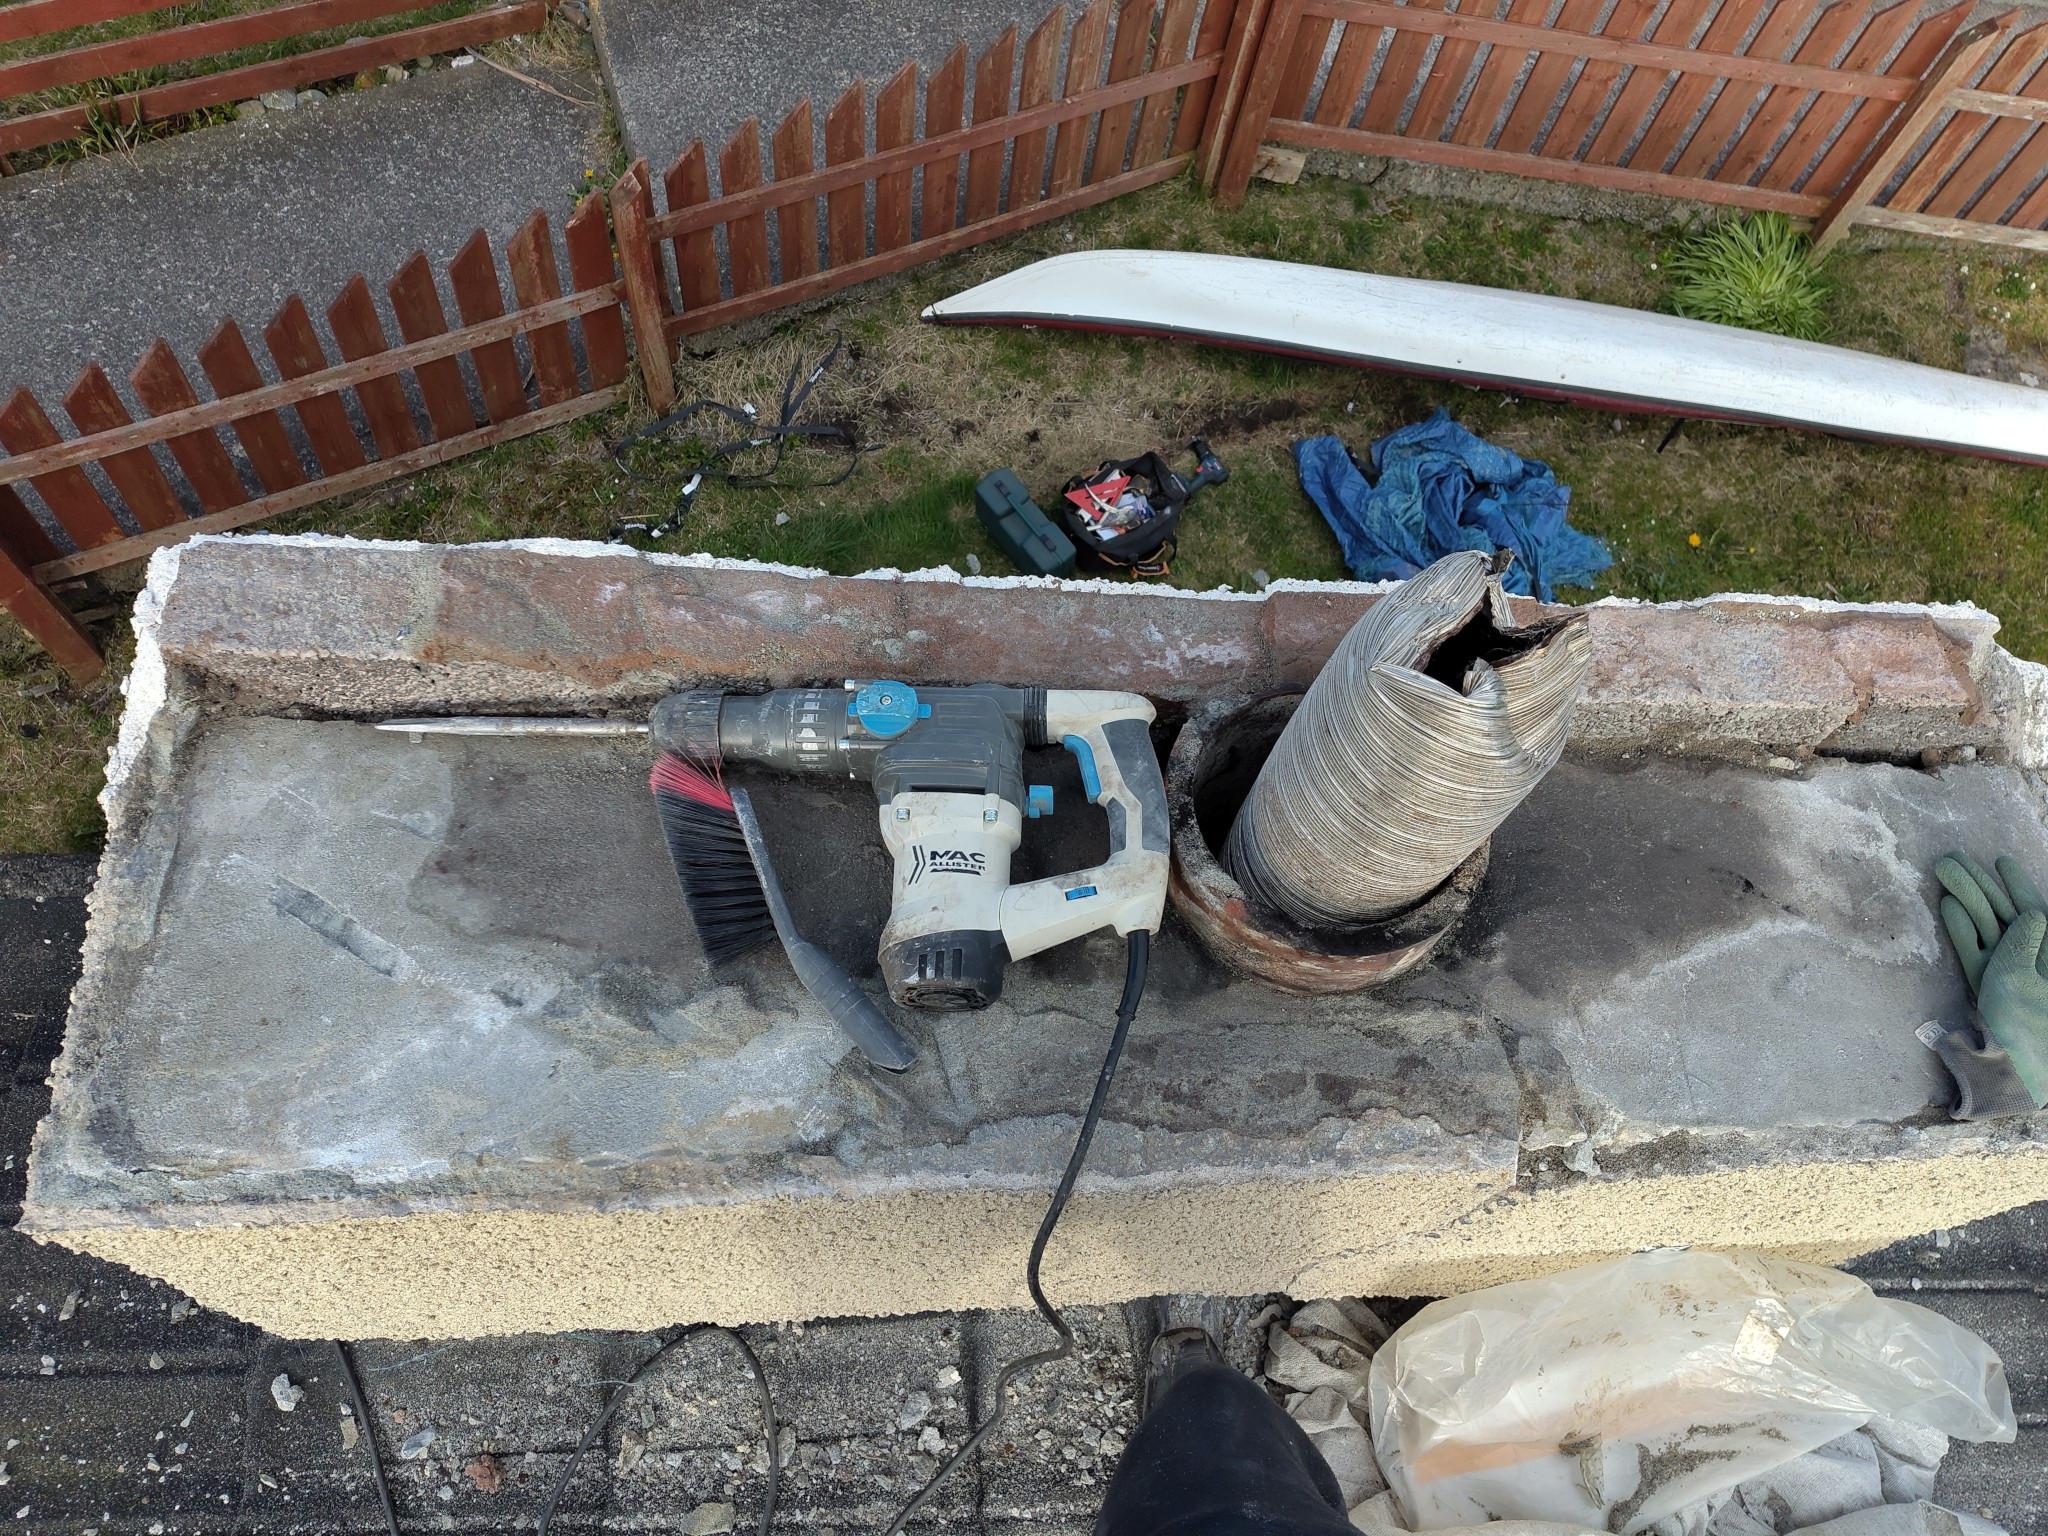
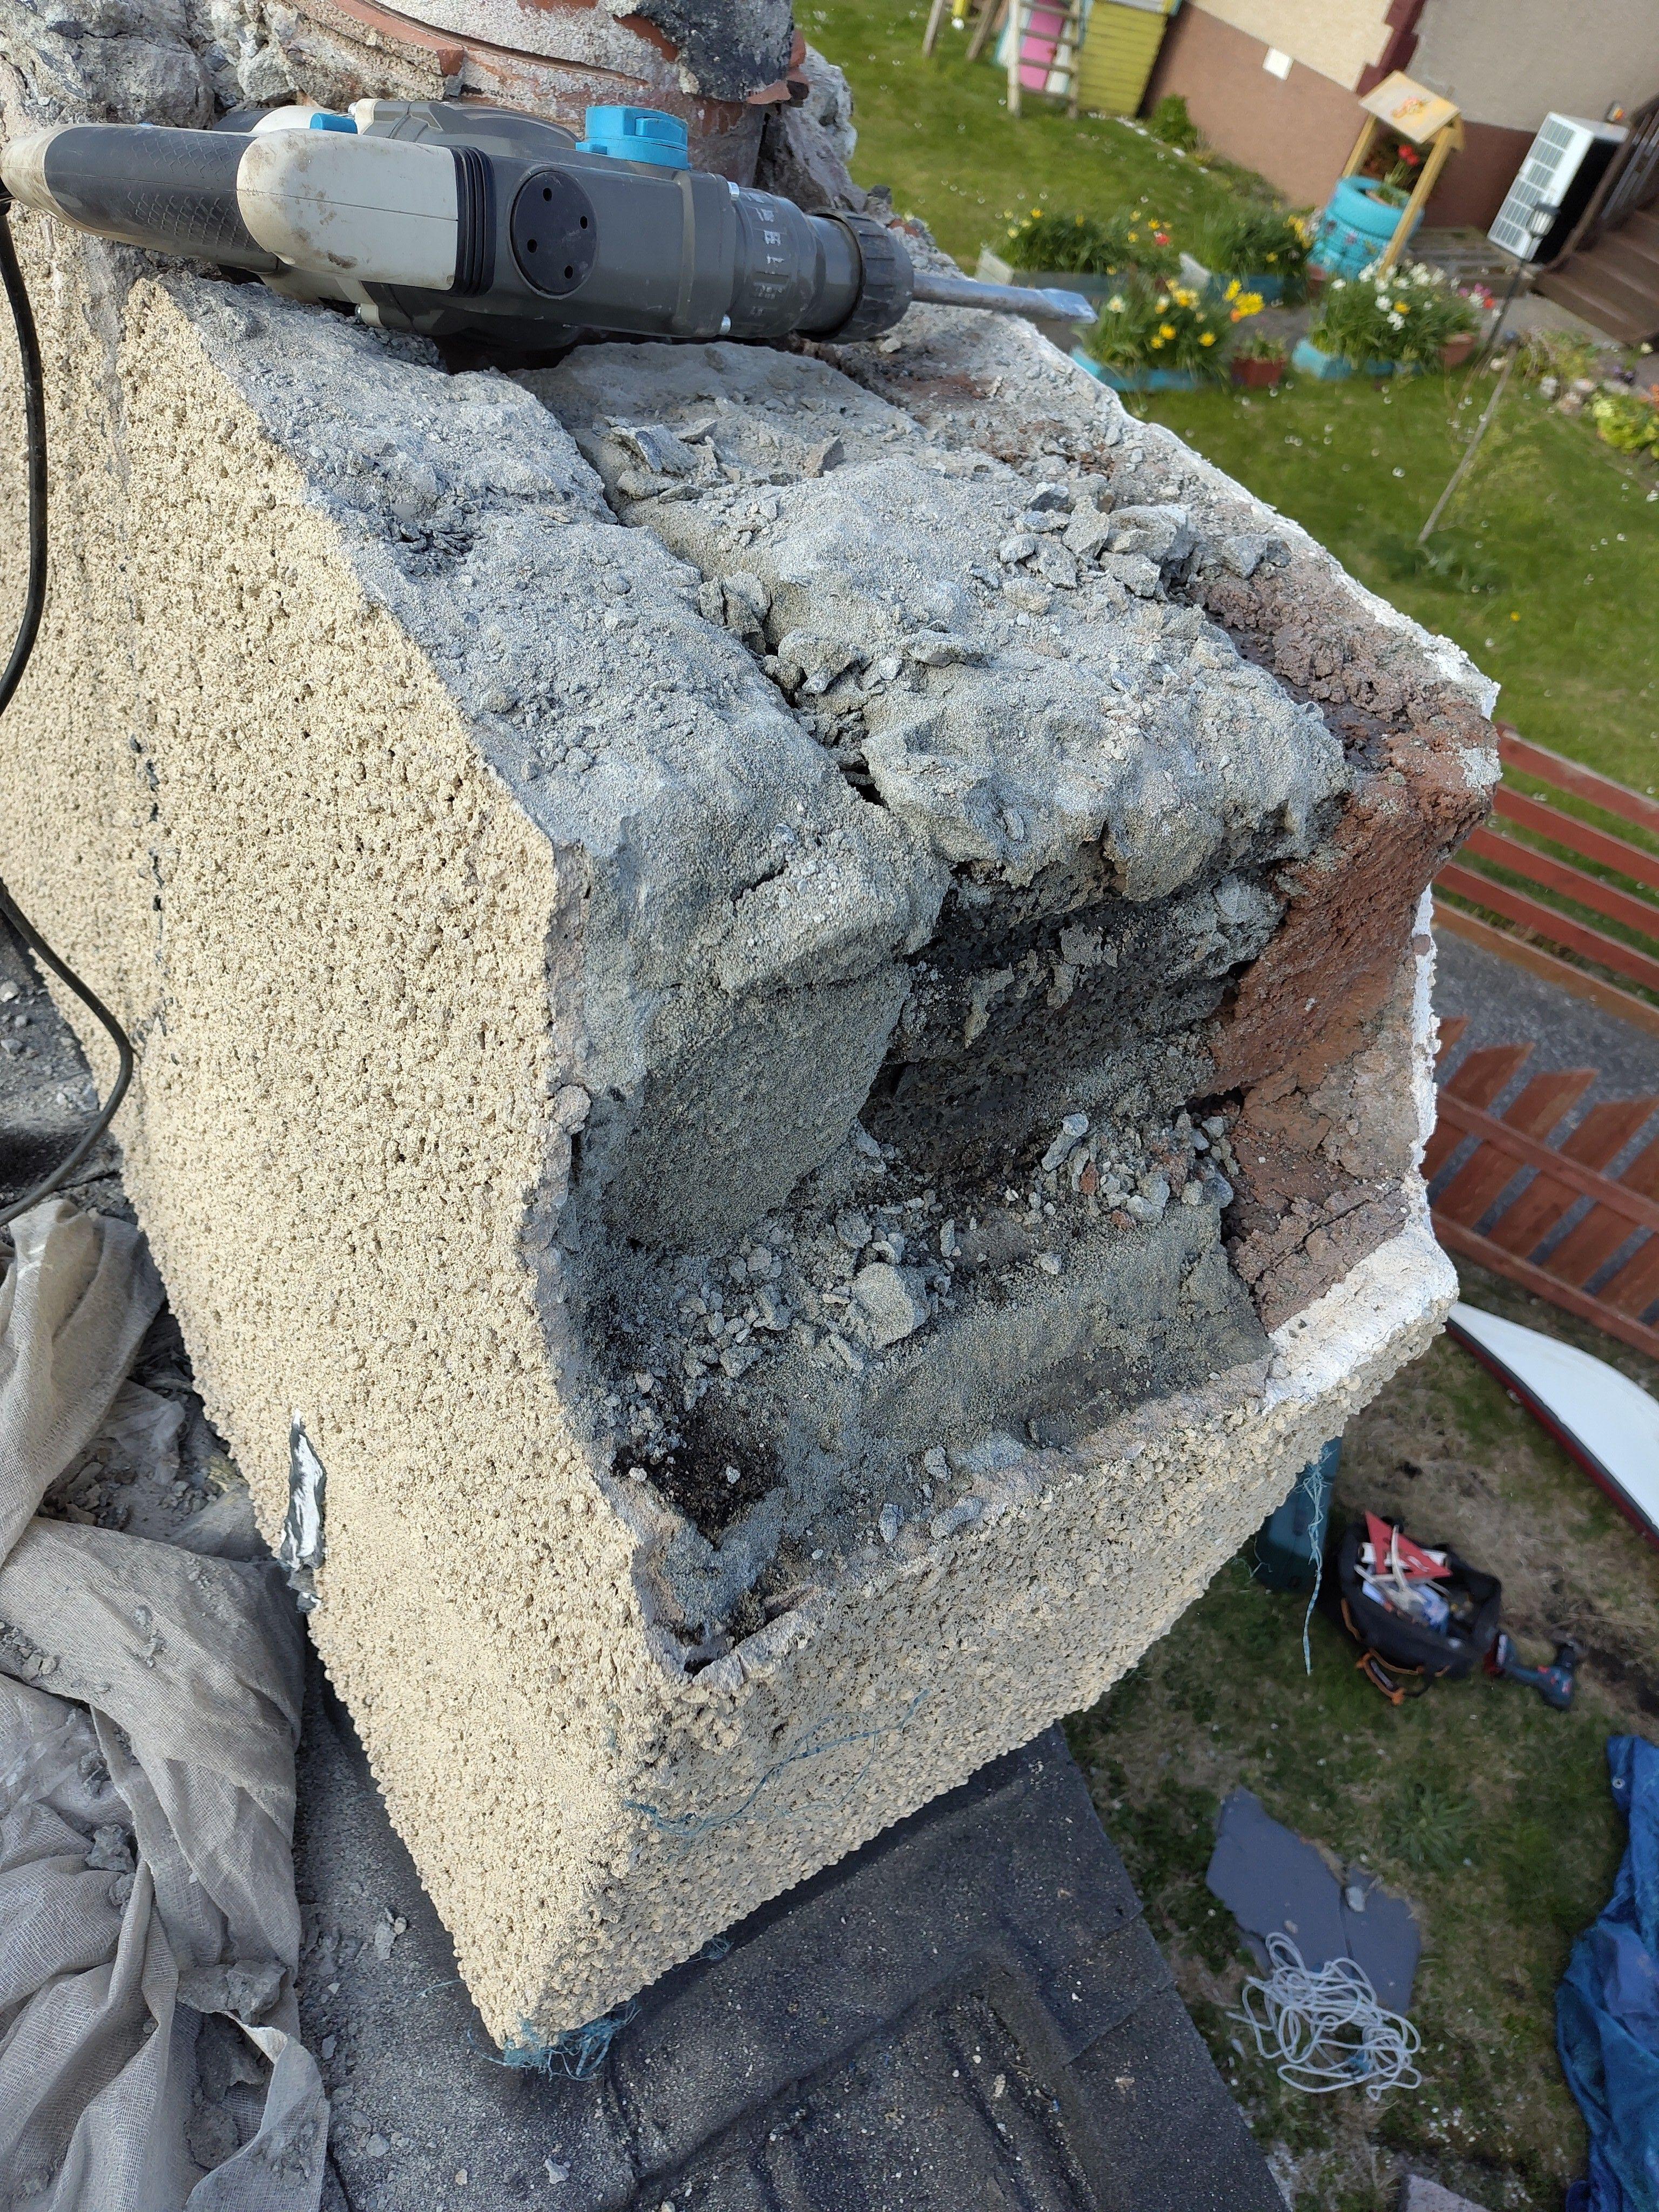
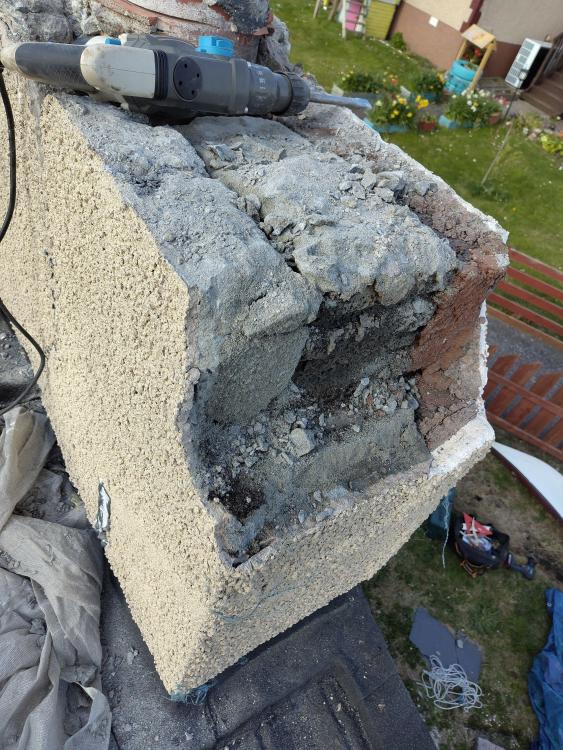
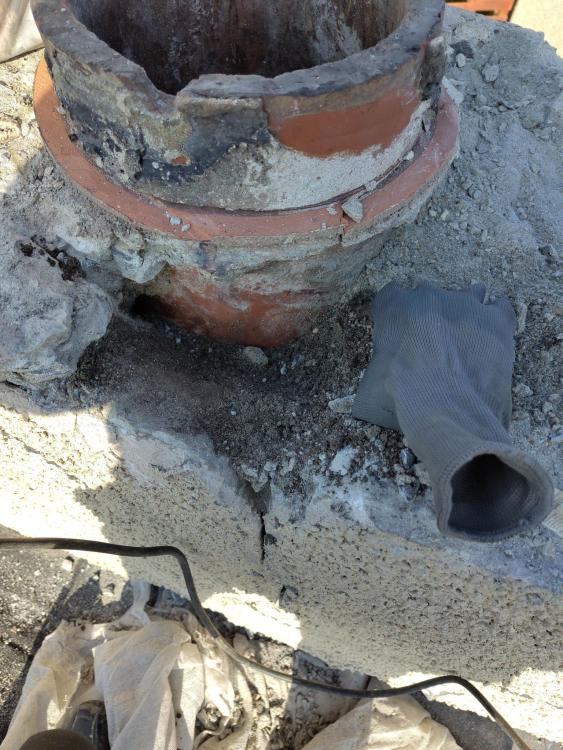
OK, the stack is gone. I ended up going down one course further than I wanted though, as the blocks on the inside face were completely rotten - they crumbled away as I removed the blocks on top of them - so I'm kind of in no-man's-land, height wise. Too low to easily cast a crown, too high to rebuild the roof, even if I had the parts. Fun fun. Yup, that's expanding foam - making up a good chunk of one of the block that crumbled away, and the one below, bless it. The top of the roof deck is just visible; it's above the surface near the ridge line, but then dips down below. If I try to cast something, I'm struggling a bit with the form - it'll have to come up flush against the lead, and then have an overhang past it to keep the water out, and needs to be at least 50mm thick everywhere. Tricky, but... doable? I suppose I could lay some block to get some height, then cast over that, but presumably I'd need to leave several days between the two stages? I could dig out yet more block and try to extend the wooden roof, but I really don't have the parts 😬. Big sheet of lead and a hammer?

-
Slaying the demon chimney stack
Nick Thomas replied to Nick Thomas's topic in General Self Build & DIY Discussion
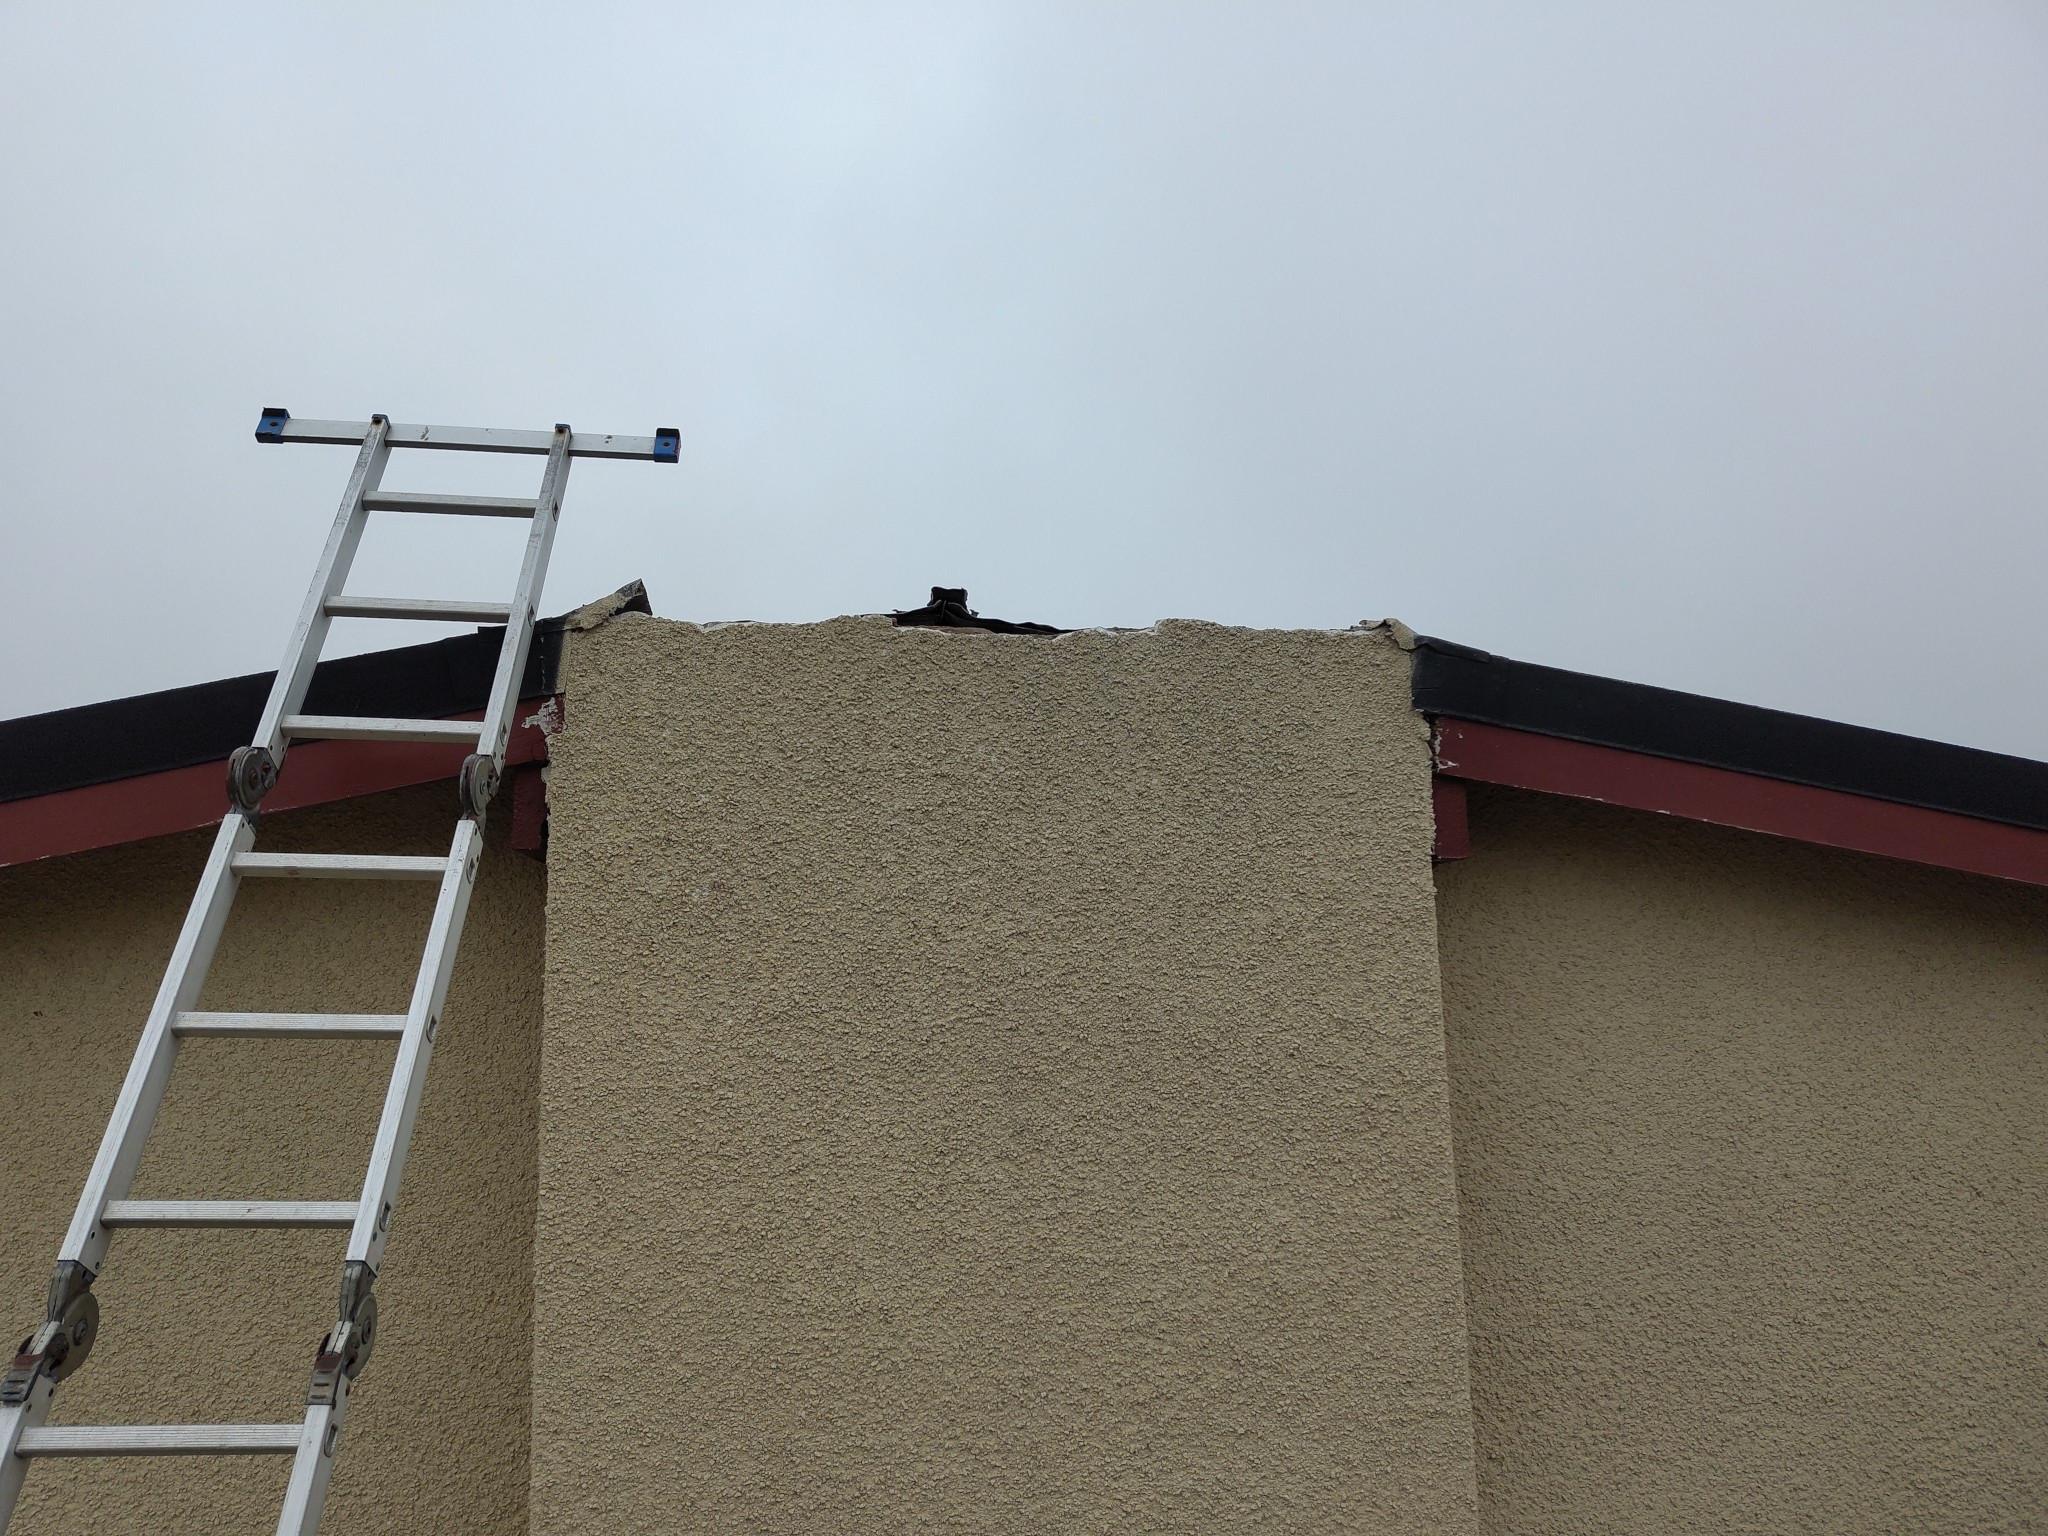
OK, I'm up and making some progress. I wasn't really expecting another chimney crown a third of the way down, but it made a decent place to finish for today. Same again tomorrow; I should be able to get to the roofline if I stick at it. I'm told it only takes 2-3 weeks for decra panels to arrive once ordered, so I'm definitely not rebuilding the roof- I was hoping they held small quantities in stock. Ah well. I'll pour yet another chimney crown instead.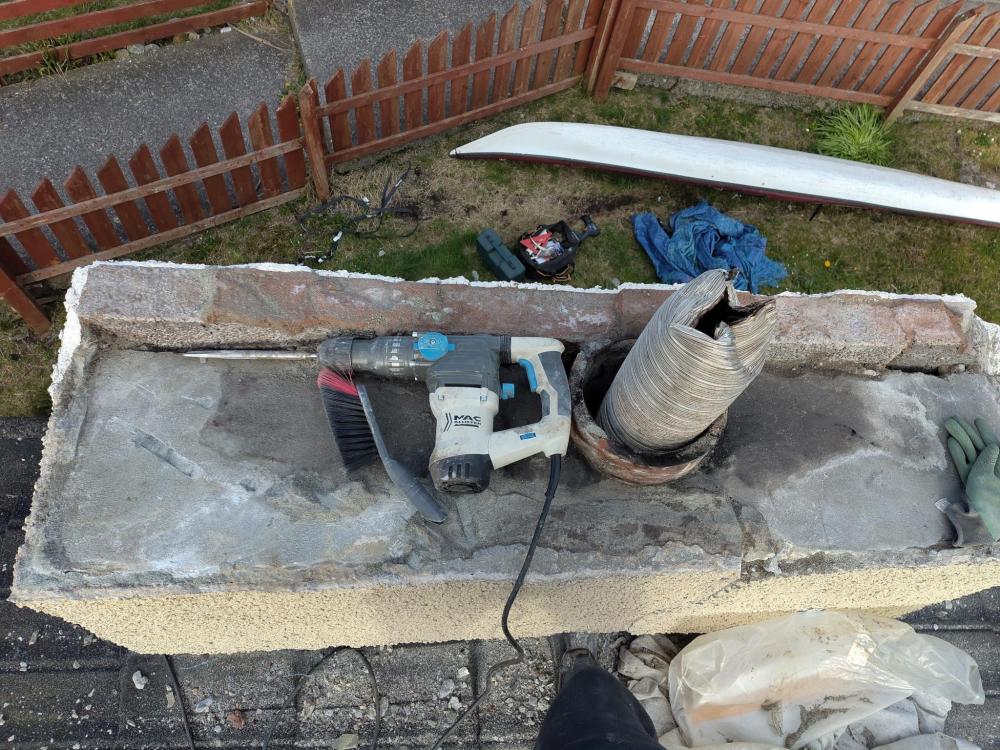
-
Slaying the demon chimney stack
Nick Thomas replied to Nick Thomas's topic in General Self Build & DIY Discussion
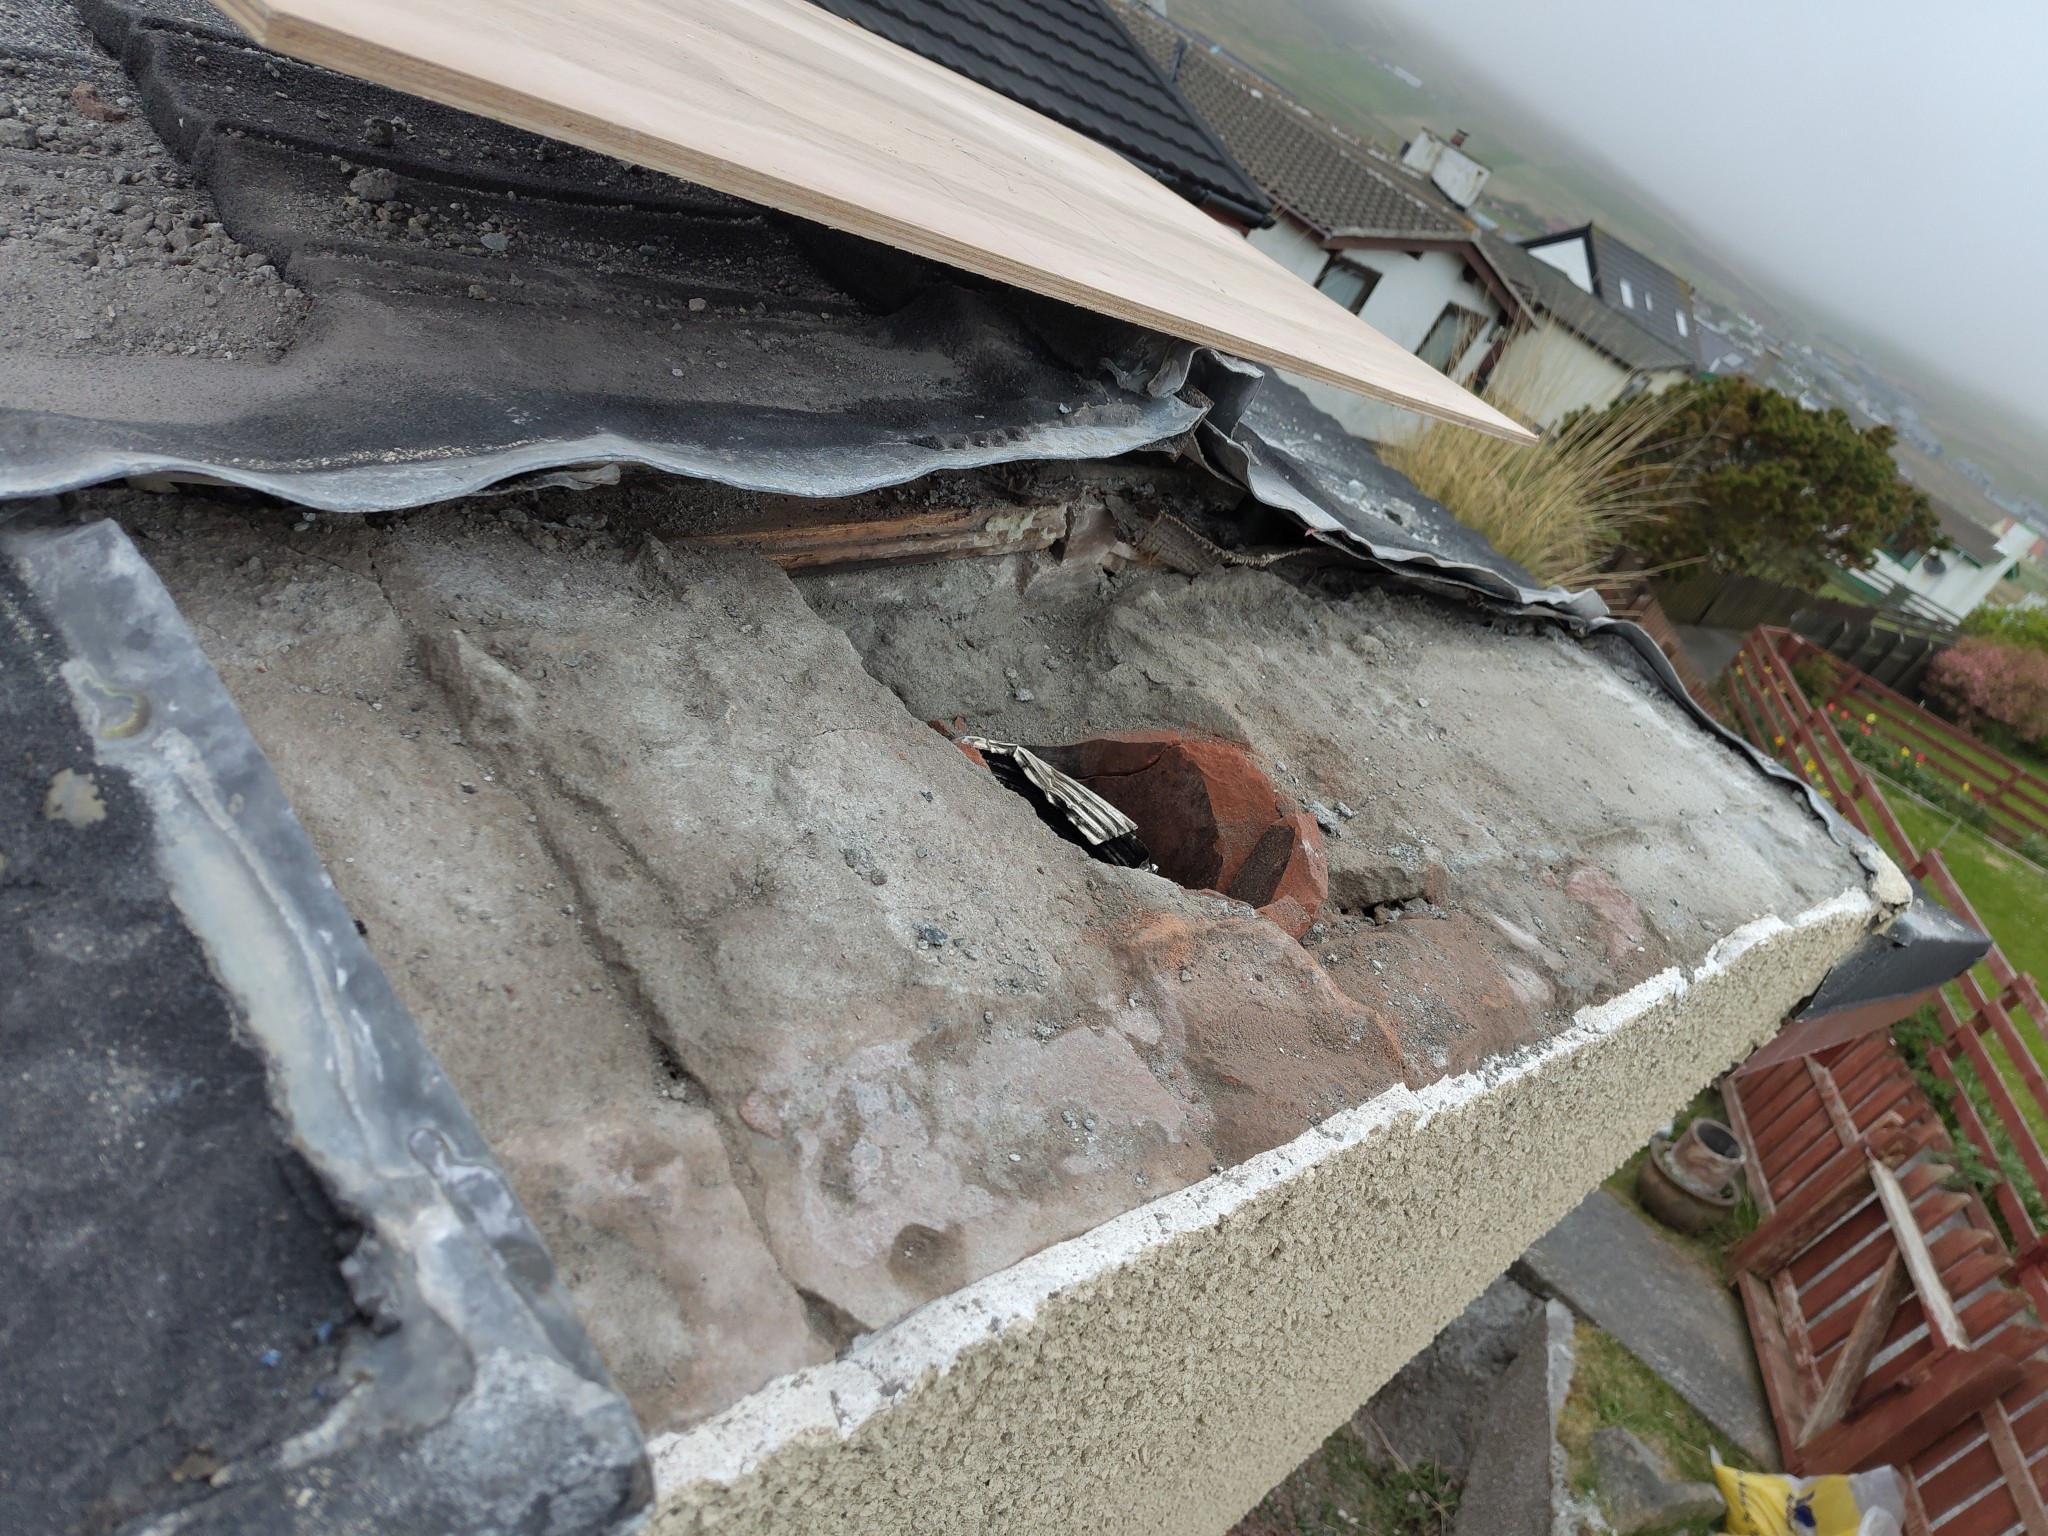
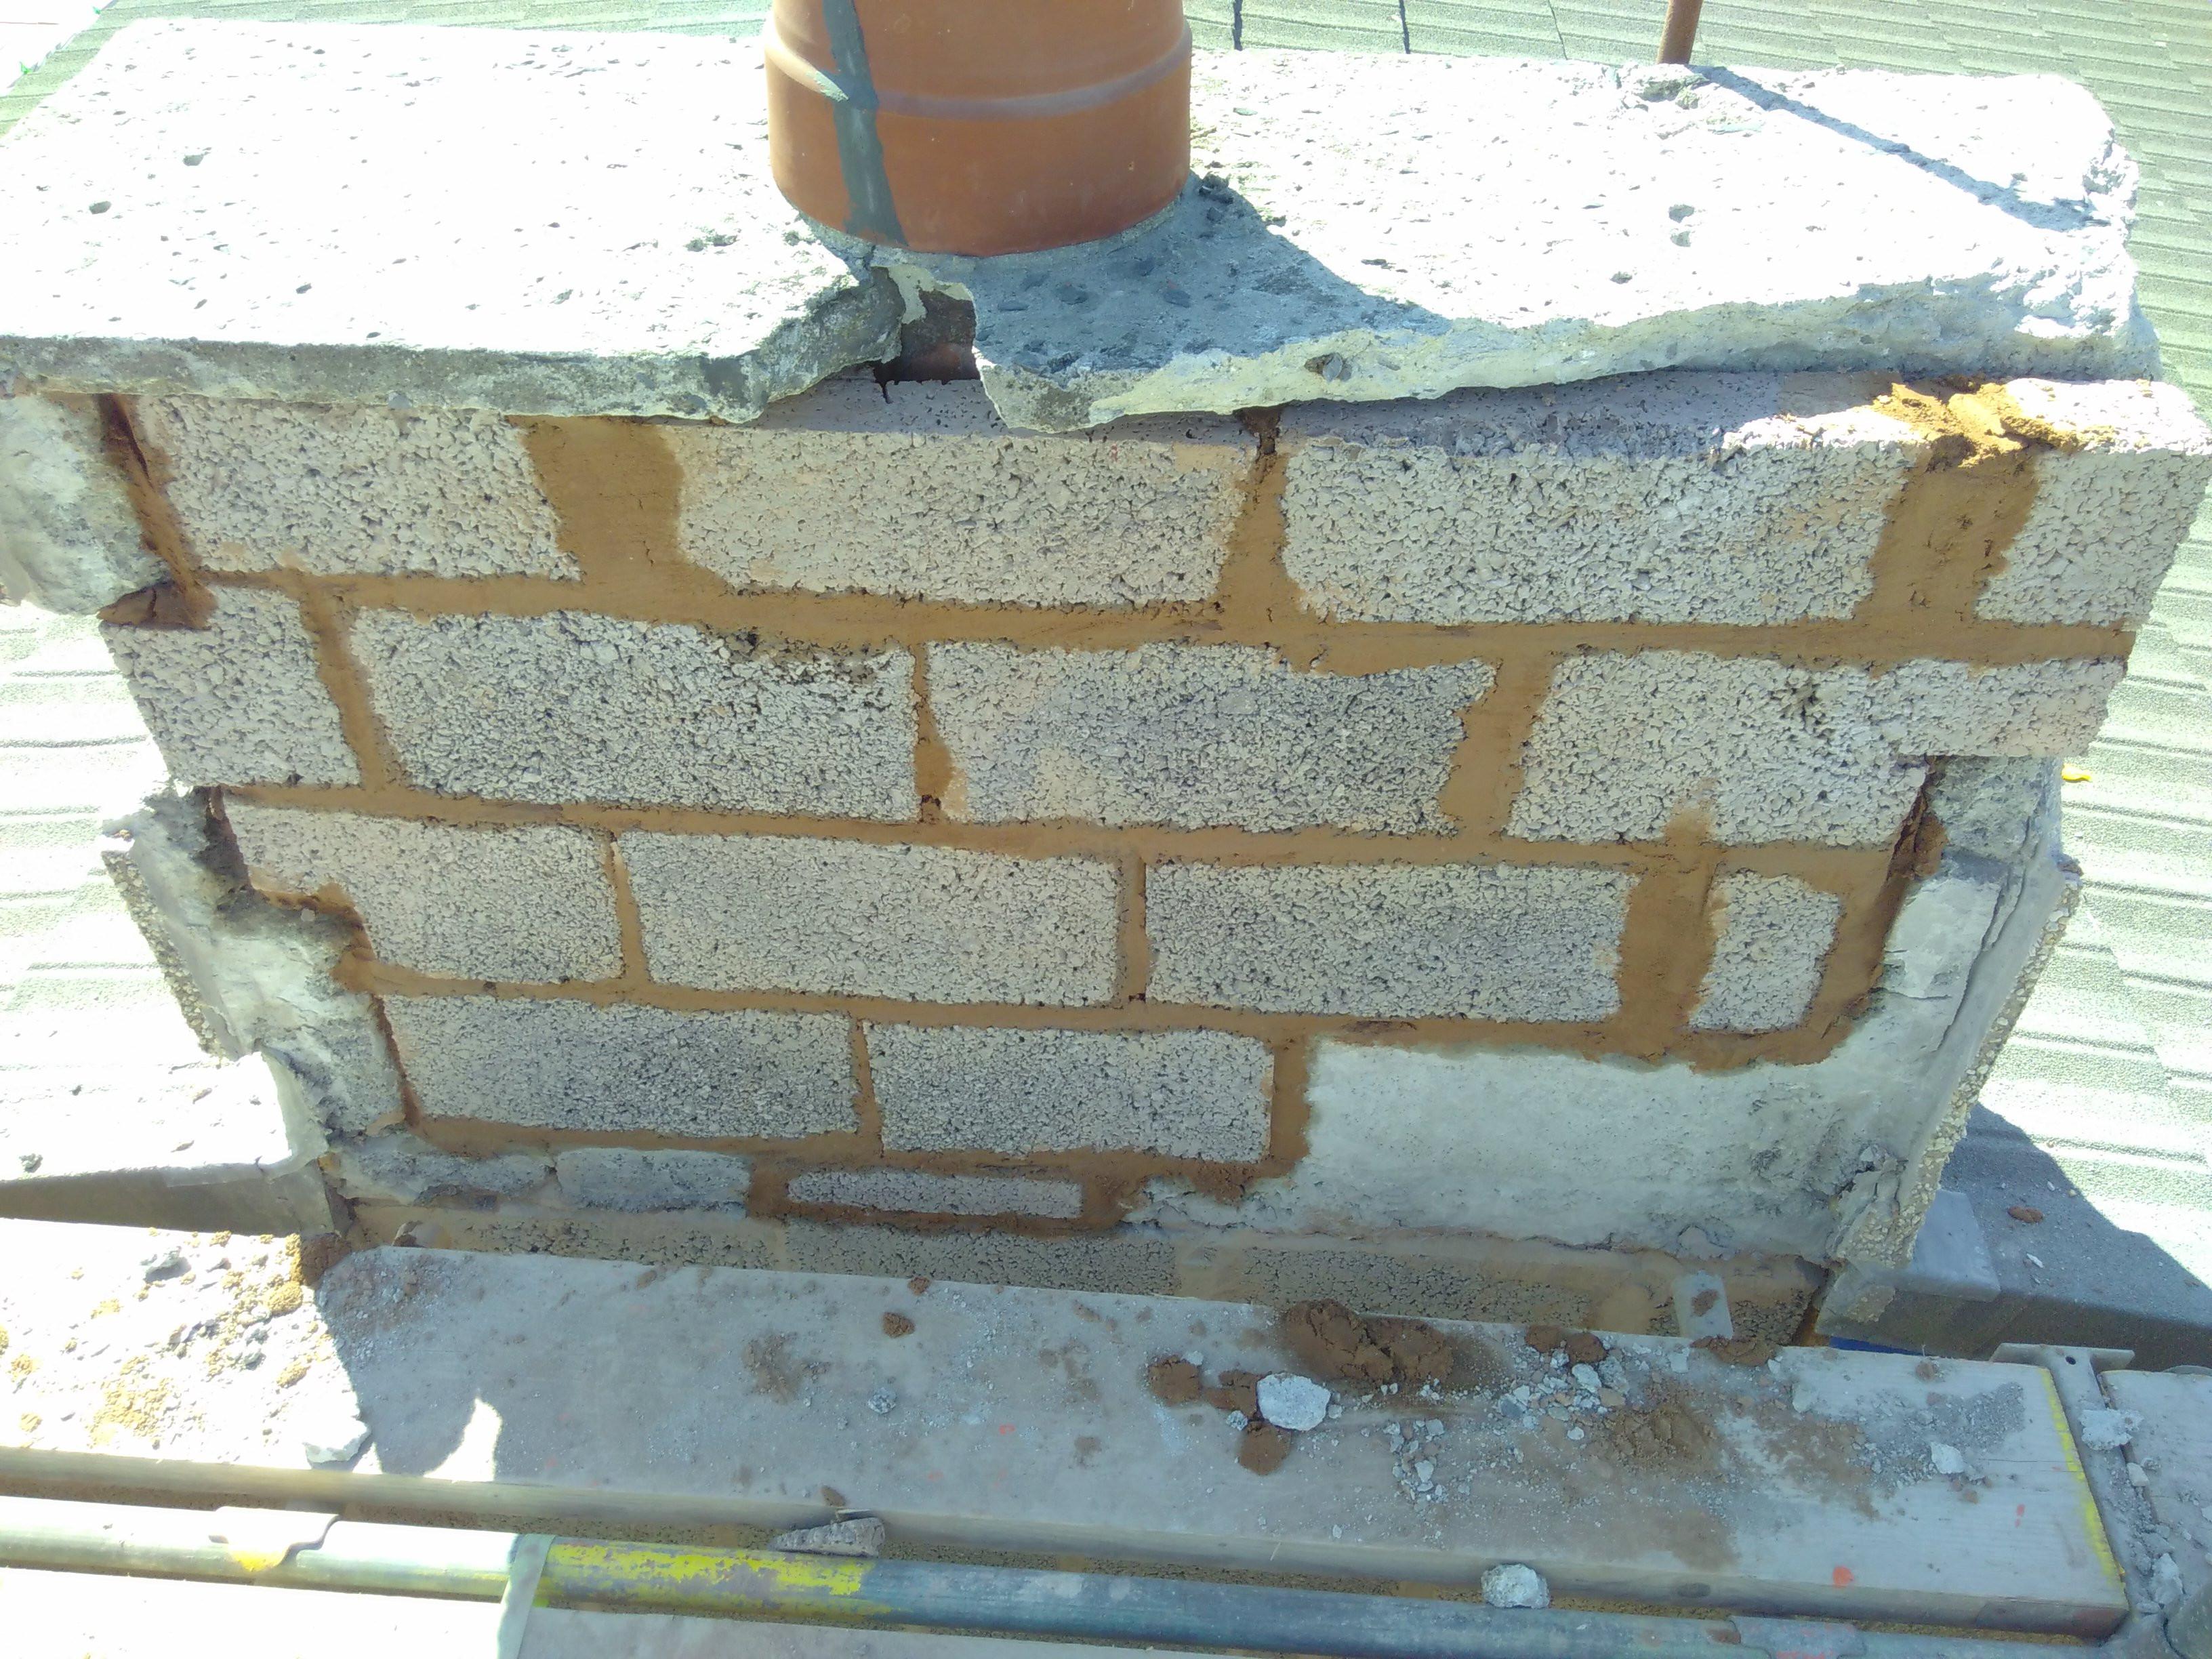
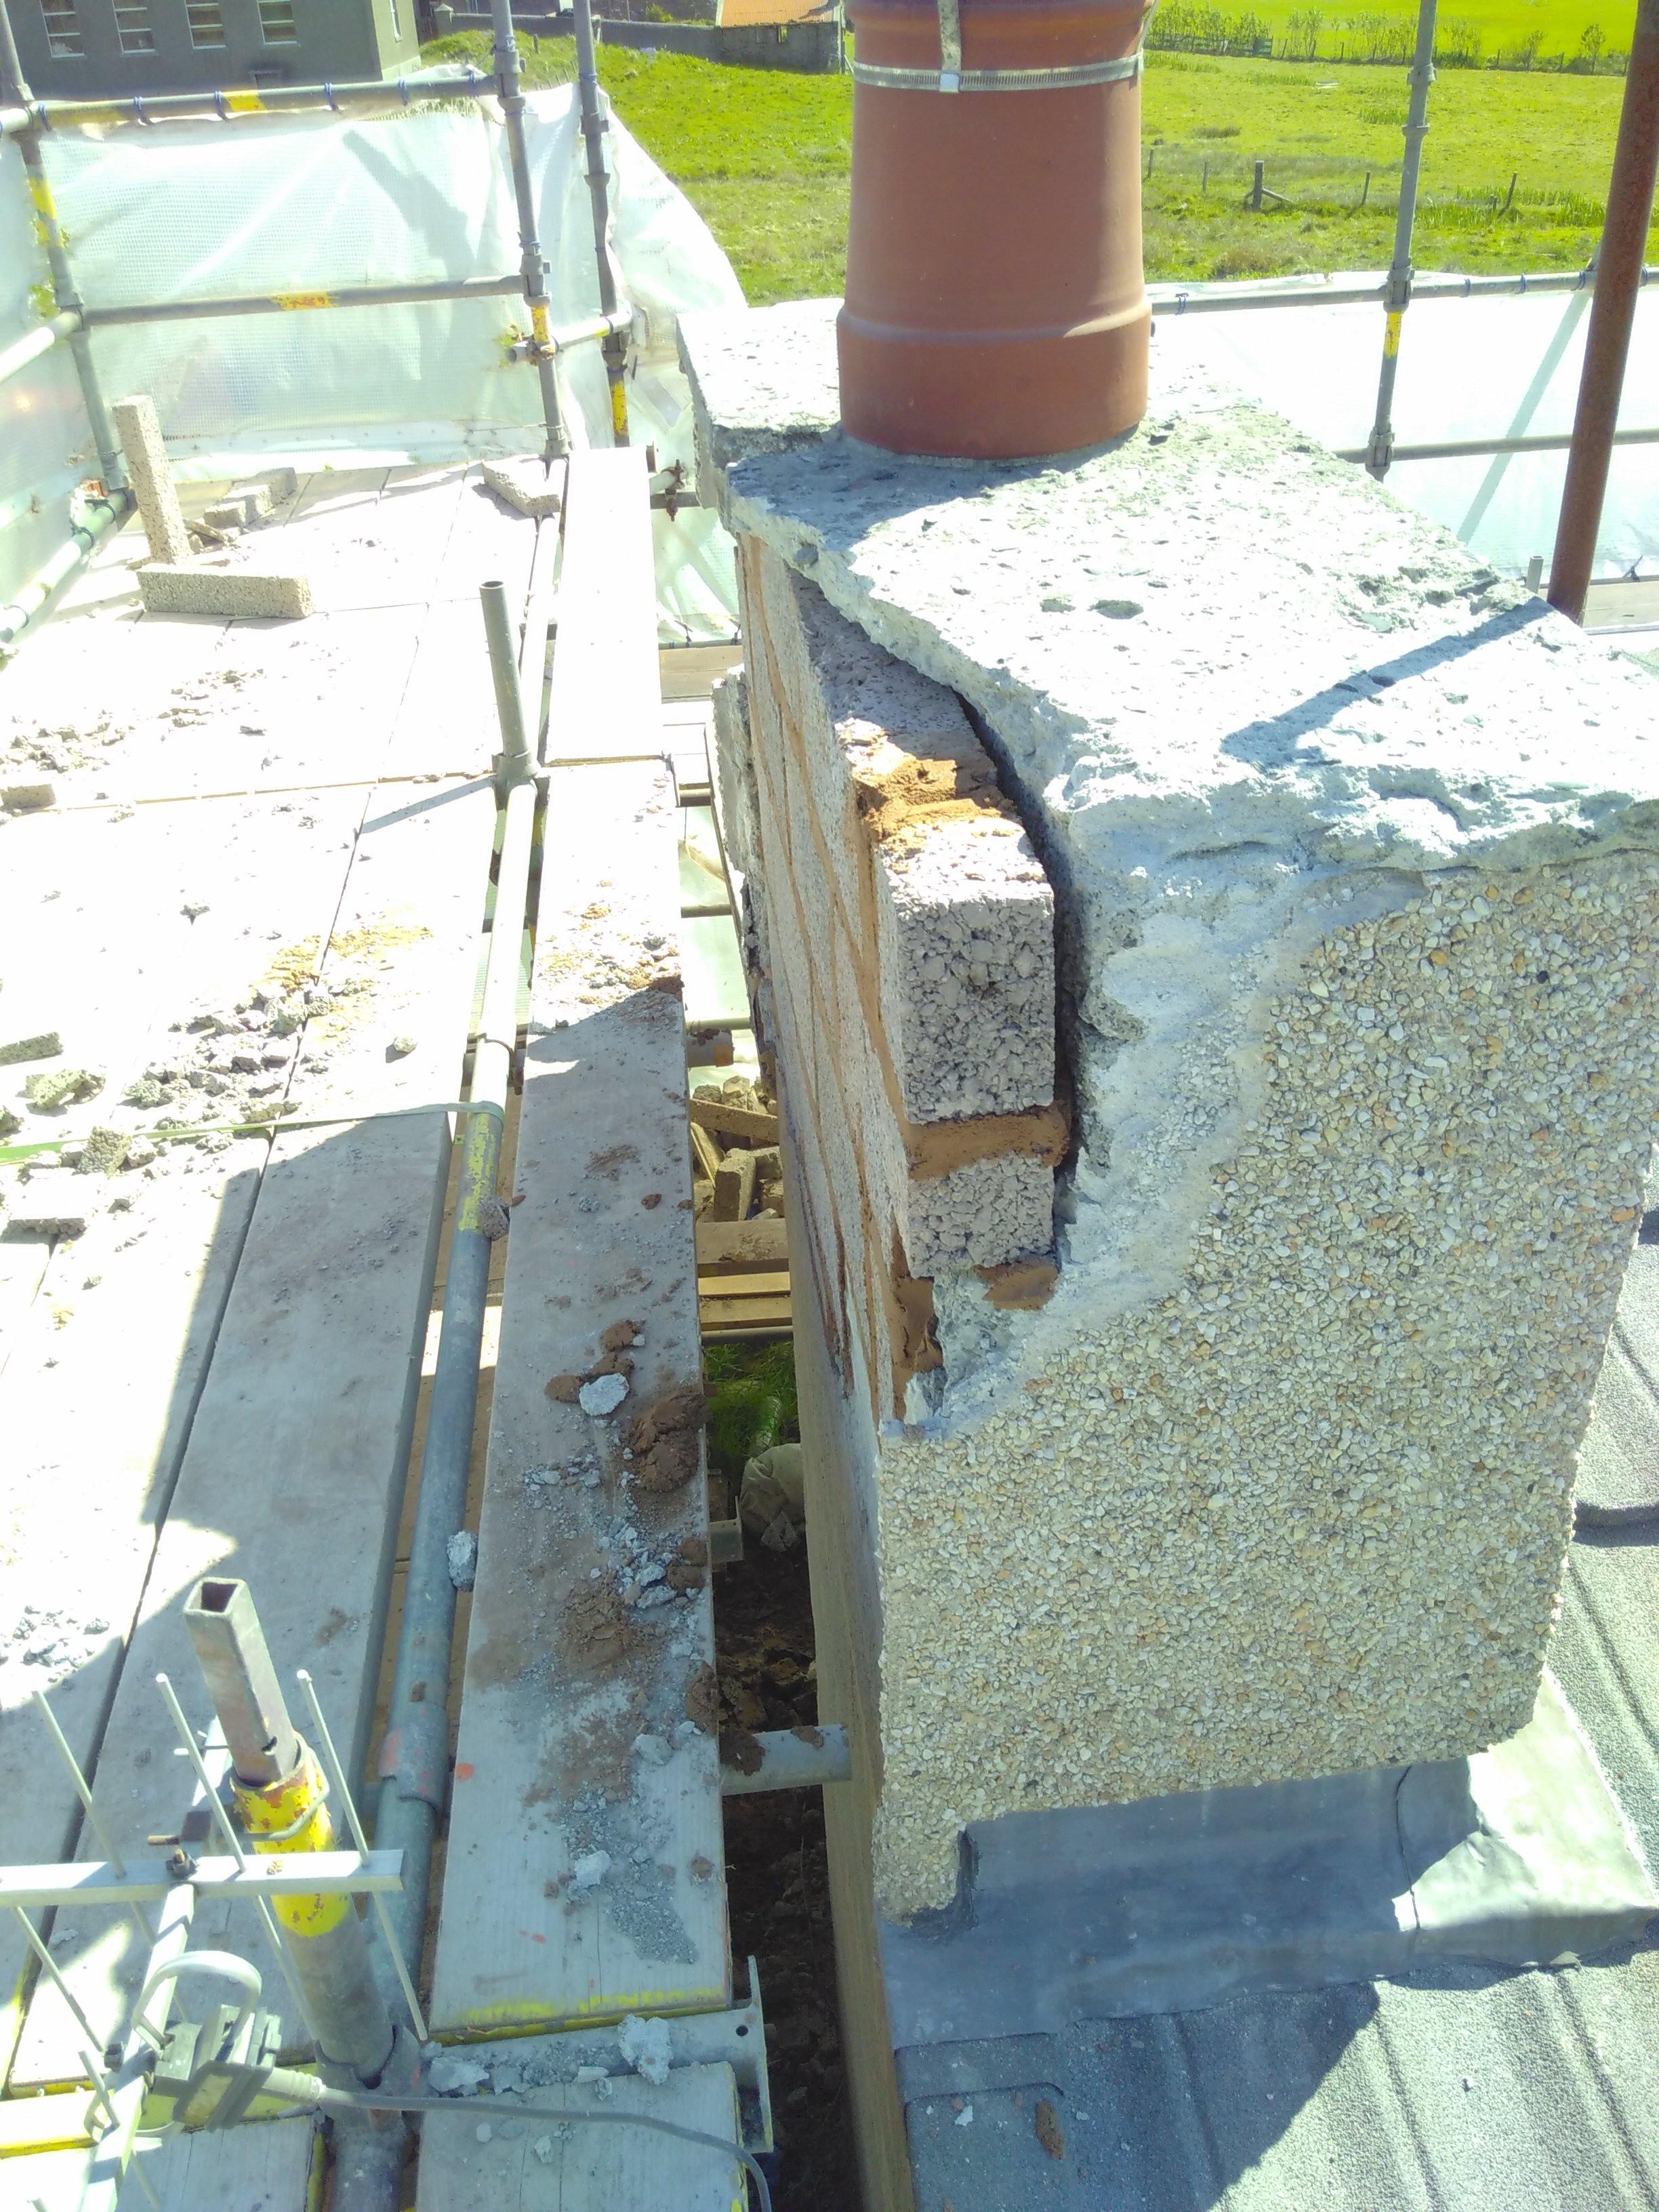
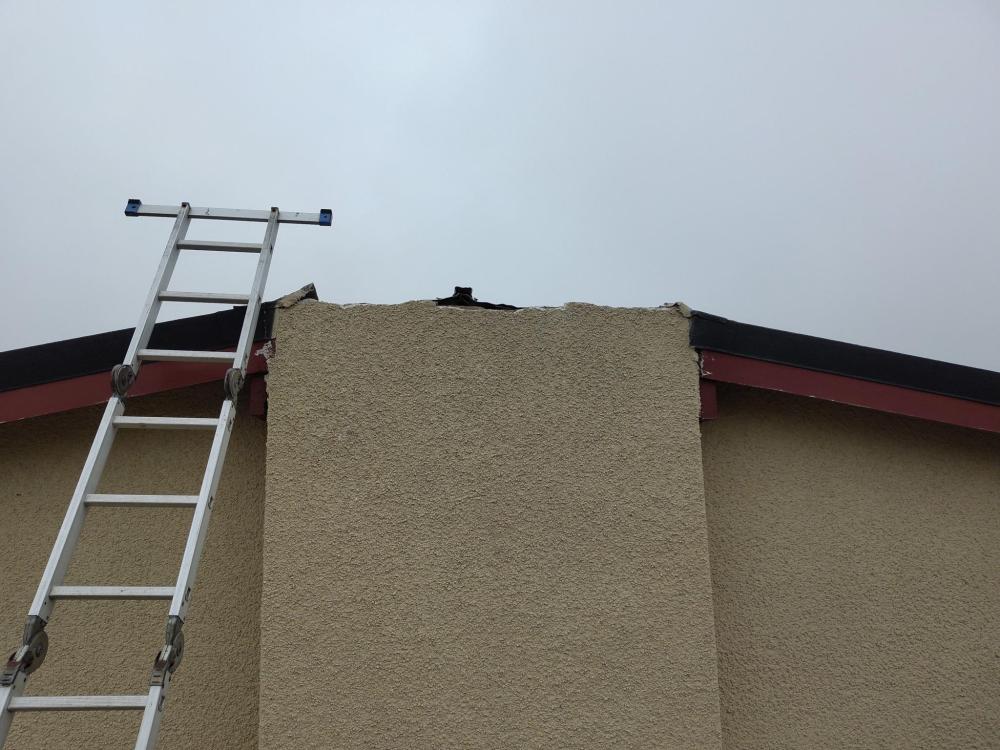
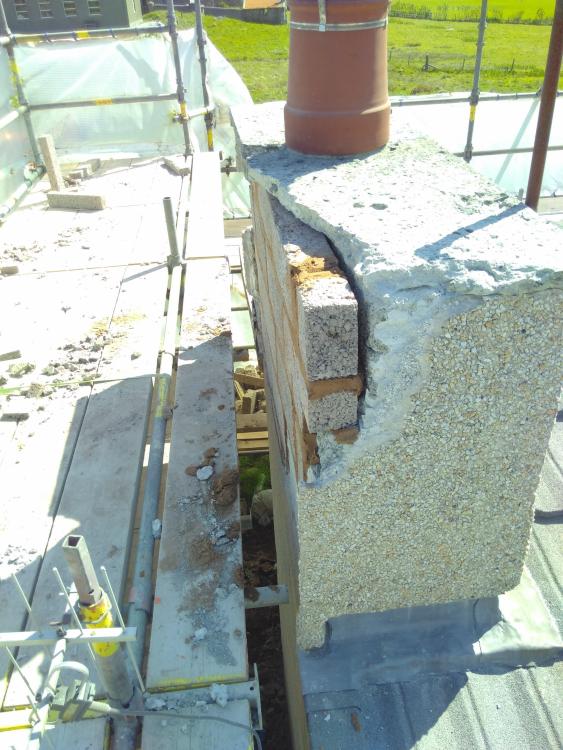
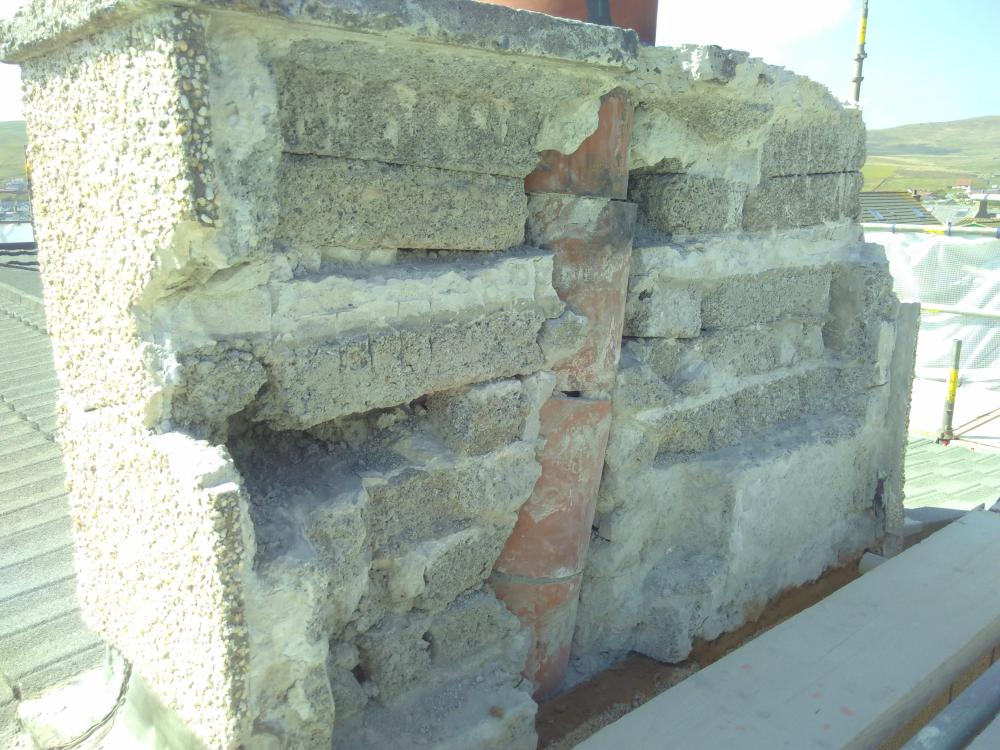
It's been a while but I'm back up around this weekend - there's a break in the weather and I'm keen to do something permanent to this chimney. I'm reliably informed that the tarp has been ripped to shreds over winter; hopefully the butyl tape I popped over the various cracks has kept the water out, though. I found a few more pics from when the builders rebuilt part of the chimney stack, chasing leaks and rotten block - back in 2021: Judging from the courses of blocks, I'm looking to take down ~1.2Mx0.6Mx1M of assorted concrete fun?, which is apparently about 1½ tonnes. Bit by bit, for sure. I've got an angle grinder and a hammer drill to go at it with. In my head, I've allocated ~2 days to the demolition and ~3 to making good, but it's strictly a guess. It's just me and a ladder, so I'm going to need to be veeeery careful. I'm still on the fence between just taking it down to below the cracked portion and casting something like a chimney crown - only without a flue - over the top, vs. going below the roofline, then making good the roof over the top of it. Commentators above (and thanks for the input) were keen on the latter, but I'm a little stressed about the possibility of demolishing to that level, then failing to build a decra roof "patch" over the ex-chimney, either correctly, or at all. That said, the crown approach seems pretty complicated - I found https://www.concreteconstruction.net/_view-object?id=00000154-22df-db06-a1fe-73dff6220000 which talks about the process some. Obviously, hard to say without seeing what's *around* the chimney, under the roof tiles, but am I just psyching myself out here for no good reason?
-
More foundation fun - straw bale garden room on clay
Nick Thomas replied to Nick Thomas's topic in Foundations
Netting would work 👍. I'm thinking of using the strapping because I happen to have it, not because it's the best thing for the job 😅. Up in the roof, the air gap is above the rockwool, rather than below; I didn't see any details suggesting there should be one between the bottom of the rockwool and the ceiling material. Definitely too late if there should be one though - I wouldn't fancy taking it all down and going again! -
Typically ~450mm.
-
https://terravesta.com/news/the-worlds-first-miscanthus-bale-house/ is an experimental build trying to satisfy the permaculture lot by saying "look, we have this perennial crop we can cultivate for housebuilding material instead of straw". In a world where we're producing significantly less straw, though, we've also freed up a great deal of land through no longer growing wheat or barley on it.