Nick Thomas
-
Posts
383 -
Joined
-
Last visited
Everything posted by Nick Thomas
-

More foundation fun - straw bale garden room on clay
Nick Thomas replied to Nick Thomas's topic in Foundations
They say "clear HDPE"; I have no reason to doubt them. https://www.onlineplaygrounds.co.uk/children-playground-bubble.html -
More foundation fun - straw bale garden room on clay
Nick Thomas replied to Nick Thomas's topic in Foundations
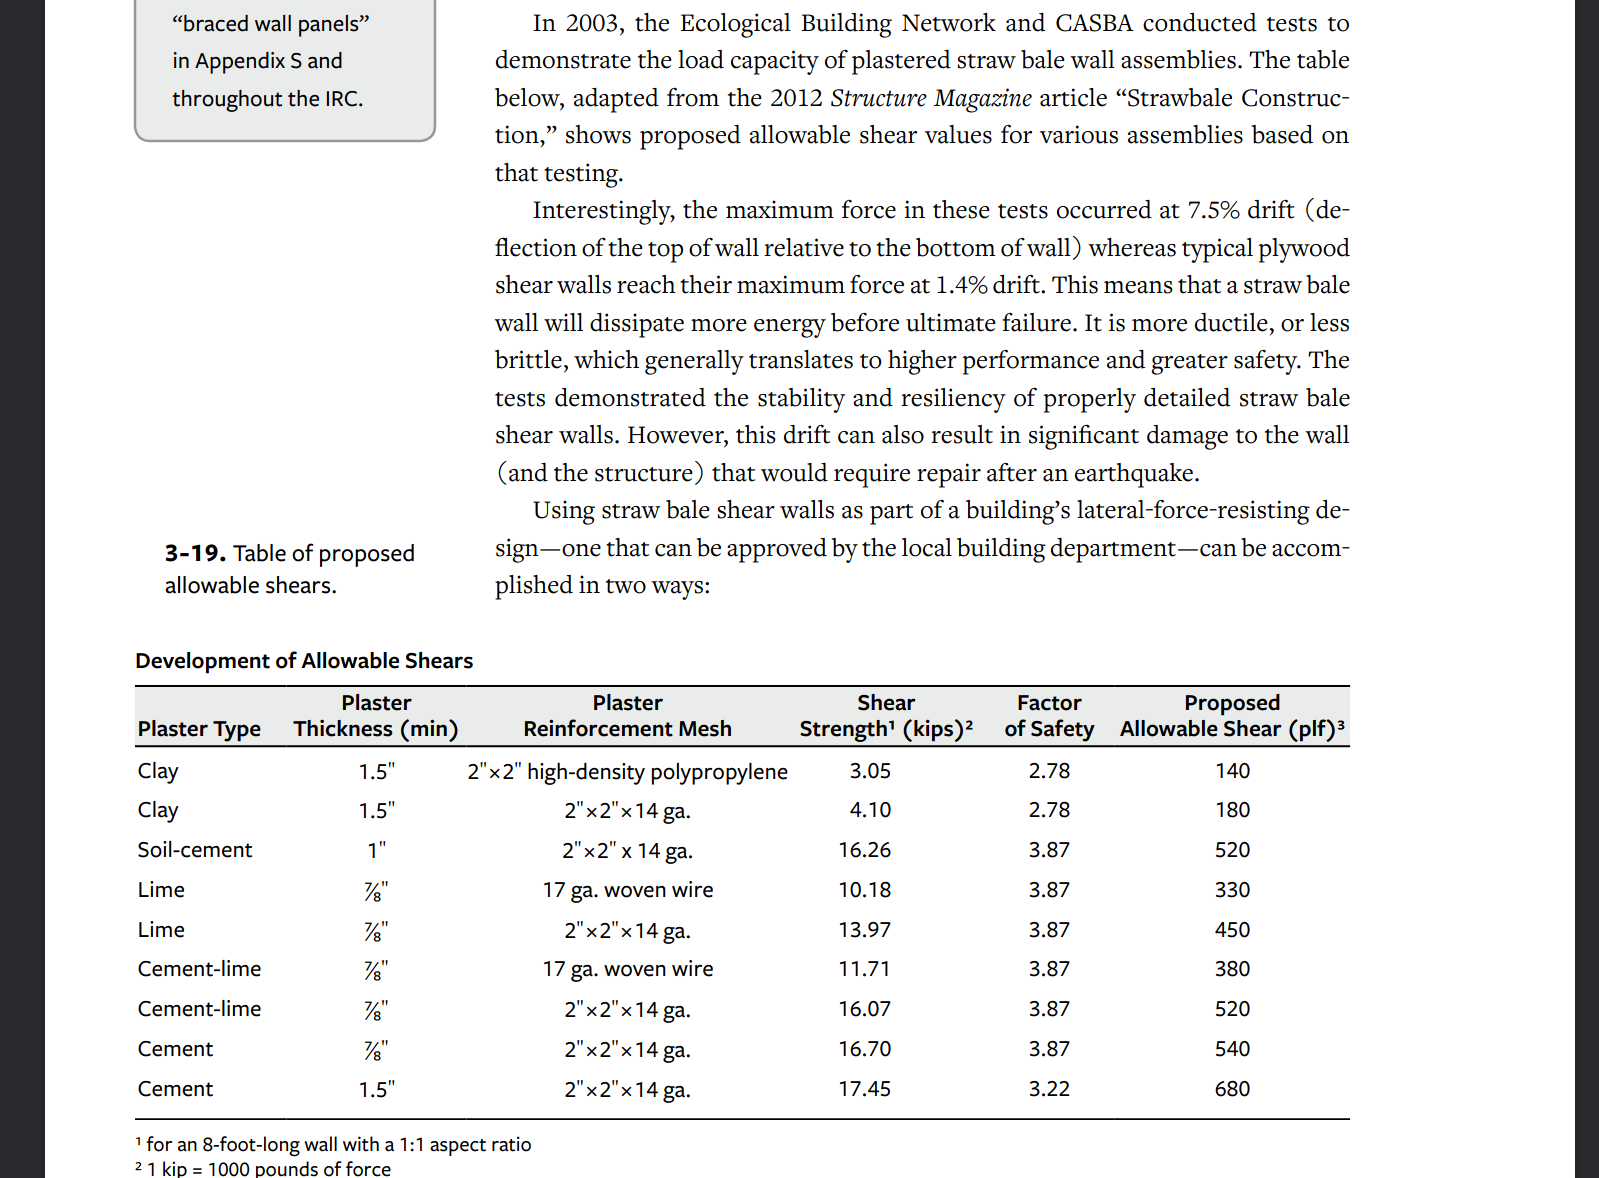
So here's a very nice book - "Straw Bale Building Details". https://newsociety.com/books/s/straw-bale-building-details . Published by the canadian straw bale people (CABSA). Its chapter 3 is dedicated to structural stuff, including shear forces. A relevant snippet: The units are all rather awful, but I'm quite impressed by how much stronger than clay the lime render is; it's definitely pushing to use it inside as well as out. They go on to talk about various shear wall designs, including the "internal pins" style of things. More reading to do before I understand it well, though. OSB3 is here; I've done one last level and tied all the foundation blocks to the wood with the straps, and started cutting the cladding for the box beam. Before I can get those glued & nailed into place, I need to get the upright posts in for the openings (or at least prepare the box beam to receive them, I guess). I've sourced the windows - local curio shop had a single-glazed wooden casement set that's ~800mm wide by 1200mm high, and I've ordered a 440mm HDPE bubble window(!) for the apple tree view. Just a little bit like https://www.sopocottage.com/2019/01/for-love-of-bubble-window-but-dont-try.html . Figuring out how all this fits together to keep the water out is, uh, absorbing.
-
England has lowest quality of housing vs rest of Europe
Nick Thomas replied to Alan Ambrose's topic in Research Resources
I quite liked this diagram: https://worldmigrationreport.iom.int/wmr-2022-interactive/ France: UK: I'll give you three guesses why people from Algeria and Morocco decide to end their travel in France, while people from Poland and India decide to end it in the UK.

-
England has lowest quality of housing vs rest of Europe
Nick Thomas replied to Alan Ambrose's topic in Research Resources
Horse, water, drink. -
England has lowest quality of housing vs rest of Europe
Nick Thomas replied to Alan Ambrose's topic in Research Resources
https://www.tuc.org.uk/sites/default/files/Welfare_States_Touchstone_Extra_2015_AW_Rev.pdf https://ukandeu.ac.uk/how-generous-is-british-welfare/ -> https://www.cwep.us/ but I don't have easy access to their data. Still, this is an instructive picture. Why do they actually make their destination the UK rather than another country along the way? Complicated, but a major factor is that it's seen as much easier to find work in the UK. Yes, work. Taking our jerbs etc. Then there's the language barrier (or lack thereof). More, better, cheaper housing would likely make the UK more attractive to people from overseas, but refusing it for that reason would really be cutting off our noses to spite our faces.
-
More foundation fun - straw bale garden room on clay
Nick Thomas replied to Nick Thomas's topic in Foundations
No more maths yet, but a bit more progress: That's the foundations and the box beam pretty much done. I found a supplier of OSB3 that's £20/sheet rather than the £60/sheet being asked for by Big Builder's Merchant, so I've decided to just follow the instructions and clad it top and bottom with that, which will add lots of stiffness. It's being delivered tomorrow. Baseplate on top after that, and I can get the uprights in for the door and windows, so it'll have some height. The eagle-eyed will spot that some of the foundation blocks are still on their sides. Those are the 430x215x140 ones - sat upright individually, they're not very stable, it turns out. Managed to overturn one filled with gravel while dragging the frame around 😬. So I'll leave them on their side but will fill the voids with something cementitious in an attempt to improve their strength. Excavated soil went to the HWRS, and not a moment too soon - the lawn is not happy. I guess it was about a couple of tonnes across 70 bags. One more thing I've thought of - I'm currently taking the 2.5M height restriction to stay within PD from the ground by the apple tree. Behind the retaining wall, however, the ground is maybe 50cm higher than that (I haven't measured it precisely, just guessing). If I could use that as my level instead, I'd have so much more freedom, but it may be a case of wishful thinking. The wording is the highest ground level "immediately adjacent" to the building, and I have a 50mm gap between the garden room and the wall; but then, the wall is kind-of-maybe part of the structure, since it provides essential rain shielding? I can pay them £60 to find out, which seems worth a punt if it's at all arguable. Anyone had a similar situation?
-
More foundation fun - straw bale garden room on clay
Nick Thomas replied to Nick Thomas's topic in Foundations
Hah, easy mistake to make, no worries. Thanks for the pointers @Gus Potter. Yep, some more calculating to do, for sure. To pick out a few things - Yup, makes sense, thanks. I guess one approach in the absence of data about how the uplift / lateral forces would split (which I assume is quite dependent on specifics of structure shape) would be a sensitivity test; I'll see what I can knock up. I don't know if you've taken it into account or not, but the straw bale walls are (or rather, will be after this winter 😬) rendered with lime plaster externally, which adds a lot compared to just stacked straw bales, or even stacked-then-compressed bales. https://www.sciencedirect.com/science/article/abs/pii/S0950061821006711 has some experimental results vs lateral loads, to see the kind of difference it makes. The detail for the door (and window) supports is 4x4 timbers anchored to the box beam either side of the door, running up to the roofplate where they are similarly anchored post-compression. So it's pretty much a portal as you describe it, I think? I've got the ones for the doors landing directly over piers (the ones for the windows *might* have to cheat a tiny bit, or I might have to dig a bit more ground out, but I'd like to think I'm finished digging for the moment 😅). Normally it's lime render right up to the posts, with clay plaster internally, both at a nice curve that increases daylight penetration; I don't mind losing that if I can prove the structure needs it for stability, but less keen on adding it "just in case", since it would lose those features. I actually had the same thought on my initial read-through. A few (or many, depending on what numbers end up saying) guy ropes into earth anchors wouldn't be the end of the world, and easy to fit - or retrofit, if things started going wonky. If I'd gone with piles, I'd be tied down into the earth already, of course, but it could easily have been £1K in steel to do it. Got the final two piers in, at least. Lots of rejigging to do, still need to turn a load of the blocks, etc, but hopefully no more digging. Soil away to the HWRS at the weekend, I think.
-
More foundation fun - straw bale garden room on clay
Nick Thomas replied to Nick Thomas's topic in Foundations
OK, finally got around to calculating some wind loads. The question for me was whether wind pushing against the side of the garden room might cause the whole thing to roll away, off into the sunset. Assuming I'm doing it right, it all seems pretty simple. Call it 4 tonnes of structure sat on top of the gravel. Coefficient of friction for a concrete block sat on wet gravel is apparently 0.4: https://www.eng-tips.com/viewthread.cfm?qid=379441 > The CalTrans Falsework manual (4-5.09) allows mu=0.6 for concrete anchor blocks on dry gravel (or 0.4 for wet gravel). Mass * gravity * CoF = 15.68kN. 100mph winds against 10sqm of wall exerts a force of 12kN, so even in those conditions it should stay put. In reality, the gravel surface should generally be dry, the winds will never get up to those levels, the concrete blocks will be bedded into the gravel, it's braced on three sides, etc, etc. So I figure there's no need to anchor it to the ground (e.g. by shoving a post through the concrete block and down into the gravel). Progress elsewhere - I've figured out the 15° cuts on the mitre saw to get 105° angles on the baseplate. That's allowed me to locate the final two foundation holes; I've dug one out, got the other one halfway. Will finish those off, level, then screw all the timber into place next time. Illness and weather have conspired to make it hard to get much done recently :/. -
More foundation fun - straw bale garden room on clay
Nick Thomas replied to Nick Thomas's topic in Foundations
Eh, it's coppiced lumber so they're boughs, not twigs. It's optional, though - best thought of as training wheels for straw bale newbies. Helps to hold the wall in place until compression, and doesn't have a significant role thereafter (although it does help a bit against lateral loads, you don't benefit from that unless you've got a long exposed run. In practice you've got door and window posts along those too, most of the time, which will do a lot more). In low-humidity places they often use rebar for the bottom set of spikes - more for convenience than strength. Can't get away with that in a humid climate. Bamboo can be used; it's about the same price, but somewhat harder to source locally at ~38mm diameter. None of it's structural though. -
More foundation fun - straw bale garden room on clay
Nick Thomas replied to Nick Thomas's topic in Foundations
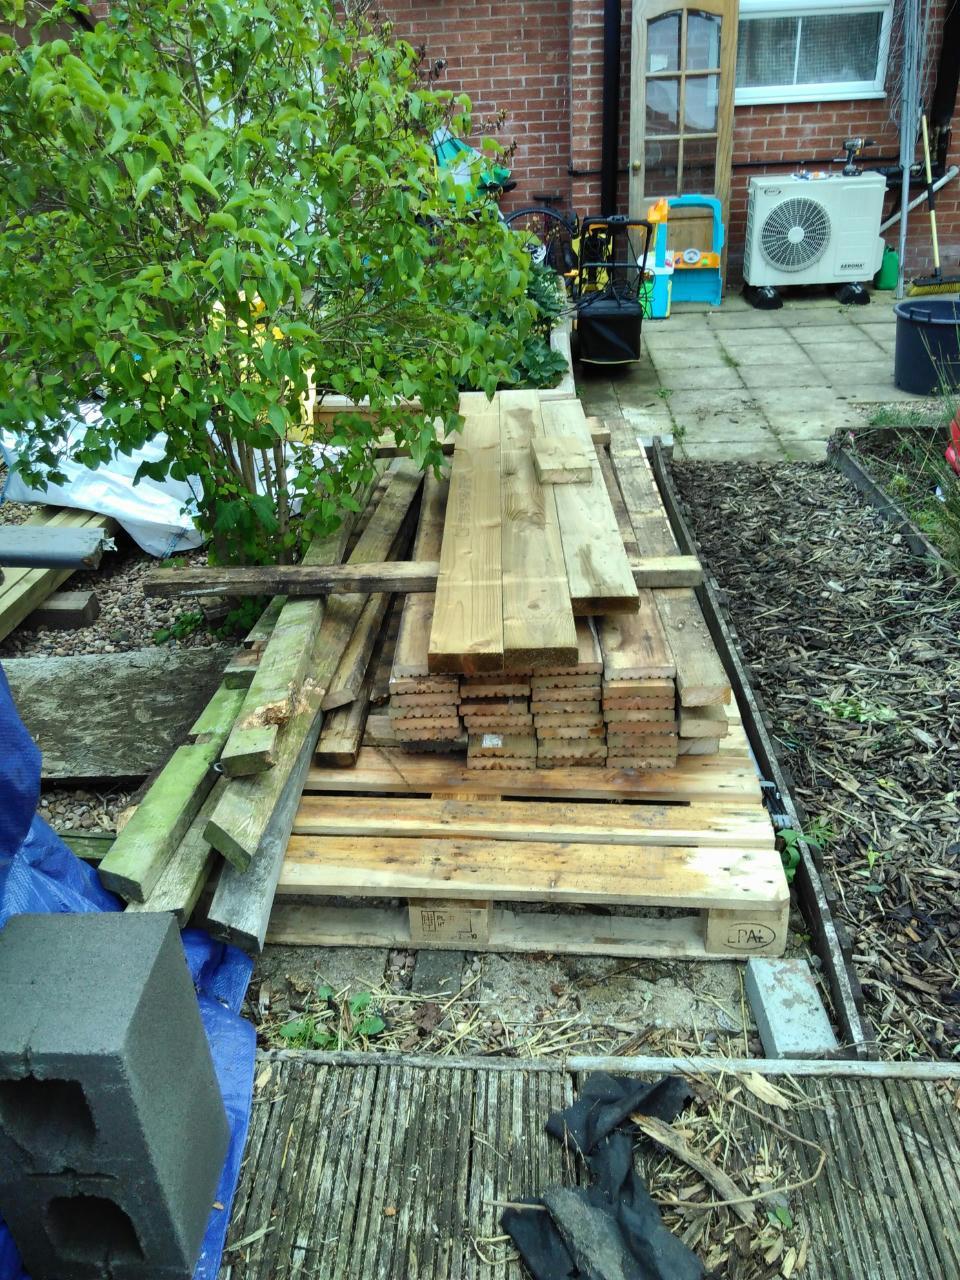
Definitely on filling them with gravel, it's actually where I started ^^. The one difference will be some packing tape placed before the fill. Half the pier are these 140s, the other half are 215s, so I just have to remove some gravel from the ones currently using 140s to get the level back. Maybe tomorrow. Today I picked up a mitre saw and processed the timber that made up the old deck, cutting off rotten ends and generally tidying up and stacking stuff neatly. Far more fun than it had any right to be. Got a fair bit of 2x4, and ~7M² of decking boards that would otherwise have been thrown - the saw was £100, and I've salvaged maybe £150 worth of timber with it already.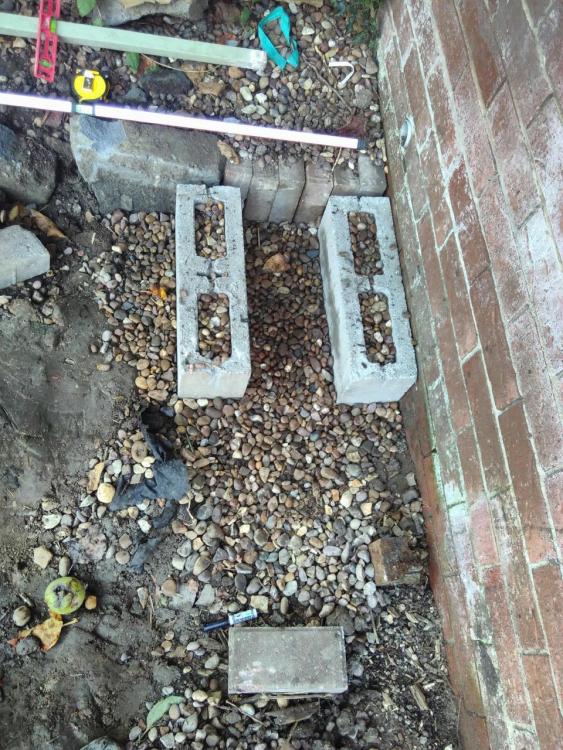

-
More foundation fun - straw bale garden room on clay
Nick Thomas replied to Nick Thomas's topic in Foundations
It is, but I'm here for advice and I'm trying to take things people say into account ^^.. Just spent a bit reading about cars and boats crushing these things when laid side-on, which is sobering. I'll flip them upright, re-level, then strap through them vertically. It's not that much harder. Thanks for bringing it up! Yeah, the "flat 8"s seem to be a little niche these days, although it varies from area to area. The farmer I got mine from makes them for horsey people, but they're almost perfect for building with. There's a build going on at the moment with the big ones (hestons?), although I don't have a link offhand. We did pieces on infill and and SIPS, and they both look fine - definitely more suited to mass-market stuff, but more expensive than load-bearing. Also lacking a bit of the charm, at least to me. -
More foundation fun - straw bale garden room on clay
Nick Thomas replied to Nick Thomas's topic in Foundations
They're rated for 7.3N/mm², although I don't know if that's in both orientations or just the voids-vertical one. Easy to break in half with a hammer through the thin walls, anyway (I needed a few halves). I wasn't really thinking about the possibility of them failing, but none of the timbers happen to be placed only above the void space - the weight is always spread across some of the solid bits. Originally they were placed with the voids running top-bottom, but another poster upthread suggested this orientation and I like it for being able to easily strap them to the wood. There were solid concrete "foundation blocks" I could have gotten instead, but I quite like these in this application. Real stone would have been better, but isn't £2.50/piece ^^. -
More foundation fun - straw bale garden room on clay
Nick Thomas replied to Nick Thomas's topic in Foundations
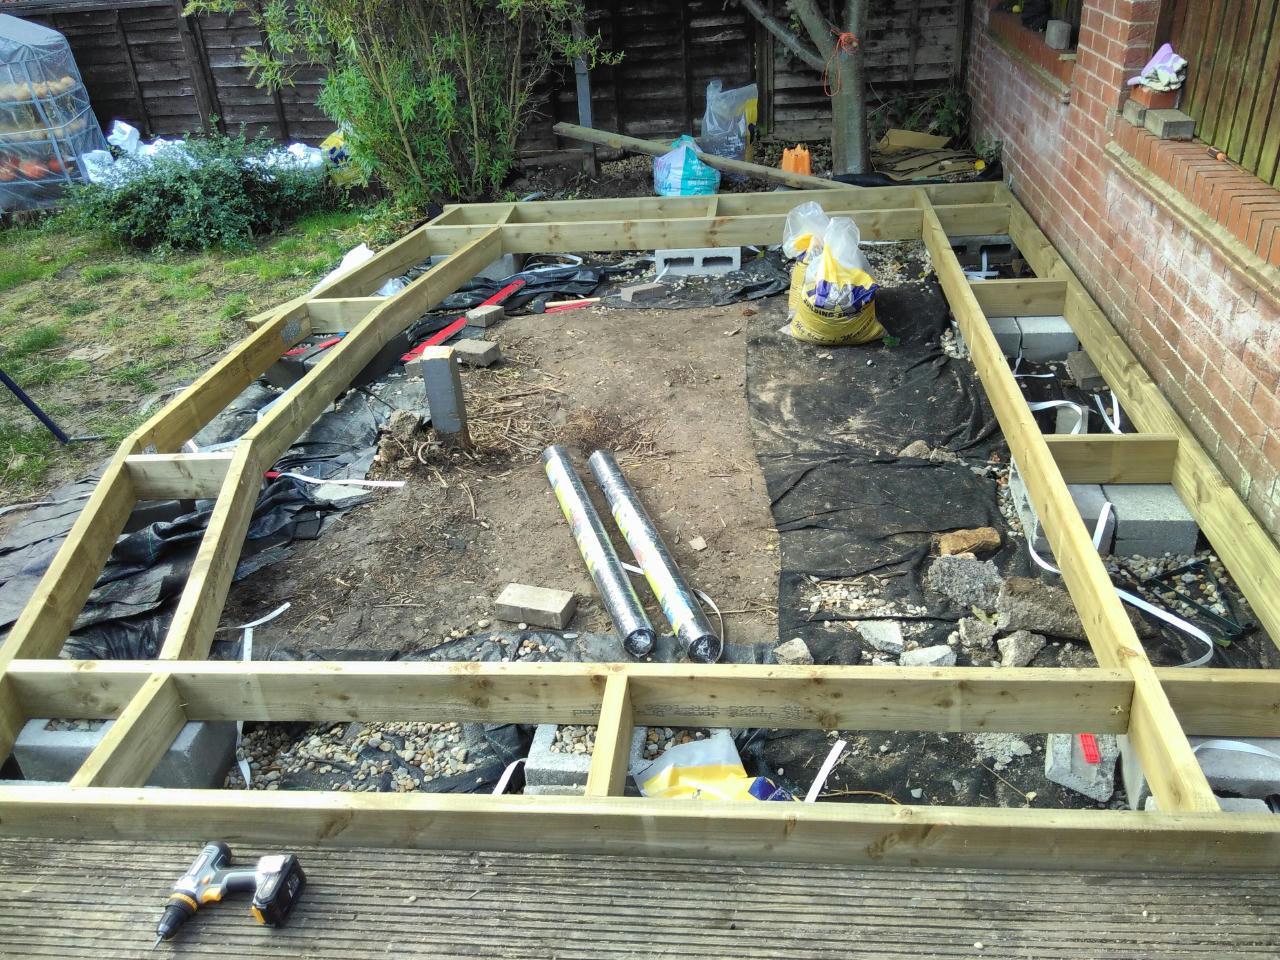
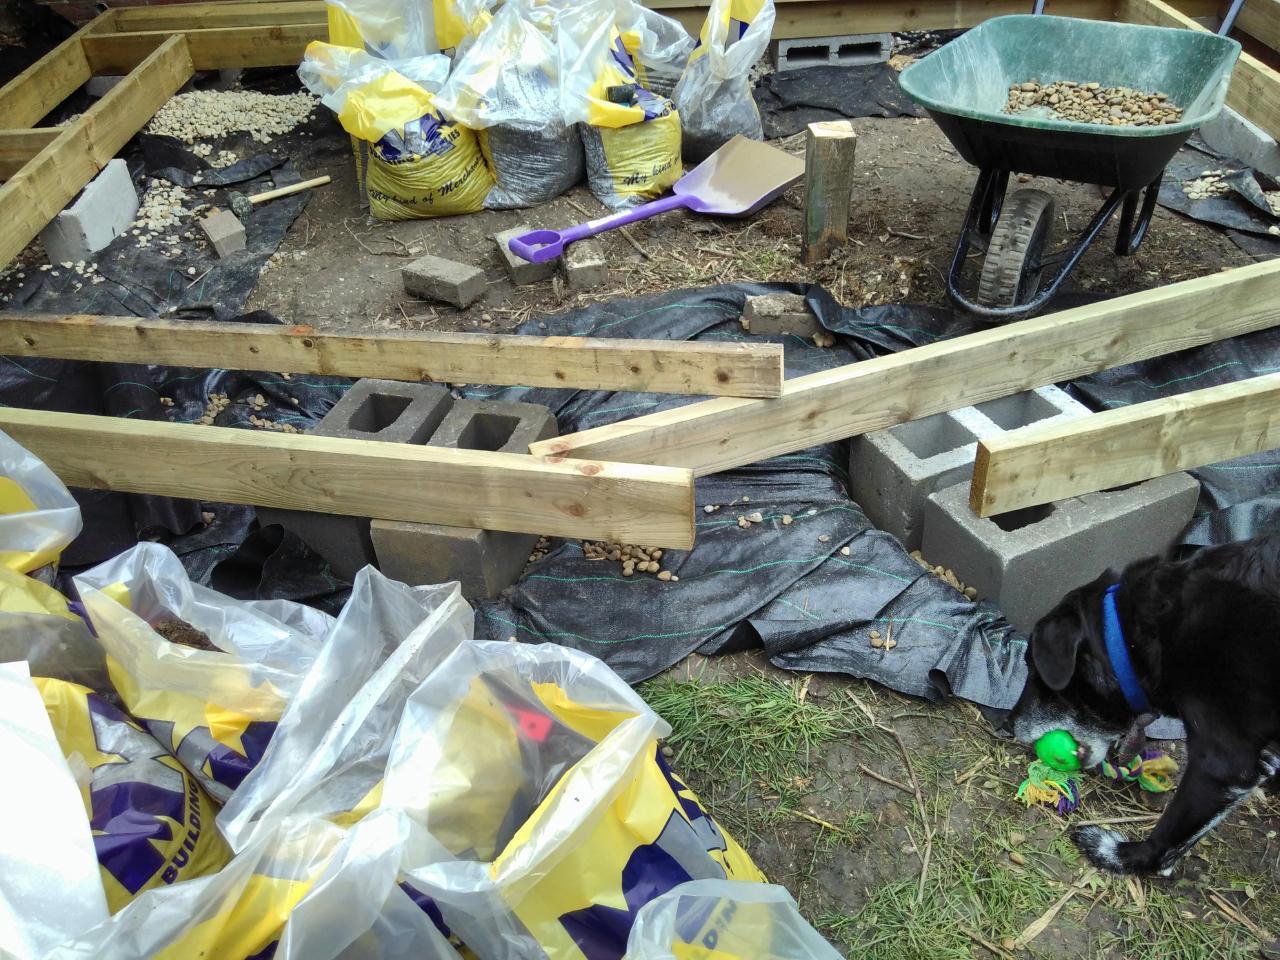
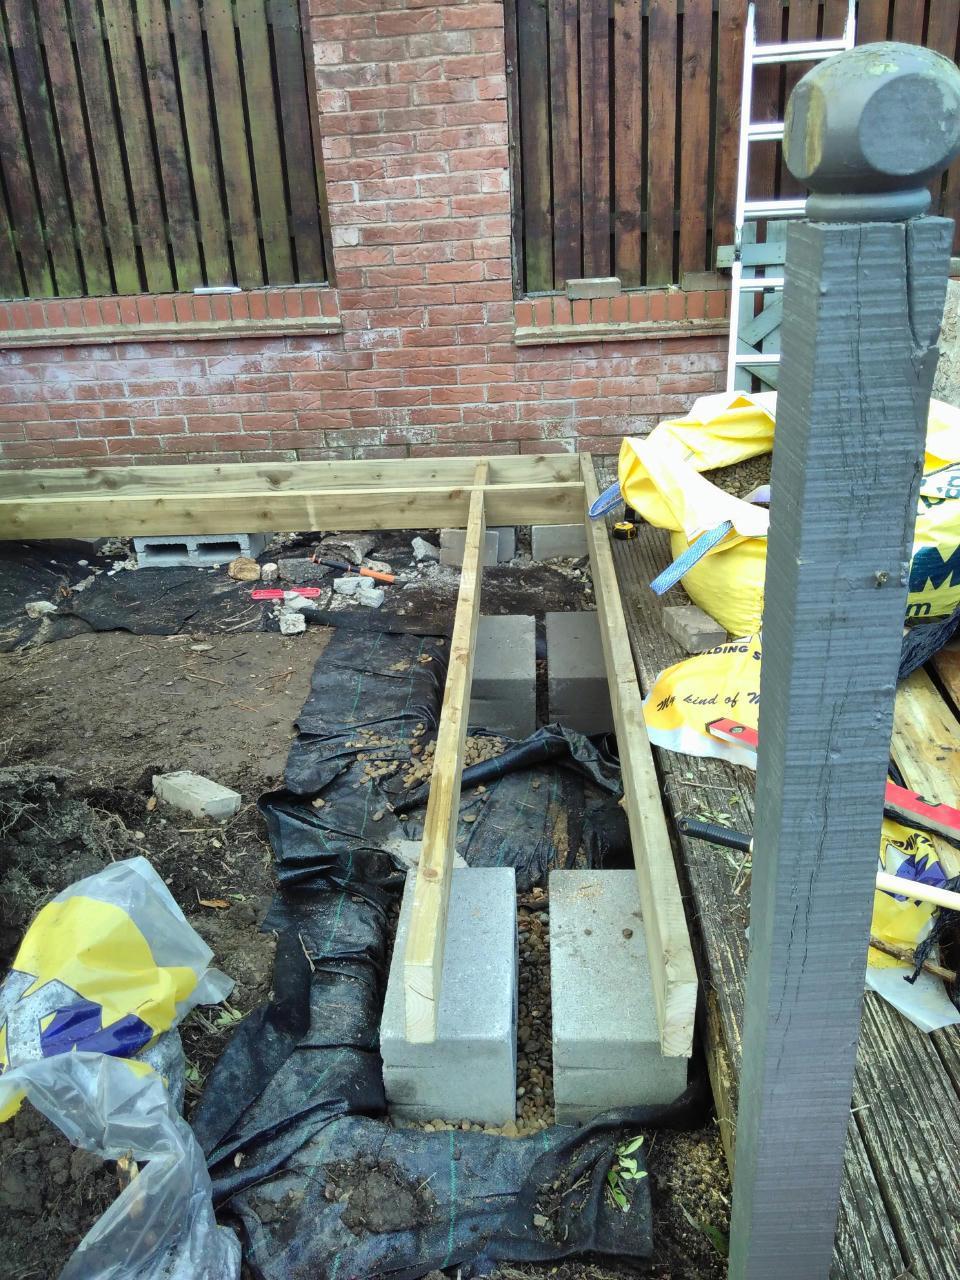
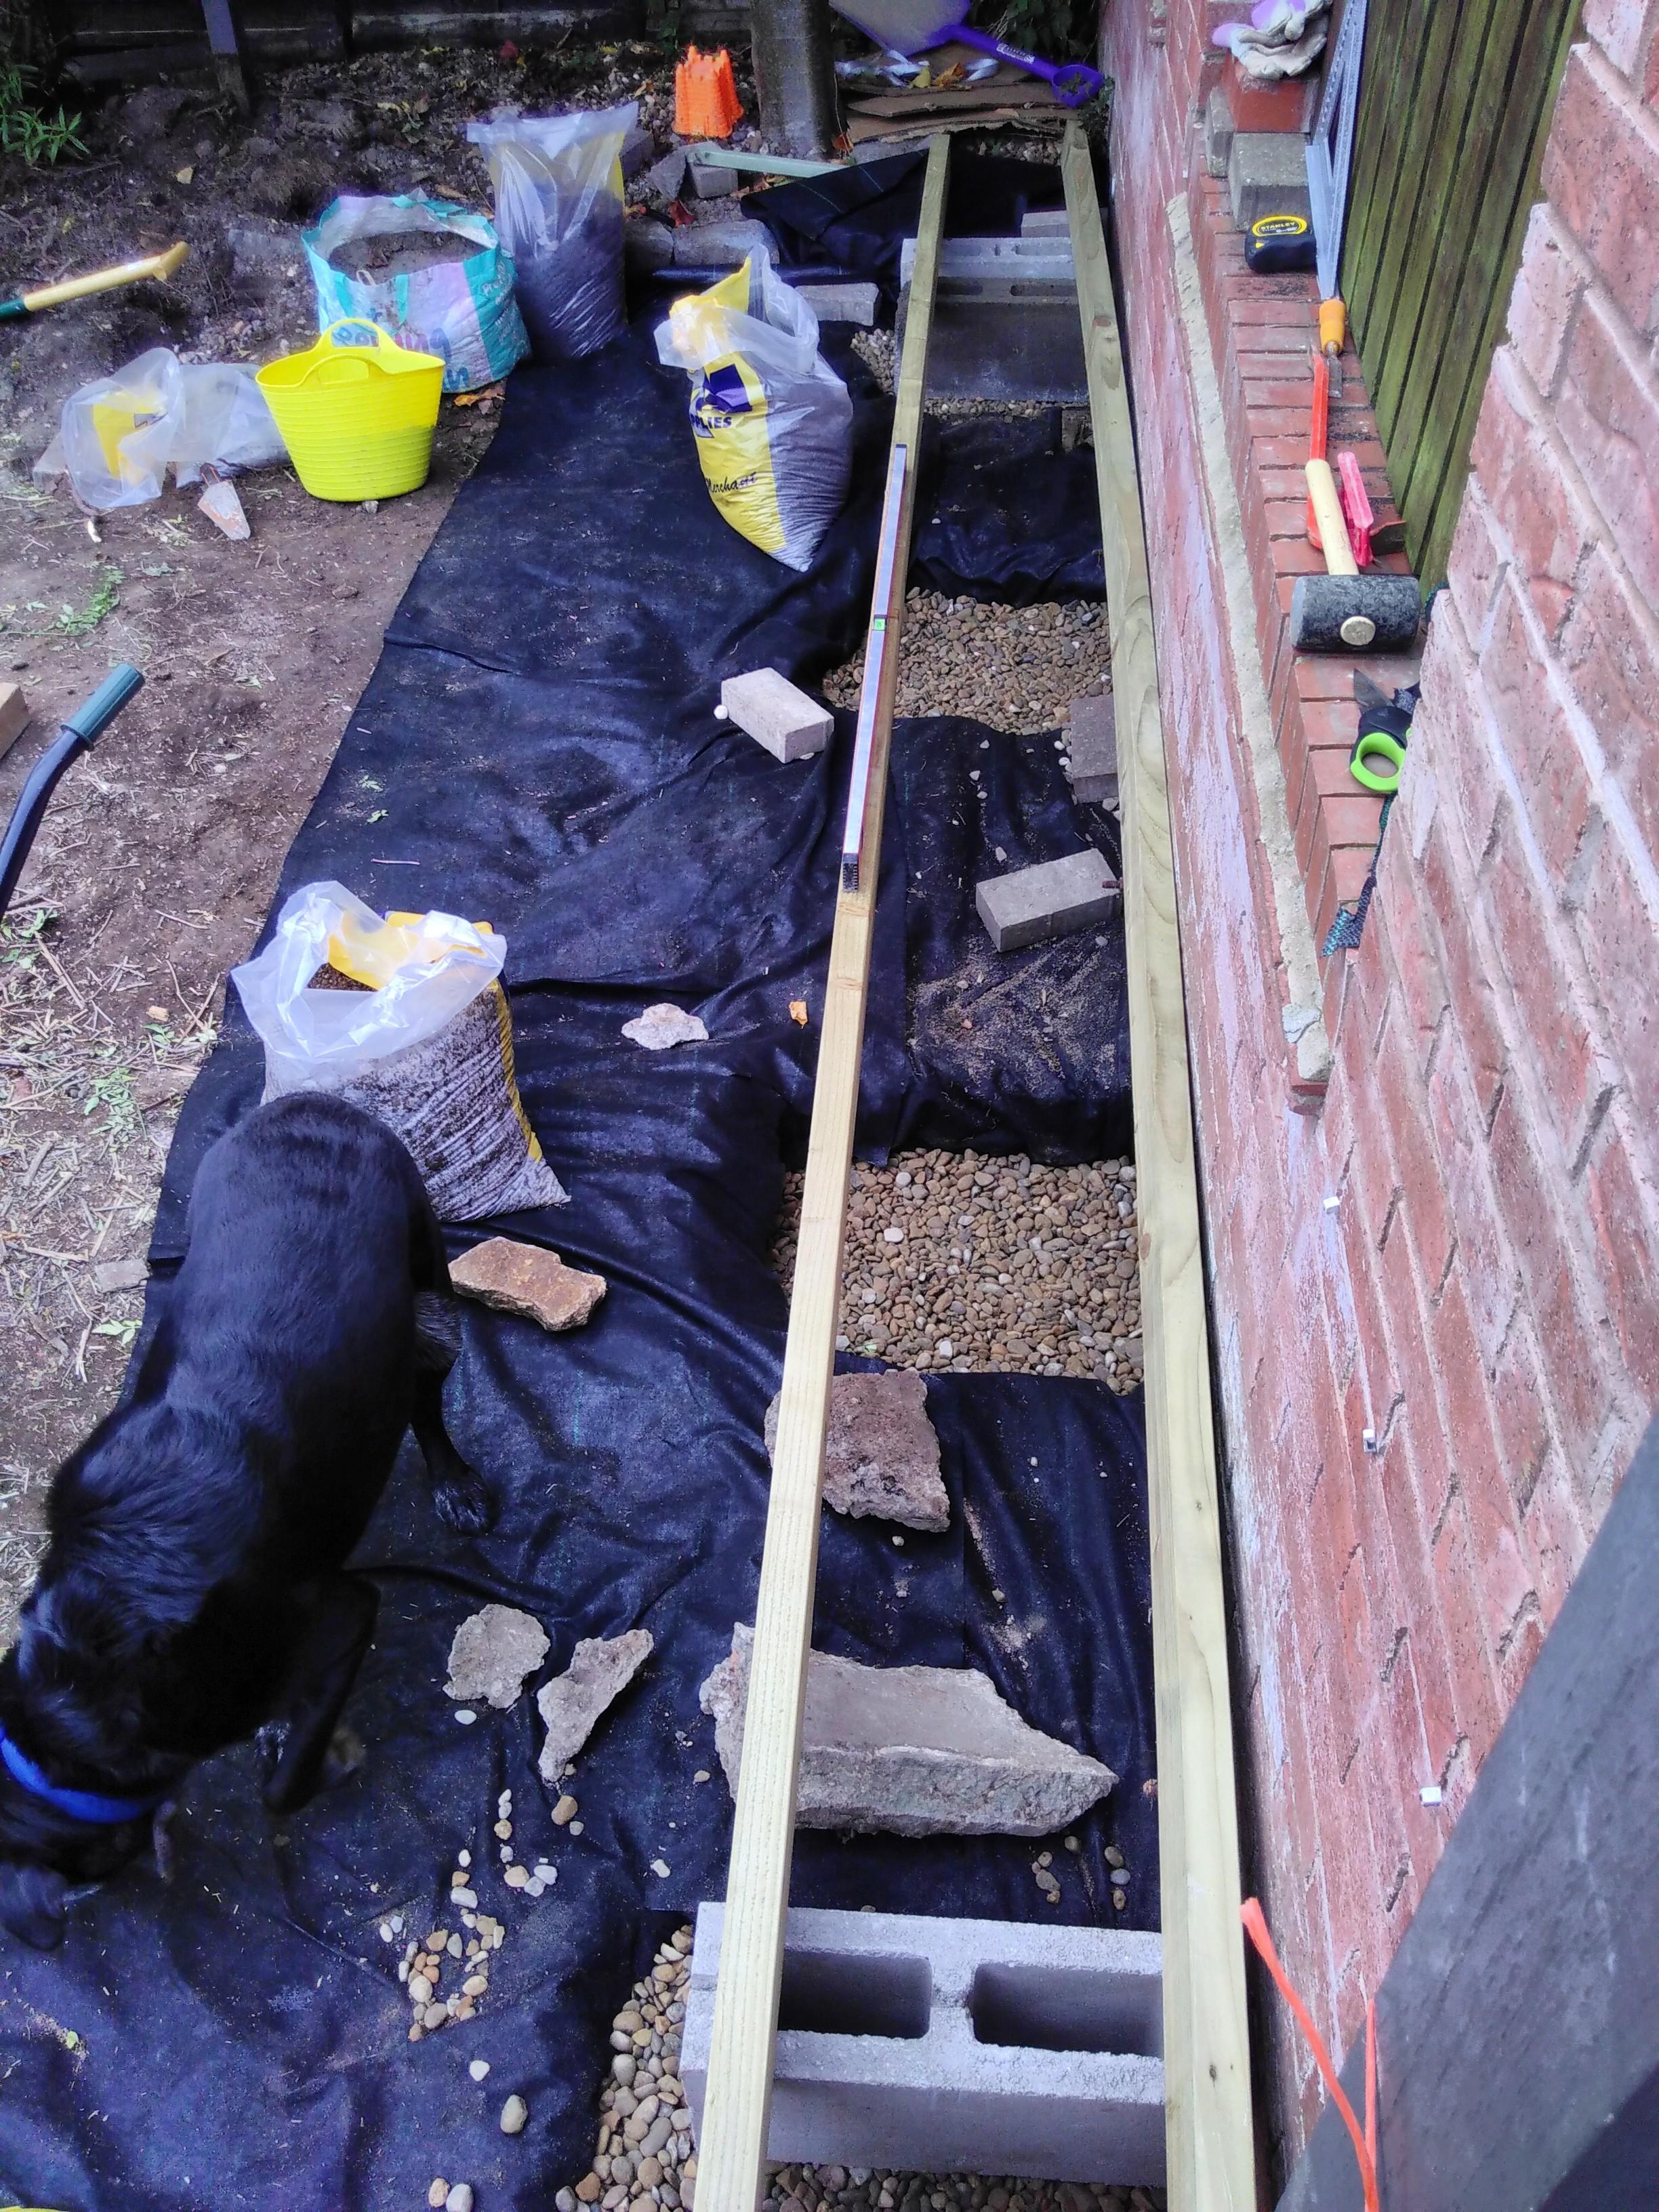
A bit more progress - I have (some of) a structural box beam on top of piers \o/ Still got a fair bit of levelling to do (might cheat with some packing sheets), noggins to put in over the piers, and prep for the vertical beams the doors and windows will be attached to. The positions of those are pretty much finalised now - where they were in the original plan, but minus the two additional windows on the curved section. The doors I've got lying around are half-glazed, so I reckon there'll be enough light without those - and if it's not, I could always add a rooflight. I also need to get that final, curved side in (two more holes to dig!) To do that, I'm just going to attach straight beams at a 15° angle going out to each of the middle piers, then straight over the central gap. That seems like it'll do the job with only the tiniest bit of overhang here and there, which isn't a problem - the finishes will overhang the beam too. So much easier than trying to make glulam beams out of ply 😅. i've concluded that I do need to cover at least the top of the box beam with *something*, mostly to stop critters from getting up into the straw from below. Taking another look at @Gus Potter's suggestion of bits of wood; I happen to have a lot of old decking timber and a few pallets lying around, which might do in a pinch. Wondering if covering the bottom as well would be a good idea from the point of view of resisting the timbers spreading out due to the load coming from above. Since this face won't be in contact with the straw, also wondering if I could just use mouse mesh, which is reasonably cheap and, presumably, more than strong enough to help. I might just be inventing more work for myself, though. No progress on reading up on what the wind will do to the poor thing, but I've belatedly recalled that there was a garden shed sat in a more exposed location last year, with just a timber base, and that went nowhere. It just rotted away from the bottom up. This will be a fair bit heavier than that, and I can ensure the roof stays attached by reference to my solar panel design document which calculated wind loading on the panels for this location \o/. The thing that's left to reason about is whether friction between the concrete block and the pea gravel will be sufficient to stop it from being pushed off the base, or if I'm going to need to anchor it down into the gravel somehow. It's getting dangerously close to playing-with-straw time.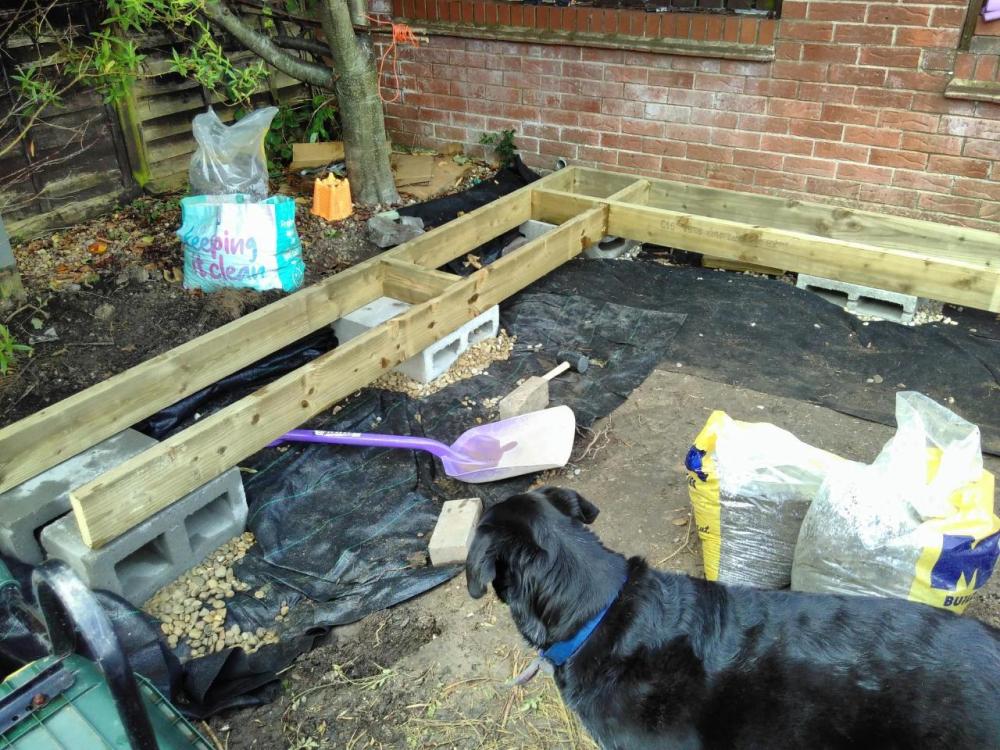


-
Landlord epc min c scrapped
Nick Thomas replied to Pocster's topic in Environmental Building Politics
A weird aspect of the Japanese property market is that second-hand homes are fairly rare. Quite literally, they knock them down and rebuild them, en masse. Random article on the phenomenon: https://www.economist.com/finance-and-economics/2018/03/15/why-japanese-houses-have-such-limited-lifespans Not sure I'd recommend it in pursuit of net zero, though. Anyway, one can only hope the U turn will be U turned on again. Check back in a year or two. -
More foundation fun - straw bale garden room on clay
Nick Thomas replied to Nick Thomas's topic in Foundations
The order: 4200x150x50 C24. The delivery: 4800x150x50 C16. Timber calculator is still happy with it, albeit with finer margins, and honestly I prefer not having to joint two bits of timber to get 4.6M, but... sigh. Will check the order more carefully next time. The C24 has disappeared from their website too, so presumably they've realised they don't have it. Price/metre is about the same either way. Might just let it go. -
More foundation fun - straw bale garden room on clay
Nick Thomas replied to Nick Thomas's topic in Foundations
Aye. My plan at the moment is to try to get the bales up on a single dry day, then protect them with tarps and/or vapour-permeable membrane. As long as I size, dress, notch and dip the bales that need it, and keep them organised, raising the walls should go quickly - and I've got a few helpers I can call on ^^. It's OK if the side of the bales can get wet, as long as they can also dry out - but water from above is death. -
More foundation fun - straw bale garden room on clay
Nick Thomas replied to Nick Thomas's topic in Foundations
I did read and appreciate your thread on that, and there is a box beam detail using timber i-joists: https://strawworks.co.uk/wp-content/uploads/2021/08/05-02-Floor-plate-structural-box-beam-details-with-timber-i-joists.pdf . Thought of going this for, ooh, at least 30 seconds before deciding it was over-complicating things ^^. The roof gets attached to the roofplate with regular fixings, it's just wood->wood. That's both pinned with hazel spikes going into the bales, and held to the bales and floorplate with packing straps. What we did on the course was squash this whole sandwich of baseplate, straw, roofplate, together with trucker's straps, then used packing tape to keep the compression in place. There are also timbers running the full height of the wall to act as posts for the door and window frames. They're not structural, in the sense that the walls support the roof even if they're not there, but they get tied to baseplate (and box beam) and roofplate, so help to hold the whole thing together. How to attach the whole thing to the foundations is a bit more of a question. I was planning on using more of the packing straps to hold the baseplate to the concrete blocks, which adds ~280kg to the overall weight of the structure, but they're just sat on the pea gravel with nothing holding the whole thing down. I was thinking about driving a metal or timber support down and tying that to the blocks, but only vaguely so far. I suppose the friction forces could be calculated and compared to the wind loading, but... Ooof. Thanks for checking my maths here, it's really never been my strong point, but that's a pretty awful fail. I'm still well in range for hard clay soil, at least. You had me hastily re-checking my timber beam calculations, but I don't seem to have made the same mistake there, which is fortunate as I didn't have anywhere near as much margin while cheaping out on the timber! (And thanks for your other comments about the founds for this wall too). Yeah, I'm well-resolved not to dig any more of this out, and the levels there are fine, fortunately. All the holes are filled again with pea gravel now, so the wall should be back to how it started, more or less. I suppose if I were pushing down really hard on the retaining wall foundation on one side, that could lead to it tipping, but the forces required for that feel... extreme. Still, might have been wiser to give the wall more clearance, with hindsight. I'm scrapping for space, though - it's not a particularly large garden and the bales take up a significant proportion of the footprint. Hmm, hadn't thought of this, thanks. Assuming my maths isn't off again, and ignoring the gaps between timbers for the moment, it's looking like another £450 of timber though (top and bottom of both base and roof boxes, around 15 linear metres of wall, 450mm wide, ~£1/linear metre of 100mm wide fencing slat). Cheaper than the OSB3, but not *super* cheap. Genuinely hadn't thought about this aspect of it, and you're right, it needs attention. Thanks for bringing it up. Fortunately, the site is very well sheltered, although less so to the east - still, we had 40mph winds today and I was playing with a tarp without it being an issue (very scientific measure, is tarp wrangling difficulty). Definitely trying to tackle these catastrophic failure possibilities at the design stage, but I feel I need to do some reading before I can actually interrogate the subject 😬. 300mm minimum - which I'm violating on one wall. They prefer 450mm. I'd put the retaining wall buildup through the ubackus calculator which indicated there'd be an issue with condensation if the bales were hard up against the brick and the delta between inside and out was greater than 10°C ; I'd forgotten to mention it. The same calculator says a 10mm ventilated cavity is enough to manage it even with a 20°C delta; I'm thinking I should go for ~50mm anyway, for practical reasons (I'm going to be fiddling with compression straps and all sorts along there). It's also not a solid brick wall - there are those wooden slat panels from ~1M up, so there will be ventilation from the NE as well, which ubackus didn't know about. -
More foundation fun - straw bale garden room on clay
Nick Thomas replied to Nick Thomas's topic in Foundations
As I say, I have no idea what I'm doing ^^. The topsoil definitely swells and contracts quite dramatically so i'd imagine taking that out of the equation can only be a good thing, even if it might cope alright without it. Thanks for the vote of confidence on the pea gravel - I don't have a whacker plate, just big boots and some lumps of heavy stuff! You say temporary structure, but I'll be unhappy if it lasts less than 25 years. The budget is around £2,000, although it's not a strict thing and a lot will depend on what I end up doing for the roof. Honestly, I appreciate the input, even (especially?) when it's "this seems like a terrible idea" ^^. I'm not here to evangelise straw, just giving it a try. If it's a big wet rotting failure, it will at least be a garden-room-sized one, rather than a house-sized one and if that happens, I can try my hand at straw bale gardening instead. Keeping it dry during construction is a challenge, as you rightly note, but once built - I've been inside straw bale buildings that have lasted plenty longer than 25 years already, in inauspicious conditions, so I don't share the same moisture concerns. Time will tell if I'm just unreasonably optimistic. I have some straw bale specialists weighing in from time to time too, but this scale of project is much smaller than they're used to, I think. Onto a bit of progress - Hole number five, this one in the SW corner (so 3M closer to the house). No made ground here that I can see, just a smooth surface of very hard clay, gently sloping down towards the house. The ground is pretty saturated at the moment and the clayey topsoil is sticky and plastic, but I was pretty much bouncing off this layer. In theory, I'll be digging another hole a bit like this in spring to gather material for the internal clay plaster. A bulk bag of the stuff is £600! Here I'm just filling the other four holes with gravel and compacting it down. Still haven't laid the blocks on their sides, but that will come once I get my "L" shape together, which is one pit away. I've gotten some 440x215x215 blocks and should be able to get a decent level by varying the amount of pea gravel in each hole and using different heights of block. This timber is 100x50mm C16, and not strong enough to span the 1M gap between piers according to a random timber calculator. Instead, I've got some 150x47 C24 which the same calculator is happy with. Butt join, 450mm wide, more or less following the "box beam" strawworks detail. I'm currently umm-ing and aa-ing over whether it needs OSB3 top and bottom for the box part of the box beam. Presumably it adds significantly to rigidity against lateral loads, and it gives a space that can be insulated (for this space, the acoustic, rather than thermal, insulation is the important bit), but not much to vertical loading? The sheets aren't cheap, and need a bunch of precise cutting, then gluing and nailing, so it's a saver if I can skip it. Fortunately, I've got plenty of time and a mock-up to run through before that decision needs to be finalised.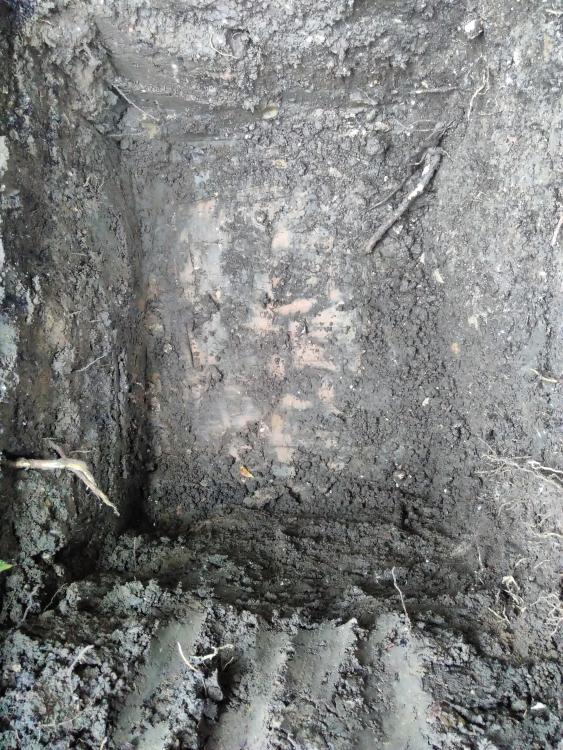

-
If you use NHL5, it'll be relatively impermeable, so the water you currently see in the voids will be more likely to stay higher up. Is that desirable in your case? Same if you added a bit of cement to it - the water will be slower to move through (if at all), so it'll end up going elsewhere. Into the house?
-
More foundation fun - straw bale garden room on clay
Nick Thomas replied to Nick Thomas's topic in Foundations
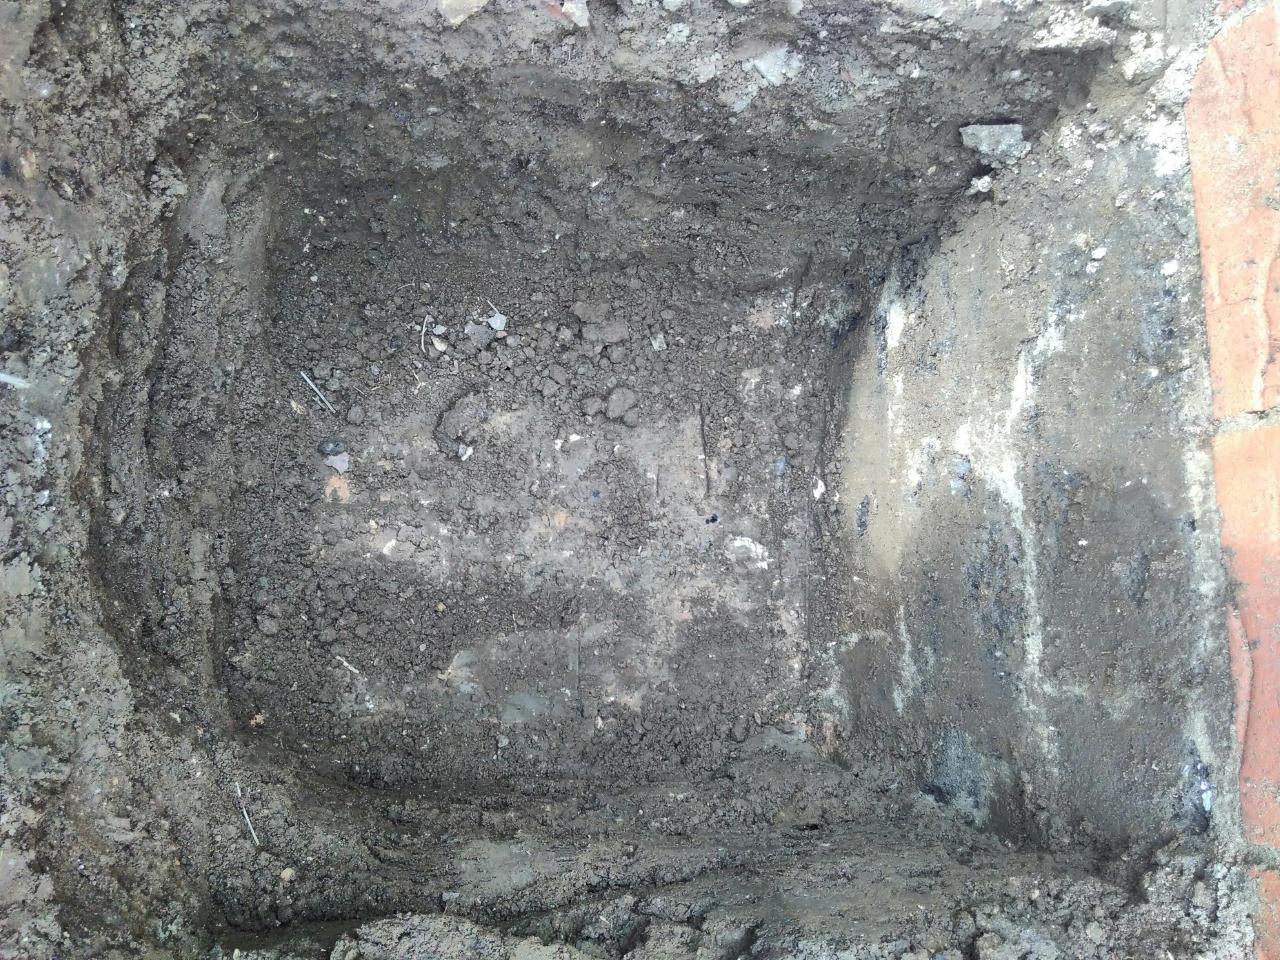
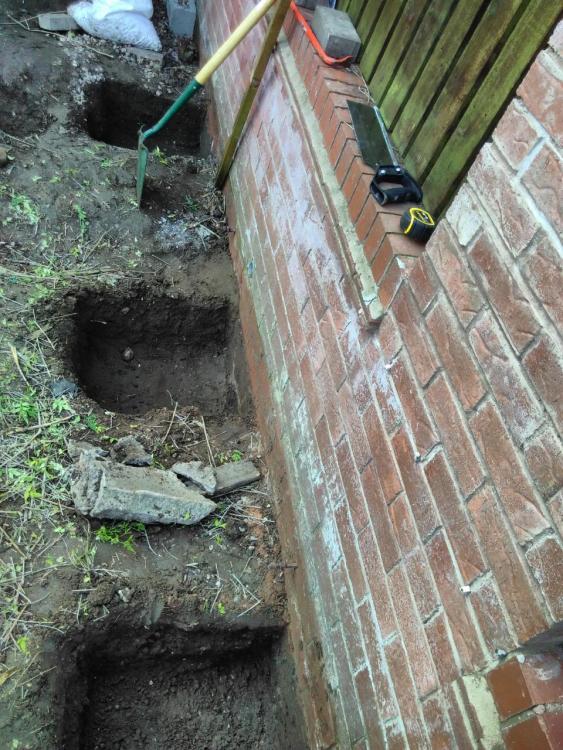
Overnight I decided to have a go at digging deeper, since the back four pits would be more difficult to access than any of the others in case it turned out they *needed* to be deeper. I'm glad I did - against expectations, I've found a lovely flat hard horizon at about 0.7M below ground level. It seems the brick wall goes at least four concrete blocks down, and I'm around the middle/bottom of the third one down at this point. At 0.5, I was still in topsoil 😬 . My spade just bounces off this layer. I can dig into it with a pick - it's mostly compacted gravel, various other bits and pieces mixed in, a few whole bricks and so on. This depth must be fine. SURELY. Mind you, this bottom 0.2M is easily as much work as the top 0.5.

-
More foundation fun - straw bale garden room on clay
Nick Thomas replied to Nick Thomas's topic in Foundations
Thanks, that makes a lot of sense now I stop to think about it. And there are 440x215x215 blocks I could use along the south part where everything is lower (so there's more height to make up). Lovely. The pea gravel is just what I have lying around. Do you think it makes enough of a difference, once compacted, to be worth using angular instead? For the whole depth, or maybe I'd get the same benefits from just having a layer of it on top of the pea gravel? Definitely 👍. This was on my mind, but not enough that I remembered to do it in the first test pit. Fortunately, I'll be digging that up in a minute so will get to re-do. Details in a sec... Yes, at least on the three accessible sides, the plan is a nice white lime render. The side that goes up against the brick wall will have a ventilation gap, then some vapour-permeable membrane to protect it from the elements. The bales should also get a pre-installation dip (since they won't be accessible) in a slurry of lime to give some fire resistance. Having the brick wall there is throwing up some fun challenges, for sure, but I don't much fancy demolishing it. -
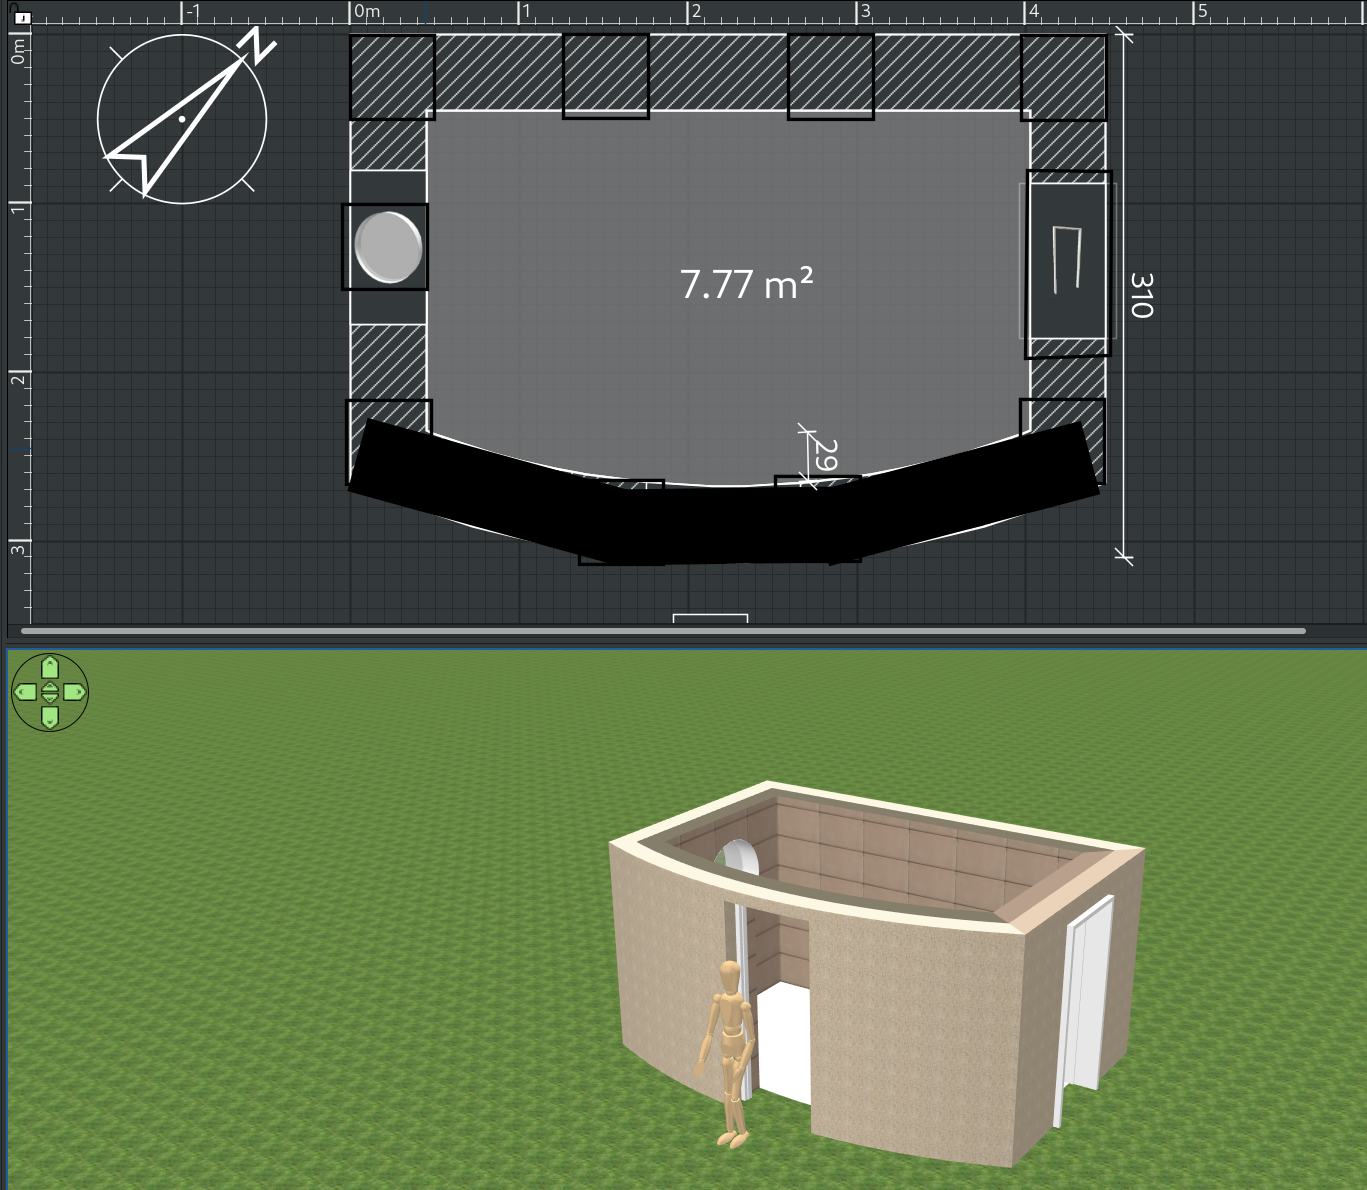
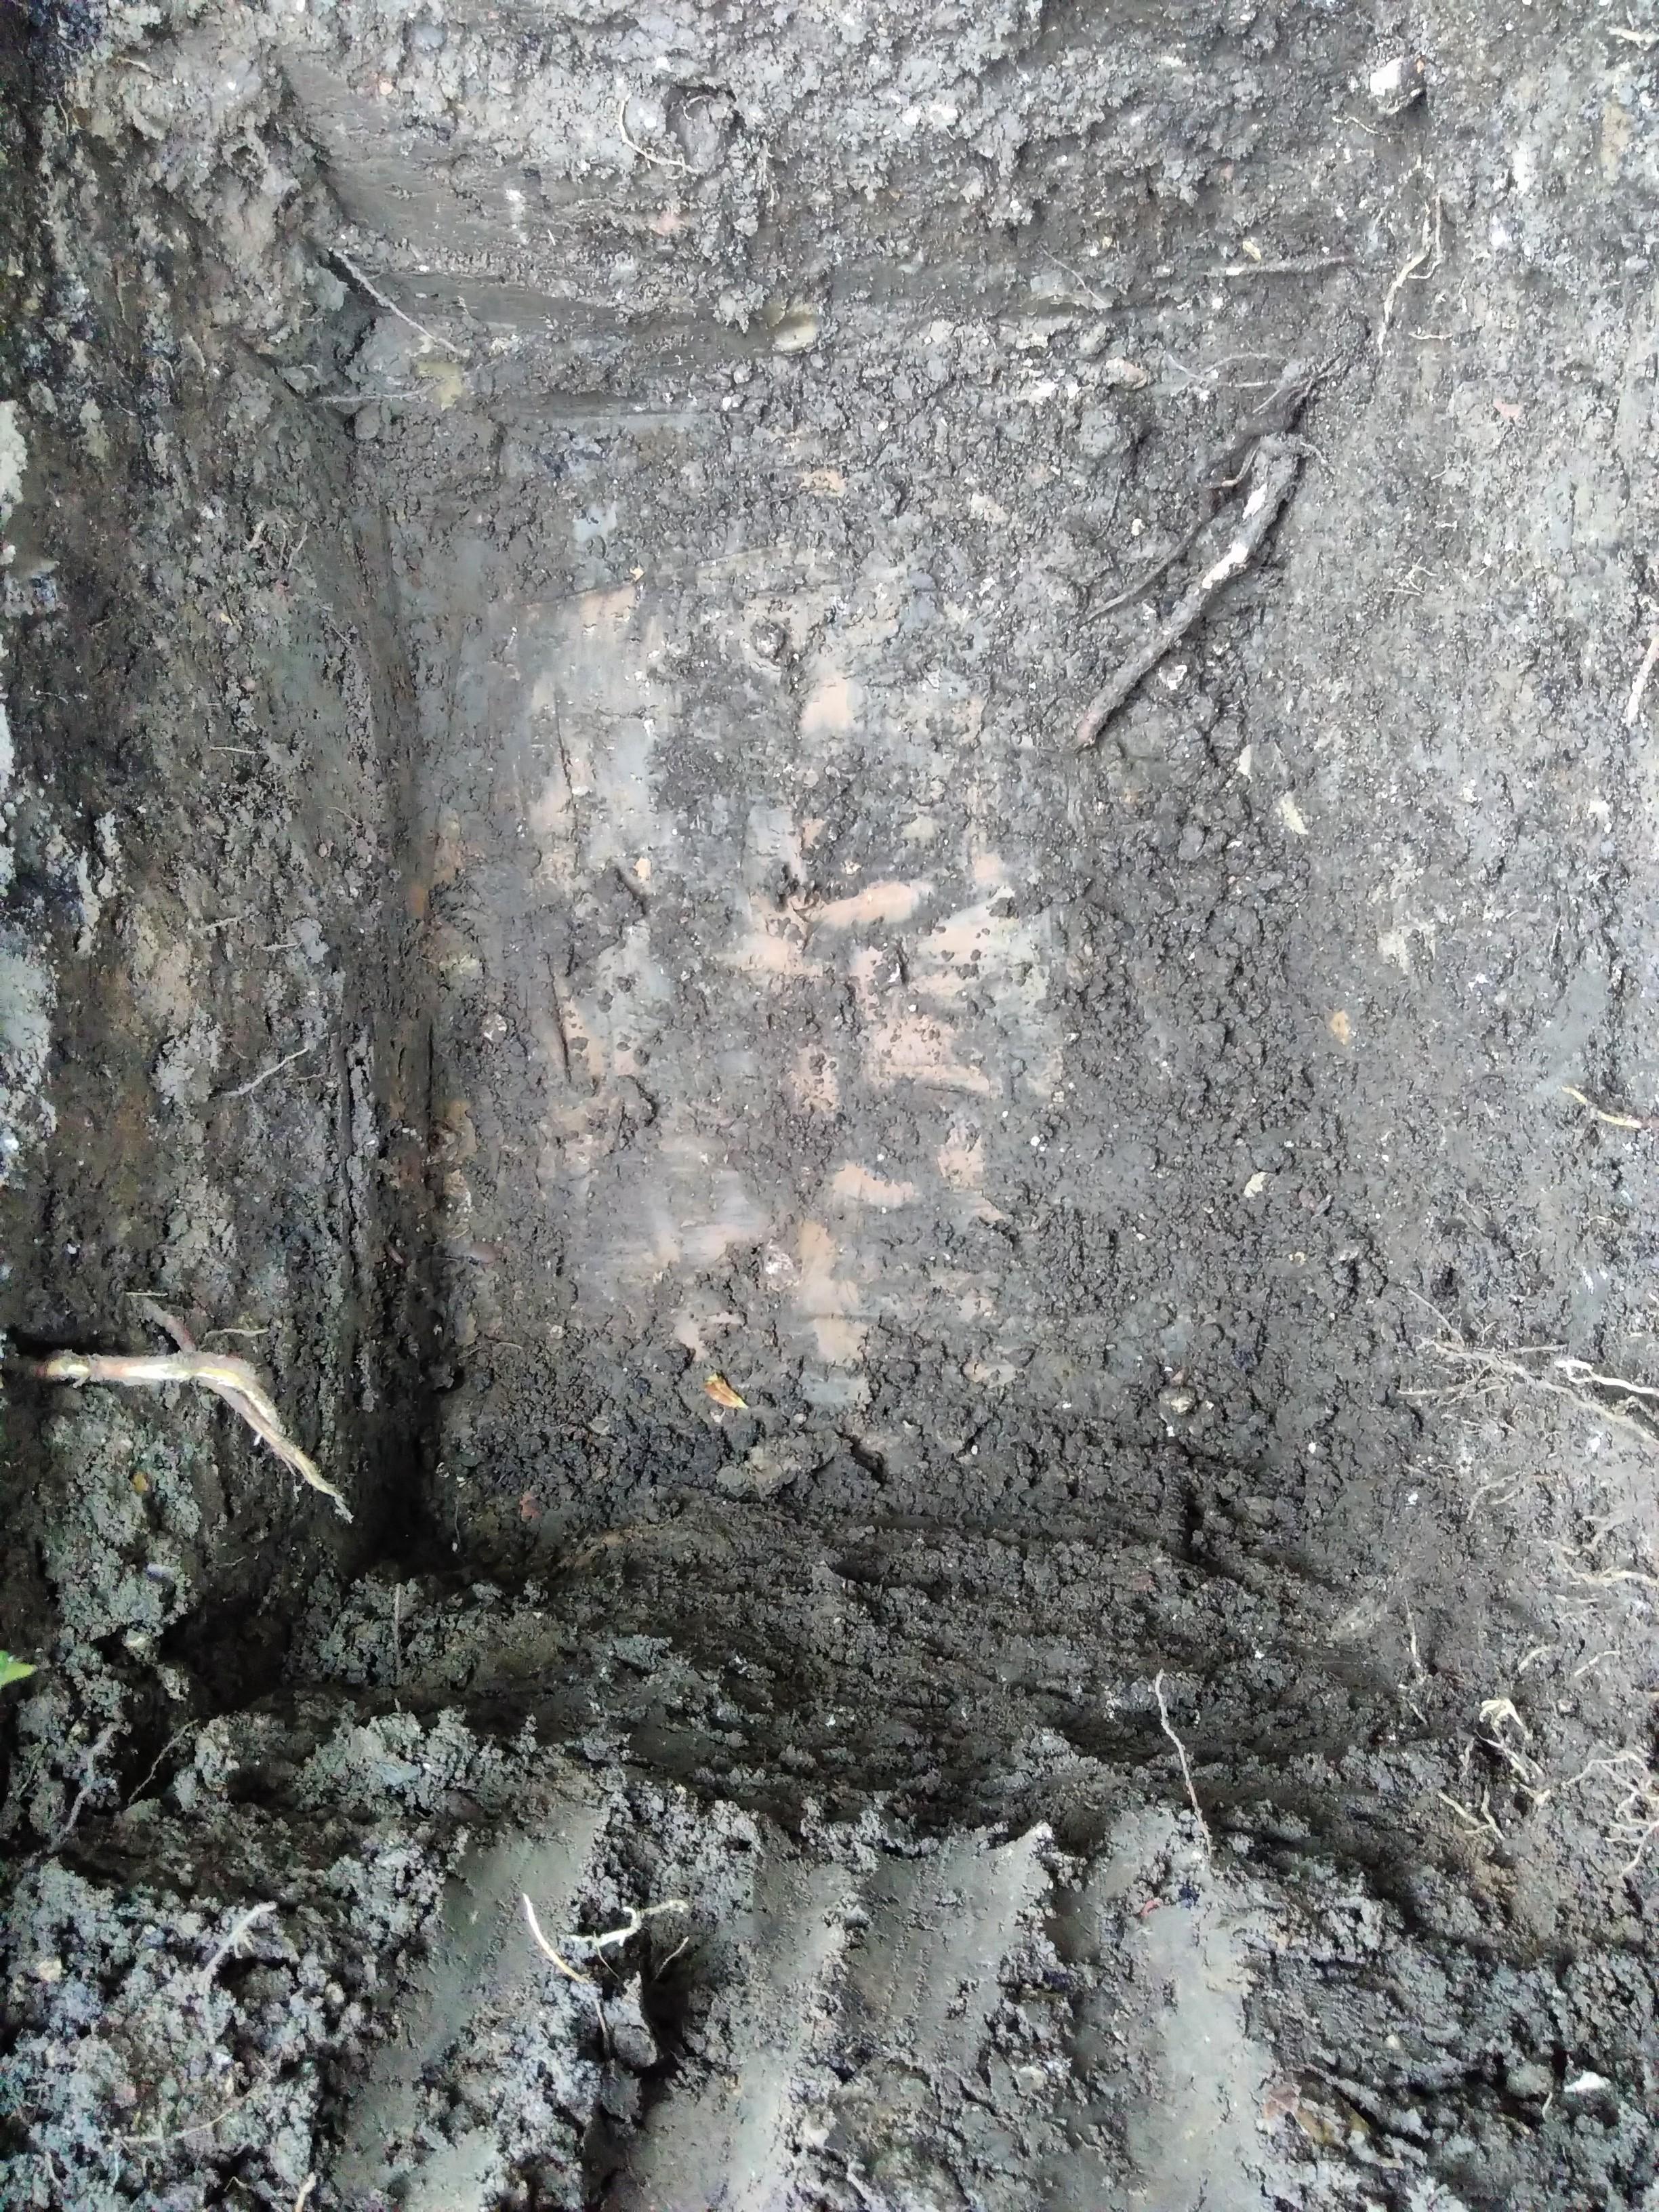
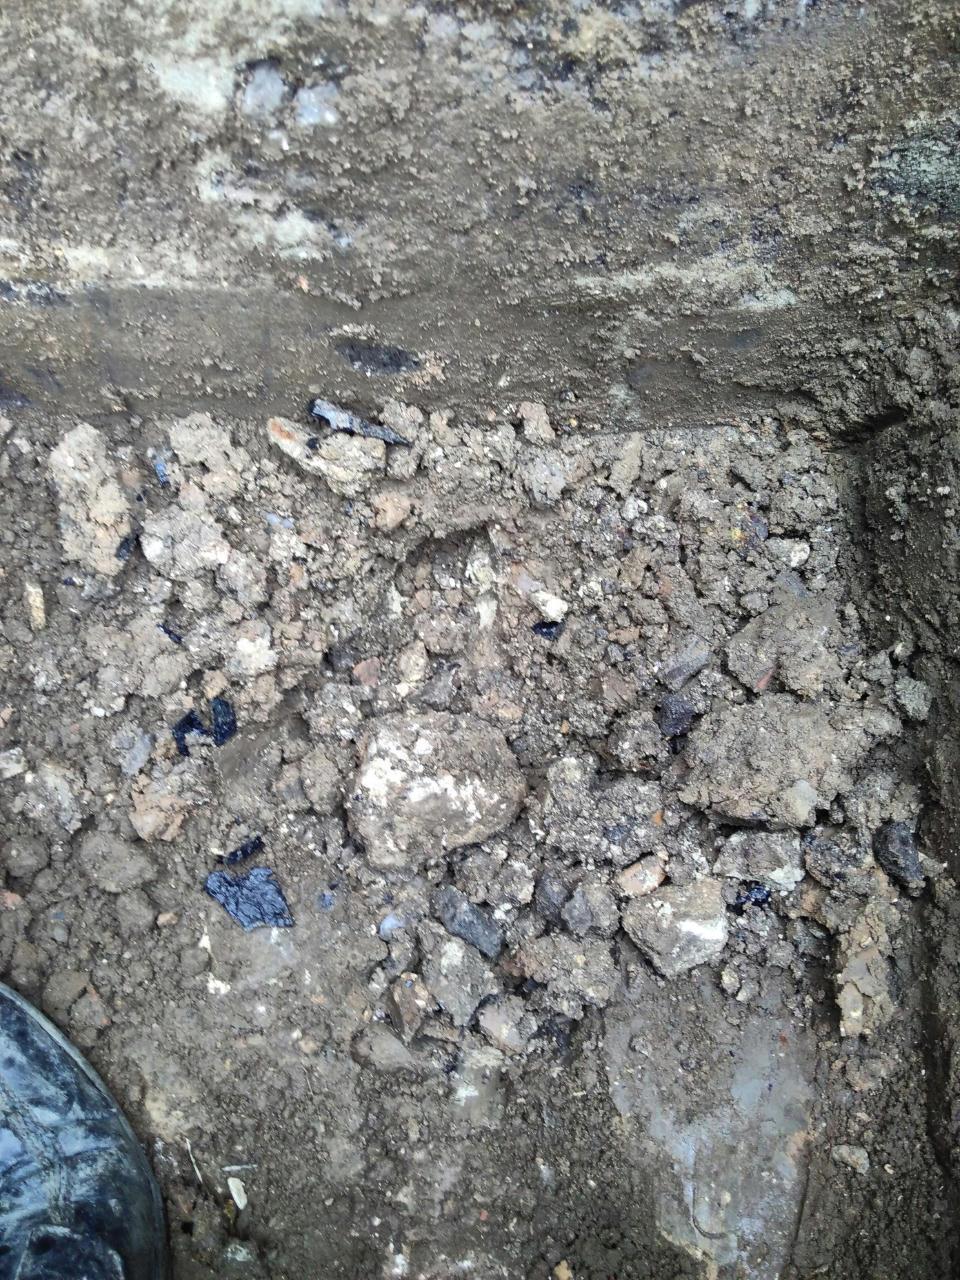
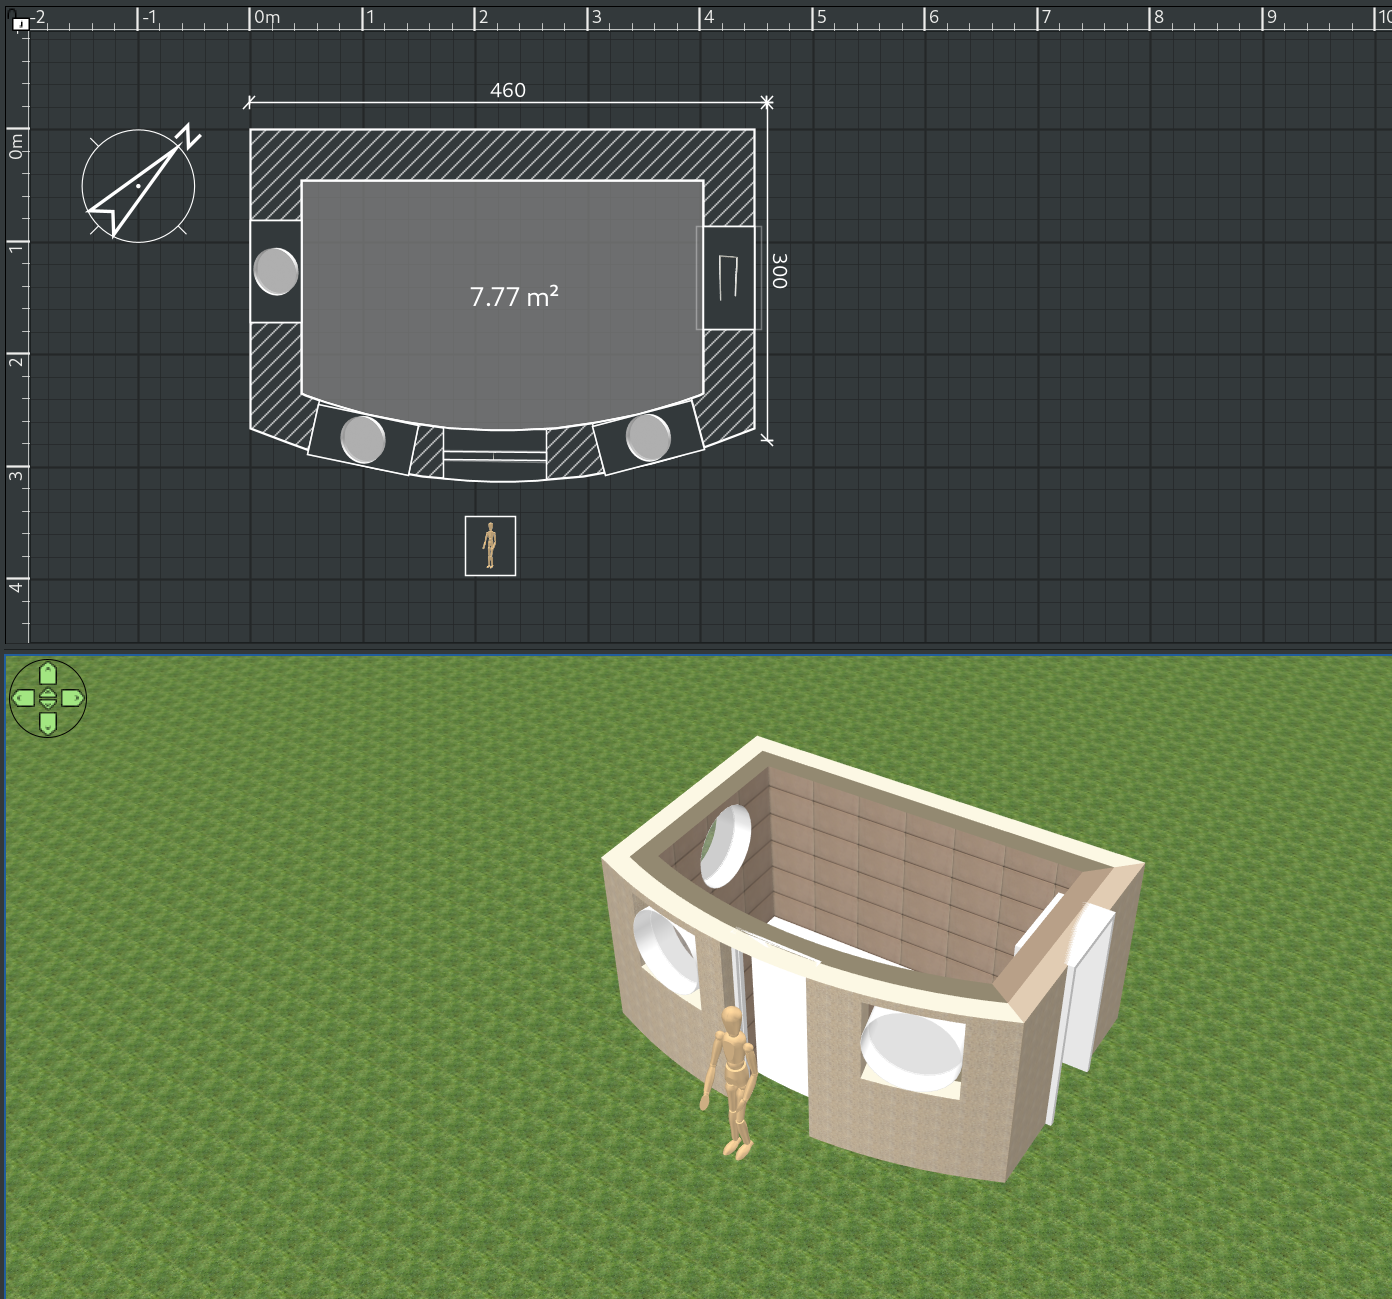
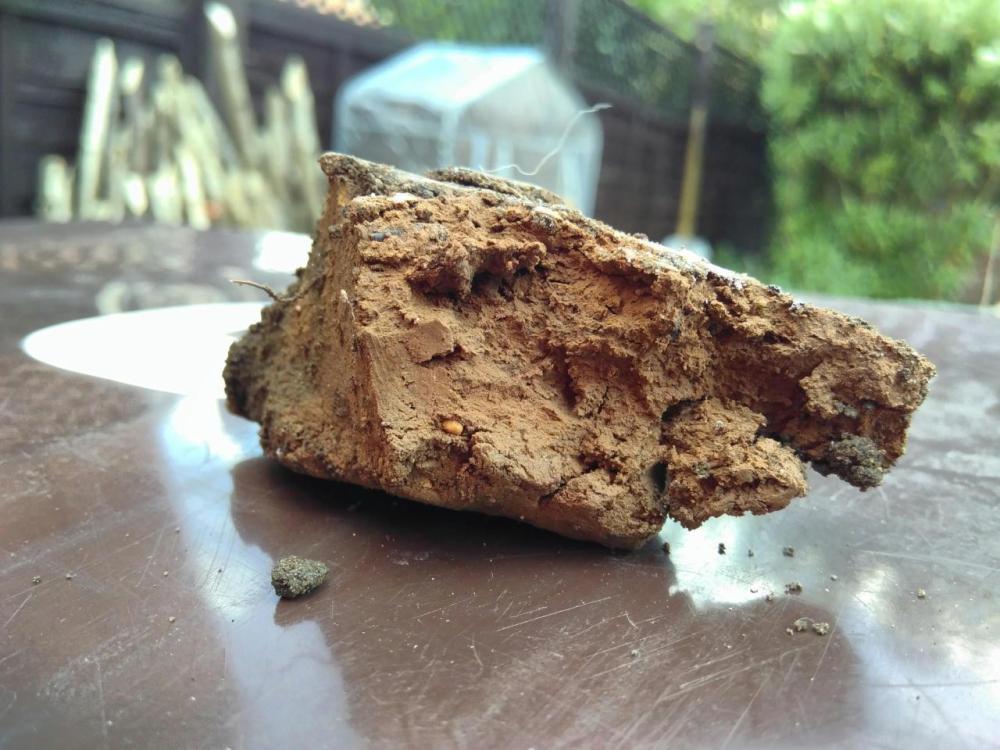
I've been following @ToughButterCup's thread with interest, as I'm just starting to put together a garden room. Thanks everyone for sharing so many interesting things there; my case is different enough that I figured a separate thread would be sensible. went on a straw bale building course in August and rather foolishly bought 100 bales to get building with before clearing the site or planning... well, anything, really. They're in the garage, which I'd quite like back! The site is cleared now and I've started digging with a vague plan, but I don't really know what I'm doing so I thought I'd see if anyone had any suggestions or criticisms. The basic idea is a ~8sqm unheated, buildings-regs-exempt, planning-exempt room in the back of the garden, maximum height ~2.5M. Three square walls (4.6M long side along the wall, ~3M on the short sides), then a gentle curve on the side facing the house. The garden is a ~10Mx10M square, with a brick wall to the back, running northeast. I don't want to interfere with that wall much or rely on it for support, but I don't mind pushing on it (the level of the road behind it is a bit higher than the level of my garden, and there are a line of existing 2" plastic pipes for water coming from behind the wall. Only one intersects the wall; I'm planning to add a length of pipe to divert the water beyond the wall I'm building). Straw bale construction is pretty lightweight compared to masonry (~160kg per linear metre of wall once rendered and plastered), and the resulting walls are nice and flexible - and thick, ~450mm. The straw generally wants to be kept ~300mm above ground level, though. The most northwesterly corner of the room has a high ground level compared to the rest of the site, with a ~4M high apple tree growing in it. The site slopes down both to the south and east; it's about a 140mm difference from NW to SE corner. To fit inside the 2.5M height restriction, I've already decided to minimise ground clearance for the straw in this corner - it won't get 300mm, I'll just belt on many types of water protection to compensate, and if that doesn't work, replace the straw there every few years ^^. Fairly awful screenshot of a model to give pictures to those words: The door and window placement is all very provisional, and, uh, I don't have much idea of what the roof is going to be like, other than "lightweight". Probably not flat, but whatever will work with the pitch I can get in 2.5M. Asphalt shingles on some lightweight rafters, perhaps. It's unheated, and I'm not planning to insulate the floor or roof much; the walls will be super-insulating, but I'm after the soundproofing more than that. Since I'm building-regs-exempt, I don't want to overengineer the foundations - I just want them done so I can move on to the fun bits :D. At the same time, I don't want to be jacking up the whole structure in a few years to re-do them because I made bad decisions now. I'd like to minimise cement & concrete use, but not completely averse to using a bit. Straw balers generally love tyre piers rammed with gravel at 2M centres, with a timber box beam / baseplate on top of those to spread the load. I don't really want the tyres leaching their substances into the garden, so have ruled that out ^^. What I've come up with after a few false starts, and after ruling out screw piles on cost grounds, is to have 50cm x 50cm "pads" of pea gravel (I happen to have lots of 20mm hanging around) as deep as is sensible to minimise movement. Compact it, pop hollow concrete blocks on top of those pads to get the height above ground level needed to keep the straw happy. Varying the depth of the holes and the amount of pea gravel allows me to get a level for the timber. I'm aiming for a maximum of 1M between the concrete blocks to minimise the amount of timber needed to span it (a random timber calculator suggests 100x50mm would be more than sufficient for that; I'm planning to over-spec that by having each side baseplate be 100x100). I've been digging along the back wall today, and here's where I've gotten to so far: I've aimed for ~500mm going from the ground level given by the NW corner. As I get further from that, they get shallower due to the slope, of course. The wall is, I think, two concrete blocks of foundation beneath the bricks, and probably poured concrete below that - I've not gotten quite that deep at any point. It's made ground with a lot of clay - these houses are built on an old brickworks that was filled in. My chances of finding undisturbed ground with a shovel are pretty minimal, I think (and there's no access for a mini digger). When it's dry, the surface gets cracks big enough to get your fingers in and becomes impossible to get through. Fortunately, we've had some rain so it's a lot softer right now, but going down even this far it really stiffens up again. There's lots of white stone mixed in, and I'm digging up nuggets of clay like this: As far as I can tell it's "expansive clay", and before backfill the whole area was a "luvisol" soil type - so there'd be a fat shelf of clay at some consistent depth if it hadn't all been turned into bricks. I did a soil jar of the topsoil which had plenty of clay, but also a fair bit of silt and organic matter. I did some tissue-paper calculations and I'm pretty confident the soil that's there has the bearing capacity for the structure - it's quite light and the pads are quite broad,so it's well spread. Say ~5 tonnes total for the structure and foundation materials, ~5kN. Spread across 10x500x500mm pads, 2.5sqm, gives 2kN/M², which compares very favourably against the numbers in the table here: http://environment.uwe.ac.uk/geocal/foundations/founbear.htm . The biggest question I have right now is pad depth - would 500mm the way I'm calculating it be enough to minimise other movement (particularly frost heave) in this case, or should I be aiming deeper? 1M? 1.5M? The calculations for concrete trenches get a bit mad when you add clay and trees to the mix, but concrete is really not very tolerant of movement. I've got a nice big bag of hydrated lime and was considering digging some of it into the base of each hole in a highly amateur attempt at soil stabilisation, if anyone has an opinion on that. The 500x500 pad approach could do with a critique as well - assuming I get the depth right, does it have a chance of working? Do the pads need to be bigger? The baseplate and bales are ~450mm wide, so I'm sure I can't go narrower ^^. I read about rubble trench foundations, where the whole length would be excavated, and I guess I'm about halfway there (2M out of 4.6M dug out so far along this wall). I'd be leery of removing all the soil at once with the wall there - what I've removed so far is pretty much at the limit of what I'm comfortable with there - but are there solid reasons why a single long trench filled with the gravel would be better than the individual pads, assuming I keep the concrete blocks at the same spacing either way? I could always dig out the remaining soil to whatever depth is sensible, one section at a time, if it would get a better result. Earthbag builders seem to go with insulating the foundation rather than getting deep enough to avoid frost heave; I wonder if that might be worth it here? I could get away with it on the short and curved sides, but not along the back wall. As I say, four holes dug so far. I figure I've got 6-10 left to do around the perimeter, depending on how curvy I decide to make it and whether I make the short sides more than 3M deep, and four to do internally to provide support for a suspended timber floor. Thanks for any help!

-
Loft insulation advice - unusual construction
Nick Thomas replied to DanRobertsB's topic in Heat Insulation
Here's a video of the decra: https://files.mutual.email/s/3XdHEPk6a5w3WcW - can't figure out how to link to it from its place on facebook, and it's too big to fit as an upload to this site. It shows the panels being deformed and un-deformed again, too. I did a sheepswool insulation with a friend a few weeks ago and it seemed fine, nicer to work with than fibreglass, of course. No special expertise though. Good luck with it! -
Loft insulation advice - unusual construction
Nick Thomas replied to DanRobertsB's topic in Heat Insulation
Compressed straw has the air forced out of it and has good fire resistance ('B' rated IIRC) as a result - the surface chars, the body doesn't burn - but loose straw is a tinderbox. All the wires mixed in do make me feel a bit queasy, honestly; it was mostly a joke. We sprayed the whole roof with corksol in-situ, which is a mix of cork granules and elastomeric paint. I'd imagine anything that keeps the metal from rusting would do the trick, though. We experimented first with a detached decra sheet, bending and rectifying the bend after the spray had dried and it didn't flake off, it all looked pretty sound and a good way to extend the life of a 50-year roof. It needed a good wash with a pressure washer first to get the moss and lichen and dirt off it. -
Loft insulation advice - unusual construction
Nick Thomas replied to DanRobertsB's topic in Heat Insulation
One thing I discovered about decra roofing is that it's quite easy to bend the panels back into shape if they're a bit deformed. Ours had been walked on a lot - including by a younger, less-informed me - and the ¿asphalt? granules were coming off some bits. We had trouble finding replacements of the right size for patch repairs, so they got taken off, bent back into shape, put back on and sprayed. Labour-intensive and a few cuts here and there, but a decent result overall. That wasn't 180M², though - just a few panels concentrated around the chimney. Loving the straw by the way. You don't feel like adding more?