Jeremy Harris
-
Posts
26430 -
Joined
-
Last visited
-
Days Won
360
Everything posted by Jeremy Harris
-

Who has used, is using, PHPP?
Jeremy Harris replied to Dreadnaught's topic in New House & Self Build Design
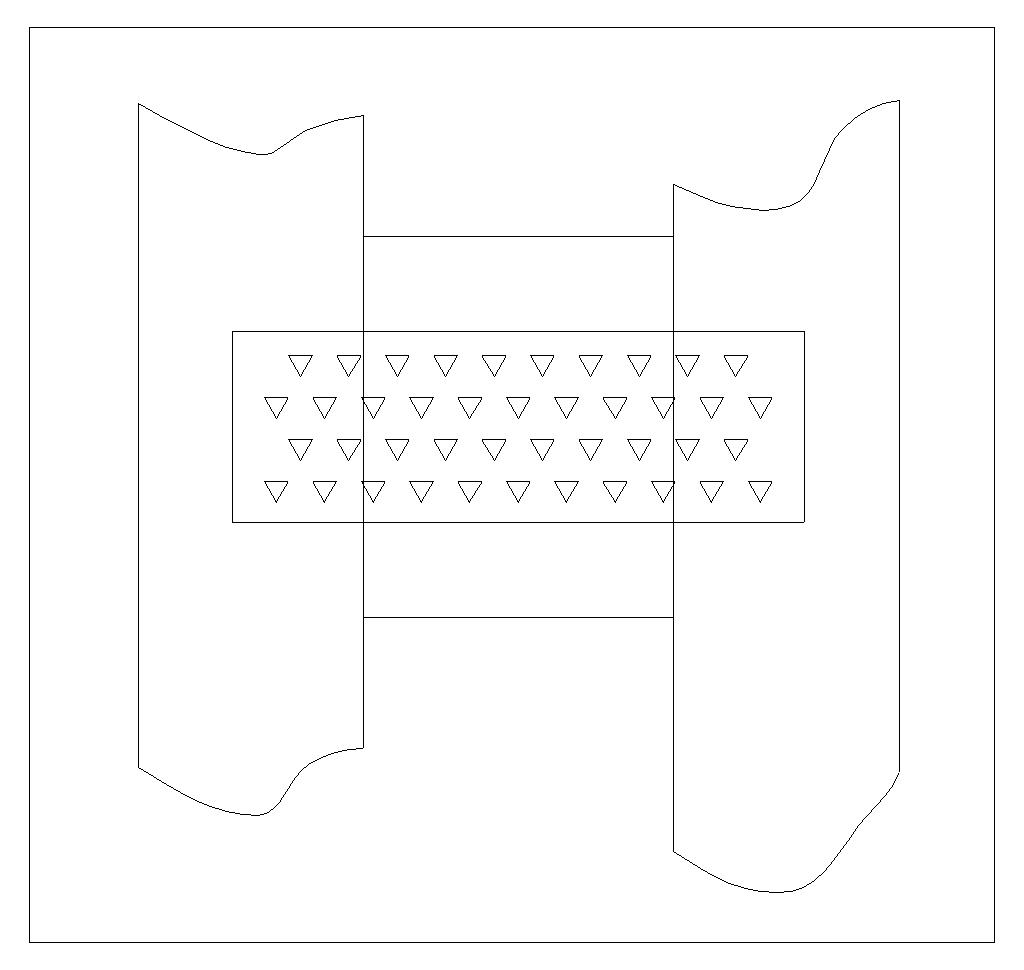
@Russdl, for info, here's a scale sketch of an actual MBC nailplate and frame spacing noggin: As you can see, the nailplate has a lot of voids in it and also doesn't extend the full depth of the 89mm x 38mm frame members. Somewhere I have another AutoCad file of just the nailplate, I'll see if I can find it - it's archived from when I did all this stuff 5 or 6 years ago.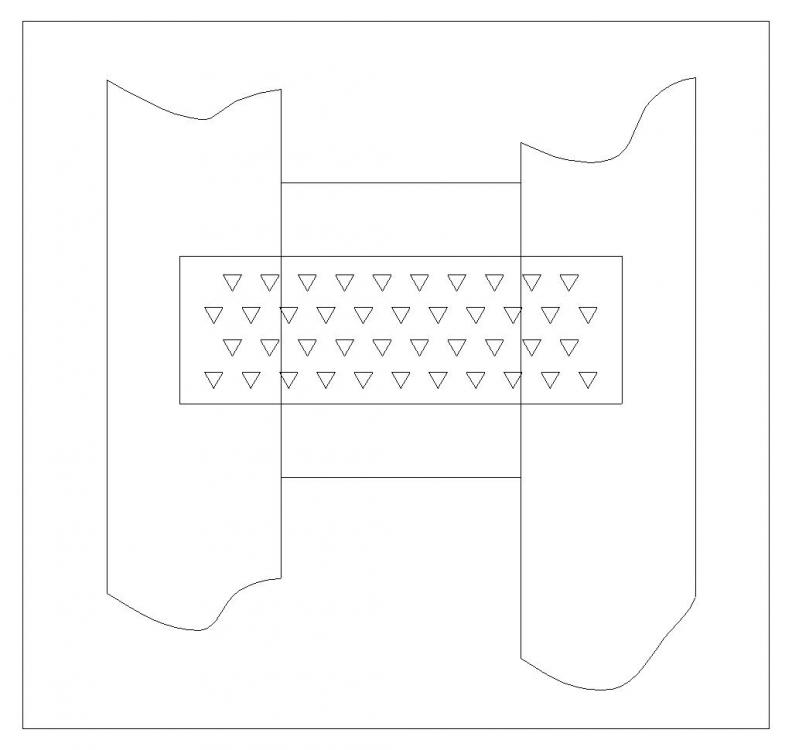
-
House Cooling ideas
Jeremy Harris replied to mike2016's topic in Energy Efficient & Sustainable Design Concepts
The main problem with rapid overheating is caused by a short decrement delay. Get this long enough, and combined with cool nights and a night purge system you can usually keep a very well insulated house cool. The exception is prolonged hot weather and warm nights, when a night purge has little effect, so the internal temperature builds up day on day during a hot spell. -
Who has used, is using, PHPP?
Jeremy Harris replied to Dreadnaught's topic in New House & Self Build Design
Our build up uses different materials, but I allowed for the exact number of noggin/nailplates between each of the two timber frames, the 89 x 38mm timber frame elements and the number of them in total, the OSB outer skin, the Durelis inner skin/VCL, the 45mm service void, 12.5mm plasterboard, 3mm plaster skim and externally the 50mm x 25mm cladding battens, air gap and the larch cladding. I then worked out the average U value for the whole area of the external walls. Things to watch out for are the exact number of noggins/nailplates per unit area and the fact that the nailplates have a lot of voids (more voids than metal) so cannot be modelled as if they were solid plates. Somewhere I have an AutoCad drawing of a nailplate that I used to work out the effective CSA, as it's a fair bit less than the apparent CSA. -
Who has used, is using, PHPP?
Jeremy Harris replied to Dreadnaught's topic in New House & Self Build Design
I modelled our cellulose filled twin wall from first principles and ended up with an overall U value of 0.121974 W/m². That included allowing for the joining studs and nail plates, plus the service void air gap, plasterboard, outer board, cladding etc. -
House Cooling ideas
Jeremy Harris replied to mike2016's topic in Energy Efficient & Sustainable Design Concepts
The lack of any breeze at all in this hot weather has had the most impact, I think. It was notable when I went back down to Cornwall last week and the week before that it was noticeably cooler, primarily because of the constant breeze I think. -
Who has used, is using, PHPP?
Jeremy Harris replied to Dreadnaught's topic in New House & Self Build Design
Thanks, @PeterStarck, it's nice to have confirmation that you found the model as sensitive to local climate data as I did. The main problem I had was not having any reasonably accurate data for the local conditions before we started building the house. I certainly didn't anticipate the fairly large reductions in wind speed experienced in our "hole in the valley", nor the higher overall temperatures. Building the house has itself changed the conditions very locally to a marked degree. Our neighbour has a vegetable plot immediately to the East of our house, and keeps telling me how grateful she is for the improvement in growing conditions building our house has created. She tried growing raspberries, starting last year, never having had much success in the past. She's had a superb crop, some of which I finished off this morning on my breakfast! -
House Cooling ideas
Jeremy Harris replied to mike2016's topic in Energy Efficient & Sustainable Design Concepts
We used two different films, one primarily for privacy on the large glazed gable, that works like one-way glass, at least during the day and one very slightly tinted film on an East facing bedroom window that had more solar gain than the models predicted (we get a surprising amount of sun from the East, far more powerful than that from the West, another local effect to do with haze build up in the afternoon, perhaps from the stream and lakes adjacent to the house). The front glazing film is Sentinel Plus Stainless Steel and the side glazing film is 3M Prestige . If not interested in privacy control, then I'd use 3M Prestige , as you will hardly know it's there. It is more expensive, though, and generally I'd avoid using an external film unless you have other options. In our case we had an unforeseen privacy problem at the front, so films made sense. If we hadn't had that issue, then I'd have been inclined to look at something like the timber brise soleil slats discussed in this thread, with some photos on the second page: -
Sun renewables solar panel problem( with pictures )
Jeremy Harris replied to Cs111's topic in Ireland
Overheated connectors are almost always the result of a poor cable crimp joint internally, as I mentioned above. At one time there were installers fitting connectors with the incorrect, or wrongly setup, crimp tool, and there were a spate of connector failures, including some small fires, I believe. Your failure may well be a one-off, due to a single duff crimp (it's pretty hard not to notice a connector that's not fully pushed home), but I'd keep a regular eye on the outputs from the two strings, as shown on the inverter display, just in case there are any more potentially duff connectors up there. -
@Andrew Bissell - Sunamp has a Daikin hybrid IIRC, and may be able to shed some light on how they perform in the real world.
-
Who has used, is using, PHPP?
Jeremy Harris replied to Dreadnaught's topic in New House & Self Build Design
I used PHPP in the early stages of our design. Useful for confirming what I already thought in many areas, but like all models I found that it's only as good as the data that's available. In our case PHPP over-estimated the heating demand and underestimated the overheating risk. I spent a bit of time working out why this was, and concluded that it was the climate/weather data that was in error. Our house is cut back into a South facing hillside at the bottom of a valley, and PHPP cannot accurately account for the impact this has on the local air temperature and wind speeds. Measurements taken locally and compared to the data set used by PHPP showed marked differences, in general the area immediately around our house seems to be 1 to 3 deg C warmer than expected, all year around. Wind speeds are also way lower all year than expected from the climate/weather data, so accelerated convective cooling from the outer skin is significantly lower, which alters the effective wall, roof, glazing (and floor, if suspended) U values. This accounts for the majority of the errors between the model output and our real world findings. Interestingly, in terms of just heating requirement, the very crude and simple spreadsheet I wrote years ago, that was intended only for comparing where the cost/benefit trade offs might best be made at the design stage, turned out to be very close to the PHPP output (and equally in error in terms of overestimating heating demand). Models like PHPP are certainly very useful, but I would urge extreme caution in taking their output as anything other than rough design guidance. As our house has shown, models like this (and there is also a very good free Canadian model worth looking at) fall over, often quite badly, when the external conditions are not as they predict from the data sets they rely upon. We did not anticipate any overheating, yet in practice this was quite a problem, and one that caused some significant changes to the build. Luckily, during our ground works I had a hint that there may be a local problem, as when the guys had dug out for the retaining wall it was very noticeable that the local temperature, in the North East corner in particular, was very high. This caused me to change the MVHR choice to one with an integral air-to-air heat pump, to add around 1.5 kW of comfort cooling. What I didn't anticipate was that 1.5 kW of comfort cooling wasn't going to be anywhere near enough. According to PHPP it should have been, but in practice it wasn't. -
House Cooling ideas
Jeremy Harris replied to mike2016's topic in Energy Efficient & Sustainable Design Concepts
Our problem was before we removed the original thermal store (which in theory, and according to the flawed manufacturers test data had a low heat loss) and replaced it with the Sunamp PV. The primary reason for replacing it and fitting the Sunamp PV was to remove the undocumented massive heat loss from the thermal store (it's documented BS test heat loss was about 1.5 kWh/day, without the additional insulation layer, it's true heat loss was well over 3 kWh/day with an additional layer of spray insulation). -
House Cooling ideas
Jeremy Harris replied to mike2016's topic in Energy Efficient & Sustainable Design Concepts
I'd agree, I read every passive house publication available for several years before even starting on our build. However, as a note of caution, I still screwed up... I know others that have built passive houses that have found that theory doesn't translate well into practice, and have had to take some additional mitigation measures in order to avoid overheating, which in some ways is reassuring. If I were starting again now, then I would be very focussed on two things. Reducing incidental heat gains (appliances, lighting, cooking etc) and providing adequate comfort cooling. The two biggest problems to solve with a passive house are the provision of hot water and a way to provide comfort cooling in sustained warm weather, and the two are linked, as a lot of hot water systems can introduce a significant heat gain into the house right when you don't want it. -
House Cooling ideas
Jeremy Harris replied to mike2016's topic in Energy Efficient & Sustainable Design Concepts
Overall fans in the room add heat, so make the house warmer. They provide an illusion of making the house more comfortable (as long as the RH is low) by increasing the rate of sweat evaporation, so aiding body cooling. For that to be effective you need to drink at least as much additional water as is being evaporated away by the forced air cooling effect of the fan. If the RH increases to the point where body evaporative cooling, even with fan-assistance, isn't significantly increased, then fans are generally a bad idea, as they just add additional heat with little cooling effect. One exception to this may be in a house with an actively cooled floor, like ours, with the UFH being capable of being reversed into a chilled water floor cooling system. A fan that directs warmer air from the ceiling down towards the cooler floor may well be quite useful in cooling the whole house down. -
House Cooling ideas
Jeremy Harris replied to mike2016's topic in Energy Efficient & Sustainable Design Concepts
I remain very, very unconvinced, I'm afraid. A few days where the night temperature stays high and even the very best designed passive house will overheat badly. The MVHR will pump in air at outside air temperature, and with the best will in the world that will end up overheating the house when combined with the internal heat gains that simply can't be removed. You can get solar gain right down, as we have, but that doesn't overcome the fundamental problem of outside air at 30 deg C + during the day, and maybe 20 deg C+ at night (we've had four consecutive days where the night time air temperature was over 23 deg C). PHPP will give you an overheating risk ESTIMATE, and it is an estimate, that doesn't take account of factors we've had in the past couple of weeks, like sustained high air temperatures. We now have very good solar gain control, especially since planting the row of trees along the front, and with the reflective film we get very little solar gain overall. However, when I went around with the big vacuum cleaner last week, the house shot up to 24 deg C within about an hour, and without the active cooling would quickly have become pretty uncomfortable. Today was cooler, around 26 deg C outside, but the floor cooling was still on by midday and the MVHR air cooling came on by about 15:00. The house stayed at a fairly comfortable 22 deg C, but it wouldn't have done without cooling, as with the MVHR on 100% bypass it was filling the house with air at 26 deg C every two hours. -
I came across this a while ago, as we had (I think I'm now on top of it) a major infestation of horsetail (equisetum) which is as stubborn to get rid of as Japanese Knotweed (the roots go down several metres and it regenerates from tiny bits of root): http://www.nodiggardener.co.uk/2017/08/speedy-elimination-of-japanese-knotweed.html?showComment=1504246334285 I've been following his advice, although my experience is that nearly a year on I am still getting the odd growth pushing up through a double layer of weed membrane a bark, and needs another going over with glyphosate. I also found that using the normal dilution of Gallup 360 wasn't effective, and have been using a very much stronger dilution that seems to work OK.
-
Aren't they a bloody great thermal bridge, too, which will create cold spots (with the commensurate risk of condensation) at the base of each of these posts? Questions need to be asked about how the thermal bridging has been addressed, in my view, as well as building regs compliance.
-
House Cooling ideas
Jeremy Harris replied to mike2016's topic in Energy Efficient & Sustainable Design Concepts
Night purge works well if the night time temperature drops and if you can open windows o cross-ventilate, or have an MVHR with a 100% bypass option. Turning the MVHR off during the day, when air temperatures outside are higher than you want the house to be, also helps, as does keeping doors and windows closed during the day. Adding cooling to the MVHR is another option. If you don't have an ASHP then a ground heat exchanger (like a GSHP heat collector - a long length of fairly deeply buried pipe) could be used to pump cool water around a heat exchanger fitted to the MVHR intake. Water from a ground loop like this will be at around a constant 8 deg C or so in most of the UK, so could provide a useful source of cooling. I'm looking at economic ways to fit a heat exchanger to our MVHR intake at the moment, and will post the details once I've finished working them out. -
No Nonsense? Pha! Suck on this......
Jeremy Harris replied to ToughButterCup's topic in General Construction Issues
I have a can of that and will give it a go, as getting rid of cured PU is always a right PITA. FWIW, dichloromethane (or methylene chloride) is also what's sold at an inflated price as solvent pipe cleaner, the stuff you wipe around the pipe and fitting to be joined before using the solvent cement (the solvent cement is just a mixture of methylene chloride, hydrofuran and some dissolved PVC to thicken it up, if you fancy making your own). -
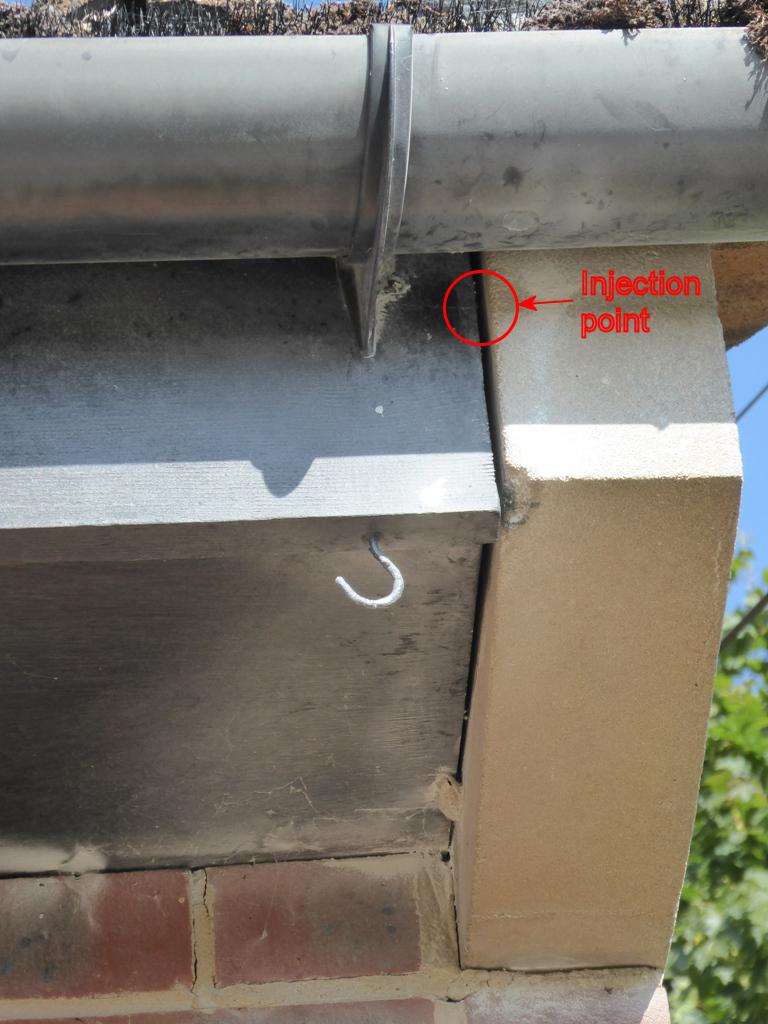
I went up in the loft and couldn't find the nest, so am guessing it was down under the insulation right in the far corner. I wasn't prepared to lift the insulation to find out, after my last experience, as it would have taken me a fair time to try and escape. It was also bloody hot up there. This is the hole they were getting in through, with the point where I injected the powder ringed. The rest of the powder around has blown out of gaps at the edge of the fascia/soffit:

- 22 replies
-
- 1
-

-
- wasp killer
- wasps
- (and 2 more)
-
No Nonsense? Pha! Suck on this......
Jeremy Harris replied to ToughButterCup's topic in General Construction Issues
Acetone stores for ages in a sealed container. It's not that nice to your hands though. MEK (Methyl Ethyl Ketone) is every bit as good as acetone, but a little bit safer to use and slightly less harmful to your skin, Nail varnish remover often contains a moisturising additive, something like coconut oil, to reduce the effect acetone has on removing the natural oils from the skin. Both acetone and MEK will attack a wide range of plastics (but not polyethylenes) so need to be used with caution. They are very good for degreasing stuff, but I find they evaporate too quickly to be that useful as a degreaser, so prefer to use something less effective, but safer and polar, like isopropanol, which will wash off with water. -
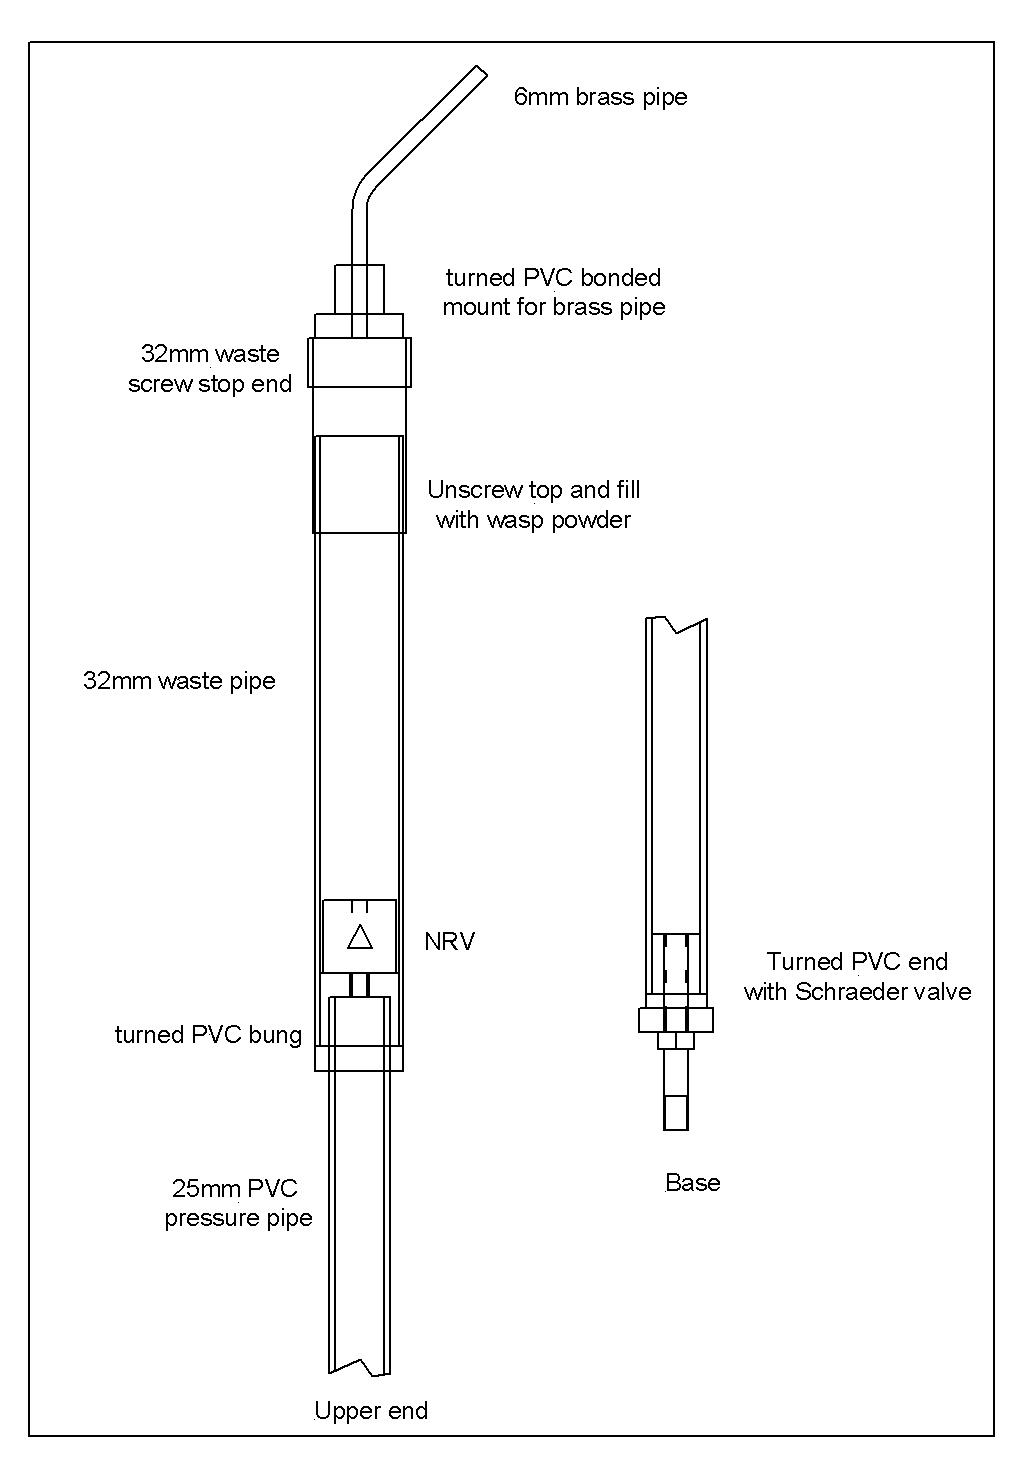
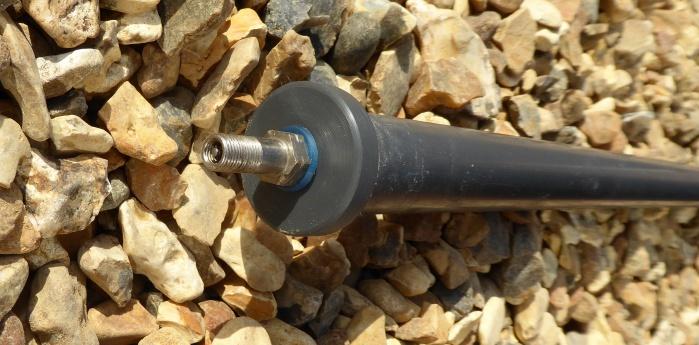
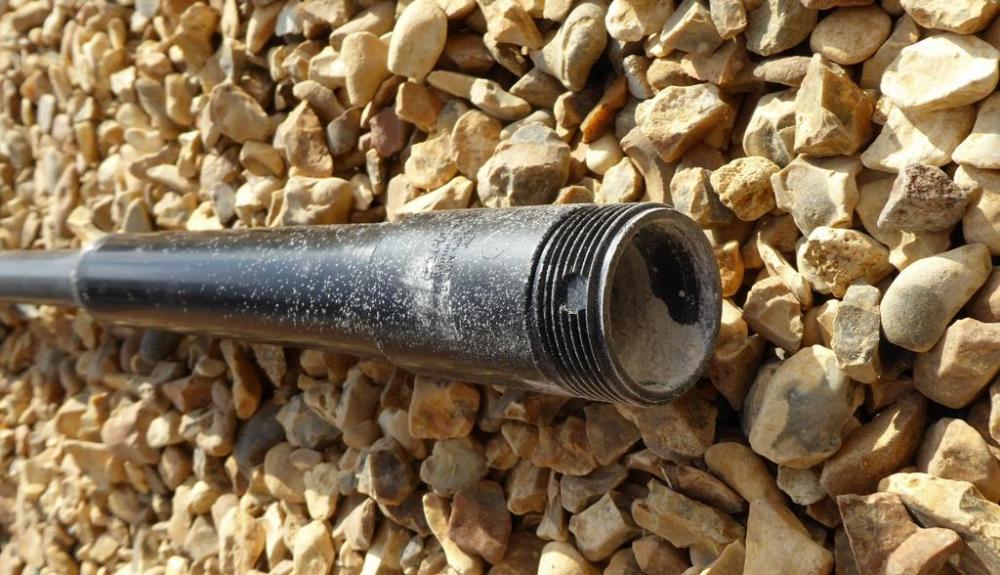
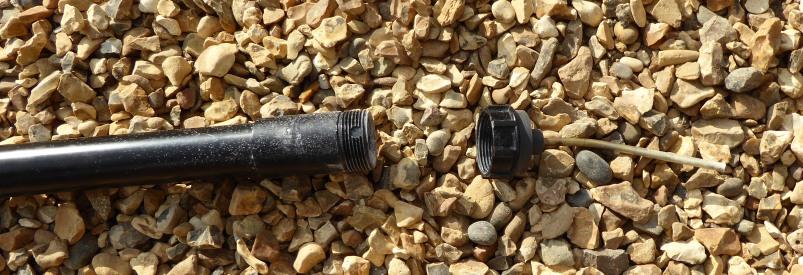
We had a small problem at the old house, wasps had started to build a nest in a corner of the roof, flying in and out via a small gap in the facia board. This is right next to the drive and I spotted them yesterday when laying the gravel, and as it's right next to the entrance to the house there was a high risk of getting stung later in the year, when they tend to get more aggressive. Last time we had a similar problem, on the other side of the house, above our bedroom window, I didn't spot it until late in the summer, by which time the nest was the size of a football up in the loft and we could hear the noise in the bedroom underneath. I had to pay a bloke from the council around £50 to come out and deal with it, after my own attempt to puff insecticide powder in the hole resulted in my getting multiple stings (no fun when your up a ladder). This time I did a bit of digging around on the web and came across this gadget: http://waspnestkiller.co.uk/acatalog/Dustick-High-Reach-Dust-Powder-Applicator-dustick.html for close on £200. Looking at it in use (there are Youtube videos of people using it) it seemed ideal, as you can stay on the ground and just poke the nozzle in the hole and pump in insecticide powder. I wasn't going to pay £200, so last night I went and had a look to see what I had lying around. I found a length of 1 1/4" solvent waste pipe, an 1 1/4" solvent straight joiner and a screw on solvent end cap. I also had some 50mm diameter grey PVC bar, some 6mm brass pipe, a length of 25mm PVC pressure pipe (20mm bore), a very low blow off pressure fuel-type non-return valve and a Schrader valve with a 1/8" BSP thread on it. All the parts were glued together with ordinary pipe solvent cement, which works just as well on the bits of PVC that I turned up. So, this is roughly what I made up. First the drawing of the two ends: The way this works is that you unscrew the top with the brass pipe, and fill the bit of waste pipe with insecticide powder. This doesn't need to me marketed as wasp killer (I found it hard to buy wasp killer powder in the local garden centre) it just needs to be a powder containing around 1% or so permethrin. Ant powder is usually the cheapest way to buy the stuff, and it works very well against any form of insect (including beneficial ones, like bees, so use it with caution). With the top part full of powder you can screw the lid with the brass tube on, as shown in the photos before (taken after use): When assembled, the whole thing looks like this: It could be made a lot longer, but our house is a bungalow so I cut the 25mm pipe down to make it easier to handle. The non-return valve in the base of the upper section just stops powder going down the 25mm pipe - not sure whether this was needed, I think I could probably have got away without the bit of 1 1/4" waste pipe, but it is easier to pour powder into the larger opening. Finally this is a close up of the Schrader valve at the lower end: To use this I connected a tyre inflater to the Schrader valve, that was connected to my compressor (at around 90 psi). The brass nozzle was poked into the hole where the wasps were coming in and out and the air trigger quickly pulled to blow almost the entire contents of the powder container neatly into where their next was. I then beat a hasty retreat, as permethrin tends to get wasps a bit mad for a few minutes, before they snuff it. I went out half an hour later and there was no sign of wasps at all, other than some dead ones on the ground. Best of all, there was very little sign of white powder when I'd sprayed the stuff in, as unlike the puffer bottles, this gadget squirts a high velocity narrow stream of dust directly into any hole. The only thing I had to buy was a bottle of ant killer powder for around £2.50, and I only used around half of it. The rest was made from "may come in handy bits", plus the use of my small bench lathe. It took me less than an hour to make - the longest bit was waiting a couple of hours to make sure the solvent cement had gone off, before I could have a go at using it. If anyone wants to borrow it they are welcome. I think it would work every bit as well with something like a bicycle track pump as a compressor, as it doesn't need a lot of air (a 1 second burst was about all it took to empty the container).


- 22 replies
-
- 4
-

-
-
- wasp killer
- wasps
- (and 2 more)
-
No Nonsense? Pha! Suck on this......
Jeremy Harris replied to ToughButterCup's topic in General Construction Issues
It is acetone, and only dissolves uncured or partially cured foam, rather than cured foam (I don't know of anything readily available that dissolves cured PU foam). Rather than buy the spray cans, I buy 5 litre cans of acetone. Typically these are around £20 for a one-off 5 litre can delivered, cheaper if you buy more, as half the price is the hazardous materials shipping cost. I found that stripping the gun and dropping the parts in a jar of acetone did a better cleaning job than using the spray alone. -
The Optimum domestic hot water and heating system
Jeremy Harris replied to Triassic's topic in Other Heating Systems
The other point is that in summer that heat is just making the inside of the house warmer than it needs to be. We had that problem when we had the combination thermal store, in summer the heat loss from it made the services room and the adjacent bedroom very hot indeed. -
The tale of the sale of our old house
Jeremy Harris replied to Jeremy Harris's topic in General Self Build & DIY Discussion
Our 20mm stuff is crushed stone, rather than rounded washed gravel, so doesn't move around, but does make a loud crunchy noise... -
The Optimum domestic hot water and heating system
Jeremy Harris replied to Triassic's topic in Other Heating Systems
Tough to get any worthwhile geothermal heat in the UK, you need to drill down a few km, even in areas like Cornwall, where the prospect of getting some geothermal energy is reasonable, but even that hasn't really been shown to be worth the effort. On a domestic scale, geothermal is really just a pipe dream, as the cost to get any worthwhile heat energy would run into many millions. Using solar pre-heating, via a shallow ground heat exchanger is practical, and is the system used by most ground source heat pumps. This isn't geothermal heat, it's just heat from the sun that's stored in the upper few metres of soil. A duct cooler is essentially just a radiator-type heat exchanger, placed in the duct, or in a chamber with the duct connected either end, with cool or warm water pumped through the radiator in order to either cool or warm the air flowing through the duct. There's no merit in using warm water on the intake side, as that reduces the efficiency of the heat recovery process in the MVHR, but for summer cooling there is an advantage in pre-cooling the air intake, as that will have a modest impact on cooling the house. My plan is to do this cheaply, so I'm looking at radiators, rather than purpose made duct heat exchangers, as this unit will be mounted outside and can be quite large and custom made to fit whatever suitable radiator I can find (maybe one designed for a plinth heater). I'll fit a motorised valve, so the cool water only flows through this radiator from the ASHP when cooling mode is selected from the room thermostat. Water cooled by a buried pipe loop in the ground would work for cooling, as the once down below the top metre or two the soil will be around 8 deg C all year around, enough for summer cooling I think.