pilgrim
-
Posts
86 -
Joined
-
Last visited
Everything posted by pilgrim
-
Council Tax Blow!
pilgrim replied to richo106's topic in Self Build VAT, Community Infrastructure Levy (CIL), S106 & Tax
@richo106 was your house left totally empty? or was any furniture left in the house? I had exactly the same situation as you but the law says the house has to be left unoccupied AND unfurnished to be liable for the 300% premium. My house was left with some furniture in it so I was able to successfully argue this with the council and eventually got the premium removed but it took a few months and the threat of court action before they finally backed down. -
Looking at getting a van, what do you think?
pilgrim replied to CalvinHobbes's topic in General Self Build & DIY Discussion
I had a vivaro van for years but it is now being used as a shed, thanks to the head corrosion issue. Also unless you get the long wheel base varient of the vivaro/traffic you cannot fit a whole 8x4 sheet in the back it is something annoying like 50mm too short. -
Multipanel Shower End of Life Repair/Replace
pilgrim replied to Ferdinand's topic in Bathrooms, Ensuites & Wetrooms
@Ferdinand Thanks, they sound very good from other posts on here. Ive ordered some samples, so will see!! -
Multipanel Shower End of Life Repair/Replace
pilgrim replied to Ferdinand's topic in Bathrooms, Ensuites & Wetrooms
@Ferdinand did you go ahead with the Nuance panels? and if so what are your thoughts on them? I am looking for wall panels at the moment. Thanks -
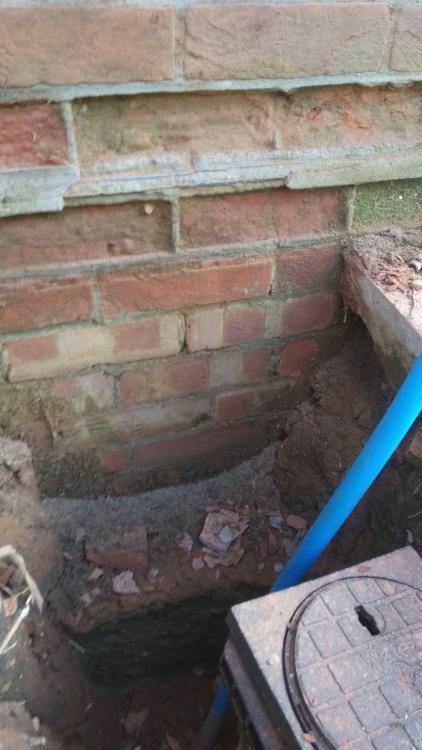
@Nickfromwales @Mr Punter That standing water was actually caused by a blocked sewer, after I read these messages I lifted the man hole and the level was only a few inches below the cover. Ive had it unblocked now and the water is gone, it was just an elbow. Ive now started the process of installing the french drain and digging out the old pipes.

-
Plant room wall covering - will ply suffice?
pilgrim replied to sean1933's topic in General Construction Issues
I asked the same question to my building control inspector recently about my small utility room / pantry and he sent me the attached page in reply, and said "Your plywood will meet D-s3, d2, but any standard higher than that will require expensive paint treatments, or overcladding with plasterboard. Looking at the table above, if your utility room has a floor area under 4m2, plywood will be fine, but if your utility floor area is more than that you will only be able to untreated ply cladding up to an area equivalent to half the floor area. So as an example, if your utility room has a floor area of say 10m2 then only a maximum 5m2 area of untreated ply would be allowed." Hopefully that will be the same for you.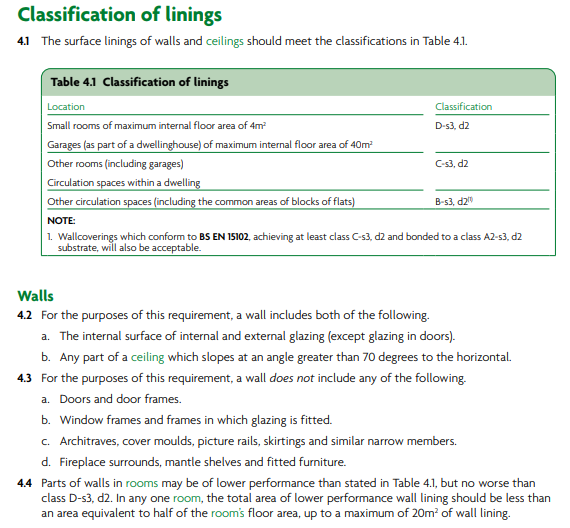
-
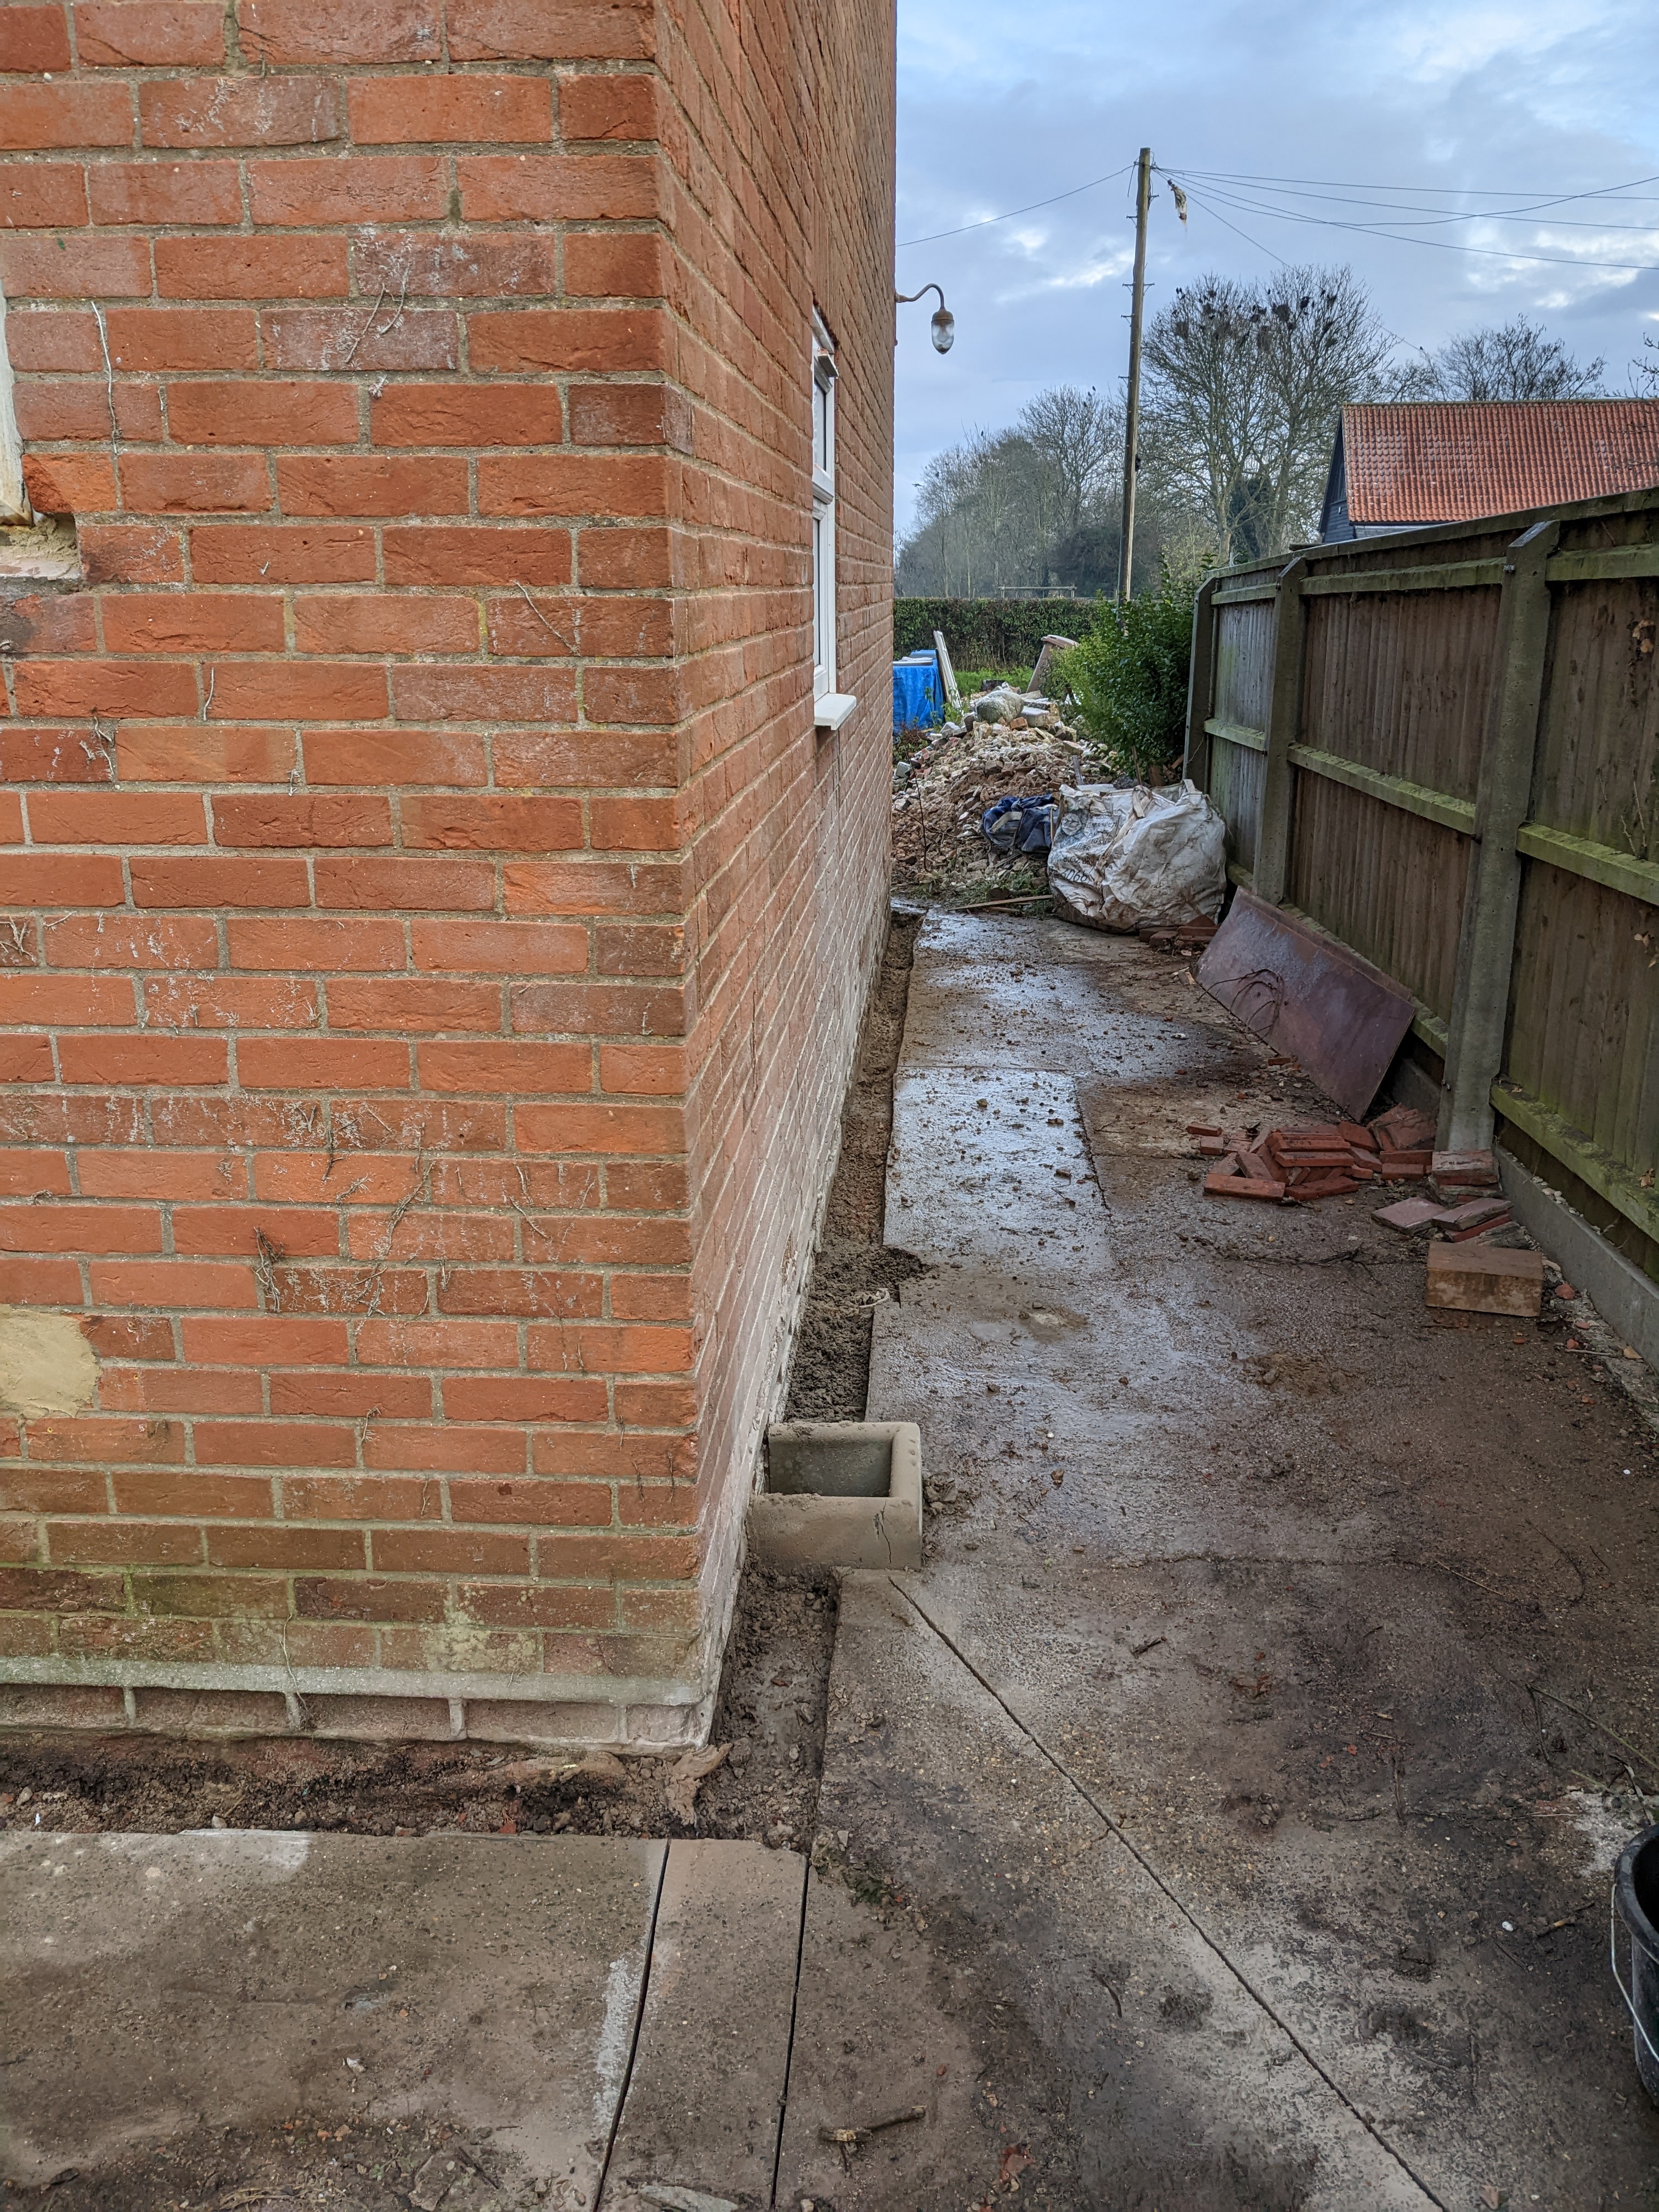
Thank you for the links to documents and the advice @Conor @crispy_wafer. I will check with my building control guy whether he would like the new joint encased in concrete or not. I have to cut the concrete against the wall back and put in a french drain so I will also cut around the connection and see what I find when I dig down. 🤞
-
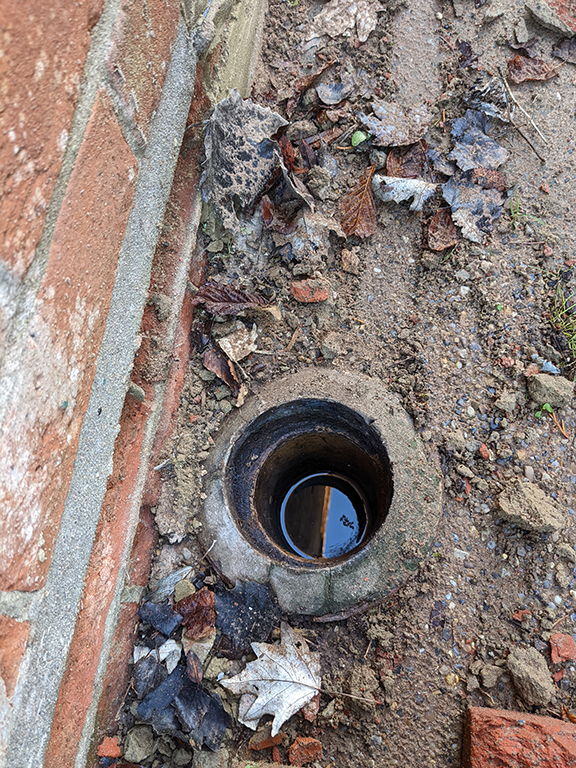
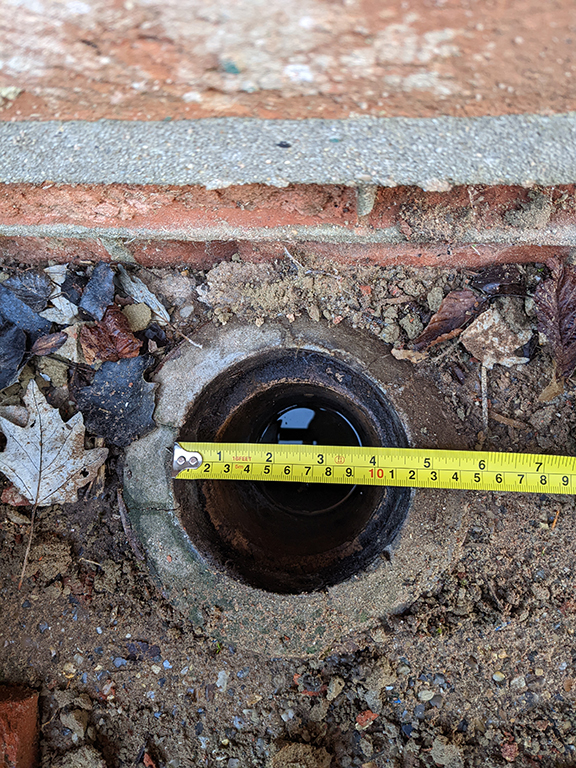
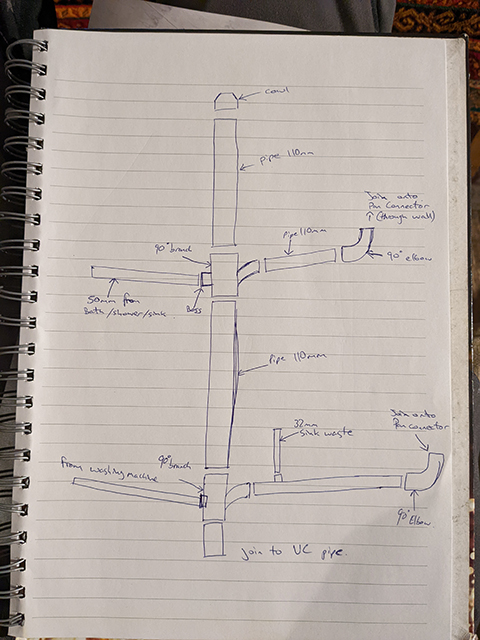
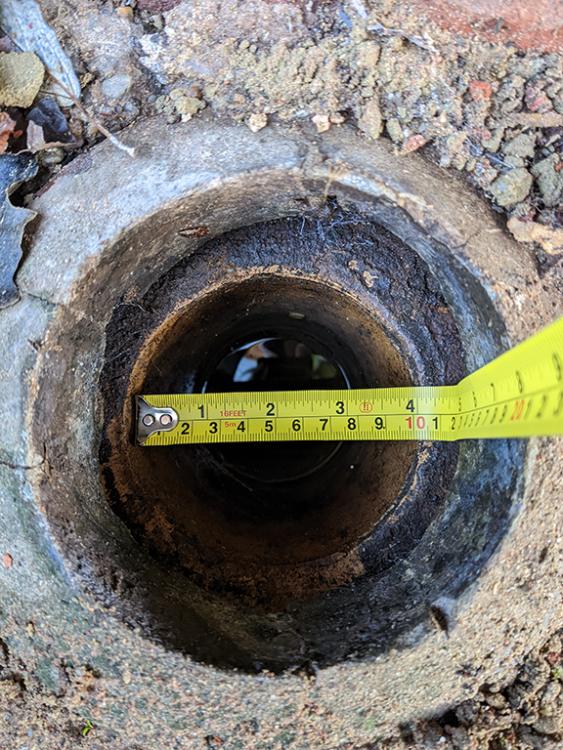
I am struggling to find the right key words to find the bit I need to connect my new soil stack to the existing vitreous clay soil pipe in the ground. I assume an adaptor would be best here to ensure a good seal. I have attached some photos of the existing pipe and a rough sketch for the new soil stack that I am planning to build. Any help on this would be much appreciated.


-
Great thank you @Olf will the stepping up from 32 - 40 - 50 mm pipes help to stop any pressure buildups causing water movements in the other units when one is draining?
-
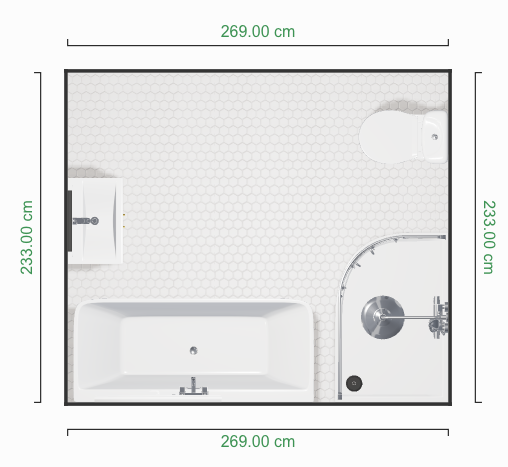
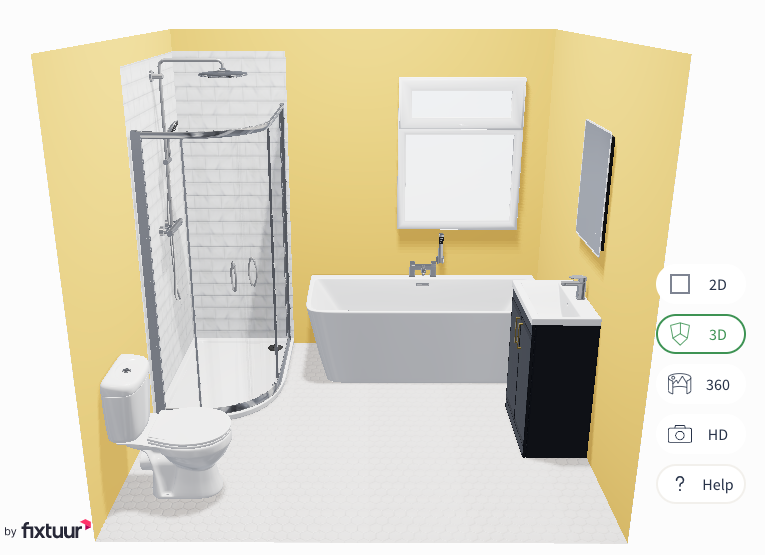
Hello, I am looking for some advice on the best way to route the waste water for my bathroom. I have attached my planned bathroom layout. This bathroom is on the first floor, with the kitchen below and a small utility room below the shower / toilet end. The short wall that the toilet is on is the external wall with the drains connection below it. The floor joists run north/south across the room so I do not think I can drill through them all that close to the wall to allow me to run all the waste water under the floor, but I could be wrong. I am happy to have the toilet waste going straight through the wall. I want to connect up the shower bath and sink to a common waste outlet through a separate hole but avoid any back pressure causing waste to flow up into the bath when others are in use (as happened in the last house I rented!) I do not mind if I have to drop down through the ceiling of the utility room in the corner below the shower, I am also happy to build a stud wall off the bathroom if this makes it easier to route the waste water, nothing is ordered yet so all sizes can change, measurements are to the existing walls. Thank you
-
Power and network socket philosophy 101 please
pilgrim replied to puntloos's topic in Power Circuits
I struggled with the same conundrum, especially with the majority of devices that I use now being battery powered. Paying a bit more attention to the sockets that I actually use day to day made me realise that I do not use most of the sockets in my current house! I opted to put in a couple of sockets in each room in subtle locations and then left some channels to pull cable through in future if I need to. -
thank you @Mr Punter i'll get onto this soon before it gets much wetter!
-
Thanks @Mr Punter how deep do you think I should dig the drain channel?
-
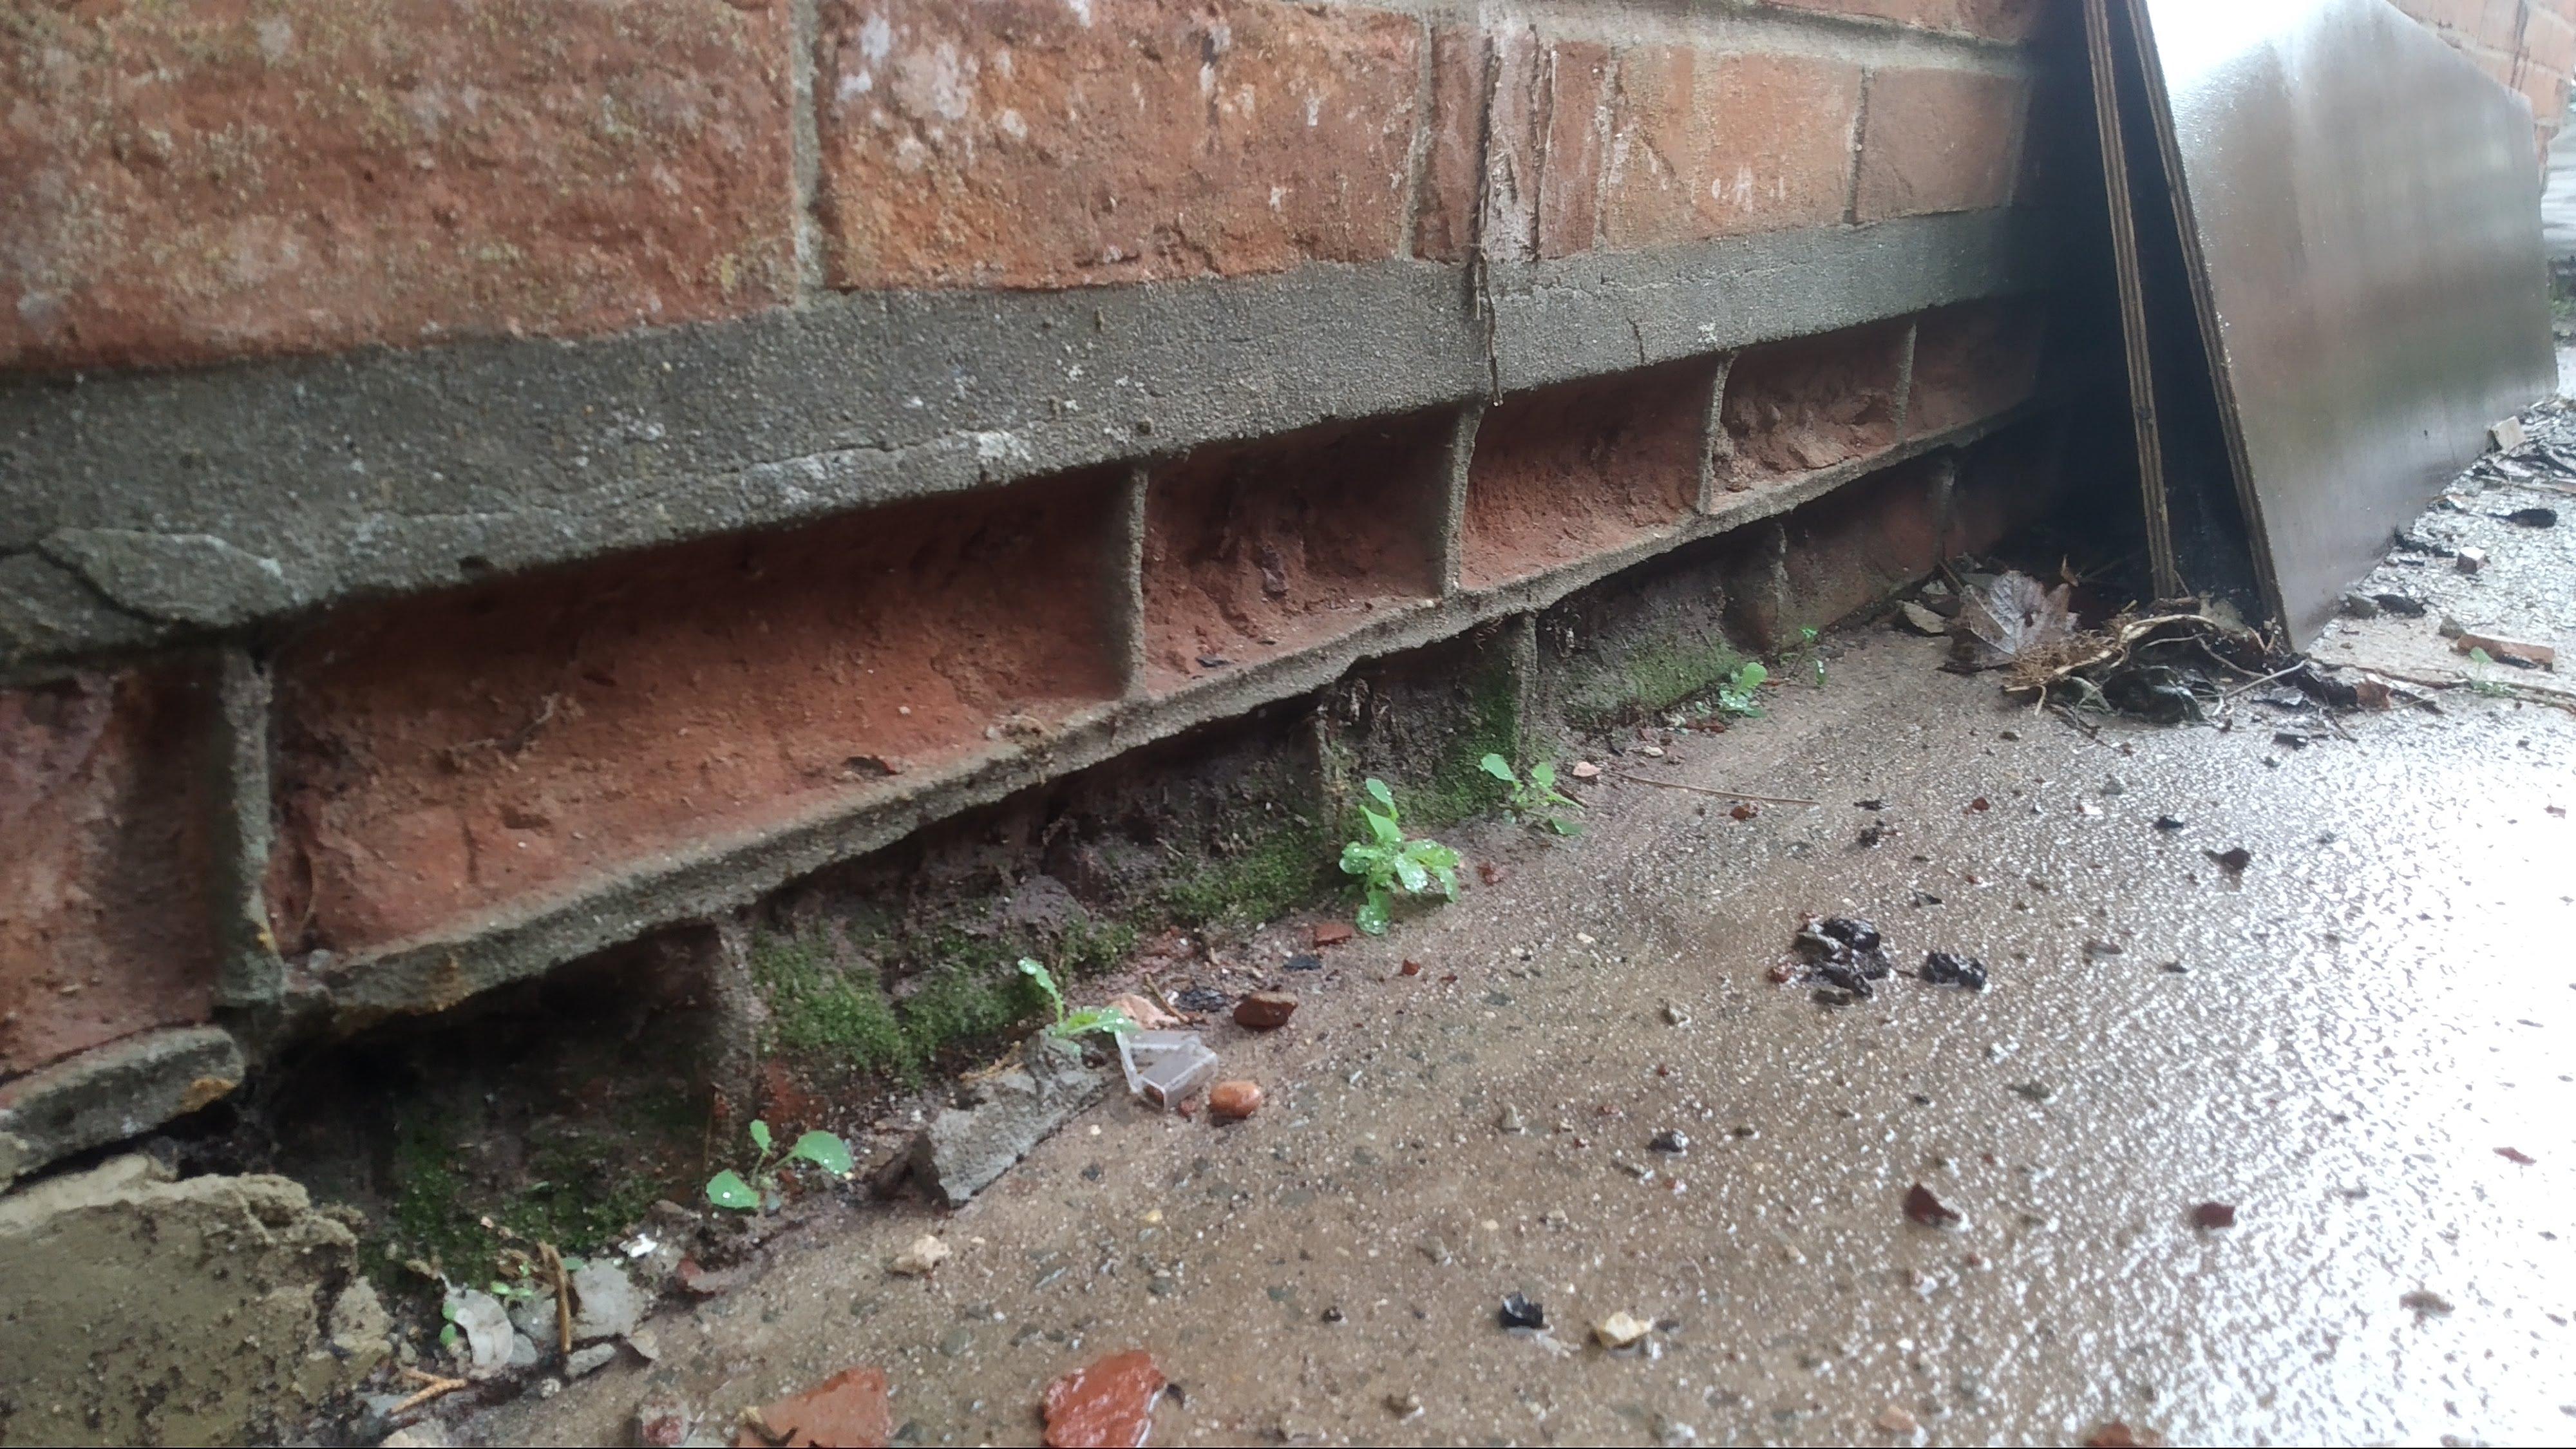
Heres another picture where I have excavated down to the footings. weirdly you can see that they had tougher bricks on the footings then switched to softer bricks 2 courses below the DPC, the course of bricks below ground level havent blown jut the ones above ground that have been eaten by the frost. Any good ideas for the best way for me to fix this?
-
Ohh I know the answer to this one!! link 1 is designed to clip over the joint with the legs so that you can clip it on and pull the pipes apart, so you can do it one handed. link 2 you have to press the tool against the joint while pulling the pipe out so need 2 hands! not used the fancy metal ones!
-
Neighbours house is not as bad, but does have some frost damage. my neighbours are not sure what was done to their house but it looks like it's been painted below the dpc. Chimney stack is fine, no signs of frost damage, it's built with a different type of brick. The inside skin of the house is harder engineering bricks This is a 1930s semi all the others in the street use a darker red brick not the softer orange brick used on this pair. Part of the problem with my half is that it was left abandoned for 25 years and was over grown with vegetation which would have trapped the moisture against the wall. I can cut the concrete path back 100mm that's not a problem.
-
Hello, I have quite a lot of frost damaged / Blown bricks below the damp proof level on the outside of my house, I am hoping to just render up to the damp proof level to protect the wall. I was wondering if anyone has some advice they can share on the best process / type of rendering product for doing this with? It is a semi detached house with an extension going on the rear and a porch on the front so not many meters of rendering required luckily, this side wall will have my heat pump against it and will not be seen very much so the aesthetics are not a priority! Thanks

-
If your local council do not offer a pre application planning advice service then I would say you are better off paying a local planning consultant, you've already drawn up your plans so they shouldn't charge you too much for some guidance. It will potentially save you thousands. At least get a few quotes from local planning consultants and see the costs. My local authority in suffolk were quite fussy about visibility splays for the driveway, (despite hardly any other houses on the road having driveways that would comply) moving your driveway across may class it as a new vehicular access which will have to comply with whatever the current regulations are and will impact on your fence plans.
-
Discount Offers of the Week
pilgrim replied to Ferdinand's topic in General Self Build & DIY Discussion
Bauker Wall chasers being sold for £40 including delivery https://www.ebay.co.uk/itm/185422284710 not sure how good they are but it includes 2 blades and a chisels so got to be worth a try! -
well if it is just a trial you can get a euro plug to fit in a uk socket, once you've safely used something to open the earth pin gate! But that is obviously not a sensible idea.... 🤫 My black and decker mouse sander (and some other cheaper electronics) came with a euro plug and the euro to uk adapter as standard in the box. you dont have anything like that lying around that you've forgotten about and never unplugged since you bought it do you?
-
Do you need to keep the euro plug on? can you re wire it with a uk plug?
-
If you want to know how to go from MDPE to hep2o ask @pocster 😉!! Im doing the same as you at the moment, but in a renovation not new build. Kitchen sink is plumbed in with no leaks, bathroom is next!!
-
Ive just bought the hep2o tap tails, they should be ok to remove and replace without damaging the pipe, if you really feel the need to change every few years. https://www.travisperkins.co.uk/push-fit-hoses/hep2o-flexible-tap-connector-15mm-x-12in-x-300mm-length-hd125a15w/p/616869
-
Boiler Upgrade Scheme Grant - Actions to Take Now
pilgrim replied to Green Power's topic in Air Source Heat Pumps (ASHP)
I have recently done this from the UK without any of the complications that you have listed and it took 1 month from filling out the form to getting the grant approved email. I think you will just have to be patient -
Plumbing: logical? Naaaahhhh. So how the Hell do you ....
pilgrim replied to ToughButterCup's topic in General Plumbing
Ok thank you, so best to use a section of copper to link the MDPE to the Hep2o, Sorry I didnt say this is inside the house, I've got the 25mm MDPE coming inside from the water meter. no external plumbing for me yet!