jayc89
-
Posts
1389 -
Joined
-
Last visited
-
Days Won
1
Everything posted by jayc89
-
Our family bathroom as been a bone of contention for some time. It was originally a bedroom that we had converted 2 years ago, the original bathroom fitted went AWOL half way through the work, we had a tiler working elsewhere in the house at the time, he said he was previously a bathroom fitter and offered to help us out, he got it to a useable state then never came back to finish it off either (not finish the boxing in, fit the shower screen, seal around the toilet etc)... The bath is fitted with textured stone-looking tiles around 3 side (bath's in a sort of alcove between the outside wall and airing cupboard), when doing work in the room below I found out it had been leaking, quite a bit, for some time. Originally I thought it just needed resealing, so pulled off the old silicone to find a 15-20mm gap between the bottom of the tiles behind the taps and the bath, all new silicone was just falling through the gap. I used some expanding foam from beneath to fill the gap and give the silicone something to hold onto. That seemed to do the trick, I ran the shower head around the joint between the bath and the tiles and happy days. Fast forward a couple of days and one of the kiddy winks were in the shower whilst I was working in the room below, when I started to hear dripping again... The internal joint of the tiles between the wall at the back of the taps and the one running down the side of the bath was just grouted, no silicone, and the grout has all cracked (old house, tiled straight onto the external walls). I ran a bead of clear silicone down the internal joint, but water's still leaking from that corner of the bath. The bath's currently gobbed up to the high hills yet water's still managing to run down the back of it. WTF's going on? Any thing obvious I should be checking?
-
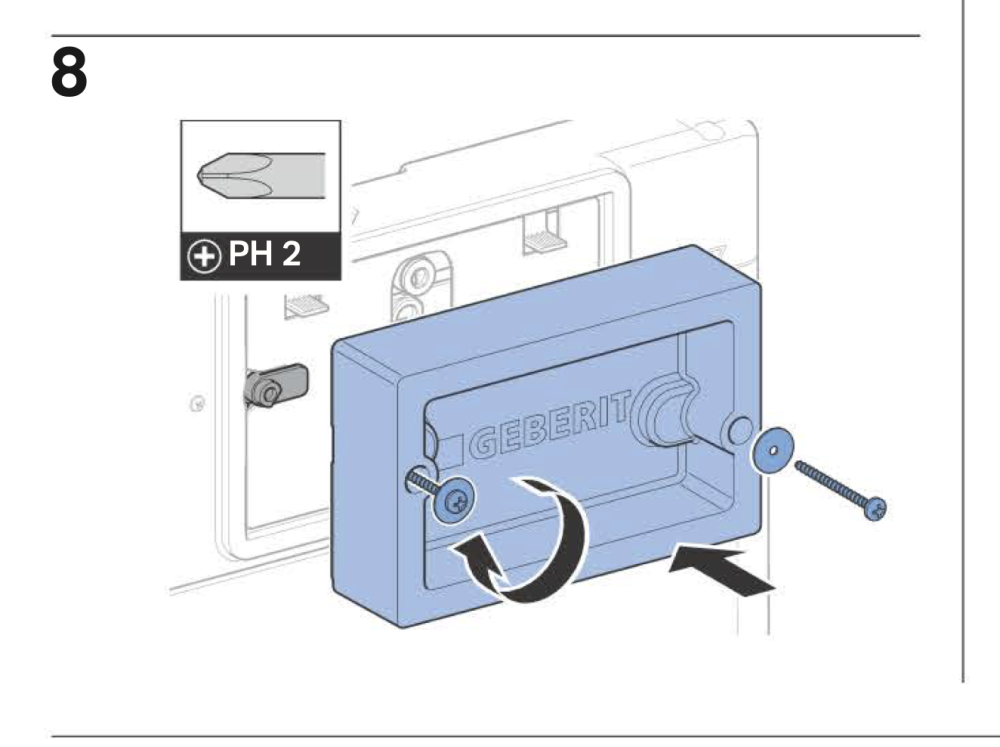
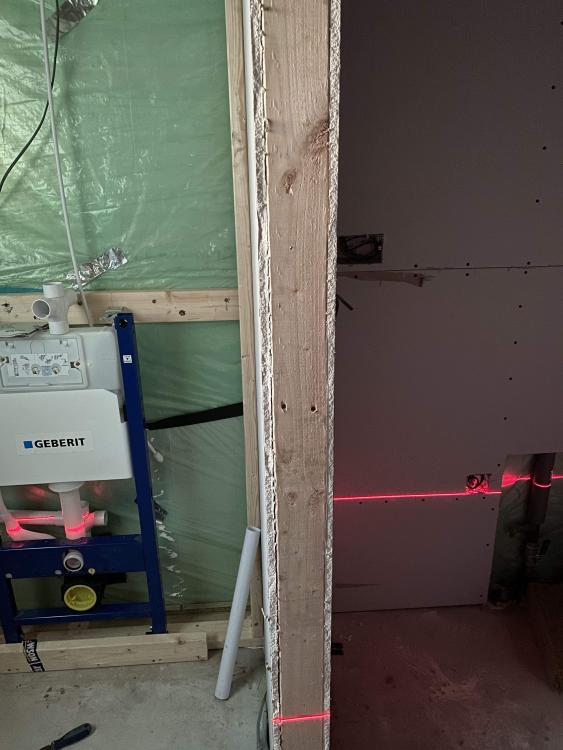
It's the Delta cistern (458.119.21.2) https://www.plumb2u.com/geberit-1120mm-duofix-frame-delta-concealed-cistern-and-delta30-flush-plate-458119212-c2x39344840 Certainly not in the packaging. I have the 2x screws and washers to attach the box with, just no box!
-
According to the instructions I should have one of these; But it's missing from the box. I've emailed the company I bought it from but it was over a month ago now... Can I get a spare from anywhere? I don't even know what they're called to try Google!
-
Do you think 600mm from the corners all around would work?
-
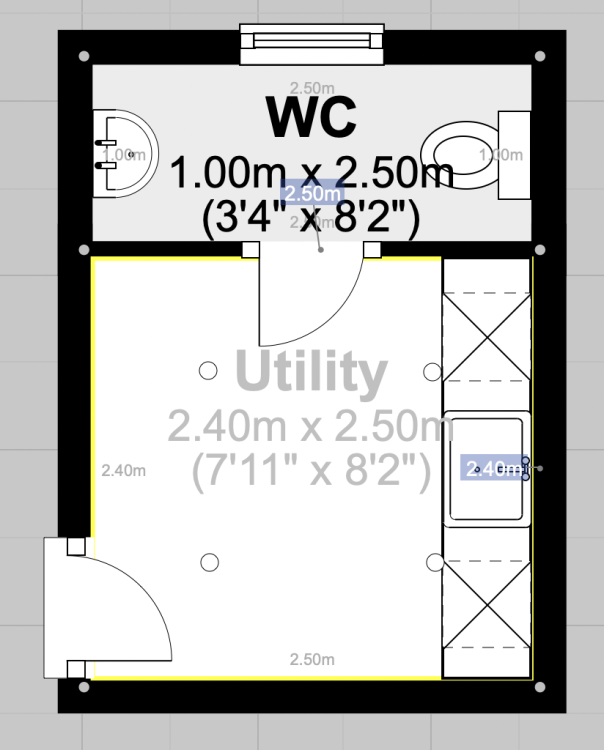
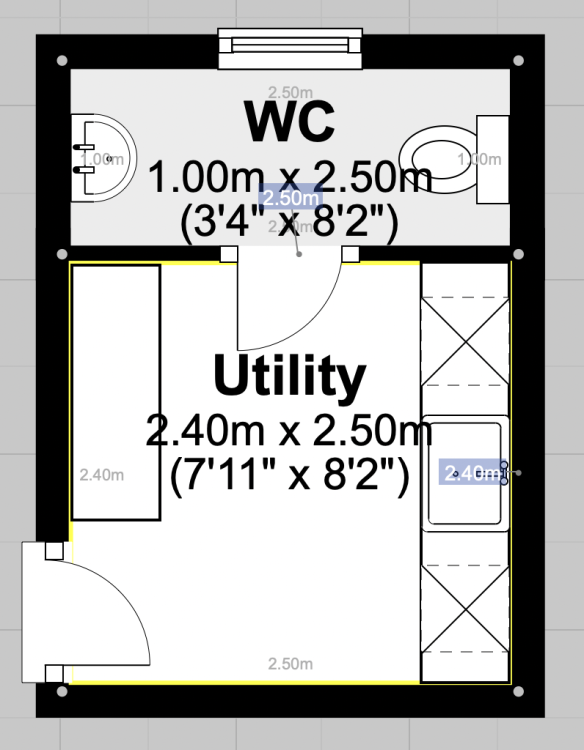
We have a fairly small utility room, approx 2.4m x 2.4m. No natural light, so we'll have the lights on whenever we're in there. I'm thinking quite simple, 4x LED downlights. Should I just set them out as 2 banks of 2, evenly, or is there benefit to have them offset over worktops?
-
What's the best way to patch the old hole? Screw a couple of strips of PB behind the wallboard, glue and screw a new piece of PB to that followed by FibaTape?
-
It'll be in the wall on the left, behind the W/C frame, surface mounted on the right, as that will be behind utility units (washing machine, sink etc).
-
My OCD's getting the better of me as there's another single socket out of shot to the right at the same height as the one in question, so I'd be tempted to move that one as well. Even if I can get the pipe in below the sockets current location, it's going to make plugging anything in a PITA.
-
Think I might have balls'd up on my levels I need to run a length of 40mm from behind the W/C frame, through the stud wall across to where the water mains comes up (insulated pipe on the right hand side of the pic). It's bang on the bottom of the single socket. I can drop the tee behind the w/c 2cm max, what's the minimum fall I can get away with for a Utility sink/washing machine waste?
-
How are you getting on with this @Onoff. Was this on a solid or cavity wall? Any problems with moisture?
-
Might be too late for this now, but I would switch it around; 150mm conc (FFL) VCL 200mm insulation DPM Sand 150mm MOT 1 Run your pipework through the insulation.
-
Sand blinding and DPM are the wrong way around. You use the sand to protect the DPM from ripping against the stone.
-
Presumably you remove the cistern to get a couple of holes through the frame in the top half? Looking at pans, all the ones I've seen so far, use rods in the frame at 180mm centres. Is that a fair assumption to make, or do I need to physically have the pan to confirm that before wall boarding?
-
This is a plastering question, I haven't cracked, yet. We have an LED downlight within an extractor vent above the bath. I want to replace that with a standard LED downlight in prep for fitting an MVHR extract valve instead. The ceiling is lath + plaster and in some rooms, it's more than 30mm deep, so cutting a section out to replace with PB isn't really an option (I don't think...). What's the best way to fill the hole where the existing downlight + valve is to then be able to cut a smaller hole within the area that had been filled for the new, standard downlight?
-
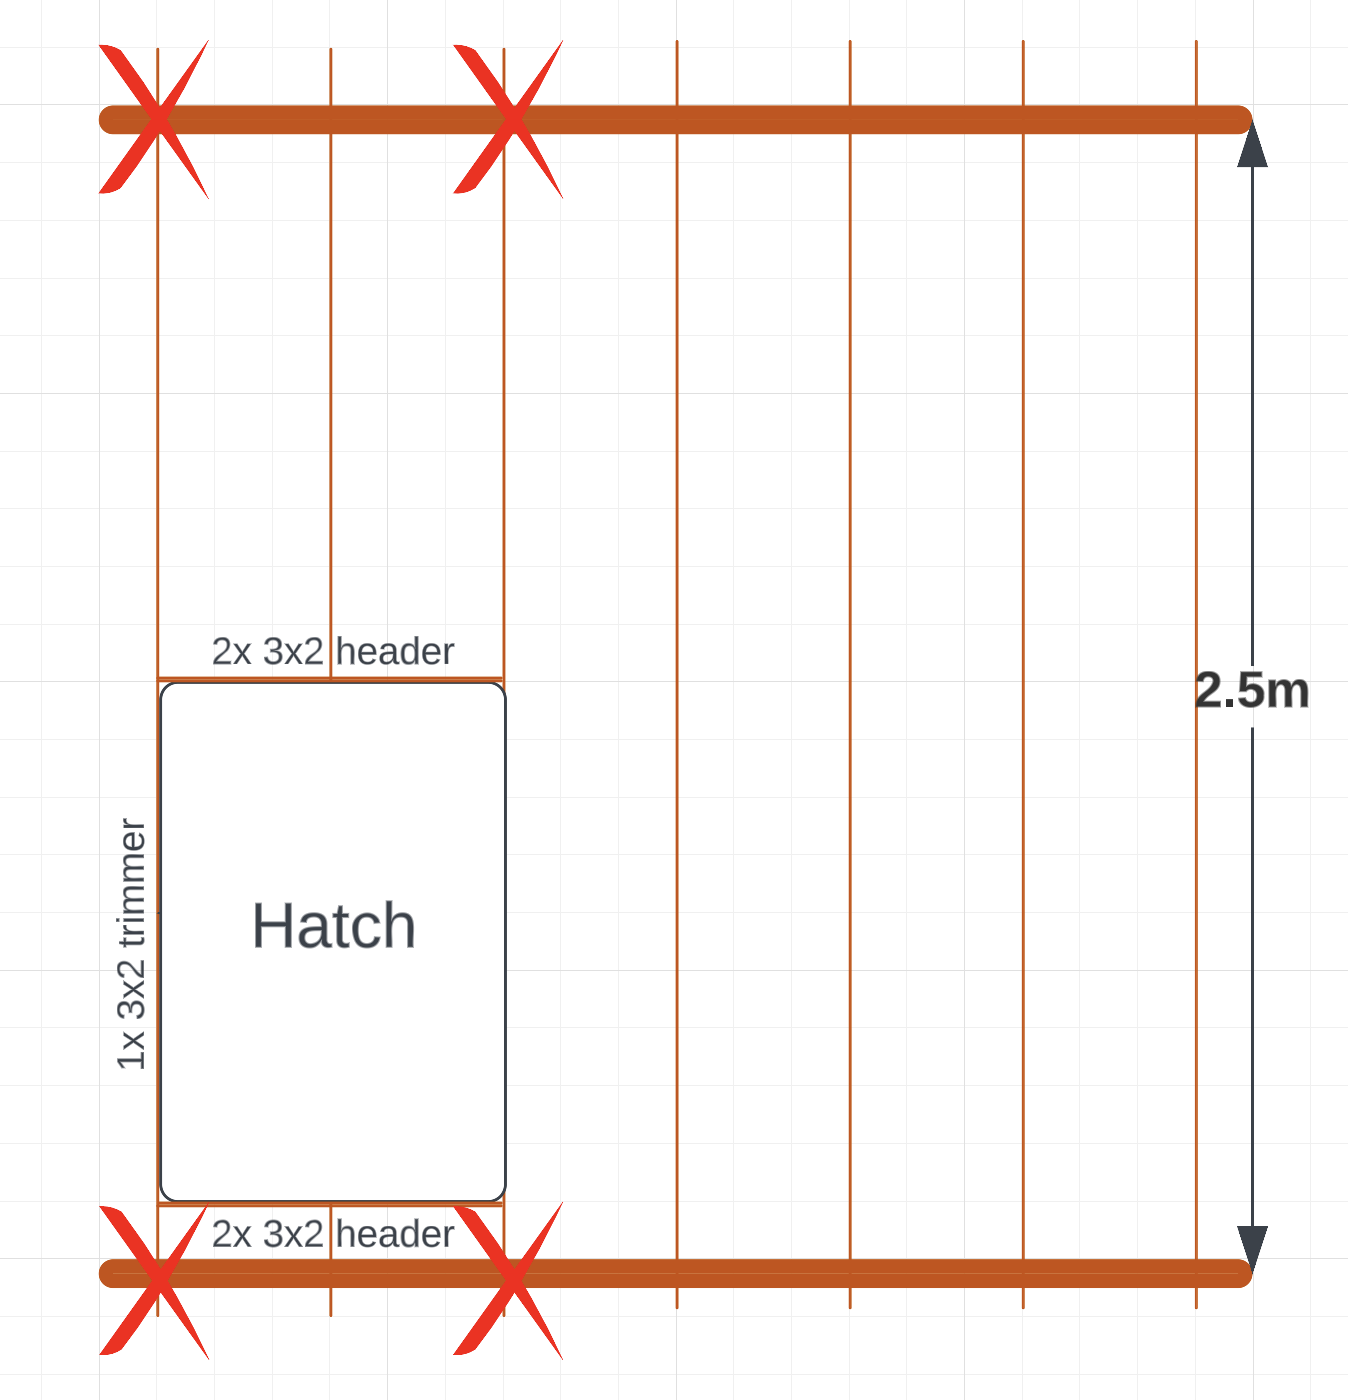
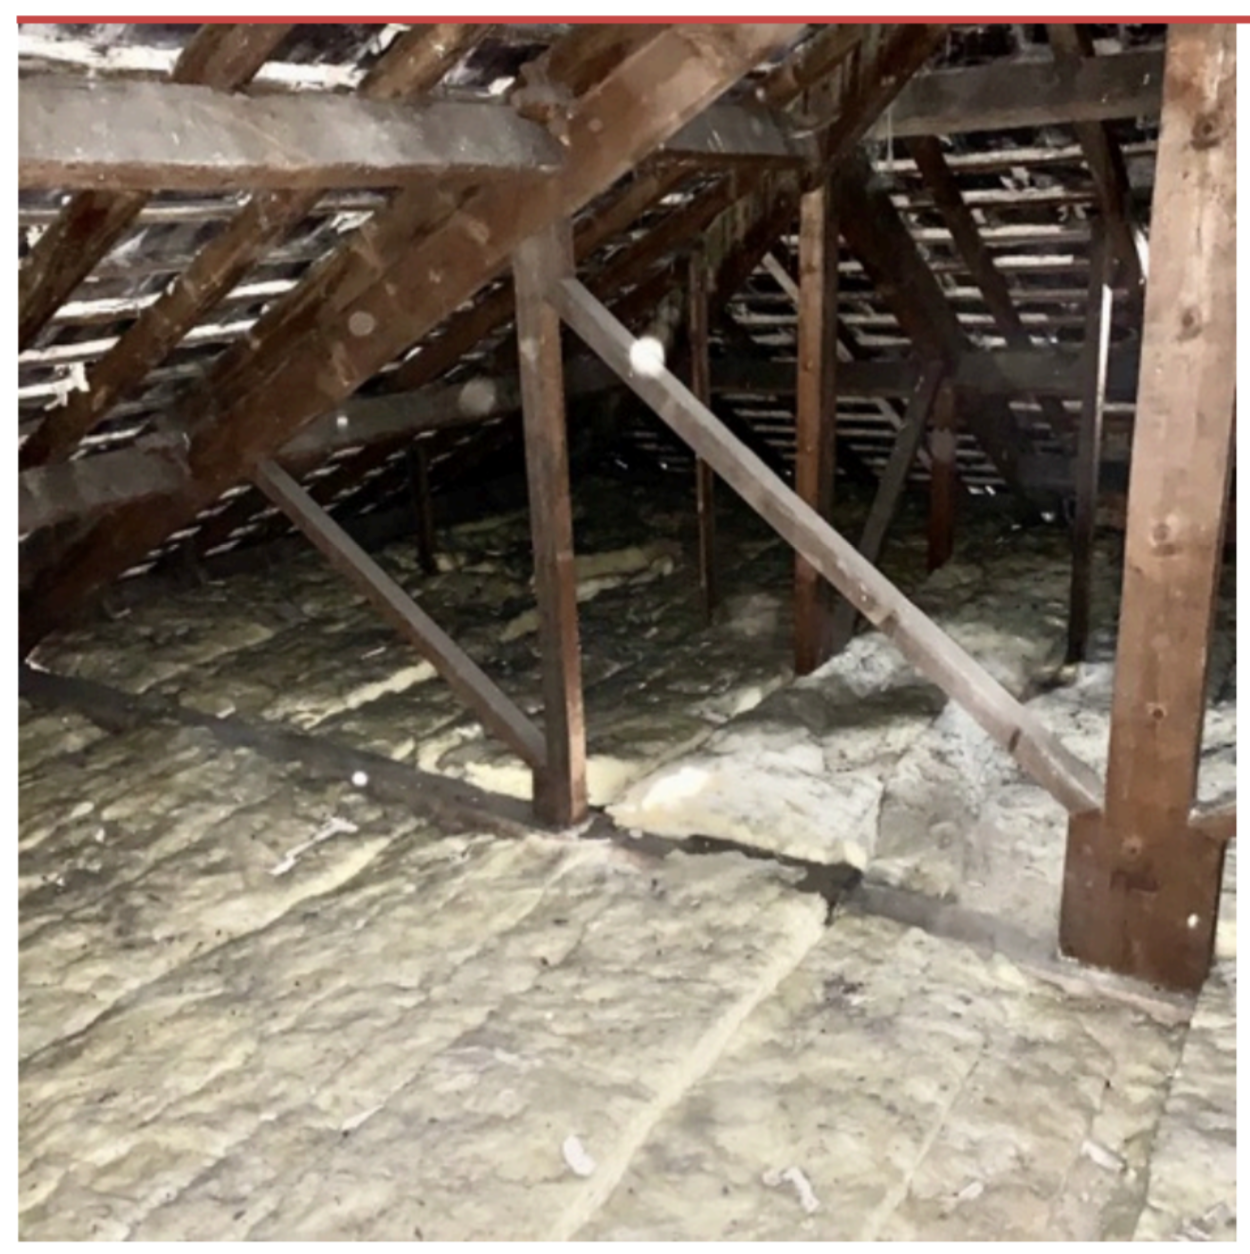
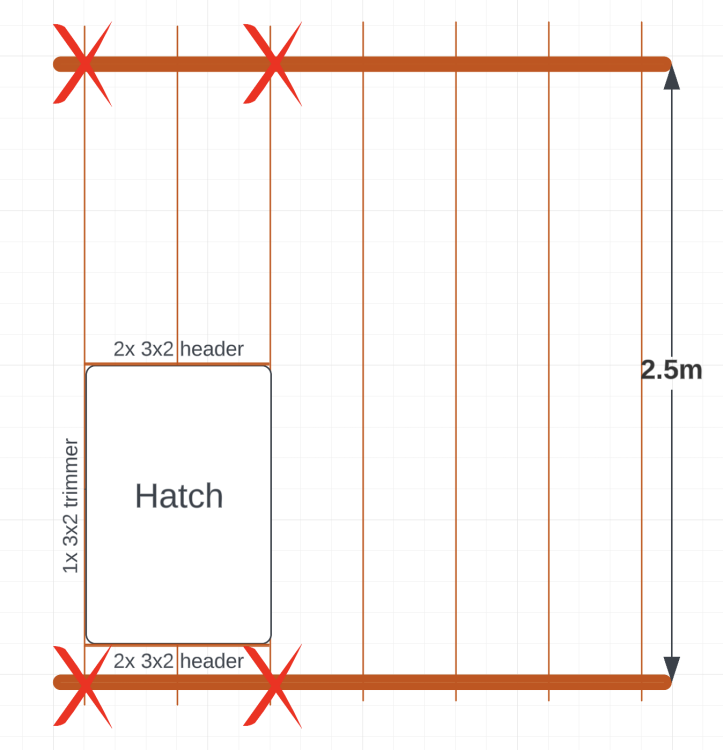
The existing joists aren't even 3x2, I've just measured them and they're 2 3/4" x 2 1/2" (or 65mm x 55mm) but I assume 3x2 would be the best to use these days as a match. They can stand slightly proud in the loft area, beneath the loft rolls.
-
I have all the 40mm run now and ready to be PB'd, I've used solvent weld pipe as I didn't want to risk leaking push-fit joints when it's covered with PB. Where it terminates (protruding through the PB for the W/C basin and surface mounted for the Utility basin) do I need to convert from solvent weld to push fit before connecting to the traps, or will the compression fittings on the traps support solvent weld pipe too? (32mm bottle trap for the W/C basin, I have a 40/32 reducer for this and 40mm appliance trap for the Utility basin)
-
When doubling up the joists, is that the full length; Not just between the new cross-members/headers?
-
We have a couple of king post trusses, these lengths of 3x2 are attached to the bottom of those, they're basically only holding up the lath/plaster ceilings below. I don't believe they're structural at all. You can see the bottom cord of the trusses here, and the 3x2s are below them, buried in the insulation. I'll strip all the insulation back and take a proper picture of the area I'd need to cut open over the weekend.


-
Yeah, width. Given I'd be getting 6-15mm tape (or 8-15mm if using Tremco). I'm thinking 15mm wide should be enough?
-
And what thickness of tape would you recommend for external window sealing?
-
Thanks. This would just be the external seal, I'd still have FM330 as the intermediate seal and tape joining my VCL as the internal seal.
-
Will be replacing 13 windows over the next couple of weeks and I'll have a 10mm gap to seal around each one. Tremco Compriband seems crazy expensive for the amount I need. I've seen a few other "expanding foam tapes" popping up recently, has anyone used any alternatives? Were they as good as Compriband?
-
I've battened out a couple of rooms now using 2x1 battens. All seem to be holding well, the only problem I've had is having to screw quite close to the PB edge so you run the risk of crushing the PB edges if you're not careful. A decent PB screw bit has helped me though. If I didn't already have a load of 2x1, it would have been much easier with wider battens.
-
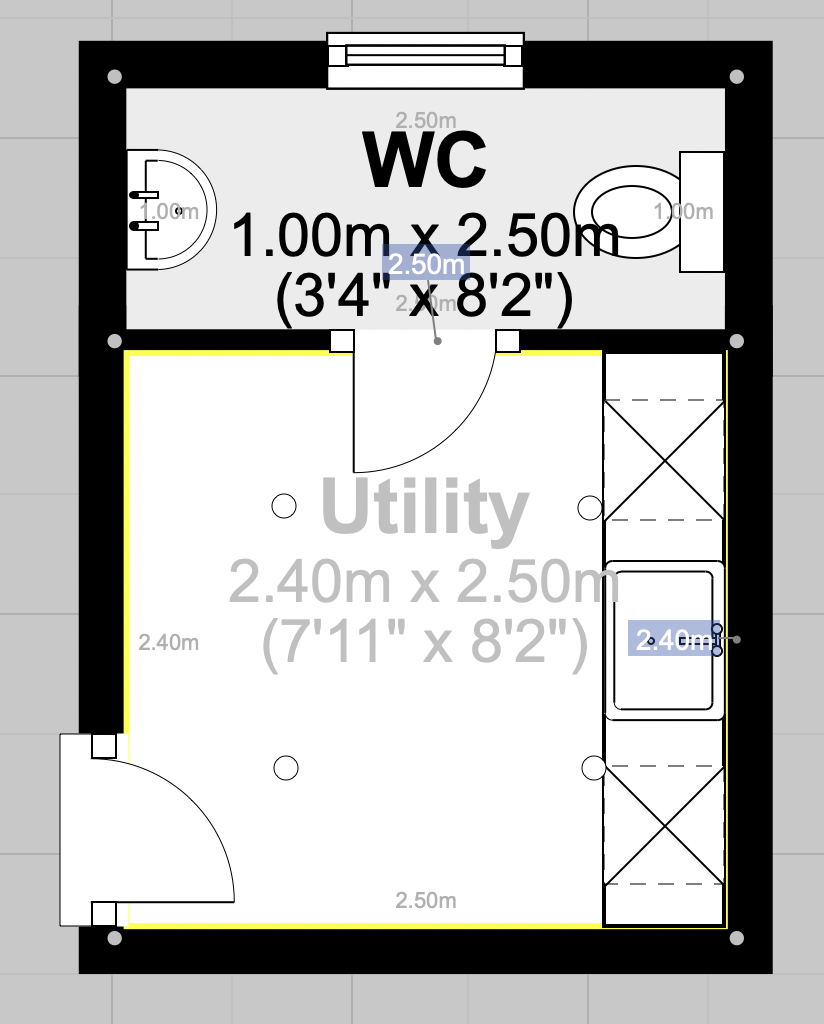
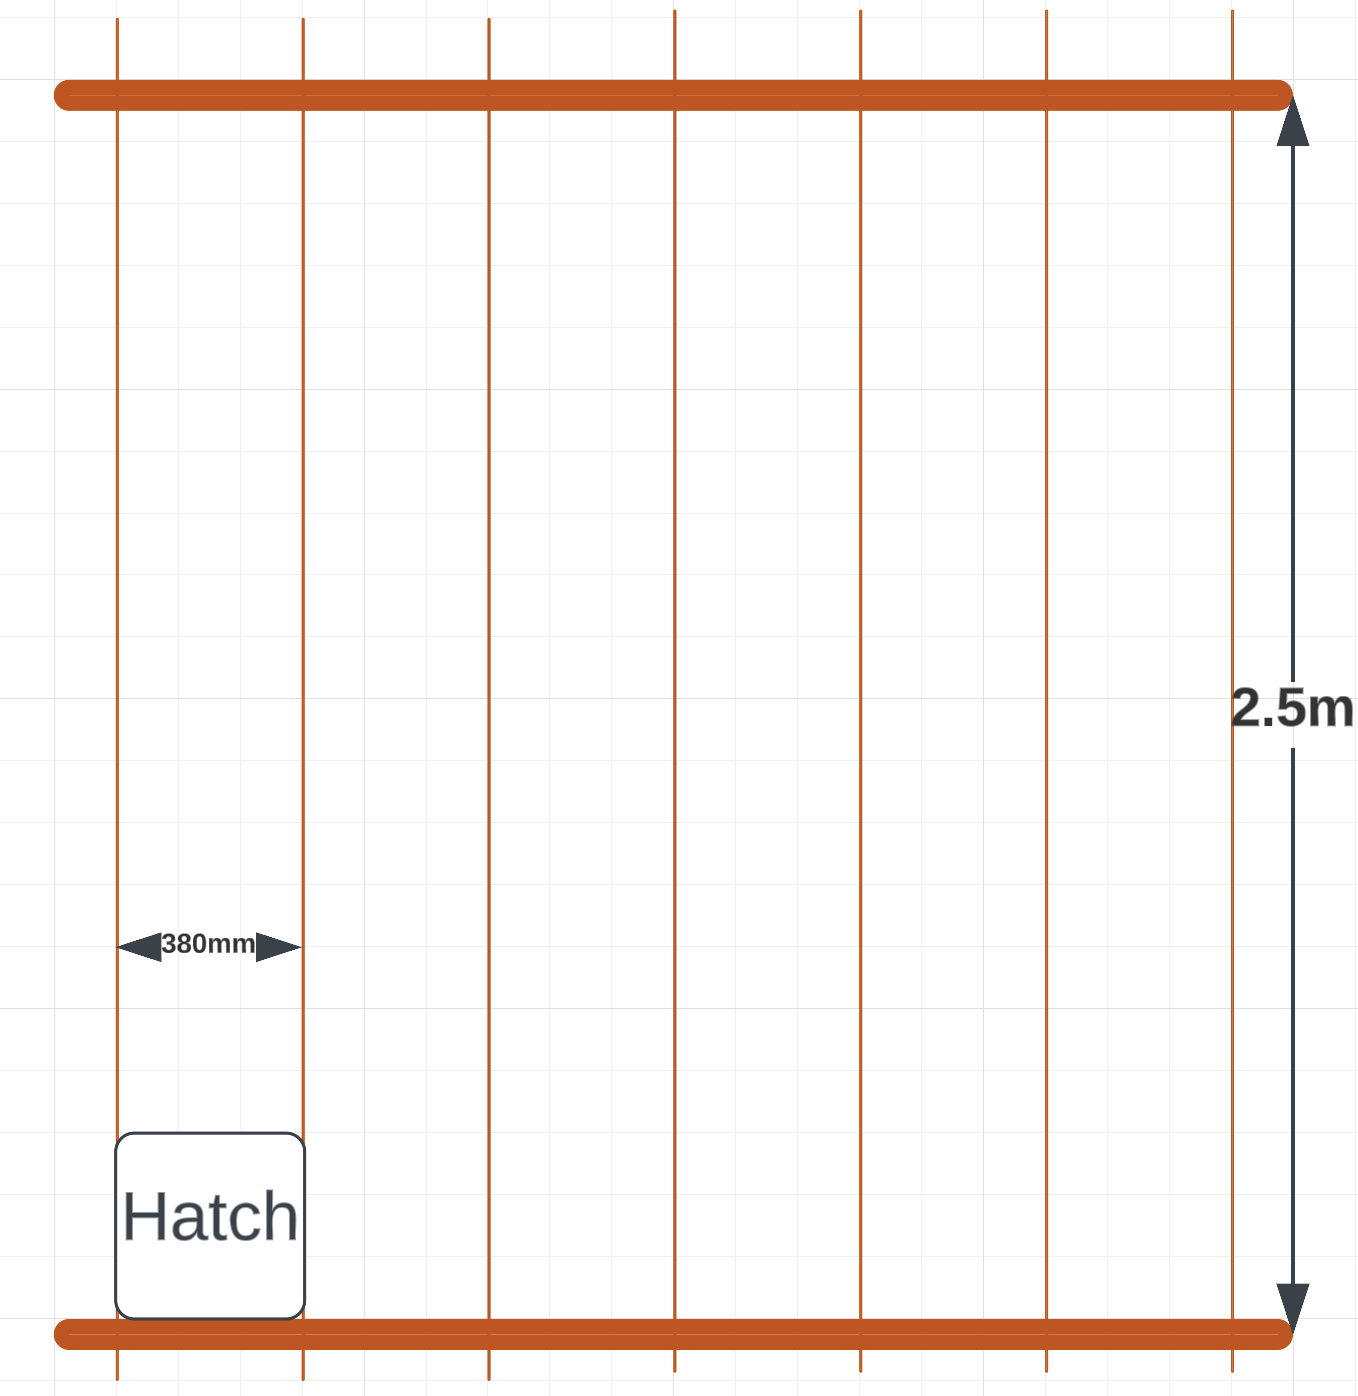
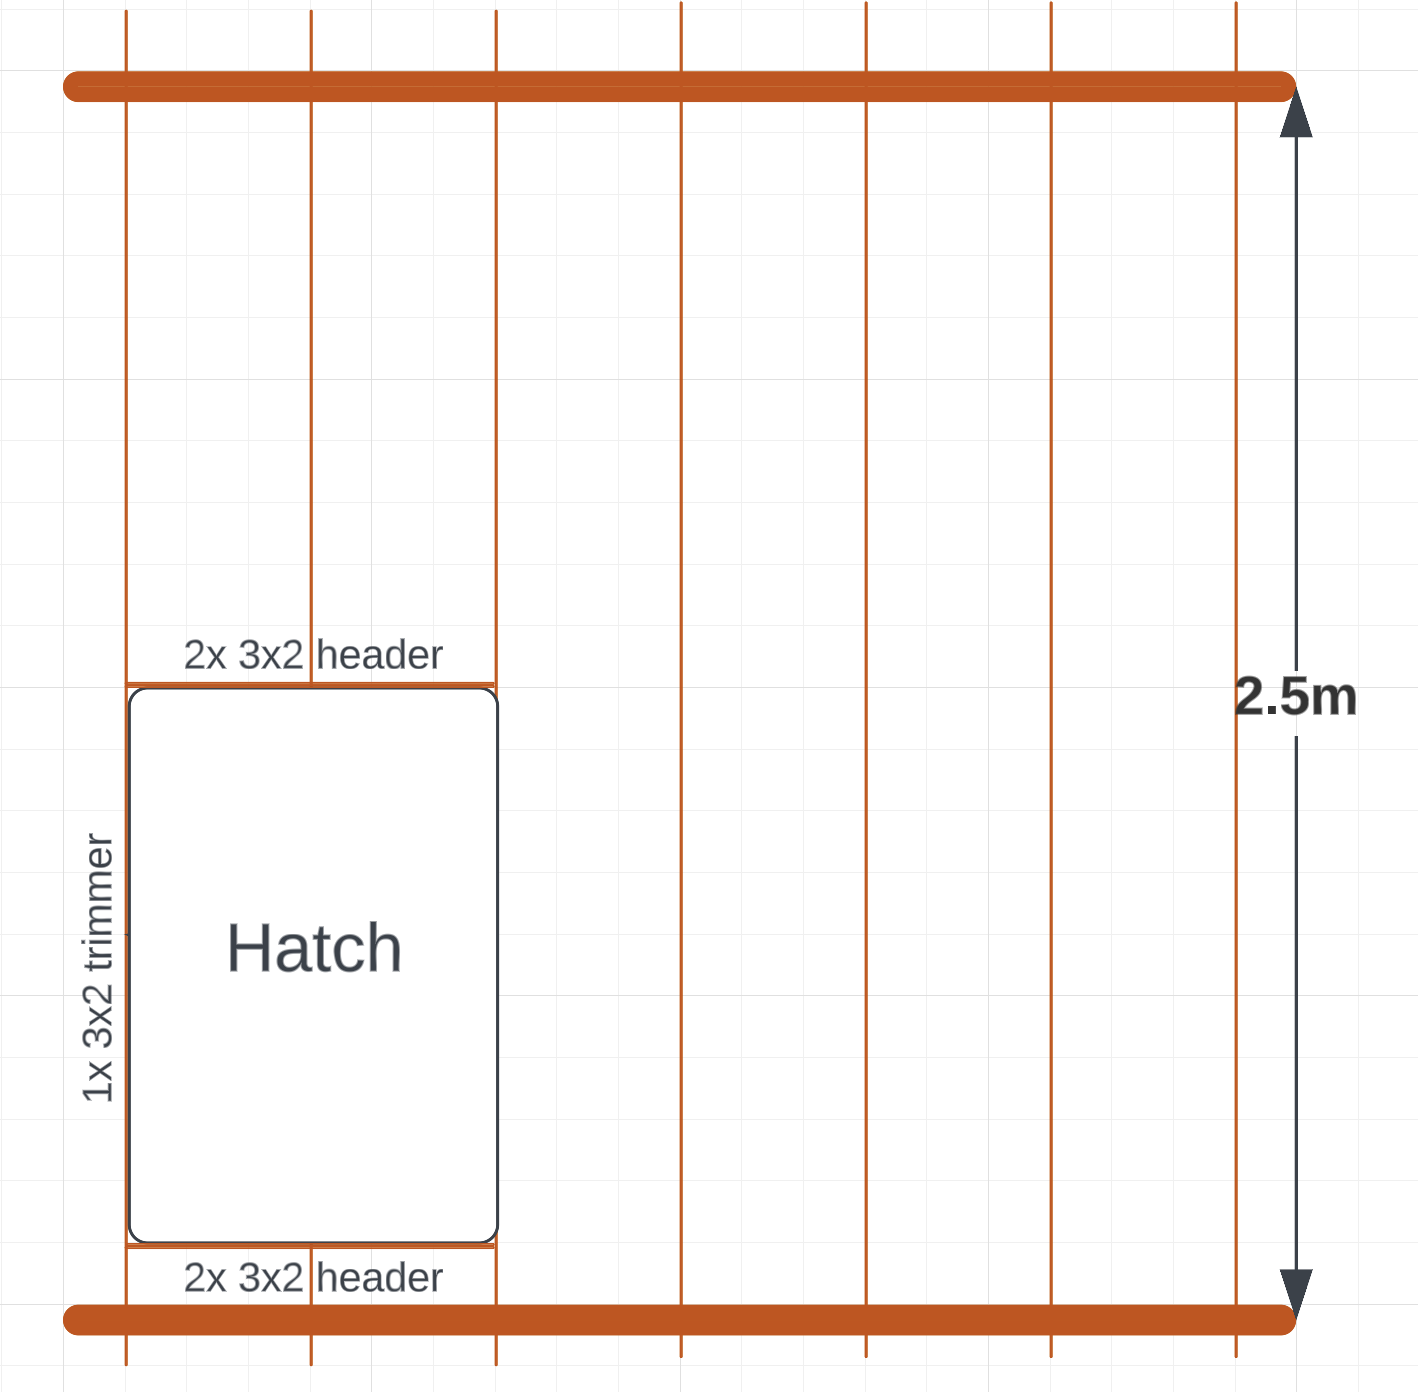
We currently have a tiny loft hatch, approx 350 x 350mm (it's tiny), which sits between ceiling joists at 15" centres (380mm). The joists themselves look to be 3x2. I need to make it larger, if only to get the MVHR into the loft! I'm thinking the Dolle hatch + ladders are the best bang for buck - https://www.dolle-uk.co.uk/shop/loft-ladders-clickfix-76g - they come in 55cm and 70cm widths. 70cm would be preferred, the distance between 3x joists is 76.5cm which would mean I'd have 6.5cm to pack out between the hatch frame and the next joist, so I think I'd need a 3x2 double header on each end and a 3x2 trimmer to help pack it out, like this; Am I on the right tracks here?


-
Frame's in. I have a new found hatred for soil pipes.