jayc89
-
Posts
1389 -
Joined
-
Last visited
-
Days Won
1
Everything posted by jayc89
-
Wet (lime) plaster straight on to brick (solid brick walls, no insulation). It's pretty thick too, over an inch in place. The lime's been on for so long I think the stuff's turned back to stone! The walls are by no means cold to touch. The uPVC windows are old so won't be helping. I've been up in the loft and the insulation all looks well laid. There's a local £99 top-up deal running at the moment so I'm inclined to get them out, just for the free survey...
-
The valve's connected direct to the Heatmiser UH8 wiring centre, all stats are Heatmiser NeoStat v2. When the boiler return temp increases, the flow rate on the open loops remains the same so I don't think the valve's turning off. My assumption was, as the loops get up to temp, the demand for hot(ter) water reduces with the mixer able to recycle more of the water being returned in the loops, as that demand drops, pressure on the boiler feed increases meaning the bypass valve opens and returns that hot water back to the boiler to reduce the pressure. But I'm by no means a heating expert, winging it as I go. I could be talking utter nonsense
-
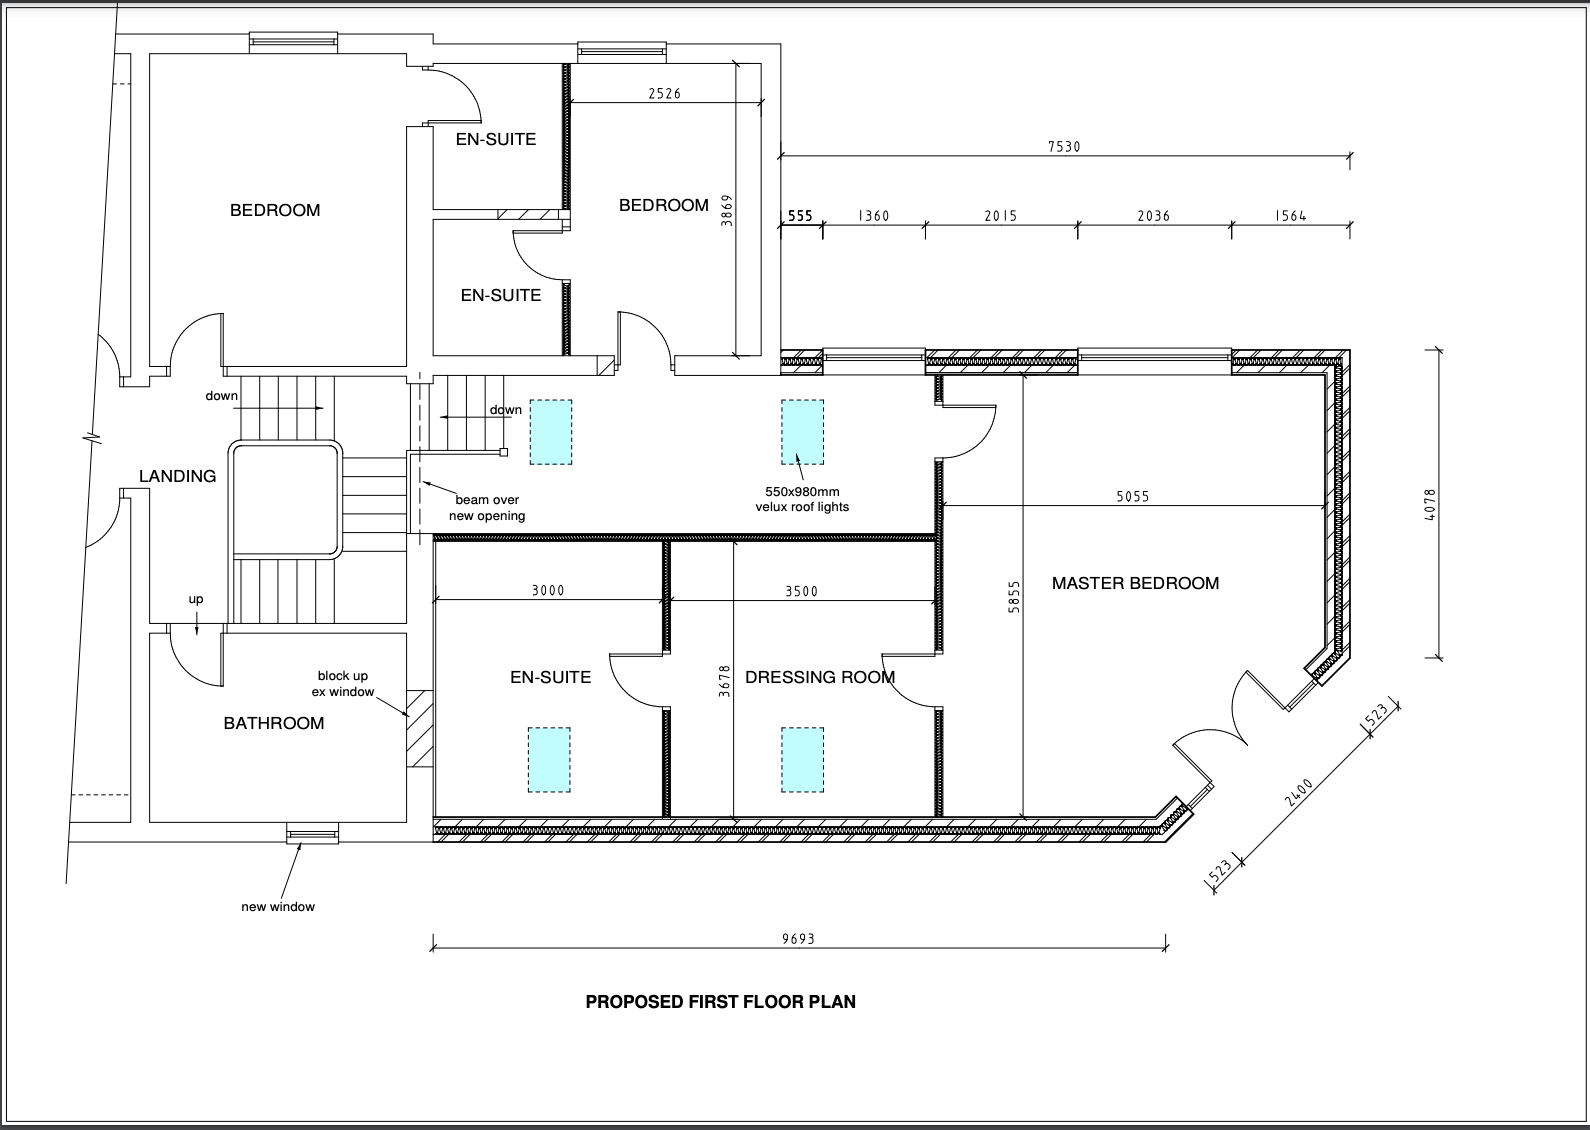
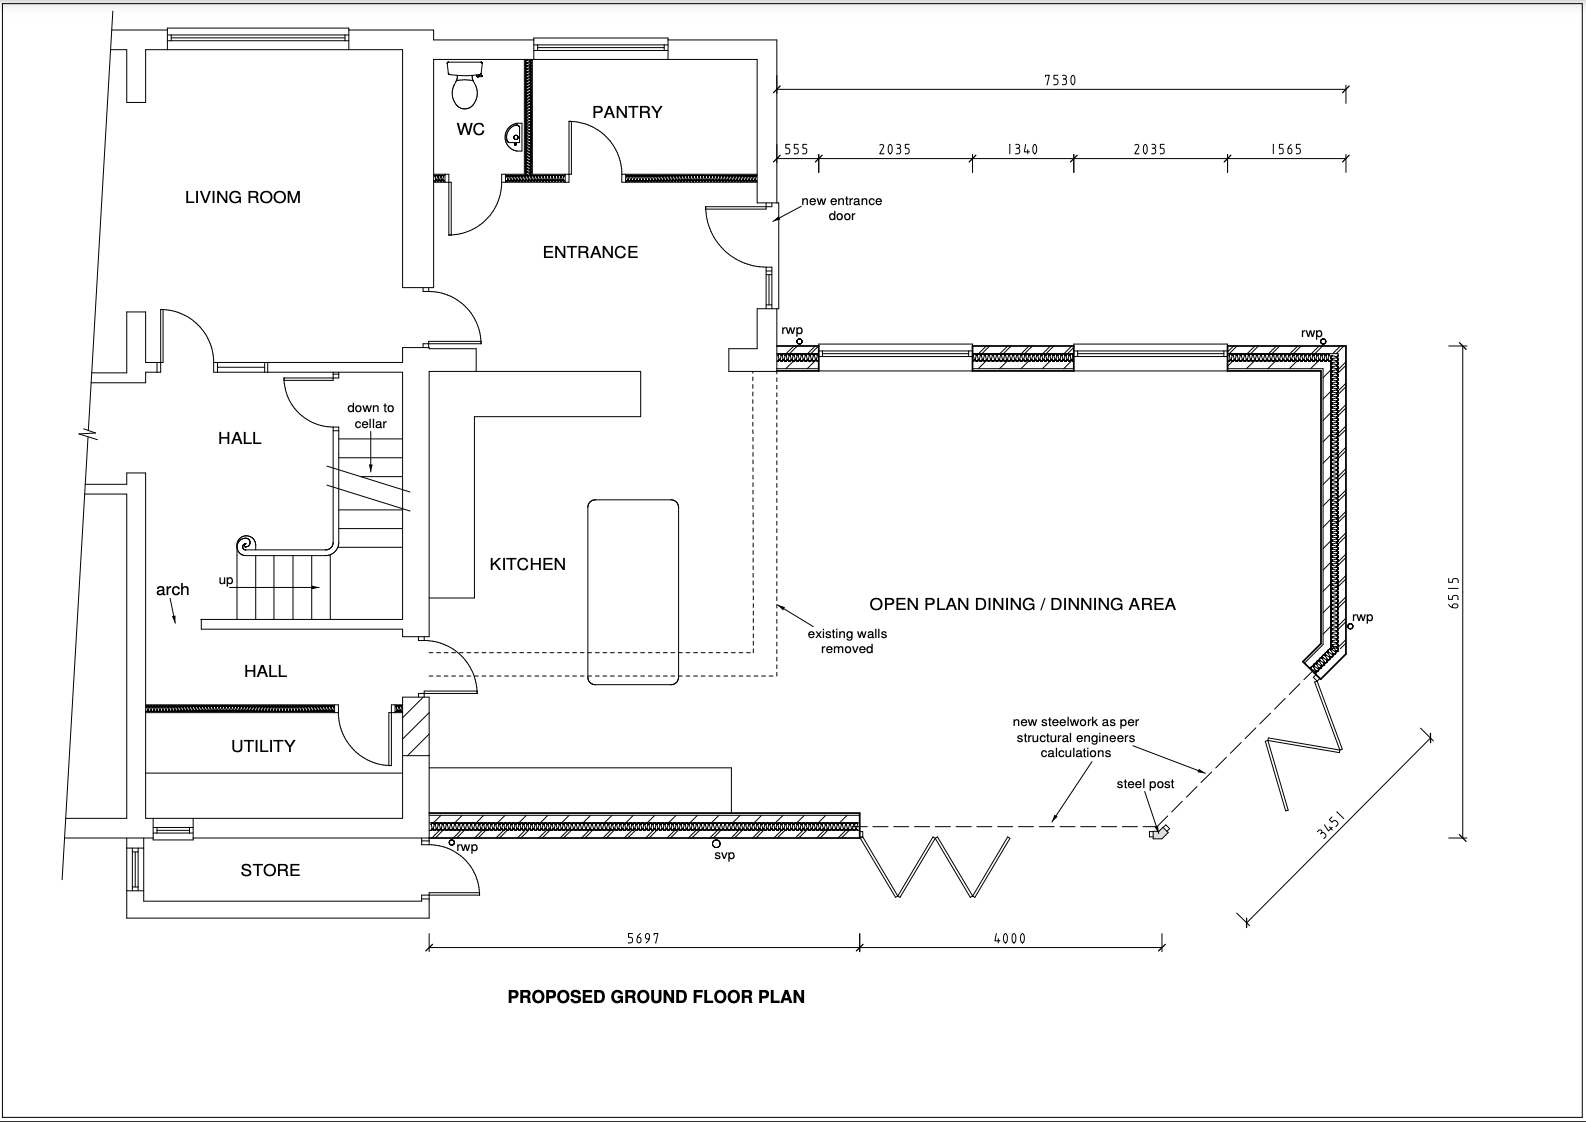
We're now thinking of something like this (my terrible mock up, not the architects!) The main reasons being; The original pantry was on the south facing wall with an existing, large, window - it seemed a better use of this area as a utility The rear entrance was straight into the kitchen area, potentially causing drafts on cold days when the door's open and it also didn't provide anywhere to store (AKA hide) shoes/coats/bags etc. By moving the entrance to the new utility room we can store this stuff out the way (and the kids have somewhere to go to the toilet/wash hands etc when they get in from school) The extended hallway towards the north of the building had the potentially to be quite dark (no natural light around there) so we've pulled part of it into the kitchen space to try mitigate some of that. Thoughts/comments/feedback would be greatly appreciated.
-
-
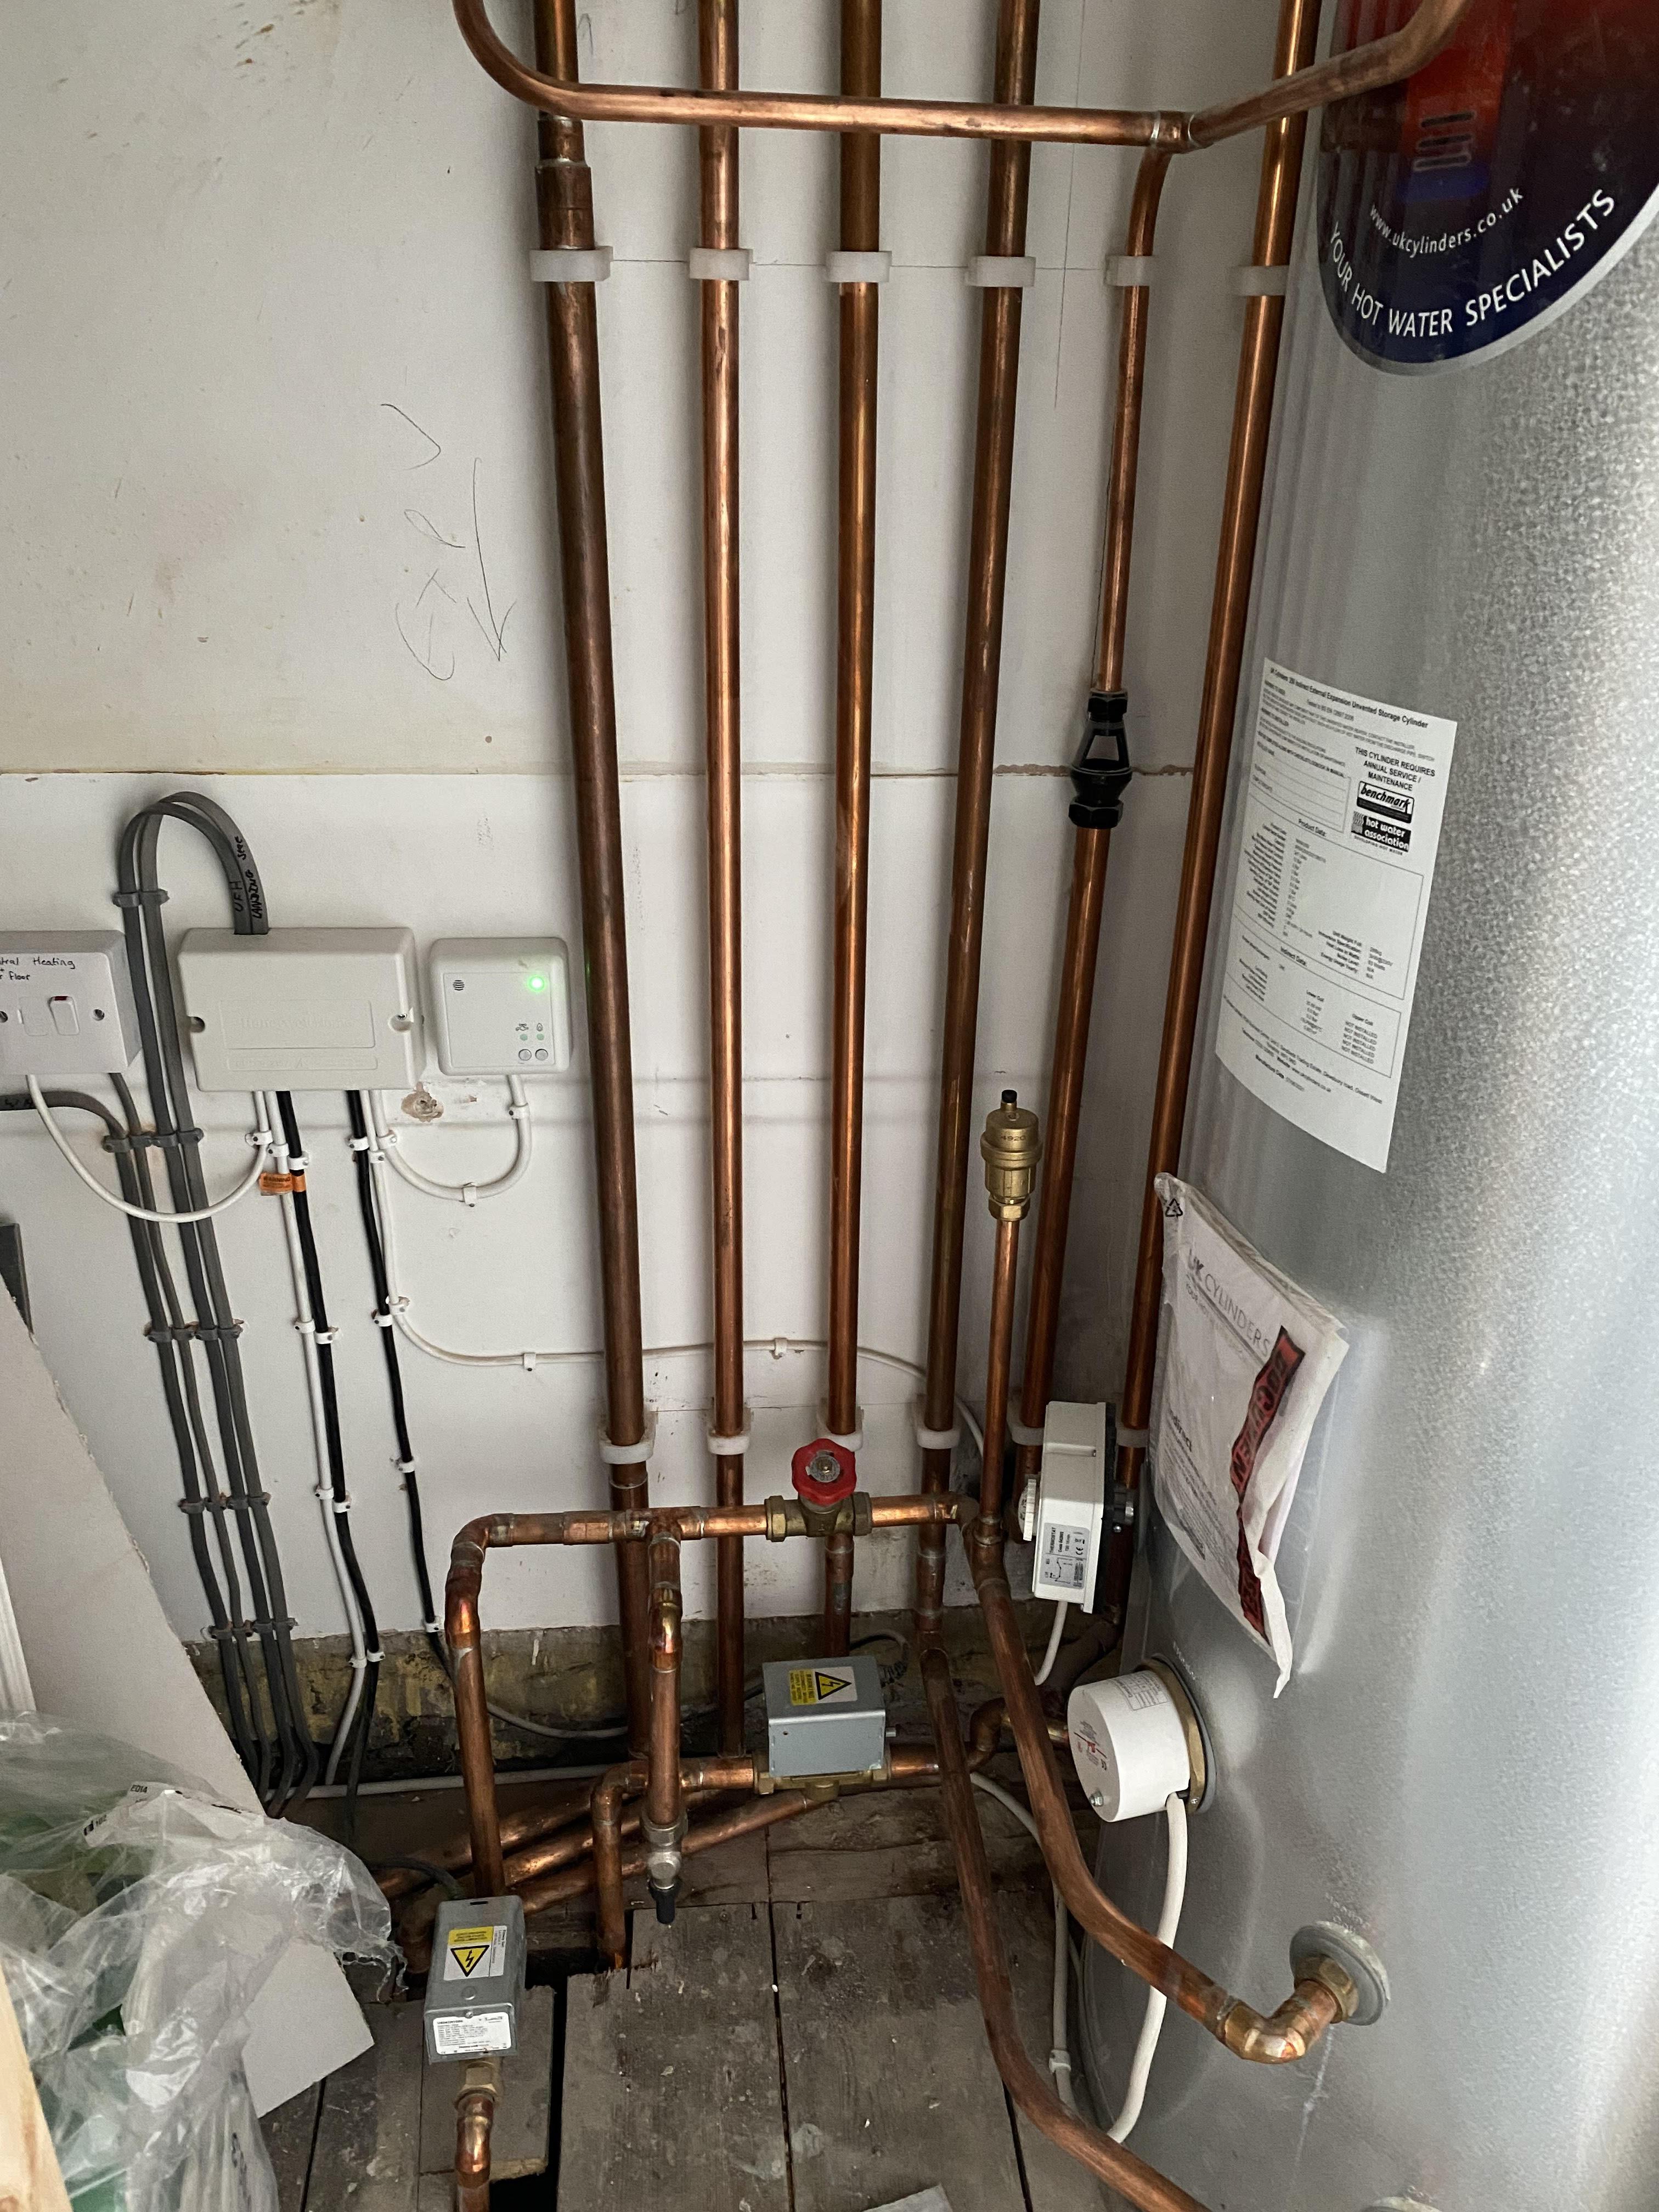
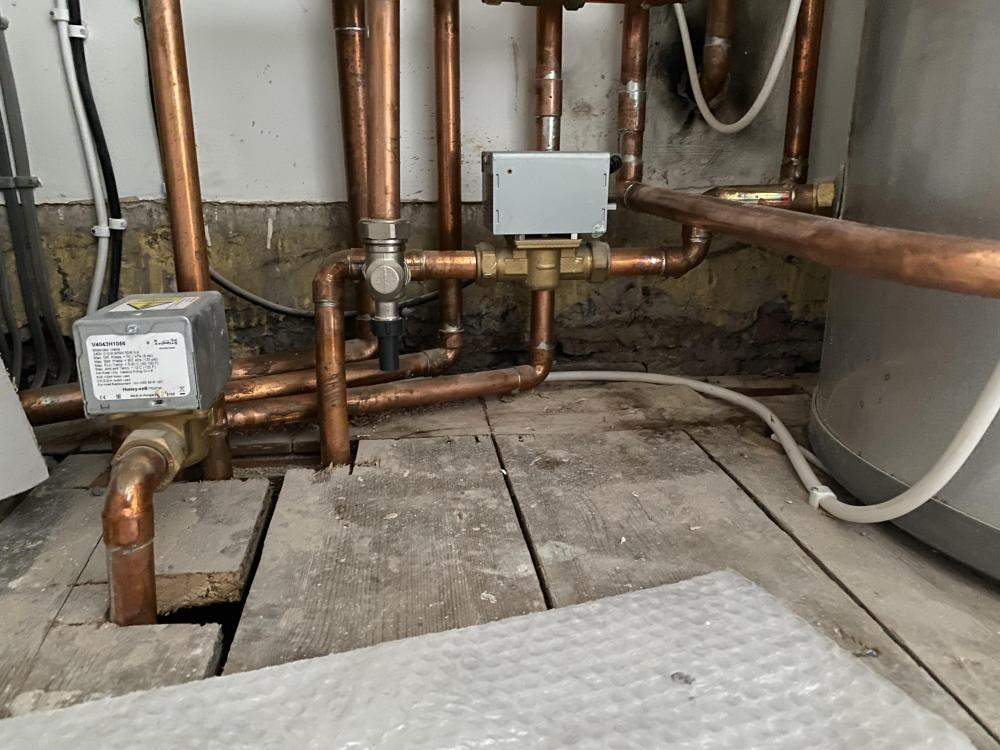
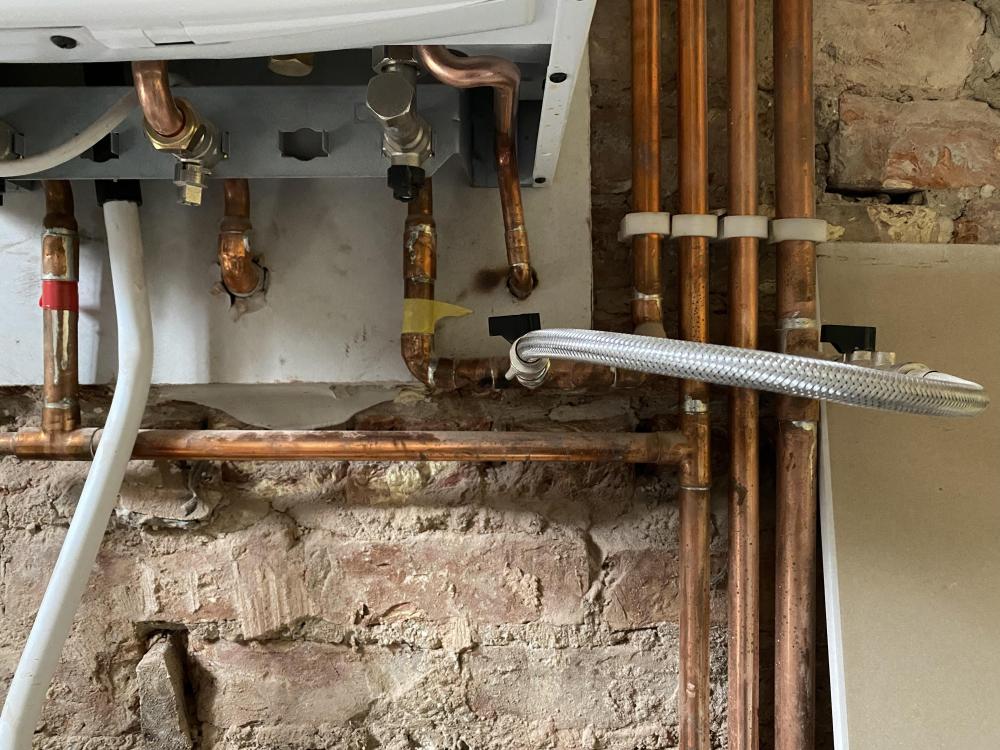
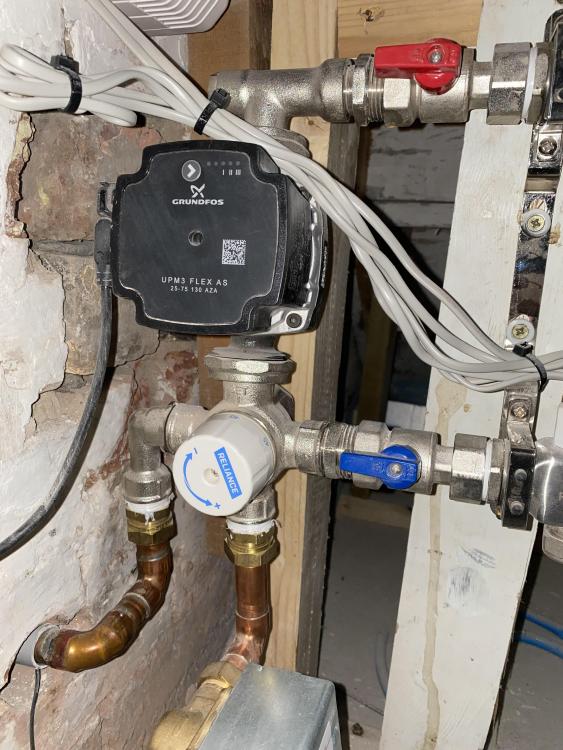
Boiler - 4 pipes from left to right; Boiler return Boiler flow (teed; below for UFH flow, above for upstairs rads + water cylinder) UFH return (goes from the UFH mixer return up to the airing cupboard) Cold water supply These pipes run up to the airing cupboard above the boiler. UFH is pretty simple. The pipes shown above feed into a a mixer, pump and through to the manifold; Airing cupboard, which is far more complicated than I understand, bypass valve can be seen between the 2x 2 port valves and is set to 0.5 bar (max)

-
Interesting. The maths makes sense, but I don't understand why it's only the return to the boiler that increases in heat, NOT the return from the UFH mixer. That's why I assumed it was the bypass valve causing the increase. I'll try dropping to the boiler temp to 60 and see what difference that makes.
-
Makes sense. I have some of this - https://www.toolstation.com/colron-knotting-solution/p62212?store=MG&utm_source=googleshopping&utm_medium=feed&utm_campaign=googleshoppingfeed&mkwid=s_dc&pcrid=515847200306&pkw=&pmt=&gclid=Cj0KCQjw5JSLBhCxARIsAHgO2SexHqu4BcVNROpnXXqgTzmNzlmpLus1SZtaBkByKGpjFLkG5NoZrLkaAi2QEALw_wcB&gclsrc=aw.ds - is it worth trying some on one of the smaller patches first? The solution itself is quite dark so I'm guessing it will need a couple of coats of paint too.
-
I have a S-plan heating system. Condensing system boiler powering upstairs rads and unvented cylinder and the downstairs UFH. Boiler temp is set at 65 for the hot water. UFH is mixing to 40 degrees. When only the UFH is calling for heat, the return temp from the mixer is approx 30 degrees, which is as expected with a 7 degree delta-t across the loops. However, once the loops are up to temp, the return on the actual boiler is far hotter - nearer 55 degrees, so not condensing much at all. I suspect as the UFH demand reduces the bypass valve kicks in, causing the increase in return temp. Is there anything I can do to fix this? I have a feeling my only solution will be a buffer tank for the UFH...
-
Ways to save money on large renovation project
jayc89 replied to richo106's topic in General Self Build & DIY Discussion
Our renovation spiralled due to "unknowns" - rotten floor joists, rock solid walls meaning the chasing out for the rewire took the electrician significantly longer than initially expected etc. Make sure you have a contingency budget. If you're doing a lot of the work yourself, make sure you time manage appropriately - we had a digger sitting around for an additional couple of days doing nothing, but costing us money, because my full-time job got in the way. Shop around! For trades - for our rewire and new heating system we had quotes come in wildly different. Most extreme example - £5k - £12k for the rewire - for the exact same job! We needed some hardcore and decorating stones, looked around the well known local/online companies which were extortionate - managed to get them both at a fraction of a price from a local aggregates company. Ditto on PIR insulation, we managed to get our 100mm PIR for £38 per sheet whereas at the time the majority of places were asking £50-60! -
The price point between CAT 5 and 6 is negligible, maybe an extra £30 for a 300m reel. All my cables have been chased into the walls at the same time as getting the house rewired and I don't intend on doing that again for another 30+ years so for me at least, it made sense. My biggest concern is network congestion - there's a finite number of devices that can be connected to a home WiFi at the same time before you start experiencing a degradation in their connection, so where possible I hardwire everything using ethernet (RJ45 to the back of TVs and gaming consoles etc, Smart Bulbs connected to a wired bridge rather than wifi etc), which is where a 10GB backbone comes into its own. It's perhaps overkill right now, but it allowed me to geek out whilst I put it all together so I'll take that
-
We had a joiner and bathroom fitter do the same to us. The bathroom fitter was a funny one, spent literally WEEKS on the bathroom, then what turned out to be his last couple of days he was rushing around like a mad man, cut corners and we could never get him back onsite to make it right. We ended up getting a new joiner and I finished off the bathroom myself. Hope you get sorted!
-
Derp. I should have included that. Rockwool between and over the joists - approx 300mm in total. The stuff over the joists looks in good condition, the stuff between the joists is looking a little worse for wear, I have no idea how long it's been up there for, so we could replace/add more, but I surely it would cause such a drastic loss of heat?
-
I have a similar requirement. I went for a hub and spoke approach. 10GB switch which the internet router connected to and then CAT 6 to various switches around the house, using 1GB switches with a single 10GB port for the "uplink". For the majority of home use cases 1GB is more than enough, especially given the average UK household's internet speed is 71.8Mbps (or 0.008975 GB/s), but the 10GB backbone avoids congestion within the home network itself and becomes more future-proof.
-
We have a 32kw Baxi system boiler powering the downstairs UFH, upstairs radiators and unvented cylinder for hot water. Temp is set to 65 degrees, mainly to ensure the hot water is above 60. UFH supplies 3 zones and 6 loops (approx 550m of pipe), the manifold is mixing to 45 degrees (as per heat loss calcs for our old house) and very rarely comes on, a couple of hours in the morning to bring it back up to temp and maybe a an hour in the evening, occasionally. The upstairs radiator stat is programmed at 22 degrees between 06:00-09:00 and then 16:00-21:00 and it's pretty much always on during these times. All radiators (3 bedrooms, 2 bathrooms) have been balanced with a target delta-T of 15 degrees (60 degree flow and 45 degree return) and it certainly gets warm up there but it seems to struggle to keep the heat. I'm guessing we're losing heat as fast as we're generating it upstairs, but I'm not sure why there's such a difference between the UFH working really well downstairs and the radiators working pretty poorly upstairs. Is there anything else I can try other than the standard, upgrade windows, try reduce any draughts (not that I can find any) etc?
-
For a multitude of reasons I've ended up with a small section of the house with the block and beam subfloor still exposed. It's 160mm below final floor level, with the initial plan to install 100mm PIR and 60mm Cemfloor screed. Can anyone see any problem if I was to replace the Cemfloor with a sand and cement screed that I can hand mix myself? I could even drop to 75mm PIR and increase the S+C screed to 85mm? Appreciate this is not something anyone would ever spec - the space is only to be used as a pantry and w/c so it doesn't need to be ultra-efficient.
-
I'm probably being simple here, but I'm not sure I follow - are you suggesting the marks are from old gloss paint? (Even through the bluegrit and skim?) What's the best course of action given it's already had 4 coats of emulsion? Whilst the marks are getting lighter with every coat, at this rate I think it would need another 4 coats!
-
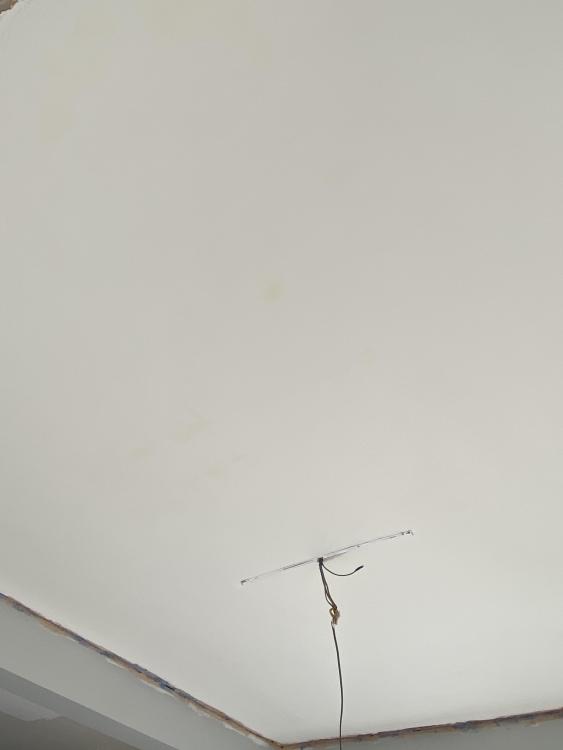
Not the best lighting to show you, but hopefully you get the idea
-
There are radiator and hot water pipes running through the void above, but they're all brand new pipes (copper for the rads and hep for the hot water) and the patches seem to be scattered all over the ceiling (4m x 4m), not in any sort of pattern I'd have associated with water ingress (but I'm no expert...). Some small patches (size of a 2 pound coin) some larger, maybe 20cm, some round, some longer strips etc. I really hope not as we've just redecorated upstairs...
-
I've recently had our dining room kitchen reskimmed. It was in pretty poor condition, it had lining paper which I stripped off to find old cracked, but not loose, plaster. The cracks were covered using scrim tape and the entire ceiling was then "blue-gritted" before being skimmed using multi-finish. It's been a couple of months since it was skimmed so it should be well dried out now (I painted other rooms in the house that have been reskimmed after a couple of weeks!). There were a few darker patches in the plaster, but I didn't think anything of it and applied a couple of coats of white wash (50/50 contractors emulsion and water). Those darker patches were still visible after the white wash as brown/orange spots, after 4 coats of emulsion now, they're still coming through, although fainter. I'm not sure what they are, but I'm guessing I need to put something on them to neutralise them before painting again? Any help would be greatly appreciated.
-
We had a very similar situation - moved into an old house, found the downstairs joists were all rotten, replaced with slab and UFH. We had an architect, builder and BCO onside and all three recommended/agreed that the top two courses of our stepped footing should be chopped out flush with the wall to allow the insulation (and perimeter upstand) to run flush with the wall. The architect and builder specialise is older properties. So we took an angle grinder to them (and oh the dust!). Our footings are pretty deep (for the age of the house) mind, we were 800mm down to swap out the old led water mains pipe and they were still going!
-
I'd probably stick the actuators on, unless you're enjoying the sauna experience As a rule of thumb, when I was doing mine, I got the delta-T on each loop to ~ 7 degrees by adjusting the flow rate and then slowly increased the flow temp until each room was comfortably reaching the thermostat temp, any hotter and you risk your room temps overshooting. I used the heat loss calcs to guide me in the right direction, but my setup's currently running a flow temp 10 degrees cooler than the calcs suggested I would need... Good luck!
-
Yep, if nothing else, it helps dry the screed out. Once up to temp, make sure to also turn it off gradually too (normally by 10 degrees a day) Flow temp should be house specific - floor/wall insulation, window sizes, final floor finish etc. - did the company you bought the UFH kit from provide any heat loss calcs? Based on each room's heat loss, you can work out the required W/m2 and go from there. Here's a rough guide I used for mine (150mm pipe centres); Return temps generally depend on your flow temp. If the flow is less than 30 degrees, go for a return temp ~ 4 degrees lower. If it's more than 30 degrees, go for ~ 7 degrees lower. The delta-T can be managed by adjusting the flow rate on each loop until each one is something like.

-
Thanks - that was a super interesting read! We're by no means writing the original building off - when we moved in we found the ground floor joists to be rotten so we replace the floor with an insulated slab + UFH (100mm PIR, 25mm PIR upstands). All the original plaster is still in good condition, 1 inch thick in places(!) and it's direct to brickwork, so whilst not perfect, it does provide a certain level of air tightness. The windows are probably 30 years old, we had planned to replace them first, but when we got the keys it was the heigh of lockdown/brexit aftermath and frames coming in from Germany were on a 12 week lead time which we couldn't afford to wait for (paying 2 mortgages whilst we renovated etc). They're to be replaced at the same time as the extension now. The roof does need some TLC, there's 300mm rockwool between/over the joists, but some of the slates have slipped so they need putting right really before winter sets in.
-
The walls to be knocked down are the existing ground floor extension, nothing above them, so I don't think we should require any additional structural support there? The bifolds are a good point, the window/door company our builder and architect both, independently, recommended offer a sliding/patio door range which I suspect we'll end up using instead - http://www.conservatec.com/Aluminium_Sliding_patio_doors_visoglide.asp In terms of build up - I've totally bought into the passivhaus concept, although I'm a realist too and don't plan to spend £££ getting the original part of the house (solid walls, lime mortar, plaster etc) up to that level. So for the extension, it's still TBD but I suspect we'll land on something similar to that used at Golcar. 150mm full fill cavity, 150mm reinforced conc built into the inner leaf sitting on 200mm EPS and Thermalite blocks used on the inner leaf below DPC. Internally, we'll wet plaster, rather than D&D. Does that sound reasonable?
-
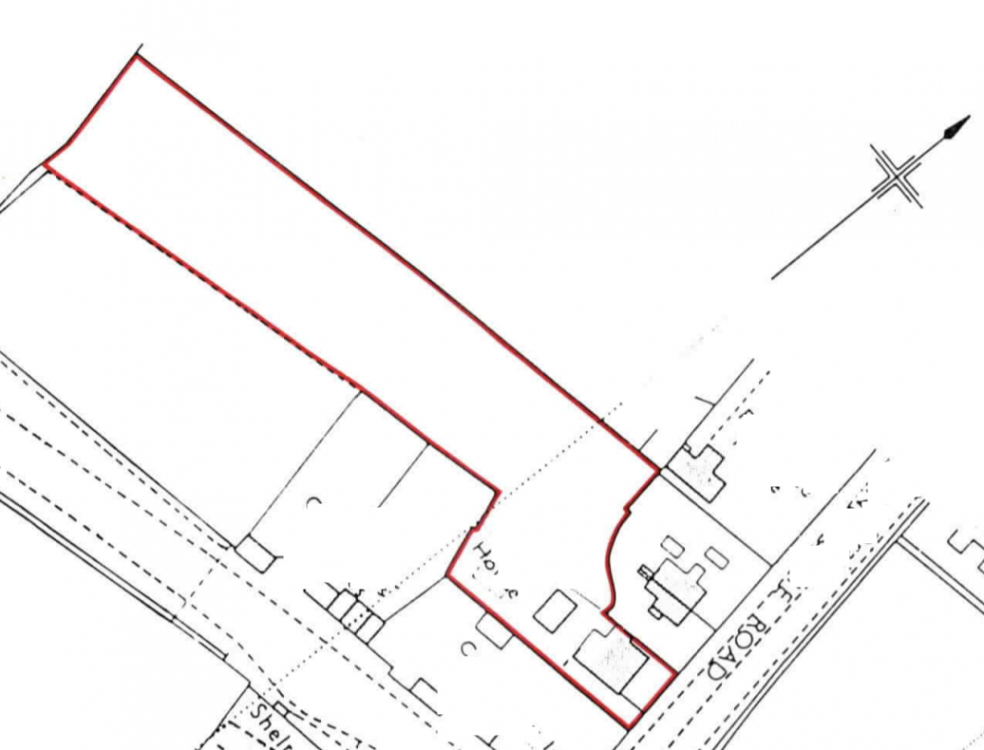
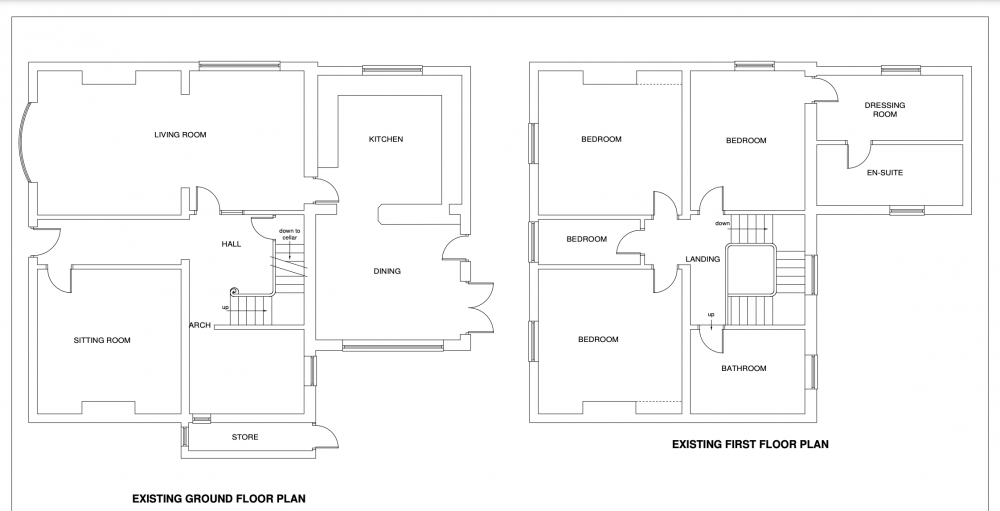
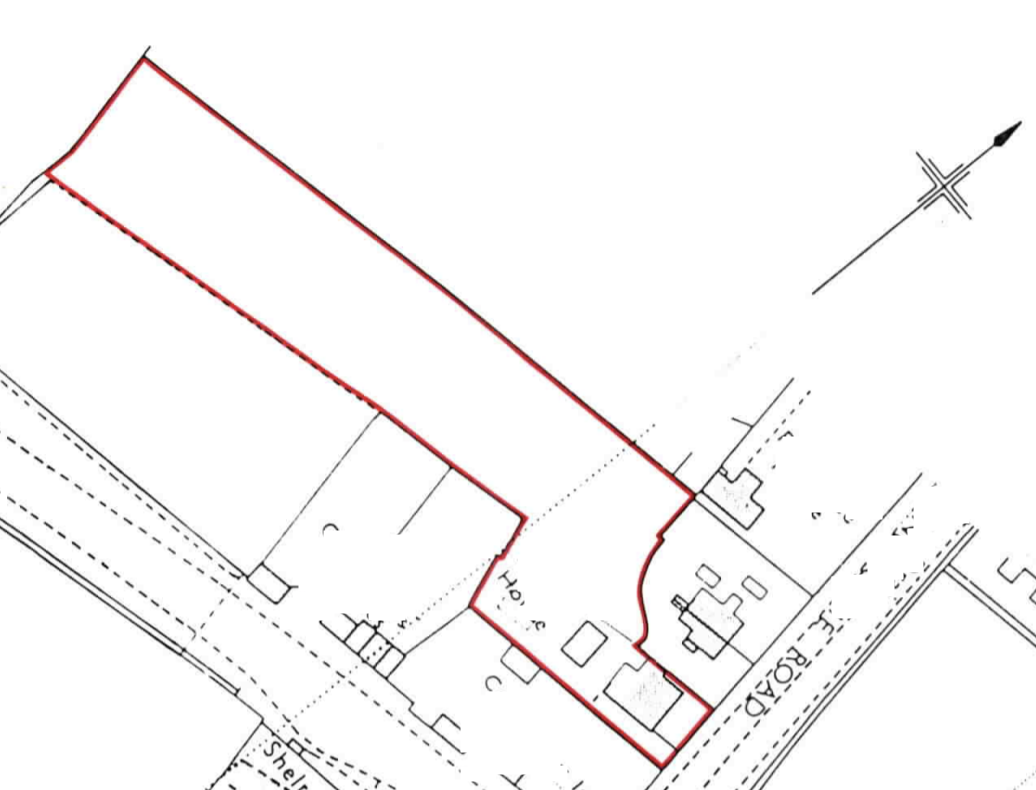
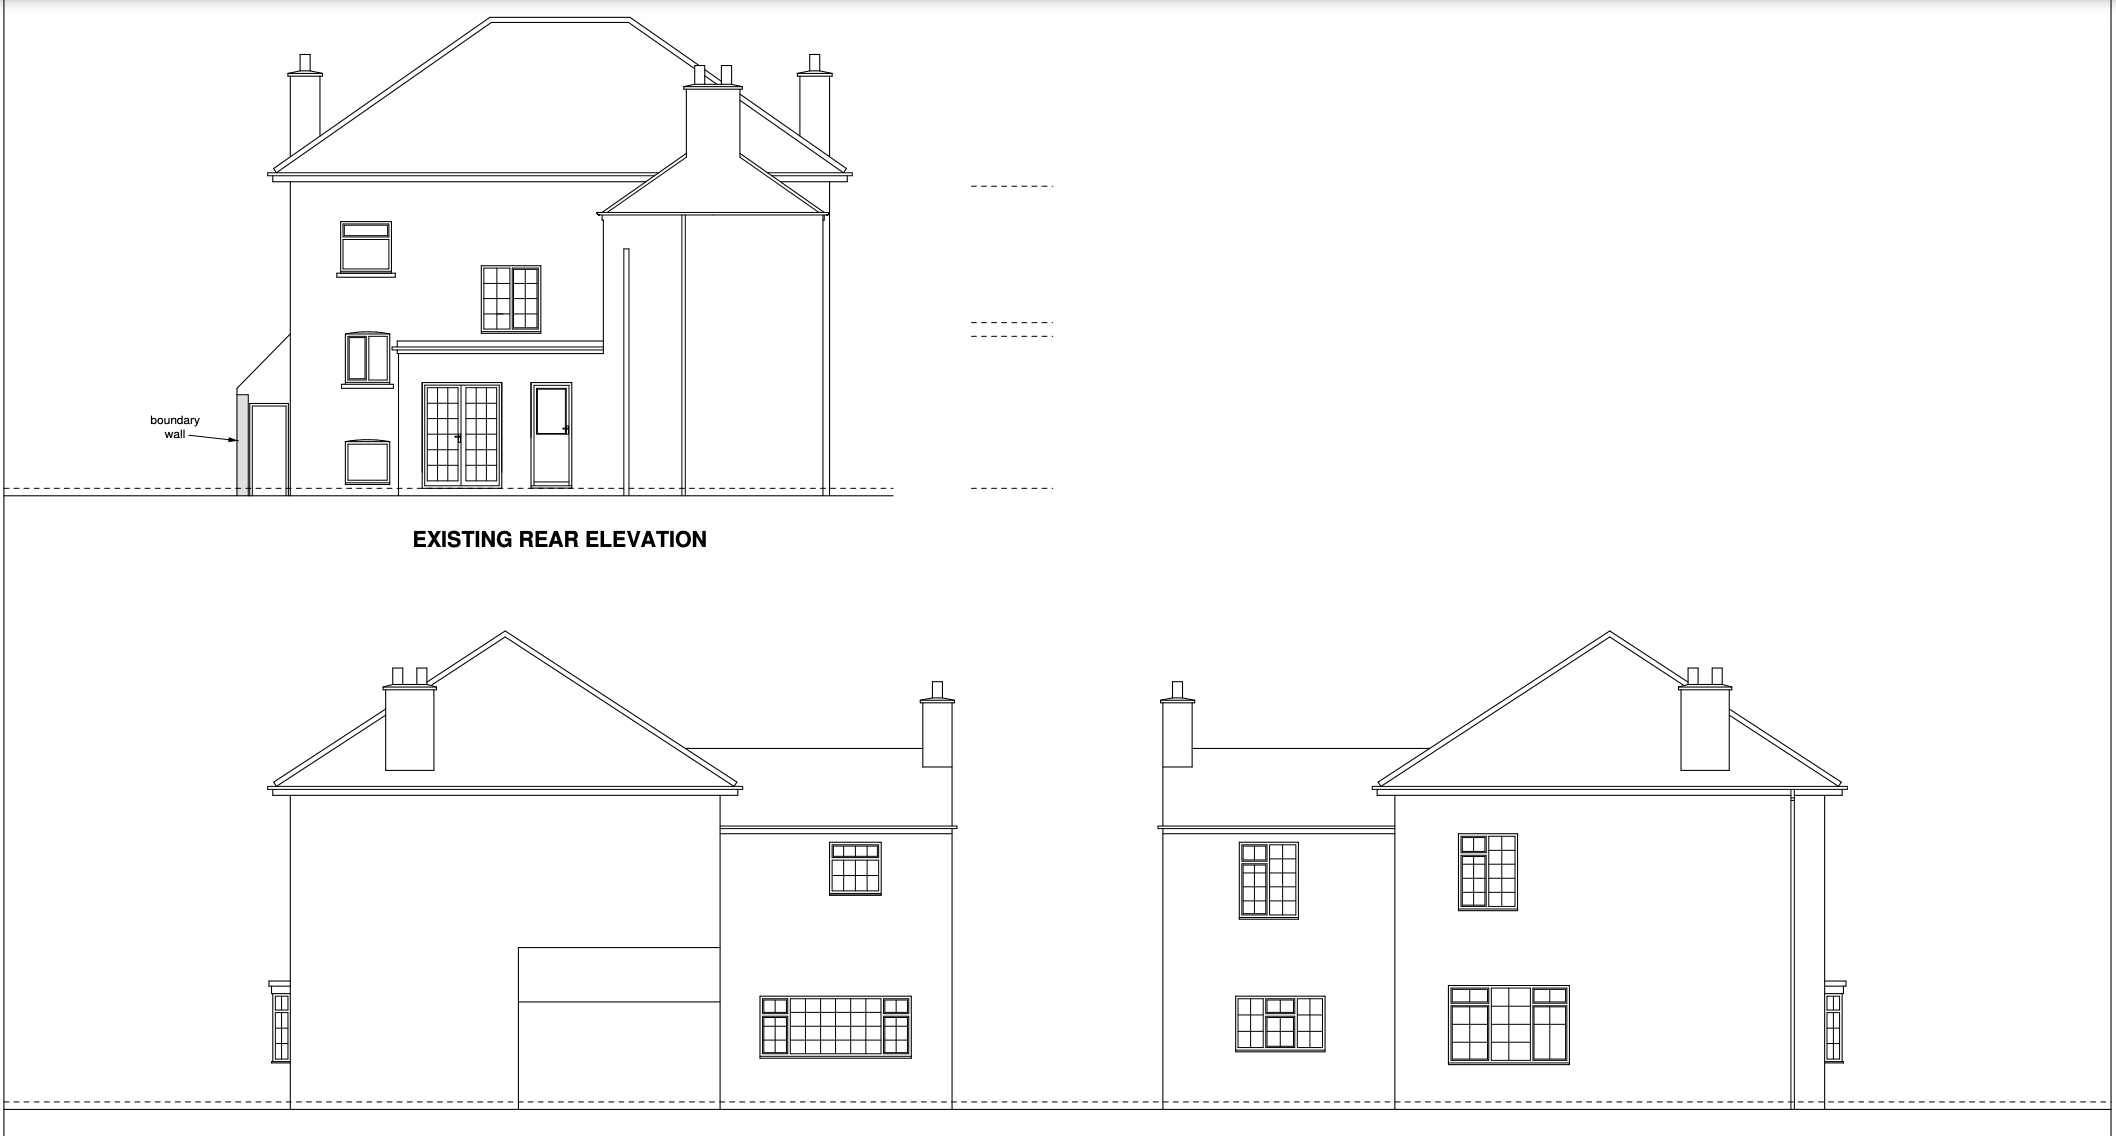
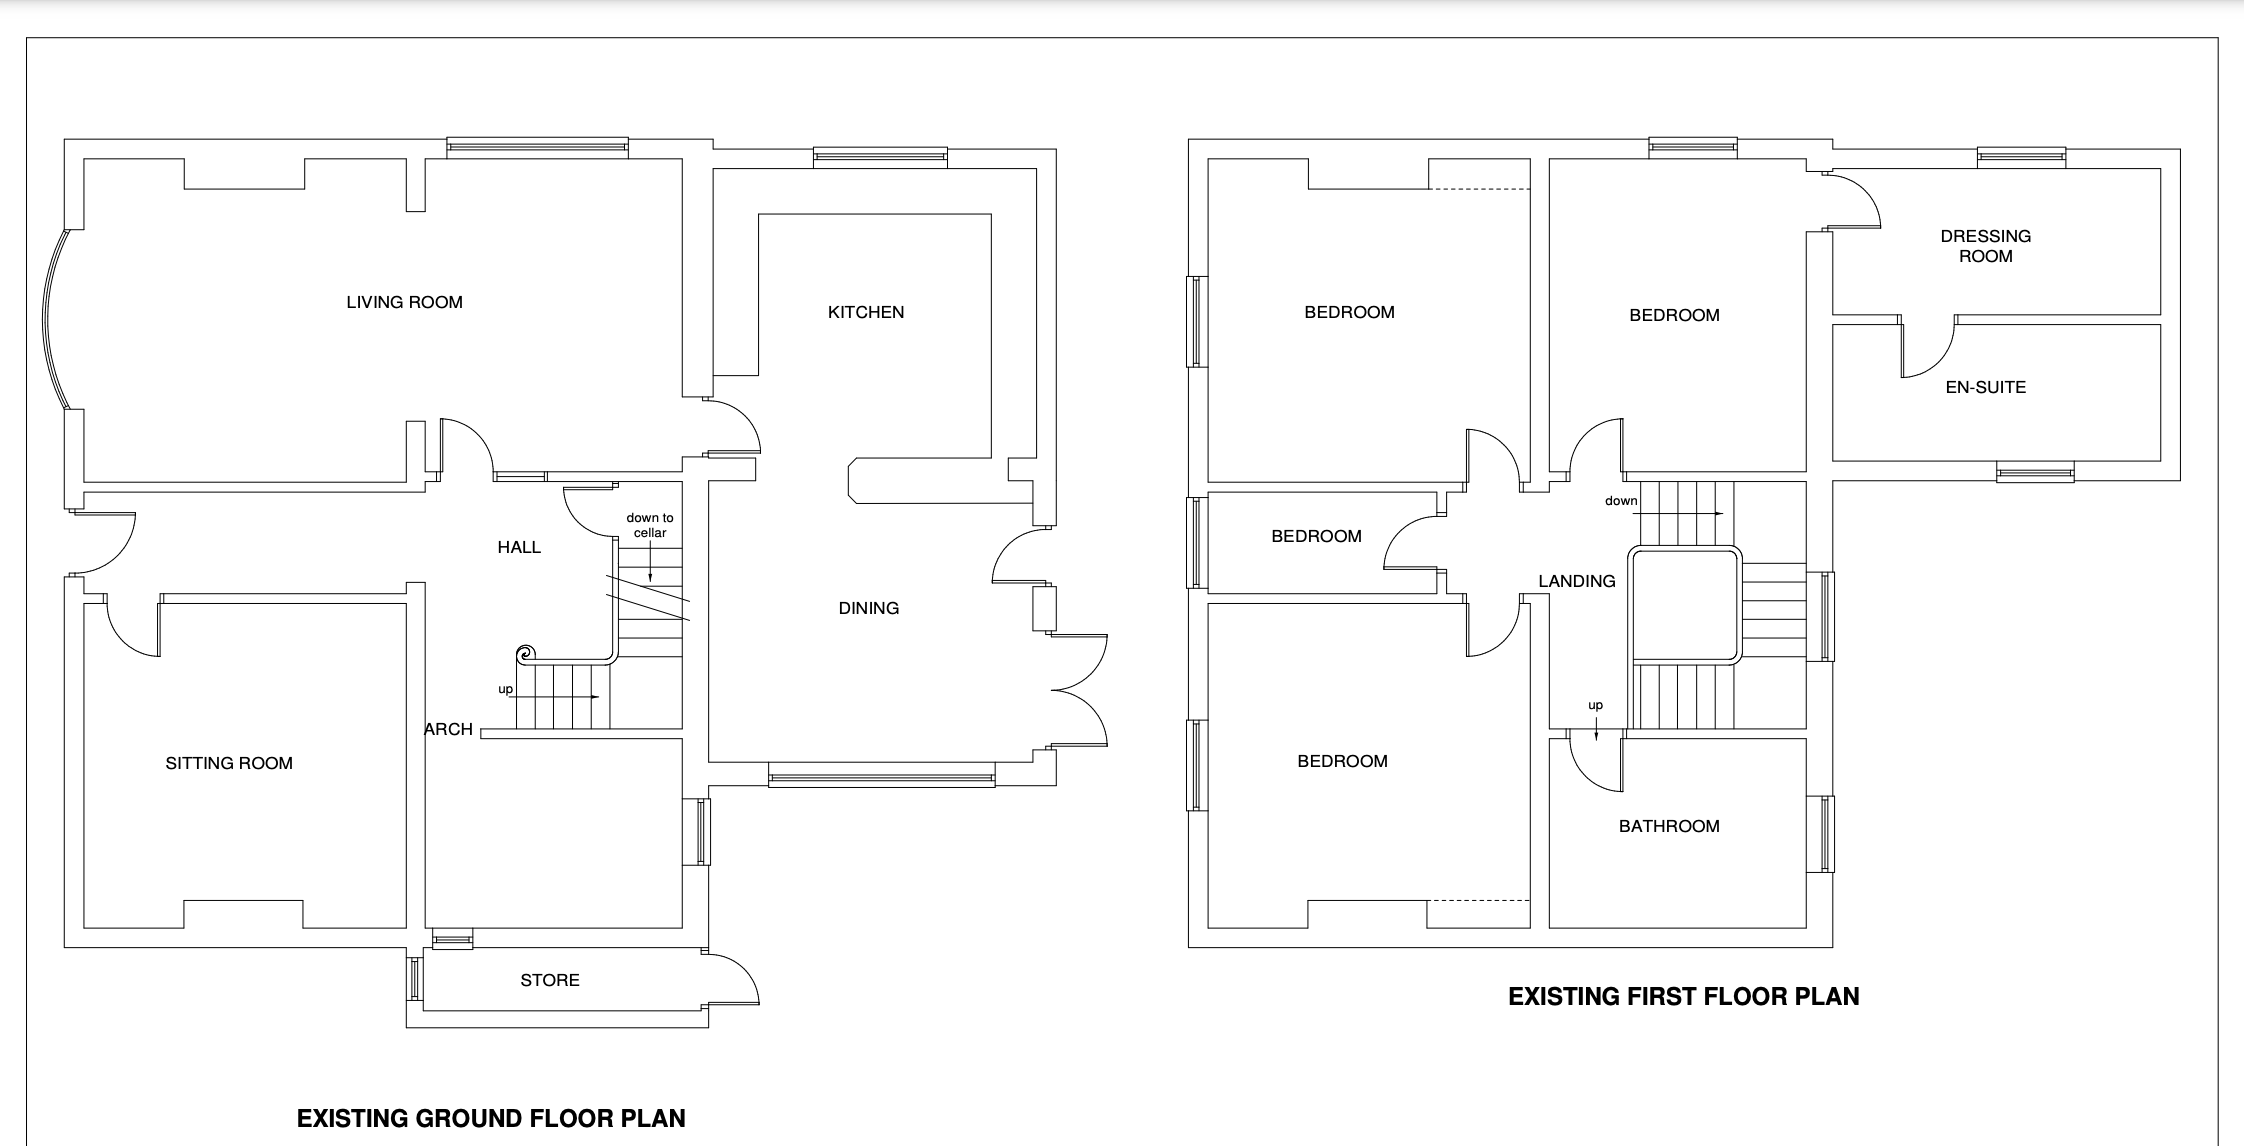
Hi all, newly registered here, but a long time lurker. We're in the process of getting designs drawn up for our house extension. The idea being to create an open plan kitchen/living area and a new master suite upstairs (bedroom, dressing room and ensuite). Our plot is a little odd in that our back garden doesn't extend directly beyond the rear of the house, it curves around behind our neighbours and then extends out. The extra building to the rear of the property is our garage. It's location on the plan is slightly misleading, it's 18m from the rear of the house and approx 5m from our rear boundary. The extended section of the plot was used as paddocks by the previous owners. The idea is to build out far enough from the current building so that the new day room and bedroom benefit from better views of our garden (and not the neighbours back garden!) The current floor plans are fairly simple. A largish living room/dining room and a separate "sitting room" (which is actually a home office). 3 bedrooms upstairs, one with ensuite. (North is to the bottom of the drawings) Because of the odd shape of the plot, to avoid intruding on our neighbours, it means we have to built out quite far. The idea was to make use of the additional internal floor space and add an extra bedroom to the north of the building, but because of how close it would be to our boundary wall, our architect suggested that bedroom would need a frosted window, which we weren't keen on. So the entire north face of the upstairs extension is now the master ensuite and dressing room - which makes for a spacious master suite - perhaps too big? The extension will also cover up an existing window over the staircase. The 2x Velux windows and wall window on the new landing are meant to mitigate that loss of light. We're also a little unsure on the placement of the pantry and utility room - the pantry doesn't need a window (especially a south facing one) and given it's where the kitchen sink currently is, it already has the plumbing needed for the utility room - maybe it's worth switching them around? Overall, we're pretty happy with the proposal, other than the points mentioned above, but from being a "lurker" around here for some time, I know there are some great contributors on here that will almost certain spot things I haven't even considered yet - the property was built around 1870 so we don't want the extension to be anything ultra modern, but suitable for modern family life - so I'd love your feedback!