jayc89
-
Posts
1389 -
Joined
-
Last visited
-
Days Won
1
Everything posted by jayc89
-
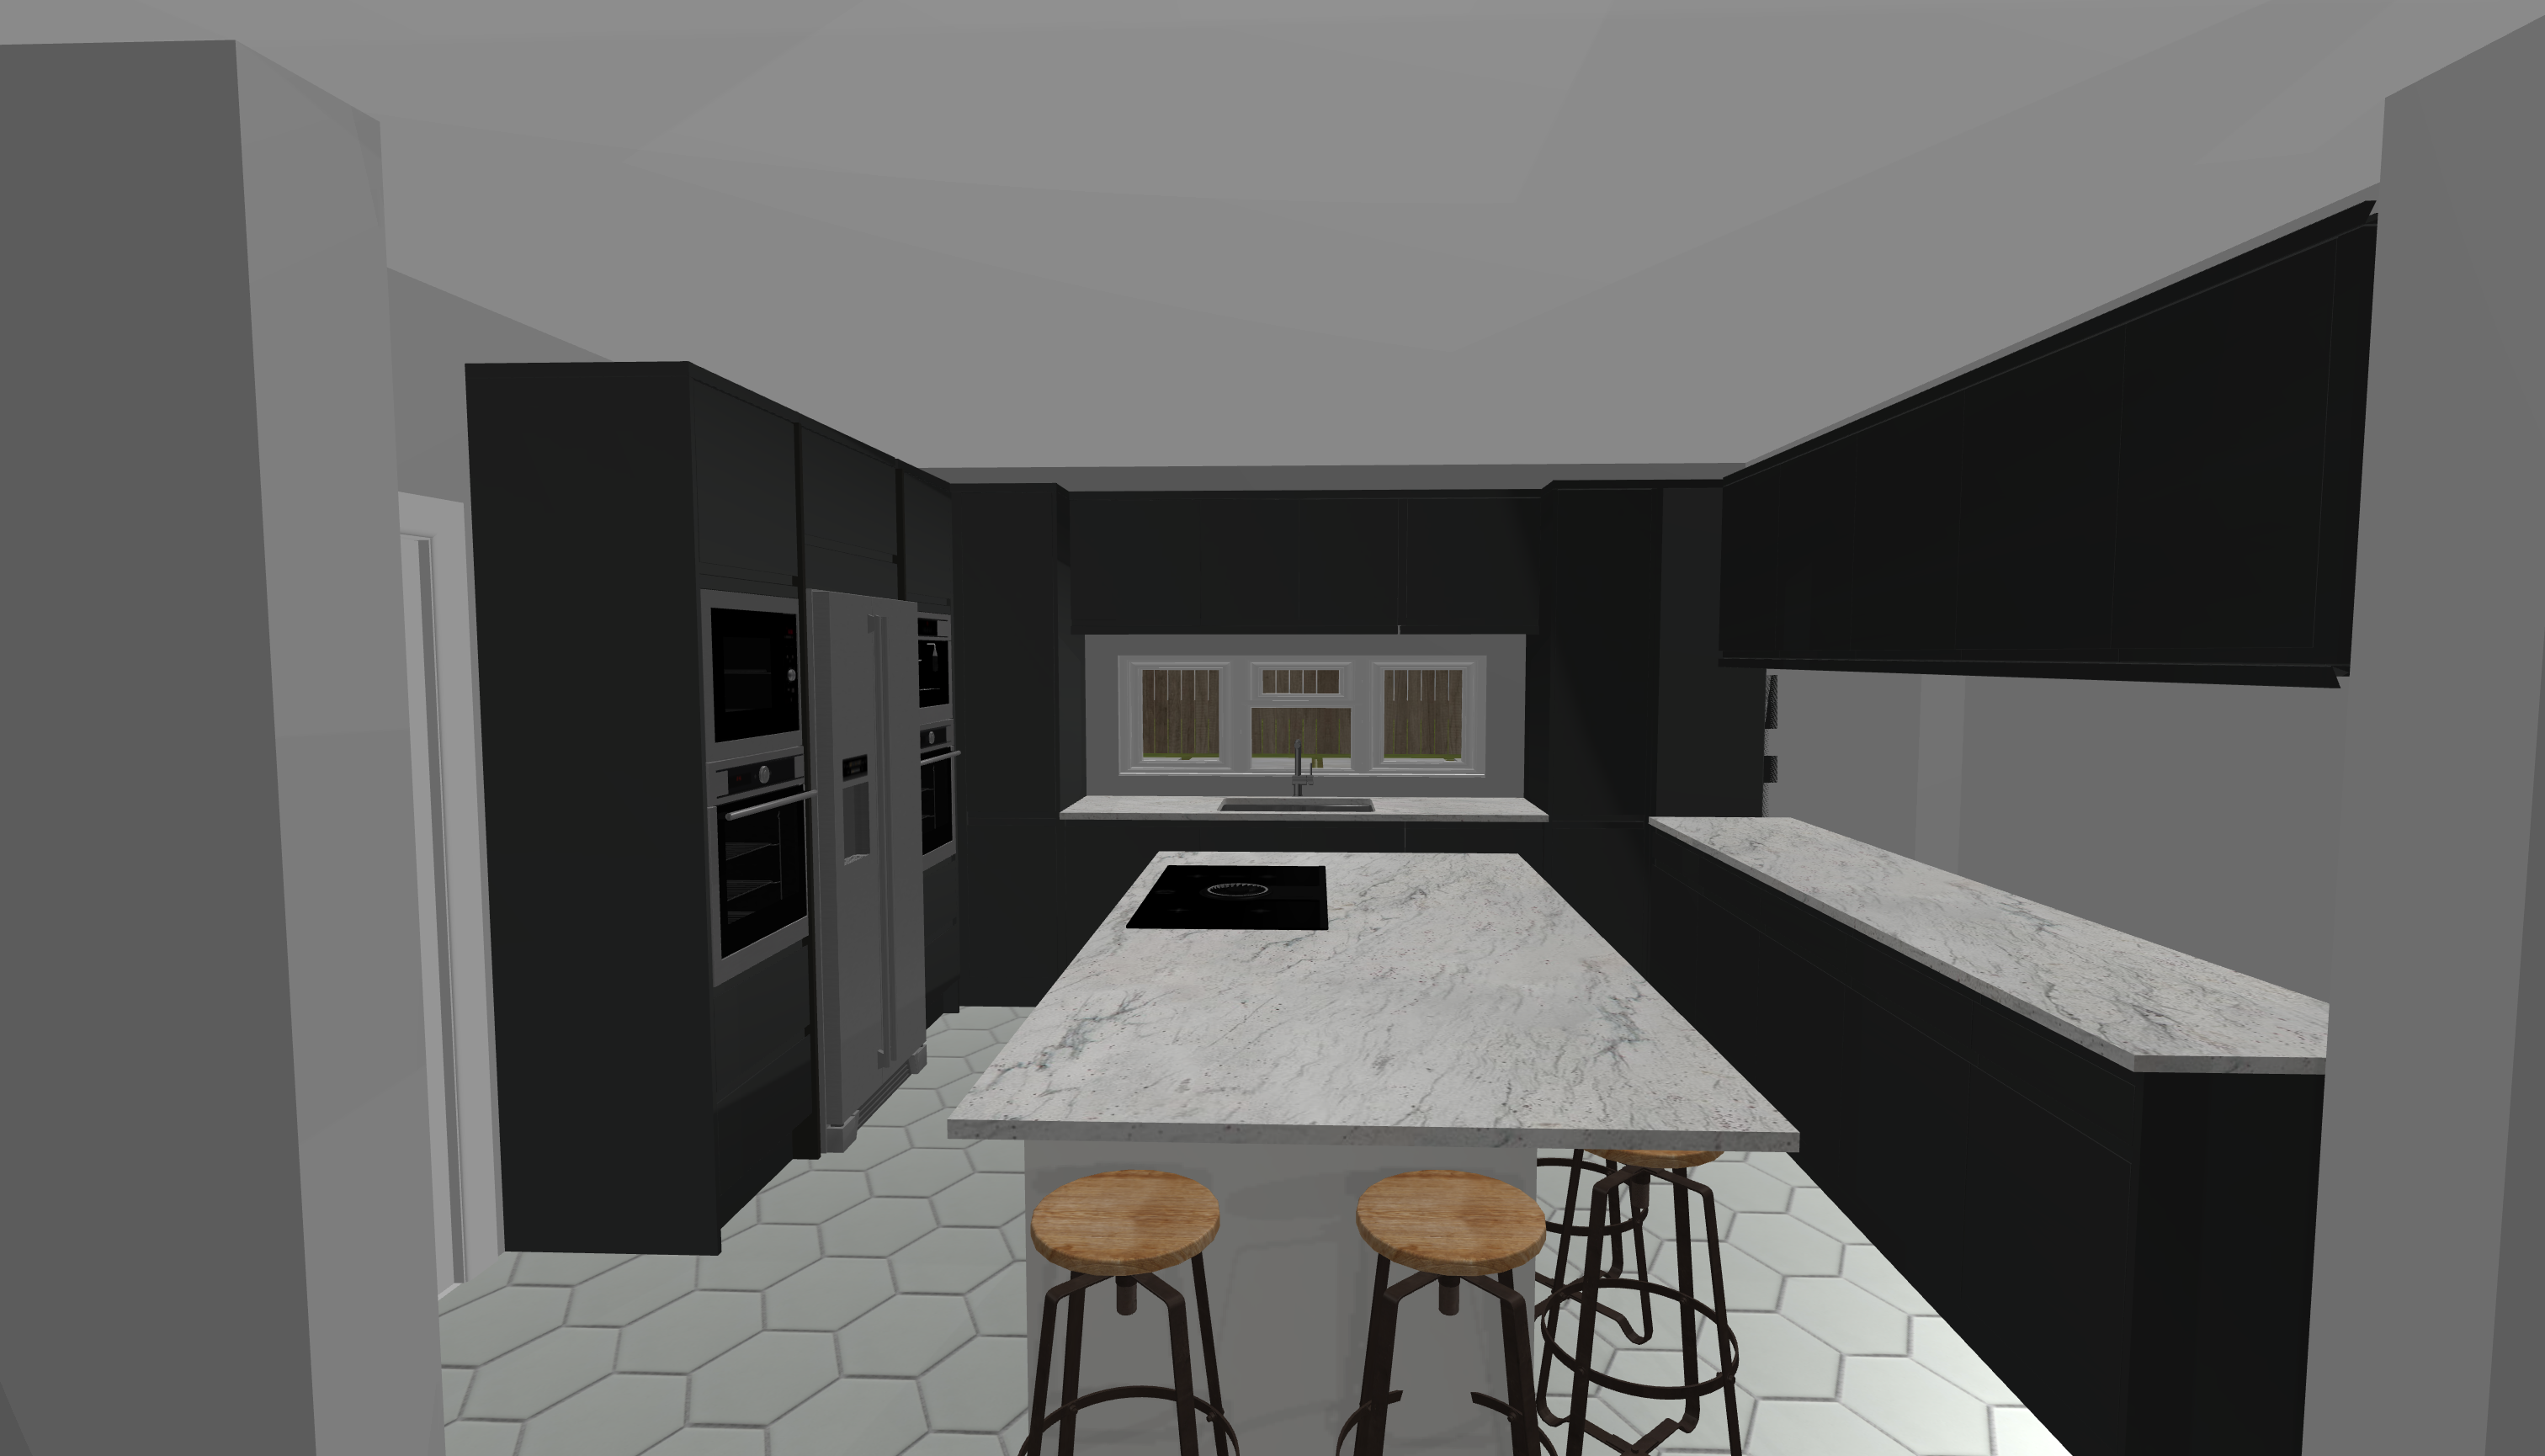
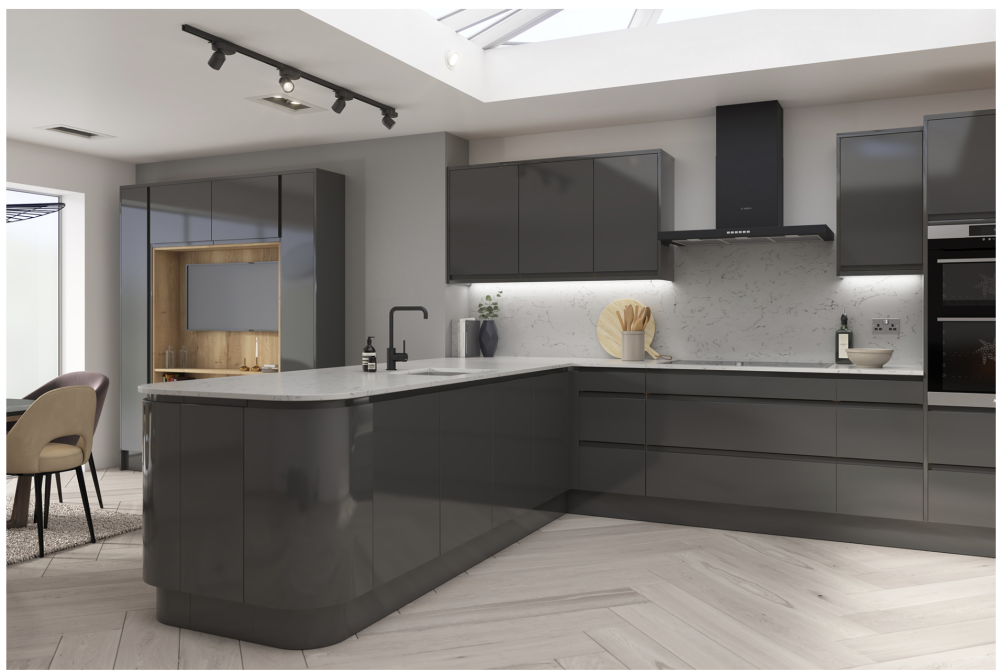
SWMBO loves cooking, she has gadgets that look more like WMDs to me! Drawers under the island at the hob side, cupboards at the opposite side. Dishwasher is to the right of the sink, bin cupboard to the left, so I hope that'll work nicely. The 4x appliances are 2x ovens 1x microwave and 1x coffee machine. Thinking of removing the tall unit on the left of the sink (right of the coffee machine) and leaving a little alcove there for the toaster/kettle. Then everything's in the same area.
-
Good point on the kettle/toaster, almost certainly on Wall A somewhere. There's pretty much 1m wide walkway from Wall A, past the sink to Wall C though. Would that be a problem?
-
Thanks. The units above the sink are reduced depth, and shorter to hopefully avoid that issue. I did try without but it looked pretty bare, we could potentially have some sort of "wall art" there instead? The visualisations aren't great, the units around the perimeter are meant to be Graphite and the island Dove Grey. Will take a look into changing the island worktop though. Perhaps a cheaper one around the perimeter and splash the cash on the island?
-
Used DIY Kitchens for our Utility room recently, plan to use them again for our Kitchen. The room itself is approx. 7.5x4.2m half of which is to be used as a day room; sofa, coffee table, tv etc. Garden is north-east as the plan is drawn, there are folding doors to the north-east corner of the room, between Wall A and D. I had also considered a peninsula coming off wall A, but I couldn't make it work; fitting in the hob and required units and it not being tight to get through the kitchen door. Feedback and thoughts most welcome!


-
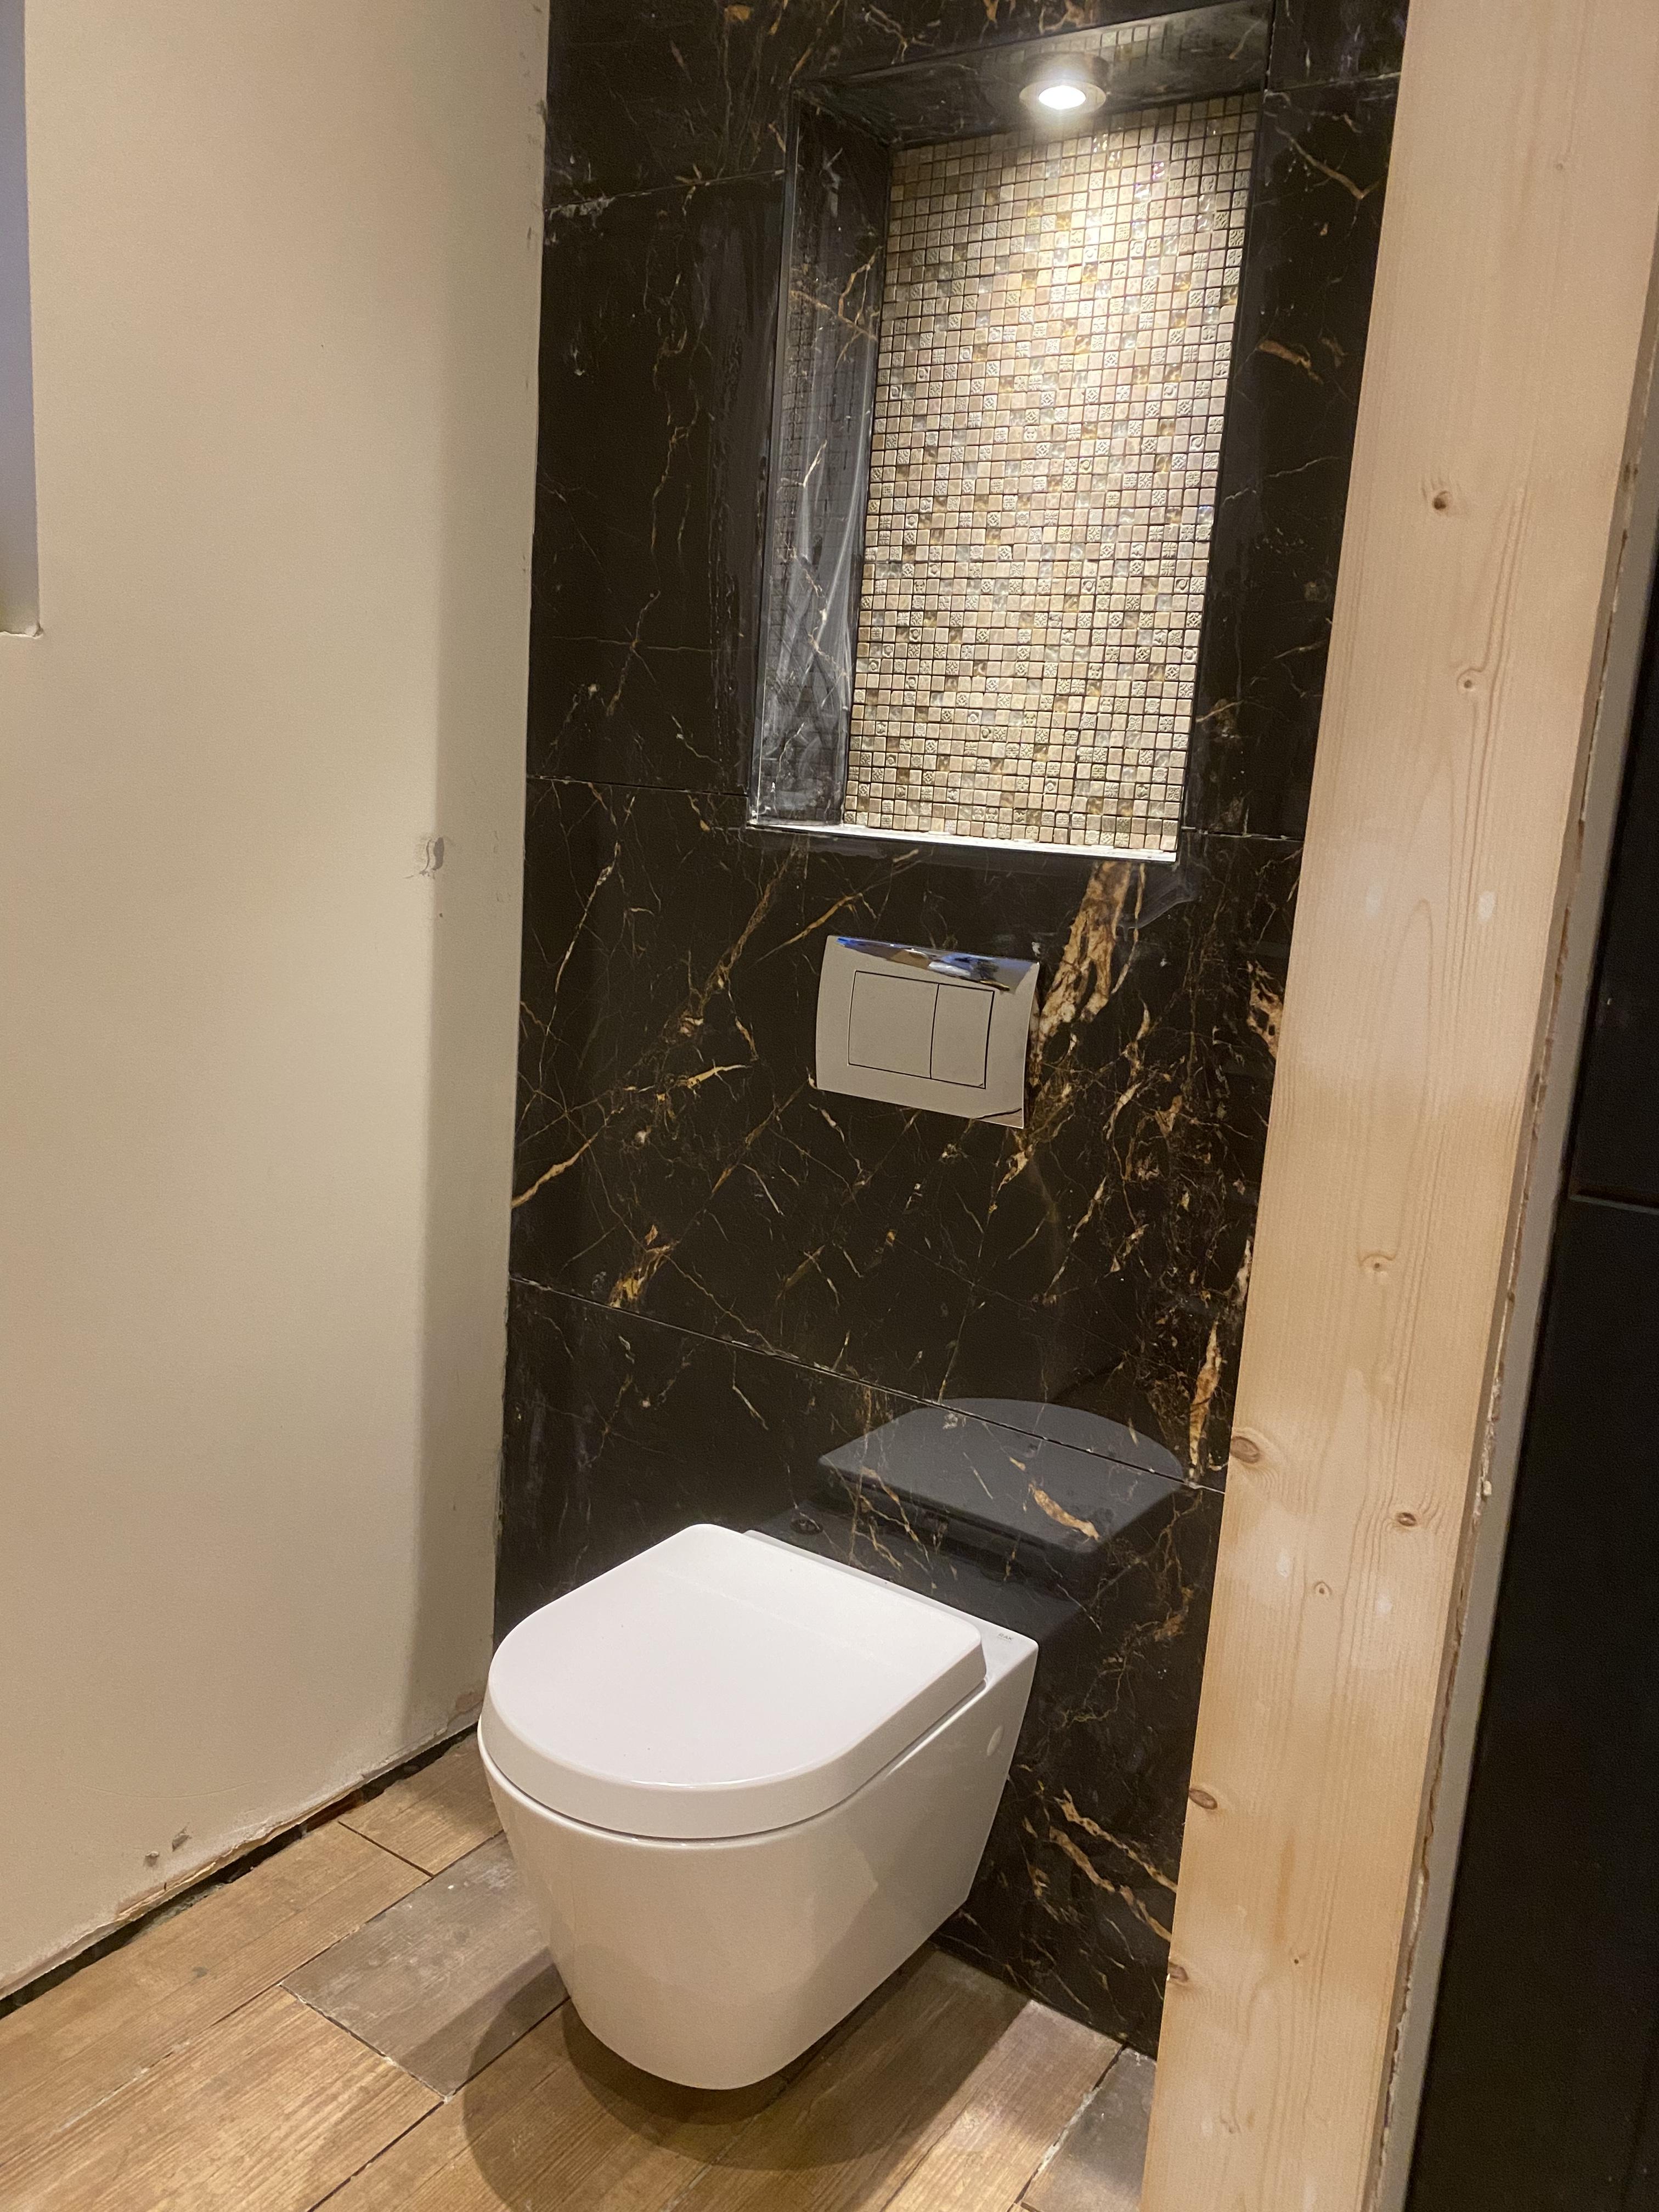
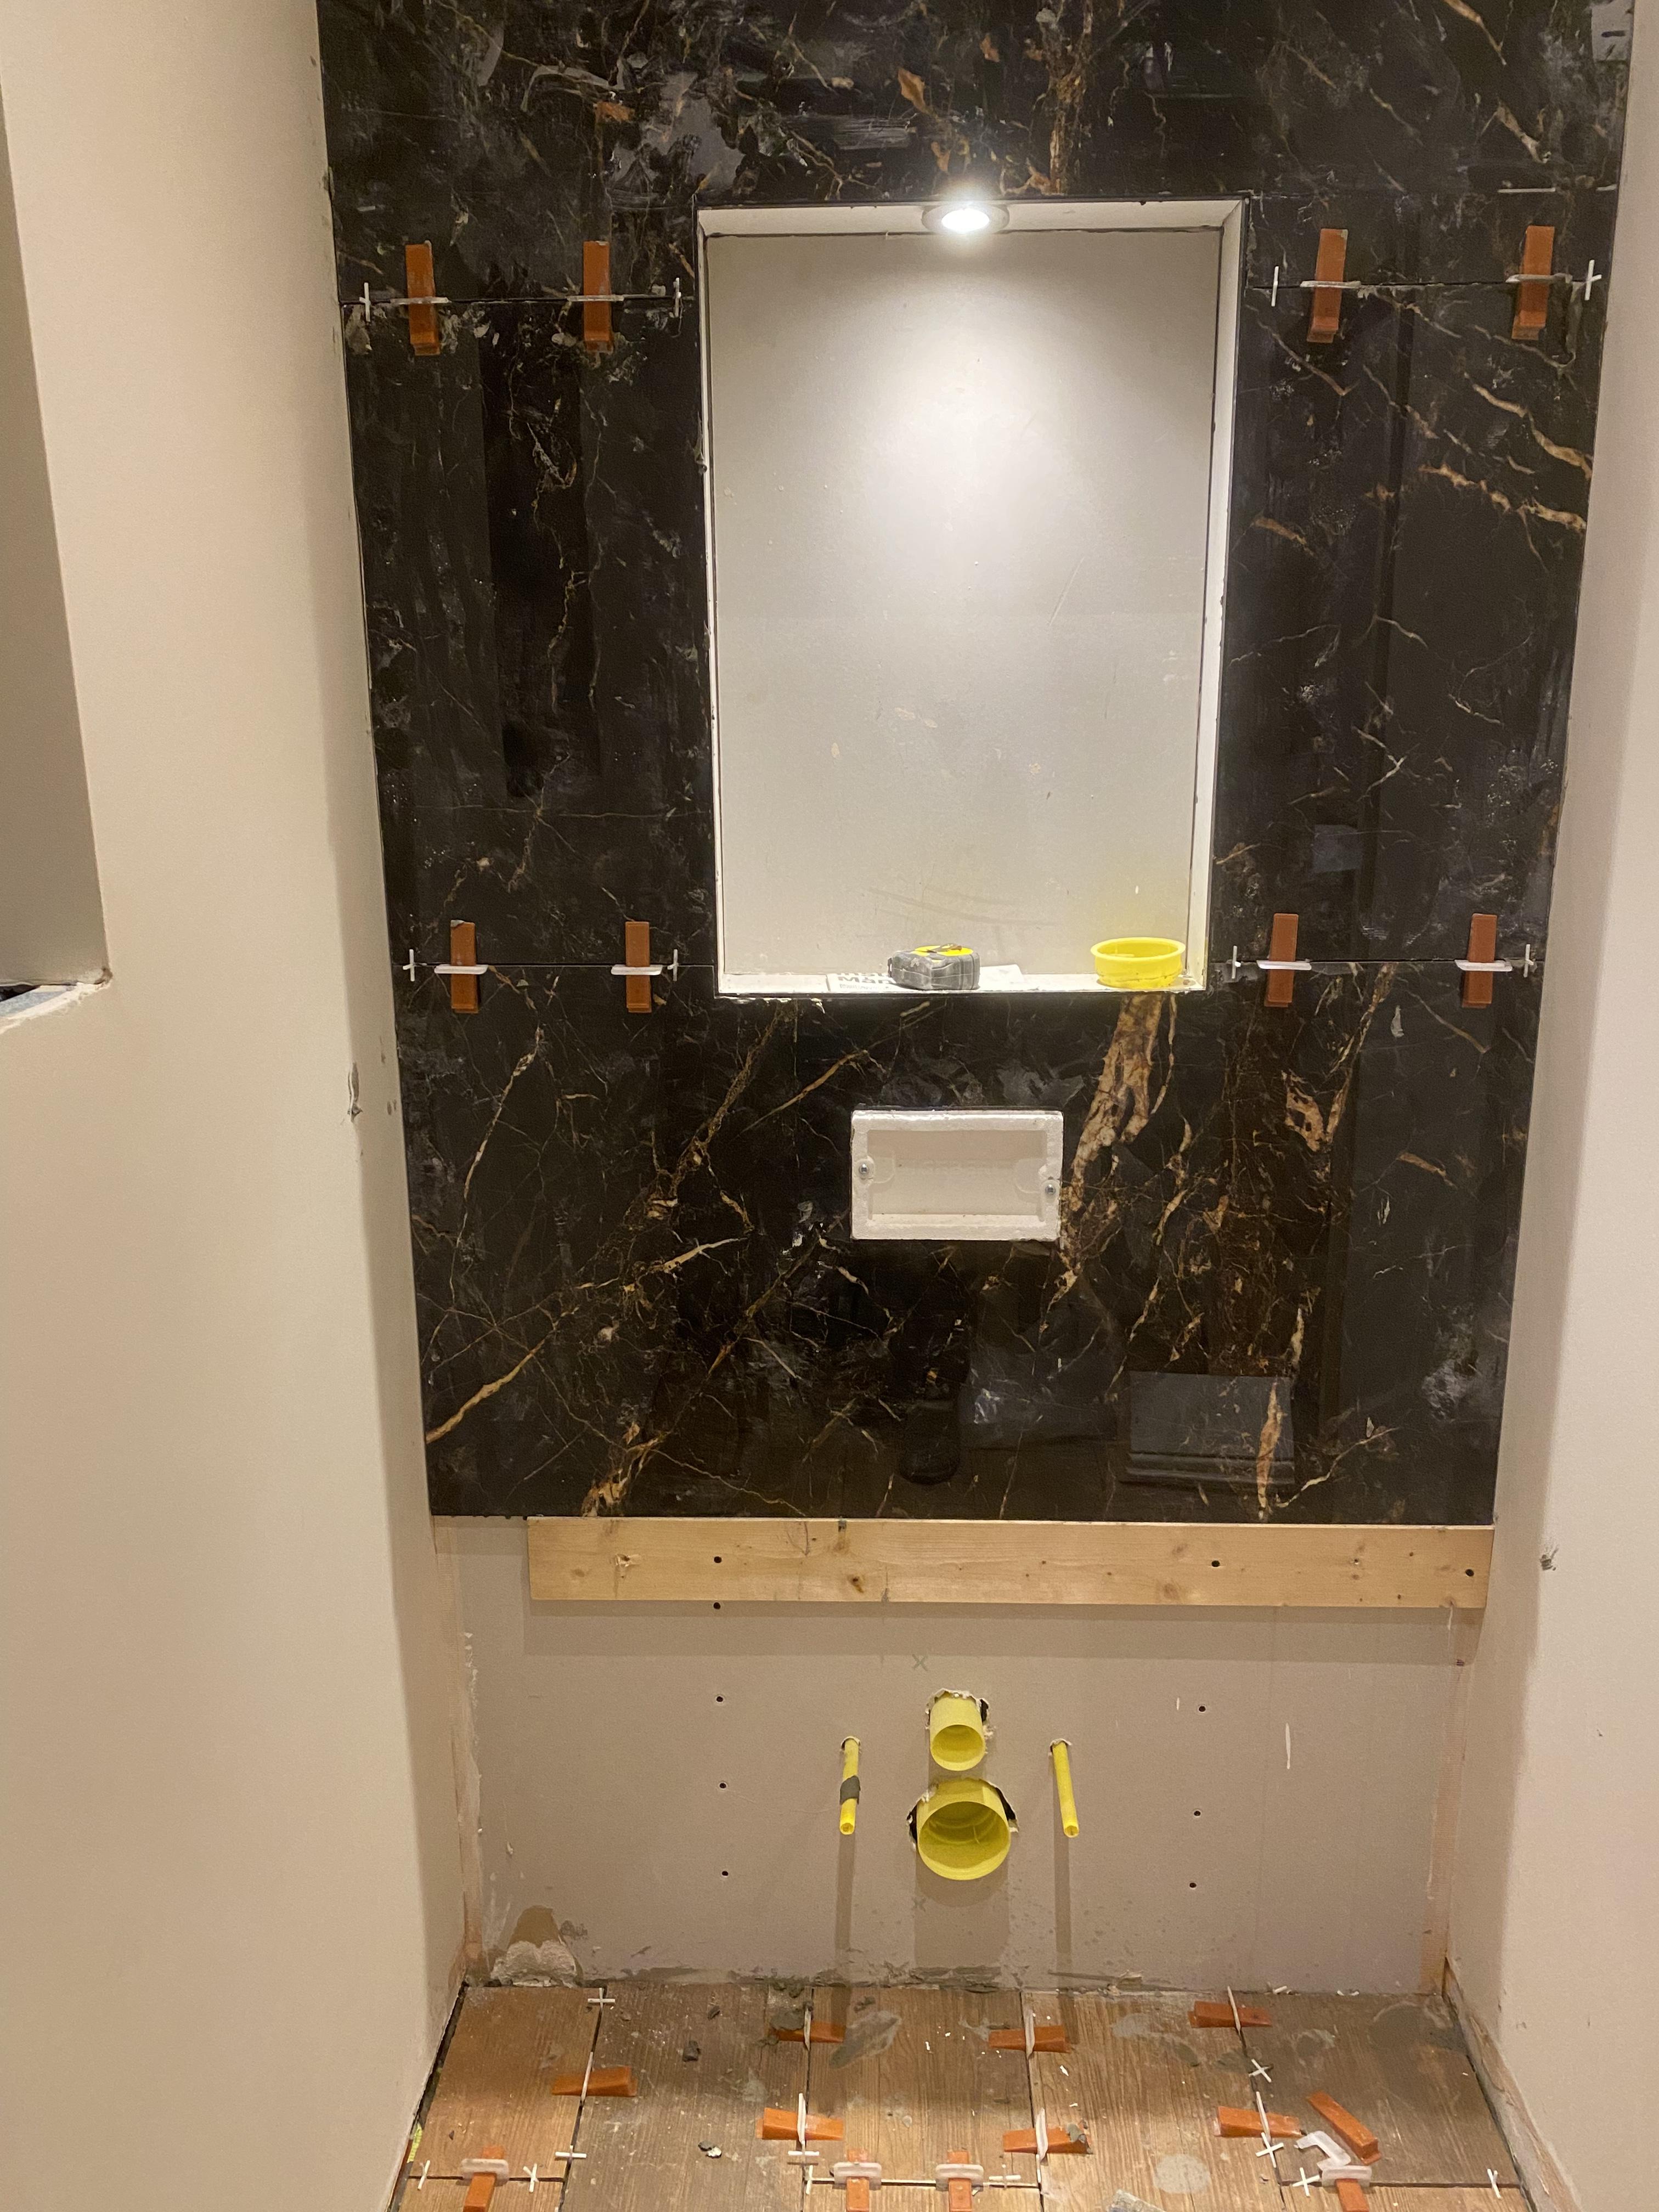
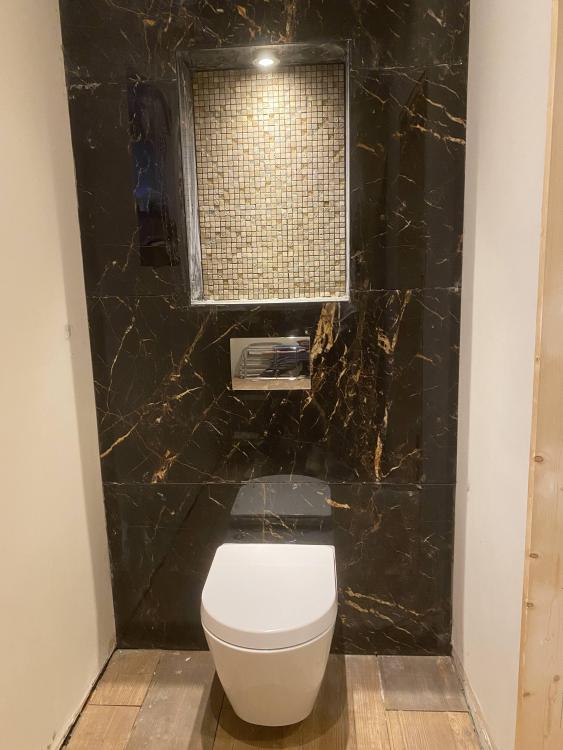
Thinking back now, I just carried the flooring on from the Utility in the next room, which has resulted in a full width tile on the right of the pan and a half width tile on the left. Ideally I'd have re-centred the tiles in the W/C so I had similar width cuts at both sides - like I did in the Utility room to begin with!. Hey ho.
-
Exactly what I was thinking. Surely they've just made removing the roof even harder.
-
Sorted. You can slightly see the cut above the pan so I should have squared the top like I did the bottom. Nothing a thicker bead of silicone won’t hide and I’ll know for next time!

-
Far too neat for something I’ll never see again 😂
-
Ordered a 70mm for the niche downlight. See how that turns out.
-
It’s on.

-
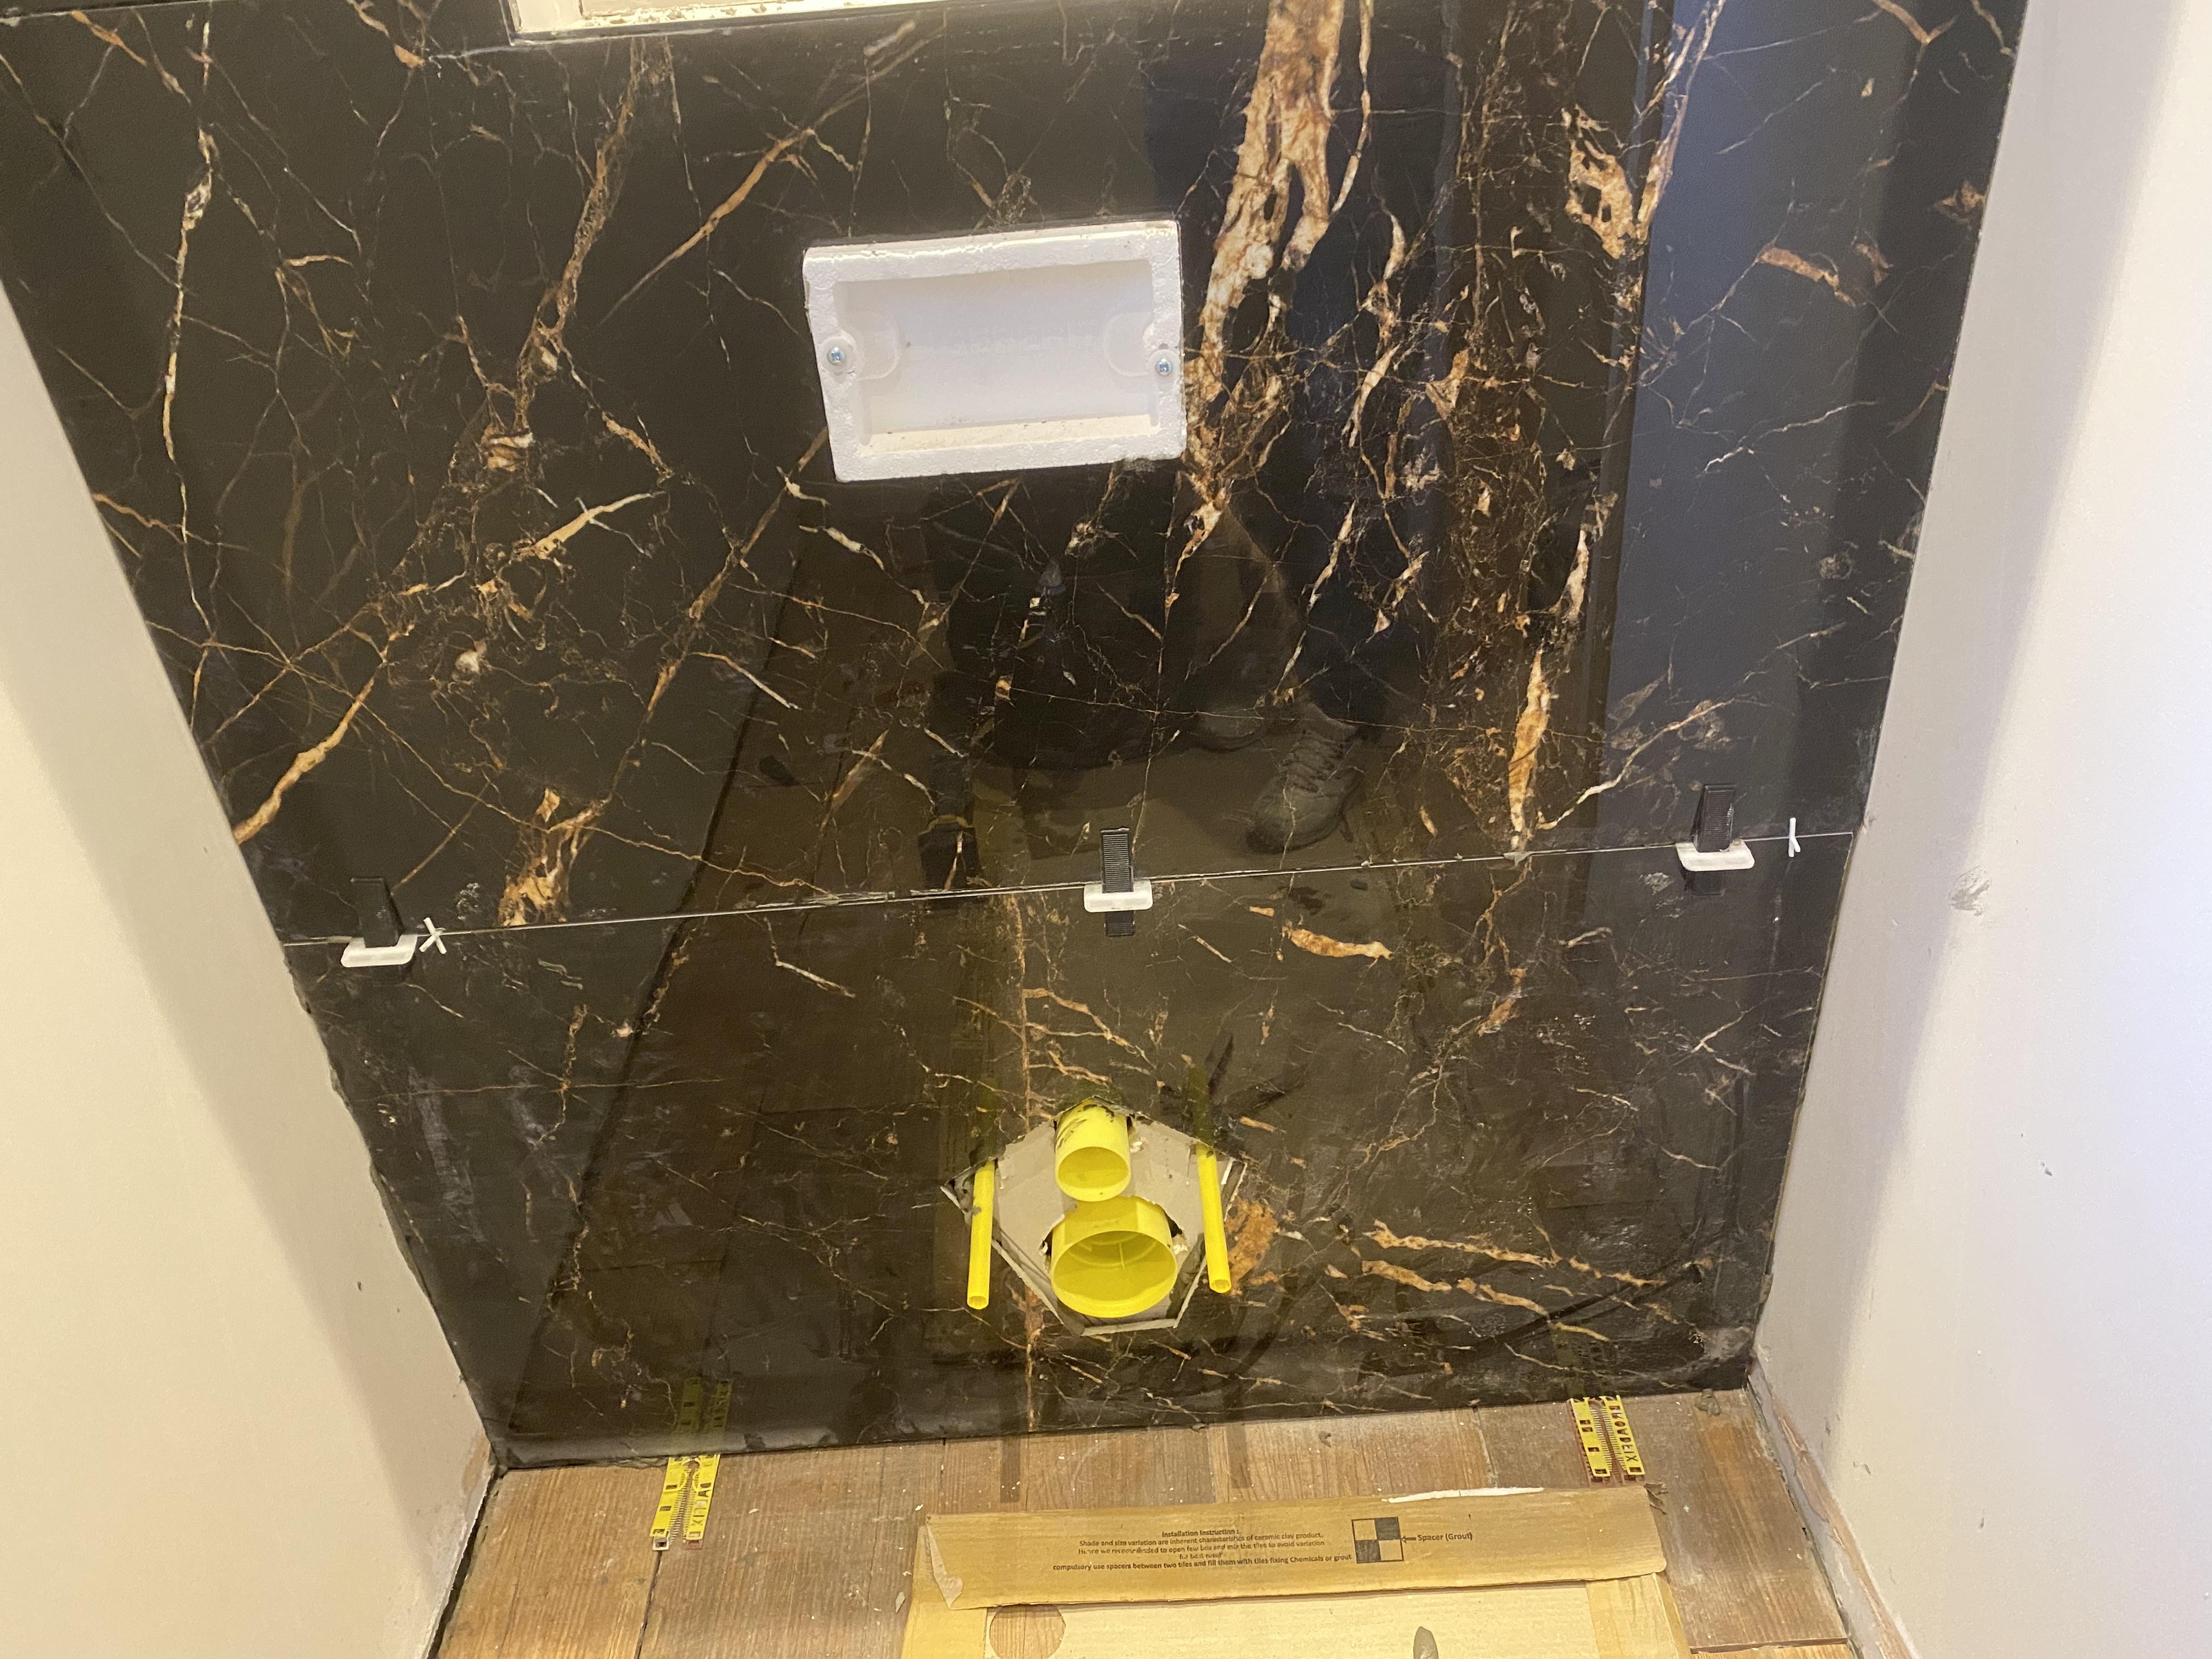
Running behind as ever, but today’s the day. I plan to; - make sure the pan fits (I.e the rods are in the right holes - draw a diamond on the plasterboard using the protrusions as a guide - take the measurements of the 4x diamond points and transfer them to my tile - connect the dots and turn the grinder on. wish me luck…
-
On the subject of farmers, I borrow a tele handler of a local one for odd jobs; fixing the chimney etc. I was speaking with him about renovating our bathroom; knocking the old tiles and plaster off, ceilings down etc. He said I should have brought it all round to him and he'd have used it as hardcore!
-
I worked at a caravan dealer, washing the vans on weekends for a bit of cash. All their bangers (£1000 and under, i.e. the ones Joe Public wouldn't touch) would get sold to highway construction workers in bulk. They were for the workers to live in whilst working on new roads and when they were coming to the end of the job, they'd get flattened and dumped under said road. Apparently there's a fair few under the M18...
-
I saw them and thought "Nah, must be crap" 🤣
-
I haven't tried yet, but I'd transcribe the protrusions onto the back of the tile, using the tiling protectors as templates to get the circles the correct diameter, just like you would when boarding the frame in. Then use a straight end to draw a diamond encasing those outlines. Cut along the diamond lines. Sounds pretty simple in theory, I'll let you know how I get on tomorrow
-
Pretty smart and better than the butchery I was about to attempt. Presumably just measured the 4 corners and joined the dots? I'll give it a whirl.
-
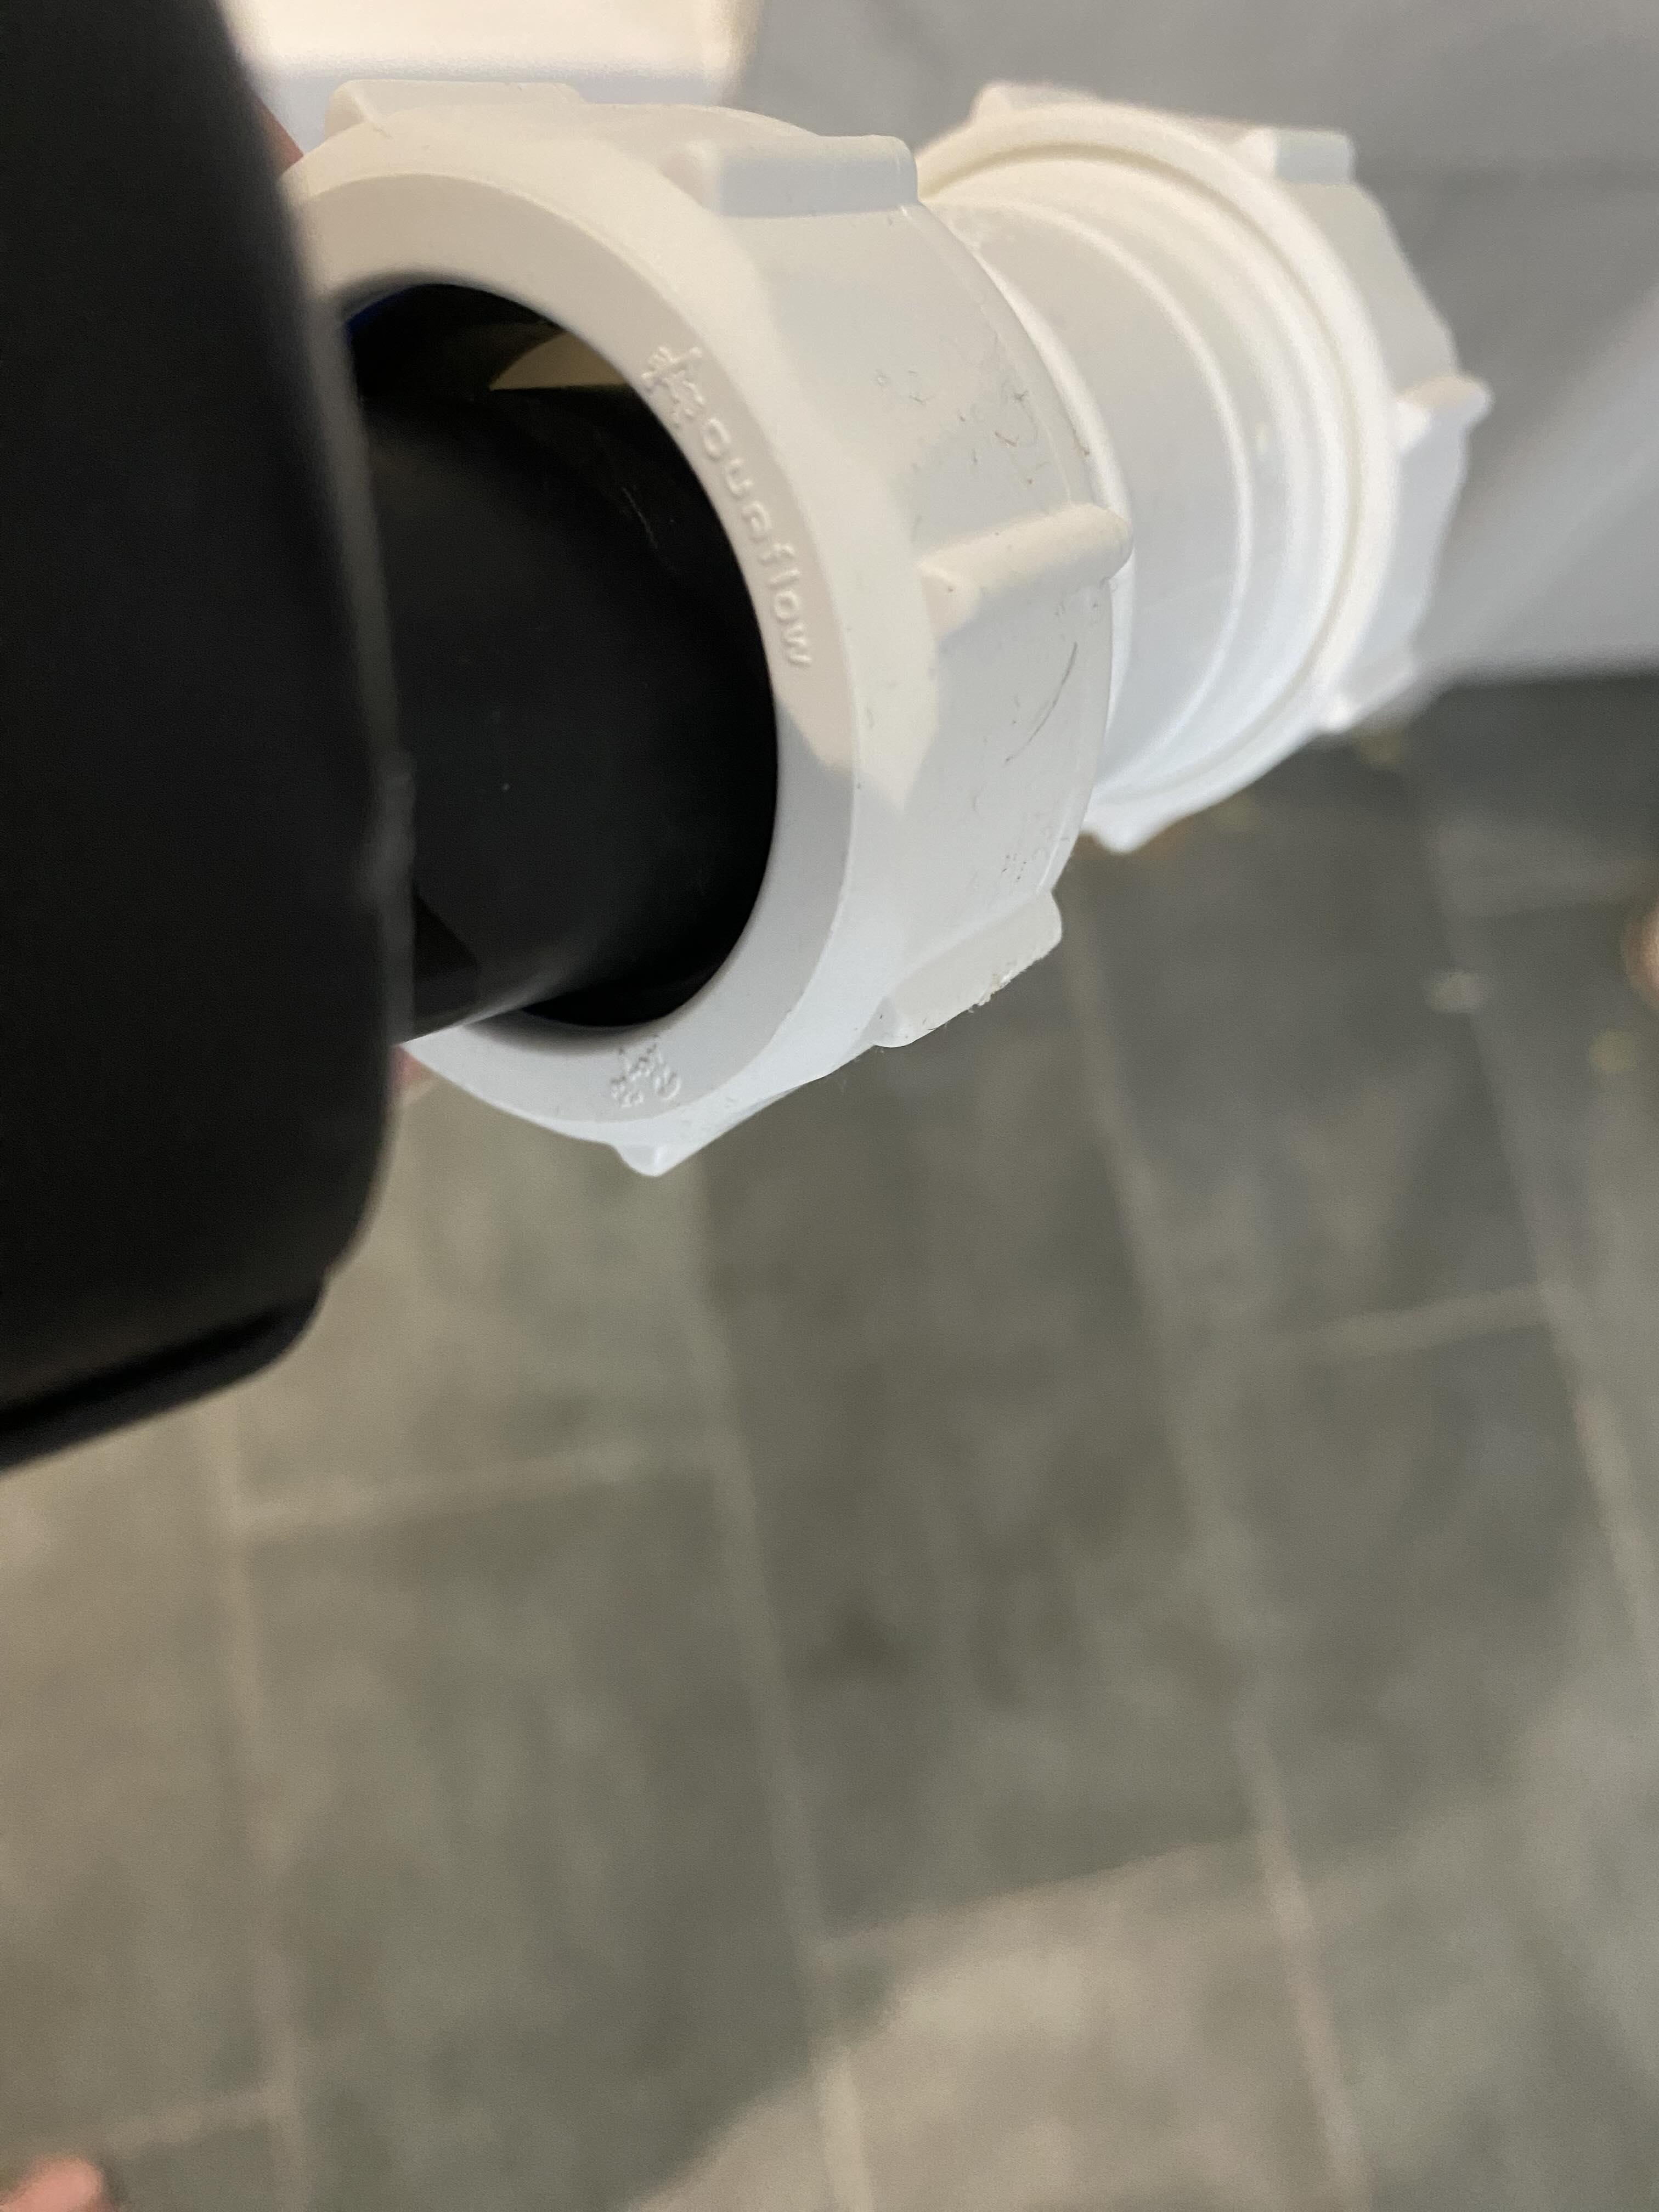
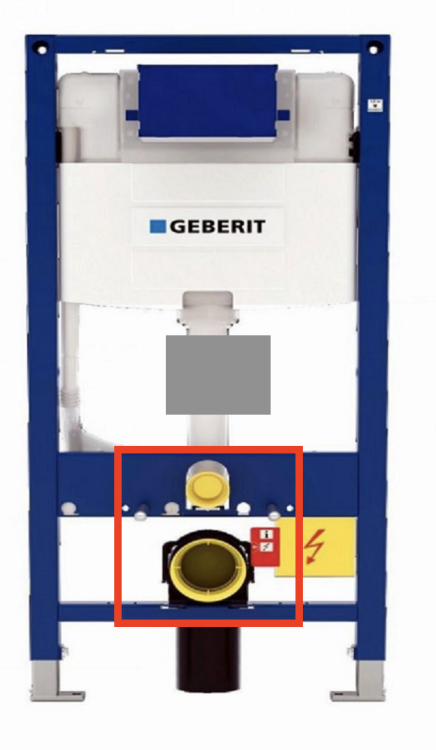
Brink Flair condensate drain
jayc89 replied to jayc89's topic in Mechanical Ventilation with Heat Recovery (MVHR)
Turns out 32mm in the user manual != 32mm compression fitting. Anyone know what I should be using for a Brink Flair 325 drain connection?
-
Something like this?
-
Sounds like a sure fire way for me to ruin a tile Thanks, I'll give it a go later on. Wish me luck...
-
Argh, they're porcelain - https://tilesparadiseuk.com/products/rich-black-gold-high-gloss-porcelain-60x120cm-kitchen-bathroom-wall-floor-tiles?_pos=1&_psq=Black+and+gold+wall&_ss=e&_v=1.0. I have a 115mm tile cutter disc that I've been using to cut some ceramic floor tiles, can I get away with using that for the 120mm hole and nibbing the 68mm one?
-
Need a set of tile hole cutters to make the holes required for a wall hung W/C and concealed bath/shower valves (25mm, 68mm and 120mm - or there abouts). Can't seem to find a kit that includes all 3x sizes. I'll only need to cut a couple of holes per bit then I'll flog them - any recommendations as to what hole cutters I should go for?
-
Brink Flair condensate drain
jayc89 replied to jayc89's topic in Mechanical Ventilation with Heat Recovery (MVHR)
Something like this - https://www.ac-one.co.uk/macvalve-dry-trap-1-14-32mm-13934-p.asp ? -
My Brink Flair 325 has a 32mm condensation drain connector, I only ran a 21.5mm drain up for it (before I knew which unit I would end up)... What's the best way to reduce the 32mm Brink connection down to a 21.5mm solvent weld one?
-
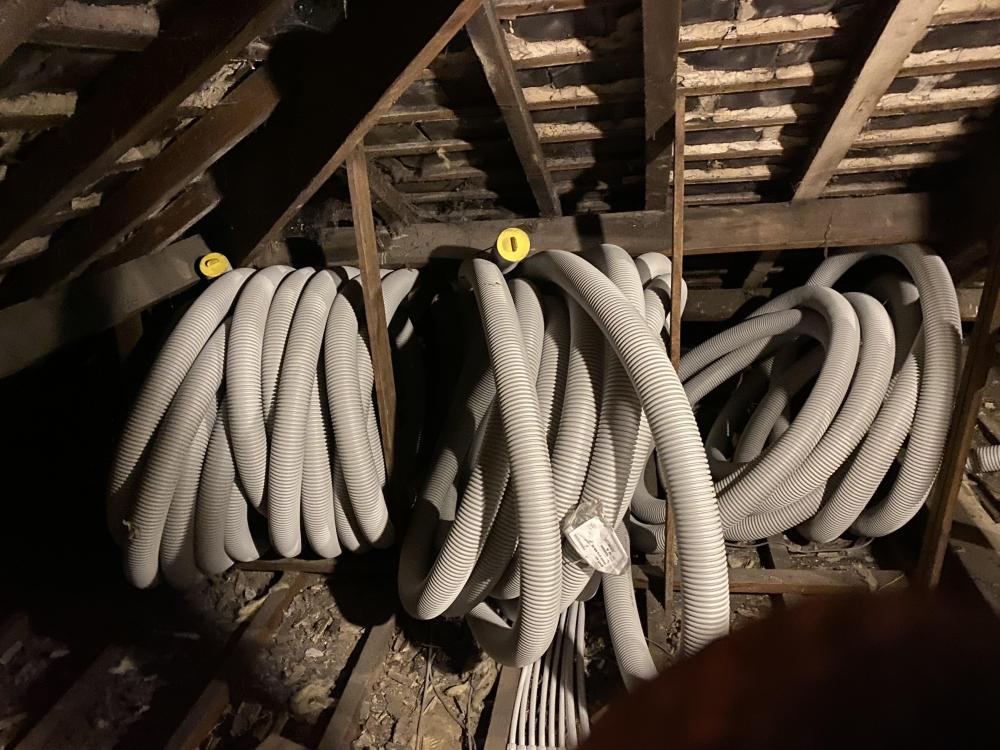
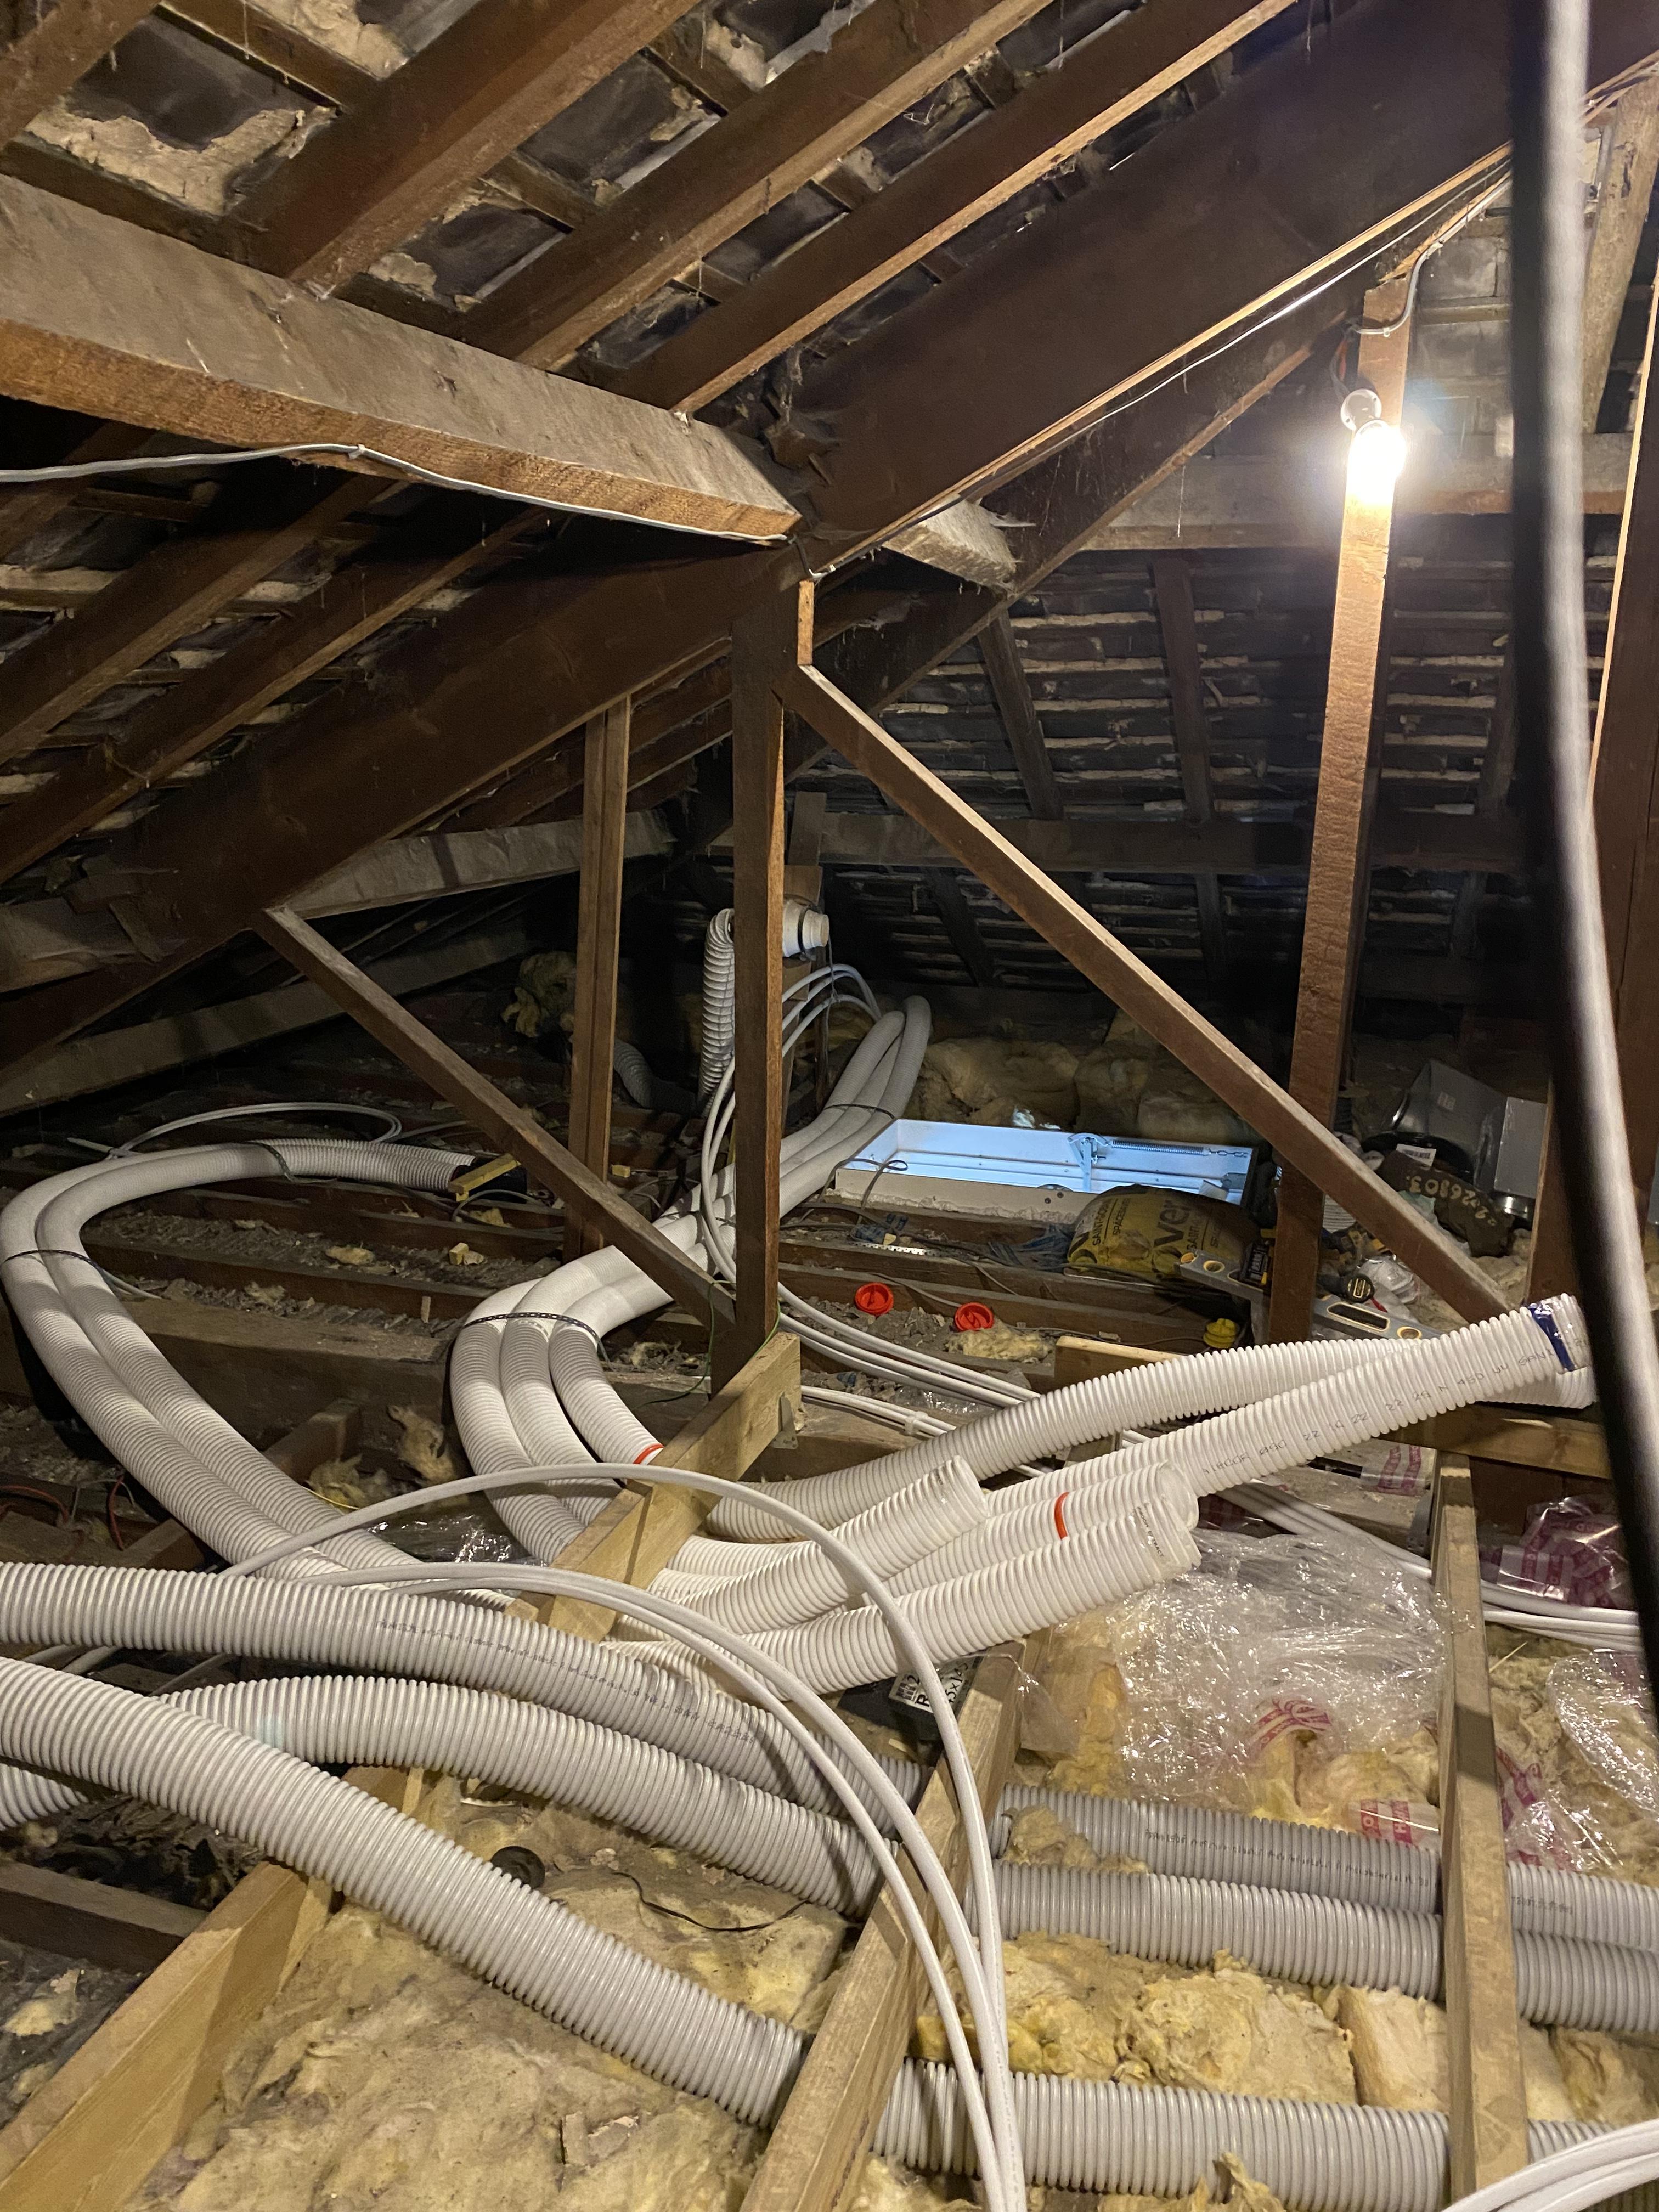
Taming the uncoiled ducting beast
jayc89 replied to jayc89's topic in Mechanical Ventilation with Heat Recovery (MVHR)
that’s what I did for the first set of runs (white pipe) as they were pulled in whilst that side of the house was back to brick and opened up to the world anyway. But the opposite side (where I’m running the grey pipes) we’re currently living in so it was less of an option to strip it all back and pull it in as you suggest (as it would have been much easier.
-
Taming the uncoiled ducting beast
jayc89 replied to jayc89's topic in Mechanical Ventilation with Heat Recovery (MVHR)
Bloody things