Jump to content
  • entries
    4
  • comments
    202
  • views
    2537

Fitting of new windows in EWI layer using EWI brackets


oranjeboom

6489 views

Original house contained cheap UPVC windows that were ill fitted and would not match the new windows in the two extensions. So the decision was made to fit new windows throughout with the original plan to go for alu-clad wooden, nut resorted to UPVC due to cost and worries on how some of the alu-clad windows were constructed.  Surprising how difficult it was to get quotes that were in an affordable category. Some companies needed numerous follow-up calls which was very frustrating in view of the fact that I would be spending approx £20k on their product. In the end, although I would have preferred to buy local, I ended up sourcing windows from abroad which ended up costing a lot less than anything UK-sourced and also meant they were passivhaus certified! Pity how many sectors in the UK shoot themselves in the foot by atrocious service which is partly down to them not wanting to deal with end clients/self-builders.


There was a lot of email ping-pong, but I think that would have been the case with UK windows too, but they were at least keen to do business which didn't seem to be the case with many of the UK ones. The only area I was hesitant about was measuring the window openings which was further complicated by the fact that I was using special EWI brackets which would position the windows outside of the window opening itself. So I had to take into account the bracket measurements in addition to the window openings. I must have measured each opening at least 15 times before submitting my final order. Glad to say everything seems to fit (just 3 doors to fit now).


Unloading some of the units was a bit precarious especially the 800kg 4.6x 2.3m slider using a standard forklift and then travelling 200m down the road! I got a local window company to help me fit the windows and of course they had no clue how to fit them with the EWI brackets. It took a while for them to admit that the client knew best in this case as he'd actually read the bloody instructions. Means I'll have to rectify their first window later on. 


External view:


IMG_1151.thumb.JPG.fb780c65d4479f13b3f38697e02d63e2.JPG


IMG_1157.thumb.JPG.ff36ad5970d6015b208aa43c72f2c024.JPG


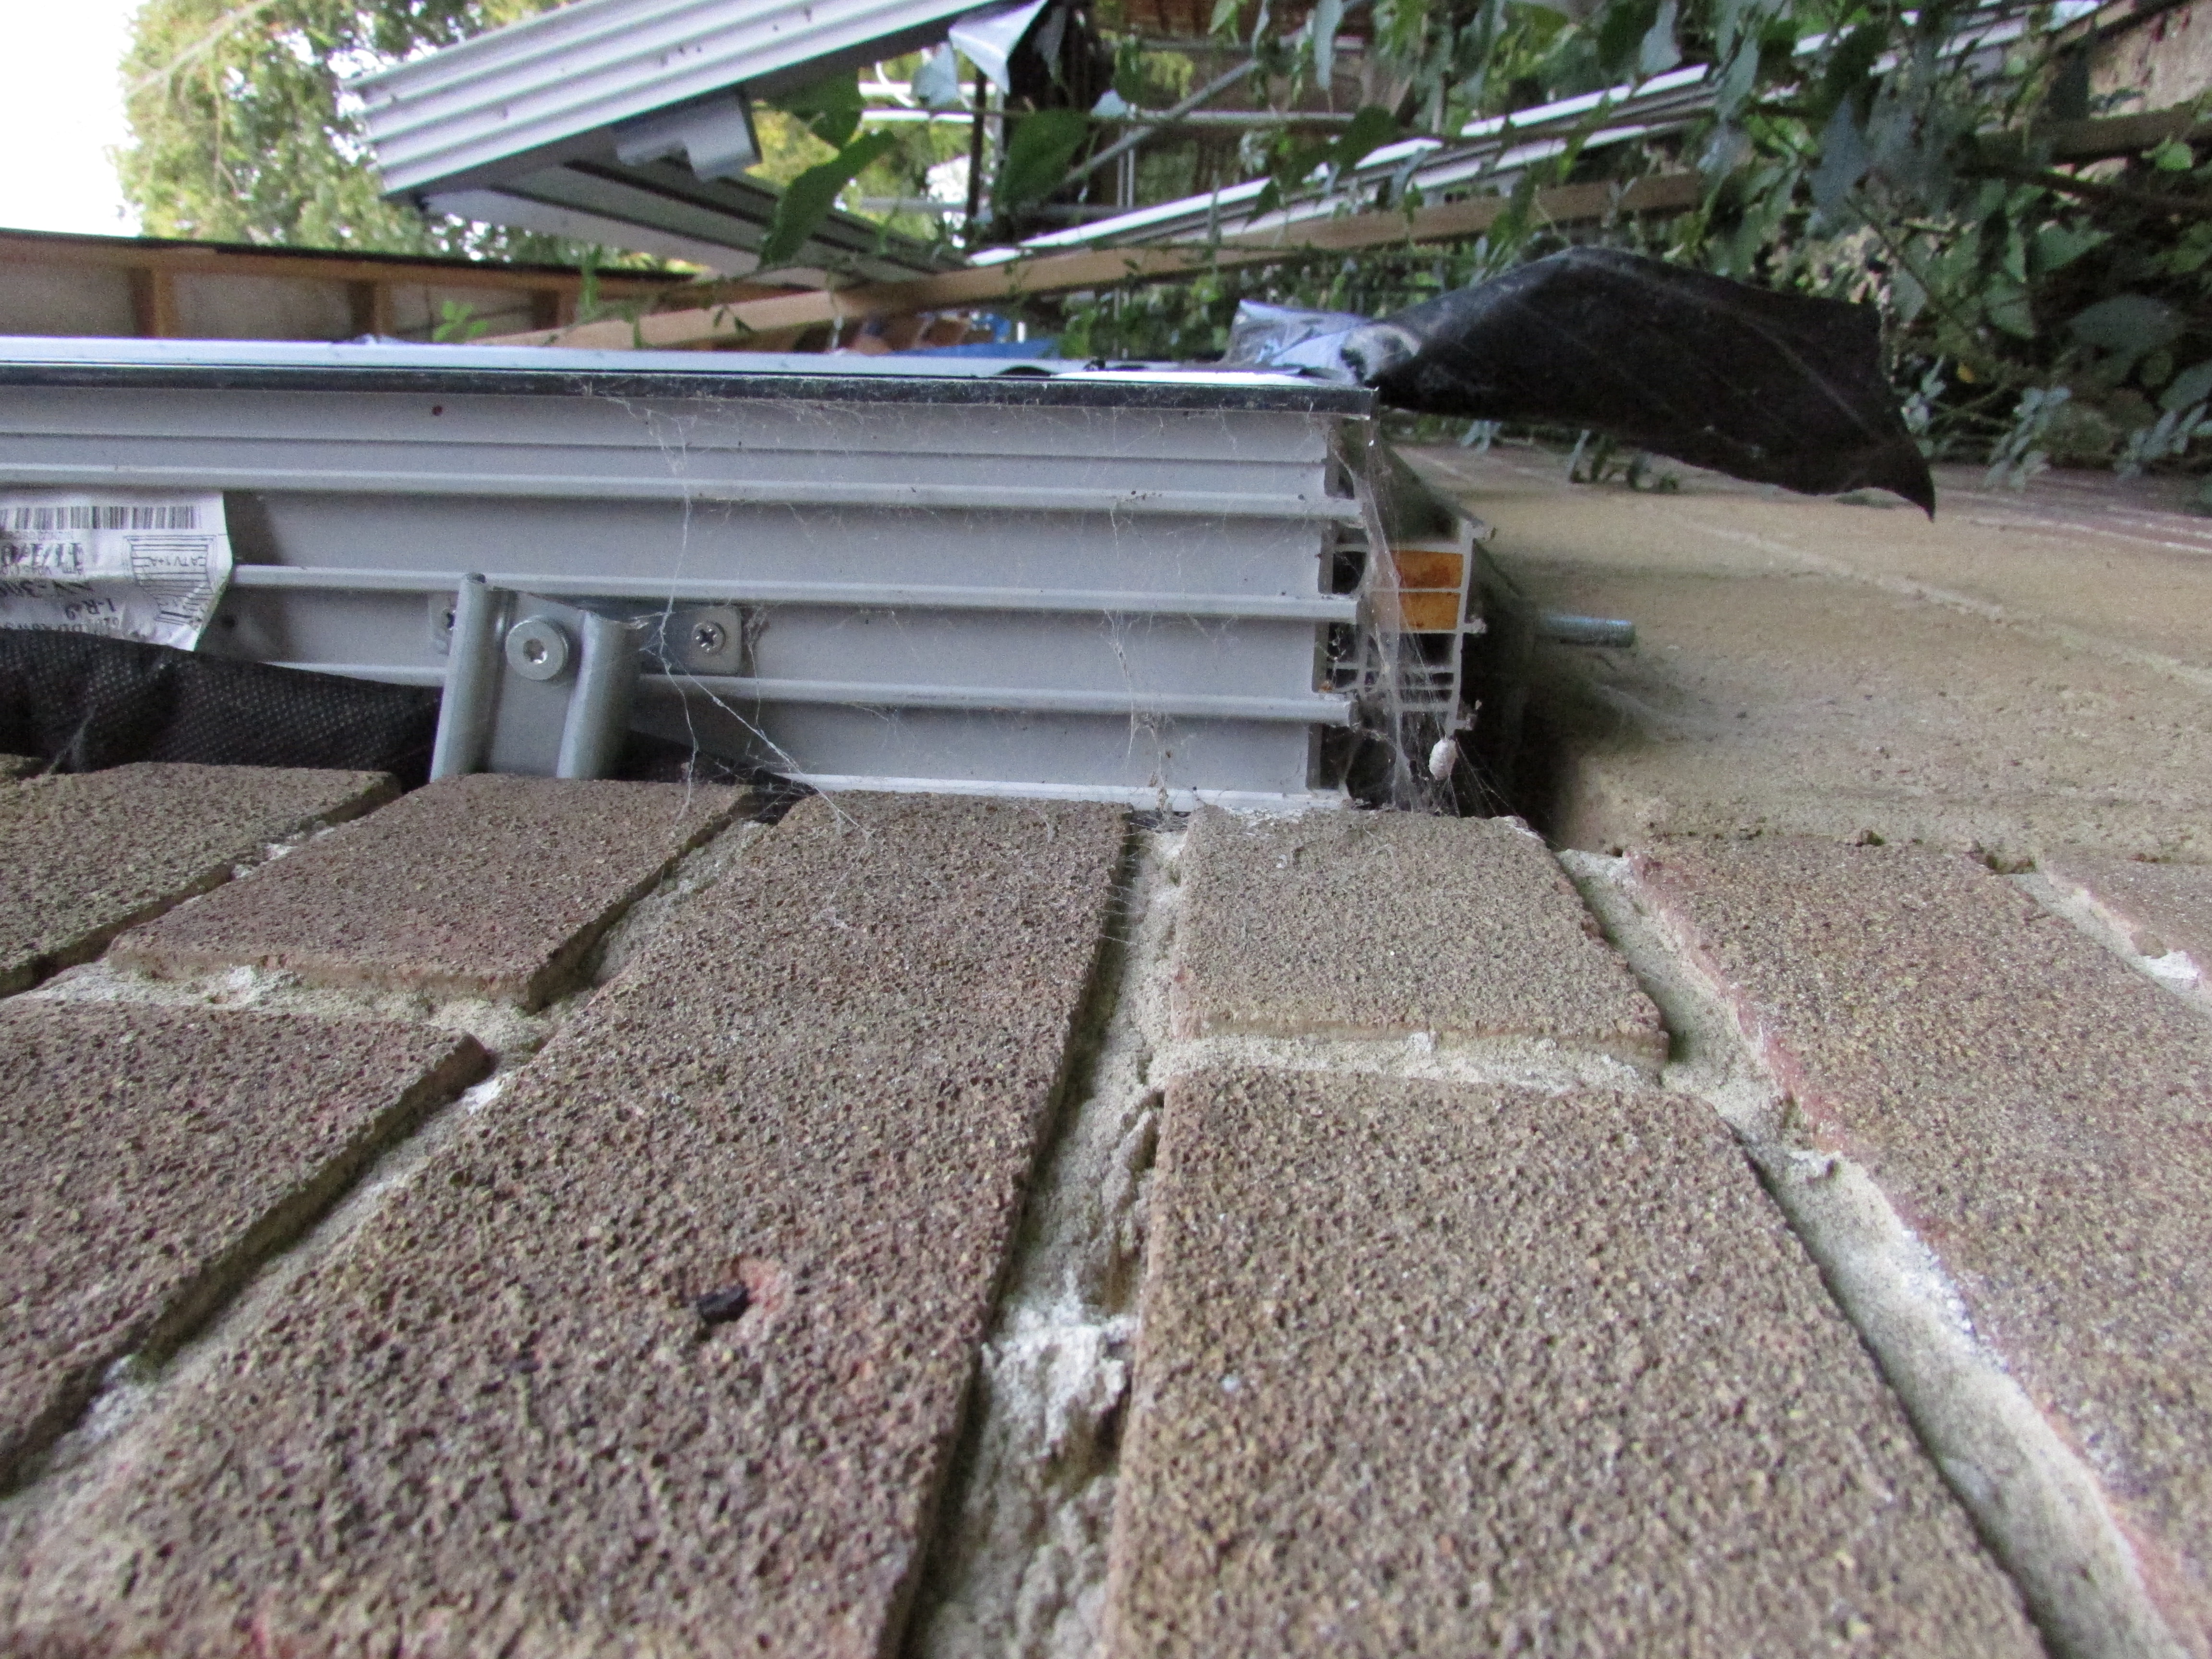
Next stage on the exterior, is to EWI all walls with circa 100mm insulation. Note the brackets above (this is the first window and the bottom bracket aren't fitted correctly, so will need to be fixed before EWI). The brackets will cause minimal thermal bridging at least and certainly be better than having a timber frame constructed all round the window frame. The external aluminium cills (sourced from Germany, cheaper and thicker than UK suppliers) will fix onto that bottom mini (grey) cill at the bottom.


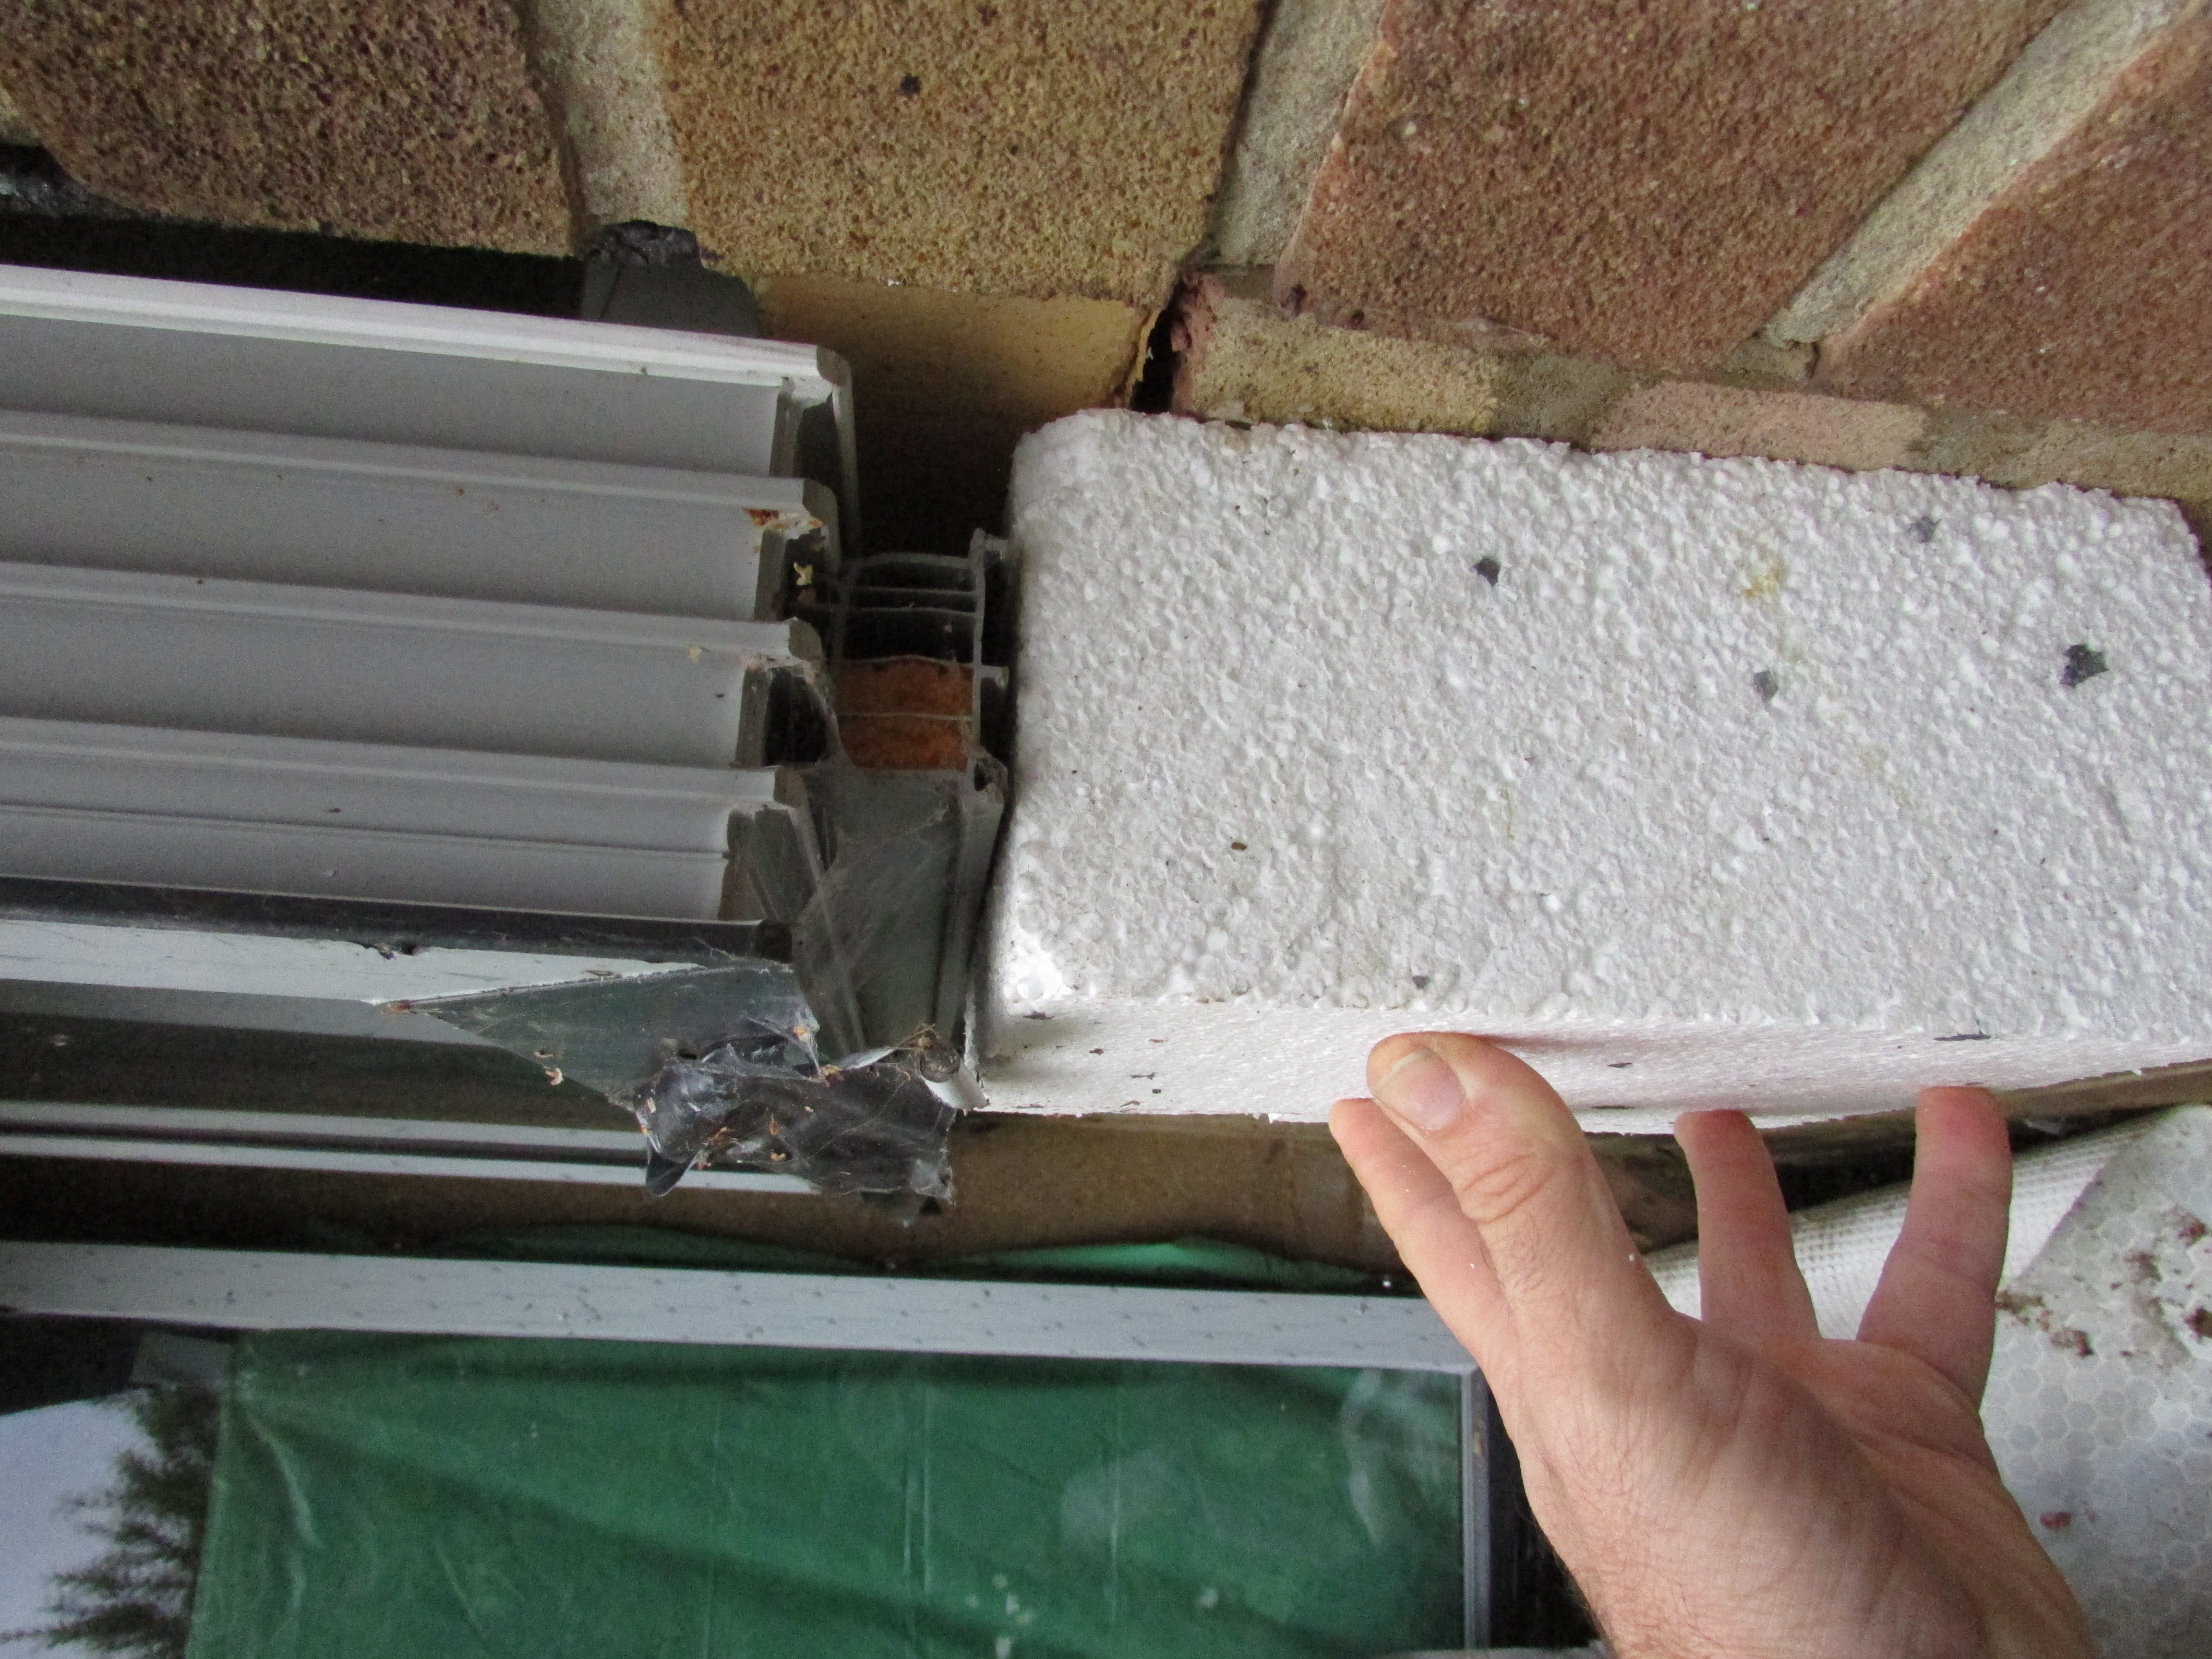
EWI will tuck in under frame (well all sides of frame of course):


IMG_1154.thumb.JPG.e368447e44319ac0096b59066e81fc77.JPG


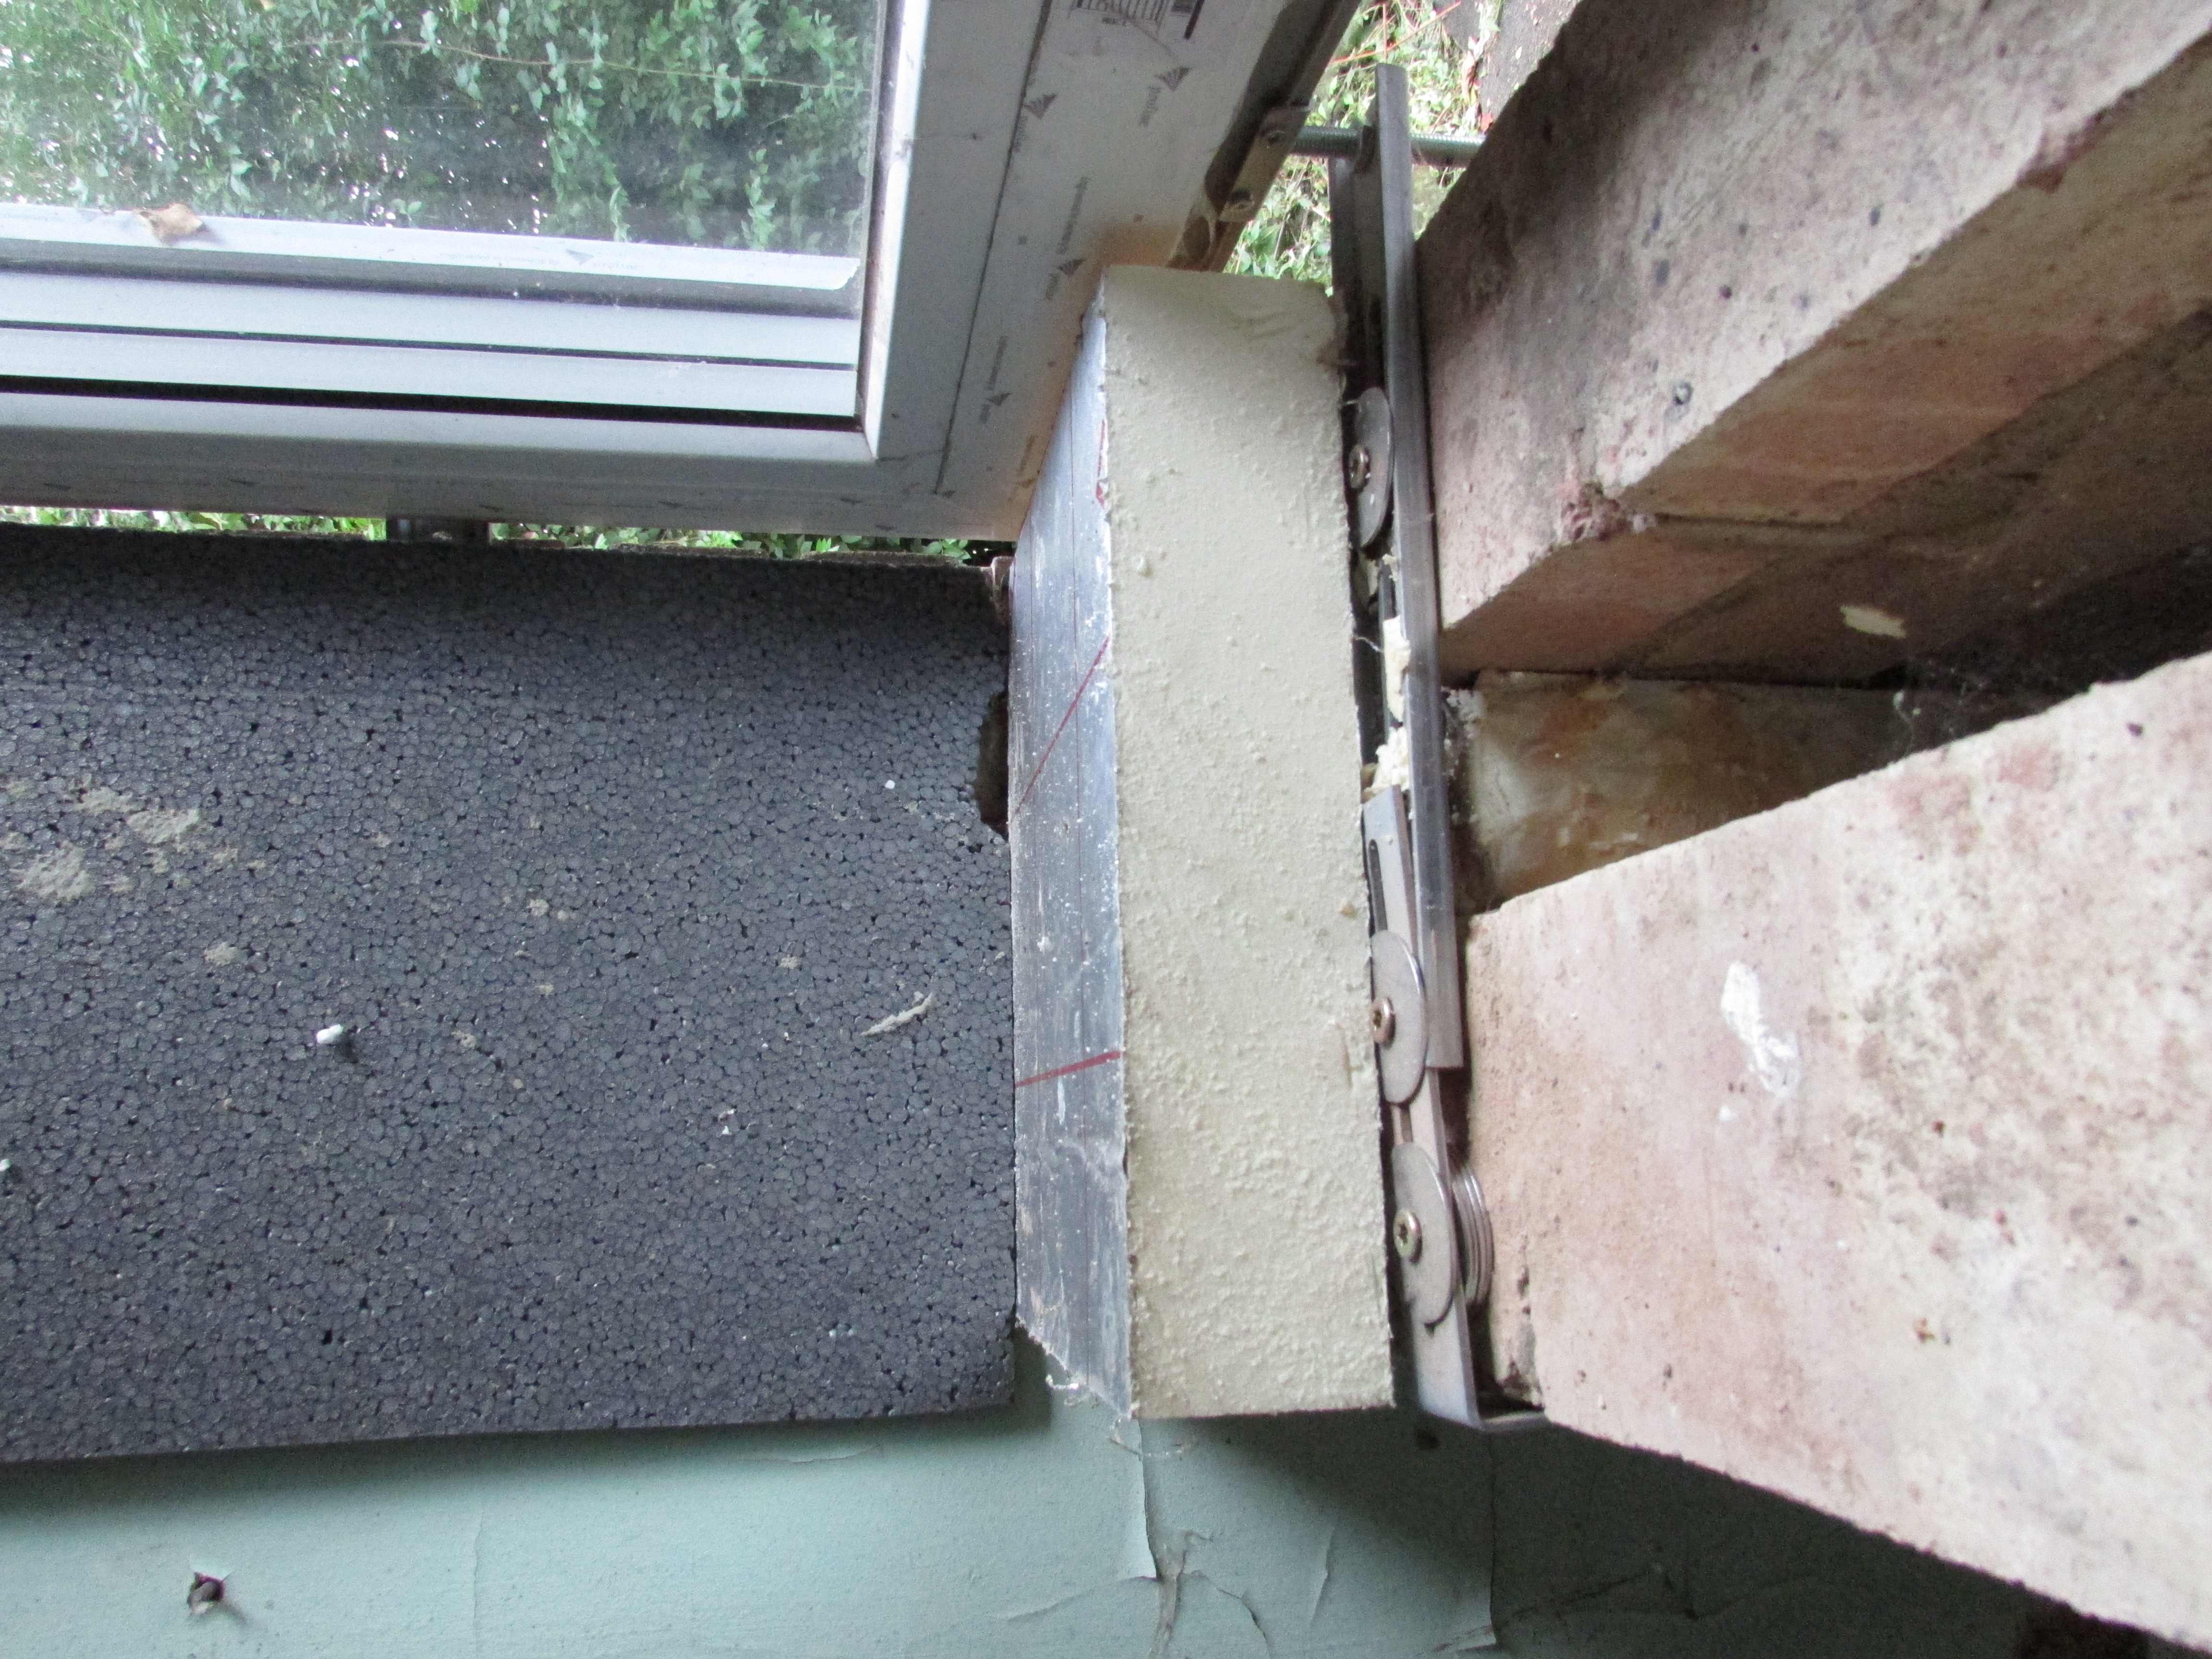
and will marry up with the insulation I plan to add under the internal cill also:


IMG_1153.thumb.JPG.75a96ea759d2779431e2657fc01a6d4a.JPG


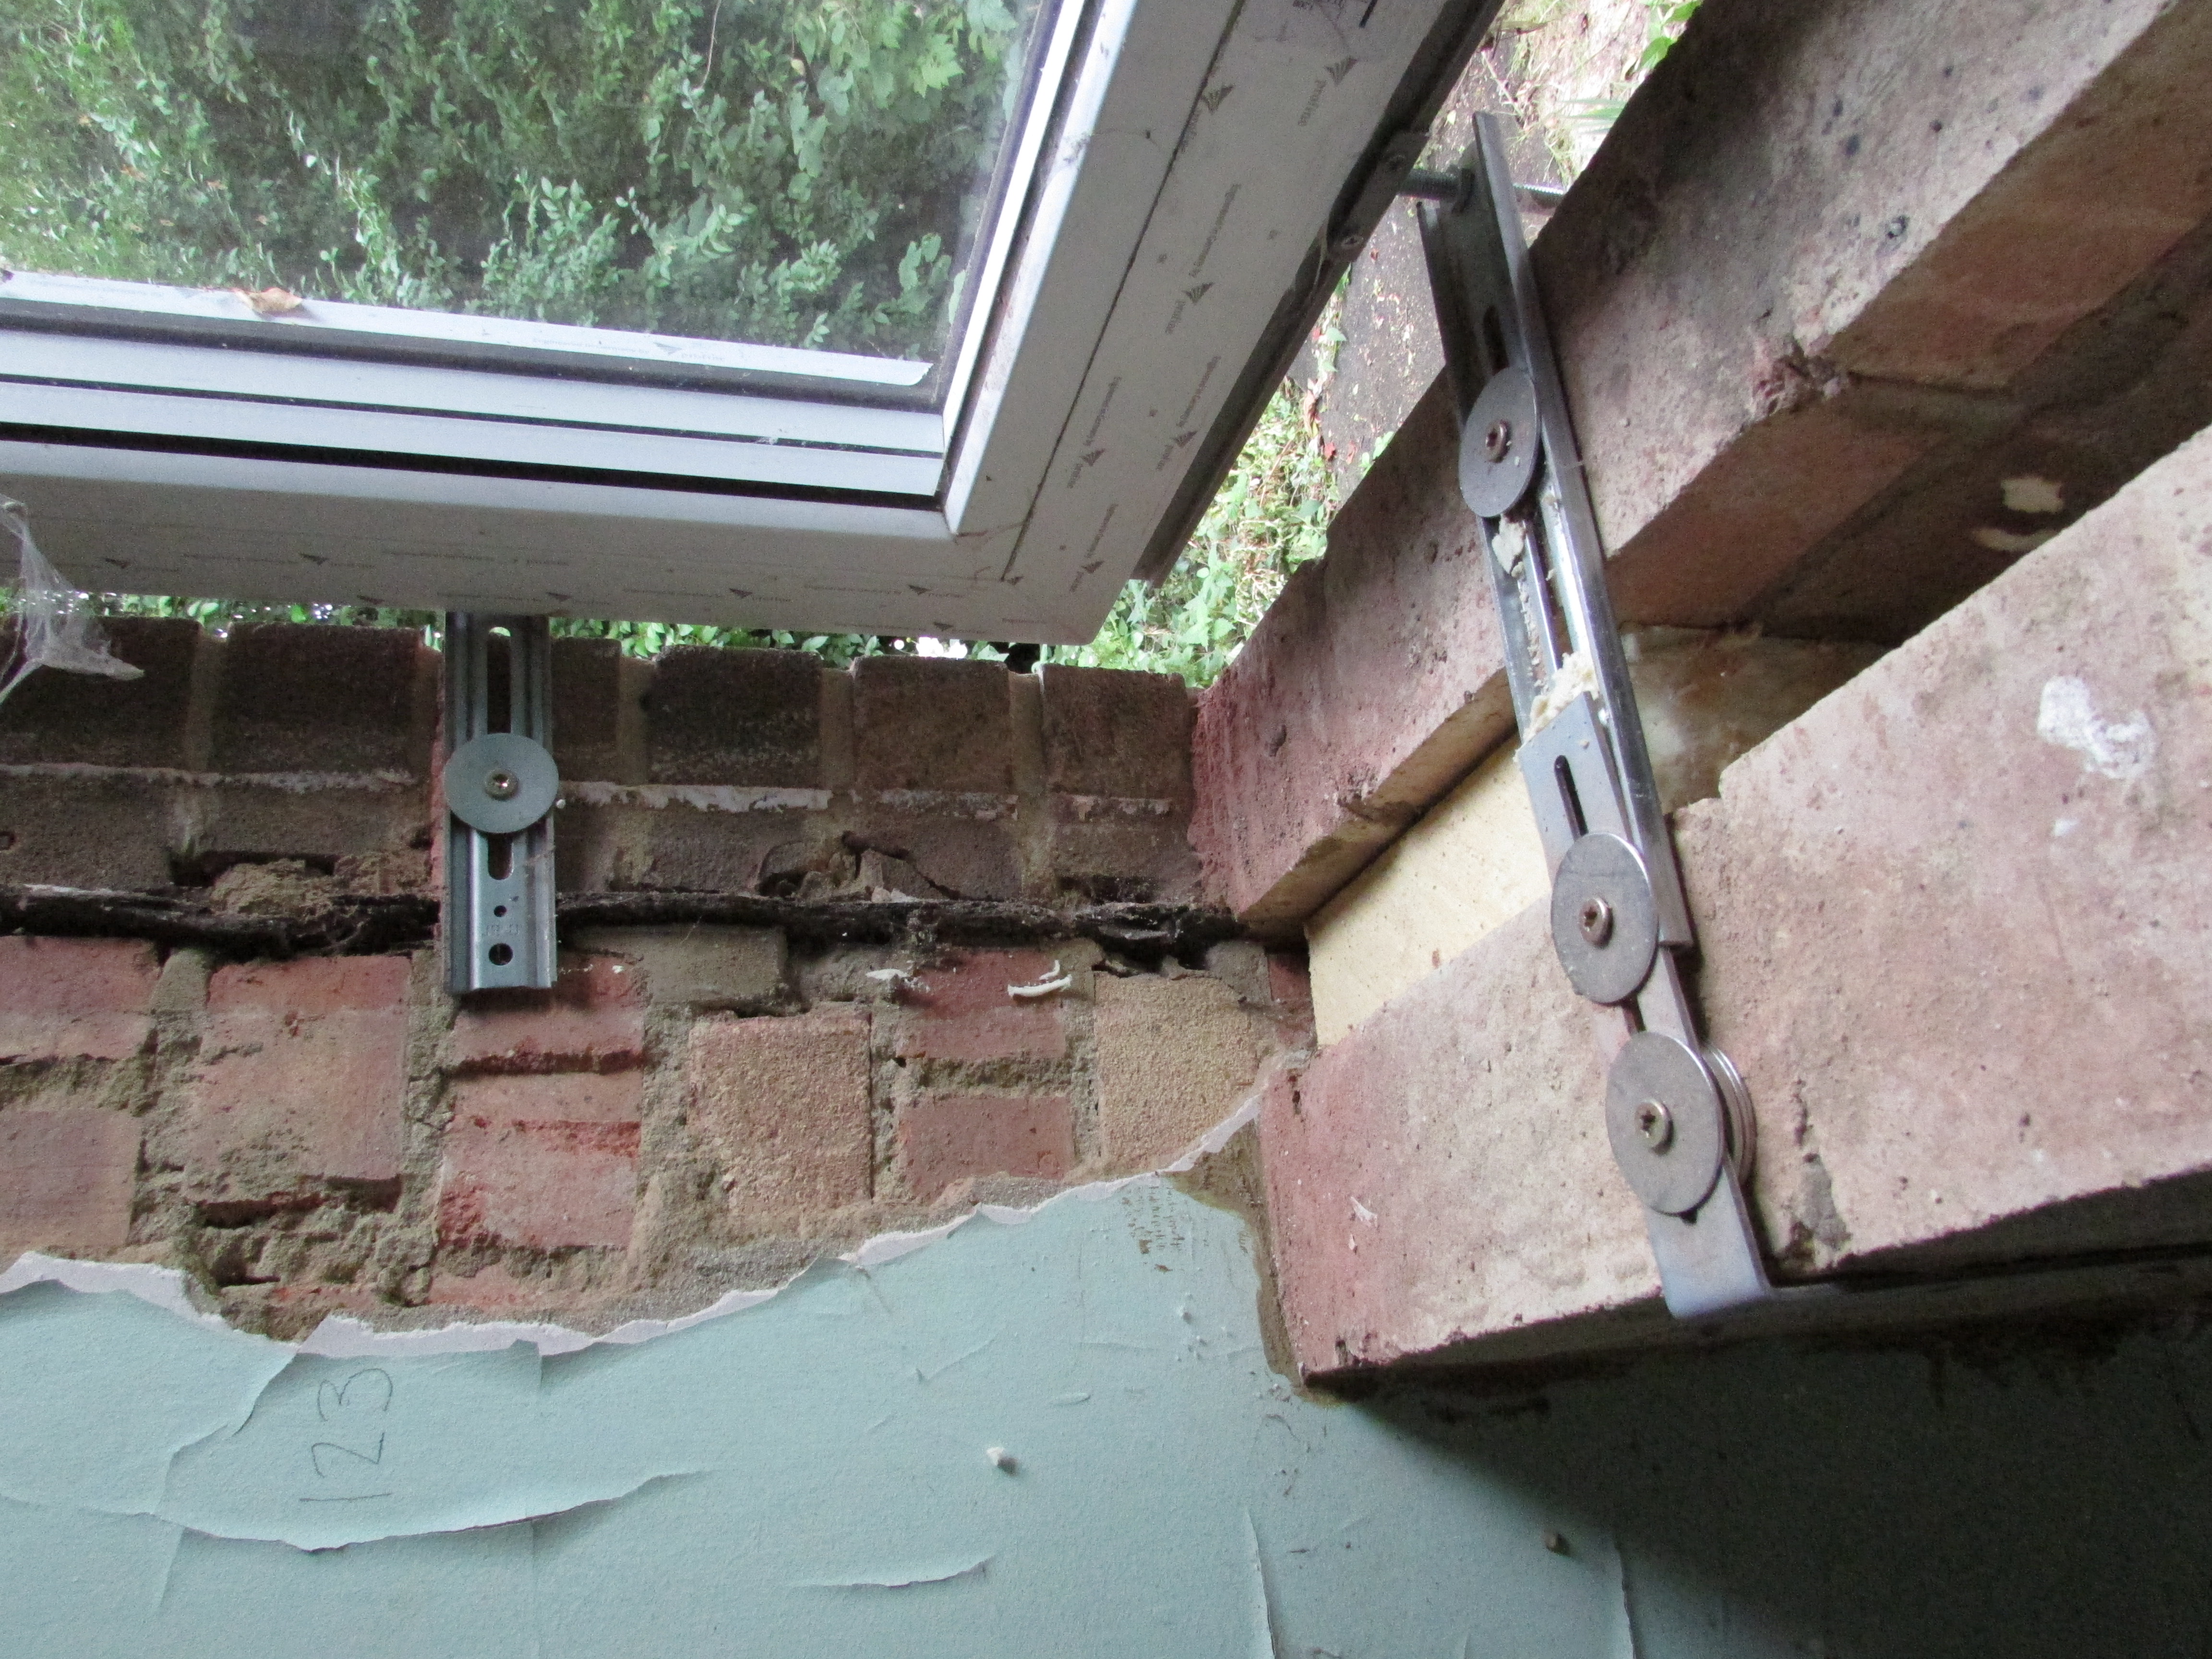
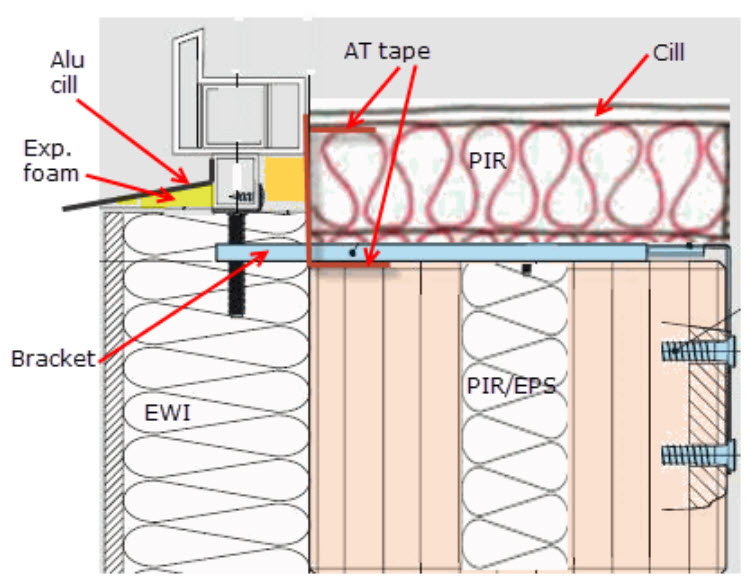
My next job is to get started with the internal plastering, so I'm looking at how to detail the internal reveals and cills. My plan is to insulate under the cill also. Cavity wall will most likely be filled with PIR where I can force it down or EPS beads (with a bit of PVA). I'll then fix 60mm PIR board to the now insulated cavity wall using PU adhesive. I'll have to channel out a bit of the PIR to accommodate the window brackets so the board sits flat:


IMG_1182.thumb.JPG.44e58c3d6c0296edb0612bd8ada11079.JPG


I should have enough clearance then to fit a wooden cill on top of the PIR. Not sure how best to affix that to PIR. Maybe the plasterboard reveals will sit on top of the cill and help pin it down.


Probably overkill with the EWI, but my intention was to also insulate the reveals (see grey EPS example above) with 20-25mm PIR board and then plasterboard over the top. Just need to leave sufficient space to get at the internal beading in case the glass ever needs replacing (sons and footballs....).


The other consideration is to decide where to stick the air tightness tape. Initial thought was to stick that on face of window frame and onto brickwork before I stick down the PIR board. But how well does the stuff stick to clean brickwork? I could add a further layer of tape from window frame and stick to top of PIR board before the final cill goes down.


I'll try and post some drawings up here later on.

IMG_1183.JPG


Not great, but some of the intended detail:


59c02f7995d78_ewiwindowinsulation2.jpg.28c67d4f22afc1efce97fb1eff4f3ee5.jpg

  • Like 3

13 Comments


Recommended Comments

Illbruck ME500e with a butyl adhesive will do the job, I would also use Illbruck TP600 around the frame of the window.


I would have used llbruck PR007 for the window installation.


IMG_8503.thumb.PNG.cdd26e3d3797de4ba91b5d95b178270b.PNG


Looking good though, good job.

Edited by craig
Link to comment

Thanks for this.


What's wrong with the plywood box method in your view?


I also found this: 


(Advance to 3:15)


Here they use something called Compacfoam that the window sits on, instead of the bottom brackets.

Edited by gravelld
Link to comment
6 minutes ago, gravelld said:

Thanks for this.


What's wrong with the plywood box method in your view?


Here they use something called Compacfoam that the window sits on, instead of the bottom brackets.


Plywood method is fine, but insulation-wise would be worse over brackets and EWI sitting snugly against the frame.


Not seen the Compactfoam option, but that looks like a decent method also. Not sure how supportive that would be with some larger/heavier windows (>400kg) though.

Link to comment

Did you do the TB analysis for comparing the brackets with frame? Plywood's lambda is a lot lower than that metal's... Just wondering.

Link to comment

Each window frame only has a few brackets (depending on weight/size etc), so no, I did not do any calcs, just figured that I would be needing more than plywood to keep some of my windows in place. All of the metal fixings would also be completely be surround by insulation so minimal bridging in these particular locations. The other advantages with the mechanical fixings is that you can alter the x,y,z positions in case of last minute adjustments with the window frame.

Link to comment

The Compacfoam is the best option and can easily support the weight but is very expensive. I've also seen fibreglass angles used. I like the idea of the brackets but was afraid they wouldn't be strong enough to support the weight. I personally used galvanised steel angles at the bottom and restrained the window back to the existing blockwork with steel brackets as I didn't know better at the time. Live and learn. If I was doing it again I'd use the Compacfoam


Window.thumb.jpg.3cdc70f4ac9ef9636cc23a699c5b86d0.jpg 

Link to comment

That's a meaty looking bit of steel at the bottom. At least you know it's not going to move easily. Next time I'll look at Compacfoam also, since my bracketry came to just under £800 in any case.

Link to comment

It is indeed very rigid. It's essentially like a piece of timber. I've just used my first bit under the front door, and am planning to use some more for the EWI windows as in this thread

I've also just done the calculation comparing 100x75 compacfoam batten, 50x50 timber batten and 6 off 3mm thick stainless and galv brackets 80mm wide. This is fitting a U=0.92 PVC+ali frame into 160mm of pavatex woodfibre, so Wall U is 0.19. I used Therm for the sums (which is a very annoying piece of software!).

Psi values:

compacfoam: 0.008 W/mK

timber :     0.014

galv bracket: 0.041

Stainless bracket 0.036


However as the brackets are only 11% of the length the average psi is:

galv: 0.012

stainless: 0.011


So compacfoam is best, but metal brackets are fine too so long as the frames are well-lapped with insulation. Stainless brackets seem surprsignly expensive.

Cost is

£10.80 galv brackets (90x90x62)

£ 46.44 Stainless brackets

£ 28.90 1m compacfoam  (6 x 166mm sections). So it's not really that expensive. It is if you line the whole window perimeter with it, but you might as well just fit the load-bearing blocks, then put EPS between them. You could use 1.5m with a 1m piece across the bottom and 4 blocks up the sides. That'd be £44.85. per window.


This is the 'line all round the edge method by the suppliers: https://www.youtube.com/watch?v=5sSKsKB9doc

This is the 'use blocks' method: https://www.youtube.com/watch?v=GUUrd7dbBzU


Link to comment

I got a sample of compacfoam, and whilst being quite solid, i wouldn't trust it with a very heavy window. I think its intended purpose was for beneath doors really where there is a firm bearing underneath it.


For me, either steel angles like this, or proper timber

Link to comment

Dont worry about how good compact foam is in compression. If we are putting a machine on a delicate floor we use compact foam under the outrigger pads. 400mmx400mm foam pads will support 3 tons no problem.

Link to comment

Create an account or sign in to comment

You need to be a member in order to leave a comment

Create an account

Sign up for a new account in our community. It's easy!

Register a new account

Sign in

Already have an account? Sign in here.

Sign In Now
×
×
  • Create New...