


Redoctober
-
Posts
836 -
Joined
-
Last visited
-
Days Won
3
Everything posted by Redoctober
-

The Build - Reflections & sign off.
Redoctober posted a blog entry in Our Journey North of the Border
So after a month or so in the house, the time has provided us with an opportunity to reflect on what we have achieved and what if anything, we would change or could have done differently. In truth there is very little if anything that we would change. The rooms flow, the doors open in the right direction and the lights can be switched on and off in the appropriate places. Even the WBS has proven to be a worry that wasn't worth worrying about, as it's position within the hearth is no longer an issue due to it being vented through the back as opposed to the top. Some jobs have been completed such as the down pipes and a few jobs remain outstanding but nothing that has an impact upon our daily lives. One such job is the porch that needs to be slated. Thankfully I still have some financial leverage over those various trades so I know they will return. Our satisfaction I suppose, has to be routed in the preparation work, the research and being a member of this superb forum. None of these elements should be underestimated. Therefore I would like to sign off this blog with a heartfelt thanks to all those who have contributed, not only to my issues over the past couple of years, but to all the other threads, as they too are just as relevant / enlightening. I have also attached some images which complete the project, namely the WBS chimney installation and the erection of the much mentioned porch. For a final time, thanks for reading, and given the date, seasons greetings to you all. Paul.- 14 comments
-
- 19
-

-
Tidy job there ?
-
Plus one to that. You should be able to source oak trims from a BM. If your budget can stretch have a look at the UK Oak Doors website. We got our oak Cills and boards from them.
-
The Build - Mission accomplished! We're in!!
Redoctober commented on Redoctober's blog entry in Our Journey North of the Border
Many thanks @Square Feet you would be most welcome so if in the area make contact, the kettle(hot water tap) is always on? -
Looking lovely. The larch cladding will be worth the wait I'm sure.
-
Klover pellet swallower!
Redoctober commented on recoveringbuilder's blog entry in Recoveringbuilder
Good to hear that the "caravan days" are behind you albeit not in the manner you had hoped I'm sure. Hopefully the pellet stove business will be sorted sooner than later and you can then concentrate on moving forward - even if it is just one day or one job at a time. You will get there, just be patient. -
The Build - Mission accomplished! We're in!!
Redoctober commented on Redoctober's blog entry in Our Journey North of the Border
Yes this was very much an all trades build - I supplied the materials were I could and just paid the labour costs. An example of that is the Joinery. I supplied all the oak materials etc., whilst the Joiner worked on an hourly rate of £25 per hour. Again the floor tiles and associated sundries were supplied by me and installed at a rate of £35 per sq m. The builder supplied and fitted, so to speak, all materials for the ground works & drainage systems. His costs also covered the stone mason, although I supplied the stone at £70 per sq metre. The same is said of the roofer - He supplied and fitted everything required for the house, car port, porch [ when fitted] and the Rainwater goods. The timber frame, additional insulation and erection costs came in at £316 per sq metre. I supplied all the landscaping materials and just paid for the Landscapers labour - A breakdown of £5500 for labour and £6100 for materials. I hope this helps and should anyone require more specific details, please send a PM. -
The Build - Mission accomplished! We're in!!
Redoctober commented on Redoctober's blog entry in Our Journey North of the Border
Yes a great question and one Mrs W and I have chatted about. I will answer these points as I think it is important to address them. However I will do so in my next entry as I would like to show the porch in all its glory once it is erected. ? -
The Build - Mission accomplished! We're in!!
Redoctober commented on Redoctober's blog entry in Our Journey North of the Border
@Onoff exactly as @CC45 has described. The TF is doing all the insulating and air tightness. The stone is for appearances. Render was not an option as it wouldn’t tie in with the local housing stock albeit 3 farm workers cottages and a Smiddy!! -
Fallout with builder- now I’m on drains - questions
Redoctober replied to Tin Soldier's topic in Waste & Sewerage
So true - well said.? -
The Build - Mission accomplished! We're in!!
Redoctober commented on Redoctober's blog entry in Our Journey North of the Border
Thanks, yes we too love the chapel chairs. They just bring a little something. As for the drive, during the build it was subsoil with Type 1 spread across it. When we came to finalise it so to speak, an additional layer of type 1 was laid and this in turn, was compacted down. We then put down the stone you see in the images. This stone is called Whin Chip and we went for the 200mm version. All the people in the know advised against a membrane going down under the whin chip, due to it eventually ripping and moving etc. As for maintenance, we plan to spray the area twice a year and just rake it over every now and again to keep it tidy. I believe we managed to get he whin chip for around £30 a tonne and required 20 tonnes. -
The Build - Mission accomplished! We're in!!
Redoctober commented on Redoctober's blog entry in Our Journey North of the Border
Ha, yes that's what being on this forum can do for you - stay around long enough and you can capture all the good points from others !! ? -
The Build - Mission accomplished! We're in!!
Redoctober commented on Redoctober's blog entry in Our Journey North of the Border
Yes very pleased with the outcome thanks. -
It was online and via the Royal Mail website - no link at hand but I think I found it under " new addresses or something similar.
-
The Build - Mission accomplished! We're in!!
Redoctober posted a blog entry in Our Journey North of the Border
A busy November saw all the trades coming good, albeit some were cutting it fine for the moving in day – 30th November – However, we have moved in with all the services up and running. Having said that, BT and Openreach have missed the deadlines and as a result we are without any internet, phone line or TV for at least a week! Also the master bedroom built in wardrobes are still be fitted. The landscapers have finished their work, providing us with a patio area and a driveway area which will see plenty of activity. Look closely and you should see the hedging that has been planted. 330 separate plants in all. This was a planning condition and the hedges are a mixture of Hawthorn, Beech, Holly and Maple. Locally referred to as native hedging. The turf will be laid next Spring. Our Air Tightness test was conducted by a guy from Perth - a good couple of hours away. We never set out to achieve such low levels because we didn’t want the capital outlay of such a system as well as the infrastructure it requires. Our score was 4.9 which in our eyes is very good. There are a number of minor jobs which I need to do such as touching up the paint work here and there; re-oiling some wood in places but all that can wait until we have given the whole place a deep clean. The main external jobs outstanding are the erection of the oak framed porch and the downpipes. Both of which should be completed within the next 10 days or so. Anyway, this was not a self build in the true sense of the words but it was project managed by myself and built using a main contractor and sub contractors after the TF had been erected. I hope you have not only enjoyed reading about our project but have found some useful bits of information within the blogs in order to assist yourselves with your projects, whatever that may be. Overall my experience has been a good one. It hasn’t been without its difficulties, such as additional unforeseen expenditure and additional expenditure as a result of our mistakes, or due to us changing our minds! Such examples include ordering the wrong door frame - we failed to realise we hadn't ordered a threshold suitable for level access - a mistake that cost us £1k. Changing our minds over the 3 toilets we had ordered. They simply looked lost in their respective environments so 3 new ones were ordered at an additional cost of £850. A failure to get a full grip of the scaffolding cost an additional £1k and a failure to budget correctly for the foundations and dwarf wall for the carport cost an additional £4k. Final facts and figures - Build schedule – 6 months from the day the TF arrived. Cost per sq metre - £1850 – includes everything, and I mean everything - from the scaffolding through to the landscaping and it includes the car port and porch [ still to be erected] but not the land or fees. Only two skips were used throughout the build – everything else was removed by us to the local dump or burnt on site – best investment was a £25 oil drum which we used as an incinerator. Thanks for reading - Paul.- 35 comments
-
- 15
-
-

-
Here in the Scottish Borders, I contacted the local council and they steered me to the Royal Mail. I completed a form and they registered the address free of charge. Also received two bins this week also free of charge.
-
Update to this thread - we had our Air Test carried out today - 3 days ahead of our moving in date - We achieved a score of 3.9 which we were most impressed with. This figure was a touch "tight" for us as we have no MVHR and do not wish to install one. We needed to get the figure nearer to 5 so the seals around the loft hatch, letter box and flue were "loosened". Final recorded figure came in at 4.9. The test cost us £245 which included his travelling costs from Perth to the Borders.
-
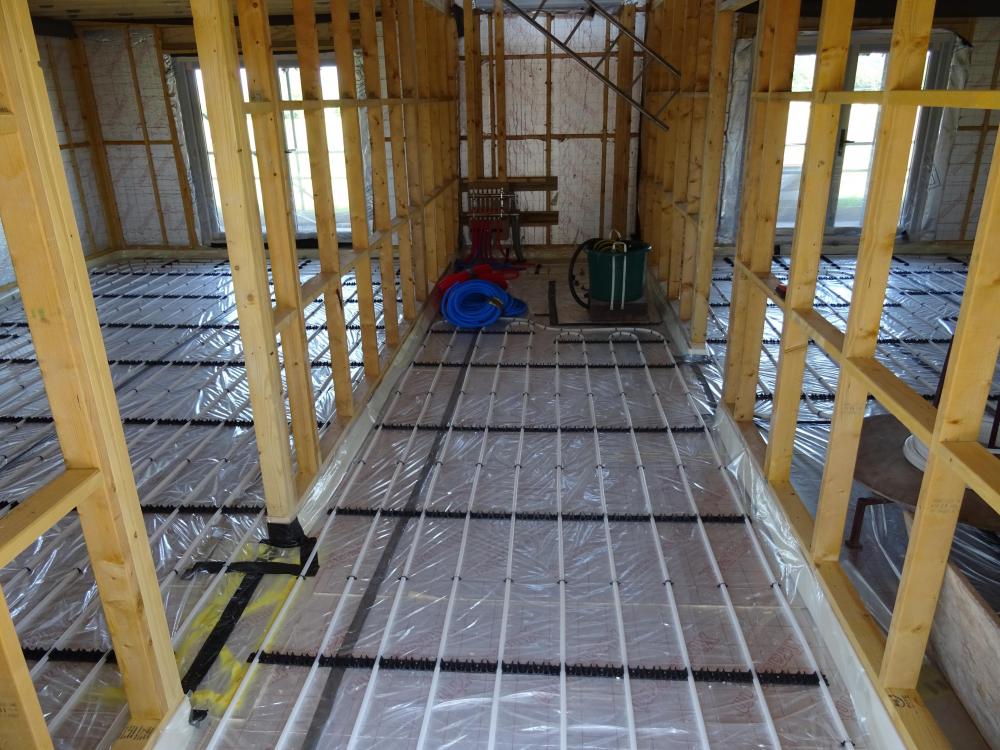
Rest assured @TerryE the floor area in the middle section and to the right are being laid with stone tiles, so no problems in that regard. As for the floor are to the left, that will be carpeted and our UFH installer was aware of this. We were more than happy with the spacing as it was more generous than it appears. As for 9 runs instead of 10, I can't really comment other than the installer knows more about this sort of stuff than me and if he felt it needed 10, then who am I to argue. But I suspect @PeterW is correct with his suggestion.
-
Our studs went in first and we even glued one set of studs as this was fitted after the screed was poured. You will see from the images, the bottom of the studs are protected and the manifold is already in place. Hope this helps.
-
WBS and Flue position
Redoctober replied to Redoctober's topic in General Self Build & DIY Discussion
An update - thanks to @joe90 I contacted the installer and he has confirmed the flue will be coming out of the stove at the rear, so this will push it forward some mm's which in turn should improve the look beyond it's current situation. I have to say, the service I have received from the installer has been well below expectations - but as we all know, we live and learn!! -
WBS and Flue position
Redoctober replied to Redoctober's topic in General Self Build & DIY Discussion
Massive thanks @joe90 - I will certainly mention this to the installer ahead of the final set up phase. ? -
WBS and Flue position
Redoctober replied to Redoctober's topic in General Self Build & DIY Discussion
It is a Wiking Mini 2, 5kw w/b stove. Thanks -
WBS and Flue position
Redoctober replied to Redoctober's topic in General Self Build & DIY Discussion
It is the appropriate type of render applied by the installation team, so I'm hopeful it won't crack! -
WBS and Flue position
Redoctober replied to Redoctober's topic in General Self Build & DIY Discussion
Thanks @ProDave @PeterW @joe90 and @Cpd - Here is an image which hopefully will show how far back we have to have the WBS in order to achieve a vertical flue. The chimney is straight so no problems with bends etc with that.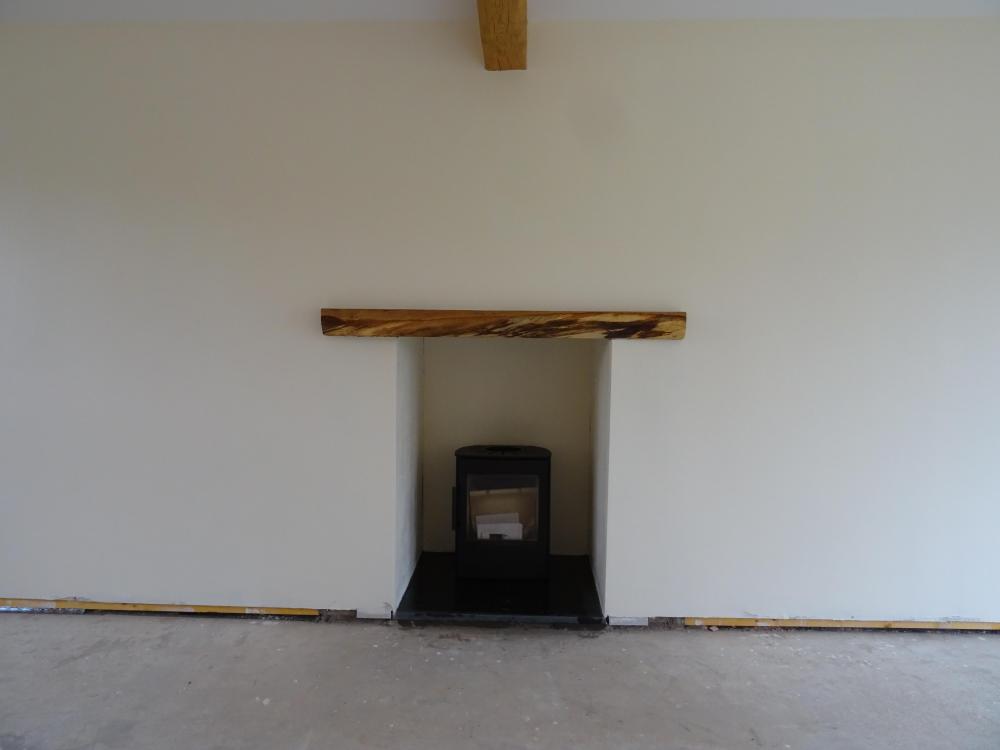
-
We have a chimney which is to service the WBS when it gets commissioned in early December. Unfortunately the builders positioned the hole for the register plate too far back in the hearth area causing the WBS to sit further back in the "hole" than we would have hoped for. I have spoken with the installers and they say there is nothing we can do to bring it forward. I suggested a double 45 degree bend flue pipe set up but he said because it is a chimney and not a twin flue system, the pipe needs to go vertically from the WBS to the aperture in the register plate. Now, once I have been signed off so to speak is this something I could fit retrospectively or is it a complete no no ? Thoughts welcome.

