


flanagaj
-
Posts
1349 -
Joined
-
Last visited
-
Days Won
5
Everything posted by flanagaj
-
Can anyone provide some guidance here as I read a post on FB about someone unable to get a completion certificate as their architect was unwilling to sign off as principal designer (no idea what that means). In a nutshell, we did the following. 1) Architect A did planning drawings and secured us planning. 2) Technical Architect B did building reg drawings and submitted them to planning. 3) LABC signed off the drawings and gave us an inspection schedule. 4) Warranty provider has also given us their inspection schedule. I thought that so long as we satisfy 3&4 then we'll get a completion certificate and everything is fine. But I think that maybe I've missed something crucial?
-
Sorry to hear that. Thanks for sharing your experience though.
-
I have lots to learn and need to understand that things are not always perfect and accept improvisation will be required.
-
I am obviously overly complicating these things. It's not my intention, to but I spent nearly 2k on Visqueen membrane, pre formed corners and top hats as I thought it needs to be done with precision. I get the impression that it's a case of just do a Heath Robinson job on it. The PIR tip is useful and I naively thought it needed to be flat and smooth. Having been a furniture maker in a previous life, this hackery is not something I am used to.
-
That does seem like the logical approach. Do you know whether the SCC can be easily worked so it provides a suitable surface for Radon membrane / insulation. My concern is that the concrete slab is laid and the surface resembles the Alps and then needs remedial works to get it flat enough for PIR / Radon. My plan is to put the the Radon membrane on top of the slab and a sacrificial DPM below the slab. The utilities are quite high and if Radon membrane goes below the slab, it's going to be a hatchet job sealing around the pipes, due to the fact that at that level I am either on the start of the curve of the rest bend, or sat directly on the rest bend collar. Going above the slab puts me on the vertical and will mean I can use the top hats for sealing.
-
The reason for attempting it myself is mainly due to an inability to find anyone who can do the job OR who I trust to do a good job. Having already had a poor experience of trades, my confidence is at rock bottom.
-
Ok. Thanks for clarifying. I've realigned my expectations and accepted that more money will need to be spent and more trades hired 😞than I wanted too
-
Thanks @Nickfromwales the manufacturers state that no further finishing is required, eg power floating. Looks like they are being slightly disingenuous with that claim.
-
Interesting. The problems you face seem to be common. Too many 'builders' will happily say "Yes, we can do that", when in reality, they can't and should be honest and upfront that they cannot If I read your post correctly, you did not use SCC for your slab?
-
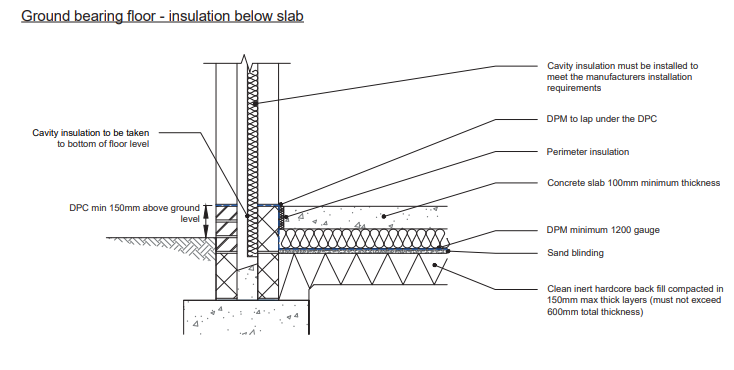
I am in the process of getting the hardcore in for the ground bearing slabs and have been looking at SCC with interest. Cemex and others state that when finished with a dapple bar it provides smooth flat surface that does not require further finishing. So this has got me thinking. If SCC can be laid and finished with ease, why bother going down the traditional route of insulation under screed and on top of slab, when I can omit the screed layer and go with insulation under slab. This removes another stage in the process and ££ too. Our original plan was to go with a power floated floor finish, but we scrapped that due to the ridiculous quotes and also having read negative comments. I know @Oz07 has used it before, but has anyone used it with UFH attached to the rebar mesh and then simply tiled or used engineered flooring directly on top of the SCC
-
Insulation upstand when not having skirting board?
flanagaj replied to flanagaj's topic in General Flooring
I will have a look at self compacting concrete. When you say someone to help finish the slab, will a bull float suffice? -
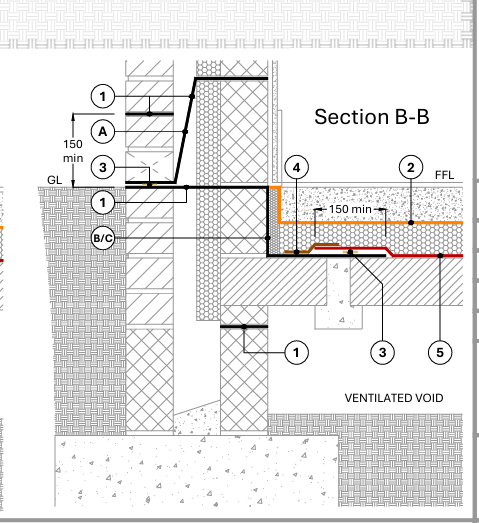
This is very interesting and although a year later, I am keen what approach you went with. I too have been banging my head against a brick wall on this topic. We are having a ground bearing slab and level thresholds. My plan is to simply follow the detailing for the block and beam Radon barrier protection. If you swap out the block and beam for a ground bearing slab then why would it not work. From what I can see, water / damp cannot migrate through the ground into the dwelling and the cavity tray captures any moisture from the cavity and will surely help mitigate and water that did try to breach the cavity. Can anyone see any reason why that detailing could not be used for membrane above a ground bearing slab? I want to go membrane above slab, for the simple reason that service penetrations are quite high and to get a decent damp / Radon seal below the 150mm slab will be a complete dog's dinner.
-
Insulation upstand when not having skirting board?
flanagaj replied to flanagaj's topic in General Flooring
I've subsequently discovered that you can cut a 45 degree angle on the PIR to hide the edge. One final question. How do you get a smooth enough finish on the slab for PIR. Do you simply use a piece of timber with a side to side motion and then use a bull float at 90 degrees. I really need to be able to do the slabs myself with my brother as I struggle to find anyone to do it without changing lots of £££ -
Build has descended into a xxxx show
flanagaj replied to flanagaj's topic in General Self Build & DIY Discussion
Thanks for the photos. So it can be done, just doesn’t look as tidy as a collar, but needs must. Brickie two is not returning. An ego the size of England, unable to understand who the client was and seemed unable to read plans regarding door openings and lintels. -
Build has descended into a xxxx show
flanagaj replied to flanagaj's topic in General Self Build & DIY Discussion
We only require 'Basic' Radon protection as we are in a 3-5% area. The one issue I've got is that the membrane sits at the same level as the coupling on the rest bend. No idea how I'm going to solve that problem. But the top hats I purchased won't work. I think Juta do a liquid rubber that you create a dam and pour. The top hats are great for soil pipes in the middle of a room, but not so when your soil pipe is in the corner of a room. -
Build has descended into a xxxx show
flanagaj replied to flanagaj's topic in General Self Build & DIY Discussion
Yes. Slab build up is as you have stated. Taking down the internal 3 courses won't take long and it will help considerably with gas membrane installation and concreting. -
Build has descended into a xxxx show
flanagaj replied to flanagaj's topic in General Self Build & DIY Discussion
Ok. There is some reassurance that undoing work can make things simpler. The required preformed Visqueen internal door openings will be circa £500 alone. Let alone the additional required taped joints. -
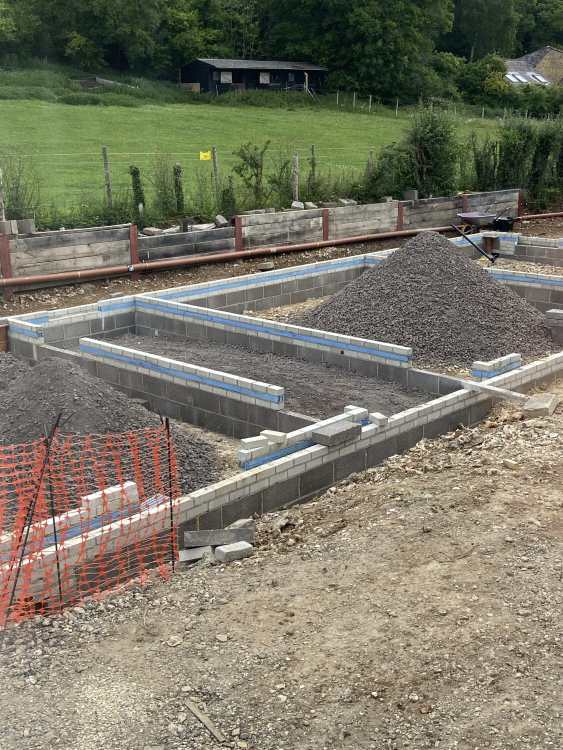
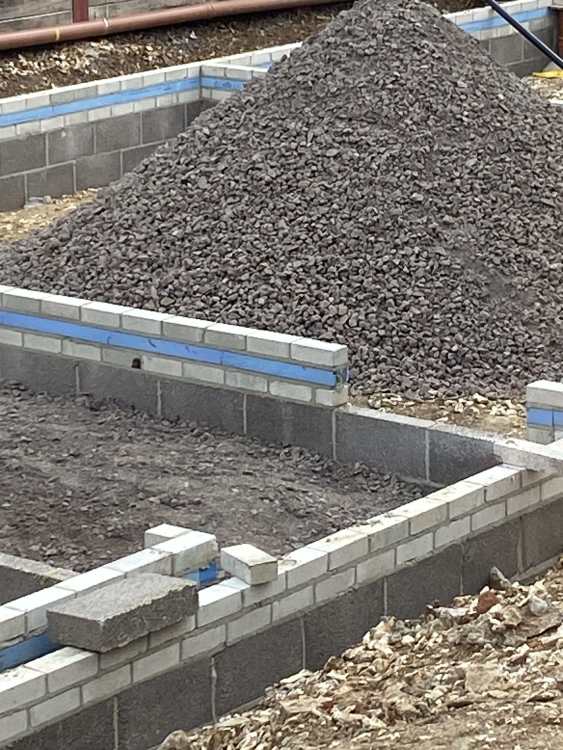
As some of you predicted, our self build has turned into a disaster. We’ve now parted ways with bricklayer number two. Choosing a ground bearing slab was a dumb idea and beam and block would have enabled everything to run more smoothly. i think the bricklayer could have made things simpler by not building up the internal walls the past the block course. This has now made the Radon membrane detailing more tricky and expensive, due to the number of internal door ways. I also feel it’s going to be difficult to lay the slab as the open door ways will mean you have different levels for tamping off. I am contemplating taking the internal walls down to the top block course. What do people think? I don’t want any hate. So if you’ve got nothing constructive to say, please don’t comment. I’ve been contemplating deleting my BH account.
-
Insulation upstand when not having skirting board?
flanagaj replied to flanagaj's topic in General Flooring
My post was confusing. I have an insulated garage floor slab, but I wasn’t planning on plaster-boarding or fixing skirting board. Rather than having a 25mm slice of PIR showing, I could either omit the upstand, but that sort of defeats the point of insulating the slab. -
Insulation upstand when not having skirting board?
flanagaj replied to flanagaj's topic in General Flooring
No floor covering -
With a conventional build, the thickness of the 'dot & dab' / float and set and skirting board will hide the 25mm thickness of the PIR upstand of a screed floor. If you are not planning on having skirting board, then a conventional build up risks the PIR showing. In such a scenario, is the only option to use insulation backed plasterboard or bring the plasterboard off the wall using battens? This obviously only applies to a polished slab finish or an insulated garage floor.
-
Ok, thanks. Do you surround the whole pipe in concrete?
-
I need to route a rain water drainage pipe under the concrete slab. As you can see from the image there is only about 150mm clearance from the top of the pipe to the underside of the concrete slab (red line) Part H indicates that I need to encase the whole pipe in concrete, but I didn’t find it very clear and wondered if anyone can provide any further guidance on how I should do this. I also wonder whether I should change the pipe for socketed?
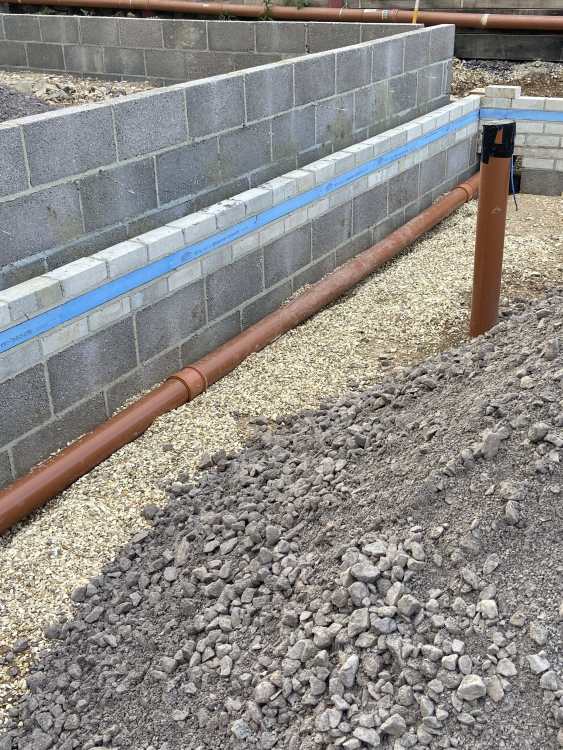
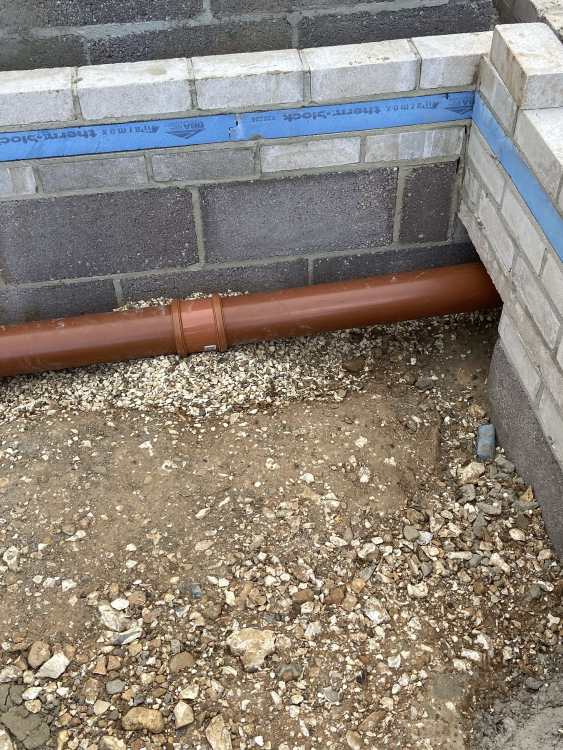
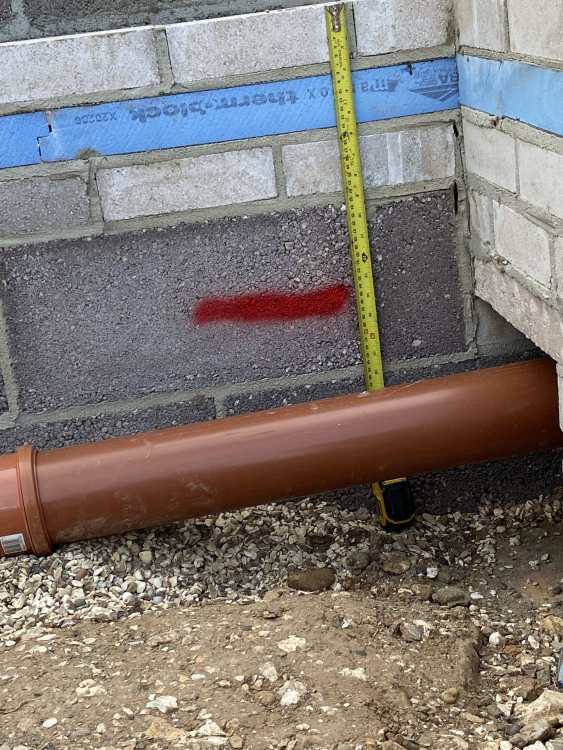
-
Garage floor build up has XPS on top of Radon membrane and below concrete slab. Do I need to put a VCL on top of the XPS as well?
-
I cannot comment on the sewage as we have a sewage treatment plant, but we simply requested the water company installed a new connection to a temporary building supply. They came along and inspected the trench a water stand pipe and then connected us up. Once that was connected you can then take a T off the supply to the caravan and then when ready connect up to your house supply.



