Ed_MK
-
Posts
381 -
Joined
-
Last visited
Everything posted by Ed_MK
-

Render / cladding quotes a bit of a shock
Ed_MK replied to Weebles's topic in General Construction Issues
What is !! Don't tell me ....titanium Coated and Anodised to within an inch of their life with a unique reverse cross thread plug-fitting, countersunk, self sealing taper shoulder... ..inspired by the fixings used in the sidewalls of NASA's Martian lander, which in turn was developed by a designer working underground in New Mexico using technology "borrowed" from remnants of a flying saucer that crashed in New Mexico just after the war, subtley adapted from rare earth minerals and elements from Meteorites ? Am I close ?? Or failing that ....nip down to Screwfix and get a punnet of these bad boys ...Will do the job! I think it was that famous philospher/psycologist Nietzsche that once said .... .."There are many Questions in life, deep and Mysterious enigmas and puzzles ...But almost NONE that cannot be solved with either a 5cm Spax Screw, a 2lb lump hammer or a Tin of Expanding Foam Filler"... ..actually no ..it was Bald Trevor down the Jewsons trade counter ..I always get them 2 confused !
-
Render / cladding quotes a bit of a shock
Ed_MK replied to Weebles's topic in General Construction Issues
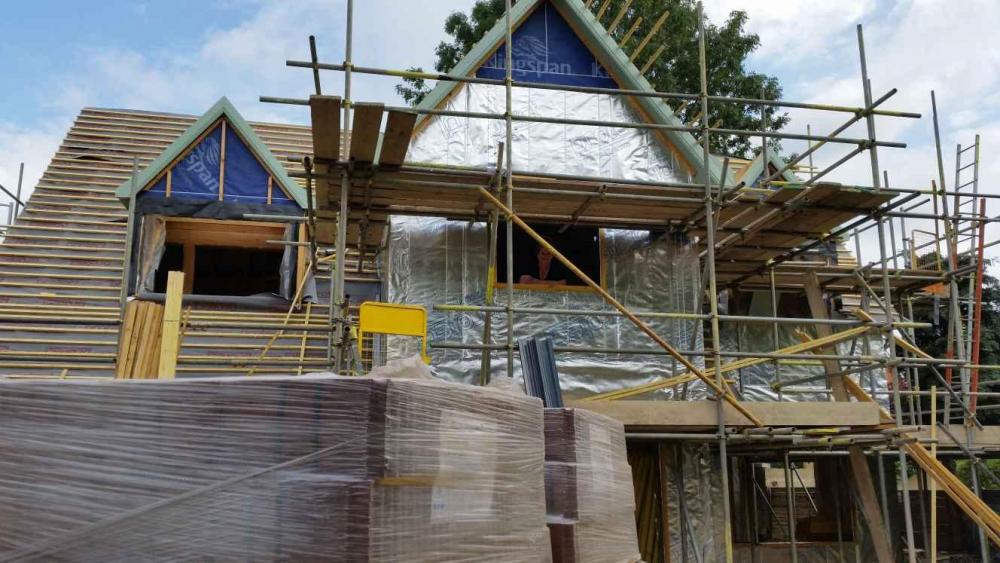
So I take it you dont rate their recommended method Peter ? I have re-read their email and guide (attached) perhaps the terminology and brand names are bamboozling me... Stuca this Rendalath-Something and Aqua that .... I was lead to believe by the nice lads (who are coming back to fix feature boards for me ) That on top of these Potton Frame cassettes/SIPS/Silver Foil Jobbies that currently make up my walls, where render was happening... 1. There would be some batten applied ...they have put some up around the dormas already... (hard to get to once roofed i am told) 2. Some Board or Mesh would be nailed to this ?! ....I should have asked more ...but at the time we weren't sure just HOW we would do it 3. On top of this board or mesh would go so cement/mortar 4. Then we paint it 5. Done But since we have spoken to a few people now, trades affiliated or at least regular Potton "go-to guys" who do a lot of OTHER stuff for them. I hear the words Render board ..Not much about this MESH stuff ..I mean i heard the word AQUAPANEL mentioned ....So i downloaded a cross-section from their website ...No MESH There...getting the impression Aquapanel is a red herring? and is NOT used if mesh is used (like Stucanet) OMG (With a WTF thrown in!) Silicon. Polymer, Cement board, 3 coat process, Panels, Mesh, Cardboard , Chicken Wire, Trowel it, Spray It, K-Rend, Self Coloured, Scratch Finish ...All i ever wanted was a nice creamy wall between the wood ...I never knew there was so many ways to cover a bloody building Stucanet Installation Guide (1).pdf Builders handbook extract.pdf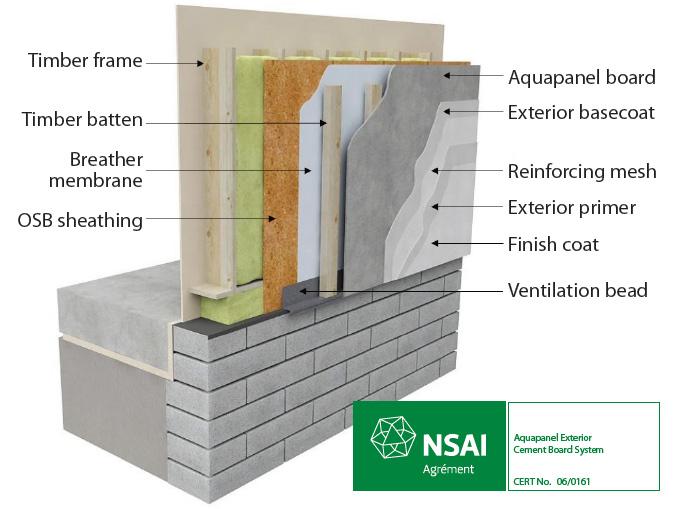
-
Render / cladding quotes a bit of a shock
Ed_MK replied to Weebles's topic in General Construction Issues
1. My work clothes are ALWAYS on these days ..as I am covered in Dust and Paint from Dawn til dusk and Tits to Tonenails 2. Porsche ..well close ...I have a 5yr old Kia ...but its black ...and black is a sporty colour ...sooo it MAY get mixed up ..but then it has a toebar, and scratches on the bumper where I dropped as small lintel last week ...so maybe not I ran out of Mach3 blades 2 weeks ago and need to get some ...So the wife says i look like a Hobo ..Paraffin Lamp, Dirty Wizard, Homeless Santa, doorway dweller or whatever other euphemism is used in your part of the UK There is NOBODY that would look at me and think I have Spare Money..NOBODY...even the guy selling the big Issue in the Centre gives me a refund -
Render / cladding quotes a bit of a shock
Ed_MK replied to Weebles's topic in General Construction Issues
its the same around here Milton Keynes has Sooooo much building work ..trades are coining it ! One bricklayer 6mth ago was at LEAST Honest ....He gave me a quote and I told him ...well thats not bad, for a nice job We were ready to do the handshake and he put in that at least i could be "canny" and claim the VAT back on the materials I said ....not if its in your name I can't he said ...Wahay Pet ...oh no ...that price was for LABOUR ONLY ...I am not VAT registered me ....Geraway! I said that can't be ...it works out at almost £900 a thousand !! He said ...yep..because you are a domestic ...you dont have no electric hoists, no premixed mortar and all that stuff the big boys have..we have to hire a mixer and do load more humping and that ..plus me and me Pal have to split the labouring in turns ..We dont like the "Muckwork" either Pal .. so we typically DOUBLE our rate ! ...D O U B L E ....I mean a brickie in Manchester is about 350-400 per 1,000 Quid for straight walls and up to 500/600 for anything "fancy" ...and these are GOOD time-served old boys too. Not some 27 yr olds that look they are stand-ins for fupping BoyZone but i dont live in Manchester any more ...and when i told him the rates..He said Yep, thats why i moved down from Gateshead aye... We re so busy with agency in the old MK..we only take on domestic that are desperate or Rich ..and prepared to Pay. Simples. bit of the old cash for the back pocket ya knows I said thanks for being honest Pal ...but I would rather take a nail gun to my nad-sack than pay that much. he said ...sounds nice ....Anyway ...good luck then ,,,and off her went in his BMW x7 series ..I hope he didn't scratch the paint with his Breitling on the way in I remember my mum saying like it was yesterday .....dont go into the building game like your Dad and Uncle ....get educated, get a proper job with prospects and money (sigh) -
Render / cladding quotes a bit of a shock
Ed_MK replied to Weebles's topic in General Construction Issues
I am going through the same torture now. I have had several quotes for "render" but every time they come they sniff and say Timber Frame ...yada ...lots of movement yada... ...needsto be silicon or polymer .....dee-dum..never needs painting ....Mortar Render is 300 years old slapdash ...it will be cracking like Fukishima in 5 years... ? So no wonder I started asking for Polymer only quotes ...I have NEVER had someone quote me on Sand And Cement ...YET So I asked the cheapest Polymer quote (still gives me the shakes looking at the total) ..about guarantee.. Well ..I got chapter and verse in it depends on the backing and edges ...Building stability ....weather facing side and how the guttering and roofing are done ... So ...basically (i have heard this before) .,.it means there is NO guarantee ...or very little one, and once you pay your Megabucks you are on your own ...unless you start threatening the legals ...:( not what i want So I called Potton up, architect actually and he said ....basically the heritage style (which is they style we have got) ..they ONLY recommend Sand and Cement Screed conventionally applied to something called Stukanet 80 ?...apparently the same tackle for over 20 years at least I asked what about all these new fangled stuff ..and they seem to think there is no need or indeed any advantage ...I mean we have SEEN a lot of Potton Heritage and some of them awere 10 or more years old and they looked fine ... I mean there is a LOT of it on there ...some seem to thing about 70m2 All told. I am getting quotes that RARELY come in under 10k and one which was a scrotum contracting ....12k LABOUR ONLY God Help us all
-
I know you are right Peter ...and I wasn't going to let it slip. .....But I think it is more diplomatic to pick my "timing" I have told the REAL BOSS today ! ...and she will not forget it 100%... That's the good think about the BH Forum ...hundreds (if not more) People get to read this stuff and then they go forward armed and ready with the right questions...especially if they are ABSOLUTE BEGINNERS like us... ...Makes you feel proud and brings a tear to your eye ! ...i bet CROATIA don't have a Homebuild Forum as good as this ..HA!
-
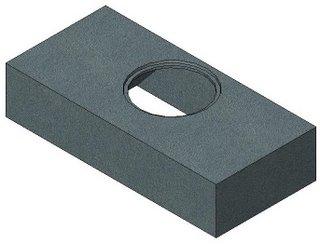
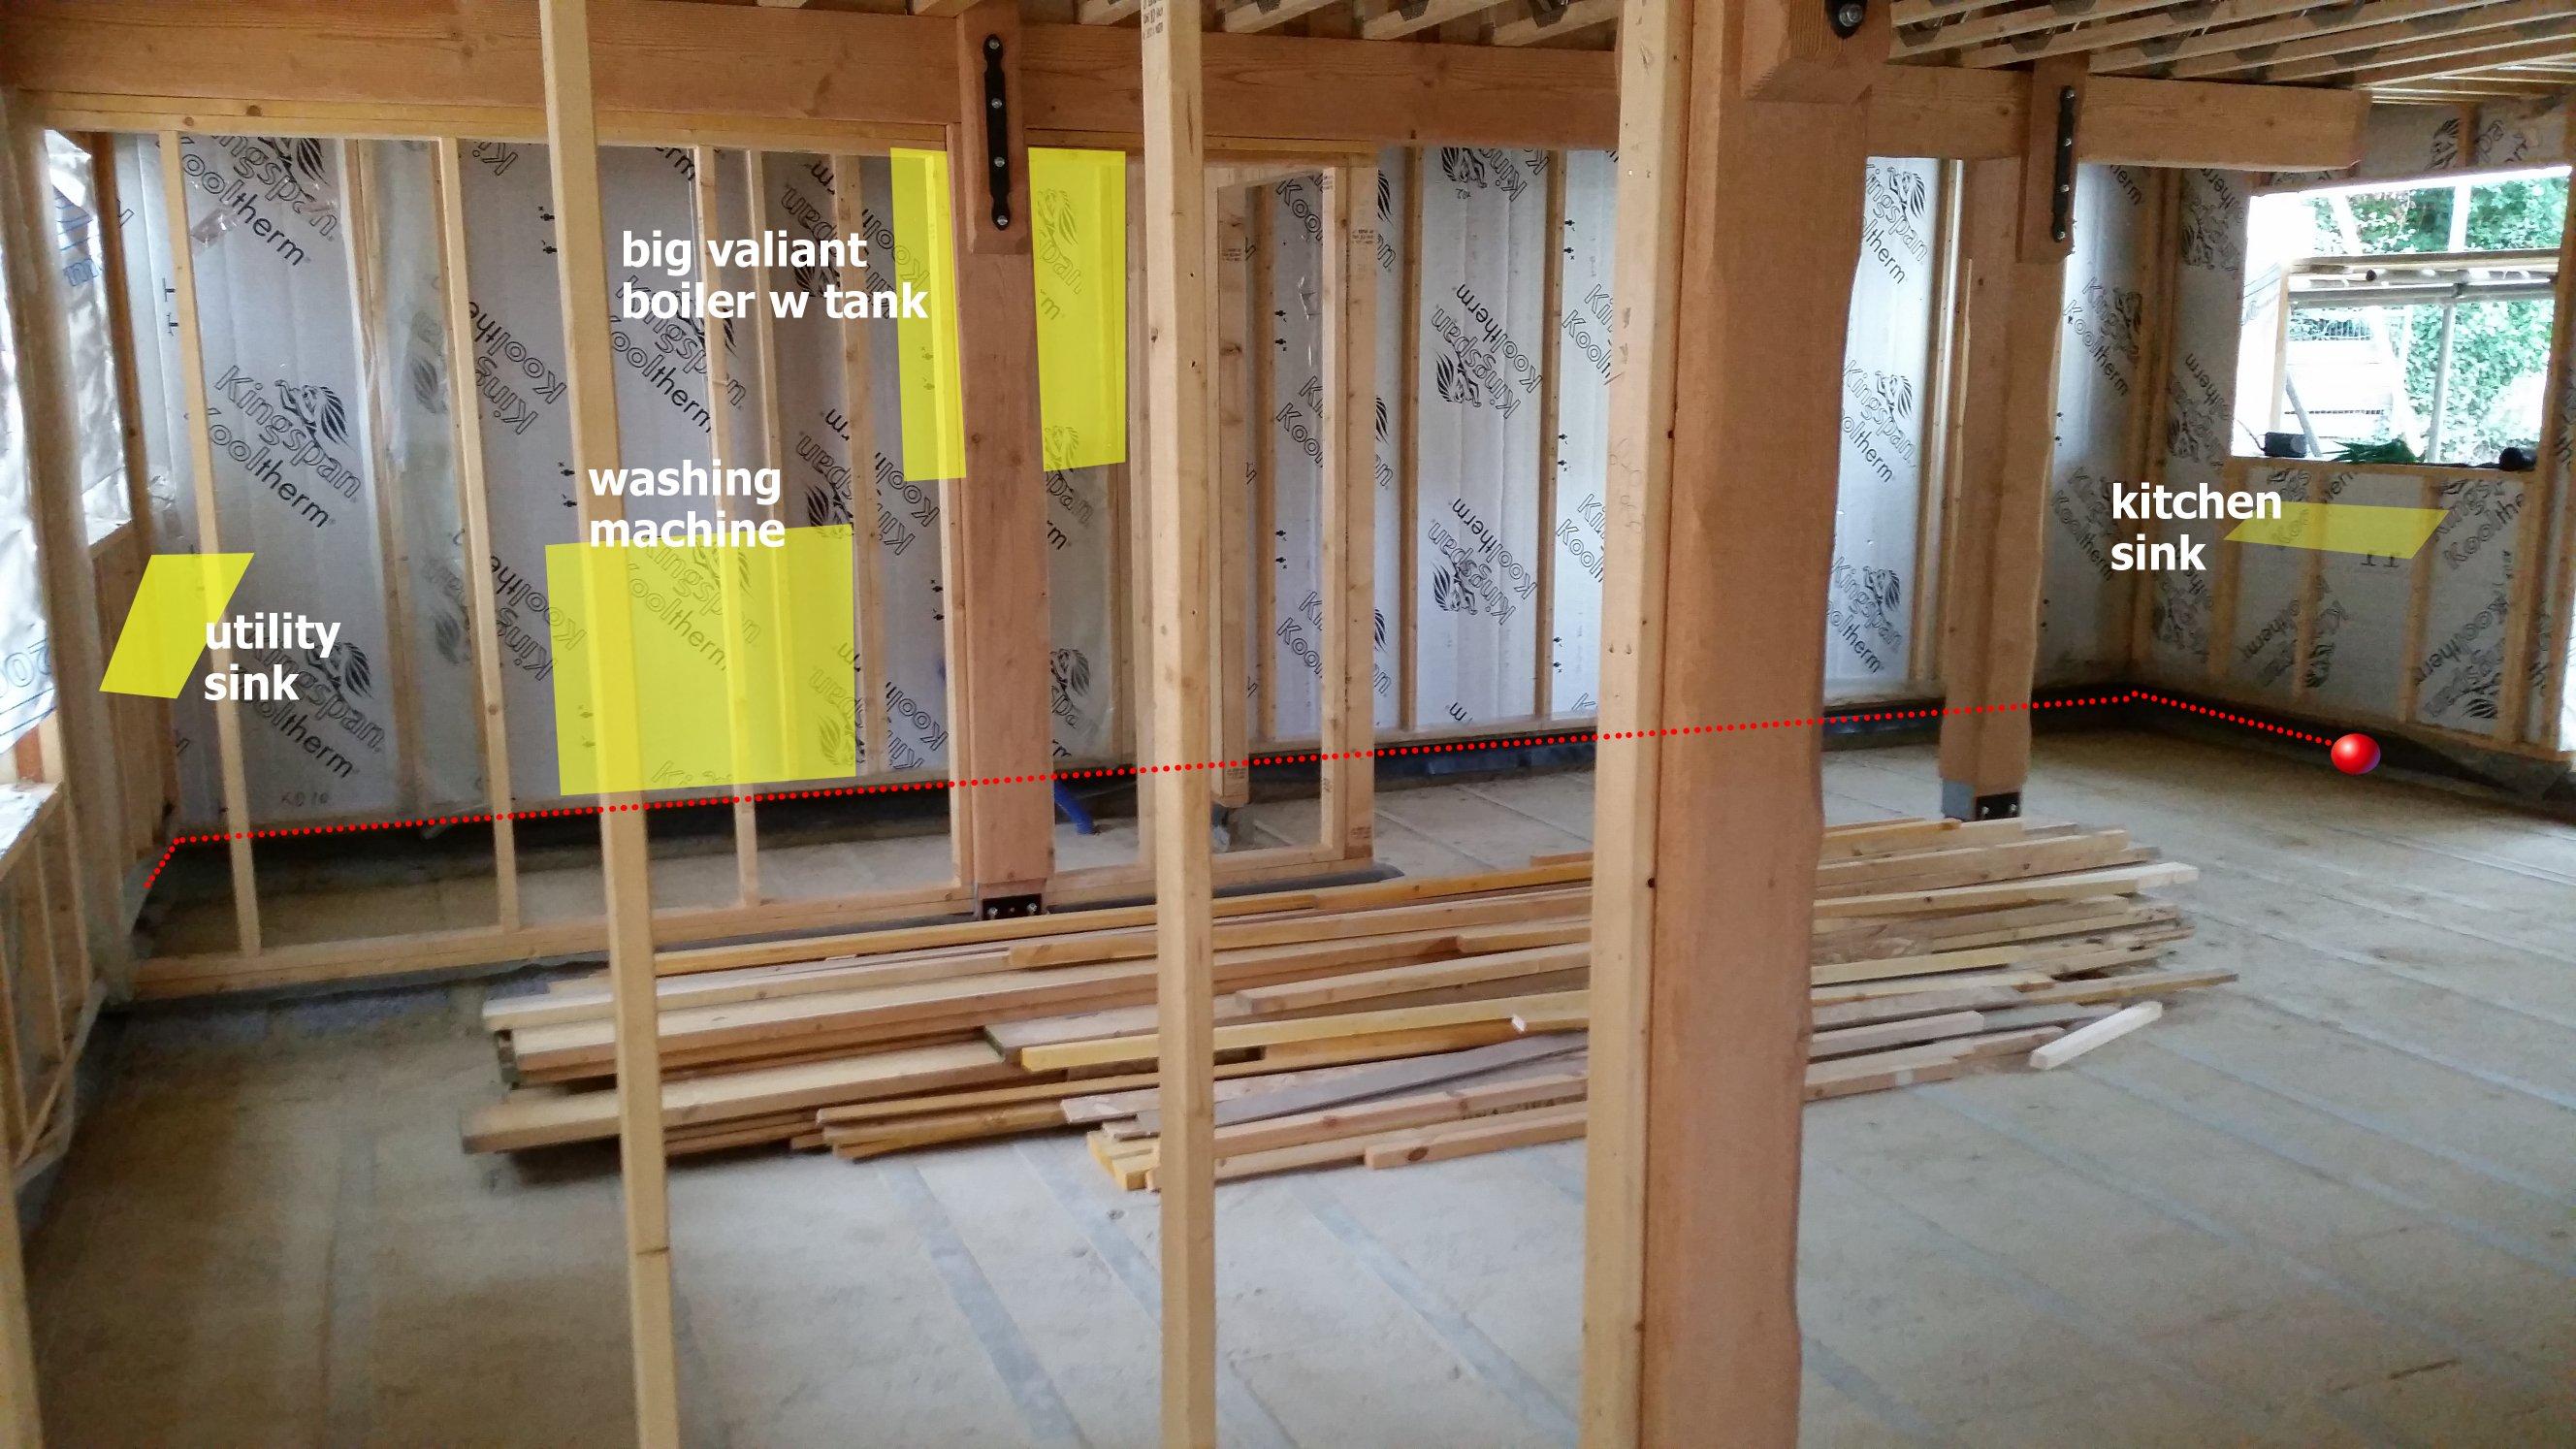
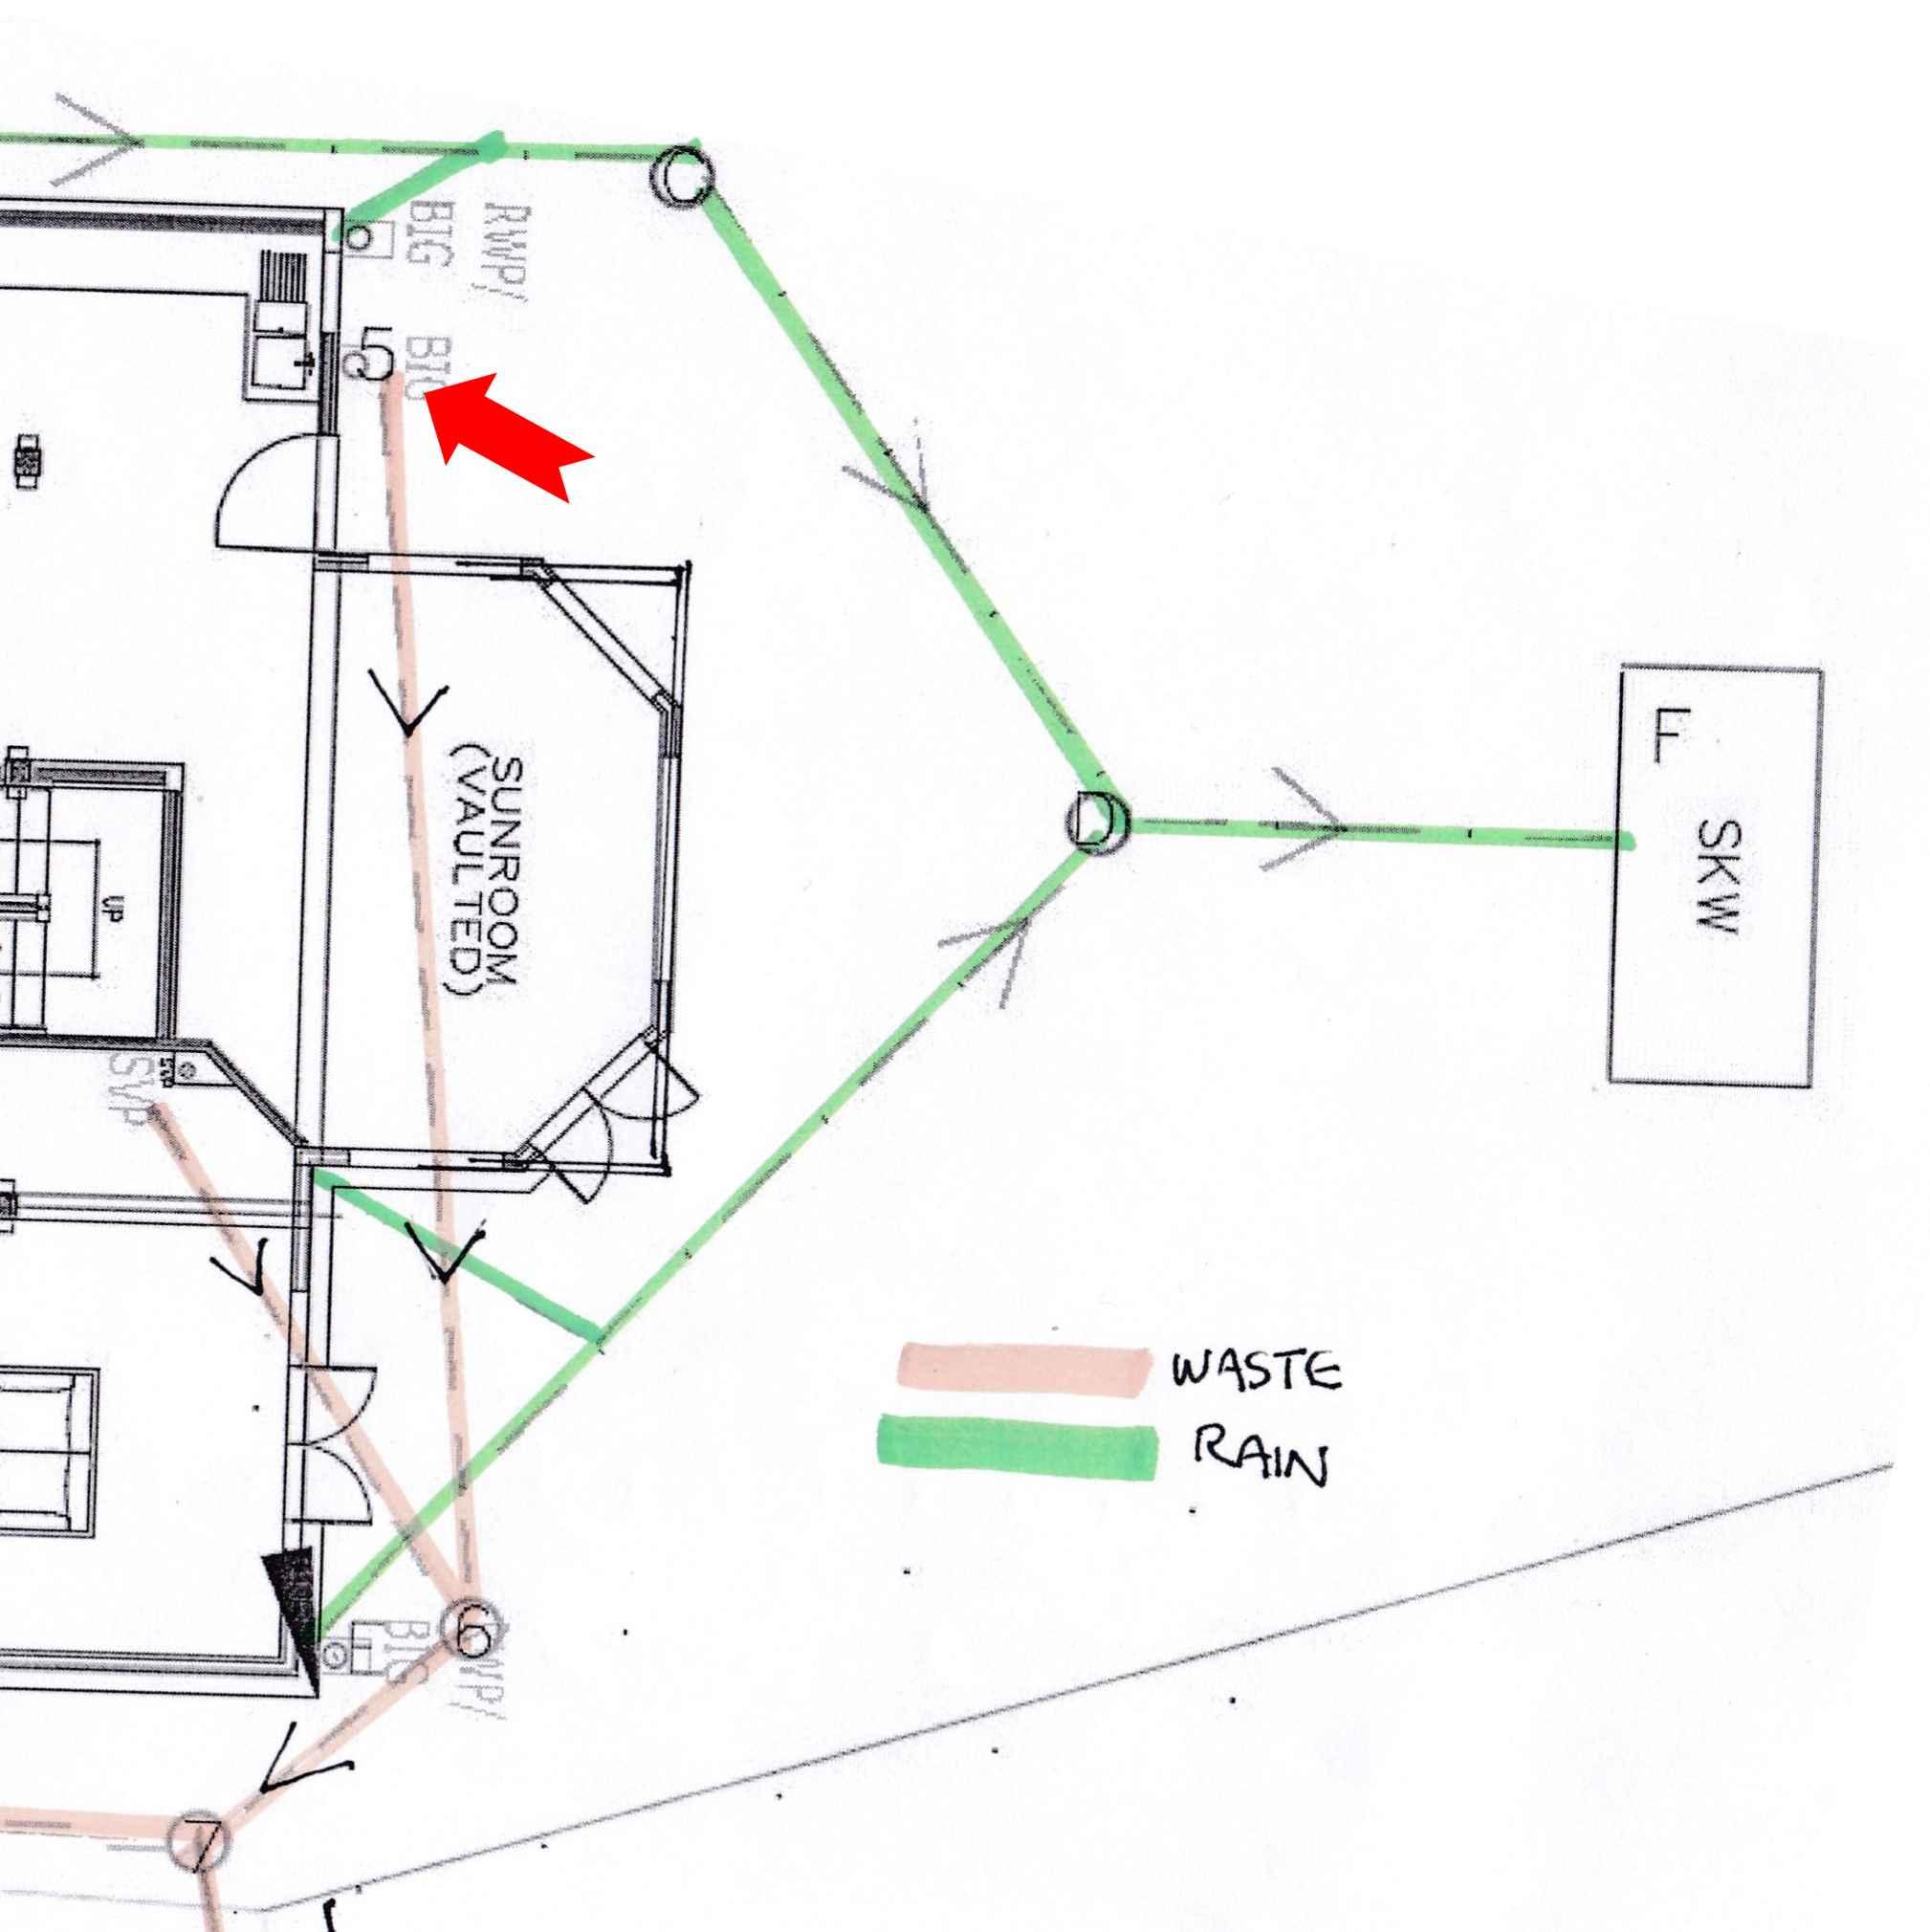
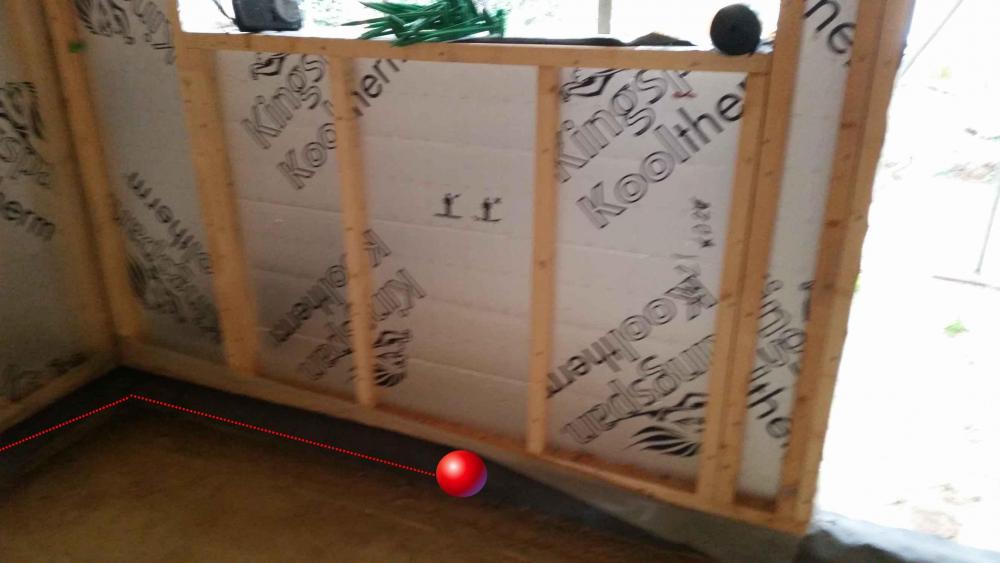
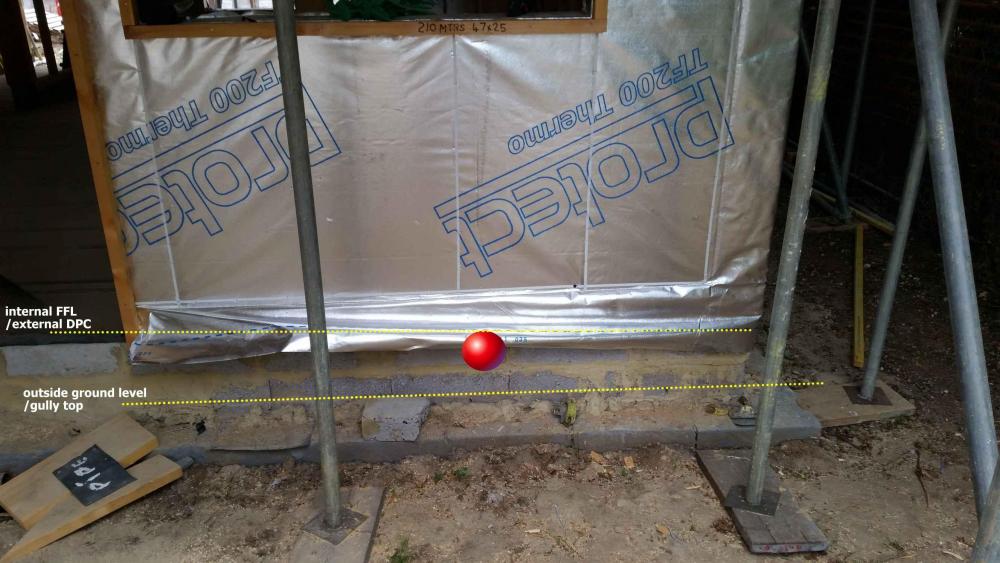
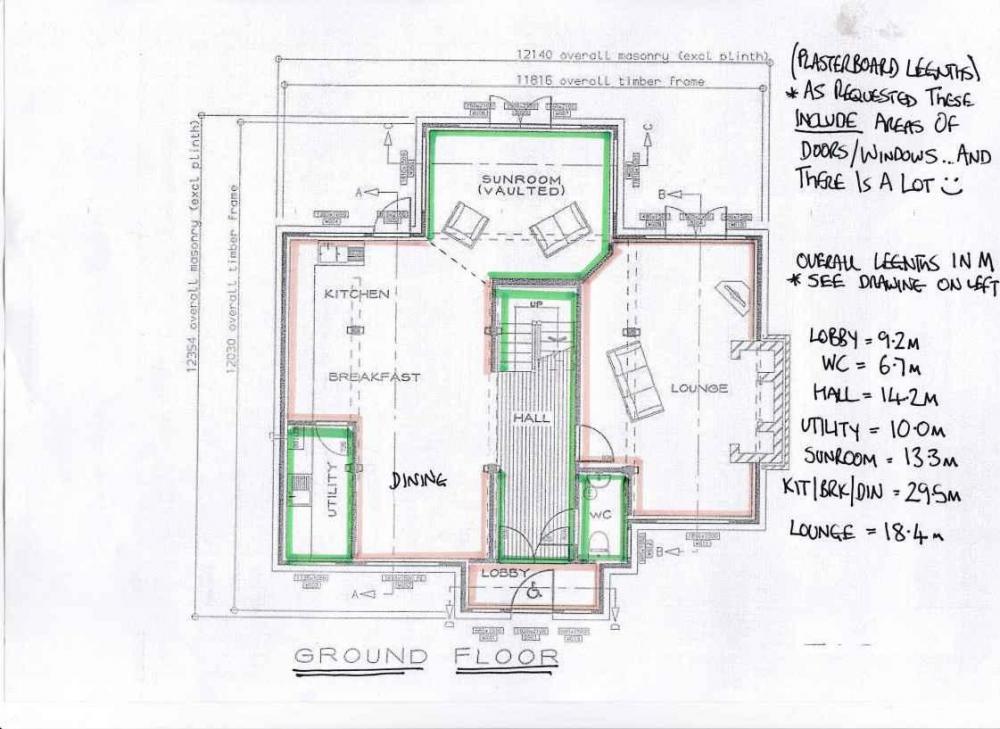
Morning All, Just a few thoughts ...see what you think .. the plumber has been in (nice chap) and the plan is to basically send the waste from the util room ...along the wall to the kitchen window area and out via a 4 inch pipe . I plan to fit the stub for this today But i have a few niggles ....maybe i should have spoke to him ...damn! Basically the reason its going right into a 4inch is he said it is taking a fair few "feeds" ...which i suppose is correct. I think he is planning to get this in before Insulation/UFH/screed phase He is one of those sticklers for neatness and clean lines ....and so suggest building pipes in/under wherever possible ....which is nice But here are my thoughts ..I have a few pics so you can see (as usual) * Is it fine to get a fall on this from the utility room and try and get as much of the pipe under screed? bottom of TF is like 160mm above the B&B ..so is there room to sink it all ...or will some be behind cupboards (not a big issue!) *He wants me to make an EXIT HOLE 4" wide under the kitchen sink, but was talking about "core drilling" to get depth. To be honest, I am a little nervous about cutting into B&B or even the hard blocks between the beams ...COULD i just bolster neatly out a hole to suit in the kicker brick under the TF ...I have a good 160mm so I should get it ? *do you think he means to run a 4" pipe INSIDE too ...I am not sure ...But i dont think I have ever seen it done ...blimey? *From the outside as you can see it would come out ABOVE ground level though ..and then have to drop into a Gully ? ..maybe ... The thing is this is the FIRST run of waste from this side of the house (as you can see from diagram) ...So I am not sure if a BEND and pipe would be OK instead of a gully ......It would be nice to have access for rodding to the AC if necessary ....but i suppose it could be a sealed top or something ? any thoughts? *I know the wife will want me to make a neat exterior job out of it ...and of course the brick face ...not forgetting the extended brick plinth courses could hose a lot of the lovely orange pipework ! ...but doing it MY WAY ..I can't see a way to avoid SOME showing somewhere ...Which i guess is why he suggested me TUNNELLING ..do you ever think if you could go back 6 months with what you know now ...you would be happy as a Larry ..no Time Machines at Travis Perkins ...I looked


-
thanks you Two. As they are finishing off some details in the next few days ...and they have been good to us regarding giving us extra feature timber and stuff....I dont want to "urinate on the french fries" just yet ...but of course ...it HAS to be mentioned. All good questions ...even though 2 x BCO has never asked them of us ...(sigh) I dont want an unsafe house ....so if they don't "stump up" ...I will have to eat it ...as i couldn't sleep at night if i didn't !... thats a LOT of beamwork to treat..I mean i take it to mean JUST the vertical supporting ones DOWNSTAIRS ? ....As those beam extend (via metal box section division) and continue right upstairs too ..eek! and there is even more horizontal ones ..OMG, I will be painting from Now til next easter ....I bet its one of those "several coats applied over 2 weeks" gear too ...i can sense a migraine coming on ...
-
I don't doubt your knowledge for a second Peter! but looking at the slab drawing you can see the 7 beams (internal featured) marked on there like black squares and dashed boxes. These dashed square are basically Load bearing Padstones shimmed onto C30 Pillars that run right down to the Foundation Slab itself ... I am no expert (understatement)...but whatever they support ,,they certainly took a lot of time to line them up and make sure the mix was dead on for them

-
Bugger me ...but there is noting around them TO BURN Sat in the middle of a load of ceramic tile etc We were recommended to treat them with Beeswax and perhaps lightly sand and blow dry first ? They are Douglas Fir ..(what is apparently called in the Timber Frame World ...Poor Mans Oak) ....not how it was described to me when i was signing the order form LOL The thing with DF ..is it ages to look LIKE Oak (takes 2-4 years to take on the colour with age) ....and it is supplied shot blasted and draw knifed ...convincing once you see it and I have looked at a LOT of old Pottons !! If i tell the wife we either have to ... a) Cover it all up with Gyproc sheets with 3 inch felt nails or b) Daub and Soak it in some stuff like "asbestos Cuprinol intuoomy Varnish etc" I dont think I will be eating solid food for a few weeks ...lets put it that way ....its why she LOVED Potton

-
this puzzles me TBH MrP... If they are exposed and feature (6 uprights 25mmx25mm ..all through the house) ..but they must be structural too ...as they are sat on the C30 Concrete to foundations and Padstones ...so presumably they are holding the frame up (in conjunction with other elements) So how can these be made Fire-resistant for 30 mins ...It' s not like i can insulate and box them ....the wife paid extra so she can SEE them
-
Ouch to BOTH of the above posts !!! Any advice ...
-
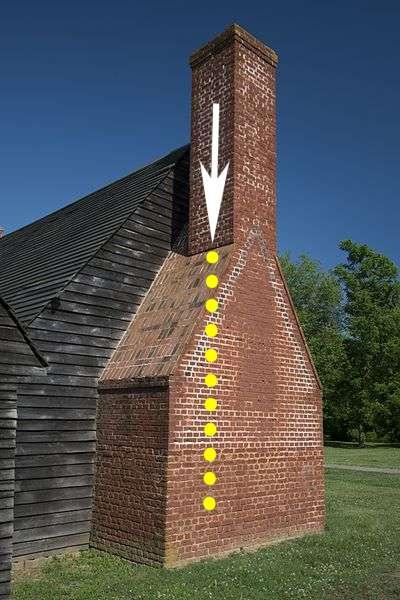
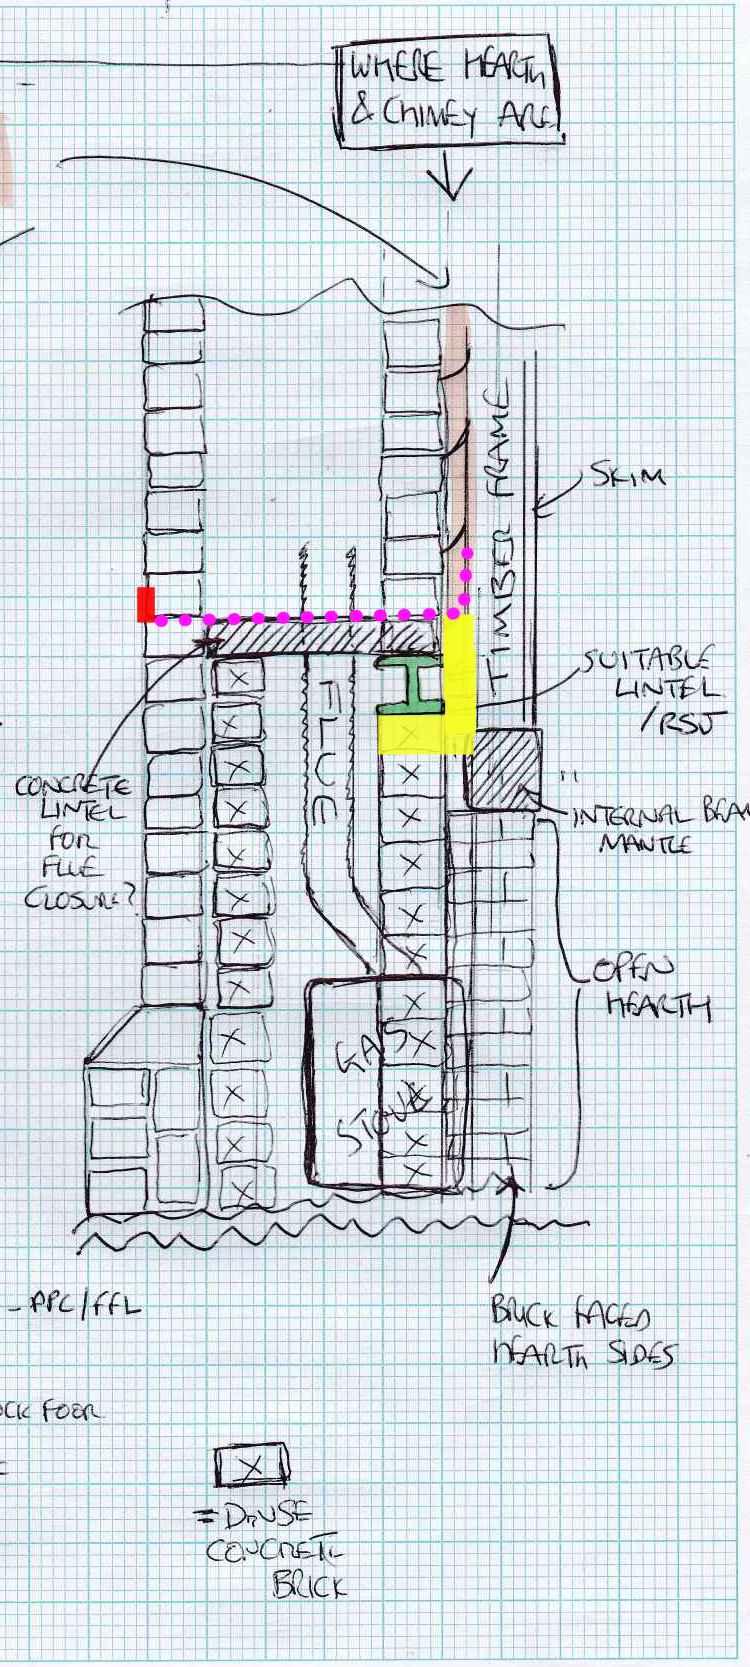
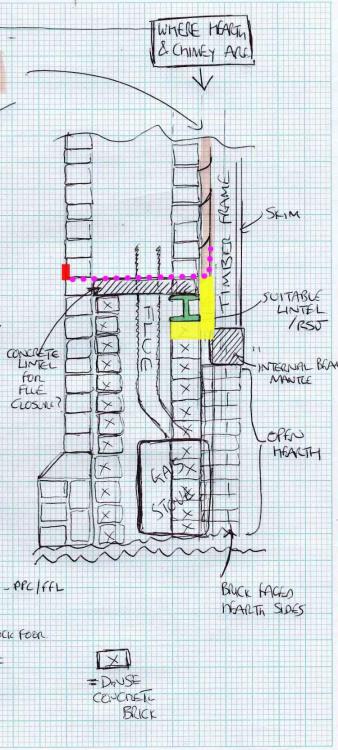
Might have to convince HTMBO ...to drop the 2nd chimney pot ..if its going to make it look like Windscale ..and cause more headache for me..and you guys helping me ! I wish I never heard the words "twin-wall" , "RSJ" and "dunbrik liner" LOL So I have taken your advice above ....and have altered my sketch In the below pic ..does THIS solve our problems YELLOW - Concrete Bricks supporting the lintel now tied on edge into a course running upward flush with TF to close the Cavity and hence the draught into lounge? PINK - A bloody Wide DPC curtain, Lead sheet (whatever is best) ...Tucked under the Kingspan Outer insulation (by cutting and inserting and nailing back) this will then run all the way across the chimney are and be fixed well around the liner cirecle ..basically sealing any water from coming down the cavity and channeling it away to the outside skin RED - 4 - 5 "weeps set into the outer and side face brick ....so that any water collected by the DPC/lead curtain is allowed to drain away have i cracked it ....or am I just crackers ?
-
Potton Rep called in about an hour ago ...he is very helpful chap really. but they dont really like to advise anything to do with groundwork or floors .. he did say he HAS seen the shuttered and filled with Concrete to the top of insulation ....with screed on top of the lot ...but he says he has also seen it just packed tight up with insulation (as per rest of floor) and then screeded to correct level I am tempted to go for the latter .....not out of laziness....but i cant see what benefit a mini 4in concrete jacket serves ..can you? I mean there are now bolts in the bottom (albeit obscured with engineering brick and resin) ..so i cant see them getting "moisturized" Oh and yes ...screeders and plaster guys HATE working near these type of beams ....whenever they see them they start talking about us making sure they are "beaded or shadow-joined" where they meet ...and full poly wrapped ...and coating them with wax/oil etc is advisable Not responsible for any damage that lime or cement does to feature woodwork ...please sign this waiver ? hmmm...I am not sure what has happened to these guys in the past ....but they are scared of something...and this isnt even oak! So if anyone else is planning to plaster close to these type of beams ...I think caution is the best option ...I am going to wrap and edge these of like I am lining a Nuclear Cooling tower !!!
-
Ah...got you. Never mind board lifters then....have u seen this gadget ?! Is it just me or is that a LOT more hassle than a man with fast arms LOL
-
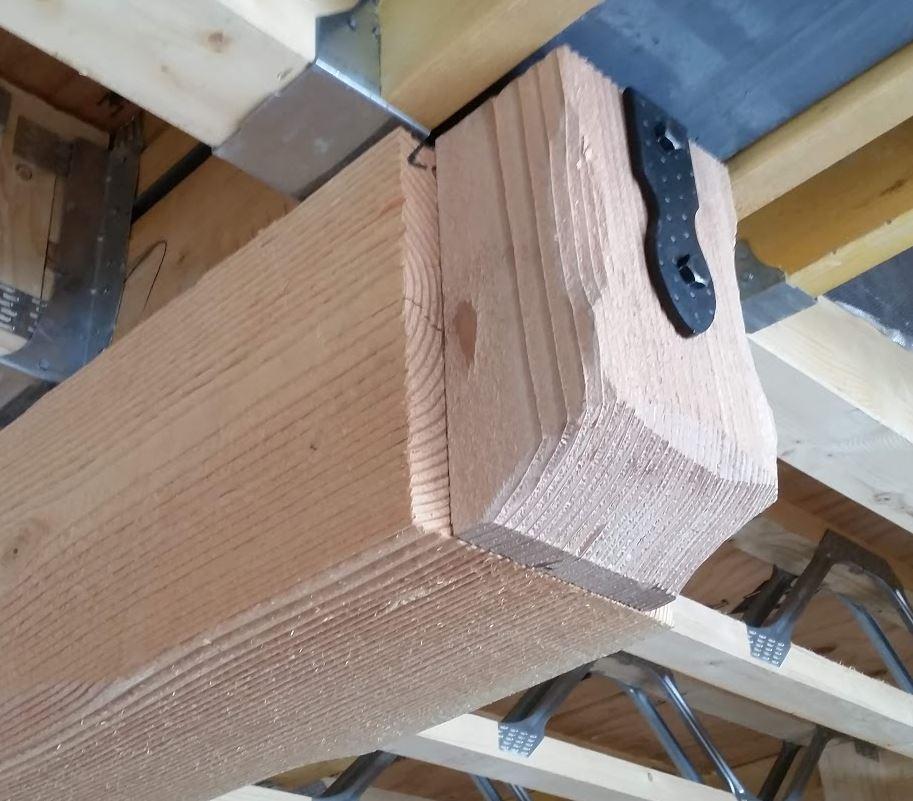
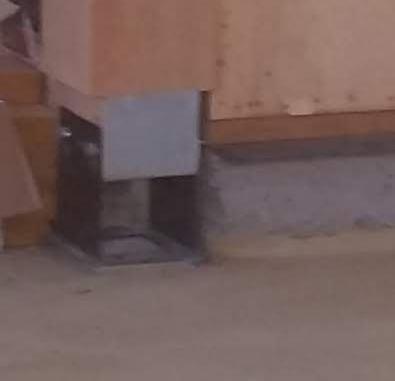
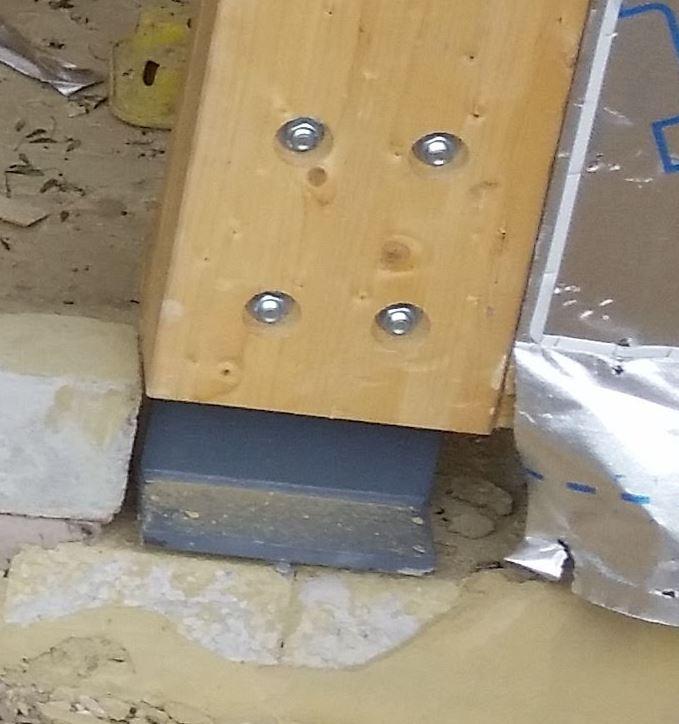
Hmmmm regarding Timber and "sole plates" not sure if we are talking about the same things I am thinking about. I have 2 different style of connections where the Potton TF meets the Floor a) the inside ones are like a little Catnic box, supporting the pretty timber beams....Metal "feet" have a space inside them ....these have now been bolted and filled with Engineering Brick, Concrete 4mm "shims" and smothered in some type of Glue ... b) the outside ones are what i think is referred to as "Glu-Lams" ?? and appear to be metal bolt-sandwiched between chunky timber beams..the metal looks far more substantial than on the internal ones Does anyone know for the type A above ...do i need to to do anything to them prior to insulation and screed ? I heard someone say shutter them a few inches around ...and pour C30 in there just shy of the Screed top level .. ..is this a common practice ? Type B external ones ..have typically some large gaps around them where they meet the kicker brick course ...I am thinking if the screed is pumped in ..i might lose a cube just getting leakage out around these ..should i shutter and fill these gaps with concrete/trench block prior to Floor Pour ?..or is there some hidden engineering reason for these spaces ?
-
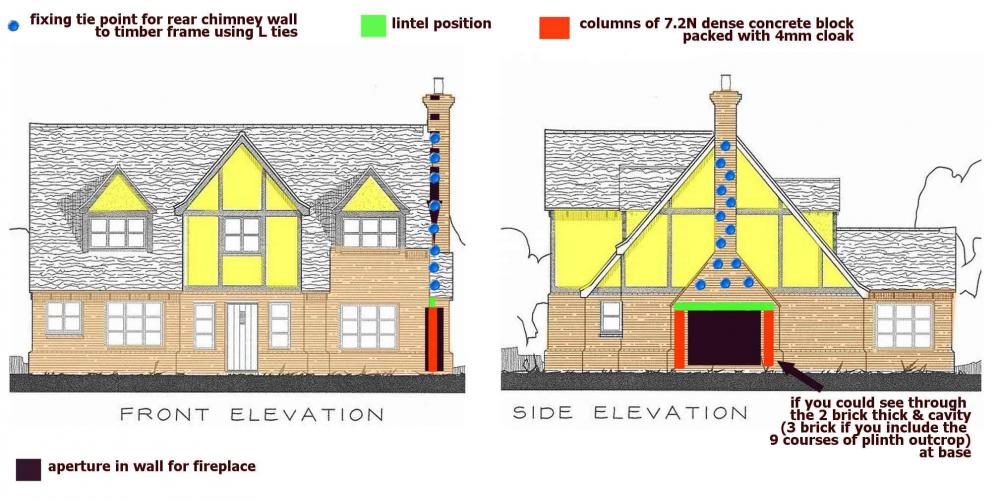
I agree Peter!...I know we have been talking in message about this ....but I finally see what you mean. For others ....it is a TF Frame with a 50mm Cavity Faced off in Brick ....The lower 9-11 courses have a "plinth" and under that it is "Brick and Brick on Edge" to get extra width for plinth stand-off ...no problems wit the plinth me thinks ... Now I can draw this Chimney area easily and it has the same structure as the wall too ...plinth, face and even put in the 50mm cavity Of course this cavity will now be between Brick (Outer Skin) and Concrete Common ..but it will still go all around ...good ? The issue here is the where the chimney abuts (is that a word) the building... For strength I was thinking that the planned RSJ/Lintel (which would carry the weight of the chimney wall up the building) would need to be fixed SOLIDLY to the TF itself, ...via copious L Arcon Ties ? This would of course KILL the cavity above the lintel effectively i.e. Inner chimney course upward from there...would have no cavity ...basically in the below image it is the area that shows the fixing points. Oh ...and the Rendered area ....which will be done later on ...does have a "stand off" on renderboard from the TF ...not sure now much. but of course it would be "beaded" where it is to meet the chimney..I presume I mean it is drummed into us ...Cavity, Cavity ...CAVITY !! But in a case like this ..is there any alternative for this area where we could ADD ..something, a barrier or something ...and kill the cavity ? I mean the chimney itself ...Tall Run is NOT humongous...externally it could be as narrow as we wanted .....but as the wife wanted a twin pot (God knows why ..its only a gas fire) ..,it will probably end up with external dimensions of 1000 x 450 ..so slightly FATTER as you look from side elevation
-
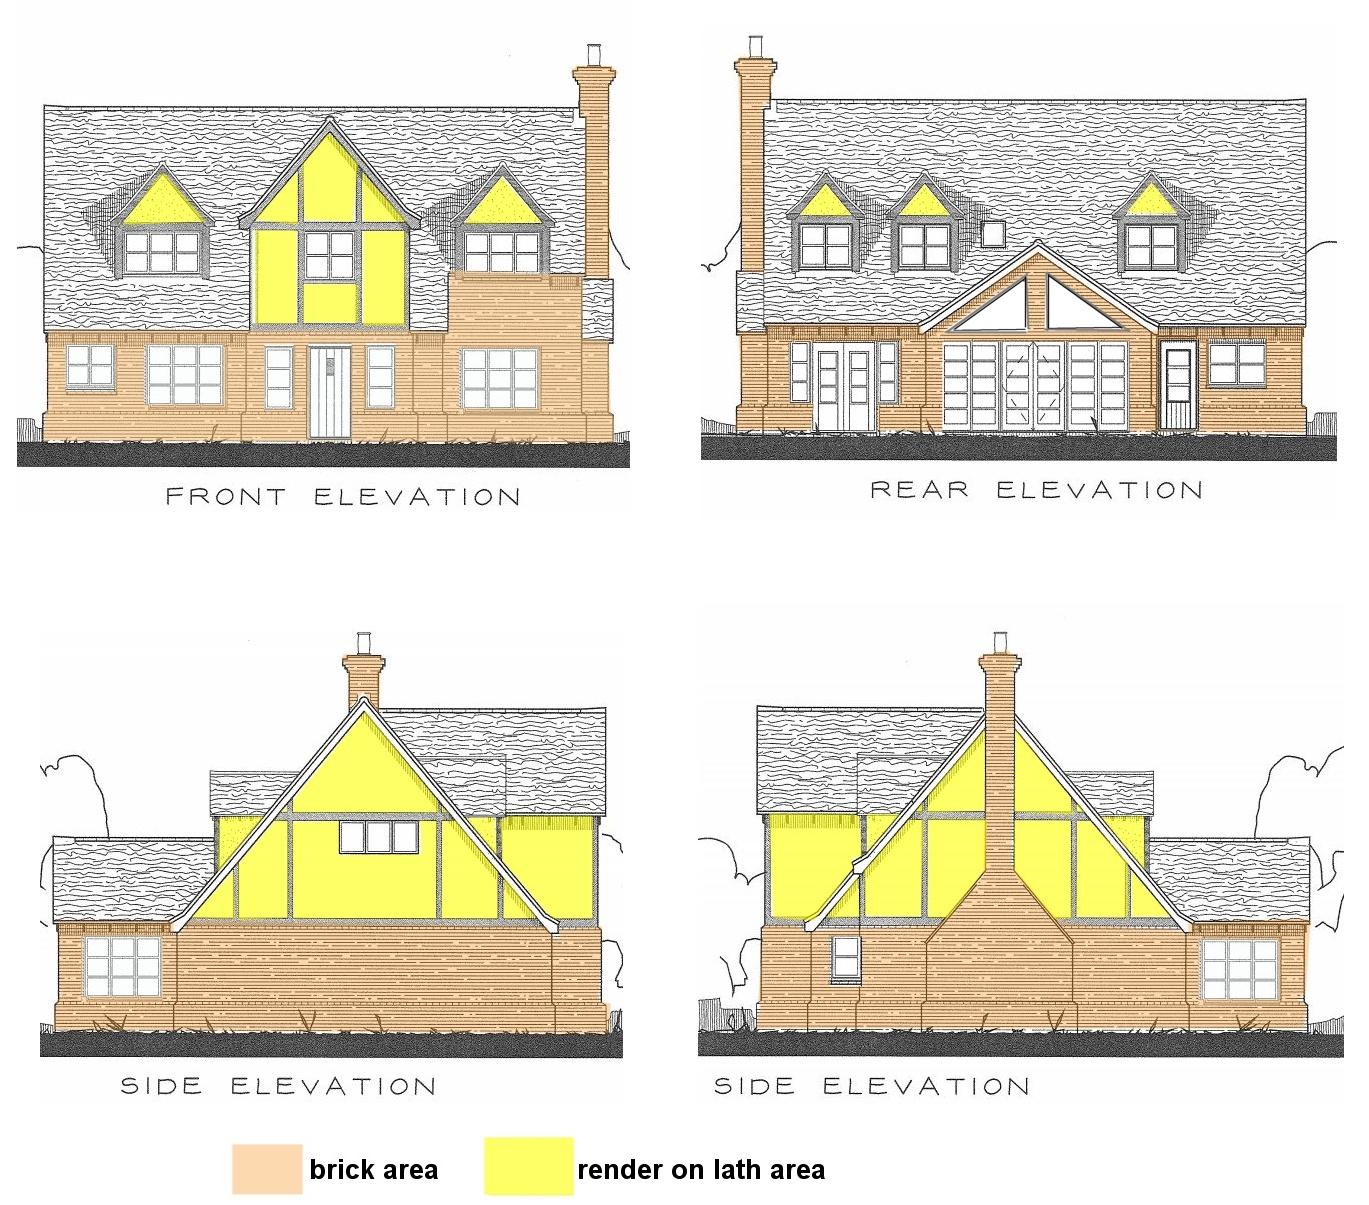
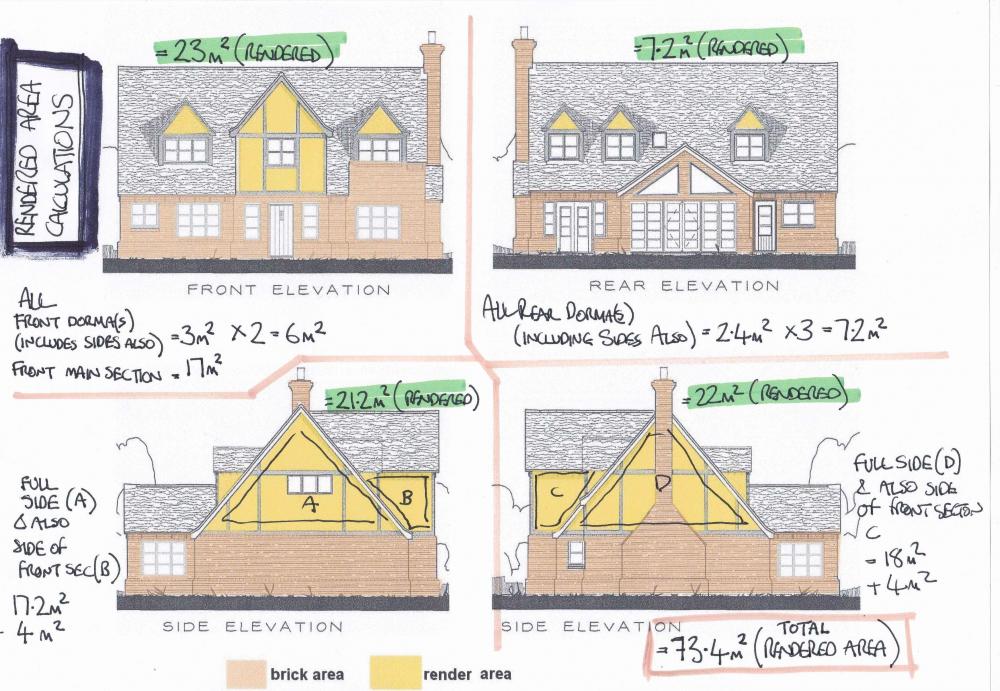
You may be only right DF! Lets see.. 3m x 2.5 = 7.5m Lets say the Top Triangle is roughly Quarter of its Square so 3x3 = 9m so lets call that safely 2.4m And if we use the same "Fuzzy Maths" with the 3 dormas ..we could get 2x2 = 4 if it was square ...so lets say using the rough Quarter rule again .... it was 1m...and then each "cheek" / side which you can't see is another 1m So each Dorma you could say 3m for all sides So 7.5 + 2.4 + (3*3) 7.5 + 2.4 + 9 18.9 tops ...RESULT Well I'll sit in the corner face to the wall !! and I went to bloody grammar school too! ..I dont know about being a high achiever ...All i ever learnt was nuns hit harder than men and NEVER let yourself get caught alone with the P.E or R.E. teachers..or you may end up in some small cupboard helping them find the "lost key" ! (gulp) ....thank god i was Fat and Ugly ! On another note ... I think I must have included the Side Cheeks for the main section (doh)
-
Nice!..I can see a labourer out of work with that puppy!! ...ah, but then no-one to mix the lumpy stuff or make a mess in the Portable toilet . ...so they are safe !
-
I am in a similar positions ....albeit I dont have anything to knock off as its a new build Timber frame ... I have had a few quotes from Good Old S+C (which some still say is fantastic) to all these new sexy self coloured silicons that you jetwash and some other stuff too ... confused? ...ohhhhh yes (as the Churchill Dog says) I keep going over and over the elevations in an old auto-cad ...and i can't seem to get over how the sq meterage is soo high ....when you add it all up (see below) with the prices you quoted above ...I am hoping I can chip a bit ...or else my house will be "bare-arsed" for a few months. although I could get used to that Silver Potton Insulation look ......kind of Space age
-
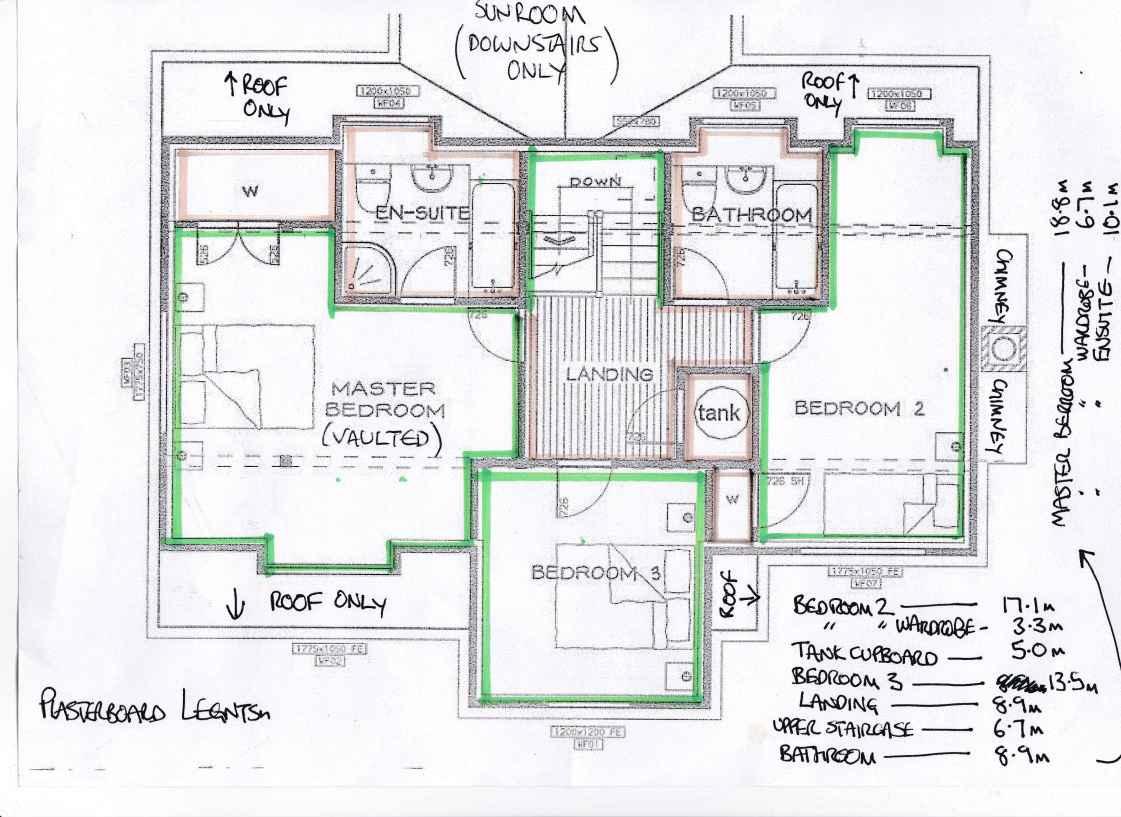
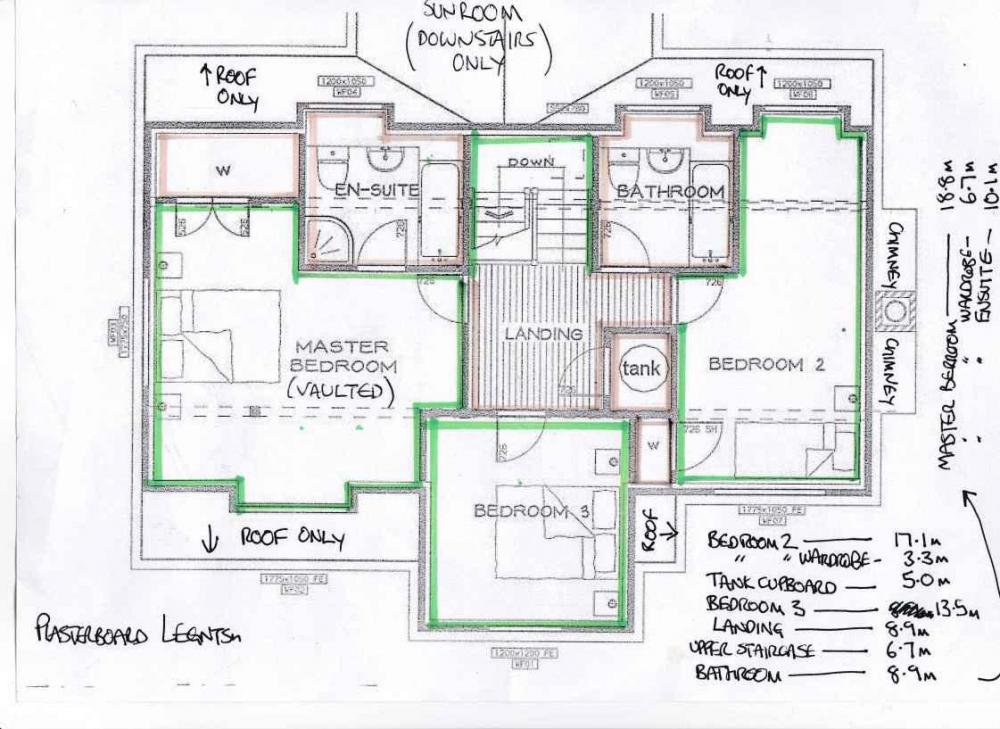
Well, I have the 2 floors attached, but linears only sorry I used a laser so its pretty accurate ...if anything ..if i had doubts i stuck a little on! Worth noting though * It is walls of each room (not ceilings) * I have not removed areas of doors and windows ..so they are included in room circumferences * Most rooms are a "normal" height ...except for Sunroom and Master Bedroom ....which are Vaulted (slope up from normal to beams ..(say 10 foot at top) I am no plasterer (but I think you all know that!) ...but the rooms are fairly straightforward...although the upstairs dorma's could be "fiddly" i supoose
-
Is that a tool or slang for plasterers labourer ?
-
thanks Guys ... I dont like discussing What I am being charged/quoted ..as i makes me feel like I am betraying a trust but (sigh) here goes I have been told if i BUY ALL the materials ...Its going to cost me about 6k in Labour. If i fit all the board ..about £4k I wish I was fit enough and had a spare pair of hands to help me ...but i don't and so option B is a no go
-
Morning Chaps. I had the plasterer come to see me ..Nice chap ..seems to know his onions! And he was discussing the "first Fix" (Board up single side phase) ..and he rightly pointed out areas and edges that need battening and finished so he can lay good board ..so I made notes He told me that I would need 18mm ply here and there for strength ...which was good advice I guess and then was asking me questions about the Plumber, Chippy and Sparks and when they were coming in ...so obviously a planner..if not a little "picky" which i dont mind So Discussion was made of 2 part payments one for first Fix and second for Finish board and Skim... its a new build and I am not sure what really to expect for Finish and skim and whether it has changed a lot from the old days of Browning scratch coat and then that Thistleboard super-smooth one I remember when i left school and TRIED to be a good labourer I have been told it would be better for me to buy the materials as I could claim the VAT back on my build, SO I said fine ...but the Labour seems to be a VERY different between the 3 quotes i have had .... I know its hard to visualise ....but its not a MASSIVE house ...its 3 bedroom detached with the only WEIRD bits worthy of note is that: a) it has a Sunroom (5x3m) which is about 50% glazed area ..the rest will need plastering b) 2 of the bedroom ceilings are "vaulted" I know this "blue-skying" ....but what would you EXPECT to pay for labour only to board and skim ... Does anybody have a good guess for me ?
-
It is for me Peter ... top be honest with the heat i didn't sleep much last night and i went out back with my maglite at 3am to do some more exact measurements ....am i mad ? ...possibly! anyway i sad down with some graph paper and i will be finished soon and let you see it .. I THINK I have cracked it ....going with your recommendations for cavity and what space i have to work with using the RSJ..Tx the only bit I cant seem to get my head around is where the chimney "narrows" ..i.e at the top of the first floor it stats to come into the actually upper chimney width .. Now with the RSJ and the other walls supporting all 4 sides below ...I think we are on the money ...Boom! But (unless I am being anal again!)...when the span gets narrower ....at this junction does that not change the load bearing from the edge of the outer chimney walls to nearer the centre? i looked online and they seem to show bricks "stepping" up with a large overlap ...but surely this wont carry the weight of that side of chimney say 200 bricks or more away to the edges? ...or is this some engineers mystery that just "works" I will show you what i mean ,......its basically this side (and the opposite one) I know this is not my chimney ...but it was best example of pic i could find in first 7 pages of google images ! ` hang on ...I have just found the below on dunbrik site ...is this the hidden secret weapon ??? ...but it only says 1m wide...:( and i was thinking it would be something that fit across the very TOP of the wide bit and right across to take all the weight from the slope to the edges ...like a bridge and a start for the flue pipe in ONE ...ok , my bad