


mm289
-
Posts
37 -
Joined
-
Last visited
mm289's Achievements
Member (3/5)
11
Reputation
-
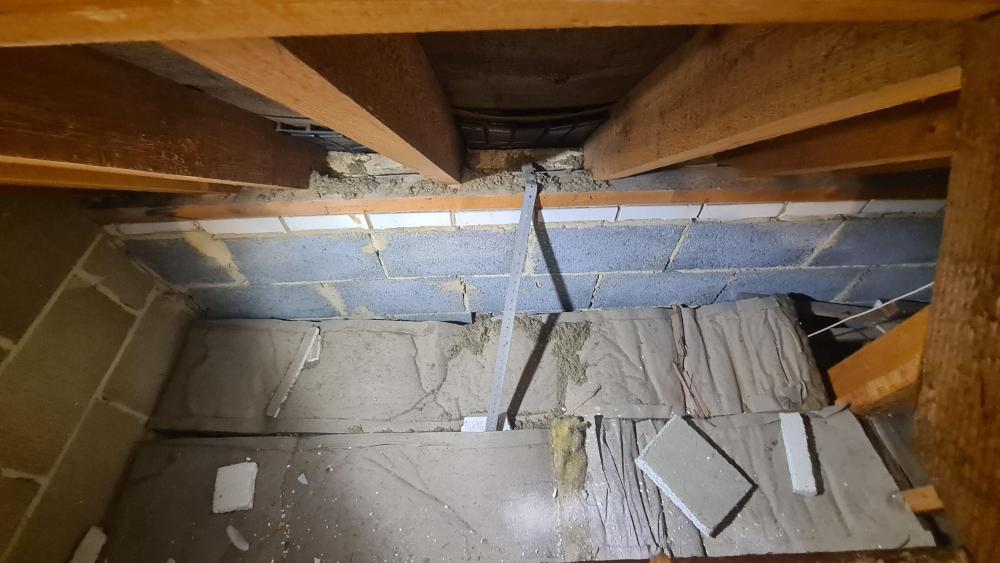
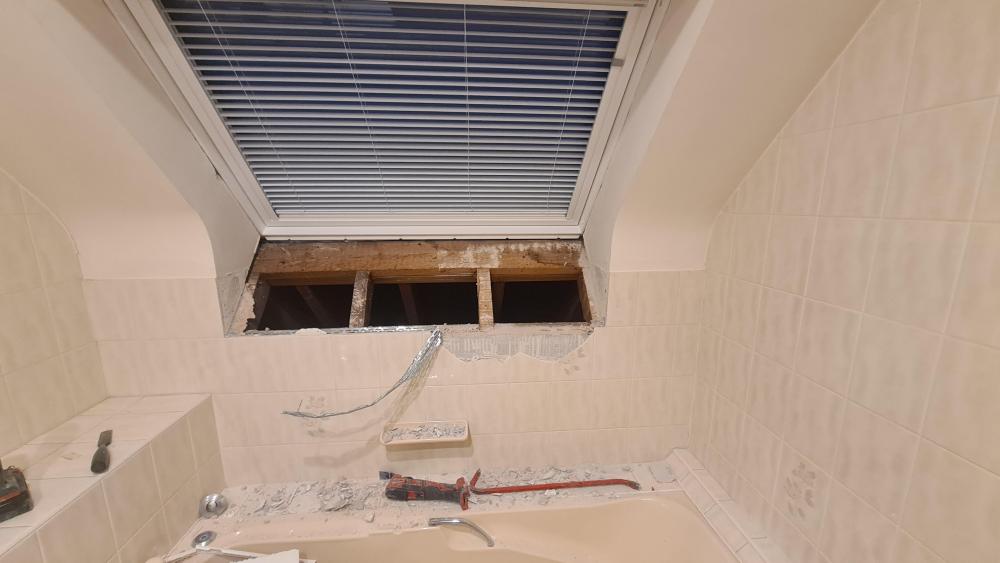
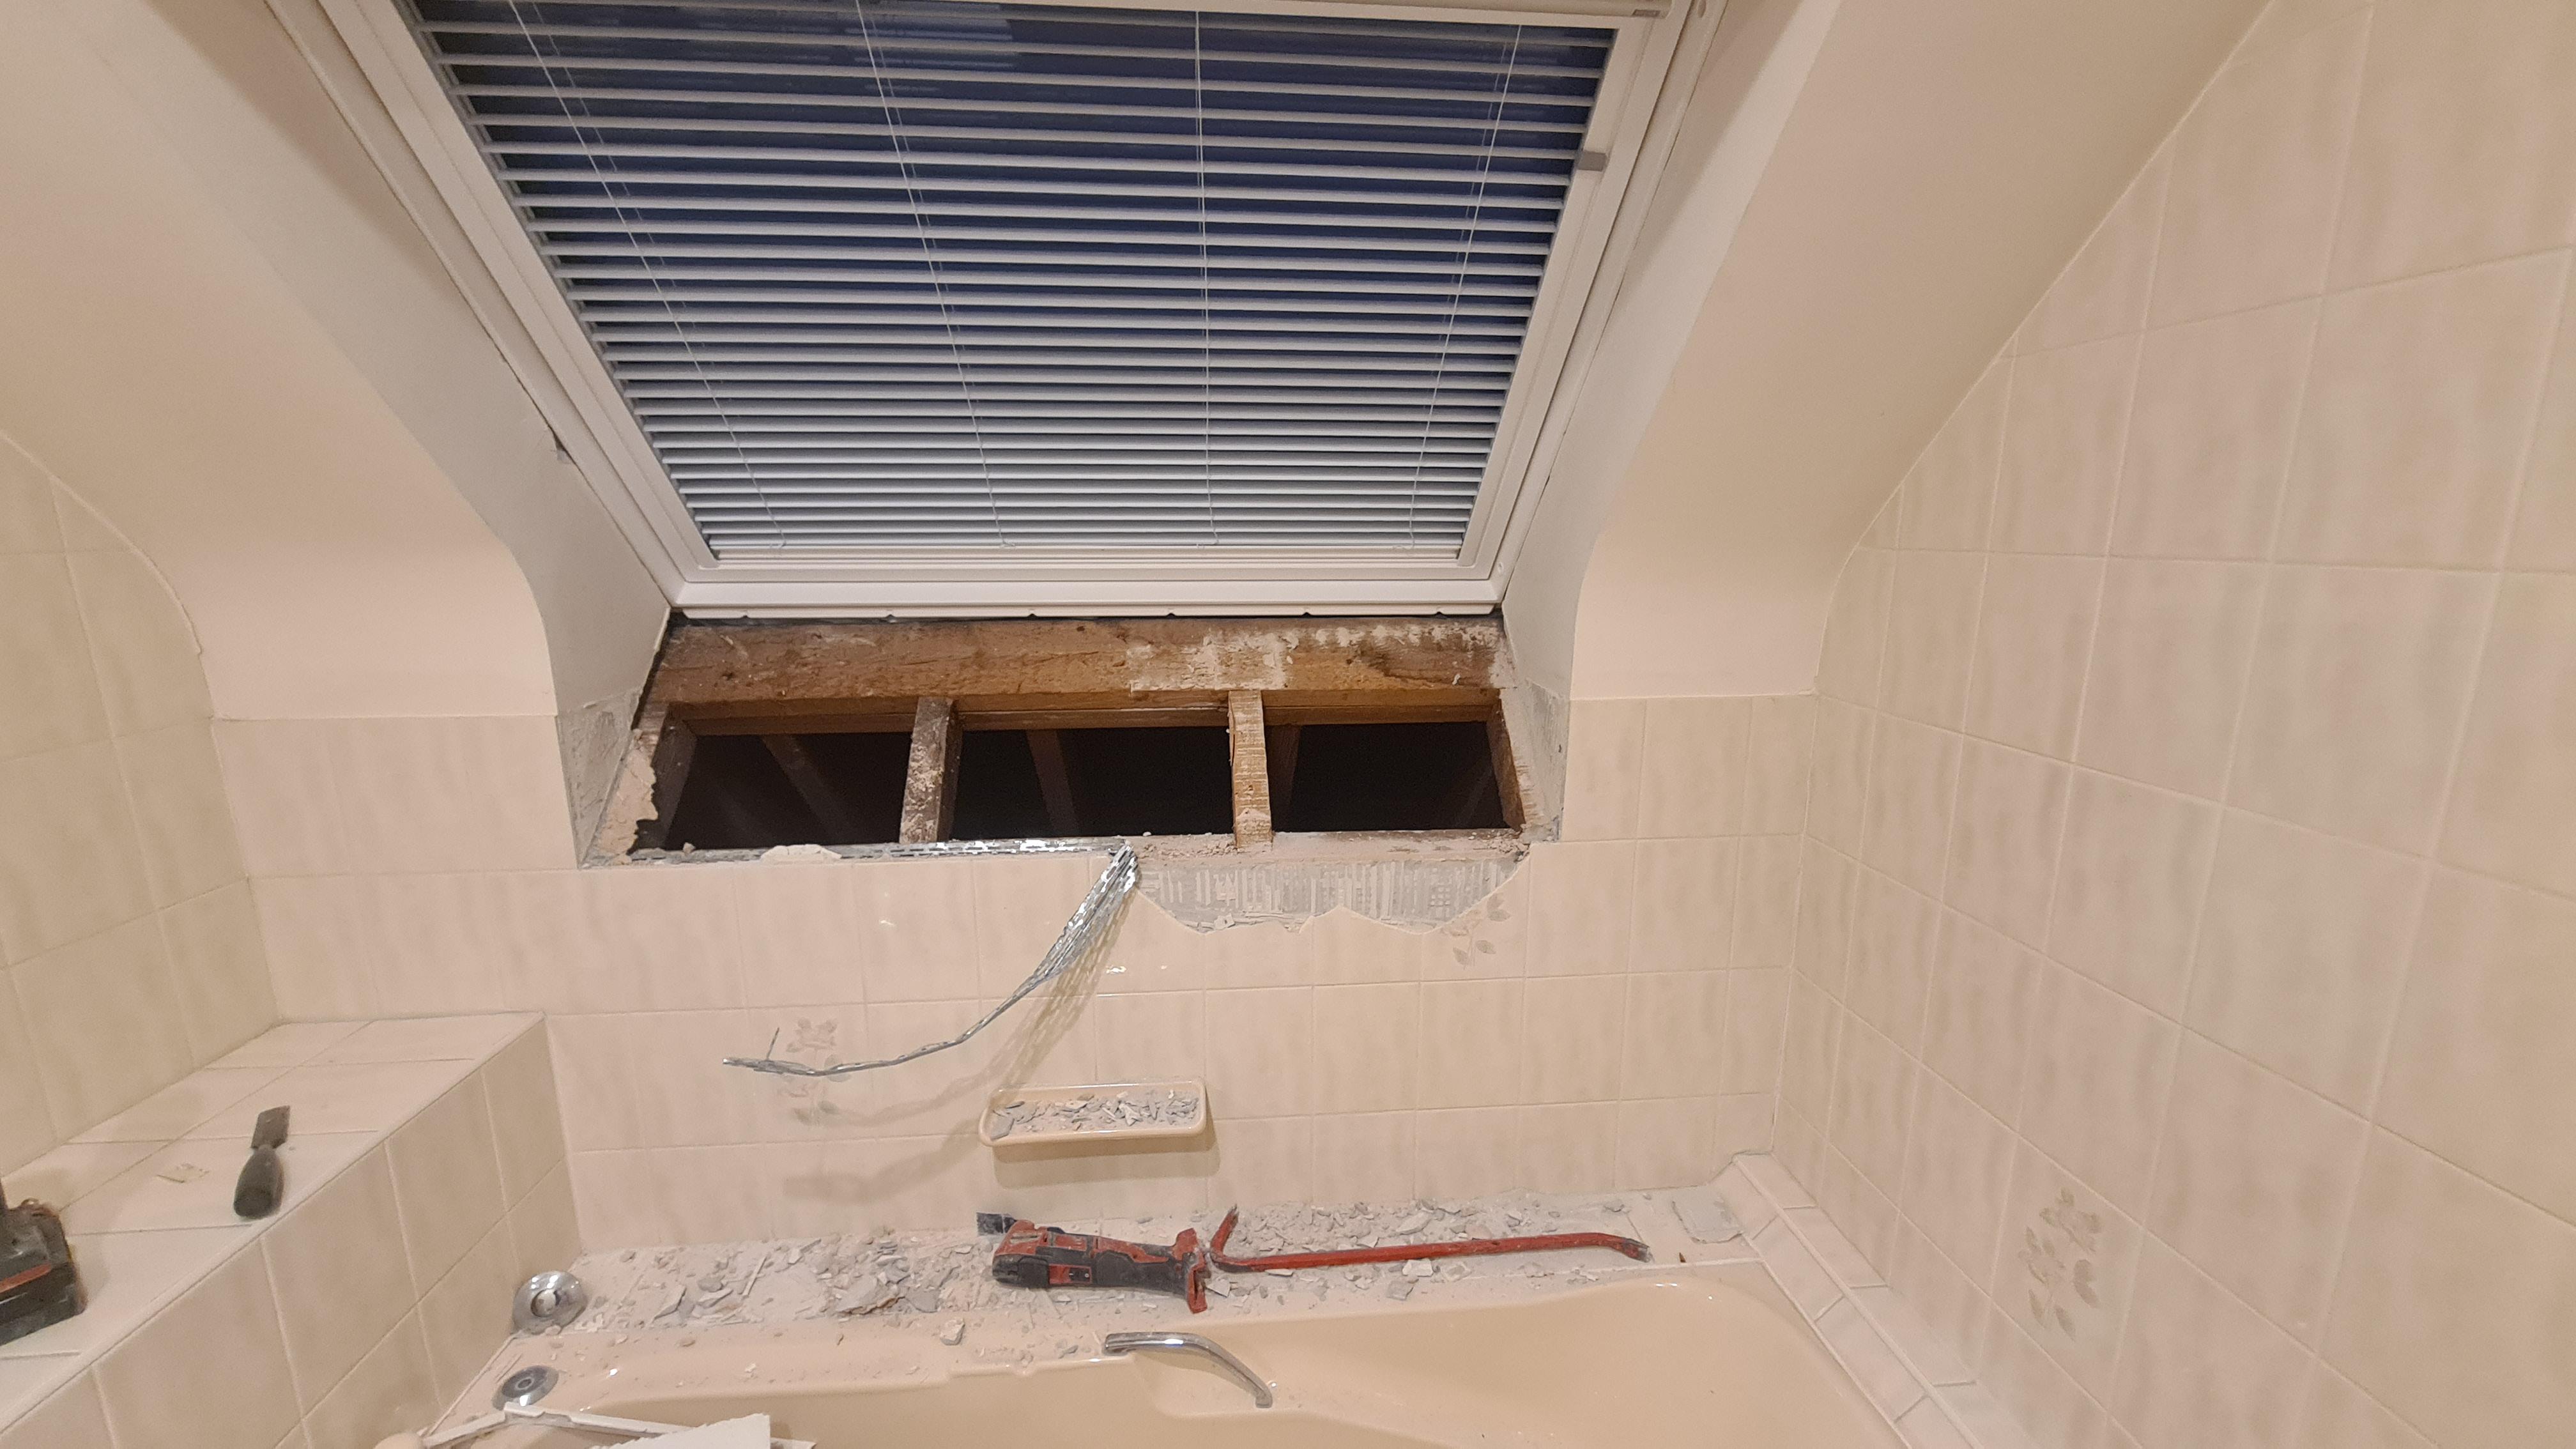
Evening all, having finished the C18 farmhouse a few years back now starting to upgrade a 90's build terrace which is colder than my farmhouse was 🫣 The place has had cavity wall insulation fitted historically and has about 200mm Rockwool in the roof but apart from that 🥶 We are starting to expose the top (3rd) floor as we replace bathrooms and as suspected have found that we basically have stud (with some 50mm polystyrene) then a rather massive air gap (1500mm) to the felt/roof. The pic below shows the stud wall behind the bath which is all going to get pulled out to create access Between the 2nd floor ceiling joists is some loose fitting rockwool and that is about it - above this room is the loft. This pic shows the eaves void, with the rafters running up to the loft/ridge beam and the 2nd floor ceiling joists below. So my plan is to get into the eaves and start by: laying 200mm rockwool between joists Foam up where joist ends go into wall/blockwork I initially thought I would just be able to fit Rockwool bats between the studwork when we replace it, but having taken the plasterboard off the gap in the eaves is huge, so am now wondering about putting PIR in between the rafters as well? Problem is, because of access issues I will never be able to make this area a proper "warm roof" so is it worth trying to insulate the roof structure or focus efforts on insulating the stud? Any thoughts gratefully appreciated (I think it was easier working with 18" solid brick lol) Cheers, MM
-
we have two wet underplinth heaters fitted in our kitchen to supplement a small rad. I quite like them, unobtrusive and with two fan speeds the slow speed is pretty quiet, you can tell its on just but not so that you have to speak louder or turn the telly up. For us they are also useful as we have an old farmhouse with solid walls and no dpc, so I like the idea of some area circulation being created under the kitchen cupboards to mitigate any dampness in the walls. Cheers, MM
-
We had an oil combi in our farmhouse I fitted about 15 years ago. Supplying a 200sqm building with traditional radiators and 2 bathrooms. It was fine for showers and wasn't to bad for baths, you just got used to running the hot in first incase it struggled. When we did our major renovation the last few years we swapped this out with a trad oil boiler feeding an unvented HW tank as @ProDave describes. This gave me a couple of advantages. As we had added a 3rd bathroom I wanted lots of HW capacity and so we had a HUGE unvented tank fitted, probably overkill but what the plumber recommended. Also having a tank meant we could add an immersion heater which is great for the times when i forget to order the oil in time and we then have no HW? The system is working really well for us and with oil at the lowest price it has been for over 10 years it is actually quite cheap heating. cheers, MM
.thumb.jpg.790d6526b81c141b6bee1e3c4f31831a.jpg)
-
My gaps were smallish probs no more than 1/2" - and yes it was lime mortar 1:2 is quite a stroing lime mix, more often see people using 1:3 in my experience. Also what sort of sand are you using? Needs to be sharp not builders and a little course as this give the mortar some strength. WOuld be surprised if your mortar was drying out too quickly in this weather ? - unless you are meaning historically Definately wouldn't use putty on its own as without sand there is no binder so the putty will just crack. Cheers, Paul.
-
Couple of thoughts... Just on terminology, you are probably well up to speed on this but just incase?. Two limes to be used on older buildings are Natural Hydraulic Lime (NHL) and non-hydraulic lime (unhelpfully can also abbreviate to nhl) but is ususally only supplied as Lime Putty. The lime NOT to use is hydrated lime sold at builders merchants and often added as a plasticiser to cement. Lime putty has a softer set than NHL and is more suited to timber frame that reuqire a lot of moevement. The problem with putty is it has a loooong set time as it goes off by reacting/reaquiring CO2 from the air. In a wet environment and this time of year it won't go off for ages if at all so probs won't make any impact on your damp issues. NHL on the other hand will go off in wet conditions. I have used lime (NHL in my case) to fill around gaps on window frames and it copes reasonably well from a porousity pov. It doesn't allow water to stream through, it may look a little damp if you have clay paint on it but this dries out quickly. I can see the logic for the oakum, if you were ramming that into gaps I would be inclined to point over the top with lime and would expect this to stop most of the water ingress, certainly to the degree where you didn't have visible wetness on the inside of the wall. I would also be looking closely at your timbers, how wet are they, is there any treatment on the outside, it looks like there has been but this has worn away. Maybe check them with a damp meter compared to the wall to check they are not allowing the water to come through? Final thought, you will be surprised how long it takes a wall to dry out. Even if you did all the remedial work I reckon it would take 6 months through summer before your wall dried out properly, so in reality anything you do know is prepping for next winter? Oh, and assuming you have done all the other stuff, checked for leaking gutters, made sure soil height isn't to high against wall, gradient of outside allows water to run away from wall not into etc etc. HTH Paul.
-
If a) the brick wall is built with portland cement and b) the render is cement then you will have no way for the wall to rid itself of moisture so it will be saturated and hence blowing the plaster. This though will have been the case for a long time so not sure why you would only see it now.... has anything changed recently? Always worth doing the normal checks of blocked gutters, soil build up around base of wall etc. IME insulation will not solve the problem as the wall still will be wet. Even if you sealed it from the vapour generated inside the house the moisture rising from the ground (unless they put a DPC in when rebuilding wall) and water ingress through likely cracks in concrete render will keep it nice and wet. Also your timber windows will move with heat/moisture and the concrete render won't so it maybe that you are getting water ingress around windows as well. Suggested fix would be get rid of cement render and re-render in lime. CO shouldn't object as visually it will be the same but more authentic and preserves the building. Only challenges with this might be if the brickwall is built in cement then it gets a bit more problematic....... or if the bricks are soft they may get badly damaged by taking of the concrete render. So, check how the wall is constructed, look for any external water ingress points and report back on any recent changes in circumstances for further ideas ? Cheers, MM
-
Not been to one of these before but they are offering free tickets. Just wondered if it is worth the trip? Thinking of a self build for the next property so thought it might be a good way to see lots of stuff at once? Thoughts? Cheers, MM
-
Could well be the case, but if so surely even on a "cheap" house they would have tied the brickwork together. Also it is not just a facade but quite a substantial piece of the house with that sloping roof, built in a totally different brick with different mortar....... But that is the joy of old buildings - trying to understand what has been done before Cheers, MM
-
As with @Mr Punter we have a master bathroom and an ensuite shower room next to each other. BC wanted fan in both rooms so we fitted extractors with one way valves/flaps, the pipework from which ran into a t piece in the loft before exiting under eaves. BC seemed happy and I haven't noticed any backdraft issues? Cheers, MM
-
Theres something odd with that whole back wall. It doesn't appear to be tied into the existing brickwork anywhere on the elevation and just has a fat mortar line. It may be tied in somehow behind it but who knows. Also if you look at the insert you have zoomed in on the "new" wall is 13 bricks high, the old wall is 12 bricks high and hence the mortar lines don't line up? I would guess at some stage the whole back of the house has been replaced, either as an extension or it collapsed during the war maybe and was rebuilt? Regarding the step around the window I doubt that is movement (not a professional opinion) as all the perps in that section line up and are all offset to the perps in the section below. That to me implies it was laid that way. Why it was laid that way is anyones guess and also why that end of the house isn't tied in.......... I would have thought that would be noted under survey when you purchased? If not and you are concerned monitor it as above, but if it hasn't moved for a long time then I "guess" there's no reason to suspect it will anytime soon. For me personally though, i would want to understand how that rear wall is tied in? Cheers, MM
-
Cost sounds about right. We had one put in last year, for extending our existing drop kerb by 5m we were getting quoted just over £2k although they did need to get traffic lights in as we are on a main road. Coment above about contractors is correct, the council/highways will give you a list of recommended but you can use anyone who has the correct licence and insurances. Cheers, MM
-
Not happy with tiling job - or am I being picky?
mm289 replied to sjb1288's topic in Floor Tiles & Tiling
Whether you use the levelling clips is up for debate or personal preference, I would even argue having a perfectly flat sub floor is subjectives (ours wasn't). The most obvious fact (IMHO) is when laying floor tiles use a spirit level or straight edge FFS? It is blatantly obvious he has not put a straight edge across the tiles as he laid them which is unforgivable in my view - hence why you have such huge deviations in depth tile to tile, not just across the floor as shown by the skirting. Cheers, MM -
Not happy with tiling job - or am I being picky?
mm289 replied to sjb1288's topic in Floor Tiles & Tiling
Agree with the above I'm afraid, that is shocking. I laid some wood effect ceramic planks in our boot room last month, hated the job with a passion but it was too small and fiddly for the pro's to want to bother with. It took me forever, mainly because I didn't use enough self levelling so had to use a lot of adhesive, but i was using a 15 ft length of angle iron and a 2m spirit level constantly to make sure it came out reasonably level. Its not perfect but max lipping is maybe 1-2mm an no sigificant dips. To get that from a "pro" is appaling - trouble is as said above I can;t see how you fix it without pulling it up which means broken tiles, can you get replacements with matching batch numbers etc...... Really feel for you ?, pic of our DIY one below.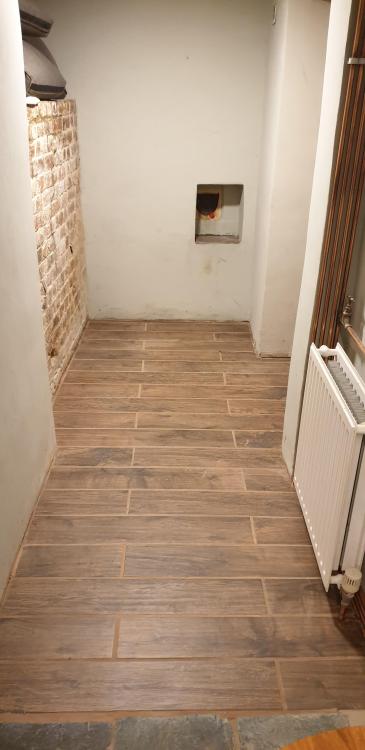
-
@Onoff what @mvincentd said, I suspect the SPAB advice is referring to walls originally built in lime, for the small infill patch you are doing I doubt it will make any difference? @scottishjohn it is getting late in the year now for lime pointing/laying but the main risk is frost or freezing. If the brickwork is covered from direct water it will have a chance, but this time of year I would be using an NHL mix not putty. In my experience the putty takes a lot longer to go off sufficiently to not be at risk, whereas NHL will be OK after 2-3 days even in lower temps. Once we are in Dec/Jan I would be very careful with weather though, we tend to try and do inside jobs over the winter but have had significant outside pointing/brickowk done upto end Oct/early Nov with no probs. Cheers, MM
-
The addition of hydrated lime won't help in that regard as the set is still a chemical set based on the use of portland cement. Having said all that, flint is very inert, I am not sure that you would need a mortar that flex'd around the flint - we used lime as it was in keeping with our property but not sure I can see a reason not to use portland cement based mortar...... looking at @mvincentd post, he seemed to imply his flint walls were made with portland cement based mortar? Cheers, MM

.jpg.5b216433c01ccae48b9f9a6d346d098f.jpg)


