


MortarThePoint
-
Posts
2294 -
Joined
-
Last visited
Everything posted by MortarThePoint
-
Tips on reviewing roof truss design
MortarThePoint replied to MortarThePoint's topic in Roofing, Tiling & Slating
It has been very smooth and I've enjoyed working with the designer, but I'm hoping it hasn't been too easy and I've forgotten something. -
Tips on reviewing roof truss design
MortarThePoint replied to MortarThePoint's topic in Roofing, Tiling & Slating
Cautionary tails Make sure they've included X in the price You may have forgotten a loft hatch (cough cough) I don't know what it is that I don't know -
Does anyone have any advice when it comes to reviewing the roof truss design? We are having attic trusses.
-
Steel Beams vs Cavity Lintels
MortarThePoint replied to MortarThePoint's topic in RSJs, Lintels & Steelwork
The Structural Engineer seems to prefer the wide cavity lintel option which was a slight surprise to me. -
Steel Beams vs Cavity Lintels
MortarThePoint replied to MortarThePoint's topic in RSJs, Lintels & Steelwork
Witch option do you think I should go for? I might be loosing the plot now:
-
Steel Beams vs Cavity Lintels
MortarThePoint replied to MortarThePoint's topic in RSJs, Lintels & Steelwork
The other work around that came to mind was to use a standard inner leaf lintel and widen the cavity just at the top. Lintels for a 120mm cavity are available quickly. The 100mm block at the top would be centred on the 140mm blockwork below so the load transfer should be OK. It leaves a 20mm recess in the inner leaf that could easily be filled with something like plasterboard. Could use a cavity lintel for a 140mm cavity with the 100mm block not centred on the blockwork below, face flush instead. This feels less defensible structurally (a.k.a. a bad idea).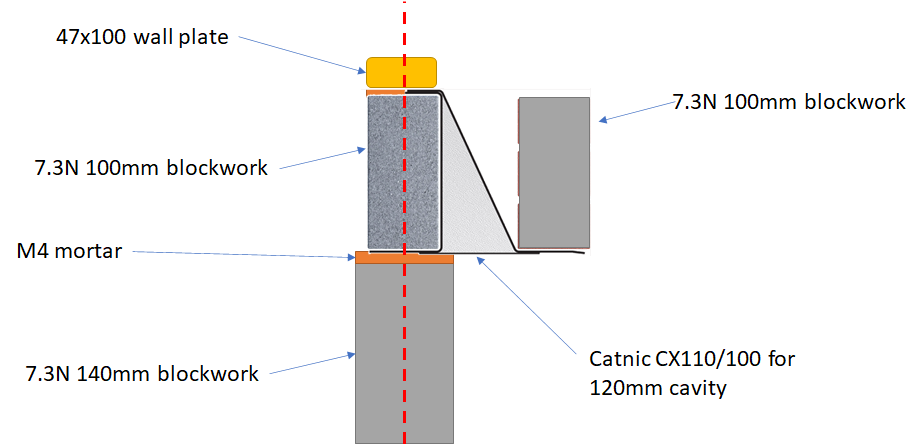
-
Steel Beams vs Cavity Lintels
MortarThePoint replied to MortarThePoint's topic in RSJs, Lintels & Steelwork
I'm using HiTherm in the house but the garage uses non-thermally broken ones. That's a weedy lintel, I need L5/100 WIL for this as the roof space of the garage is being used. Those are on 12-14 days and Catnic are only slightly better -
Steel Beams vs Cavity Lintels
MortarThePoint replied to MortarThePoint's topic in RSJs, Lintels & Steelwork
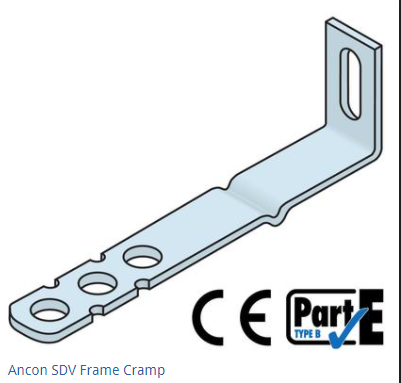
Separately, I'd like to replace the 2850mm lintels above the garage doors (2543 opening) with steel beams. The outer leaf would have a precast concrete lintel. I thought this was all good until I spoke to the Structural Engineer and they said they'd prefer a cavity lintel here as it's so near the top of the wall and a cavity lintel would join the leaves together. They asked about perhaps two UB steels with bolted on PFC between which all seems excessive. The cavity lintels are on a long lead time due to the wide inner leaf. I've concocted the scheme below which feels like it should be pretty solid. The Frame cramps would be on e.g. 450mm centres. Can anyone think of a more substantial way of joining the leaves which is compatible with quick delivery and reasonable cost. For clarity I've shown the block underneath the steel beam, but not underneath the concrete lintel. Obviously the wouldn't be blocks under the steel in the opening and would be blocks under the R15A in the panels ?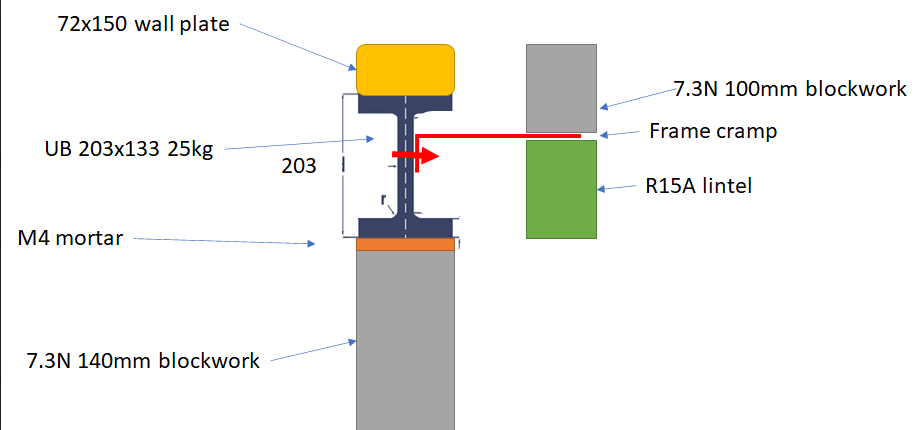
-
Butt jointing the wall plate
MortarThePoint replied to MortarThePoint's topic in Roofing, Tiling & Slating
Well I just met with the chippie and he said he prefers to sort the lapping, anchoring and strapping of the wall plate. The brickie to leave the timber bedded down and then when the mortar has gone off he can lift the timber to cut the laps etc. He says he gets it straighter than the brickies that way. I think I prefer the idea of the brickies bedding being final rather than lifting the wall plate off again. Does the chippie's approach sound sensible? -
Butt jointing the wall plate
MortarThePoint replied to MortarThePoint's topic in Roofing, Tiling & Slating
OK makes sense, the strap isn't nailed to the wall plate whilst the mortar is wet, but the straps will hold it down as screwed to wall. -
Butt jointing the wall plate
MortarThePoint replied to MortarThePoint's topic in Roofing, Tiling & Slating
They don't joint the timber at all? -
Butt jointing the wall plate
MortarThePoint replied to MortarThePoint's topic in Roofing, Tiling & Slating
According to the article BS 8103-5 also advises that lap-joints should be 100mm long, twice nailed and that butt joints with proprietary fixings are also acceptable. Does anyone know of such a proprietary fixing? I would like to explore the option. I know lap joints should be possible but I'd like to consider something else -
Butt jointing the wall plate
MortarThePoint replied to MortarThePoint's topic in Roofing, Tiling & Slating
Should have but didn't. It's going in on Thursday and I've a busy day tomorrow. This article suggests drilling and fixing once the mortar has set: https://www.practicalarchitecture.com/blog/how-to-detail-a-wallplate -
I was wondering if there is an alternative to lap jointing the wall plate, perhaps using some appropriate hardware. I'm concerned that I won't be able to keep up with the brickies as they install the wall plate. Can something like a gang nail be used? I'd really want something that covers this application in its BBA certificate, so it is considered a good job. NHBC say "joined using half-lapped joints, including at corners", but I am sure I read somewhere that propriety fixings could be used. I feel like a bodger asking the question, but feels like there should be something just as good as a lap joint and I don't mind spending up to £5 per joint as that's what a day of a chippie would probably work out as. I'd rather spend £1 - £2 though ?
-
I think NHBC specify wall plate section lengths should be over 3m, but I can see a downside in going too long. The likelihood of having straight timbers will go down with increased length. Any advice as to what length is best? " - a minimum of 3m or extend over at least three joists, rafters or trusses - joined using half-lapped joints, including at corners" https://nhbc-standards.co.uk/7-roofs/7-2-pitched-roofs/7-2-6-wall-plates/
-
Architect specified Tyvek Supro but I don't know if for good reason. I'm inclined to go with a premium one due to the time of year etc
-
I am tossing up between Permo Forte and Tyvek Supro. It's going to be installed in a couple of weeks time (hopefully) so the conditions could be challenging. A Christmas shutdown probably means the membrane is exposed to the elements for longer than I'd like as well. I lean towards the Permo Forte. Any thoughts?
-
Steel Beams vs Cavity Lintels
MortarThePoint replied to MortarThePoint's topic in RSJs, Lintels & Steelwork
The thermal bridging can be reduced at shorter lengths, but as they get longer there's no choice with cavity lintels -
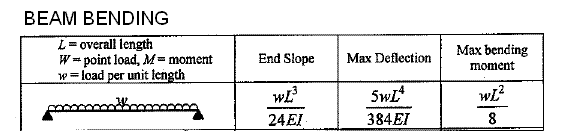
For long spans the loading can rise considerably. Not only does the load rise in proportion to length, the resulting peak moment on the resisting member rises with the square of length: The section of the member needs to get increasingly large to resist the increased moment and still the designers typically allow a deflection in proportion to length. As I understand it, this is typically L/325. That means that a lintel for a 3300mm opening will allow a 10mm deflection at the limit. Cavity lintels for large spans (e.g. >2400mm) start to become very expensive if there are roof or floor loads near by. For example, a 3750mm lintel with a total UDL capacity of 50kN runs to around £200-£400. Steel beams have huge moment resisting capability depending on their section. There is a range of Universal Beams (aka RSJ) which have a width of 102mm well suited to a 100mm internal leaf. A 3800mm 305x102x25kg beam costs around £200. I want to understand when to swap to such a steel. Considering just universal beams for a 3400mm opening with 50kN UDL: Section Iy(cm4) Deflection Saving 178x102x19kg 1356 L/364 (9.3mm) 22% 203x102x23kg 2105 L/564 (6.0mm) 6% 305x102x25kg 4455 L/1200 (2.8mm) 0% NOTE: 254x102 UB omitted A cavity lintel would probably have a deflection of 10.5mm (L/325). Steel beam advantages: reduced deflection, greater capacity, lower cost Steel beam disadvantage: rarely galvanised and so needs careful painting etc when exposed to cavity, needs boxing in for fire protection Cavity Lintel advantages: galvanised, makes provision for outer leaf, stated capacity so no need for Structural Engineer's input Ease of installation can go both ways. At length, both are heavy. What experience do people have and when do they typically change from cavity lintels to steel beams?
-
Permitted Development During Build
MortarThePoint replied to MortarThePoint's topic in Planning Permission
We're not having any frosted windows as the nearest neighbour is about 100m away through trees, so if they ant to go to the effort of seeing me get out of the bath then their welcome. -
Permitted Development During Build
MortarThePoint replied to MortarThePoint's topic in Planning Permission
It's inefficient, but I think I'll just wait for the dust to settle after completion. -
Are those rafters at 600mm c/c
-
Permitted Development During Build
MortarThePoint replied to MortarThePoint's topic in Planning Permission
It's a new build and roof related PD rights are intact thankfully -
Permitted Development During Build
MortarThePoint replied to MortarThePoint's topic in Planning Permission
Annoying as that will be inefficient, but shouldn't add too much cost. Do you have experience or have you seen this written somewhere in 'the rules'? -
What's the situation with permitted development during the initial build? Permitted Development would allow us to add roof lights to our attic space. Do we have to wait for the build to be signed off before then doing that or can we just roll it in to the main works?
