MortarThePoint
-
Posts
2198 -
Joined
-
Last visited
Everything posted by MortarThePoint
-
Well that's the first load delivered. Good news is they are on little wooden pallets. Bad news is the aspect ratio of the packaging is such that they are tall and thin so more of a topple risk. For shifting, I might lift it on to a larger pallet and strap down for the 400m move. Possibly even fashion a 4x2 brace as below.


-
I have no choice unfortunately as I can't get them direct on to site. It's either me moving them by telehandler or someone else and they might be less careful. Thanks, I'll be all over that. I am going to make sure the brickies have at least 4 packs on the go at any one time. They know all that, but it's a mistake not worth making.
-
No scaffolding yet. 'It's on the list' ?
-
Thanks PeterW. I'll look out for the packs being square and any signs of damage to the wrap. It is a lot of bricks (artic and a part load), but is enough for the whole house and garage and means we're set. We have space for them thankfully as it's a large site. Unfortunately they are being offloaded in a yard opposite site as despite the site being large, access isn't possible for an artic. I did ask for rigids but got a "no", despite the blocks coming on rigids. I've hired a telehandler to move them on to site which will take a while, but then I can carefully put them exactly where I want them. I'll try to place them 2 high and 2 deep with 500mm around all sides for access and ventilation. That suggests I need about 2.5m x 10m space for them.
-
The bricks are due today and it occurred to I should ask what's important to check when they arrive. I obviously need to check they're the correct ones and the quantity. How do I easily check for breakage as there will be 26 pallets of them? They are coming direct from Wienerberger who I've been told pack them well. Is there something else I should be checking? Excited but nervous seems to be my default state at the moment.
-
They look nice. Is that lime mortar as well?
-
Thanks @LA3222 ! What are the bricks called?
-
An advantage of the Engineering brick is it feels more weather proof, but ultimately if a brick is going to suffer at 45 degrees it will suffer if vertical as well
-
I wondered about that, it would look something like this:

-
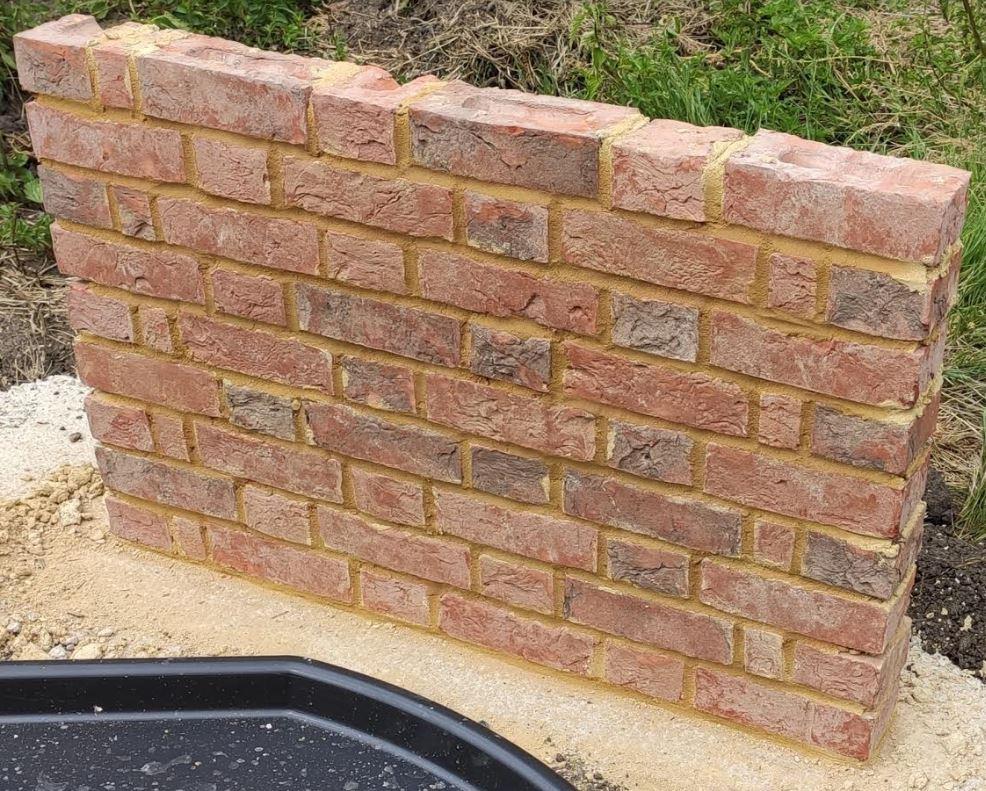
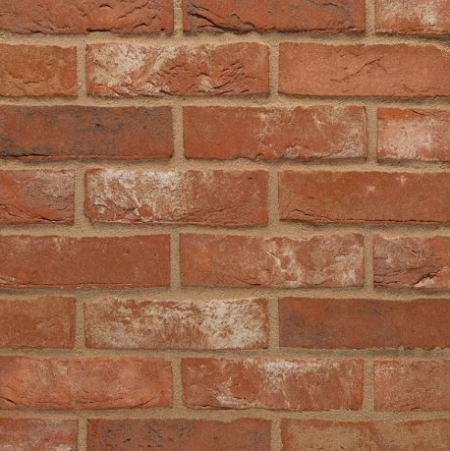
Yes that's what they say are available. For facing brick, we're using Wienerbrger Pastorale Multi: And they have Warnham Red Stock (L) and Sandown Red Engineering (R) available quickly: Though somehow bricks never look like the manufacturers website. Here is a panel I put up of Pastorale Multi: and what I expect the Engineering brick to look like:


-
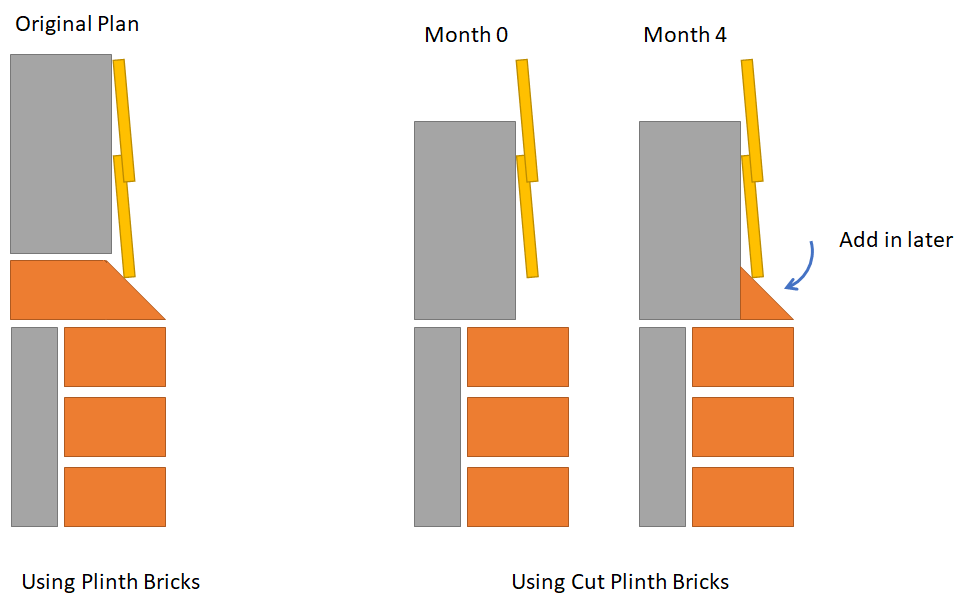
Thankfully this is only for the garage, but I have been quoted 16 weeks for the plinth bricks. There are some slightly different bricks that are available quickly as well as engineering type ones. Cut and bond doesn't look great in the photos I have seen so far, if someone has some better photos that could help convince me otherwise. Another option I was wondering is how difficult would it be to lay temporary bricks that are there for a few months until the replacements arrive and then swap those in. It may sound like madness, but I'd like to consider options as I'd like to finish the garage as soon as possible for storage etc. A third option could be to add in just the angled part (cut off a plinth brick) later on. I've sketched this below:
-
I went with Capital Valley Plastics High Performance DPC as it is rated for 3+ storeys and I could get in next day. I don't need its gas properties, but its Radon proof as well: http://www.capitalvalleyplastics.com/product/radbar-high-performance-dpc/
-
Thanks @nod High load: Do you remember the brand you used? I've seen this commonly available, but no idea if any good: https://www.ikogroup.co.uk/product/iko-hyload-original-dpc/ 600 mil: I read that as you used a 600mm wide DPC folded up over the beams, sounds like a nice approach.
-
We're using Thermabeam rather than beam and block, but the compressive load under the supports will be similar. As there are concentrated loads, do I need to use a specific type of DPC? What DPC do people use for beam & block beams to bear directly on?
-
It also does feel like it would be hard to bed the bricks properly without trimming it back.
-
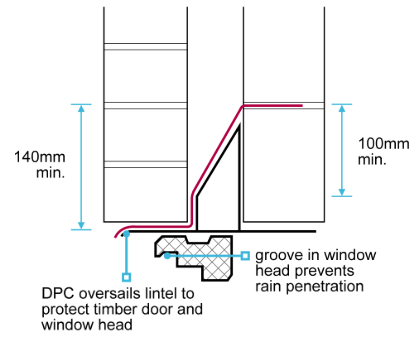
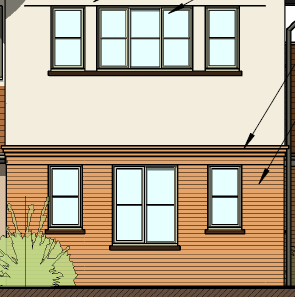
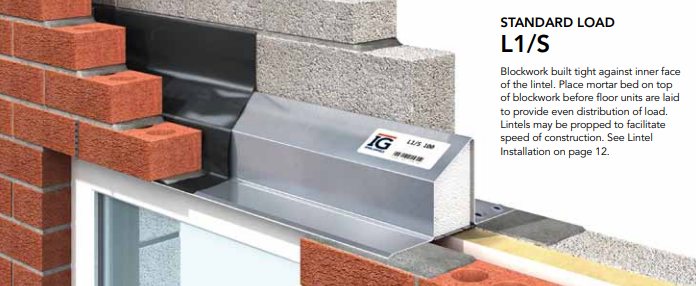
The NHBC guidance documents show the outer edge of the cavity tray DPC going past the edge of the lintel (see below). I've not noticed this done and have seen it trimmed back from the edge, for example this video. What did people do themselves here? I'm not sure which presents the greater risk of capillary action drawing water into the cavity under the DPC of the cavity tray?
-
Looks very smart, good job!
-
You're right, it was just a new thing to think about but as you say you won't notice it as it's in shade anyway.
-
That's a good option. I wondered if anyone does a sort of sleeve that can tuck over the lintel, it could even have the cavity tray built in
-
This may be daft question, but how do you conceal the outer part of a window or door lintel in brickwork. The brickwork above the lintel is sat on top of the lintel and I don't want to be able to see the metal underside of the lintel when finished. What are my options? I know you can get special soldier course lintels but we don't want a soldier course. Feels easier to hide it in walls that are rendered, but bare brickwork walls feel harder to hide the lintels in. Do people just paint the lintel? More RAL charts with the wife if so which isn't my favourite activity.
-
Brickwork and Blockwork Labour Cost Estimator
MortarThePoint replied to MortarThePoint's topic in Brick & Block
I'm confused now. Is that 250 bricks a day then when the going is hard and then 650 bricks a day when running in? -
Brickwork and Blockwork Labour Cost Estimator
MortarThePoint replied to MortarThePoint's topic in Brick & Block
I'm clearly in the wrong line of work ? 250 a day and 650 per thousand bricks equates to 380 bricks a day which feels a bit pedestrian. -
So did the 5 months dry out the block throughout and then it was important to make the surface wet to help the plaster?
-
Brickwork and Blockwork Labour Cost Estimator
MortarThePoint replied to MortarThePoint's topic in Brick & Block
Is that £650 labour cost per thousand bricks laid? That's £39/m2. -
Drainage lintel strength and bearing
MortarThePoint replied to MortarThePoint's topic in RSJs, Lintels & Steelwork
Out of interest, do you know if the Naylor P215 is a composite lintel or not?