


MortarThePoint
-
Posts
2168 -
Joined
-
Last visited
Everything posted by MortarThePoint
-
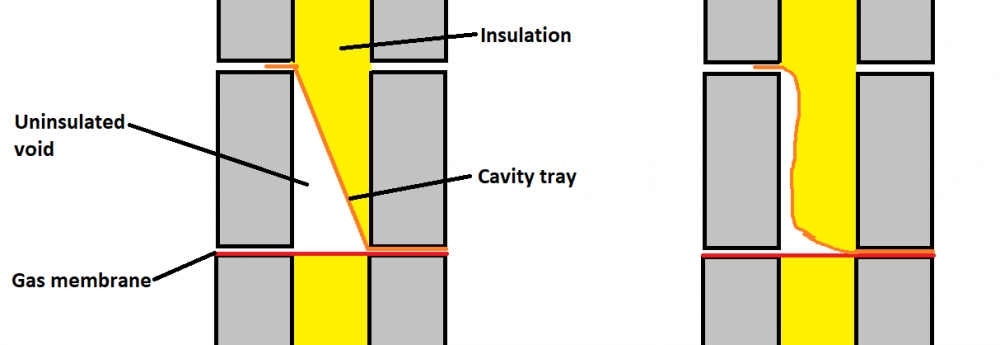
We have a gas barrier membrane crossing the cavity and as I understand it the rule is that anything bridging the cavity has to have a cavity tray above it. It's a pain, but I think we have to have it.
-
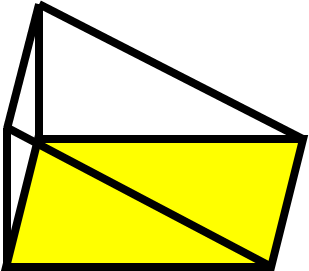
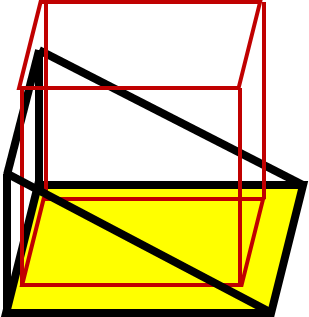
Cavity trays made using DPC roll are often shown simplistically crossing the cavity at an angle from their top on the inner leaf to bottom on the outer leaf. In reality, even if you try to run the DPC material down the inner leaf before crossing the cavity, you will still create a void behind the cavity tray that will end up uninsulated: Is there a way to insulate this void or is it a matter of trying to keep it as small as possible? Preformed corners and stop ends all seem to adopt the shape on the left and so will create quite a significant cold bridge. I'm using blown bead insulation. There is no route for the beads to get between the gas membrane and cavity tray. Also I wouldn't want the pressure of the bead blowing to dislodge the cavity tray.
-
I found this LABC guidance: "The bottom of the tray should be taken across the external leaf and preferably just visible at the external mortar joint." That's preferably just visible, possibly not, and definitely not sticking out 10mm. This LABC guidance on the other hand is perhaps clearer: "5. Ensure the external edge of the DPC is visible and not bridged by mortar when completing pointing of the mortar joint."
-
Yes, but he's saying most of the mortar in the joint is above the DPC, rather than the DPC being smack in the middle.
-
Thankfully not, though I did consider it back at the time. BCO is fine with / expects the DPC recessed slightly
-
He does seem pretty young and inexperienced. He may be right 'on paper' though which makes it hard to swing him round or to get a second opinion from his firm / the warranty provider.
-
It's a mixture of brick and rendered block work with block work inner leaf. Gosh, they're even smaller. They won't have the "Venturi effect outlet tube that reduces water pressure, allowing for optimal drainage" if you believe that. It's quite a small opening for venting through. Do the TW1 work well?
-
The Invisiweep sticking 10mm proud or the standard ones. Either way, doesn't sound fantastic
-
Well I couldn't spot them in the photo so they clearly work ?
-
I require them all the way around the house at DPC level as I have a gas membrane crossing the cavity. Down there visibility may not be as much of a concern as pest proofing.
-
Welcome to the forum! Sounds like a nice project and there will be lots people can help you with here.
-
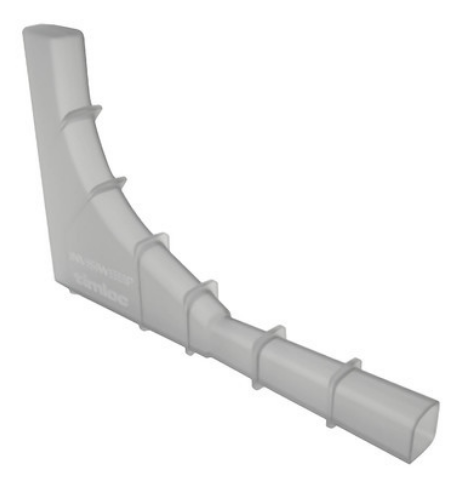
What do people think of different weep types? Any recommendations? I like the look of the Invisiweep vent as it makes the hole on the outside smaller than for the standard ones (shown below above the standard ones)

-
Agreed, it's bonkers. Into the cavity I wouldn't argue with, but sticking out like that it would catch rain and have things growing on it. I need to take a stand on this as, in my mind and pretty much everyone else's, it it is a thoroughly bad idea to have it sticking out like that. I think this is where I'd like to get to, so that the inspector can see it has been installed, but it doesn't act as a rain catcher. My brickie talks of having minimal mortar under the DPC, whereas where I have noticed DPCs they appear to be in the middle of the bed. A complication of this though is that the outer course brick would have to be laid before, or at the same time as, the inner blockwork so that it could be aligned appropriately.
-
I agree, 10mm would look terrible. I think it would look best if it didn't stick out at all. also I think any amount of sticking out has the rain issue that is likely greater than the risk of rising damp.
-
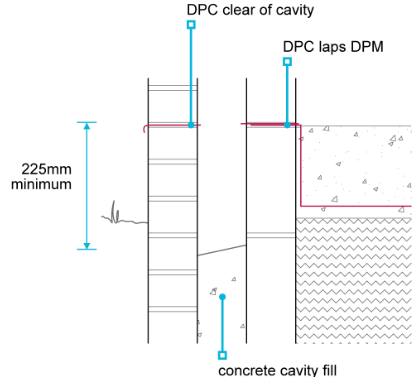
My brickie and BCO both say that the DPC/cavity tray at the bottom of wall (above splash) can stop just short of the edge of the mortar so that it isn't visible, but my warranty inspector says that he would require it remediated if that was the case. He says it needs to stick out by 10mm so that capillary action doesn't allow water to bypass the DPC. I think that's going to make things much worse as rain could collect on the surface of the part sticking out and then get sucked into the wall at a much greater rate than any rising damp could possibly bypass the DPC. Here's how NHBC draw it in their guidance: I'm wondering if I can keep everyone happy by using some kind of liquid DPC in addition to having a recessed DPC/cavity tray. Either: painted on the top of the lower course forming a DPC (e.g. Black Jack ) though ideally clear use a waterproofing admixture in the mortar to make the mortar waterproof and effectively a DPC in its own right (e.g. Sika 1 ) My brickie is going to think I've lost the plot, but the thought of the warranty inspector kicking up a fuss about the DPC would give me nighmares as remediating that would cost a fortune.
-
Wienerberger (Terca) Pastorale Multi. It must be deliberate to save some pennies on materials. I was nervous that too many decisions get made on the basis of a pack or two so we sampled across a number of packs.
-
Most standard site policies have a provision that is too low by default (£30k), but you can request higher. I'd expect you can make the change to an existing policy.
-
Well this is more of a therapy session post or cautionary tale for anyone else. I spent a long time bonding the house out at the design stage, including the periscope vent positions etc and it was all based on 215 mm stretcher and 102.5 mm header. The packs have 215 and 102 marked on them so fine there, checked. Reality is the bricks are all 210mm and many less, very few more and don't think I have come across a 215 mm one yet. Headers more like 98mm. They are stated as size tolerance T1, and that allows a range of 209 - 221 mm. Some are a tad under the 209 mm, but certainly the average isn't 215 mm. I'd say the average is likely 210 mm. To keep as bonded out in theory would make for 15 mm perps which would look bad. The brickies are bonding out now and there are lots of double header and double stretchers being deployed to fix this discrepancy. This has caught out the Architect as well as he set loads of dimensions based on theoretically working for bond. Thank goodness I haven't ordered the windows yet. Learning: check your bricks for real size distribution before finalising dimensions.
-
Half way through the shift now after 5 hours of telehandling. Hoping it stays dry overnight and I can finish the rest tomorrow.
-
Some good replies already. I'd reiterate the point of whether you'll enjoy the journey of renovation or not. It's a viable choice to choose to spend more than it's worth on paper if it provides you with a hobby you enjoy. If you see it as being trapped in a nightmare then that's the opposite. Are you currently essentially debt free? It's easy to focus on how much you've already sunk in to it but try to focus on what's ahead. If you can genuinely get a return on the future investment then it is a reasonable idea. Alternatively, if you can cut your losses then that could be the right decision. It's difficult to know from a forum if this is one of the low points on a bumpy but fruitful journey or if this is the gradual realisation of a large mistake. I'm feeling the latter. You may have done so already, but play out some 'what if' scenarios and honestly (to yourself) research them. What if you just walked away, what if there were more unforseen costs, etc. If you're feeling trapped in a nightmare try to keep your spirits up. Happiness lies ahead you just need to plot your path through these troubled waters.
-
Well that's the first load delivered. Good news is they are on little wooden pallets. Bad news is the aspect ratio of the packaging is such that they are tall and thin so more of a topple risk. For shifting, I might lift it on to a larger pallet and strap down for the 400m move. Possibly even fashion a 4x2 brace as below.

-
I have no choice unfortunately as I can't get them direct on to site. It's either me moving them by telehandler or someone else and they might be less careful. Thanks, I'll be all over that. I am going to make sure the brickies have at least 4 packs on the go at any one time. They know all that, but it's a mistake not worth making.
-
No scaffolding yet. 'It's on the list' ?
-
Thanks PeterW. I'll look out for the packs being square and any signs of damage to the wrap. It is a lot of bricks (artic and a part load), but is enough for the whole house and garage and means we're set. We have space for them thankfully as it's a large site. Unfortunately they are being offloaded in a yard opposite site as despite the site being large, access isn't possible for an artic. I did ask for rigids but got a "no", despite the blocks coming on rigids. I've hired a telehandler to move them on to site which will take a while, but then I can carefully put them exactly where I want them. I'll try to place them 2 high and 2 deep with 500mm around all sides for access and ventilation. That suggests I need about 2.5m x 10m space for them.
-
The bricks are due today and it occurred to I should ask what's important to check when they arrive. I obviously need to check they're the correct ones and the quantity. How do I easily check for breakage as there will be 26 pallets of them? They are coming direct from Wienerberger who I've been told pack them well. Is there something else I should be checking? Excited but nervous seems to be my default state at the moment.

