


MortarThePoint
-
Posts
2294 -
Joined
-
Last visited
Everything posted by MortarThePoint
-
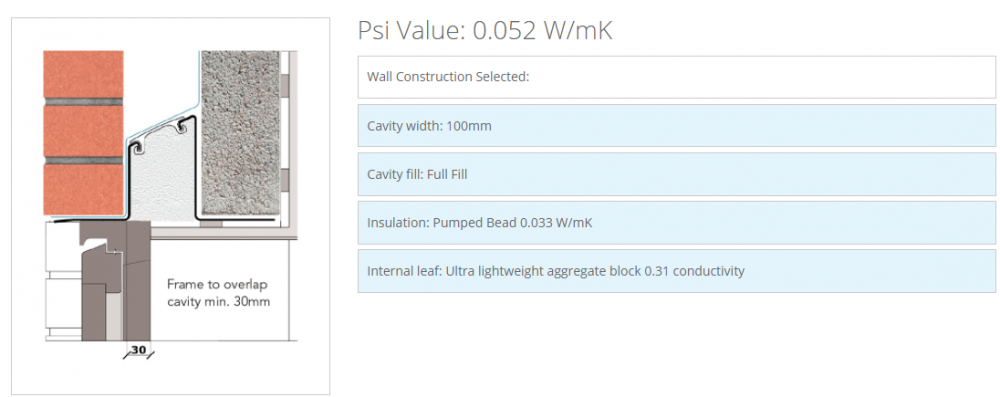
Keystone Lintels has a PSI value calculator which says "Frame to overlap cavity min. 30mm". Probably still better to have more overlap.
-
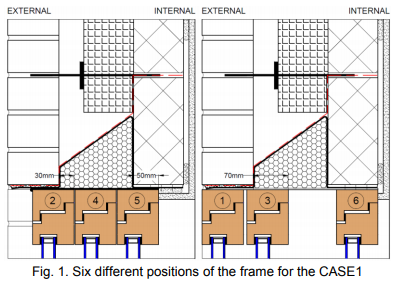
I've found this interesting paper [1] that compares different window positions relative to the cavity and their affects on condensation and thermal bridging. Six different positions were compared (modelled) and conclusions drawn: Aligned with the outer face of the façade. Fixed into the external leaf and overlapping the cavity 30mm. Fixed into the external leaf and overlapping the cavity 70mm. Aligned with centre of the cavity. Fixed into the inner leaf overlapping this leaf by 50mm. Aligned with the inner face of the room. Whilst position 2 is the most common form constructed as it is "a much more robust detail" but doesn't perform as well from a thermal bridging (best: 5, 4, 3) or condensation perspective (best: 3 and 4). My Take: Given that (3) is a position near to (2) it probably doesn't reduce robustness of installation too much and so represents a good balance. The paper acknowledges that it only considers the thermal impact, not other factors (e.g. maintenance and drainage). I'm using Thermally broken lintels so suspect that would change things a bit. My gut feeling is it would reduce the benefit of 4 over 3 over 2. What choice have most made here? [1] https://www.sciencedirect.com/science/article/abs/pii/S0378778816316383
-
Wax (PCM)
MortarThePoint replied to MortarThePoint's topic in Energy Efficient & Sustainable Design Concepts
Oh dear, I think I have thought of two more issues unfortunately. I hope I'm wrong on the first as that's an absolute killer for commercially available PCM for everything other than immersion heater based applications in which case they are still debatable (e.g. you'd be better of with the batteries or having a small ASHP or showering in the morning which is most likely anyway). Someone please spot the mistake as this is a bloodbath. @SteamyTea or @Jeremy Harris can you throw it a lifeline? 1. Capacity measured in Heat or Electricity Equivalent? If the 12kWh Sunamp capacity is for heat, which I suspect it is (above assumed it was electricity equivalent) then the numbers are much less favourable: 12kWh(heat) = 4kWh(electricity) [1] Sunamp charged up by running the ASHP off peak. Expected cost ~£500 - 750 per kWh electricity. 4kwh Lithium batteries charged up off peak, inverter to then run ASHP. Expected cost around £200 per kWh [£100/kWh for LiFePO4 batteries and £400 for charger and inverter guestimate] (£0.21/kWh * 85% * 4kWh) - (£0.12 * 4kWh) = £0.71 - £0.48 = 23p/day I also falsely assumed you'd have the heating on all yeah (D'oh). Guess 200 days per year so £46/year or £460 across 10 years. [1] assumes a constant COP of 300%. 2. COP worse at night The Sunamp side of things gets worse due to reduced night time COP of the ASHP as well unfortunately. At night the outside temperature will be lower and so the COP likewise. Using the graph below, the COP at 3C is around 225% and the COP at 8C is around 300% (based on 50C flow temperature which has the smallest kink). (£0.21/kWh * 85% * (12kWh/(300%/225%))) - (£0.12 * 12kWh) = £1.61 - £1.44 = 17p/day [Assuming the capacity is 'electricity equivalent'] (£0.21/kWh * 85% * (12kWh/300%)) - (£0.12 * (12kWh/225%)) = £0.71 - £0.64 = 7p/day [Assuming 1 above] (£0.21/kWh * 85% * (12kWh/300%)) - (£0.12 * (12kWh/275%)) = £0.71 - £0.52 = 19p/day [Assuming 1 above and avoiding the kink] Guess 200 days of heating per year so £34/year or £340 across 10 years best case, £14/year or £140 across 10 years worst case. Perhaps 50% of the heating days manage to avoid the kink (overnight temperature above 3C would mean £26/year or £260 across 10 years. First google result for "ASHP COP graph" https://originaltwist.com/tag/cop-for-ashp/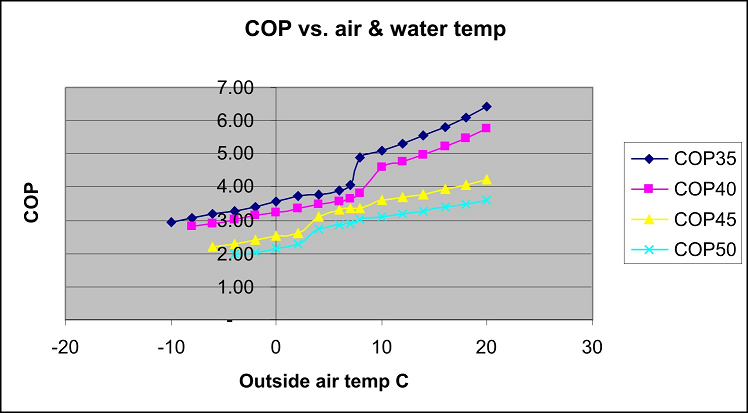
-
Wax (PCM)
MortarThePoint replied to MortarThePoint's topic in Energy Efficient & Sustainable Design Concepts
I'm not sure the economics of a Sunamp compare favourably to batteries unfortunately. Comparing two approaches: 12kWh Sunamp charged up by running the ASHP off peak. Expected cost ~£167 - 250 per kWh. 12kwh Lithium batteries charged up off peak, inverter to then run ASHP. Expected cost around £150 per kWh [£100/kWh for LiFePO4 batteries and £600 for charger and inverter guestimate] I'd expect both to have a similar efficiency (about 80-85% round trip?). Economy 7 tariff prices are around 21p/kWh day and 12p/kWh night. Storing "12kWh" saves: (£0.21/kWh * 85% * 12kWh) - (£0.12 * 12kWh) = £2.14 - £1.44 = 70p/day That's £256/yr or £2560 across 10 year service life. Not fantastic if the outlay is £1800 up front. Not sure if off peak electricity is more polluting than peak (suns not out, but demand for wind may be lower). If it's the same, the it's less environmentally friendly to store and use due to the losses. If you charge from your own solar, or can have a cheaper homebrew PCM heat store then that's more likely to pay off. -
Crazy Rafter Roll insulation cost
MortarThePoint replied to MortarThePoint's topic in Heat Insulation
Are you happy with how in insulation worked out. Looks easy to install. -
Crazy Rafter Roll insulation cost
MortarThePoint replied to MortarThePoint's topic in Heat Insulation
Brilliant, shows that you did a very neat job of it. -
Crazy Rafter Roll insulation cost
MortarThePoint replied to MortarThePoint's topic in Heat Insulation
-
Crazy Rafter Roll insulation cost
MortarThePoint replied to MortarThePoint's topic in Heat Insulation
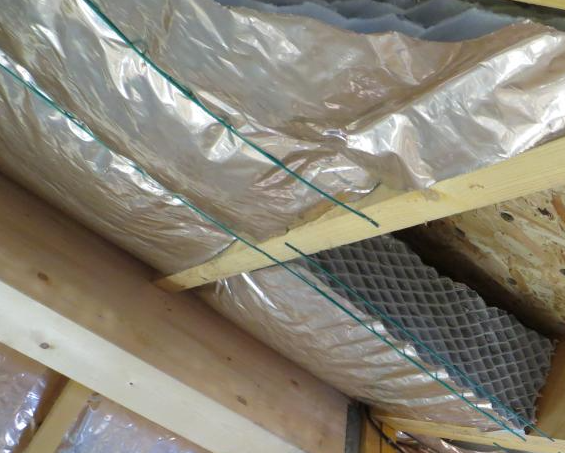
That's a far more sensible price and I think Rockwool is less likely to puff up and restrict the ventilation gap. If I'm worried abut the ventilation gap, I guess I can use a mesh though https://www.insulationsuperstore.co.uk/product/insulation-support-netting-2m-x-100m-white.html ~£0.26/m2 @NSS you appear to have used some cool looking green straps to hold your rafter insulation in place. Can you recommend a product there? -
Crazy Rafter Roll insulation cost
MortarThePoint replied to MortarThePoint's topic in Heat Insulation
Thanks, I do like the look of Rockwool but for our design I need to eliminate any added formaldehyde and I thing that has some (likely a very small amount). The Lambda isn't the best, but as @ADLIan points out probably doesn't make much odds: λ=0.032 175mm R=5.47 λ=0.035 175mm R=5 λ=0.038 175mm R=4.60 [I need to leave a ~50mm air gap within the 222mm rafter depth] I'll need additional material under rafter to hit what I need and I am considering 60mm of Pavatherm which has λ=0.038 adding R=1.58 or 50 or 75mm of DriTherm λ=0.032 adding R=1.56 or 2.34. Next time I'd go full fill rafters (225mm mineral wool) with sarking board outside (possibly Pavatex). -
Crazy Rafter Roll insulation cost
MortarThePoint replied to MortarThePoint's topic in Heat Insulation
Good thought. I was also wondering if anyone has used Knauf FactoryClad 32 as I am seeing that for a fair bit cheaper than others. -
Thermal Time Constant
MortarThePoint replied to MortarThePoint's topic in Energy Efficient & Sustainable Design Concepts
Yes these can act as a diode as well. -
Thermal Time Constant
MortarThePoint replied to MortarThePoint's topic in Energy Efficient & Sustainable Design Concepts
An oscillator can be lossy so no need to violate Physics, but I am as sceptical as you. I think phase change materials (PCM) will be like a battery holding a constant voltage as the current varies. A thermal diode is a thing, but currently only at very low temperature:https://en.wikipedia.org/wiki/Thermal_diode -
Stud wall construction for sound insulation (and cost)
MortarThePoint replied to dnb's topic in Sound Insulation
That works on the side without the Resilient bar, but what about the side with the bar? Just a whole skin of Plywood or OSB3? Without: With on RB side:

-
Stud wall construction for sound insulation (and cost)
MortarThePoint replied to dnb's topic in Sound Insulation
what's that? -
Stud wall construction for sound insulation (and cost)
MortarThePoint replied to dnb's topic in Sound Insulation
You're probably right and I'm looking to use resilient bar RB1 for the ceiling so could use it for the wall too. The main downside though is that I don't think the wall ends up very practical when it comes to mounting anything on it (e.g. TV, shelves etc). -
Stud wall construction for sound insulation (and cost)
MortarThePoint replied to dnb's topic in Sound Insulation
This is what I have been planning and I think it achieves an STC of around 53. Wasn't overly sure what to do with the coupling to blockwork but 2x2 should be strong with the anchors. Notice only 50mm of Mineral Wool insulation. This looks similar to some I have seen, but would welcome opinions on that.
-
Stud wall construction for sound insulation (and cost)
MortarThePoint replied to dnb's topic in Sound Insulation
There is quite a lot online if you search for "wall STC" -
Stud wall construction for sound insulation (and cost)
MortarThePoint replied to dnb's topic in Sound Insulation
Wow, I was just about to start a thread on essentially the same topic. I'm considering staggered 4x2 on 600 c/c with 6x2 top and bottom plates. Insulation woven through and likely a single sheet of 15mm Soundbloc F on each side. I hadn't given metal studs due consideration. Is this a separating wall between dwellings? I'm just wanting to keep the noise of our kids at bay. -
Thermal Time Constant
MortarThePoint replied to MortarThePoint's topic in Energy Efficient & Sustainable Design Concepts
I read of a Peltier based thermal inductor, but that's a bit of a cheat probably. -
Thermal Time Constant
MortarThePoint replied to MortarThePoint's topic in Energy Efficient & Sustainable Design Concepts
Temperature (T) should be analogous to Voltage (V) as it drives a flow of heat (Q) which would be analogous to current (I). V = I*R, T = Q*R. Would be nice to have passive equivalents to an inductor and a diode. -
Wax (PCM)
MortarThePoint replied to MortarThePoint's topic in Energy Efficient & Sustainable Design Concepts
I hadn't heard of that before and have found the website: https://sunamp.com/ Not surprised it's been thought of before and I have found a thread in here as well. -
Wowser! @nod are you still brave enough? Does he do the cement based for you too? Which one do you normally go with, still liquid? If you'd be happy to pass on contact details of your Screeder that would be great (PM welcome)
-
Thermal Time Constant
MortarThePoint replied to MortarThePoint's topic in Energy Efficient & Sustainable Design Concepts
That should either have been: Q = (SUM[ A.U.dT ] + SUM[air change heat loss]) Or: dT/dt = (SUM[ A.U.dT ] + SUM[air change heat loss]) / SUM[ m.c] -
Thermal Time Constant
MortarThePoint replied to MortarThePoint's topic in Energy Efficient & Sustainable Design Concepts
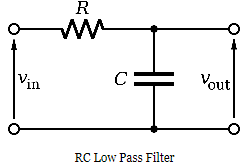
Another interesting part of this is that you can approximate the way the house will respond to cyclical changes in external temperature like the diurnal temperature change. To make an analogy with electronics, the insulation acts like a resistor and the thermal mass as a capacitor. That makes for an RC low pass filter and the RC value is the Time Constant calculated above. The transfer function of an RC filter depends on the frequency of the input oscillation and the magnitude is: where RC is the time constant and w = 2*PI*f is the angular frequency and f is the frequency. For a diurnal temperature change it passes through 2*PI of angle in 24hours so w = 2*PI / 24 = 0.26 [NB: period T is 24hours which is inverse of frequency] V_in can be the temperature oscillation outside the house and V_out can be taken as the temperature oscillation inside the house [bit confusing there with in and out swapped, but that's due to the transfer function mapping an input, the changing temperature outside, to an output, the changing temperature inside]. If we used the time constant calculated above RC = 200hr and take the diurnal temperature change as 20C, the internal temperature change would be: 20C / SQRT[(0.26*200)^2 + 1] ~ 20C / (0.26*200) = 0.38C For an wRC >> 1 the SQRT[(wRC)^2 + 1] = wRC. Any time constant above 16hours should be OK for that approximation. STOP This neglects an important factor though, solar gains! If your house is completely shaded then look no further. The surface of brickwork will be hotter than the outside air temperature. Let's guess it reaches 40C and goes down to 10C over night so double the temperature. Windows let in the suns warming rays and so the heat input isn't just via conduction and air changes. Not immediately clear how to factor that in. This highlights the benefits of masonry construction and shutters in hot countries. I can conceive of 5kW of peak solar gain through windows during a hot summer and this would be 5kW/3.2kW = 156% of the heat transfer due to conductivity and air changes at dT = 10C. This could be approximated by using a compensated time constant: Q = (2*SUM[ A.U.dT ] + SUM[air change heat loss] + [Solar Gain]) SGTC = (1000* (insulated mass of concrete equivalents in tons) + 2500*(insulated mass of timber equivalents in tons)) / 3.6*(500 + heat transfer coefficient in W/K) In the simplified example in the first post, Q becomes around 5.2kW + 5kW = 10.2kW at dT = 10C [NB: 6.4kW was at dT=20C and we have doubled the heat flow due to conduction]. That makes the compensated time constant: SGTC = (64kWhr/C) / (10.2kW / 10C) = 63hours That makes the internal temperature change 20C / (0.26*63) = 1.2C. That's the minimum to maximum. [the deficiencies of all this a multiple, but it's likely to be indicative. Yes, it ignores the effect of the subfloor earth etc] If our time constant was also reduced to around a third of the uncompensated value, that would make for an SGTC=40hours temperature oscillation of 1.9C min to max. I would be pretty pleased with that. The outside temperature changing from 10C to 30C and in inside temperature changing from 19C to 21C without any heat pumps involved. There is an uncomfortable level of approximation in what I've just written, so if someone else knows of a simple was of doing a similar calculation that would be great.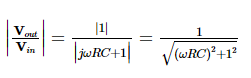
-
Wax (PCM)
MortarThePoint replied to MortarThePoint's topic in Energy Efficient & Sustainable Design Concepts
Thanks, I'll look in to that. I have also seen this which is for greenhouses so may be cheaper, but I notice the question in the top right corner of the website which may suggest expensive crops. Also greenhouses probably want to be warmer than 22C




