MortarThePoint
-
Posts
2198 -
Joined
-
Last visited
Everything posted by MortarThePoint
-
Alternative Water Supply Connection
MortarThePoint replied to MortarThePoint's topic in General Plumbing
Good thought, but that won't apply as both houses have sewage treatment plants -
Alternative Water Supply Connection
MortarThePoint replied to MortarThePoint's topic in General Plumbing
More straight forward with a private supply as I am sure it would be OK to share that. I like the idea of a borehole, but was led to believe it would cost around £20k and with ongoing maintenance/filtering costs. We have mains water o supply to the house which we are living in during the build, so it would be easy to piggy back off that -
Two relatively simple questions: Will Building Control sign off a house without a finished water connection? Is it legal to take the water supply from an existing dwelling that you also own? That second option is a possible short to medium term option that avoids the delays associated with the water company connection as well as possibly the cost if it became more permanent. I would be paying the water bill for both houses anyway.
-
Not so much. It's to connect between two buildings about 100m apart which is a common requirement (e.g. garden office, garage, workshop, barn etc). A good approach, but I have convenient mains sockets and not ethernet sockets. This must be a common scenario for the domestic market as most people have housewide WiFi rather than ethernet.
-
24v lighting circuit - good or bad idea?
MortarThePoint replied to SBMS's topic in Networks, AV, Security & Automation
I've thought about all this a while back. I like something more like 48V as it's still considered safe under dry conditions and I think meets SELV. The higher voltage means lower current. 10no. 6W bulbs at the end of 50m of 1.5mm2 copper would have a total current of 1.25A. The round trip cable resistance would be about 1.2R, so the voltage drop would be 1.5V or about 3%, but I think this is a bit of a pessimistic model. You could just regulate down to a lower voltage (45V) or better efficiency to have a switched mode constant current supply at the bulb that allows dimming. -
I want a product that consists of two mains powered units: 1. Connects to WiFi and has a wireless bridge 2. Connects to wireless bridge and has a WiFi access point (WAP) Clearly the units could be the same hardware configured to different roles. Ideally, you'd tell end (1) the WiFi credentials and end (2) would automatically use those for it's WAP. Then any WiFi device moved between locations (1) and (2) would easily connect. I've seen loads that connect to wired LAN, but not spotted ones that connect to WiFi. This has to be the most common consumer level requirement.
-
I'm making an cut stringer staircase where spindle placement needs to be considered more carefully than with a normal closed stringer stair where the spindles' positions don't need to bear any relation to the treads. We need at least 2 spindles per tread to satisfy the <100mm gap required by buildings regs. The common approach seems to be to align the front edge of the front spindle with the front face of the riser. I have shown this in the first two CAD images. I think I prefer to centre the spindles on the tread (excluding nosing and 'back nosing'), but that has the following two 'characteristics': Spindles 'clash' with Newel posts, which I think looks OK but maybe that's because I have looked at it like that for too long, Nosing of the next step up gets close (14.5mm) to the back edge of the back spindle Which way do you prefer? Do you have any other thoughts? 32mm spindles, 222mm going. Spindles centred on tread: The normal way (as far as I can tell): Gap from newel to first spindle 66mm, gap to last spindle is 34mm. Sorry about the bit of skirting board shown in the background.
-
Welcome! I expect everyone here has been overwhelmed at some point by the amount of hoops to jump through. Important to keep your eye on what you're trying to achieve. The budget always gets stretched, but there are likely ways of managing.
-
I need some pretty basic spindles. 1100mm 32x32 stop chamfer ones. I like the look of the ones at Pears Stairs, but wonder if anyone has experience with these or similar. I obviously don't want them to bow or twist once I have built them into the staircase. It would be either the 'clear pine' or white primed option. https://www.pearstairs.co.uk/stop-chamfered-staircase-spindle-32-x-32-x-1100mm.html
-
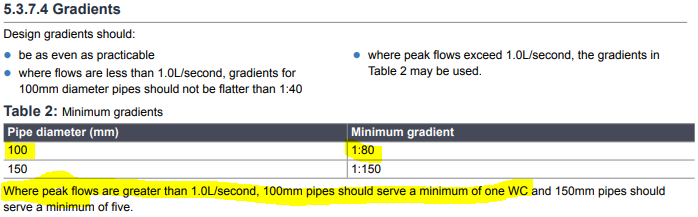
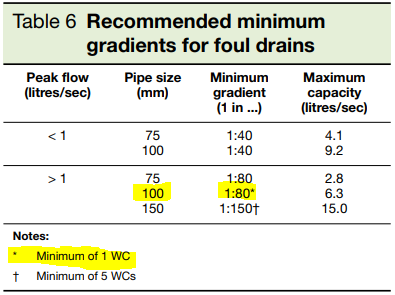
In terms of gradient, most advice is 1:40 (1m across 25mm down), but often reality doesn't allow this. 1:80 (1m across 13mm down) is allowed if peak flow rate is over 1.0L/s and NHBC give a useful indication of what that means (actually, so does the Part H table): In my pipe diagram above, the branch with two 90 turns serves a stack from a bathroom with a WC as well as a bath so should have peak flows over 1.0L/s meaning 1:80 is OK. I'll probably try for 1:60 (1m across, 17mm down).
-
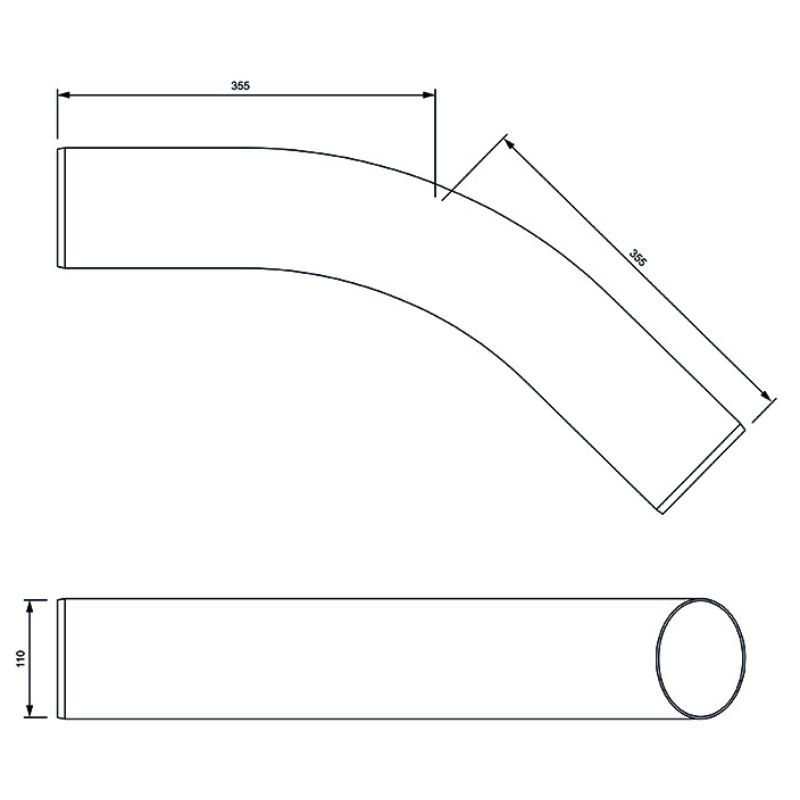
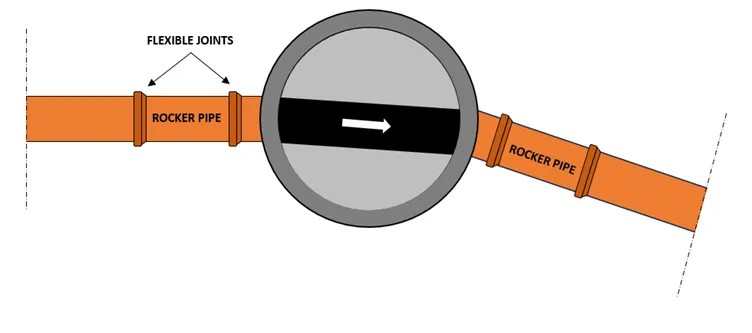
Polypipe also do 22.5 and 11.25 long radius bends, they may be bent straight pipe sections though depending how you feel about that. Perhaps useful for making rocker pipes that add small bends. Otherwise their standard 11.25 bend probably suffice. Obviously, the adjustable 0-30 bends are an option.
-
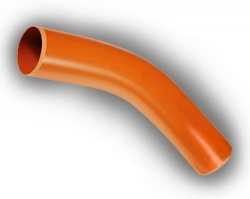
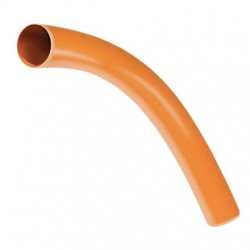
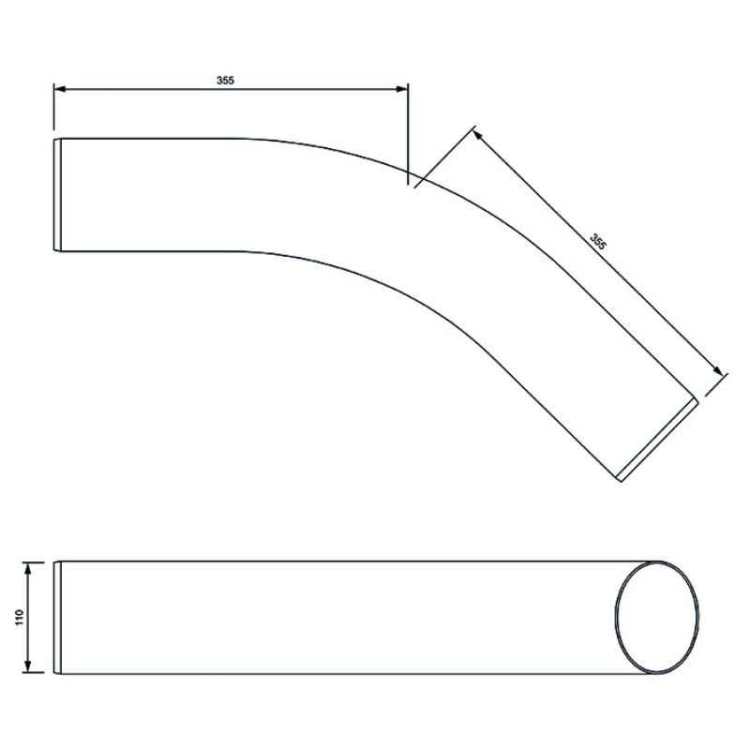
45 degree long radius bend: This may be gentler bend, or they've just used a picture of a 90: Floplast have a dimensioned drawing of theirs:
-
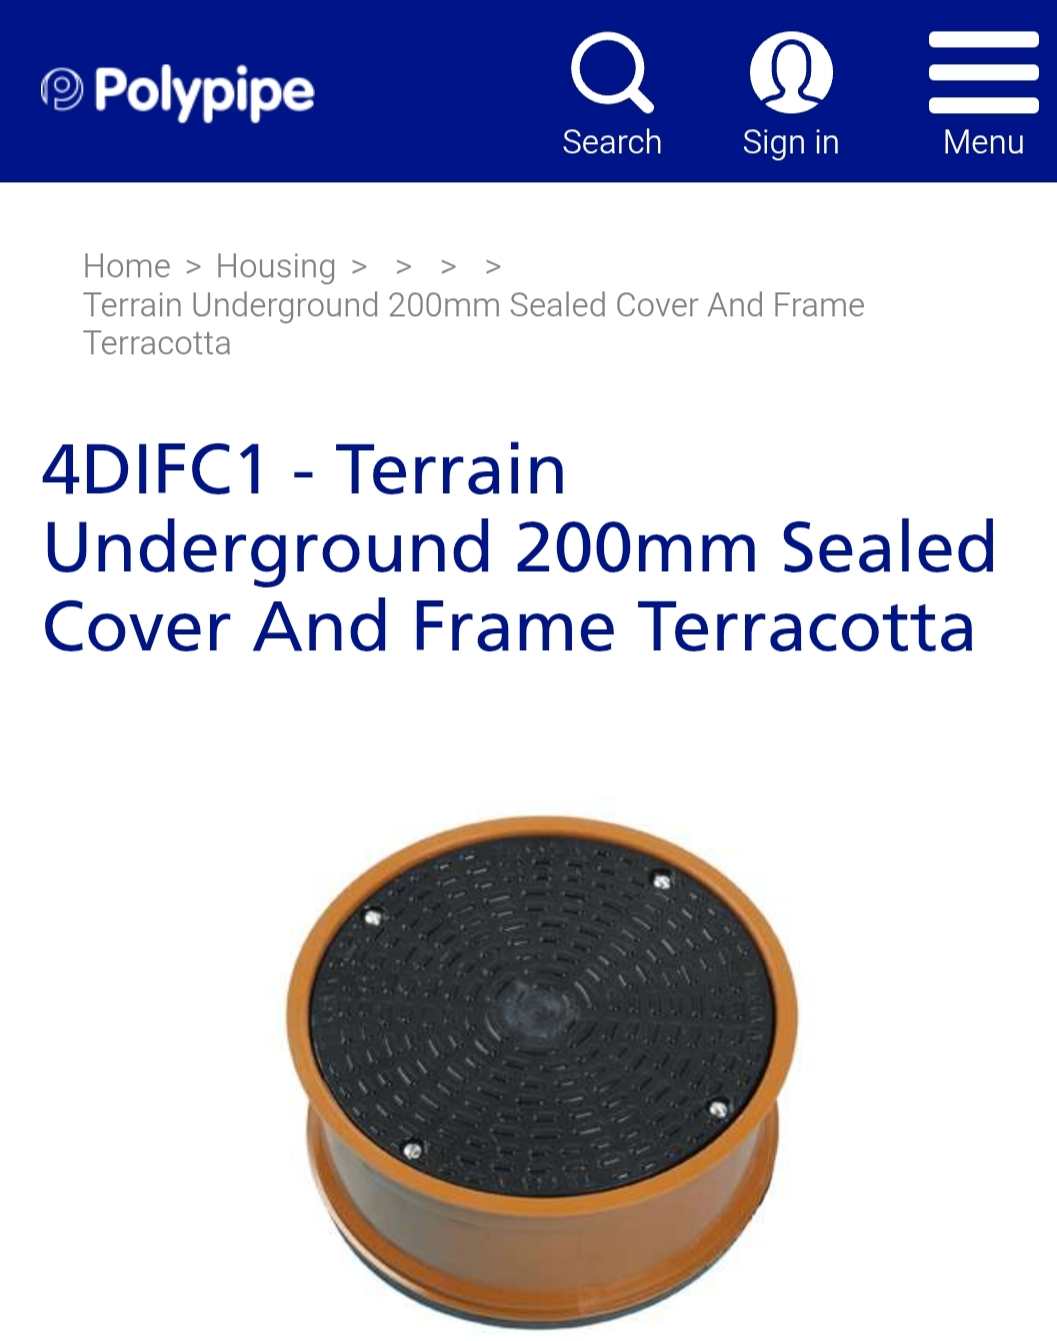
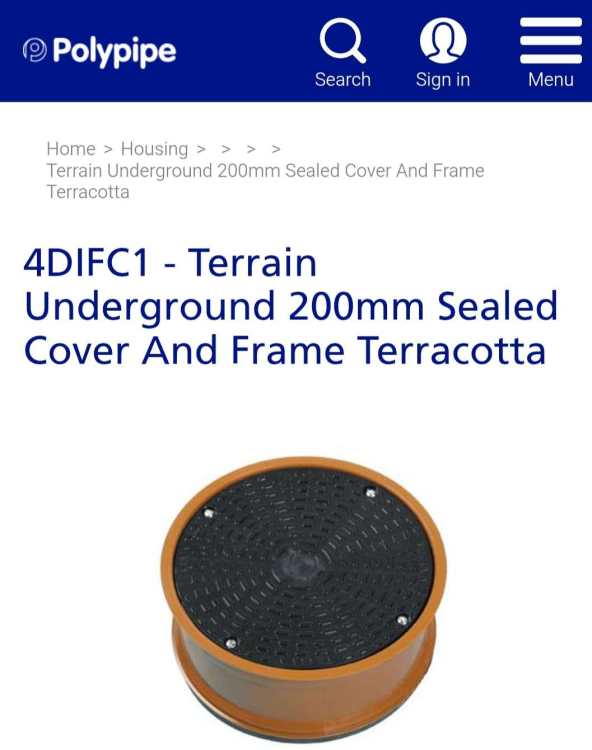
Actually, this circular cover may be compatible
-
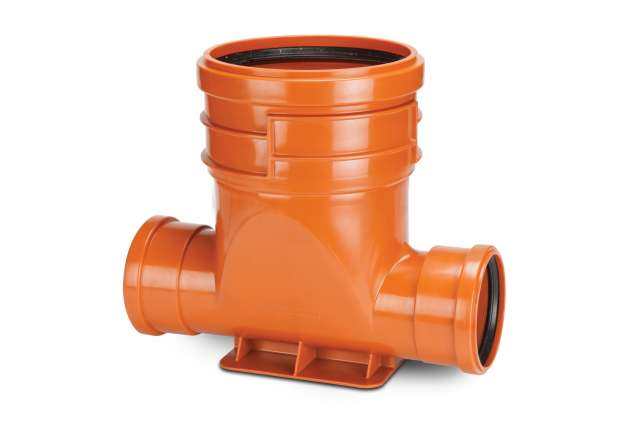
This Polypipe inspection chamber is interesting. Only 200mm diameter so easier to incorporate in various places. Would need a 45 bend either side to be on a corner. I think it's only suitable for an invert level of 600mm below ground in domestic applications, despite the tube that attaches to its top being 2m. Only option for a cover is a square ductile iron one though.
-
I don't want to go too far between ICs to make clearing blockages easier, but aren't the regs 45m between ICs: I think I'd break the ~20m section in half with another inspection chamber in case rodding through the STP was difficult

-
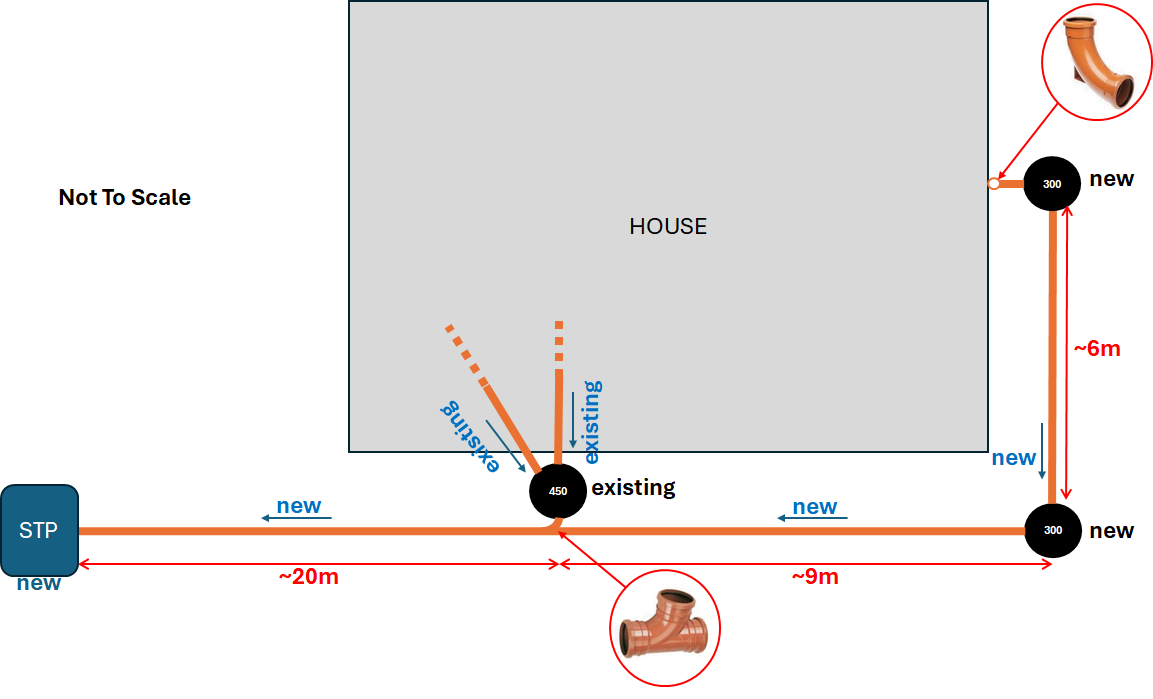
Important to remember my rocker pipes, but less clear how to do that on the 450mm with Y-tee arrangement.
-
Should be roddable via the bottom right 300mm inspection chamber (IC). The main challenge is the exit of the 450mm IC facing the wrong way. I spoke to my BCO and he said he'd be ok with a Y-tee and 45. I think I'd make the 45 by cutting a resting bend and that way I can fine tune the angle.
-
This is the setup I am trying to work out. Unfortunately the 450mm inspection chamber exists in the wrong direction. I'm hoping I can put a tee right next to it to solve that, since the long straight run will be roddable from the 300mm inspection chamber bottom right of diagram. I'd prefer something smoother, but can't find a product that is a 'resting bend tee' equivalent. Does this look at all sensible? The existing 450mm inspection chamber has an outlet invert 600mm below the surface. 1:40 fall would necessitate 600mm - (15,000mm/40) - 2*(300mm_chamber invert steps) < 225mm. Noticed a product called a shallow access 90 degree chamber which avoids the steps at the two 300mm chambers: https://www.drainagesuperstore.co.uk/product/280mm-dia-90-degree-shallow-access-chamber-base-110mm.html @Nickfromwales do you get involved in the mucky pipes outside or just stay warm inside?

-
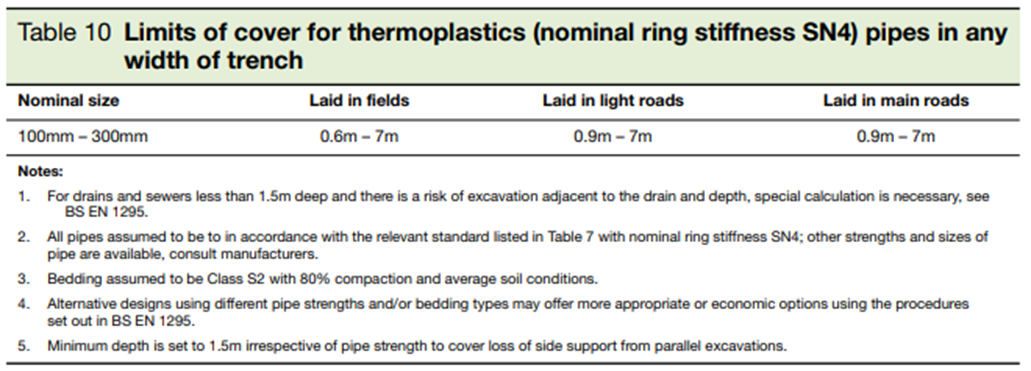
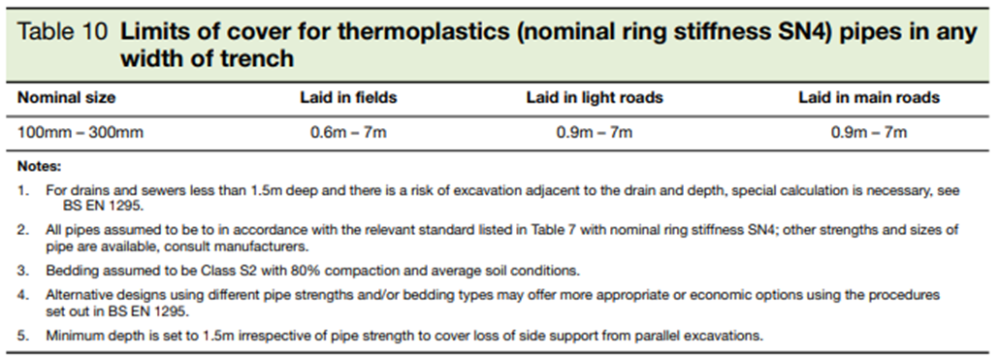
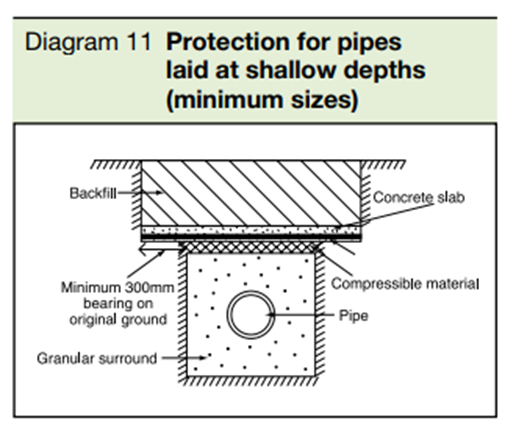
Depth information is only given for where vehicles may travel, like fields and roads: And if that can't be achieved, a slab used

-
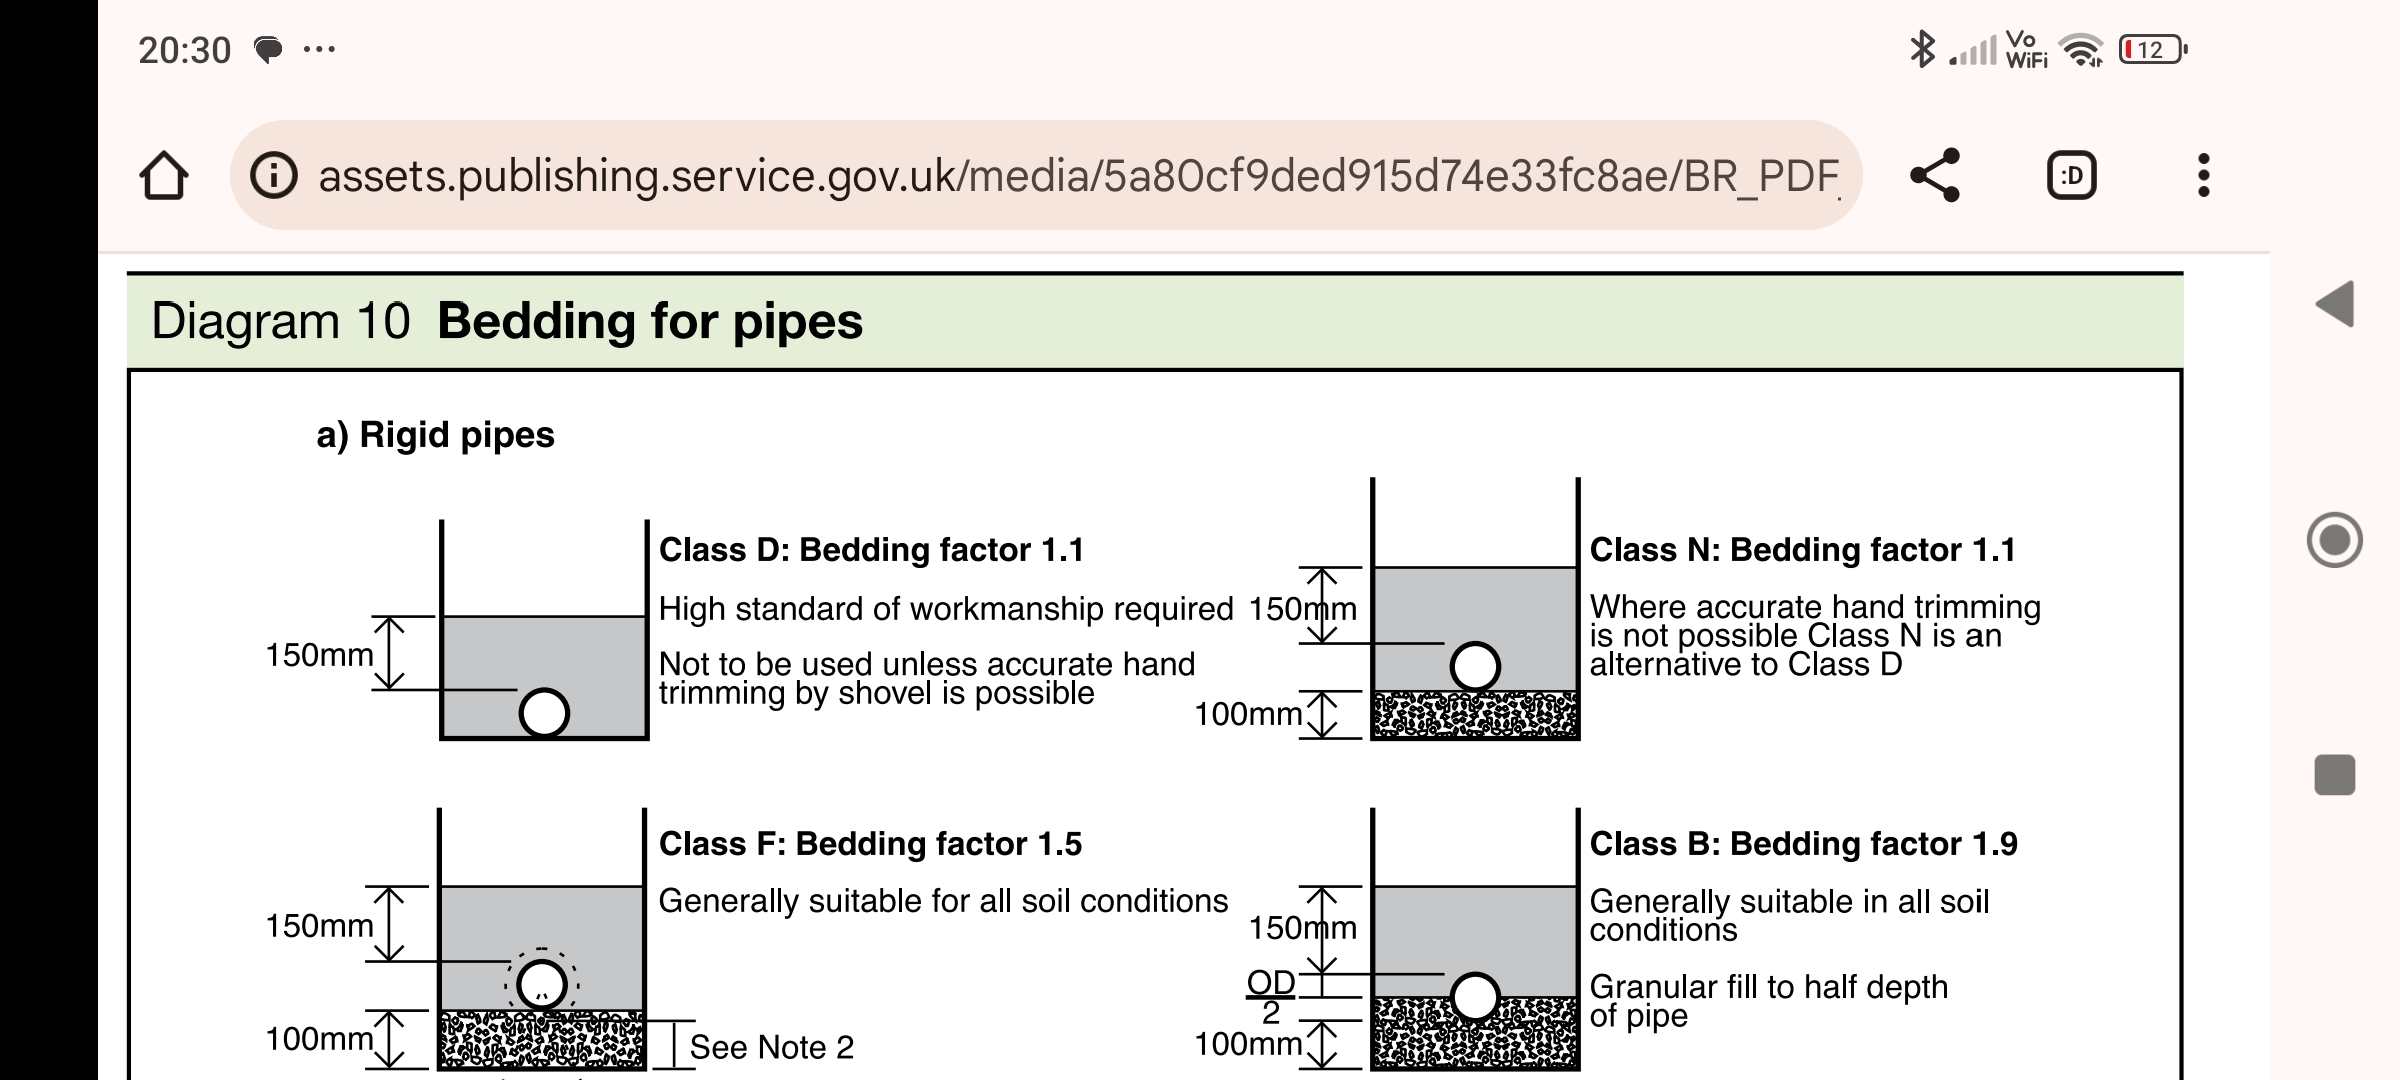
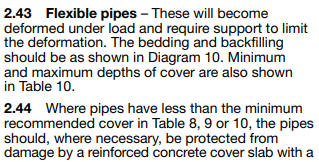
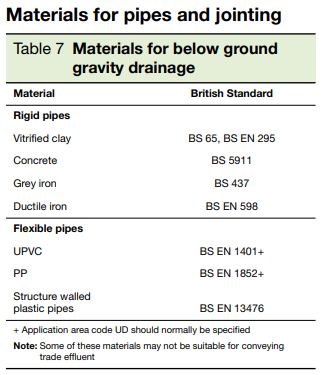
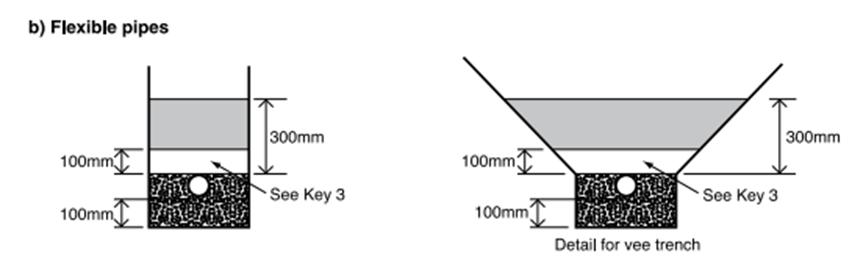
Oops, those 'Rigid' pipes are only clay, concrete or iron. The normal brown/orange PVC pipes are classed as flexible. That changes the normal installation to as shown below, (b). That suggests a minimum depth to the top of the pipe of 300mm which could be tricky.
-
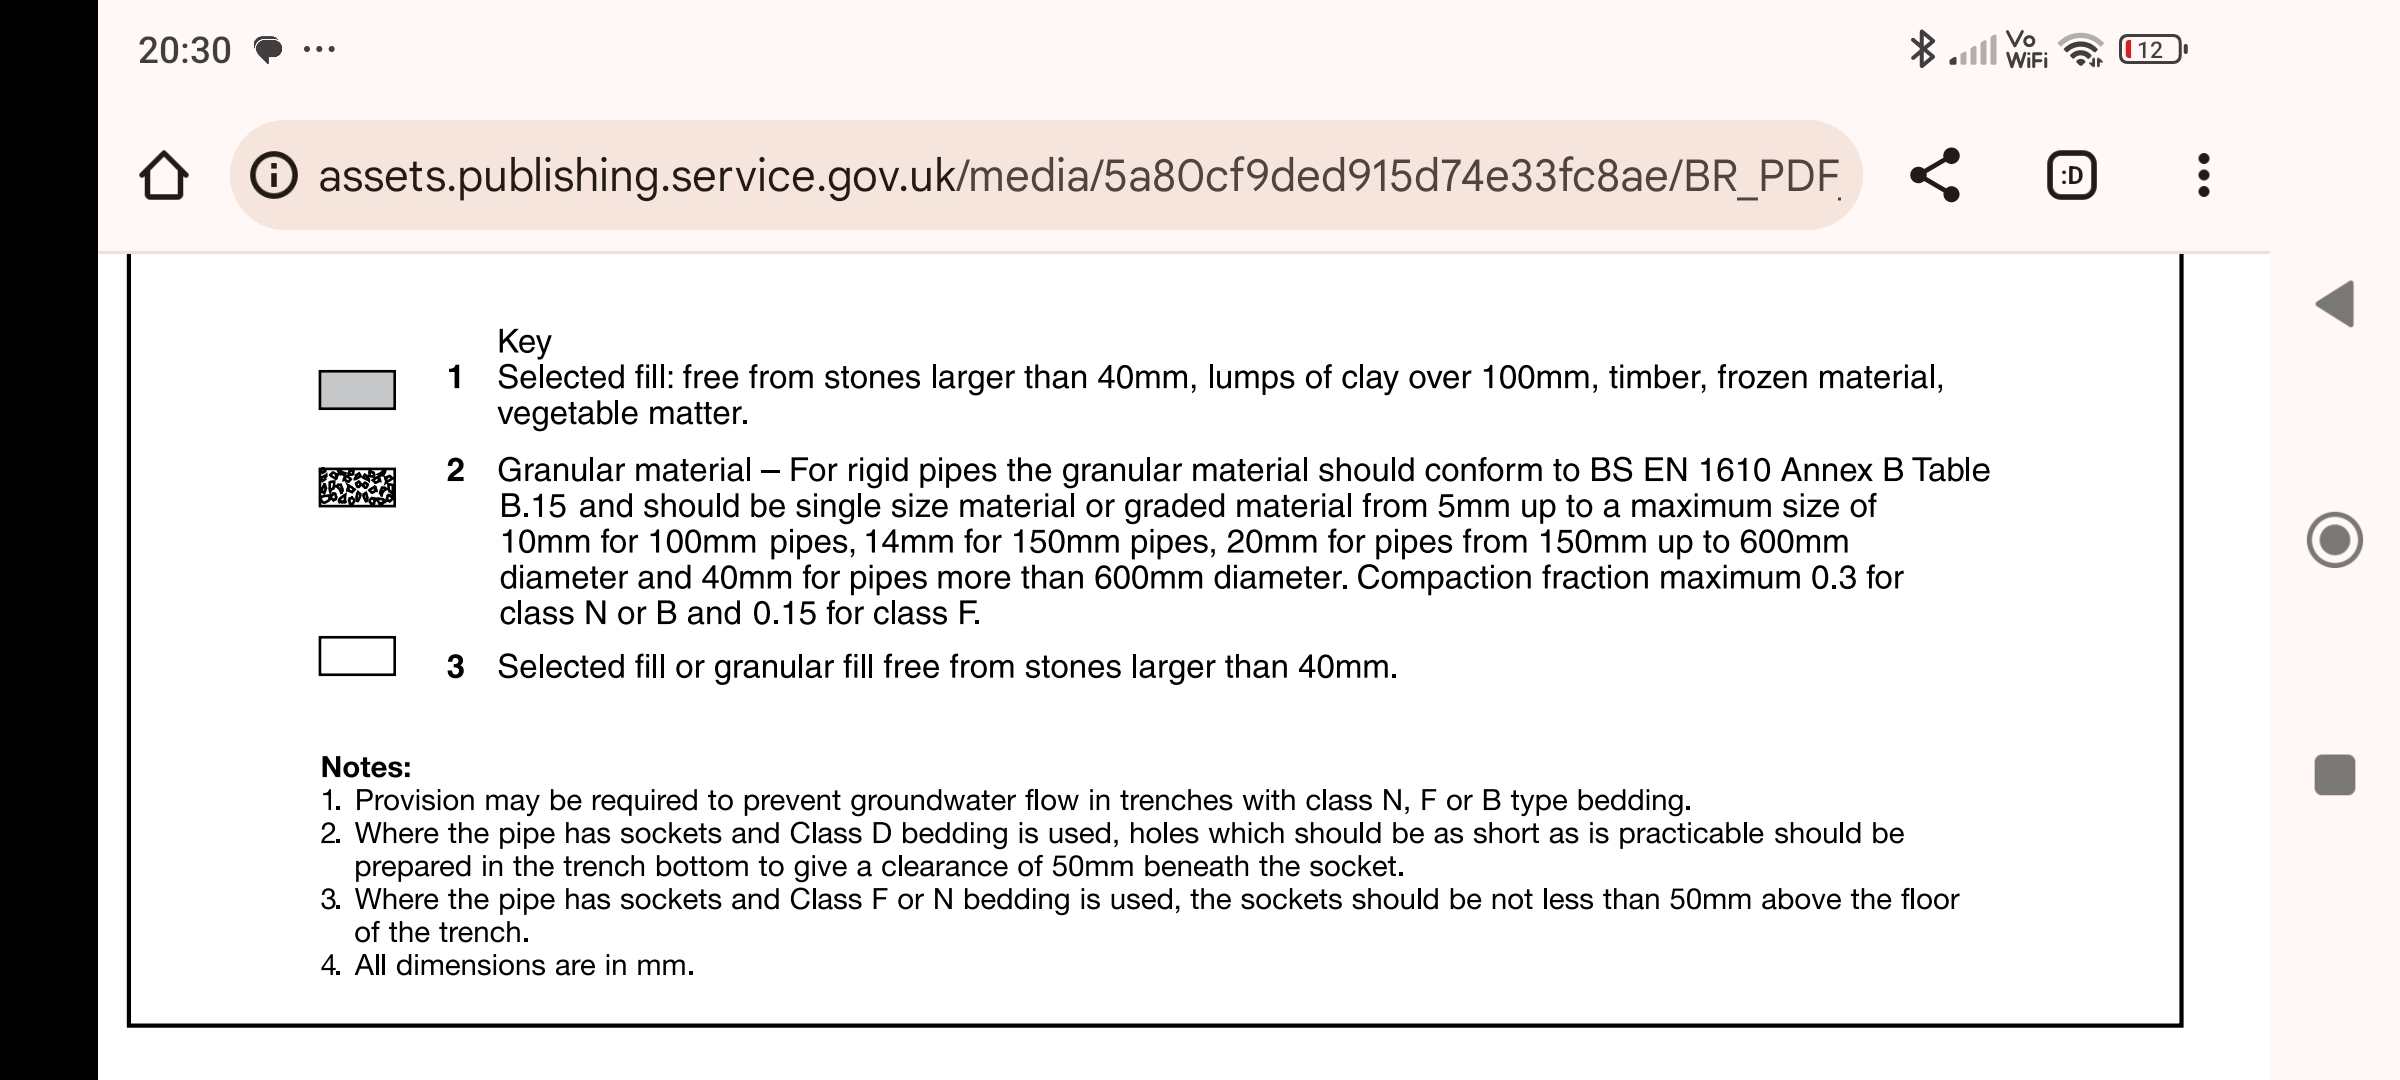
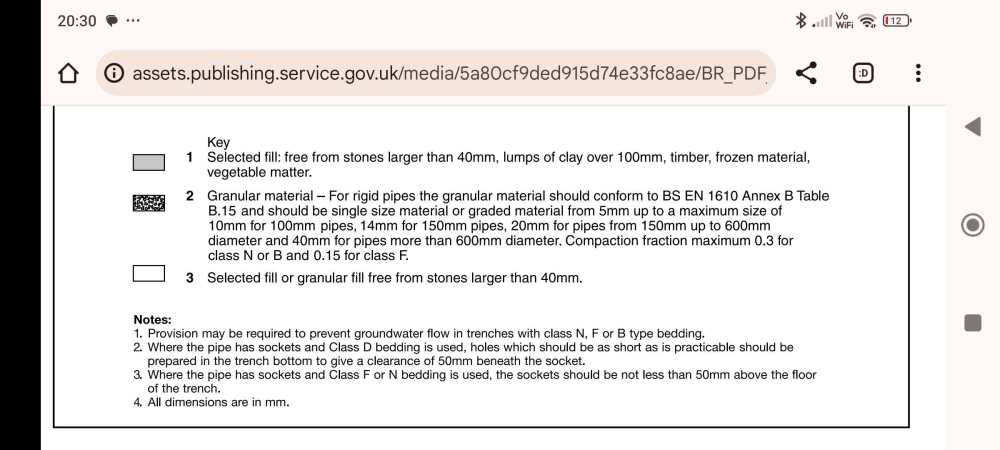
For 110mm foul pipes running around the outside of the house I was expecting to dig a trench about 300mm wide, put down a bed of pea gravel and then fill to just covering the pipe with same gravel. Then topsoil over all that. Does that sound the right approach? If I understand part H diagram 10, this method meets or exceeds Class B as long as the top of the pipe is at least 150mm deep. Though not sure why the vertical sides of the trench continue upwards in the diagrams. I think my shallowest pipe would have it's top at about 150mm below the surface. What I'm less clear on is how far from the wall to have the pipes. All pipes are above top of concrete foundations. Further from the house feels like it leaves room for unknowns, but perhaps gets closer to somewhere the wife might stick a spade. I guess same question applies to rainwater drainage too.

-
@SuperJohnG @Thorfun I'm weighing up between the Graf One2Clean and the Solido Smart at the moment. I like that the Solido Smart has the pump tucked away in the plant, but in a sealed chamber. The Graf has a remote unit (kiosk or in the house as I understand). What's the maximum distance between Graf's pump and the unit itself as I expect about 20-25m between the house and the plant? Have either of you had any issues. I hear horror stories of fixes needing software from Germany and laptops on site with expensive tools etc which worries me a bit. Also, availability of parts is a concern.
-
Recommendation - private treatment plant
MortarThePoint replied to Lincolnshire Ian's topic in Waste & Sewerage
@Duncan62 @crispy_wafer How quiet is the Solido Smart's pump? They have it as a main selling point, but it's hard to get a feel. I guess things to compare it to are a laptop fan, fridge, ASHP. This would be based on standing just to the side of the plant, obviously with the lid closed. -
Sewage Treatment Plant self install
MortarThePoint replied to MortarThePoint's topic in Waste & Sewerage
I'd quite happily have an above ground tank if there was such a product for 7PE or more and no freezing risk. -
Sewage Treatment Plant self install
MortarThePoint replied to MortarThePoint's topic in Waste & Sewerage
Silly of me not to have sorted it sooner, but am where I am