


MortarThePoint
-
Posts
2294 -
Joined
-
Last visited
Everything posted by MortarThePoint
-
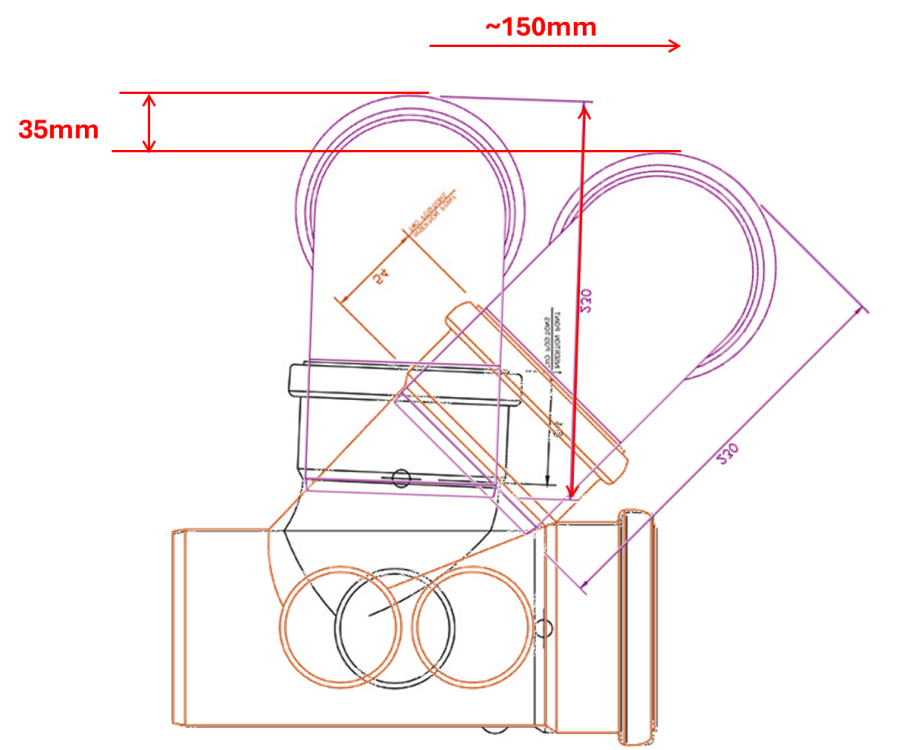
Late to the party on this one, but I have spent a long time muddling through pan connector heights. I am guessing your original plan was to put a 90 swept bend into the swept tee and that would have made things too high. Or was it going to be a 90 degree pan connector straight into the soil pipe branch? Comfort height toilets can help, but not as much as 40mm I don't think. I think swapping to a 45 degree branch is a good shout from the not blocking perspective, but also would have lowered where the bend would have ended up had you gone that route (image below). With either branch option, you could have rolled the branch about its axis and used a 45 degree bend instead of 90 at the cost of pushing the pan further into the room a bit. Some other options to have on the thread in case someone else gets stuck like this. 45degree options: SP163 https://www.floplast.co.uk/product/bend-1 https://mcalpineplumbing.com/wc-connectors/rigid-wc-connectors/45-angle-rigid-wc-connector/ You can also get a tight radius 90 degree bend (OSMA 4S160B https://www.jewson.co.uk/p/osmasoil-pvc-u-spigot-bend-tight-radius-90-110mm-black-PO4S160B) You've ended up with a really nice result though, so it's all worked out well. Floplast parts shown (SP190, SP210, SP161).
-
Inline Fan Speed Controller (for MF100)
MortarThePoint replied to MortarThePoint's topic in Ventilation
Good suggestion and I have some of that sort elsewhere. There are a couple of locations I want to use inline fans though -
I have an MF100T I have been testing and it is pretty noisy on its lowest setting (50 L/s flow). It's comparable to competitors. There are three speed settings via a jumper. I want to use it in a trickle application, ideally with Boost, but just trickle would be fine. As such, I would be happy with about half the flow rate with the associated sound improvement. Manrose do their own remote speed controller (1350), but it is expensive and not to my taste aesthetically. Has anyone else had success with an alternative? The ultimate would be one that could be controlled via Bluetooth/Zigbee/WiFi. In terms of a simple solution, I like the look of the BG 887-01. It's cheap and looks neat, but is only has two terminals (so only LINE) unlike the Manrose which is 4 terminal. I have seen a Tuya fan speed controller for ceiling fans that might work: https://www.google.com/search?q=tmwf02 I may have to change to the Manrose MF100 inline fan to make this work, but that is doable. Manrose 1350: BG 887: https://www.bgelectrical.uk/uk/wiring-devices/800-series/fan-controller/887-01
-
Airtightness for Flush Mounted Consumer Unit
MortarThePoint replied to MortarThePoint's topic in Consumer Units, RCDs, MCBOs
That makes sense when it's a surface mounted consumer unit, but when it's a flush mounted one it extends behind the plasterboard. The wall construction is 4x2 studs with plasterboard, VLC (300ga polyethylene), Knaug Omnifit insulation slabs between the studs and behind. I was thinking I could build a box in between a couple of studs and then airtight that and have the VLC taped to it. That would effectively create the 'bump' in the airtightness layer needed to accommodate the rear part of the flush mounted consumer unit. -
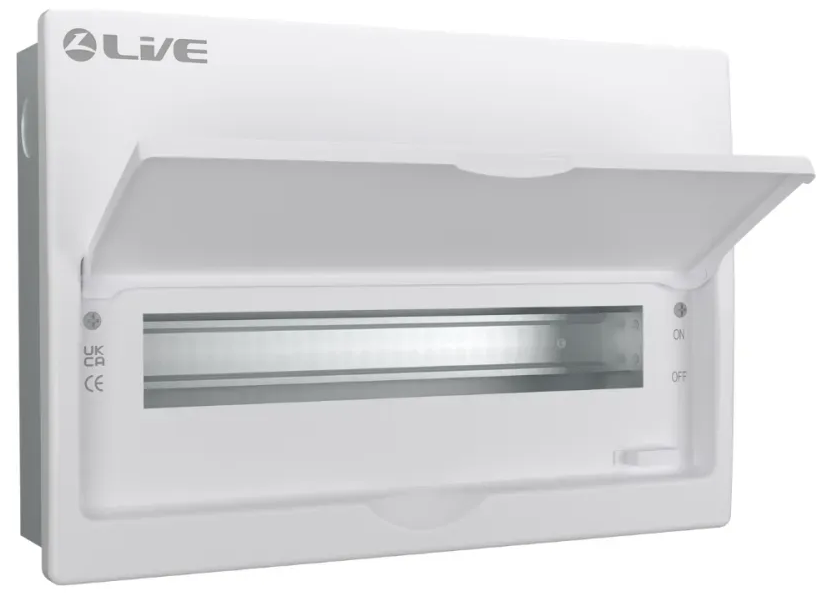
I've agreed with the sparky that I am going to have a satellite consumer unit (CU) for an attic conversion. That way, I have a single feed to the attic and then dedicated isolator, RCBOs etc for the attic sockets, fans and lights etc. I am planning to put a flush mounted consumer unit into a stud wall that has an airtightness requirement. I'm not expecting to achieve airtightness with the CU itself[1], so am thinking I'll create an OSB box behind the plasterboard that is lined with Passive Purple (air tight paint) and has sealed entries for the cables. The airtightness membrane of the wall would then get tape sealed to this OSB box. Is that how airtightness is normally done for flush mounted consumer units? I like the look of the flush mounted consumer unit below. I know Hager also make a good one, but I feel it's a bit industrial looking for being visible on a wall in living space. Hopefully this one doesn't actually have the logo on it, but if it does a pit of paint could easily solve that. Has anyone used a Live brand consumer unit? [1] I know Wiska do airtight cable grommets you can get from TLC, but attaching the membrane to the CU housing sounds tricky. https://www.electrical4less.co.uk/product/live-electrical-fmc16-16-module-flush-mounted-metal-enclosure/ https://www.liveelectrical.co.uk/product-detail/fmc16_72 https://www.liveelectrical.co.uk/storage/documents/datasheets/1720044797__LSMC &FMC DATASHEET.pdf

-
I just gave them a call and got some really useful answers abut the AT350: Learns your usage patterns and does the regen at a suitable time based on that Has a button for manual regen Full regen takes about an hour but they water bypasses (so gives you hard water) for about 20 minutes of that Regen output is at mains pressure Happily used with a 6 person house Low flow rates not likely to be an issue They are local(ish) to me which I like the thought of.
-
Thanks and you clearly rate them highly then. I have seen NE Water Softeners but they are just about it in terms of choice/competition
-
Package STP (Solido Smart). I have seen some other systems say they shouldn't receive water softener regeneration waste, but need to check my one. It has already occurred to me that I might be able to bypass the treatment plant with the regeneration drain. My thinking is there shouldn't be anything inherently 'nasty' about the regeneration drain except a high concentration of what has been removed from the hard water. those minerals would have ended up in the STP output anyway so it doesn't seem questionable to put that into the ground.
-
My current thinking is to soften everything except the kitchen sink and the outside tap.
-
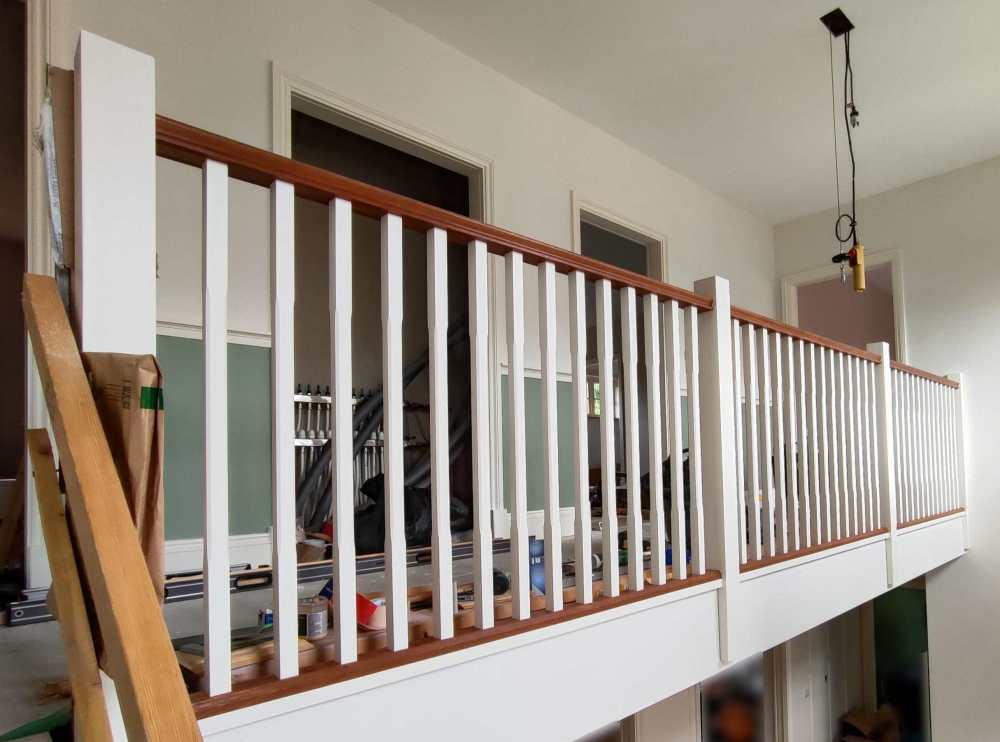
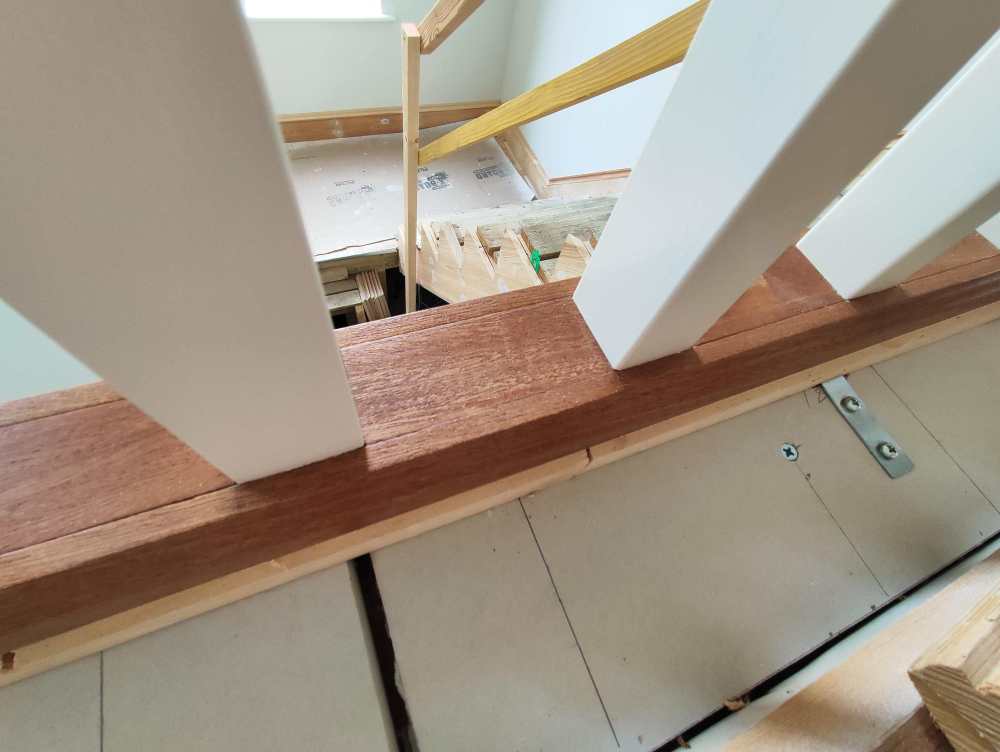
Be warned, installation is much slower than it would be if all was painted. If all was to be painted then everything could be installed and then painted together. I've had to pre-paint and varnish everything and then carefully install.
-
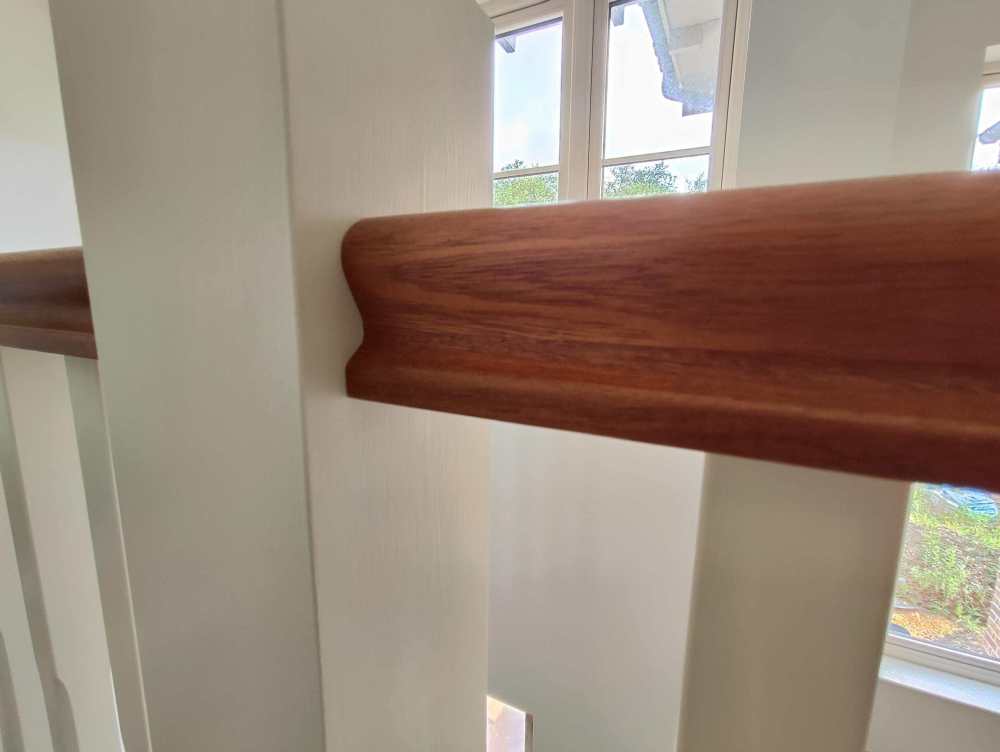
Progressing: plan to have sapele shadow gap newel caps as well as the hand and base rails and stair treads. 32mm spindles with 79mm gaps to match what the gaps on the stairs will be.
-
I've been looking at the various different water softeners on the market and see some of the key features. I consider on demand (metered) regeneration a must, rather than a timer based system. However, I don't really consider a double chamber system a must since a single chamber system with a clock would regenerate in the early hours (about 10 minutes at 2am) and have no real impact. Although we are a family of four, our water usage it limited by planning to 110/person/day, so the demand isn't very high. The Twintec S4 looks to be somewhat of a benchmark and I like the 10 year warranty, but it's not very self build friendly since few suppliers offer it for self installation. Costs about £1200 and only uses blocks so limit supply choices there too. BWT offer a cheaper range and you can pick them up at ScrewFix. Some of the reviews make me a little nervous though, despite a claimed 5 year warranty. The BWT WS555 looks like the best fit for my needs, but I have been put off by the following statement in their installation manual: Does anyone have experience with these units? Are they cheap and cheerful but not a good long term investment? YGWYPF?
-
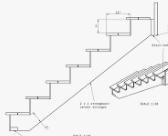
Along the landing, we're having Sapele hand rail and base rail with painted spindles in between and painted newel posts. The stair itself is an Open Stringer (or Cut Stringer) design and we're having Sapele treads with painted risers, stringer, spindles and newels. On the stair, the spindles have to be dowel fixed into the treads since there is no stringer top edge to put a base rail on. Every installation I see for spindles along a landing involves the glued packers, a blob of glue top and bottom on the spindles and perhaps some narrow pins through the edge of the base rail and hand rail into the spindles. Does anyone dowel their spindles into the base trail? Would that be excessive? I want to make sure I don't have an unpleasant surprise with the BCO if he says I should have added some fixing to the spindles. https://www.grosvenorstairs.co.uk/product/sapele-low-profile-handrail-44mm-x-60mm/ https://www.grosvenorstairs.co.uk/product/sapele-traditional-baserail-60mm-x-30mm/


-
Yes it's neat because you can have as many momentary action switches as you like connected to the coil and whichever switch is used, the light will change state.
-
I like the approach of using latching relays. AnnualCost = (365*24/1000) x Duty x PowerWatts x ElectricityRate = 8.76 x Duty x PowerWatts x ElectricityRate Assuming that for a non-latching relay is PowerWatts = 0.2W, ElectricityRate = £0.20/kWh and the light is on for 3 hours per day (DUTY = 12.5%) that makes AnnualCost = 8.76 x 0.125 x 0.2 x 0.2 = £0.04 Unlikely to justify the latching relay on the basis of saved electricity. GEYA are not a brand I am familiar with, but their website looks like they know what they are doing: https://www.geya.net/ https://geya.store/products/gir-16a-1p-2p-230vac-110vdc-latching-relay?variant=48896365396248 £6.60 each on AliExpress GEYA also make slimline relay sockets for the HongFa 41F relay range: https://www.aliexpress.com/s/wiki-ssr/article/relay-hongfa https://www.geya.net/product/gr-h41f-lz-22mm-slim-relay-socket/ https://www.aliexpress.com/item/1005001437492488.html
-
Hongfa seem to be reasonable. They are stocked by RS (socket, relay) and Farnell (socket, relay) TEM (socket) https://www.hongfa.com/product/relay-socket/41F-Sockets https://source.hongfa.com//Api/DownloadPdf/201 Aliexpress are just a bit cheaper than most places for them if they aren't knockoffs which is hopefully unlikely. It would be good is LCSC did them A 20way solution with a GPIO buffer would probably run to 2*£30 + £20 = £80 which shows the good value of the Waveshare options not to mention the really cheap ones.
-
Nice: https://thepihut.com/products/modbus-rtu-32-channel-relay-module https://www.waveshare.com/wiki/Modbus_RTU_Relay_32CH Waveshare are normally pretty good. I can't see any CE mark statement though. Pros: Cheap: £2 / channel -> £3 / channel with RS485 converter and PSU OK ON power: 11.7W / 32 = 366mW / channel Reputable: medium/high though question on CE mark Well supported Cons: It does have significant single points of failure though. I'll always be able to get DIN mounted relays. CE mark? I like Modbus / RS485 and have used it in some fun applications but it's overkill for my setup since they will be co-located. That said, it's a quick solution to the interfacing challenge. Waveshare make some other interesting items: 8-Channel ESP32-S3 WiFi Relay Module with RS485 (PoE Option) £48 30-Channel Ethernet Relay Module with PoE £67 sold out 16-Channel Modbus Ethernet Relay Module £53
-
They'll have something to remember me by when they are sat in the dark 🤣 Have have wired the house so that it can be converted to a conventional switch based one by only making changes near the consumer unit. That said, it would be good to have the type of relay that has a switch override so that all could be left switched on and then smart bulbs used instead.
-
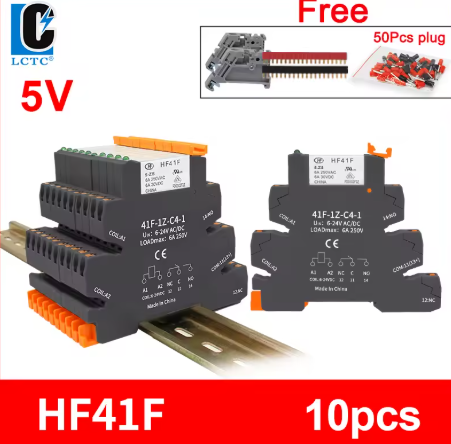
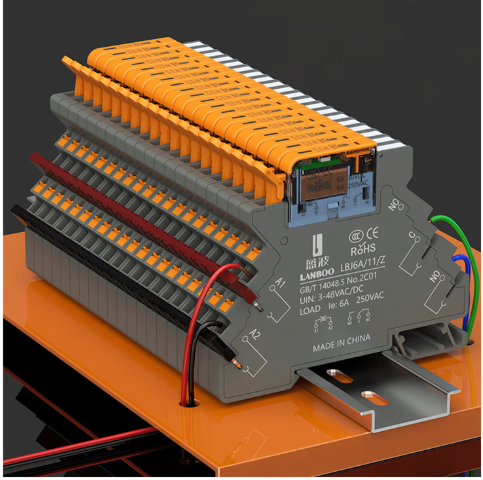
The main issue with the individual DIN rail mounted relays is the need for control buffering since the coil powers are too high for GPIO control. Nice servicability though These are tempting: They appear to use HF41F relays: https://static.rapidonline.com/pdf/507532_da_en_01.pdf Those 5V relays have a 147R coil resistance and 170mW coil power. 34mA is too much for unbuffered GPIO use though. These look really nice, but the coil power (0.9W) is unacceptable:
-
It's the 'roll your own' desire. Yes I could get 5 or 6 Shelly 3 channel relays for £400, but I like making things and can also be outside any walled gardens. The 16channel PCB for £11 with a £9 Raspberry Pi saves quite a bit too. A bit too much for my liking
-
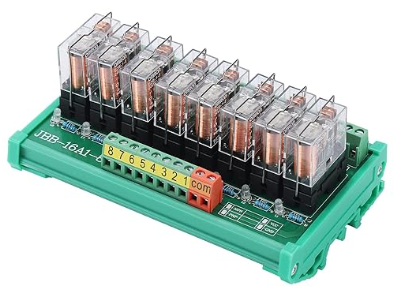
DIN rail would arguably look more professional I agree, but ultimately you could still have dubious DIN rail parts These look nice, but the CE logo looks more like the old China Export trick. There are also things like this that claim to use Omron relays:


-
I want to have my first floor lights all automated by a central control box (star wiring arrangement, already laid to allow this). At the heart of this I need a relay control PCB which should be at least 16way. The day job gives me the skills to design such a PCB, but there are some off-the-shelf options and a variety of prices and they would come with CE marking of equally variable legitimacy. I could power the whle thing from a mains plug in which case it would be outside of the scope of the Sparkie's signoff, but I want his blessing and he's keen to see a CE mark on it. I want to control the PCB with either a Raspberry Pi Zero or ESP32 which I am happy configuring and running a local webserver from. The Raspberry Pi would allow a USB connection to the relay PCB (as would some ESP32 boards), but I would prefer to have something less protocol stack sensitive like I2C or UART. Does anyone have a good recommendation of suitable relay PCBs. I have seen things ranging from White Wing £175 to Amazon / Aliexpress <£11. The main thing I want to be able to trust is the relays themselves since that's where the mains is. I think all the PCBs have optical isolators, but I wouldn't handle the RPi / ESP32 when it's got mains anyway.
-
Secure Clip Glazing Systems (Dry Glazing Systems)
MortarThePoint replied to MortarThePoint's topic in Windows & Glazing
Thanks Craig. A difficulty I have is that the frame I am using is designed around a 44mm thick door and consequently the recesses are 47mm deep. There is no room to fit a bead in with a triple glazing unit. What I was thinking of doing was adding a timber piece (dark brown ) to the back of the frame that extends over the edge of the glazing panel and effectively forms the bead. Unlike pins in a normal bead scenario which are loaded perpendicular to their length, any fixings in that additional piece would be loaded along their length, so pins would pull out. I could use screws, but they would end up visible which I don't want (oak finish). The clips seem like a good solution since the bead ends up just being cosmetic as I understand it. I realise I could extend the frame by gluing timber on which is no wider that the frame already is and then use a conventional timber bead, but that would mean I would have to extend the frame more. I expect a suitable bead would be at least 15mm whereas I can have a much thinner back piece (dark brown) if it's only cosmetic and clips are doing the work of holding the panel. It's shown below as 12mm, but could go thinner.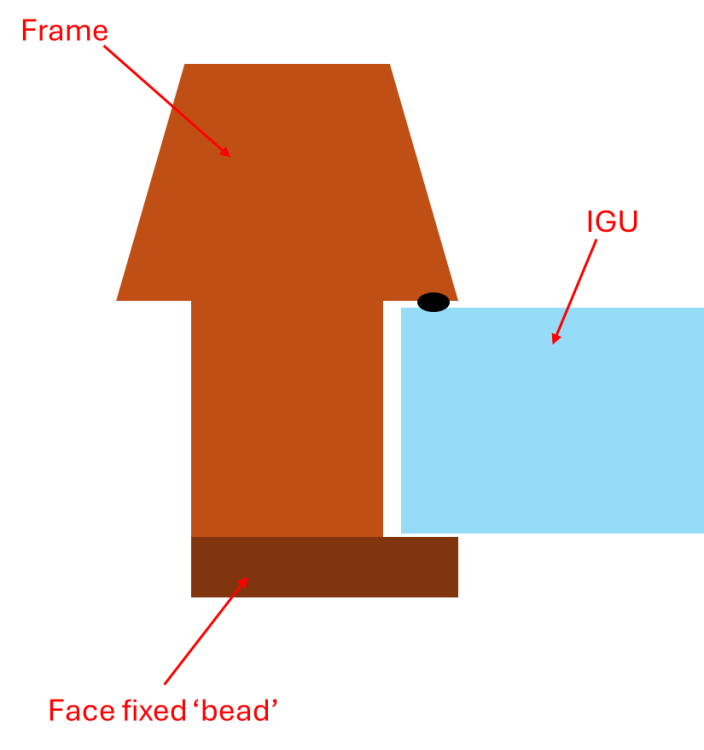
-
Secure Clip Glazing Systems (Dry Glazing Systems)
MortarThePoint replied to MortarThePoint's topic in Windows & Glazing
@craig Have you come across these clips before? Any thoughts? -
Should top of Drainage Chambers be Level ?
MortarThePoint replied to Spinny's topic in Waste & Sewerage
I don't want to get flamed for it, but some manufacturers say that chambers (mini ones) don't need to be installed with a fall. I install them with a fall though. In my experience (limited) the chamber bottom and rim are parallel so you can check wall at the top.





