MortarThePoint
-
Posts
2168 -
Joined
-
Last visited
Everything posted by MortarThePoint
-
Laser Level/Builders Level...
MortarThePoint replied to Mulberry View's topic in General Self Build & DIY Discussion
I've more lasers than make sense to be honest (no sharks with lasers on their heads though). I bought a cheap rotary laser from China (see red one below, £175 at the time) but I wouldn't recommend it as it had an issue straight out of the box. I was able to fix it and have tested it's accurate. Like with a spirit level, it is important to know how to regularly check this sort of device as you don't want to find out later that there is a problem. When I have done surveying I have repeated the process twice with the rotary laser in two different places and checked that the sets of readings agree. As I am a massive geek, I have also used homebrew RTK-GPS for surveying which works nicely for plan, but not so well for elevation. There are various non-rotary 3D lasers that have a pulsing feature. The pulsing allows you to use it with a detector when light levels and distance are too great to see it by eye. I've never used the glasses which could help under that situation. I have a Huepar one which supports the pulsing. I've never used that feature, but at dusk or in the dark it throws the laser a very long way. I thought this laser was good enough to by a second one when I smashed the first falling off a ladder. I got it from Amazon for £160 but it's now £145 (https://amzn.to/3mSTxaV note that's an affiliate link but doesn't cost you more).

-
You're right, I'm just trying to avoid newbie mistakes 🙂
-
32mm Waste Pipe in Metal Frame wall
MortarThePoint replied to MortarThePoint's topic in Waste & Sewerage
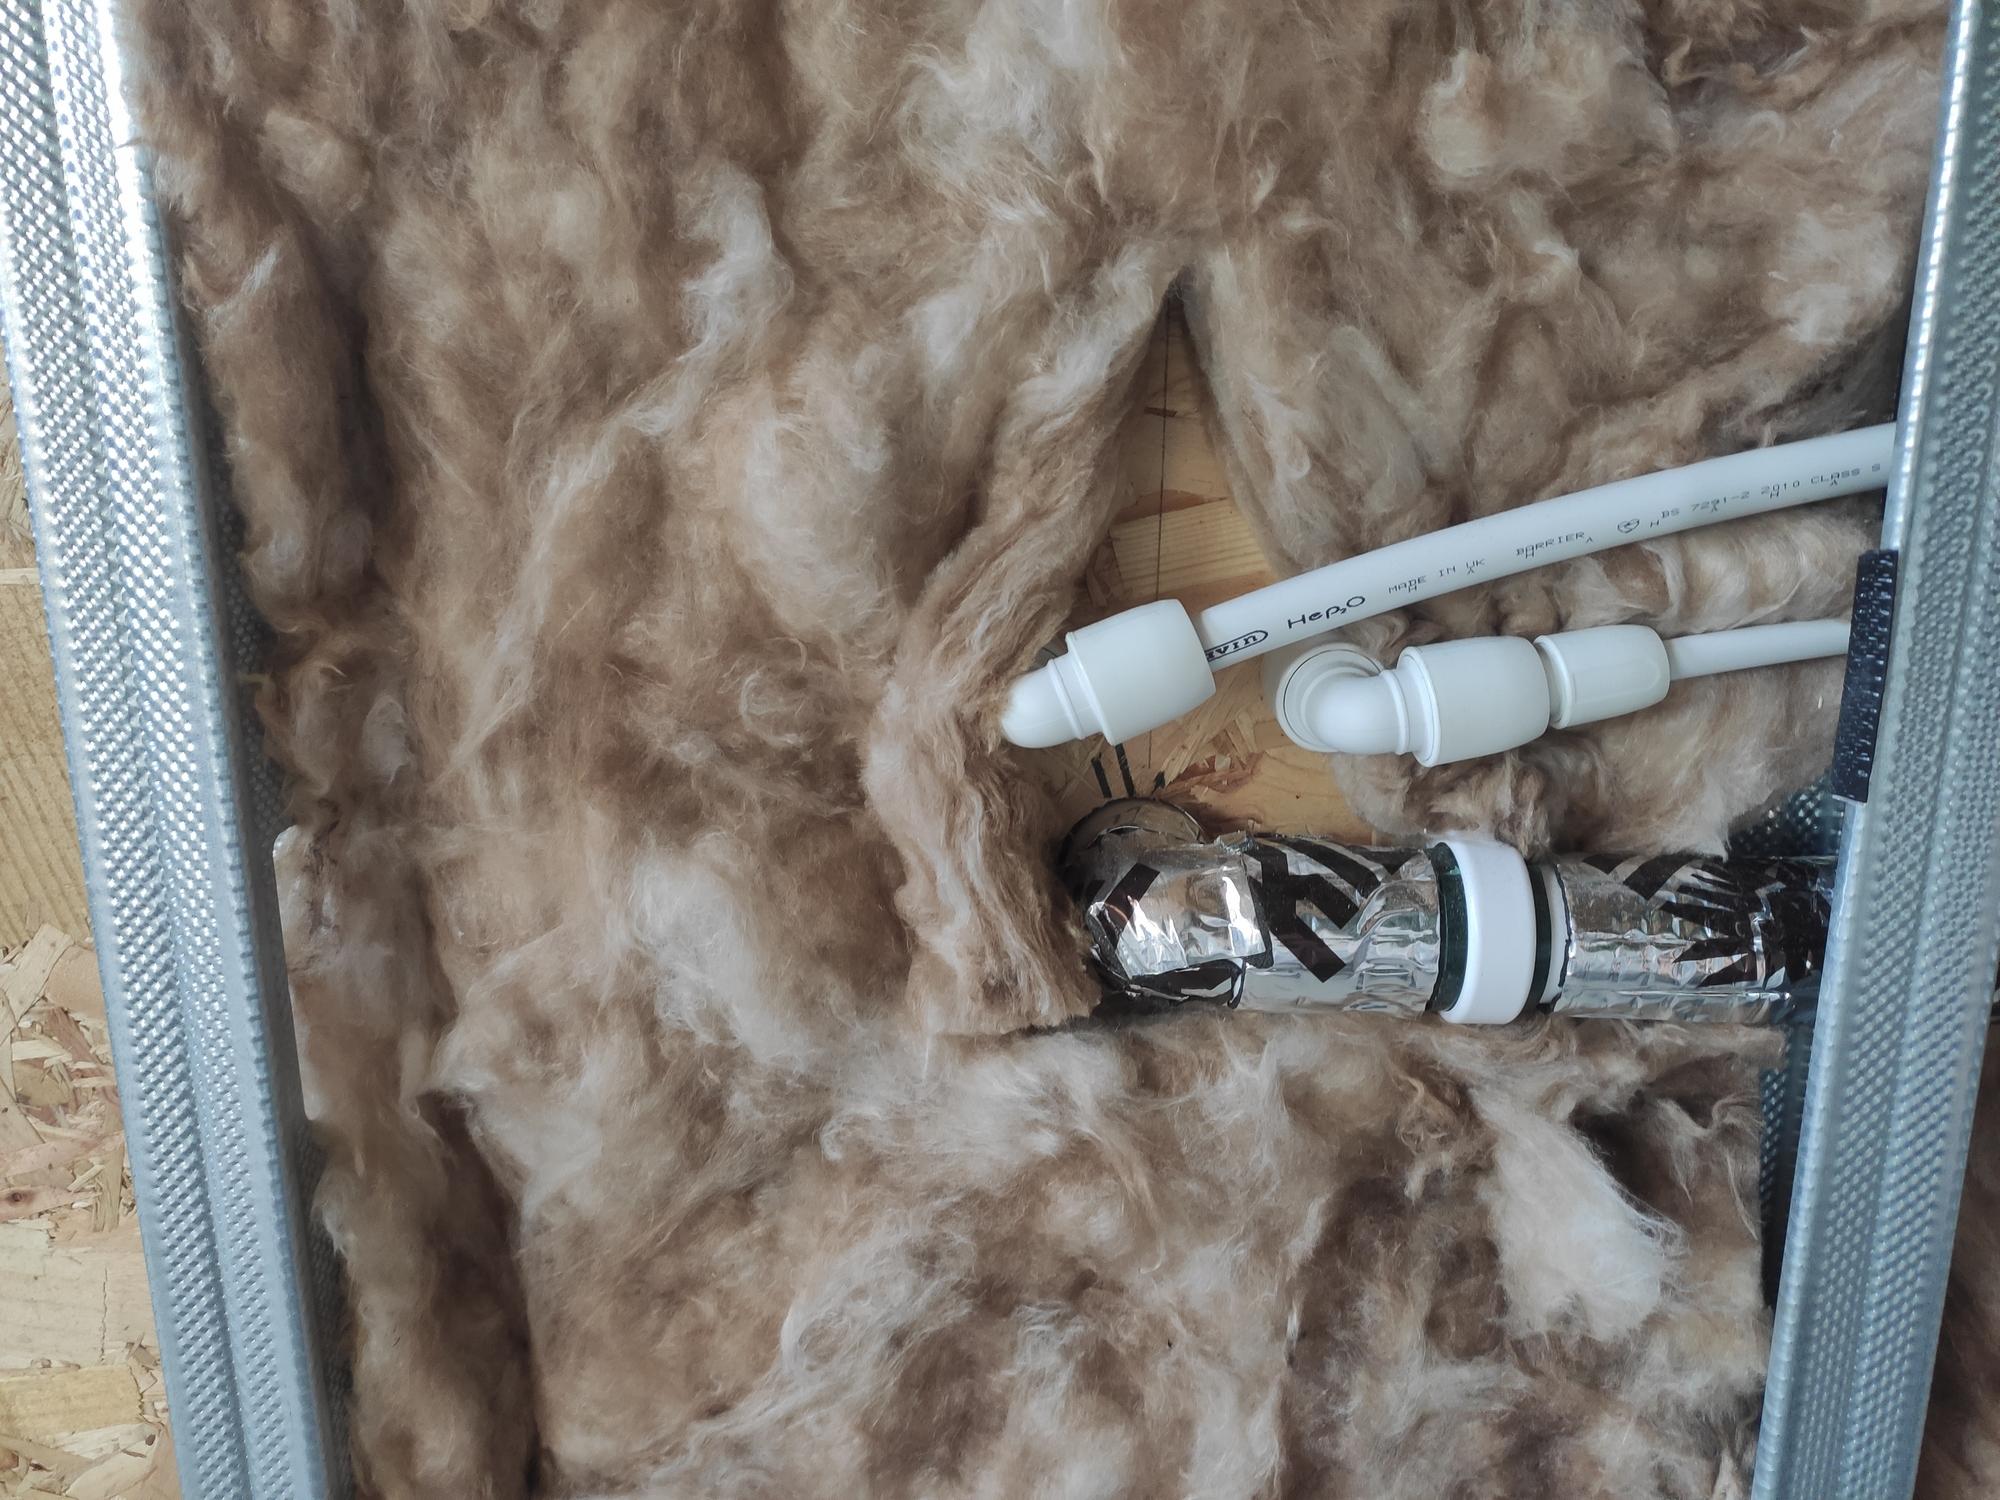
Placing the pipes between two layers of 25mm APR. I wanted 15mm pipe sticking out of the wall to attach the basin flexis to so used a 15mm/10mm reducer and 15mm elbow. Where I'm going to box out near the floor I was able to send the 10mm pipe through at a slight angle to allow it to fit in the 70mm cavity. I pushed the Hep2O fittings together really hard, but the In4Sure rumble was very hard to feel except for the reducer. I couldn't rotate the last elbows either as they had to be assembled once already through the wall. I don't want to disassemble it and reassemble in a different order that allows turning. How important is that?

-
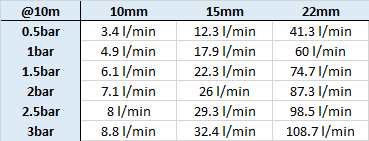
Clearer units:
-
He's a rough table using the Pegler equation but Hep2o ID dimensions: [Note: 1bar across 20m is 0.5bar across 10m] So at 10m and using 15mm pipe it would take about 2 minutes to put 100 litres of 2:1 water in a bath if 3bar dynamic pressure was available. It would take 4minutes if the dynamic pressure was only 1bar.
-
For shaving, so assuming pure hot water, it would be good to fill the basin in under 1 minute. Assuming the water in the basin basin is 300mm x 300mm x 100mm that equates to 9l, so the desired flow rate is 9l/60s = 0.15l/s. That's OK for 15mm pipe up to around 20m with 1bar loss. 10mm pipe and 1bar@20m yields a flow of something like 0.06l/s (or 2.5min to fill basin). Using their head loss tables, gives a pressure drop of 5.4bar over 20m at 0.15l/s for 10mm pipe. For shaving, a 10mm pipe run is probably limited to 10m if a dynamic pressure of 3bar is available. If only 1bar, you'd fill a square foot basin to 2 inches (shallow but can start shaving, 4.5l) in 1 minute at 10m (it's very non-linear remember). For hand washing a flow of 3l/min = 0.05l/s is probably acceptable and it's not pure hot. If it was all through one pipe for 20m I estimate a pressure drop of 0.8bar which is fine to be under 1bar including the tap loss. If you have an en-suite, a family bathroom basin would be ok at 20m with 10mm hot feed until a son started shaving.
-
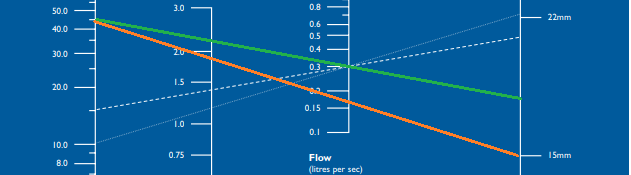
Based on the Domestic nomograph, a shower at 20m equivalent run, 1bar pressure and assuming 1m head loss across the shower taps/head with a flow rate up to about 0.2l/s or 12l/min. That's along the orange line of the first Hot image above.
-
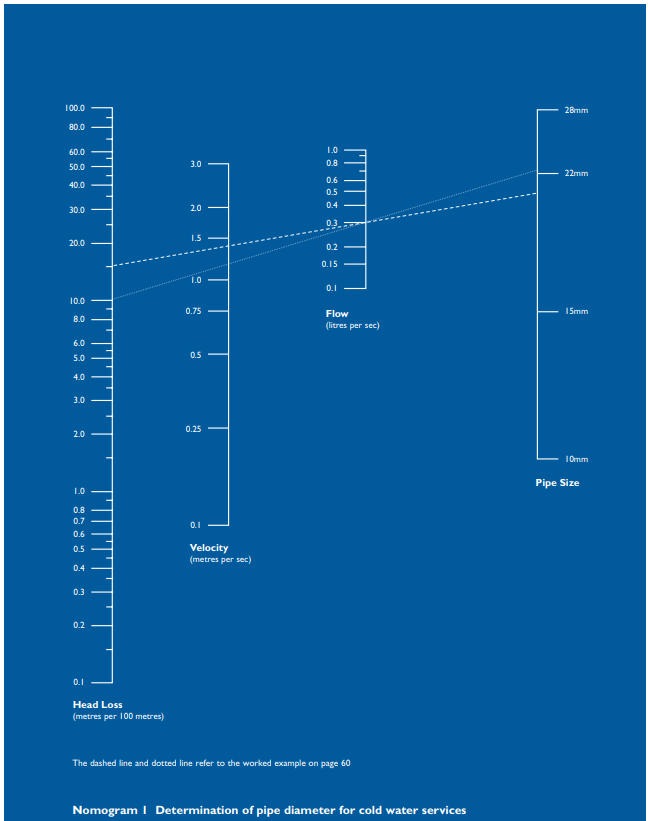
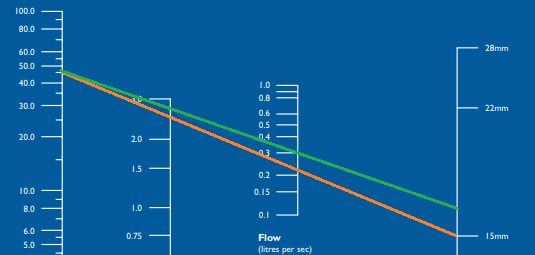
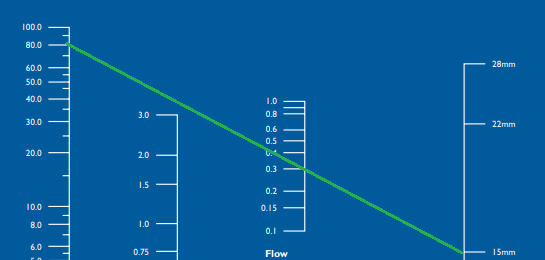
How to size Hep2o pipe (check out pages 60-62 of https://www.hep2o.com.au/downloads/Hep2o_Parts_Users_Guide_Australia_2018.pdf) Image below if for COLD supply. As I understand it, you work out you acceptable pressure loss in metres per 100 metres (which is the same as mbar/m) and then draw a straight line through the required flow rate and that hits the pipe size scale and so you pick the next number up. The dashed line is an example of 14.9m / 100m head loss with required flow of 0.3l/s giving 22mm pipe needed. 0.3l/s would provide 90l of bath water 5 minutes, but of pure cold. My most extreme situation will be around 0.3l/s over 15m, but I'll round that up to 20m to cover elbows / isolators. They (page 60) assume 0.8m head loss across the tap, I'll round that up to 1m (so 0.1bar). If I'm happy with 1bar pressure loss then: Head Loss = 0.9bar / 20m = 45mbar/m = 45m / 100m Using the cold water nomogram shows 22mm is needed for that. 15mm would be OK up to around 0.17l/s. There is a domestic hot water nomogram as well, but I suspect that just assumes something like the flow is 67% hot and 33% cold. With 65C hot water and 12C cold water that would make for an average of 30C. To use that and use 15mm pipe I would have to accept a head loss of 80m / 100m which equates to 1.6bar over 20m. Round that up to 2bar. My mains is 5.5bar at no flow, but I don't know what that would drop to at 0.3l/s. Cold: Hot:

-
OK so that calculator is guff. I've got headloss data for Hep2o and at 6l/m the headloss is 1.5bar/10m for 10mm pipe, 0.14bar/10m for 15mm pipe and 0.016bar/10m for 22mm pipe. I've checked this against another source (Pegler pip, OK not plastic but fine) and it roughly tallies. Flipping to work out what flow rate creates a 1bar pressure loss over 10m: 10mm 0.08kg/s 5l/min (est) 15mm 0.31kg/s 19l/min 22mm 1.07kg/s 64l/min
-
32mm Waste Pipe in Metal Frame wall
MortarThePoint replied to MortarThePoint's topic in Waste & Sewerage
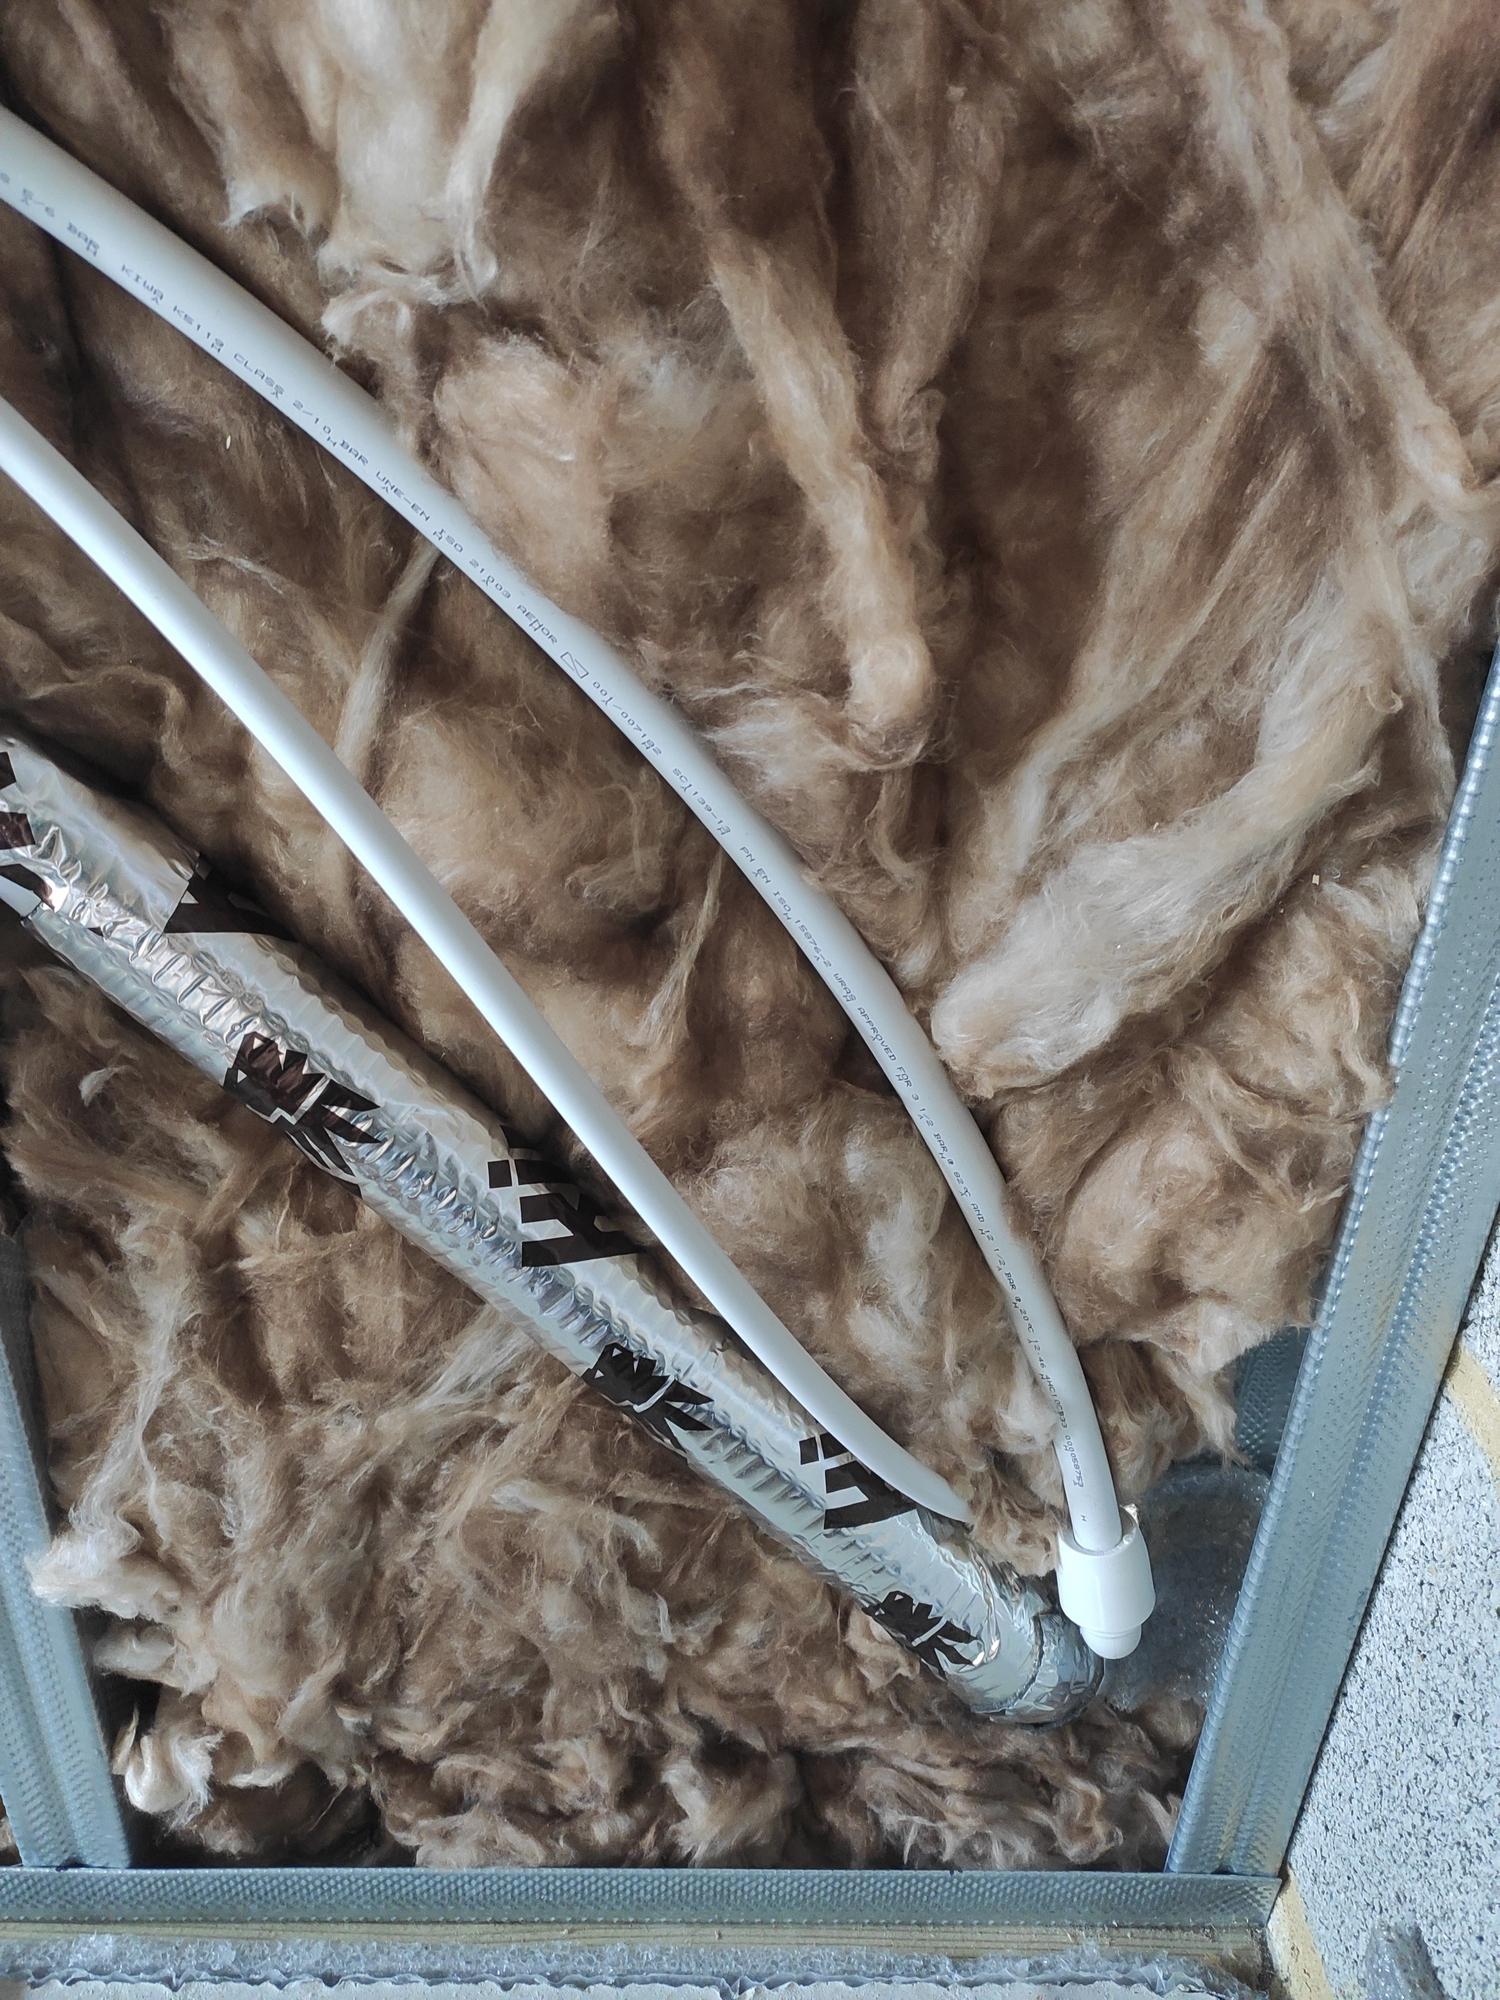
Almost ready to cover up with APR and plasterboard. I used Kilmat as @Nickfromwales suggested to help with any noise. The clips are 40mm clips used on 32mm pipe with foam tape wrapped around to reduce noise transfer. The pipe exits the wall within a 100mm square from the floor and the wall. At the other end you can see the pipe exit at around 500mm from the floor and with H and C written just above where I am going to send the water feeds through. I think those holes are 60mm higher than the waste hole and 80mm apart. The plan is for the feeds to then split inside the room to feed the two basins as that puts fewer fittings in the wall. I'll need to use elbows on the feed pipes as the wall cavity is only 70mm and the bend radius is 120mm/80mm for 15mm/10mm pipe. I could exit the wall at an angle but I think that could look bad.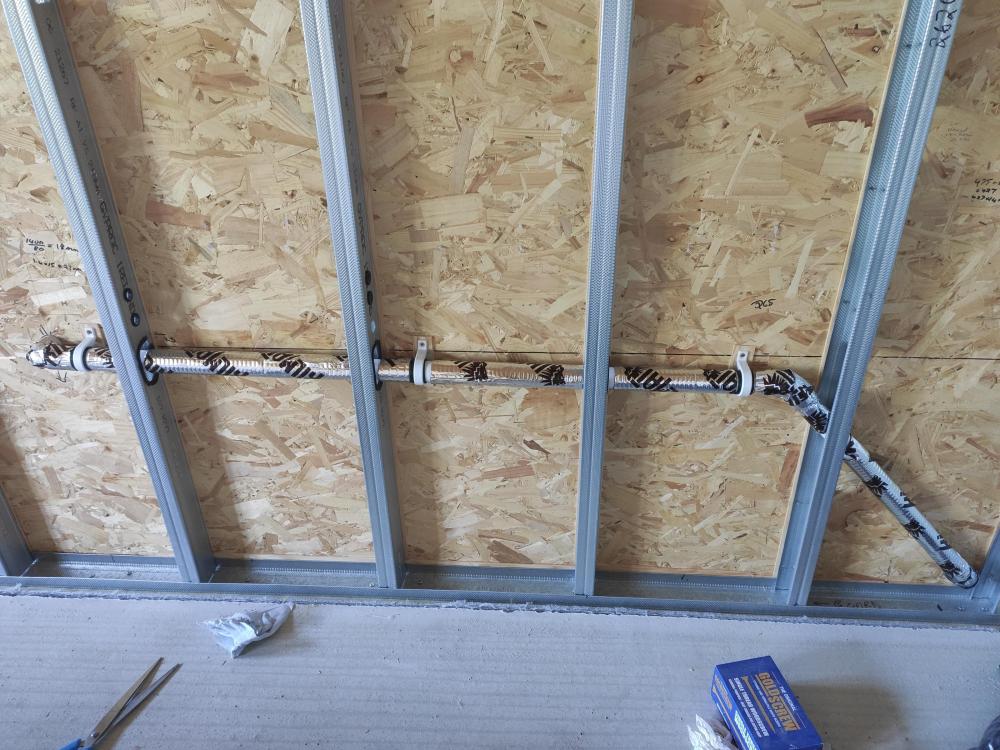
-
A 10m run of 22mm pipe has a dead volume of about 2.5litres so a 10l/min shower would take 15seconds to heat up, presuming the thermostatic valve runs pure 'hot' until actually hot water arrives. 23 seconds for 15m. It's a waste if water, but not too much time. It feels like under 10s is awesome, under 20s, desirable and under 30s acceptable. I've no idea what an pleasant shower flow rate is, but have read figures like 12l/min down to 6l/min for Part G. According to this calculator, 15m of 15mm OD 11mm ID pipe needs 3bar pressure to supply 5l/min which if the shower is running at 50/50 is at total 10l/min. A 22mm OD 17.7mm ID pipe needs under 0.2bar. Can anyone report good results having run over 15m of 15mm pipe to a shower?
-
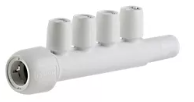
I'm starting to lean in that direction. 4no. direct pipes to taps would have 8 joints (4 at manifold, 4 at taps) where as 1 pipe branching at a sub manifold would have 10 joints (1 at main manifold, 5 at sub manifold and 4 at taps). If each joint is a worry, I 'only' increase the worry by 25% but massively reducing the routing headaches. If I'm worried enough, I could always put the sub manifold into some form of draining sump. Their plastic manifolds are all 22mm in though and only up to 3no. 15mm out.
-
Perfect, thank you. Looks like 40mm spacing.
-
I don't know unfortunately as the link is broken 🙂
-
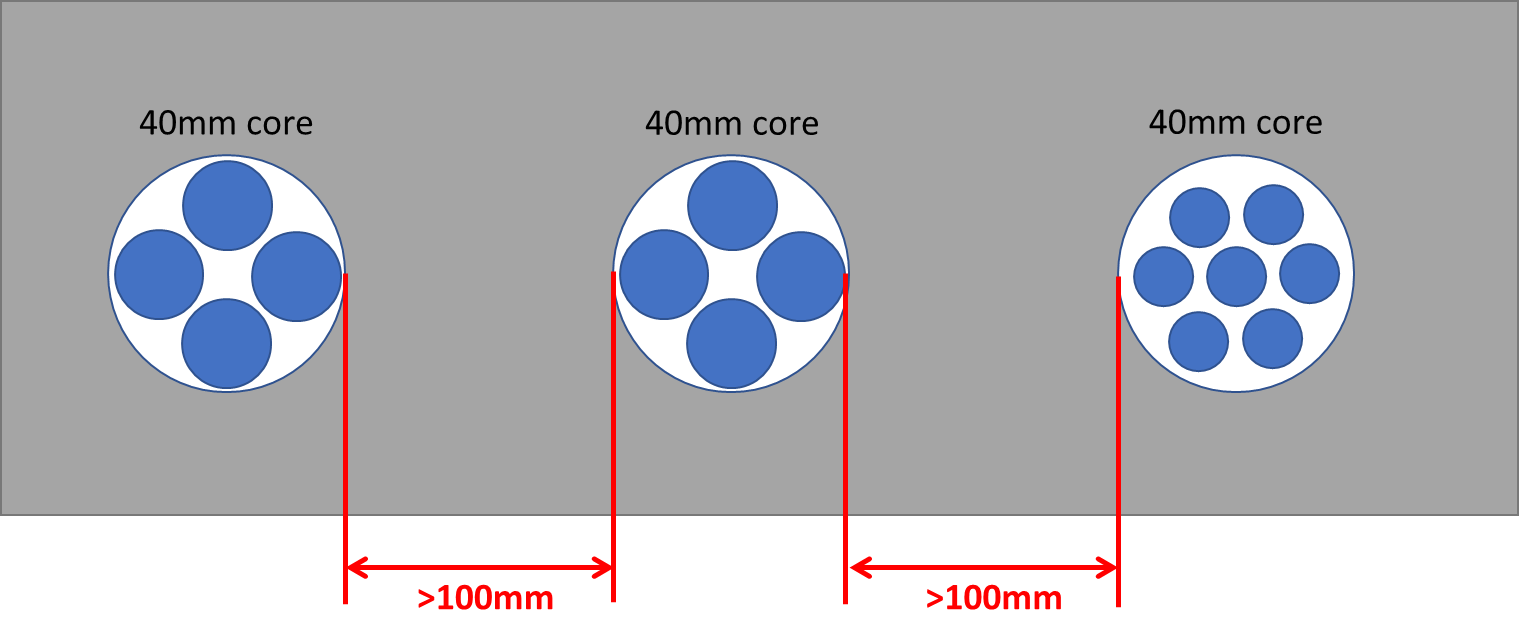
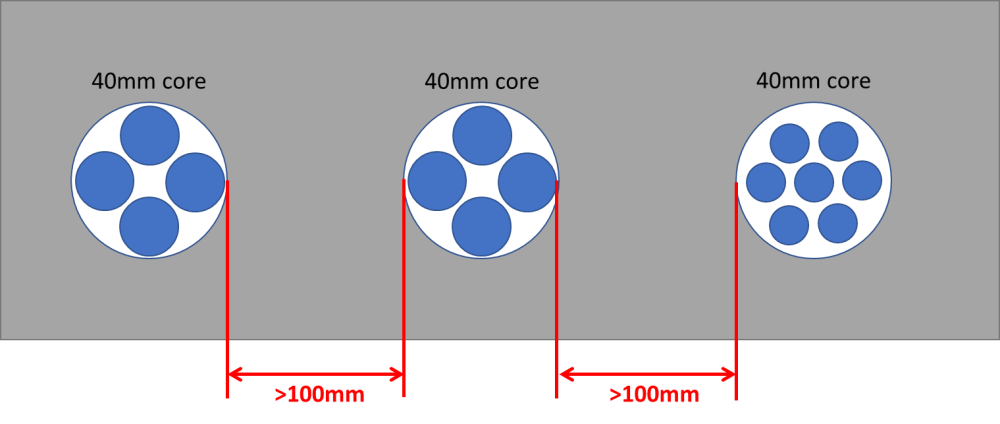
I've worked out that if I have all my outlets as independent runs from the utility cupboard, I'd have 31 runs (12no. 10mm and 19no. 15mm). It would use 108m of 10mm and 132m of 15mm and no additional fittings vs 34m of 10mm and 108mm of 15mm with a dozen or more fittings. The extra cost at the manifold likely wipes out the saving on fittings, but means if I have a leak it will most likely be either at the manifold or at the outlet itself. It would involve passing 26 pipes through a blockwork wall though, rather than just 12 pipes. I haven't made provision for this, so is the simplest thing to do to core drill larger holes, passing multiple pipes through each? The cold ones would need to pass 15 pipes. Whilst that could all fit through a 70mm core drilled hole, that would be a nightmare to route or make any future changes. Below shows that you can fit 4no. 15mm pipes or 7no. 10mm pipes through a 40mm core drilled hole. Using a 50mm core drill should make it easier and might allow the holes to be lined. I'd want a good gap between the holes to ensure each behaves structurally as a single hole, guessing 100mm would do that. I'd end up with 6 such holes, spread over about a metre. Does anyone know the spacing of the outlets on the brass manifolds?
-
Tanking a shower without foam boards
MortarThePoint replied to MortarThePoint's topic in General Plumbing
How should I deal with the junction between plasterboard and screed? I know normally you raise plasterboard up but that leaves a gap for tanking. Can you recommend something to fill the gap with in the shower area as would be good if there is something waterproof. Or do you have the plasterboard come all the way down to screed? -
Partitions: Timbers studs Vs Metal C studs
MortarThePoint replied to MortarThePoint's topic in General Construction Issues
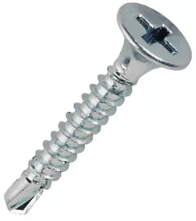
Top tip for Acoustic studs, use a different brand of screw. When inspecting a wall after the fact, if you've used a different branded screw with a logo on its head (e.g. Dewalt has DF on) or a BZP screw like the Screwfix ones it is then easy to inspect. The screws mustn't be too long (e.g. you want 25mm with a 15mm plasterboard) so if you only have 25mm screws of that type it's easy to check the correct screw has been used. https://www.screwfix.com/p/easydrive-bzp-bugle-head-fine-thread-uncollated-drywall-screws-3-5-x-25mm-1000-pack/25899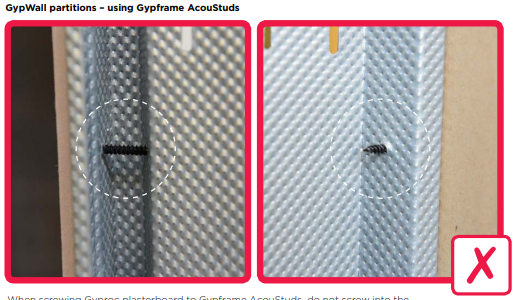
-
I like the idea of having completely separate loo feeds (10mm?) Which go all the way back to the manifold. Makes swapping to harvested water easy. Additional pipe and clips probably adds £50. Water is about £1/m3 and 20 flushes per day would work out as around 10p/day, so £37/yr. May make sense. Any harvesting method wouldn't have zero annual cost though.
-
32mm Waste Pipe in Metal Frame wall
MortarThePoint replied to MortarThePoint's topic in Waste & Sewerage
I know, it's a staple of modern building. It's to do with indoor air quality and VOCs. I don't think it's really an issue but we've started down that road now so need to see it through -
32mm Waste Pipe in Metal Frame wall
MortarThePoint replied to MortarThePoint's topic in Waste & Sewerage
How about a 50mm pipe clip having padded the pipe with UFH perimeter insulation or some other padded tape. I'm avoiding using spray foam in the airtightness envelope (I know, it's a pain). -
Aren't CLS and Regularised both eased edge? Why does Chippie prefer the CLS? Is it because it's lighter? Or is CLS typically straighter? Spot whose not a TF expert 🙂
-
Tanking a shower without foam boards
MortarThePoint replied to MortarThePoint's topic in General Plumbing
Brilliant, I'm feeling a lot more optimistic now. Thank you! -
Tanking a shower without foam boards
MortarThePoint replied to MortarThePoint's topic in General Plumbing
Should I use a tape like the one below at the blockwork / plasterboard junction, or will I need something more flexible? https://www.amazon.co.uk/Everbuild-Aquaseal-Waterproof-Tanking-Tape/dp/B0086FC8S8 -
Tanking a shower without foam boards
MortarThePoint replied to MortarThePoint's topic in General Plumbing
Cool thanks -
Tanking a shower without foam boards
MortarThePoint replied to MortarThePoint's topic in General Plumbing
Thanks, Can you think of any product names, or is it the same stuff as the plasterboard tanking kits?