


MortarThePoint
-
Posts
2198 -
Joined
-
Last visited
Everything posted by MortarThePoint
-
ASHP vs Oil in 2022
MortarThePoint replied to MortarThePoint's topic in Air Source Heat Pumps (ASHP)
Do you have a graph of indoor and outdoor air temperature vs hours of the day? I'd be interested by the dT/dt when it's cold outside. -
ASHP vs Oil in 2022
MortarThePoint replied to MortarThePoint's topic in Air Source Heat Pumps (ASHP)
I used gas generated for my comparison in the first post (just pointing out coal would be worse). I need to consider marginal as I am deciding whether to add one extra system, not form a government guideline -
ASHP vs Oil in 2022
MortarThePoint replied to MortarThePoint's topic in Air Source Heat Pumps (ASHP)
Are the powers the power taken from the grid or the power consumed in the house, or do you not have batteries? -
ASHP vs Oil in 2022
MortarThePoint replied to MortarThePoint's topic in Air Source Heat Pumps (ASHP)
That agrees reasonably well with my estimate: ASHP: When heating using an ASHP the marginal electricity* will be most likely generated from gas: 0.5kgCO2/kWh electricity / 300% = 167gCO2/kWh of heat But if the marginally electricity is coal generated.... -
ASHP vs Oil in 2022
MortarThePoint replied to MortarThePoint's topic in Air Source Heat Pumps (ASHP)
Two counters to that: Are you sure no gas derived electricity is generated overnight? If there is sufficient hydro storage, the electricity could be stored and used later, may not be enough capacity though Additionally, if but not connected to E7, some people charge their cars outside E7 e.g. during their day at work. -
ASHP vs Oil in 2022
MortarThePoint replied to MortarThePoint's topic in Air Source Heat Pumps (ASHP)
I agree, electric cars etc will create larger overnight demands. This is a key point that is so often missed in the consideration of electric cars. If you're weighing up the choice of something that uses electricity Vs something that doesn't, you need to model it as additional demand on the grid. Some made up numbers to illustrate: Scenario 1: 2.5GW of green electricity, 0.5GW of dirty electricity, my oil heating. Scenario 2: 2.5GW of green electricity, (0.5GW+3kW) of dirty electricity to include my ASHP. The green electricity can't be dialed up to match the additional demand. Until we have excess green electricity capacity that is, which is a long way off. ASHPs and Electric cars will see us burning natural gas for years to come. Without them less gas would be burned, so their carbon footprint is that of the extra gas that is burnt, not the average electricity generation footprint. -
ASHP vs Oil in 2022
MortarThePoint replied to MortarThePoint's topic in Air Source Heat Pumps (ASHP)
I don't know how mass adoption of ASHP will come about until the running cost is comparable to oil/gas heating. The grants address the increased capital expense, but not the increased running cost. Electric cars may limit the lifetime of E7, I don't know, but that isn't a solution for existing building stock anyway. It will be very unpopular to tax oil/gas heating out of existence. I also find it hard to imagine a running cost grant for ASHP or disproportionately lower electricity prices. -
ASHP vs Oil in 2022
MortarThePoint replied to MortarThePoint's topic in Air Source Heat Pumps (ASHP)
I'm not on a tariff yet so it will be whatever is available as a new customer which doesn't look great -
ASHP vs Oil in 2022
MortarThePoint replied to MortarThePoint's topic in Air Source Heat Pumps (ASHP)
Are Octopus allowing new customers on that tariff? -
ASHP vs Oil in 2022
MortarThePoint replied to MortarThePoint's topic in Air Source Heat Pumps (ASHP)
That's the marginal figure based on natural gas generated electricity. Need to consider the marginal figure for this comparison as all green electricity already being used. -
ASHP vs Oil in 2022
MortarThePoint replied to MortarThePoint's topic in Air Source Heat Pumps (ASHP)
I'm not too worried about the blackout prospect, but the ability to buy you energy when it's cheaper is a huge plus for Oil. A generator would cost a fortune to run surely. -
I have been planning to use an ASHP so have pipes at the required 150mm centres. Given the energy situation, I am now less sold on an ASHP vs Oil. If you have a tank full of oil you know you can heat the house, not so it there is a risk of blackouts. We'll have log burners as well but that's obviously faff. Environmental: ASHP: When heating using an ASHP the marginal electricity* will be most likely generated from gas: 0.5kgCO2/kWh electricity / 300% = 167gCO2/kWh of heat Oil heating: 2.52kgCO2/lire / (10.35kWh/litre * 85%) = 286gCO2/kWh of heat Winner: ASHP 42% lower* Cost Install: Hard to say accurately but about the same given the grants available. Winner: Tie Cost to run: ASHP: Assuming 300% efficiency again and current electricity price of 45p/kWh -> 45p/kWh / 300% = 15p/kWh of heat Oil: Assuming 85% efficiency again and current oil prices of 90p/litre -> 90p / (10.35kWh/litre * 85%) = 10p/kWh of heat Winner: Oil 33% lower Personal Energy Security: ASHP: heat demand is at a time of year when personal generation not really viable so dependent on supply. Supply could be subject to interruption (blackouts, smart meter bugs). No flexibility on price. Oil: bar it being stolen, when you have it you have it. Can stock up when price is low. Winner: Oil [Interestingly, for gas, the environmental is much closer 185gCO2/kwh (so ASHP saves just 10%) but running cost even lower though grid supply so security not so good] * Using marginal generation figure as I am weighing up adding an additional electricity load, rather than the average. The longest streak without coal is 67 days, so perhaps should use coal for this calculation: 0.8kgCO2/kWh electricity / 300% = 267gCO2/kWh of heat ASHP 7% lower than Oil That 67 days is unlikely to be over winter. Government plans to ban coal powered generation towards the end of 2024, but that may get pushed back. I doubt these figures include full CO2 emissions from transport, infrastructure, workforce etc.
-
The second scenario also assumes you can set at TMV as low as 30C.
-
About £60 of parts and labour, so not much. That would be paid back in about in about 3 years. It feels quite 'sensible' from a fast hot water angle though. Cheaper and probably less heat inefficient that a circulating hot water supply to the tap.
-
Is this a crazy idea? I could have a single pipe going to the cloakroom served by a TMV back near the cylinder. It would mean that the water is already warm when it comes to hand washing. And requires only one pipe to be run. Energy would only be wasted in non-heating months and by the lower efficiency associated with hot water from ASHP. Perhaps 3L*50C*1Wh/200%=0.08kWh (=1.5p) per flush in summer and miniscule in winter. 2*4*1.5p=12p/day for family of 4. An alternative is to have a TMV in the cloakroom set to about 30C and pure 'hot' would run until genuinely hot water arrived. This would get rid of the cold water in the hot pipe when the toilet starts filling which is probably long enough before hand washing starts. Energy cost even lower. Would any regs rule this out?
-
Each room is going to be isolatable back at a manifold in the plant room, so I am not planning to have isolators at basins etc. Does that sound sensible?
-
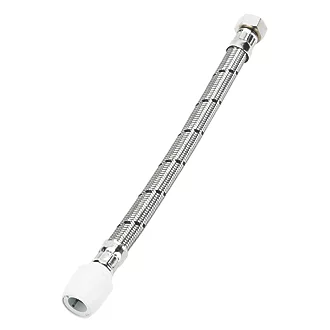
Do you not rate the Hep2O tap tails? https://www.screwfix.com/p/hep2o-push-fit-flexible-tap-connectors-15mm-x-x-300mm-2-pack/1250f
-
I guess if the pipe is gripped by the plaster then it won't be a problem but if you had unconstrained pipe expanding into a constrained fitting you might have an issue.
-
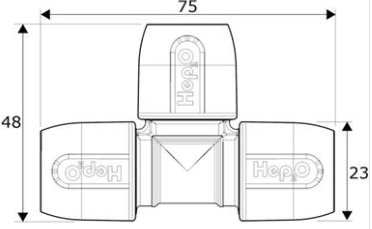
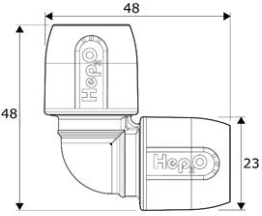
Here are some dimensions
-
The grab part of the fitting needs movement, but I guess it's pressure tested before plastering so perhaps just the thermal expansion could serve to loosen the hold of the grab ring.
-
Don't fittings require a bit of movement?
-
Onto the Hep2O pipe?
-
I know you can chase Hep2O pipes into a wall and plaster over, but fittings not a good idea. What's the normal way to handle the need for a fitting then? For example a pipe leading to a basin or the like will need an elbow at the end. A basin may allow an open hole in the wall to be hidden. But a toilet cistern or radiator wouldn't. I have to feed a basin and high level cistern both mounted on blockwork. 10mm pipe coming down from ceiling so want to use a tee to feed the high level cistern and would also need elbow to make the corner to bring pipe out of wall at each.
-
In a bathroom sure, but also in what's just a toilet?
-
I guess it makes sense to draw air across the room from the door. If not in the ceiling, I don't see a reason for it to be at any particular height other than too low could be a vermin risk.
