


Thorfun
-
Posts
4889 -
Joined
-
Last visited
-
Days Won
36
Everything posted by Thorfun
-
no gas here and I could also handle going over 3.6kWh for a short period of time. But what I like about the Squirrel Pod by Infinity Innovations is that you can add a second inverter and increase the discharge to 7kWh. so it's a very scalable solution and not something that can be easily done with the Lux Power. The Squirrel Pod is basically a Lux Power inverter but they've adapted it to allow multiple inverters to run together to boost discharge rate.
-
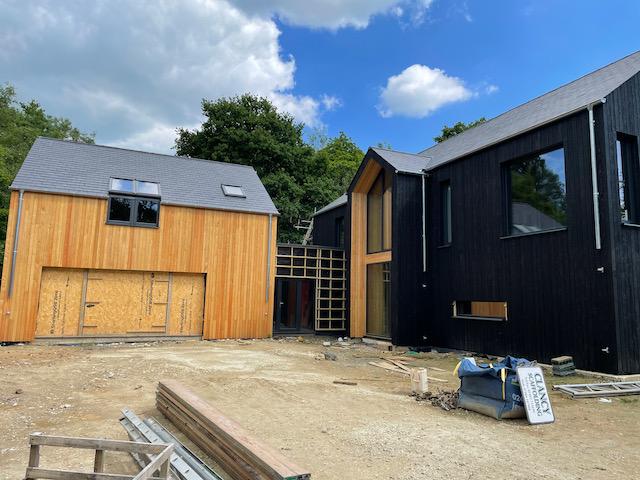
we installed natural Zinc and got it from Rainclear. great price and easy to fit. but obviously expensive when compared to plastic!
-
shame. remember that if you're doing it in the future then you might have additional costs of scaffolding etc to consider rather than doing it now. not to mention the extra time doing the same job twice!
-
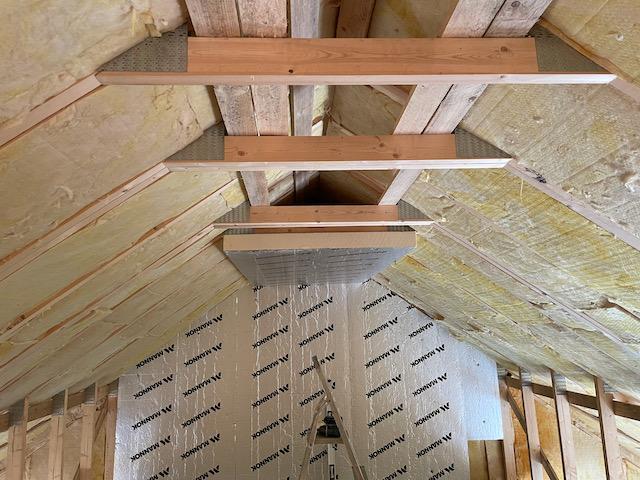
Attic trusses, warm loft, internal PIR location
Thorfun replied to Thorfun's topic in Heat Insulation
just thinking some rockwool underneath to assist with sound attenuation for if/when someone is walking in the loft. I see no benefit in putting lots of insulation for any other purpose under foot in the loft. I agree that doing it ourselves is probably more than belt and braces and wonder how a 'professional' would be doing it. but it's things like this, i.e. the fabric, that I'm happy to belt and braces as it's not something I want to try and redo after the house is finished! most of the house walls are finished with insulation now, just got the loft to finish PIR under the rafters and then I can do the AVCL, tape and service cavity. I have a fixed date of the plumber starting first fix August 1st so I need to be done by then. it's nice to have a deadline to work to as I find it focuses the mind. -
Attic trusses, warm loft, internal PIR location
Thorfun replied to Thorfun's topic in Heat Insulation
that is exactly the conclusion we came to last night! will need a big long pokey stick to get them to the other end of a 2.4m sheet of PIR though. -
We got our as-built EPC
Thorfun replied to Conor's topic in Energy Efficient & Sustainable Design Concepts
You could put the data into Jeremy's spreadsheet. I found it very useful to see the difference the airtightness gives. you might be surprised how much difference it makes but, then again, life might be a little too short to bother! I've no doubt your house will be very energy efficient and warm which is the ultimate goal. -
We got our as-built EPC
Thorfun replied to Conor's topic in Energy Efficient & Sustainable Design Concepts
well done. shame about the airtightness though as you say. did you tape the **** out of it? 😉 -
Attic trusses, warm loft, internal PIR location
Thorfun replied to Thorfun's topic in Heat Insulation
well.....air could bypass the wool as there is a breathable membrane above it and below the slates. I remember a post a little while back where this was discussed in a wall and the suggestion was to break up the air gap. so I might simply chuck all of the offcuts of mineral wool I have above the PIR to reduce the airflow within that 'cavity' to reduce the impact on the U-values. thanks for the comment about our blog. we're getting there! it's just a little slow when you're having to do a lot of the work yourselves. -
Attic trusses, warm loft, internal PIR location
Thorfun replied to Thorfun's topic in Heat Insulation
might have some offcuts left but not enough to fill that void along the length of the roof! what are you thinking/worried/concerned about with the air gap? -
External wood paint or wood preserver for battens?
Thorfun replied to Thorfun's topic in General Joinery
well done. a lot braver than us! 🙂 -
Attic trusses, warm loft, internal PIR location
Thorfun replied to Thorfun's topic in Heat Insulation
yep, the frametherm goes to the apex. re: cables, I was just going to fit a service cavity under the PIR and airtightness layer as in the rest of the house for lights/sockets etc. will again result in a lower ceiling height but as it's just going to be storage I'm not worried about that. we'll end up with about 2.1m ceiling height once boarded so it's not that bad anyway. -
Attic trusses, warm loft, internal PIR location
Thorfun replied to Thorfun's topic in Heat Insulation
I will be doing that as shown by the rectangles in red below. my question is to the gap above the horizontals as circled in red below?
-
hello, starting the internal PIR in our roof which has attic trusses. my plan is to simply screw the PIR to the bottom of the horizontals at the top of the attic trusses leaving a gap between the PIR and the mineral wool between the trusses. like the photo below: is that air gap going to cause an issue with my U-values? the loft space will only be used for storage so I'm not worried about the loss of head height I just think it's easier to attach to the bottom of those horizontals rather than trying to fit PIR above them in the small gap! there is 190mm of Frametherm 32 between the trusses and the PIR is 100mm. PIR will be covered in Intello Plus and taped where required to continue the airtightness layer from the rooms below.
-
we can't wait. at the moment it's in a box in the basement but every time I flick the kettle on in the current house I think 'one day I won't have to do this!'.
-
we picked up our Quooker at Grand Designs Live the other month. got 20% off which was a massive saving! and then I can claim the VAT back to make it even cheaper.
-
thanks Joth. something to consider then. thing I like about the Squirrel Pod is that I can easily add and extra one later on to increase the discharge amount if we find that 3.6kW isn't enough.
-
thanks for this. we're having a Quooker tap so kettle usage doesn't really count for us! 😉 money is quickly running out and so it's things like battery storage that are going to have to take a back seat but if I can get a small 3.6kW luxpower and a couple of Pylontech batteries as a starter then I can add to it over the years if required.
-
Hi all. a few questions on duct sizes please. 1. What size ducting should I run from the cabinet on the boundary that houses our 3-phase head to the plant room in the basement? 2. is twinwall ducting ok for this job? 3. I want to be able to run Cat6/6a cable back to the electricity cabinet on the boundary and from there I can run it to the driveway gates or other locations if required. can I run that in the same ducting as the electricity cables or should I run a separate ducting just for the network cable? if so, I assume the standard BT ducting will suffice for that?
-
do you find the 3.6kW discharge rate sufficient for your needs?
-
ahh...we've had this discussion many times before Nick. we're not doing it for any financial reasons or payback period or anything like that. we're doing it so we're less reliant on mains water. Also we have a constant stream of water running under ground around the basement to our sump which, even in dry weather, means that the RWH tank will be filled so, for us, the 'no rain in the summer' argument doesn't stack up. Also our header tank is fillable from mains water in case of drought as the system uses a 'brain' to manage it all. it will also flush out the tank if no use is seen after a period of time, e.g. on holiday, to replace the rainwater with mains water so the rainwater isn't sat in the tank for a long period of time. it's all rather cool. so, remember, it's not always all about repayment periods for everyone. Also, we can't buy more PV.....roof is full. 😂
-
we're having RWH with a header tank in the loft for our toilets so the toilets will have separate feeds from that tank. this means that when I'm having a shower and someone flushes the loo it doesn't affect the water or temperature!
-
all makes perfect sense. I'm using 2"x1" roofing battens for my service cavity battens and so will be fixing the OSB/plasterboard to that so all I have to do is ensure I hit the 38mm timbers with the battens and then I've got 45mm to hit with the plasterboard screws! 😉
-
My whole house is 38mm thick CLS!! 140mm external and load bearing and the rest 89mm. seems pretty standard for TF companies.
-
Do you need wider internal walls? Our TF company used 89mm CLS for ours. if your joiner prefers CLS is he likely to charge more to use non-CLS as it might make things take longer? If so it could negate any savings on materials. just a thought.

