


Onoff
-
Posts
21127 -
Joined
-
Last visited
-
Days Won
206
Everything posted by Onoff
-

Expanding window tape - how long does it last
Onoff replied to readiescards's topic in Windows & Glazing
I was going to use Compriband fitting my bathroom window recently but bottled it and used low expansion Soudal foam into a well wetted opening in the end. -
So in effect a consumer unit with the DP isolator separated out. And then what an MCB feeding its own appliance? I prefer the visible grid. Each to their own.
-
I learnt 2D first on a board, 1st and 3rd angle projection etc. Then into isometric, 30 & 45deg, vanishing point (train/tunnel ). So I had a good grounding I think. I now think/visualise and sketch in 3D. The only command you need to know for drawing in 3D in AutoCAD is EXTRUDE imho. Crack that and it's a piece of pi$$. Draw your element in 2D and make it a POLYLINE (no gaps in the outline, it's just one entity). Think of an I beam end on. Change the view to isometric. EXTRUDE it to length. Job done.
-
Quick guide to give a taste of Draftsight. Later version now out but should give the gist. (Last two pics are the wrong way round I think). Quick Guide To Using DraftSight.pdf
-
No 'kin good whatsoever when you have to shift a stack of tins to isolate a "insert appliance here" in a hurry.....and you're in a wheelchair. These designers need a smack with a rolled up copy of the "regs" wrapped round a length of 25mm conduit! When you say regs we could be talking about BS7671 the "electrical regs" which aren't statutory but may be used as a defence in law (basically you're a ****if you don't follow them ) You've then got the statutory Building Regs, P & M for a start. Back to the "bible" (afaic), 7671: On the assumption such switches may be needed for an emergency then in the back of a cupboard doesn't comply. Have a look in section 53 for a start. Says amongst other stuff that emergency switching shouldn't expose you to further danger etc. Well if your taking time to get to the tumble dryer switch etc when the things on fire and the kitchen's filling with smoke..... Indeed it doesn't comply across the various statutory and non statutory guides. A well designed, conveniently placed grid switch(es) with non switched plug tops to provide for mechanical maintenance is a good way to go IMHO. The grid no higher than 1200mm in a convenient wall space you're not going to keep brushing by. Need to carefully think out your cable runs, and of course it's more cabling. Then if course there's the missus who just doesn't like grid switches.....which is why most of my stuff has a 20A DP switch above the worktop feeding an (accessible) unswitched plug top below
-
A new room above the garage, wood or brick?
Onoff replied to 8ball's topic in Garage & Cellar Conversions
Please! You make me sound like a right bodger. -
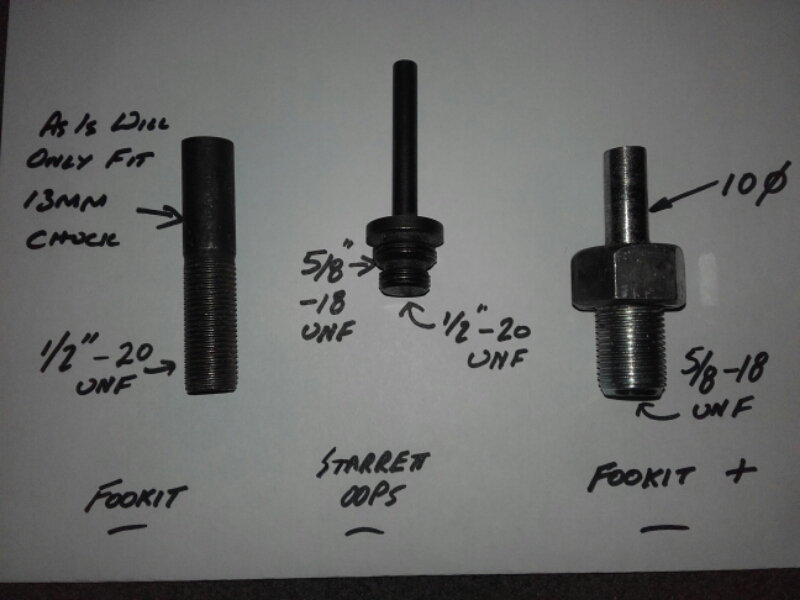
I actually unscrewed the 40mm hole saw off of a Progressor bit the other day and put it on my Fookit +.....was enlarging from 32mm.
-
That's what I use the "genuine" Oops for.....
-
A lot of folk use these: http://www.maplin.co.uk/p/rc-contact-suppressor-rg22y
-
Prompted by a request elsewhere but a little sketch ref Starrett holesaw adapters:
-
I'll have grandchildren before I fit a UVC!
-
Don't think I can do that as I want CWS tank cold feed to the bath and mains cold feed to the basin. So at the mo, hot comes in from the right goes down to the bath then jumps across left to the basin. Cold from the CWS comes in from the right and goes to the bath. The unconnected pipe is for the mains feed to the basin. I'm thinking I'd need to introduce a non-return valve(s) somewhere?
-
Bathroom basin on the left, bath on the right!
-
Where does No Nonsense mitre bond rank then? ('Cos that's all I've got).
-
It's TM3 if that makes a difference? On the assumption I need different temperatures at basin and sink then I'll need two? Some jiggery pokery here necessary as the hots are together, basin on the left, bath on the right:
-
Cheers. Never heard of the brand I'll admit.
-
Got a link or was it just a generic jobbie? Cheers
-
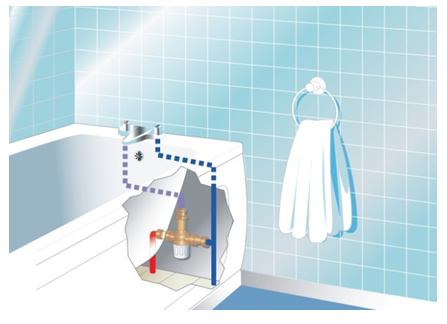
Gotcha! Understand the idea now. So set at 44 to 46degC? For some reason I find this image easier to understand: Just for home. Need to fit one as the 10 year old has grown up without a bath in living memory! Looking on S'fix there's a Bristan for circa £45 and a Bristan and a Pegler for £50 ish. All good for TMV2 & 3. I assume buy a "name"? The Pegler is preset at 43degC. There's a no-name TMV2 on in T'station for £38. ???
-
Still a bit lost on this, being a bit dense no doubt! The TMVs I've seen are "3 port". Hot in / cold in and then mixed and regulated out I guess. I've two separate pipes going to a mixer tap. Where does the TMV go, in the hot pipe? I can see that working so that hot is only ever at a certain maximum and you would just add cold if it was still too hot for some tastes. Do I end up with an unused port on the TMV? Again, dumber than soup I know!
-
PIR rigid foam waste - what else can I do with it?
Onoff replied to readiescards's topic in Building Materials
I DREAD it when I've cut a bit of PIR to go between joists. "Shaving" the edge is ten times worse than the initial cut.- 27 replies
-
- 1
-

-
- xratherm
- insulation
- (and 2 more)
-
Prompted by @dogman's comment over on @Crofter's thread: The 10 year old got out of the bath tonight claiming it was too hot. Was in there long enough! So it got me thinking of TMVs. Separate hot and cold in 15mm to these taps: Anything I can fit here? Cheers
-
Electric shower vs. instant water heater
Onoff replied to Crofter's topic in Bathrooms, Ensuites & Wetrooms
Summer Showers Sorted:- 84 replies
-
- 1
-
-
- shower
- water heater
- (and 3 more)
-
PIR rigid foam waste - what else can I do with it?
Onoff replied to readiescards's topic in Building Materials
Did you make the hot wire cutter yourself? -
PIR rigid foam waste - what else can I do with it?
Onoff replied to readiescards's topic in Building Materials
Bet he was chuffed..... -
I need to get some UPVC trim to mitre bond on and render up to. Found a short, random length in the back of the old stable that matches some of the other windows (a line of holes in it for some reason). Measures nom 15x13mm. eBay to the rescue: http://m.ebay.co.uk/itm/uPVC-Window-Finishing-Architrave-Trims-Plastic-PVC-4-x-1120mm-Lengths-/371424653872?var=640503198825&hash=item567aa27230%3Am%3Am5xcIc9bXTRM14UOYZWBkmg&_trkparms=pageci%3A5902c002-ebb1-11e6-ac6c-74dbd18094f7%7Cparentrq%3A0eba196015a0a5e0b8851677ffa27f9e%7Ciid%3A8&varId=640503198825