


Onoff
-
Posts
21126 -
Joined
-
Last visited
-
Days Won
206
Everything posted by Onoff
-
What do you do with the leaves?
-

Fixing soil pipe brackets: bit stumped ....
Onoff replied to ToughButterCup's topic in Waste & Sewerage
Pack between pipe and joist face and/or fitting and joist face and use some builders band screwed to the joist. -
No surprise there.
-
Silicone spray is good for helping push fits in & out. Don't ffs get it on any faces to be solvent welded. And don't forget your Sharpie for alignment marks.
-
Will those non Geberit pan connectors clip into the Geberit frame still? You want to ensure the flush to poo pipe centres. You'll still have a flanged rubber push fit connection hidden behind the tiles. I'd say the Geberit rubber seals are far superior to that flanged sort. Maybe one of these solvent weld will float your weird boat: https://www.ebay.co.uk/i/223472460110? or https://www.polypipe.com/pan-connector-110mm-90-s-socket-solvent-weld-white
-
Will those Spotclips give the 90mm clearance above the fitting? Saying that they do do different heights. Again worth reading the manufacturers instructions that came with the lights. They also have a version of the Thermahood they call Spotbox but again its install from above. Meant really for when trying to maintain (near?)air tightness in passive esque builds.
-
It is a straight one! This I think: https://www.ebay.co.uk/itm/Polypipe-110mm-Grey-sh43g-single-socket-coupler-adaptor-solvent-push-weld-fit/174180814011?
-
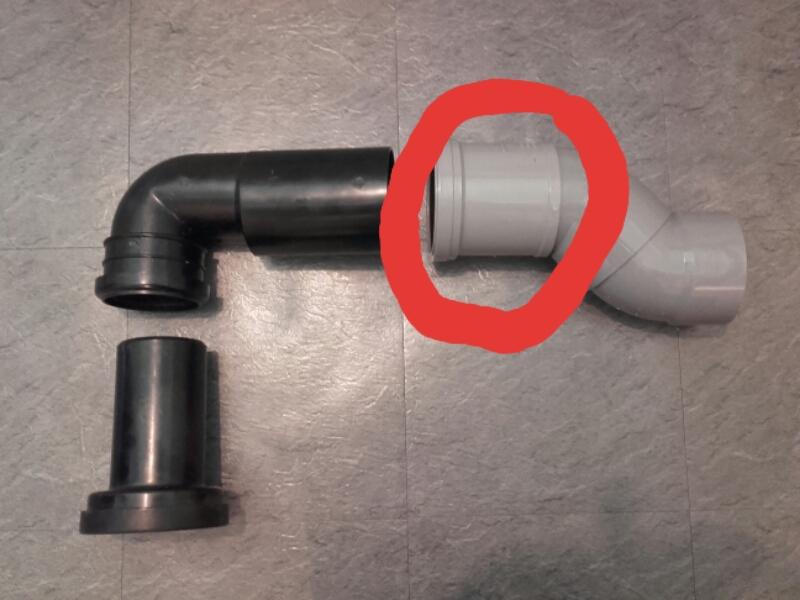
The pan connector is Geberit. The elbow I got from @PeterStarck Push fit into the grey via rubber seal. The grey, short, straight is push fit male, solvent female. Then a couple of grey m/f solvent weld fittings. Brown soil into the rhs with gap filling cement.
-
Grey is solvent weld female. Brown is 110mm pvc soil. I made a cock up there. Should have used black or grey solvent weld 110mm. The brown is the underground stuff and although still pvc, seems a bit more rubbery/resilient as opposed to the slight brittleness you seem to feel with true solvent weld pipes/fittings. Different makes too. I used solvent, gap filling cement.
-
The "reducer" Nick suggested is the same bit I showed but it's really an adapter. 90mm Geberit male goes into the 90mm female on the adapter. 110mm male on the adapter push fits into a 110mm female.
-
Sort of Dennis Nilson's drains / meaty.
-
In the Screwfix Q&As under "Fitting" they say 90mm clearance under insulation. There'll likely be a set of instructions in the box backing it up. So you need to maintain a clearance around them it seems. You need then to position "fire hoods"; be they the cloth, compressed fibre or Thermahood types where your lights will be going and "suspend" them somehow prior to your ceiling boards going on with the cabling run and coiled up ready to be pulled thru. You could wedge them in a square of pir, itself wedged between your joists. Get creative!
-
Start with the downlights spec. What is being proposed?
-
Suspended floors here, cavity walls, footings with gaps in allowing God knows what into said cavities. Do they smell when they make nests near badly positioned hot water pipes and you poison them...oh YES! ? Then there's the flies.....
-
It was me suggested hoods as his sparks was worried about covering the downlights. Didn't realise he couldn't access from above. Then saw he appears to have loads of joist depth.
-
Why not fit downlights that are coverable with insulation and don't require hoods? How deep are the floor joists above?
-
It's all male into female going downhill so even if the push fit seal failed it'd all have to back up seriously to leak at the Geberit to "other" push fit joint. There's TAP Poly Weld 2-part epoxy that is supposed to stick HDPE to PVC. Tbh I think I'd just push the Geberit in then CT1 around the whole joint after cleaning it if that worried.
-
I'd put it in a bit of 20mm pvc conduit. Always a good idea especially if a cavity where it can get wet, chewed or damaged by debris. Have it point slightly downhill if ending up external. Similarly it can allow gas/fumes from the cavity into the room. Just good practice anyway for mechanical protection, cavity or not.
-
Go and buy some Thermahoods. Insulation goes straight over the top. Loads of space for the light fitting. https://www.thermahood.com/ https://www.amazon.co.uk/Thermahood-Downlighter-Ceiling-Spotlights-Efficiency/dp/B077QHXGW1/ref=mp_s_a_1_1_sspa?
-
https://www.andersonheating-air.com/daikin-heat-pump-troubleshooting/
-
You can get tubular ones you could cut with a pipe cutter.
-
You'll remove the wc before you tank the floor I assume or does it sit raised up slightly?
-
I did a dry run, positioned the sink on the pedestal and sorted the solvent weld waste before I boarded and tiled the wall. I had to guess the floor tile height. Thought I'd be spot on. I wasn't! Also the standard McAlpine siphon trap clashed with the waste. I bought a second telescopic McAlpine waste and made one out of two i.e a telescopic, anti siphon trap! Telescopic as @PeterW says should account for any discrepancies!
-
Here you go. I'm mulling, this year, to level the strip of land up the side of the house to make it useable. (Covered storage cum a future access platform the length of the bungalow should I ever convert to gable ends). Neighbour offered the other day to dig it up (with his digger) so I can replace the clay drains down to the cess pool etc. Its not this bad now but not far off! Not visible are old building footings that the clay drains run through. I've tried hand digging and Kango'ing but its a bit too much for me. I found the cess pool in the trees beyond the jumbo bags:
-
Yep. I've found it now though. Had too as it was seriously blocked last Summer. Going to borrow works £5k drain cam sometime to inspect the clay pipe runs.


