


Onoff
-
Posts
21126 -
Joined
-
Last visited
-
Days Won
206
Everything posted by Onoff
-
 Do you consider the switching in another room to be local and could you isolate it quickly? Btw, you don't want to be in a room where the isolation is if the exit is in the room where the equipment is.
 -
45x95 so "4x2".
-
This is the code my lad used for showing the temperatures, simultaneously for 4 DS18b20 sensors. Ripped off from somewhere. All's he's done is add 1 line to the config file on the Pi to get it to work. This even though it should have defaulted to pin 4 anyway: #!/usr/bin/env python import glob import time # DS18B20.py # 2016-04-25 # 73 01 4b 46 7f ff 0d 10 41 : crc=41 YES # 73 01 4b 46 7f ff 0d 10 41 t=23187 while True: for sensor in glob.glob("/sys/bus/w1/devices/28-00*/w1_slave"): id = sensor.split("/")[5] try: f = open(sensor, "r") data = f.read() f.close() if "YES" in data: (discard, sep, reading) = data.partition(' t=') t = float(reading) / 1000.0 print("{} {:.1f}".format(id, t)) else: print("999.9") except: pass time.sleep(3.0) Of course it does this all in a terminal. How then would he make a graphical representation of the enclosure on screen with text boxes for each sensor? I just need to point him in the right direction. Cheers
-
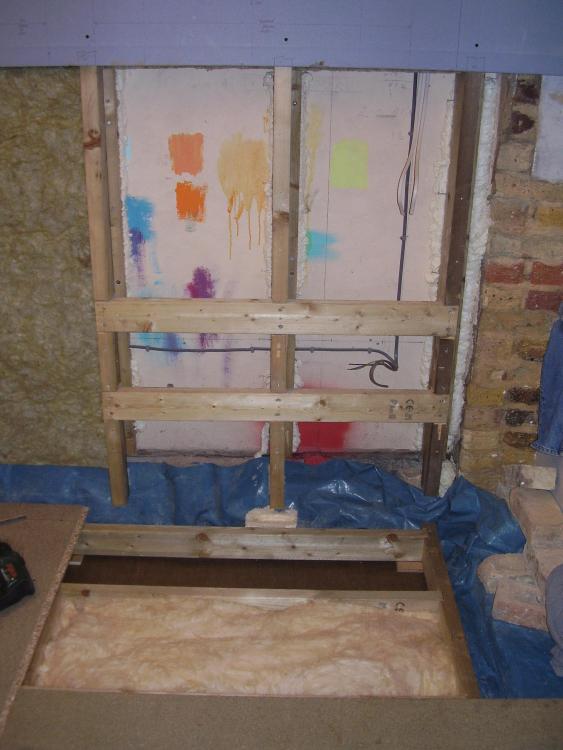
My CLS is not secured to the concrete floor in any way whatsoever. Not got many photos of back then but a few. We had a low boot room / coal store that was lower than the rest of the house. (Previous owner used to breed rabbits in there). I simply put a DPC down, 2 layers of wax building paper (no idea why) then made up a glued and screwed "stud wall" which I then laid down flat. The "frame" has a gap underneath. You can just see 2 of the 100x100 ply packs. I laid the frame down and figured how much it had to come up to meet the adjacent floor. Then just slipped in ply packs to suit the gap at that point be it 6, 9, 12, 18, 24mm etc. I lifted the frame off the packs and put a big squrt of pva between ply and underside of the CLS then left to dry. Rock solid is an understatement, no squeaks whatsoever! Widened the doorway, studded the walls etc: I've only got 100mm of roll insulation between joists. There's also a deliberate gap all round the floor frame. I had some mad idea it would be good for airflow/to stop damp! ? NB: This was before I discovered the forum or I'd have done it all different with UFH and masses of insulation under the floor that I'd have had to dig deeper. Hindsight eh!
-
How about just bonding down some thin cement type boards, the type used for under cloaking? You would want them laid in the direction of the roof fall so as not to cause a dam effect.
-
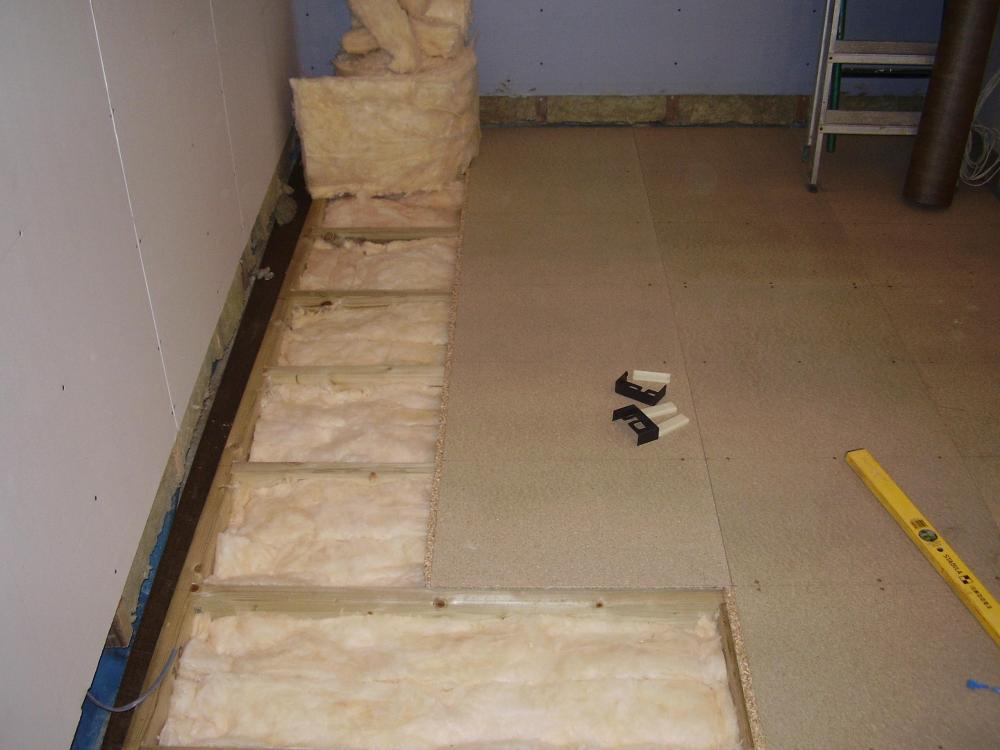
I did a similar floor downstairs: - Original concrete subfloor - 2 layers of waxed building paper - 4x2 CLS @ 400mm ctrs (in effect a glued & screwed stud wall laid on its side) - 100x100 ply packers - thickness to suit. These slipped under the floor joists with a big slug of D4 glue at each point. -22mm T&G affixed with SPAX It's the best floor in the house. Not a peep of noise and rock solid. Might sound a mad idea but I wonder if you could pour some sort of self levelling compound in through some discreet holes to flow under all the gaps? Maybe via a solid board cutter:
-
It's a common problem to have floors nailed down with angular ring nails like this: Far better is to use SPAX flooring screws: Ask me how I know! Our upstairs (ring nailed by hand) is 18mm T&G chipboard on 400mm centres and it initially had terrible problems. The SPAX have made it better but it's still not perfect. All the noggins appear hand nailed so I think they might be part of the problem.


-
Try County Batteries. Very helpful: https://www.countybattery.co.uk/
-
Tin foil:
-
How about actually trying it instead of thinking it can't be done on a tapered edge board? Just use a bigger disc to miss the tapered bit if you're that bothered.
-
Are we talking trips to the vet or do you just think they've burnt their feet?
-
Get a dog. Cats will move quicker and not burn their feet.
-
& yes, cut the rhs side to suit. Quickest way for all of us. So what if it's no longer a tapered edge before you ask!
-
-
How many clear suggestions do we collectively need to make before you get it? "I get it...no I don't...yes I do...I'm going to ignore that so I can keep this thread going..."

-
Fibaro switch wiring lack of knowledge!
Onoff replied to Pocster's topic in Networks, AV, Security & Automation
On this forum? -
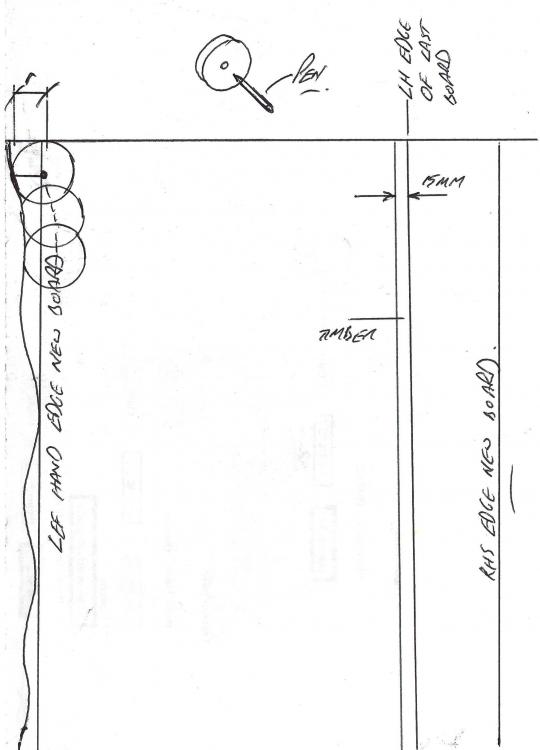
You could just do a series of marks say 50mm apart, vertically down the edge of the last board fixed - where you only have 15mm to fix to. Draw a vertical line on the foiled pir as close as you can to the wobbly wall. Mark that out vertically too, every 50mm. Then just measure at each point from last board fixed on the rhs to the wall. Transfer those measurements to your pb working from the rhs edge. The closer the marks the more accurate the fit. Join the dots. Cut to that. Acrylic decorators filler thereafter.
-
Rats rats rats . I forgot that they like streams too.
Onoff replied to Patrick's topic in Infestation
+1. Far better than a cat. Once saw the MiL's Jack cross take two caught rats released from a cage. It chased the second up the side of the old weatherboarded house. Mind the dogs can be destructive. Same dog burrowed through a sack of pony nuts to get to the rat nest behind it. -
If I've one or two 2.5s going into a face plate terminal I double them up. If 3 I tend to leave them as they are. I strip back nom 18mm and bend over to 9mm. Not all terminals mind are made equal in terms of size i.e amount you can get in. Ditto the quality of terminal and how likely they are to strip or have the head shear off!
-
@Construction Channel & @Russdl maybe?
-
Put the pb against the old wall, as near as it'll go. Hold a small disc of wood against the profile and put a pencil the other side. Move block down, following the wall and keeping the pencil tight to the little block. That'll transfer your profile to the pb edge. Cut with a coping saw, jig saw etc. Fill later with flexible decorators caulk. You did similar in the kitchen I recall.
-
The screen on the right, does it hinge to the left? Does it not hit the mixer? What ones btw? Always known I might have to do similar.
-
MVHR condensation drain
Onoff replied to Pocster's topic in Mechanical Ventilation with Heat Recovery (MVHR)
I can see this going downhill. -
MVHR condensation drain
Onoff replied to Pocster's topic in Mechanical Ventilation with Heat Recovery (MVHR)
That's it, avoid the unpalatable & wait for an answer that zoots the way you want to go that involves less work. ? -
MVHR condensation drain
Onoff replied to Pocster's topic in Mechanical Ventilation with Heat Recovery (MVHR)
Cold bridging?


