


Russdl
-
Posts
1785 -
Joined
-
Last visited
-
Days Won
6
Everything posted by Russdl
-
Thanks Peter. That's pretty much what I will be doing but I left a bit of the detail out of my original post to keep it simple - I think it just made things more complicated! The idea that came to me (below) after I posted the original question is I think the one that will work, according to the tape measure anyway. We'll see what tomorrow brings.
-
I hadn't, no. I'd only ever considered the drain following the line of the house. Not sure why. Ignorance I suppose, plus following the footprint of the house would require no digging (just back filling later).
-
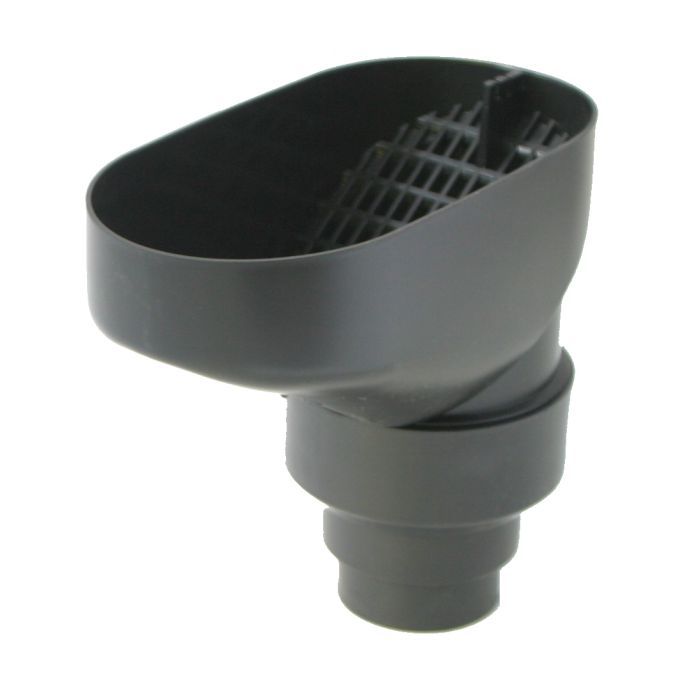
I've got these leaf catchers which is a slightly different take on the same idea.
-
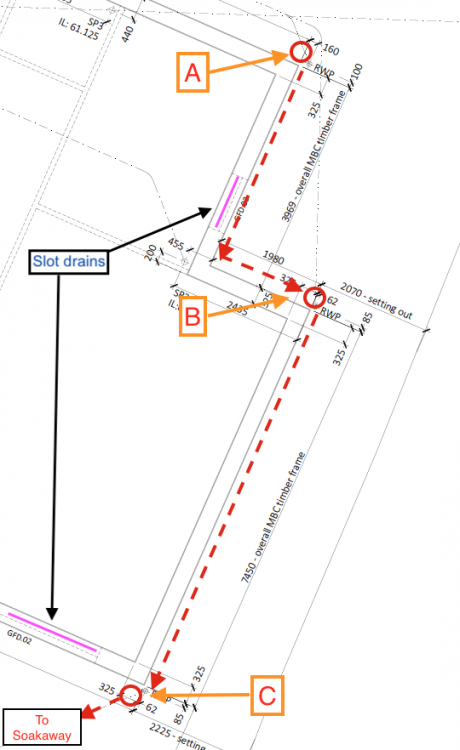
I've edited the original drawing showing the location of the 2 slot drains that need to be incorporated into the drain run as well, I thought I 'd leave them out for clarity but that seems to have backfired!
-
I should have said, but I was trying not to over complicate the post. I have to go round the long way round as there is also a slot drain at the back door, just before the 90° left that will also join the drain run. I have leaf traps for all the downpipes and plan on using a silt trap prior to the soakaway. To do the 90° bend and get downpipe 'B' in on the act, could i use a 45° bend, then a 45° equal branch (with the branch sticking up to take the downpipe) followed by another 45° bend?
-
I have three rain water downpipes A, B and C that need to get to the soakaway. Starting at 'A' it looks easy, an 87.5° bend, into the drain pipe and away she goes, en-route to 'B'. The first obstacle to negotiate is the 90° left turn which I presume I do with two 45°'s. I then end up in the vicinity of downpipe 'B' where I have another 90° turn to negotiate plus I need to incorporate downpipe 'B' into the drain run. What is the easiest way to get a vertical 68mm pipe into a horizontal 110mm drain that is just about to turn a 90° corner? Is there such a thing as a 90° bend with a spigot coming out of the side of it? (Image edited to show the position of the slot drains that will also need to join the drain run.) TIA
-
Where to buy composite cladding
Russdl replied to Robert Clark's topic in General Self Build & DIY Discussion
@Robert Clark We did manage to beat the advertised price down, can't recall by how much though. -
Where to buy composite cladding
Russdl replied to Robert Clark's topic in General Self Build & DIY Discussion
We got ours from Envirobuild We love it. The chippy hated the thought of it because it wasn't real wood but he ended up becoming a fan. As for reasonable price, I guess it's at the high end of reasonable, depending on what reasonable is. -
@Pete Thanks for those numbers. 1.3m3 for 75m2 and 3.6m3 for 145m2 seem pretty reasonable and does make the 6.8m3 for my 108m2 look a bit on the large size. Hence the original question. I've asked BCO now anyway so I'll wait and see what he says.
-
@Big Jimbo the several versions of the calculations I’ve done have all come up with 2m3. To me it’s seems 6.8m3 is massive, but if it transpires that is what I’m supposed to have then that’s what I’ll do. I’m not trying to cheat the system here, it’ll be my back garden and I don’t want it to turn in to a swamp, but if I only have to dig 2 and a bit m3 instead of circa 7m3 then I’ll go with the former.
-
@Big Jimbo I’m not going to commit until I have the BCO agreement (especially as I’ve now asked the question). What calculations did you use to get to the 8m3 figure?
-
Not sad at all. Where was it from? (Sorry if I’ve missed that information).
-
Bugger. Perhaps I shouldn’t have asked the question! We’re using ‘Spire’ a private BCO.
-
@Temp @LA3222 My computer has sorted itself out and I've now been able to open that spreadsheet. Sadly it hasn't helped a huge amount because I'm just too thick to work out how to input my percolation test results into the spread sheet so I've bitten the bullet and told my BCO inspector that I only need 2m3 not 6.8m3 ? I'll let you know what he says.
-
@Mr Punter It is, and your calculation gives me 2m3 not the 6.8m3 that are on the plans. Is that calculation going to be sufficient for me to convince the BCO that I only need 2m3? I guess there is only one way to find out!
-
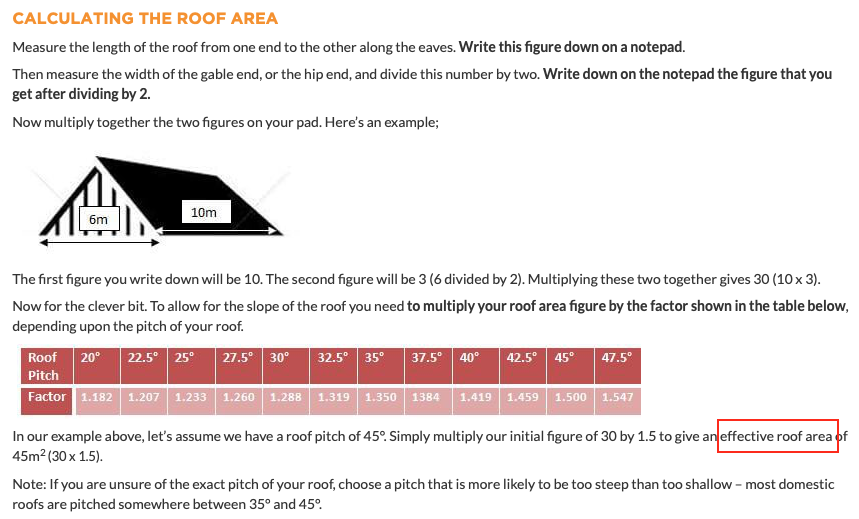
@Temp Surely that can't be right though can it, to have an effective roof area that is 25% bigger than the actual roof area. That extract from the drainage pipe website that I posted above would give an effective roof area of 750m2 for a conventional 45° roof of 1000m2 plan, so only 75% of the footprint.
-
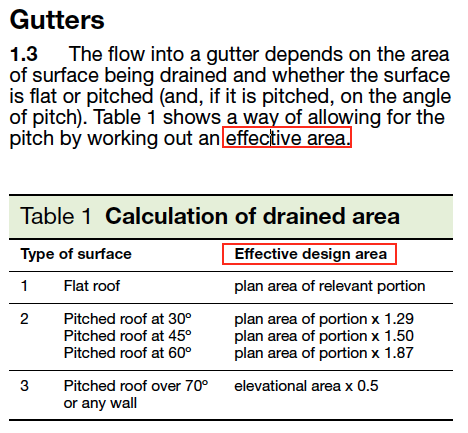
The first stumbling block in the Regs is the phrase 'Effective Design Area' I can't find a definition of it anywhere What is the 'effective design area'? Drainagepipe.co.uk clearly define it (aimed squarely at the innumerate) and it's what I'm using to convince myself that I only need 2m3 of soakaway. Does anyone know any different?
-
@Jeremy Harris I don't remember seeing that chart. I'm off back to the regs!
-
@joe90 That very similar to what @Temp sent me originally. With the two of them open side by side it should be a lot easier to get the data from Fig 1 and Table 1 without endless scrolling up and down, ta.
-
@Temp That link wouldn't open for me last night. I gave my computer overnight to have a long hard look at itself and it's performance but it clearly doesn't give a damn because I still can't open that link (probably a Mac thing?) @LA3222 Were you able to open the link? If so, was your spreadsheet correct?
-
@Temp Brilliant, thanks again.
-
@joe90 That is the obvious answer but I want to know how to do it myself because as it stands I think he's wrong and I think I have all the data I need to produce an answer myself. I don't want to be fobbed off. @LA3222 As I said, I've got the results for the percolation test, I take it they are one and the same thing? And from @Temp's link I've got a BRE document with lots of formulas, pictures wiggly lines and graphs so I think I'm on my way to an answer.
-
@Mr Punter Exactly. Using the following calculation: Length of Roof x (Width of Gable/2) x 1.419 (for our 40° roof pitch) I get 100m2 so I recon I need 2m3 of soakaway, not 6.8M3, but before I have a word with Building Control about this and explain that I think the Architect has got it wildly wrong I want to make sure I'm not missing anything.
-
@Carrerahill No idea. It seems excessive to me, you could just be correct. I'm currently struggling through that BRE guide that @Temp linked to. I don't mind maths, but I don't like maths that includes lots of letters!
-
@Temp thanks for that, I'll get reading. @Carrerahill it was the Architect. It's 2 soakaways 1 to the north of the house, 1 to the south. We have no flood risk, we're on chalk. According to the on line stuff I've found so far a roof our size requires a 2m3 soakaway. I'll see what the BRE stuff says.



