vivienz
-
Posts
1378 -
Joined
-
Days Won
15
Everything posted by vivienz
-
Excellent. Anything that saves on a bit of effort now is a plus. Thanks!
-
As my building settles and the newly skimmed plaster dries out, the usual hairline cracks are appearing here and there, mostly along beading lines. Whilst my scaffolding is still up in here, is there anything I should do about these, or should I just live with them a while and revisit once the building has settled some more?
-
Natural Stone Veneer v Natural Stone v Fiber Cement
vivienz replied to Ralph's topic in General Construction Issues
I'm using tier system on my build (timber frame). This is stone veneer on a backing board, and is applied with adhesive to builder board. The builder board goes onto battens, although I need to use counterbattens as well as the centres of the battens aren't at the right spacing for the board. I sourced everything from Sydenhams after ringing around for prices; they wete by far the most competitive. The standard panels were £ 51.05 sq m, corners were the same per linear metre, the adhesive was £21.9 per bag (44 needed for mine, 126 sq m in total area excl. corners) and the builder board was £36.24 per board (sorry, can't remember the size, but same as plasterboard). Depending on which colour you want, lead times can vary enormously. Mine took nearly 2 months to arrive as it was on a slow boat from Vietnam. -
Power equipment with no wayleave or easement
vivienz replied to Randomiser's topic in General Self Build & DIY Discussion
Interesting. I've no other experience of wayleaves or easements and just assumed they would be on everyone's deeds. I suspect it was on mine as we bought the plot from an old farming family and the land hadn't changed hands since the 950s. -
Power equipment with no wayleave or easement
vivienz replied to Randomiser's topic in General Self Build & DIY Discussion
I wonder if it's the north/south thing? The wayleave for my place is on the deeds for my plot, -
Power equipment with no wayleave or easement
vivienz replied to Randomiser's topic in General Self Build & DIY Discussion
I thought that wayleaves do stay with the property when it changes hands. When we purchased our plot, our solicitor made us aware of it as it is noted on the deeds. They are still voluntary, though, and can be withdrawn by any new owner, unlike an easement. -
Power equipment with no wayleave or easement
vivienz replied to Randomiser's topic in General Self Build & DIY Discussion
Definitely get your connection quote first, then you know how hard you need to bargain. My case was resolved to my satisfaction in that the necessary work will be done and it hasn't cost me anything, but then there are no poles on my land for the overflying cables (11kV). I already had an existing connection that I moved and eventually buried, but the overflying ones were a separate issue. There was an existing (ancient) wayleave for the wires to overfly the property - these are voluntary agreements given by the landowner and can be withdrawn, so in exchange for the wires being moved further from my garage at no cost to me, I will give them an easement which cannot be withdrawn and is lodged against the title deeds at the Land Registry. One word of caution on times and timing. If you need to negotiate a new agreement with them, it can take a really long time. It can also take a long time to get a new connection. If these wires prevent your developing the land, you need to get onto the electricity issue as soon as possible. -
Floor plans - any last minute advice please?!
vivienz replied to Mrs CFS's topic in New House & Self Build Design
Lovely design. I second the comment about switching the hob to the island. Cooking has become a far more sociable activity and it could be tricky if you have people sitting at the island whilst you're cooking but have to have your back to them most of the time. To separate the family room, the altered ceiling level has worked well for me but you could also look at internal bi-fold doors. The tricky bit with these is that you can't have an MVHR gap below the door because they need to run on a track. There are plenty of other internal folding doors, though. Never underestimate the amount of space you need for the utility, plant and srorage. It's a bit like when you first work out your build budget - whatever you think you need, you will always need more. -
Inserted deco/end panels in kitchen units
vivienz replied to vivienz's topic in Kitchen Units & Worktops
Good points, we are doing this but I forgot to mention it. -
For the perimeter drains, installation of the sewage plant (already purchased), all labour and materials, 11k. He has stated 2 weeks labour for the 3 man team and included 3 lots of muckaway. It's the materials cost I have the issue with, not labour or plant hire.
-
I've been browsing through various drainage products and come across Hepworth products which are really pricey. Are they worth the extra cost for domestic drainage?
-
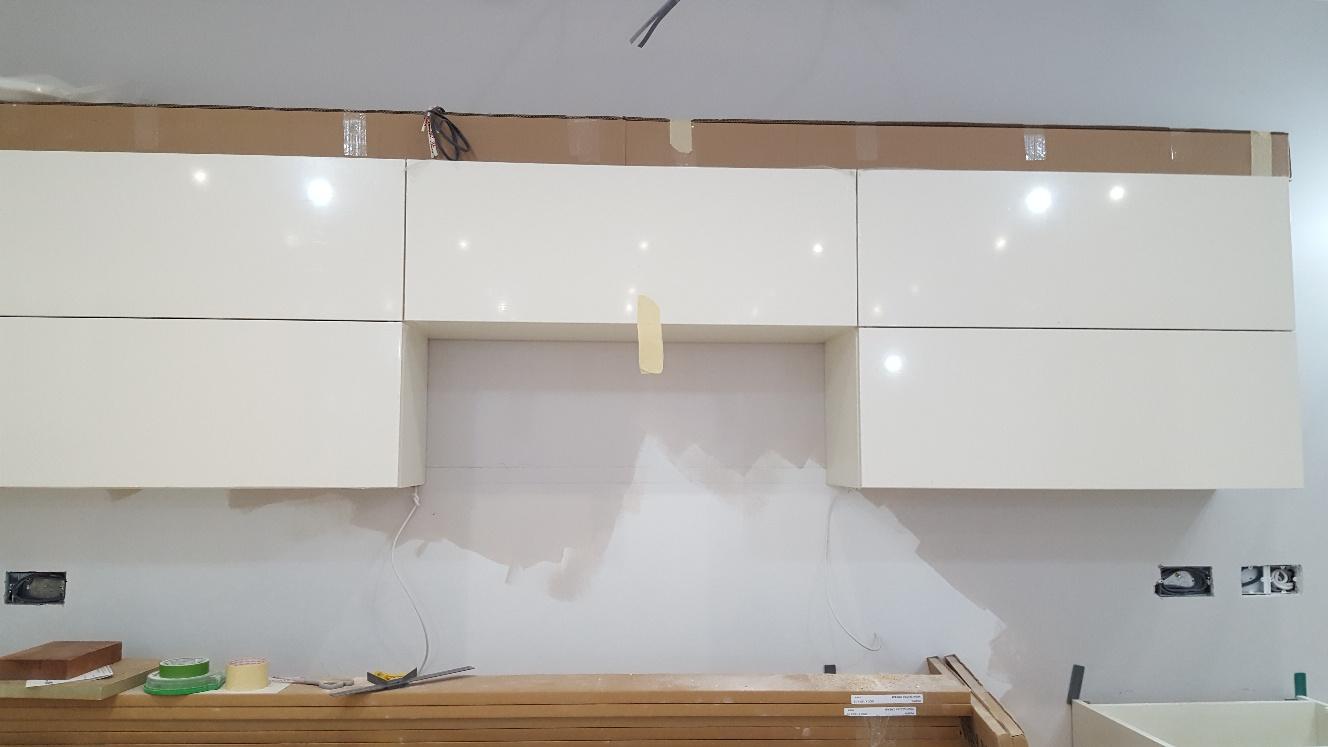
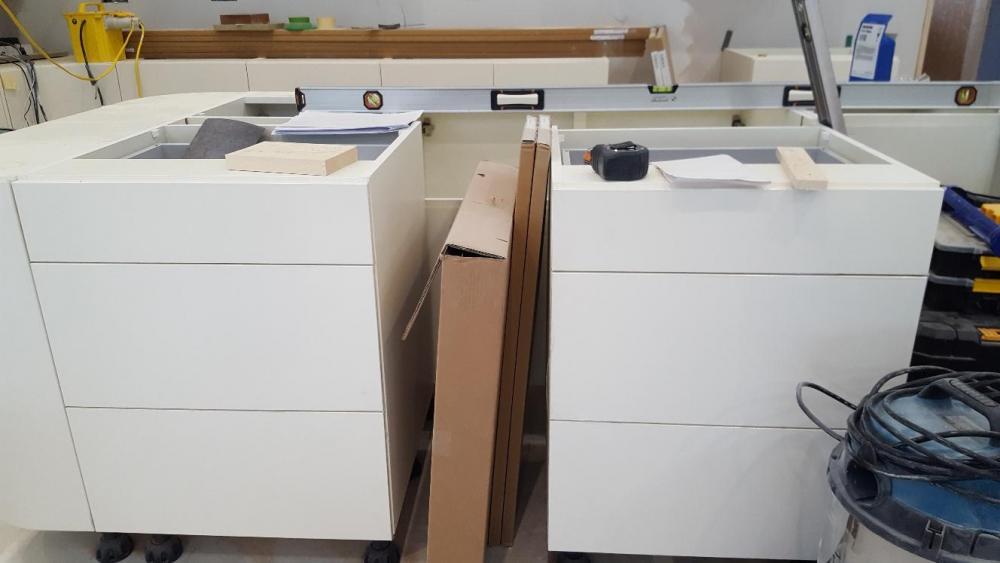
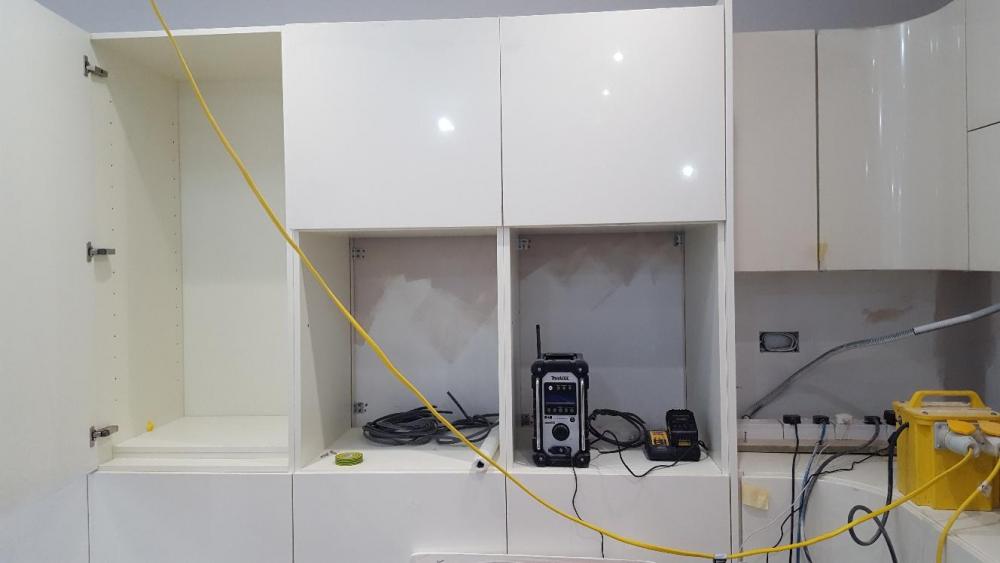
I recently posted on my blog that I was waiting for some extra end panels to arrive to insert between units for my kitchen, sourced from DIY Kitchens. @ultramods asked why this was and where they were going, so here's some detail. The first couple of locations are obvious when you see them, but as a novice kitchen orderer, I missed them at the time of the original one and had to add them on afterwards. These are bi-fold wall units with a top box straddling where the sink will be. There will be a plinth ( pelmet / cornice ) below the top box ( bridging unit ), but this still means that the inner edge of the bi-fold units either side have the external carcass exposed and whilst it's a reasonable colour match, it still looks like carcass against the gloss finish of the doors. A wall unit end panel will go on either side of the top box, giving an 18mm insert on the top section and a nicer looking, gloss finish on the inside of the bridge section. The next additional inserts are going into the island. I have a freestanding drinks cooler that will be going in there (they were out of stock at the time the rest of the kitchen arrived and will arrive in due course). The cooler is floor standing and the ventilation grille sits on the floor. Because of this, the run of the plinth will be interrupted and leave a not very pretty edge at the bottom. Again, to give a better finish, a base unit end panel will be added in on either side of the gap (leaving enough room for the appliance). Here's the start of the island and the location of the drinks cooler. Finally, I'm having two single ovens, side by side and at the level of the top of the base units. These come as standard oven housing units with pan drawers. In my current kitchen (old and very worn out now, not expensive in the first place) the sides of the built in oven get pretty mucky and it can bleed over slightly to the units/drawers either side of the oven door. For this reason, to the left of the left hand oven, a full length end panel will be inserted between the units to give some separation and an easy, wipe down clean for anything that escapes the oven over the course of time, rather than also having to clean the adjacent cupboard. Here are the oven units: Hopefully, this answers the blog query.

-
Could you build in some sort of false or suspended ceiling to take the MVHR runs and other services? What sort of head height do you have and can you afford to lose any?
-
If you think your retaining wall is big!
vivienz replied to Moonshine's topic in General Structural Issues
I'd hate to be under the runoff from that when it buckets down! -
I will cover those. There's a local hire firm with reasonable rates and I've used them a few times.
-
For a 3 man team, 1 labourer, 1 on the dumper and 1 on the digger, £415per day.
-
That's the route I will take. I said to him at the time that I'd prefer to do it as a day rate, as we've done for everything else, and I'll source the materials. This makes sense, anyway, as he isn't VAT registered and I wouldn't be able to reclaim it if he bought them. I'm still really disappointed that he's so obviously loaded this to such a degree when we've given him virtually all the groundworks for the site.
-
That's what I thought and why I wanted to check things out.
-
I've gone for spreader plates on the basis that if I'm having UFH upstairs, I want it to be as effective as possible. It's a catch 22 situation, I suppose, in that you need to be able to compare one with and one without, but it would be too fiddly (and expensive) to add retrospectively if you want to add them later. The other thing to think about is what centres your joists are at. Mine were put at 400mm - as well as the floor being less bouncy, the spreader plates wouldn't have been wide enough at 600 centres.
-
I have based the labour costs on the day rate he charges me and for the estimated (by him) duration of the job, so there is no ambiguity there or interpretation from SPONS. My sewage treatment plant has already been purchased and making a decent allowance for plant hire (i had the same equipment not that long ago) and some muckaway, it still gives a materials cost of 6k which I simply cannot see at the moment, hence the original question about what materials I'm likely to need.
-
Thanks, Christine. I'm pretty sure that, sadly, I'm being tucked up here. It's very disappointing as the groundwork team have been very good up until now but he seems to have succumbed to temptation on trying to price an all-in job at way over what's reasonable.
-
Yup, 800mm trenches. The muckaway comes from digging out the old septic tank and the hole for the sewage treatment plant (not in yet). No detail planned for the downpipes yet as I didn't think it was something I was going to have to ponder too hard on myself.
-
The soakaway isn't a soakaway as we are on clay. The far end of the garden runs down into a ditch, which is where (eventually) most of the land drains discharge to. I think that even if we had the reservoir, it would still need to follow that drainage path when it became full. We have no requirements for a soakaway or drainage field from the PP, and the BCO was happy enough with the proposed drainage plan. At this stage, I'm trying to get an idea of what the materials (including sand, etc. for backfilling) are likely to cost as I'm making an assumption of 2 weeks' labour for 3 people as well as 3 loads of muckaway.
-
Bloody hell, that's more than bad luck. What's wrong with this one?
-
Thanks both. Drainage plan attached. Note that there is no rainwater harvesting reservoir and that the perimeter drain does need to be a French drain due to our heavy clay. We had a reduced dig to 800mm all around the house already for the foundations, so there is no need for the pipes to be concreted in as this only applies for <600mm cover. Drainage plan.pdf