Nick Laslett
-
Posts
687 -
Joined
-
Last visited
-
Days Won
1
Everything posted by Nick Laslett
-
ICF How much more expensive ?
Nick Laslett replied to Dave Jones's topic in Insulated Concrete Formwork (ICF)
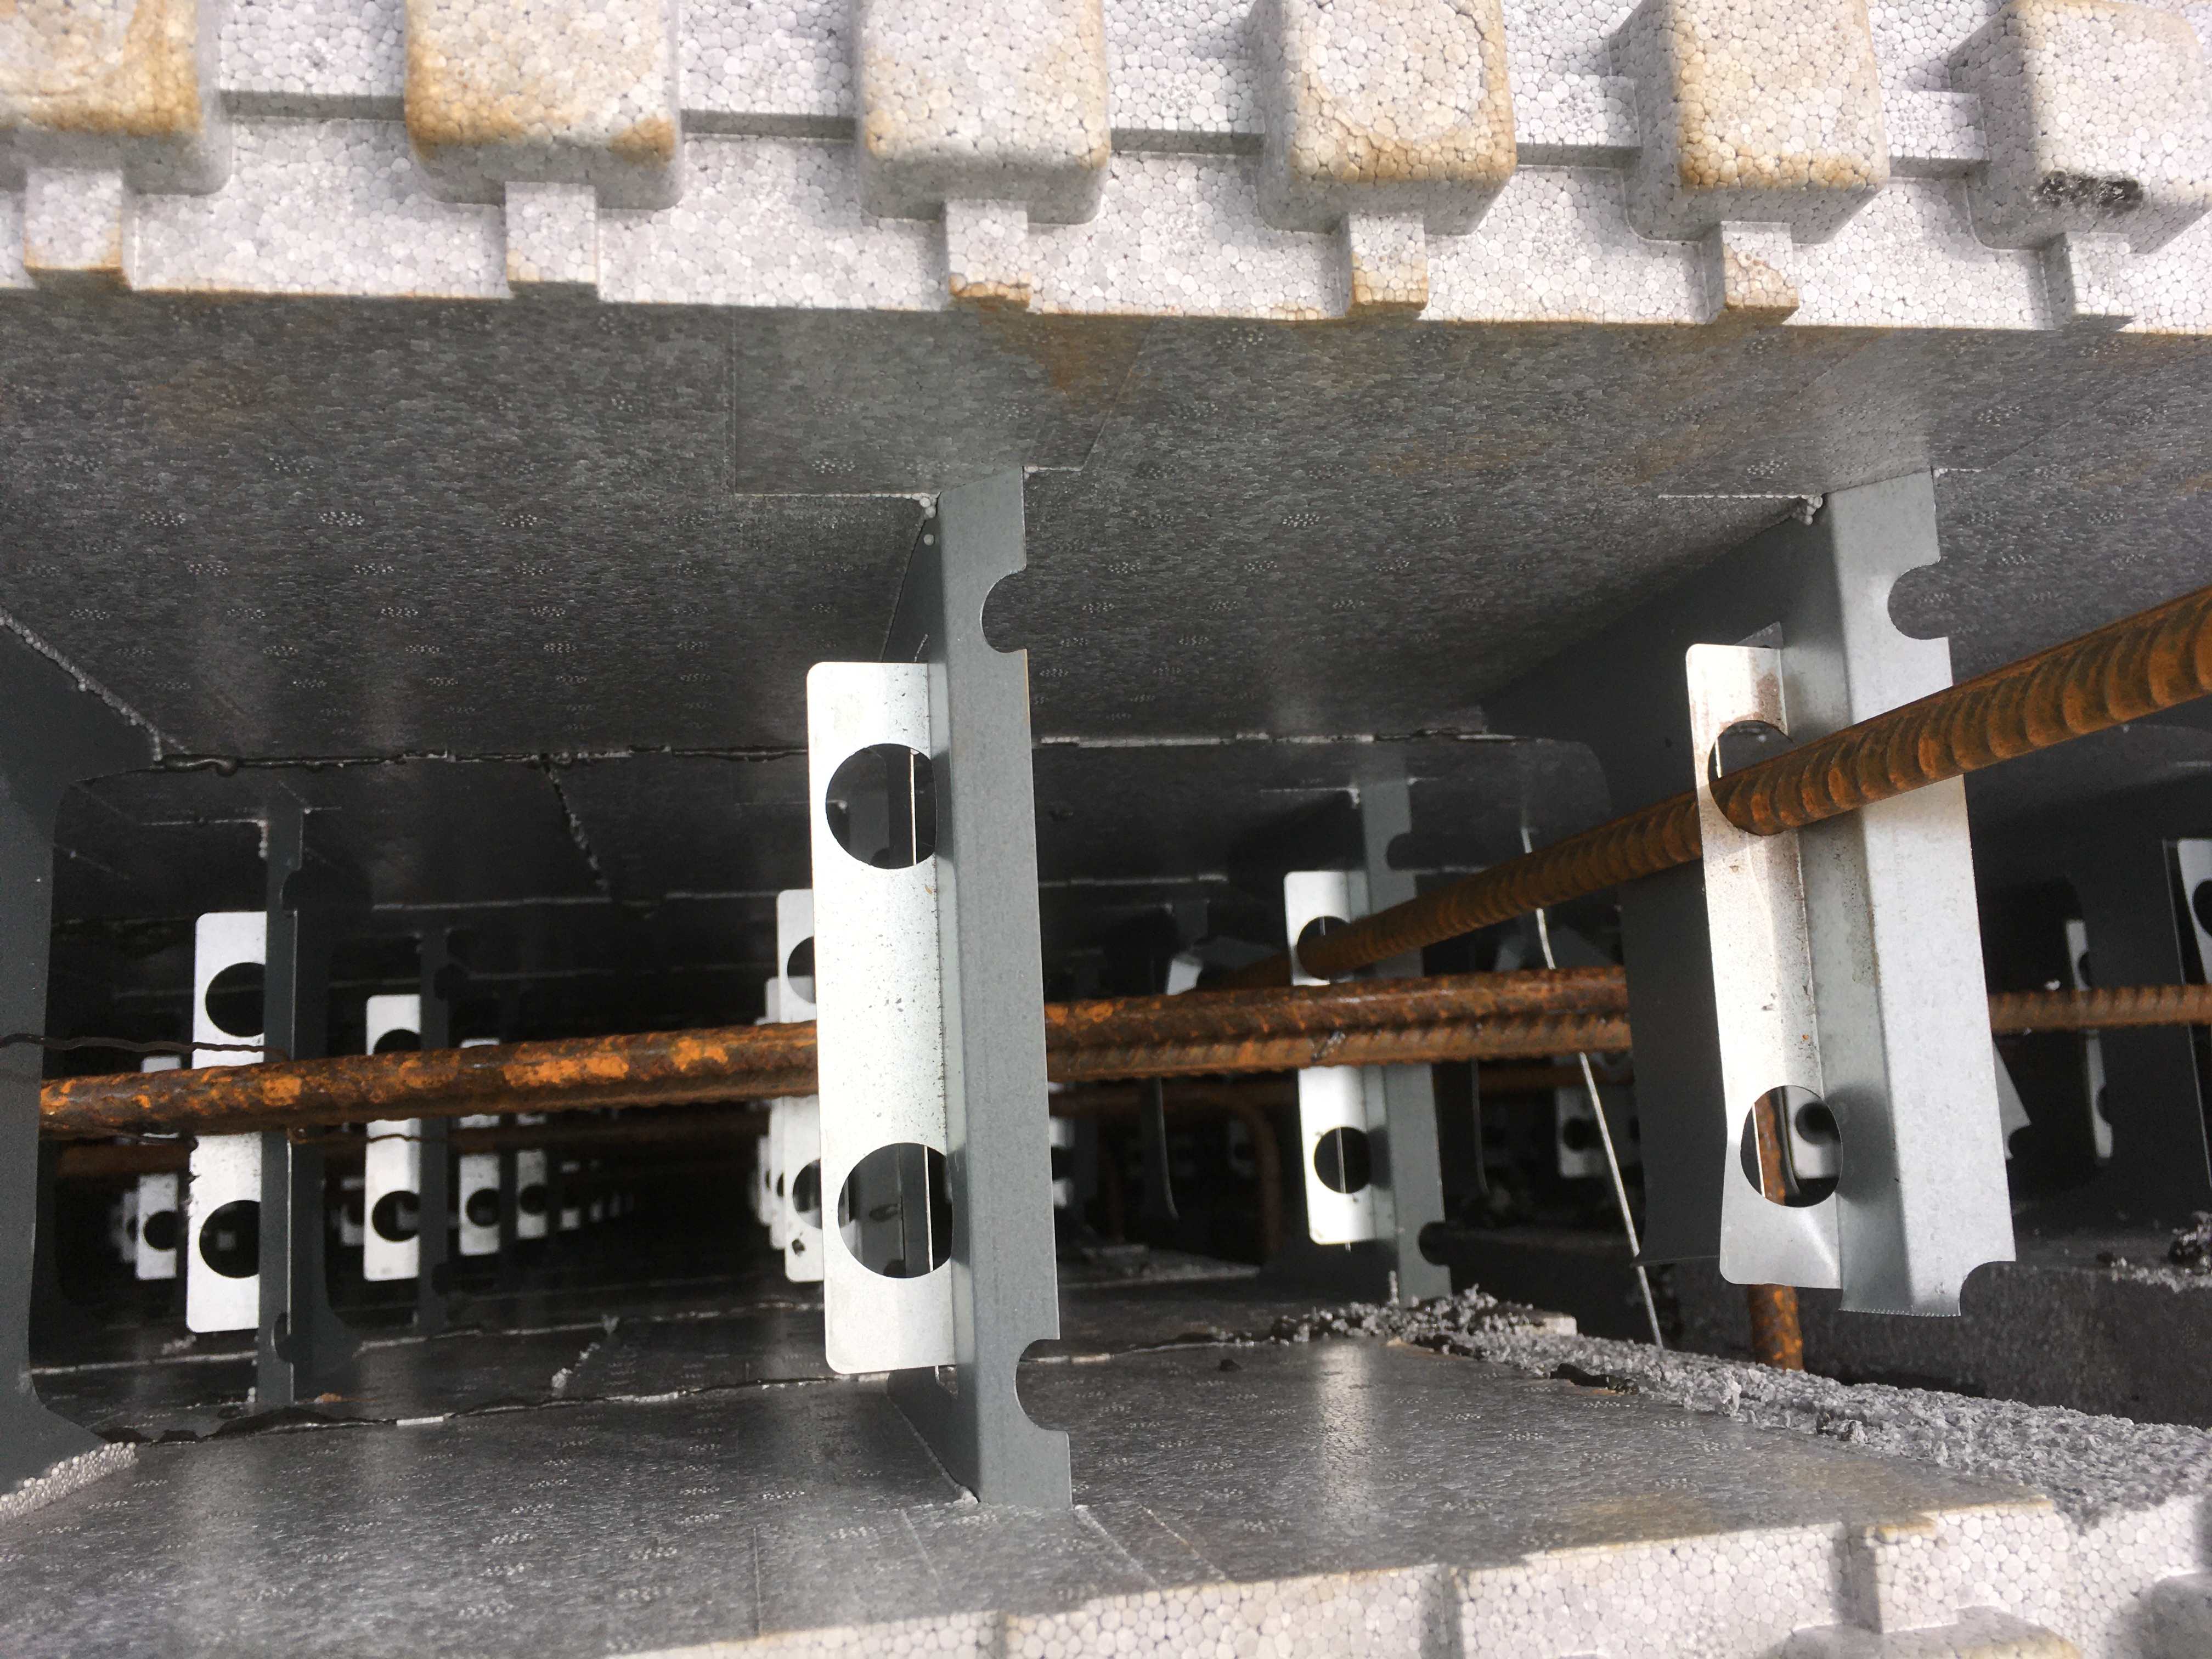
Looking straight down a section of wall before pour.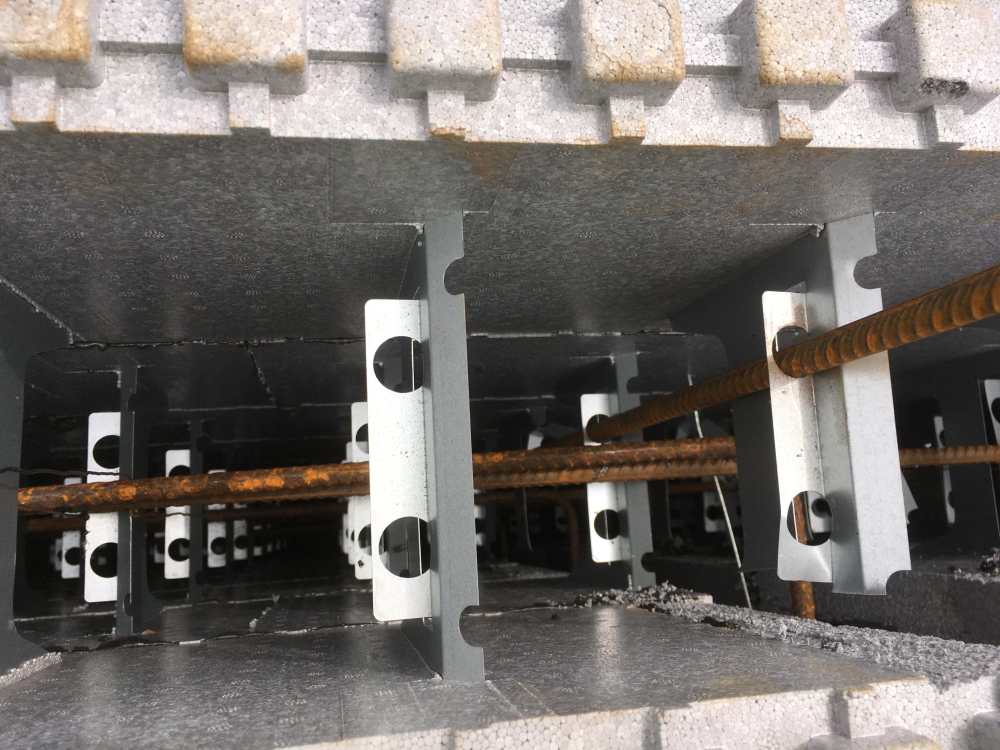
-
ICF How much more expensive ?
Nick Laslett replied to Dave Jones's topic in Insulated Concrete Formwork (ICF)
Top of walls after ground floor pour.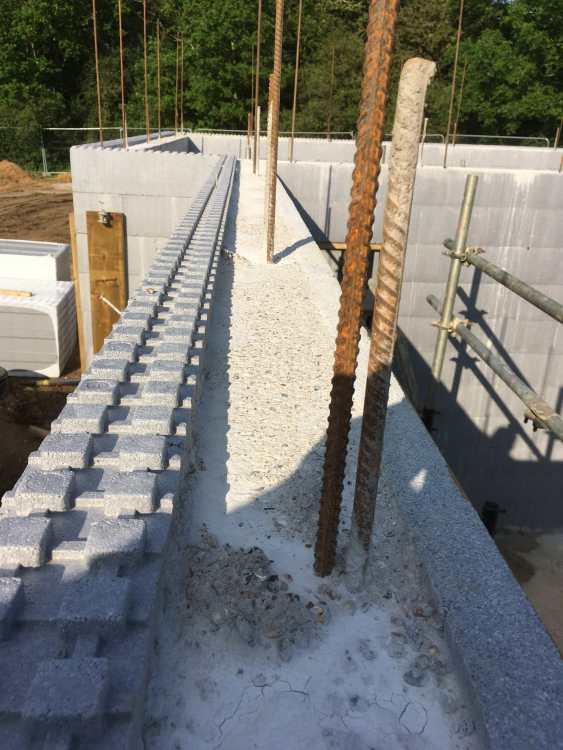
-
ICF How much more expensive ?
Nick Laslett replied to Dave Jones's topic in Insulated Concrete Formwork (ICF)
Thermohouse ICF wall rebar requirements. Horizontal bar every metre, vertical bar every metre.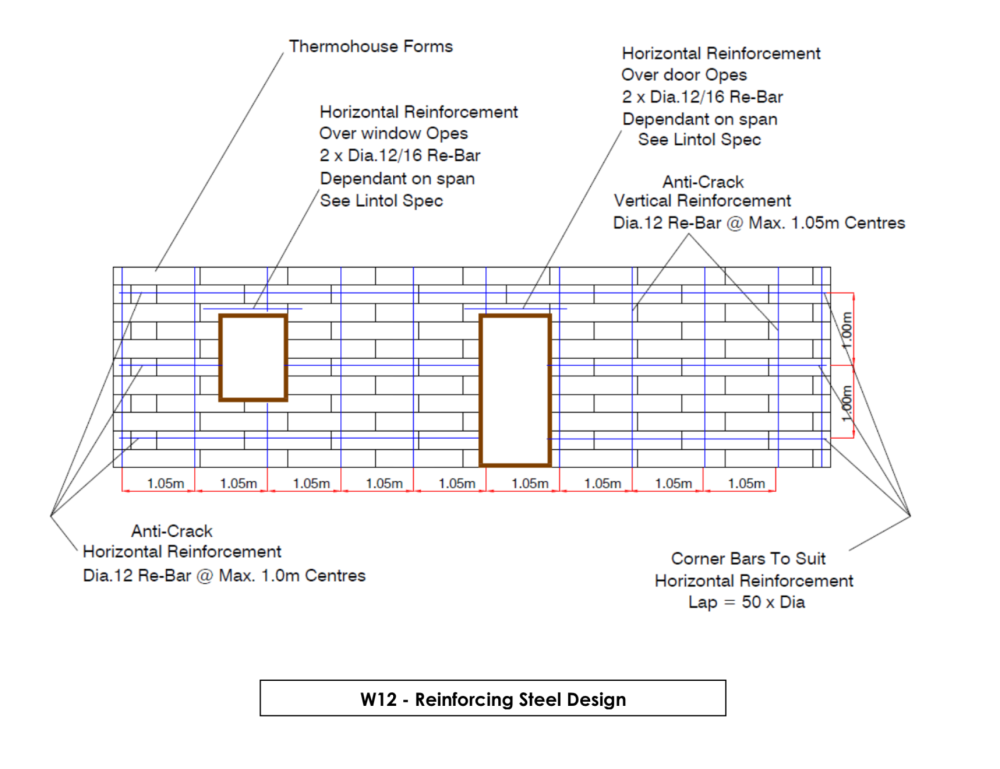
-
Checking out a company at Companies House
Nick Laslett replied to Alan Ambrose's topic in General Self Build & DIY Discussion
@Alan Ambrose, I must have missed this when it was first posted. Great advice. Should be standard practice when you are entering into a contract. Even though this is something I have done with every company I have used on my build, I still lost the deposit on my doors, because they went bankrupt. Even companies that look sound, can get into trouble very quickly. Just last week I looked at an online jewellery seller, that was selling counterfeit brand name jewellery. They had a string of short lived companies, that get shutdown when trading standards catch up with them. My wife had ordered what she thought was just a piece of jewellery as a gift for someone, when it arrived it was an obvious fake. Great if that is what you want, but embarrassing if it is a gift and the recipient knows the cost of the real goods. -
Maybe I’m just getting a bit grumpy! Urban Plumber’s YouTube channel was one of my favourites for ASHP installs. He’s done a few collaborations with Heat Geek, and is on board with the BuildHub way of installing ASHPs. But in his latest install video, he does a UFH system with no insulation under the pipes, just castellated plates. He explains that with a design heat loss of 8° from the ground, this means that there is little benefit to insulating under the UFH pipework. Maybe he is right, but watching the video just now it stuck me as totally wrong thing to advocate for. The section on UFH starts at 11:45 min.
-
Help needed setting timber frame window hole sizes.
Nick Laslett replied to G and J's topic in Windows & Glazing
I did not have the confidence to use drawings for ordering windows. I waited til I had the rough opening to measure. But I did make sure I’d started the process with the fabricator and had all other details agreed. They are at the mercy of the glass manufacturer in any case. I appreciate this delays the build, but the house isn’t weather tight until the roof is tiled. You can always polythene the window openings to let work continue. -
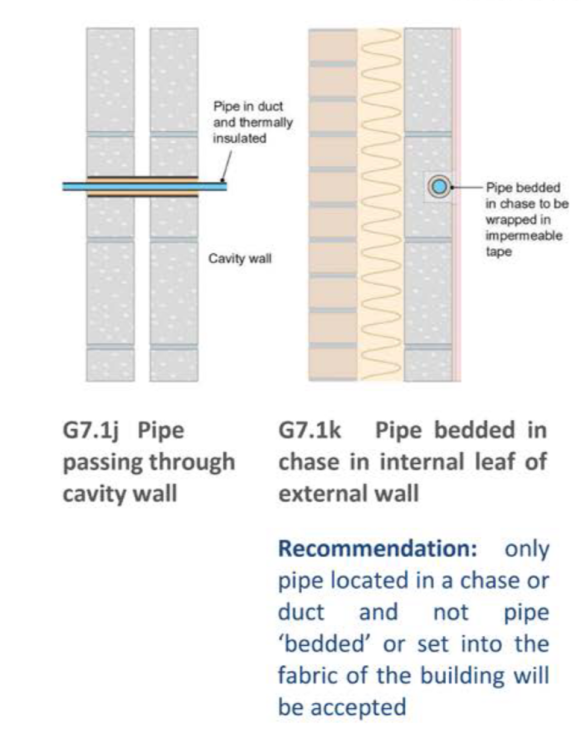
@Egnaro, I have spent a little time researching this. I am pretty confident that BR, NHBC, Water Regs, CIPHE all say that a pipe passing through a wall must be sleeved. I found this reference in the Plumbing level 2 NVQ course book I have. “All pipes that pass through wall structures must be sleeved.” Here is an attached image from WRAS I don’t know if that helps.
-
Thank you for following through with this information. I wonder if somewhere in the details of one of the plumping standards CIBSE and CIPHE, there is something about flexi pipes being easy to access for maintenance. The ASHP guide I have from MCS defers to CIBSE & CIPHE for pipework. This is what Google AI threw up. You could also try the flexi pipe manufacturer for their install requirements. https://www.bes.co.uk/flexible-hose-1-bsp-f-swivel-elbow-x-28mm-x-300mm-pair-25286/ The Primary Pro who make ASHP pipe insulation are very specific about the wall cavity. https://primarypro.co.uk/products-and-tools/#section-241-136 This post on Screwfix forum, which you might have seen says “The flexible pipe should never cross the cavity. ” https://community.screwfix.com/threads/how-to-seal-around-a-pipe-breaking-a-cavity-wall.12052/ Anyway, I’m intrigued enough to search a little more.
-
Help needed setting timber frame window hole sizes.
Nick Laslett replied to G and J's topic in Windows & Glazing
@G and J, I still have a small quantity of Illbruck compriband tape in the 3 sizes. You a welcome to have them if you want to play about with them. The tapes are an expensive way to finish the window joint, but I used expanding tape, FM330 foam and Siga Fentrim for my windows. I found a blog post with some testing data, where standard compriband on it’s own was not airtight enough, they have improved the product since then. Due to the way the ICF check reveal work, I had 10mm vertical gaps, then a few openings where I’d been too excited with the EPS rasp, I had some 15mm gaps.
-
Basement cinema room - worth it?
Nick Laslett replied to SBMS's topic in New House & Self Build Design
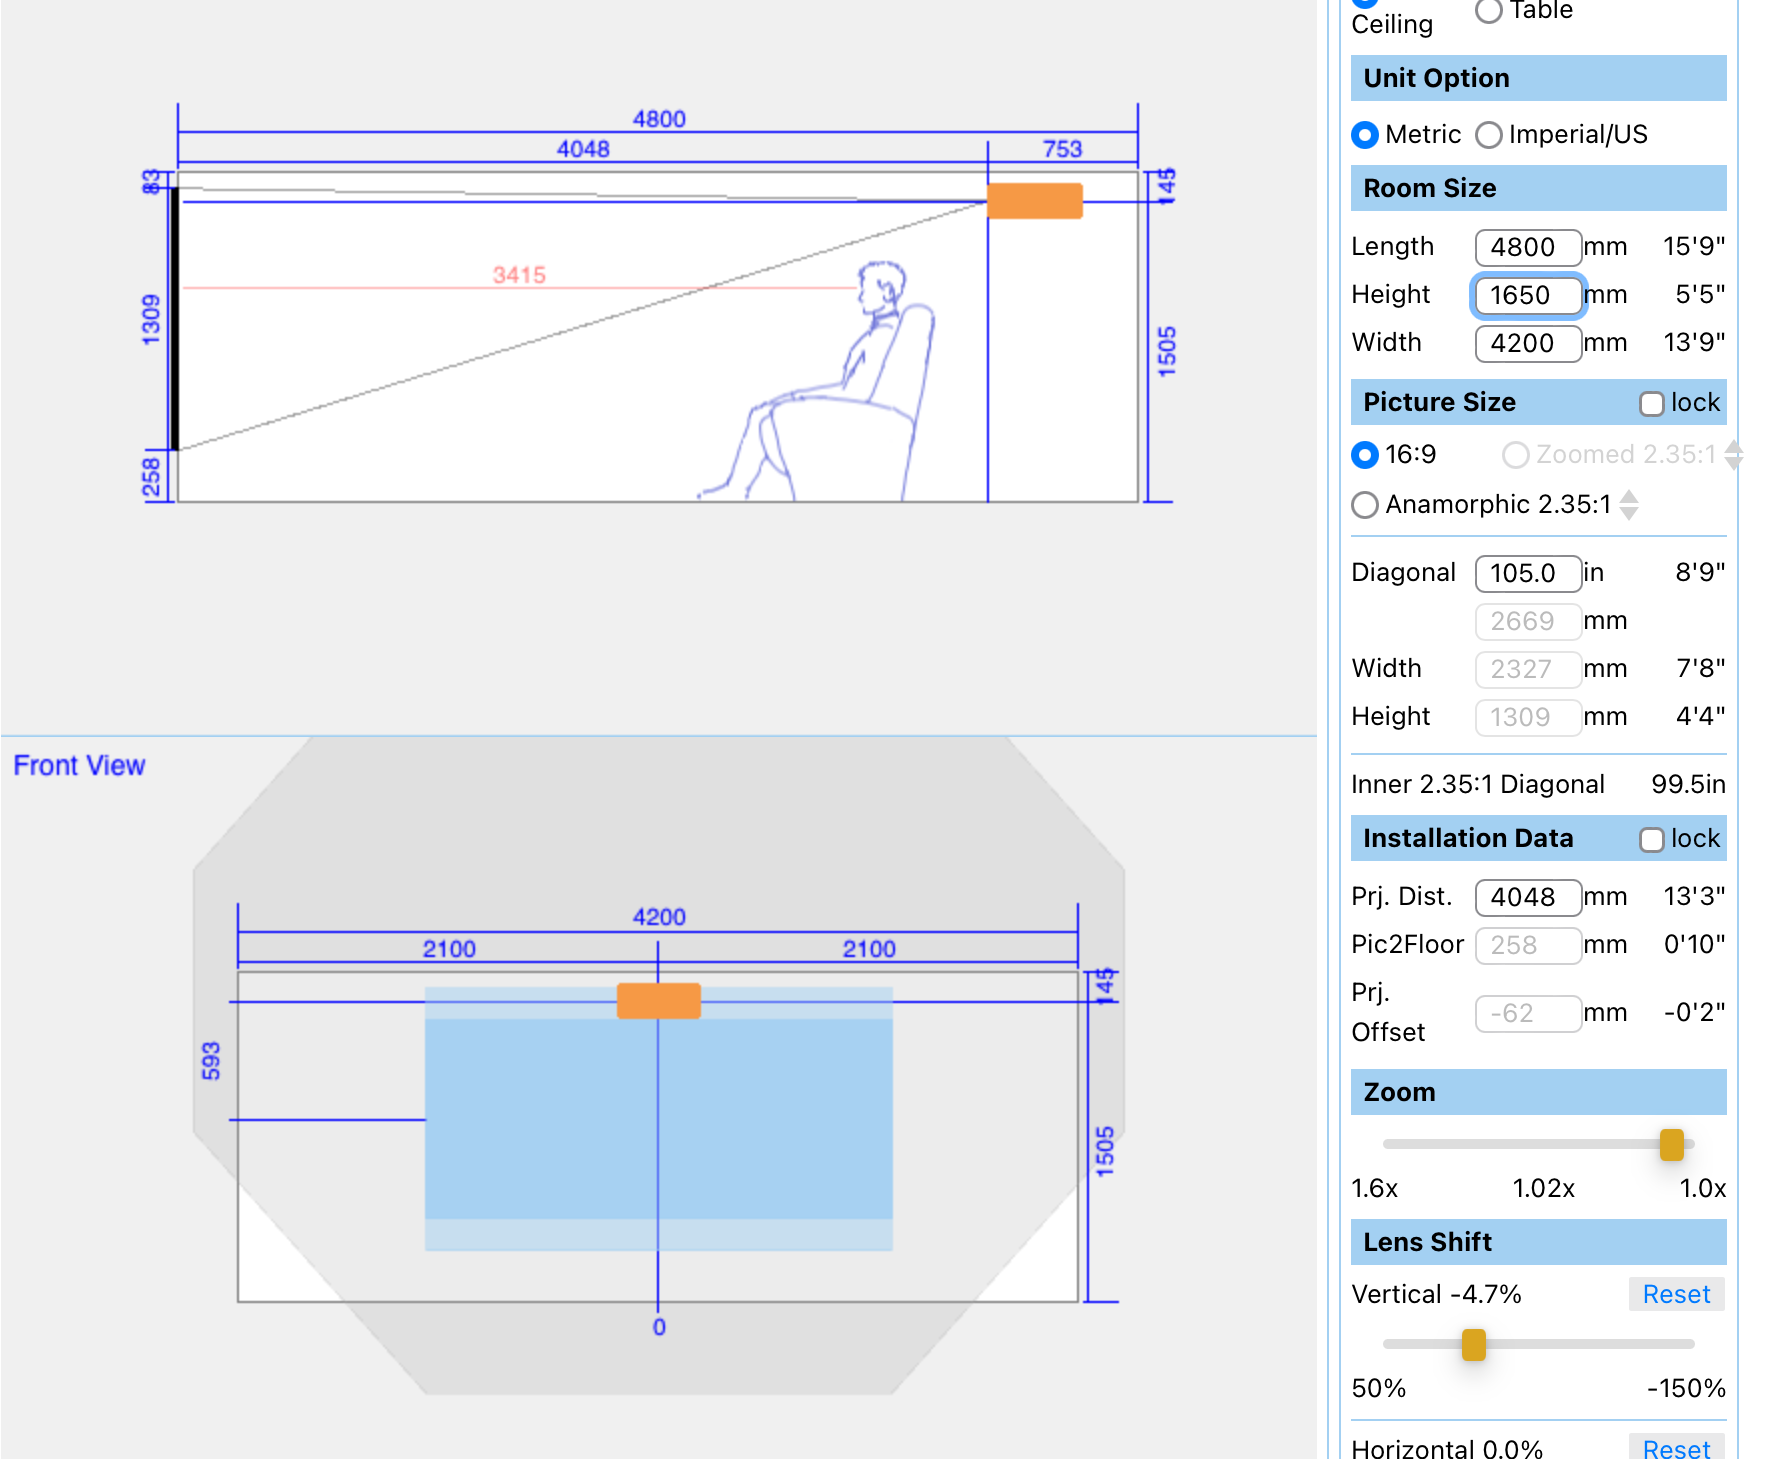
I like this Projector Screen calculator. http://www.reviewtranslations.com/projection_calculator_en.html There are lots of other ones. I feel that 1650mm room height will not give you that big of a screen.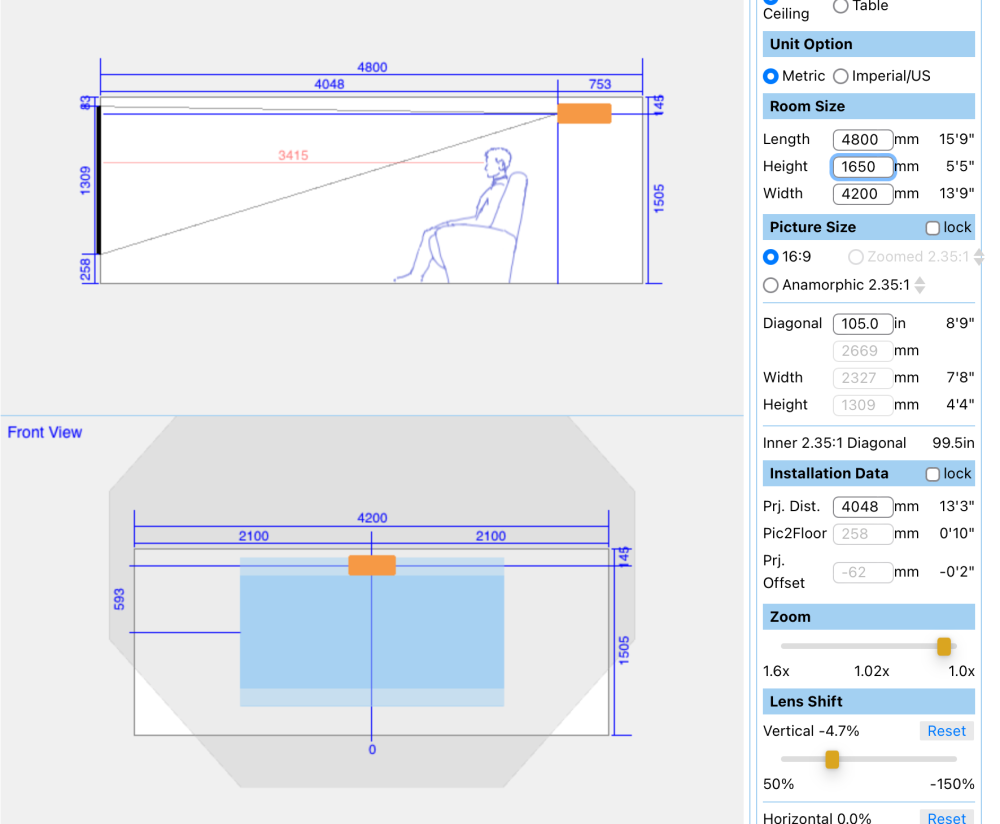
-
Basement cinema room - worth it?
Nick Laslett replied to SBMS's topic in New House & Self Build Design
In the past there were more challenges. A modern laser projector is instant on and off, no need to replace the bulb every 1000hrs, no need to keep recalibrating as the bulb ages. With an ALR screen even ambient light is not such a big issue. Home cinema is such a large topic, so many different ways to approach it. There are very good 120” short throw laser projectors that are easy to install. Or you can get 97” OLED TV screen. Of go down the long throw route and have the largest screen the room can take. Ultimately the room height will dictate how large a screen you can have, if you basically fill a whole wall you need an acoustical transparent screen with the speakers in a false wall behind the screen. After 140” inches you need serious projector power to light that size of a screen. -
Smart Alitherm do a version of their Crittal style heritage doors for internal use called AluSpace, the frames match the external french doors. https://www.smartsystems.co.uk/aluspace We went direct with our local Smart fabricator, but I would be surprised if you can get 1 door much cheaper than £1200. A lot of the Smart System products are branded by a lot of other vendors. If you want a photo, let me know.
-
@Robsco1, my garage is actually a full ICF build with an insulated foundation. I didn’t go so far as to put in UFH!!! I’m sure this made the garage much, much more expensive. But my only motivation at the time was to keep the superstructure construction as simple as possible. The garage and house were built at the same time, with the same crew and same materials. On concrete pour day the trucks just kept coming and the crew just moved the pump from the house to the garage. Most of my self build decisions have come down to simplifying a process. You can chase cost and quality, but my experience, in real life is that actual people and processes are the weak point. So whatever you save in a material decision could actually get wasted because the execution eats away at that saving. But an insulated, ICF garage might be going a bit far. 🙂 I appreciate that your circumstances are very different. Only you can answer the cost benefit analysis, but you are pretty much free to do whatever you want. I’ve only built the two foundations, but the process of constructing an insulated foundation is very straightforward, but it will be more expensive than just a regular raft.
-
@G and J, here is a good YouTube video on the effects of shading on solar production. If you are not installing a battery, you might also want to look at micro inverters, they are more expensive than an optimiser and large inverter system, but they do have some advantages. Gary Does Solar has a good video going into the pros and cons of micro inverters.
-
@Dreadnaught did a DIY PIR Insulated Raft, I hope he doesn’t mind me saying this. Charlie Luxton has a YouTube on his insulated raft, he went direct to the manufacture for his EPS. A good SE should be product agnostic. With Tanners, I discussed EPS, XPS and Geocell. He cared about the ground conditions and the superstructure of the house. He could make any insulation layer work for those requirements.
-
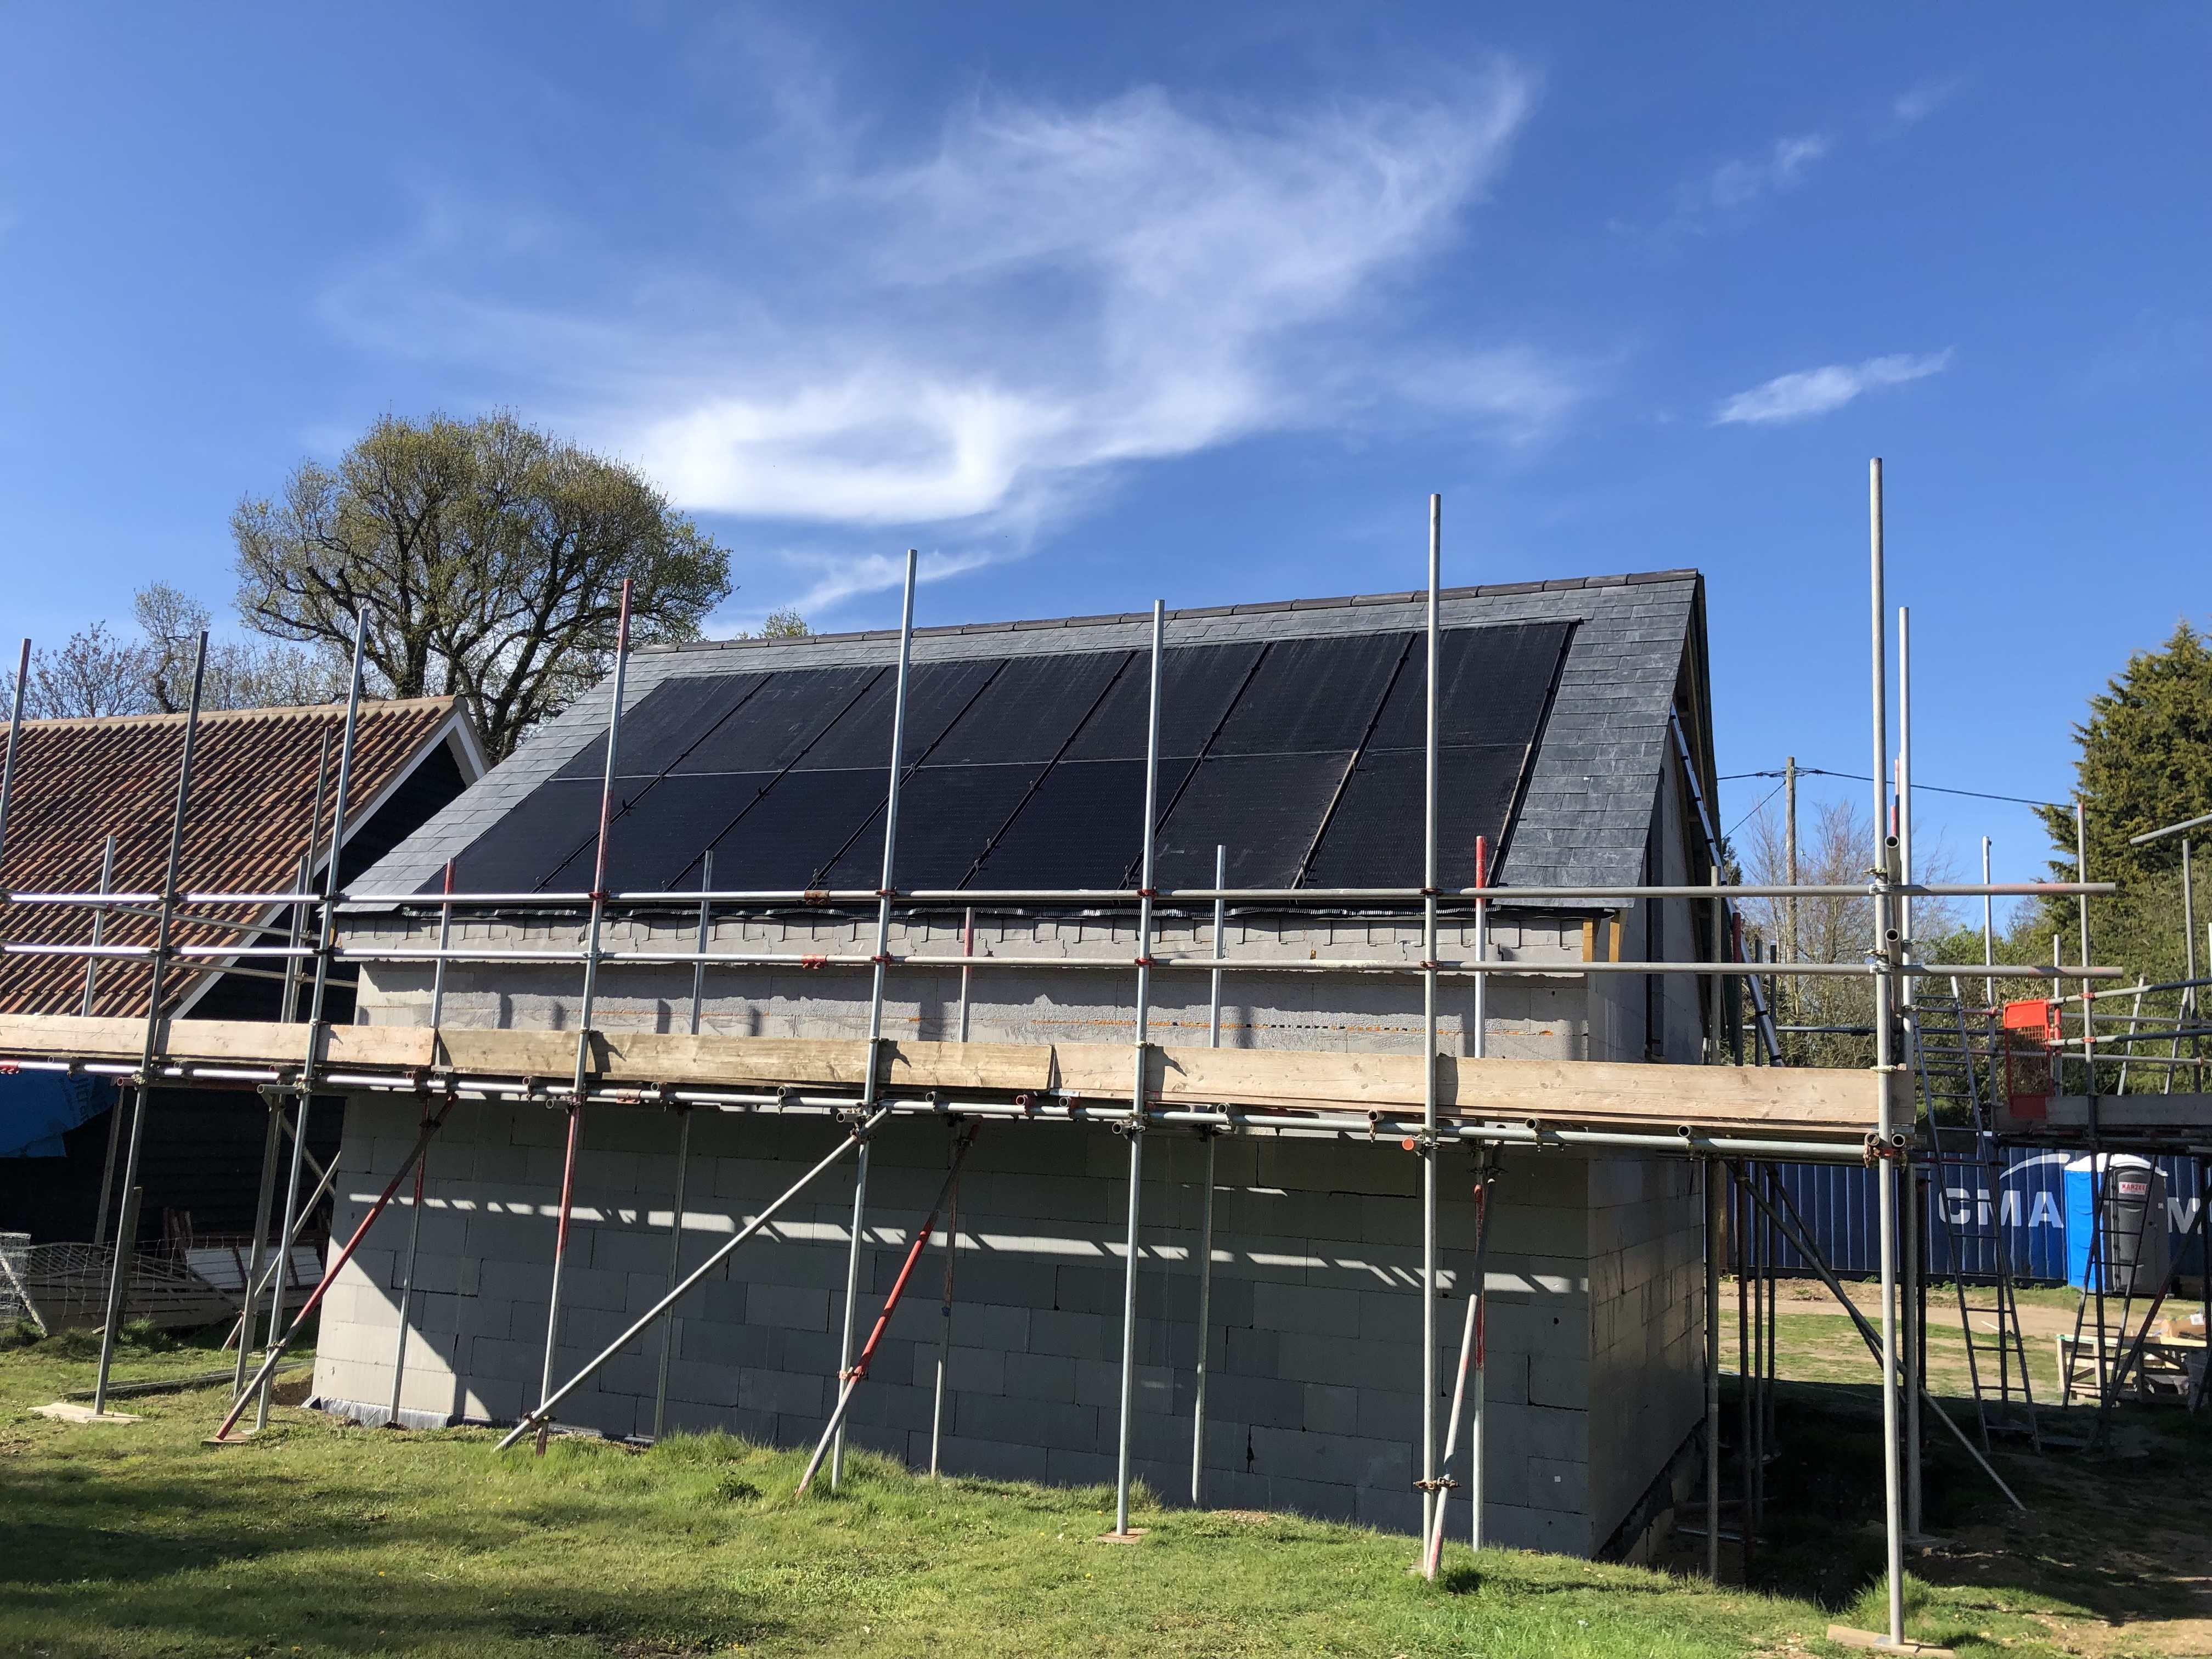
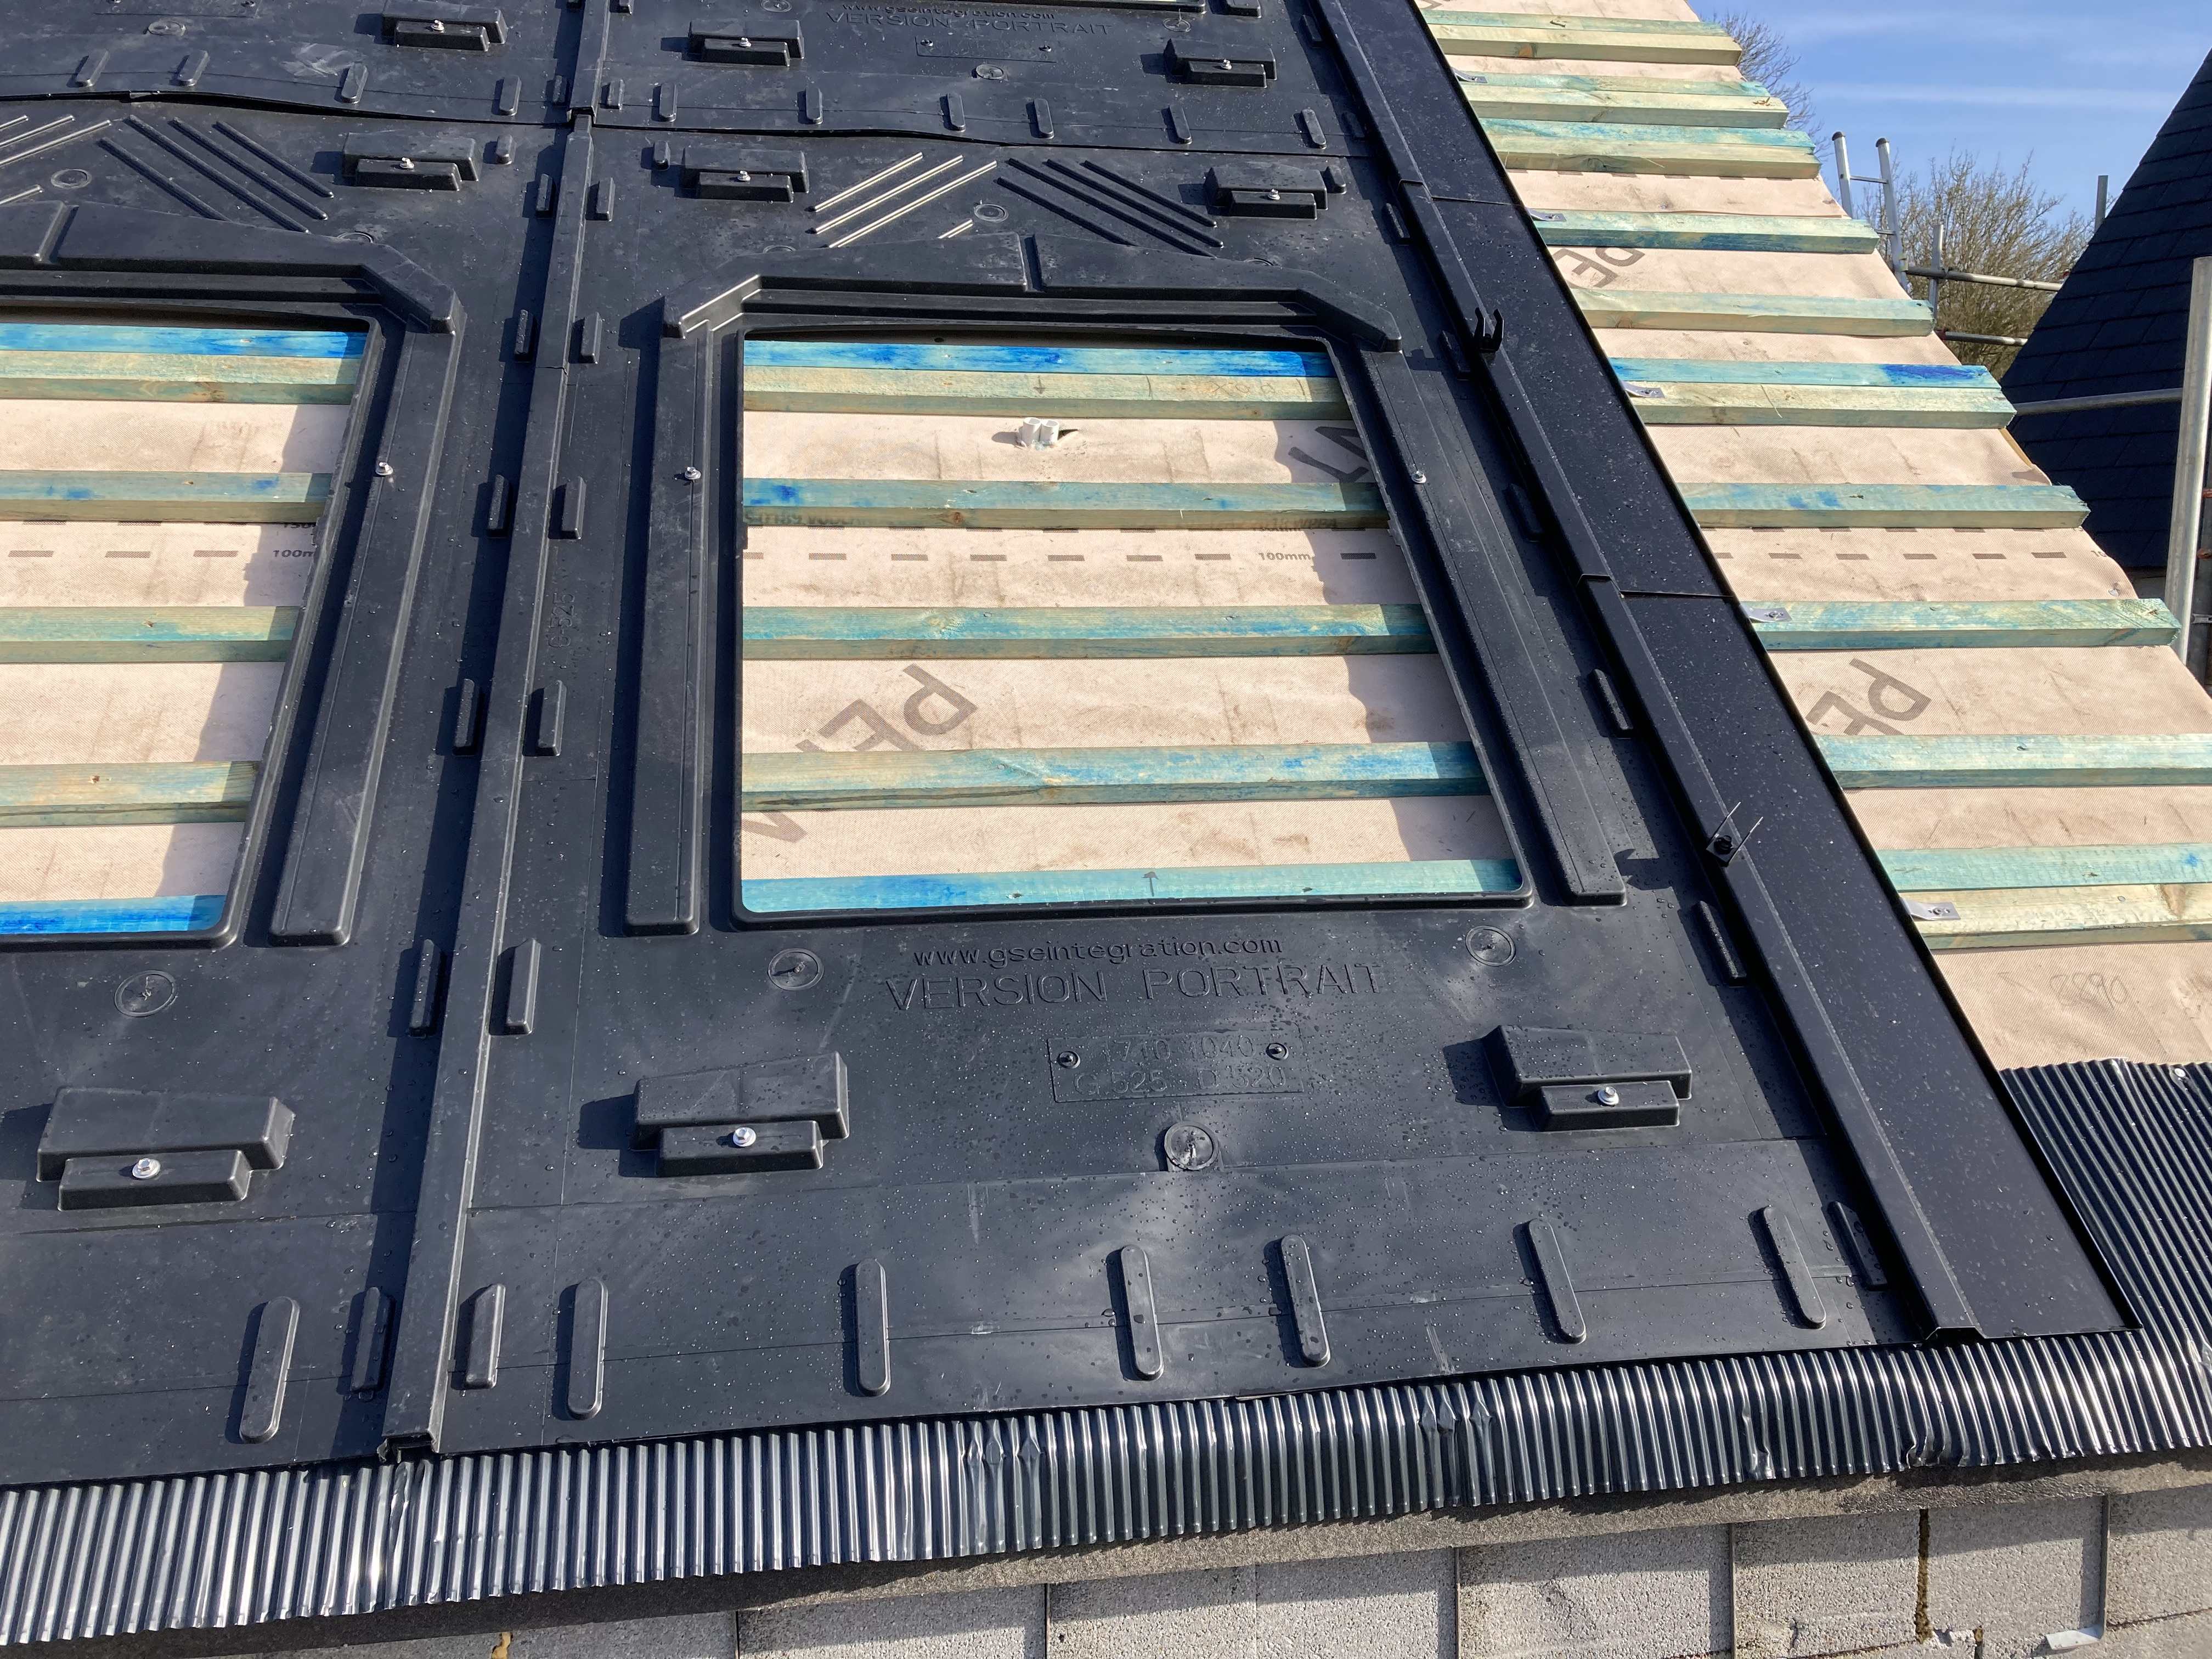
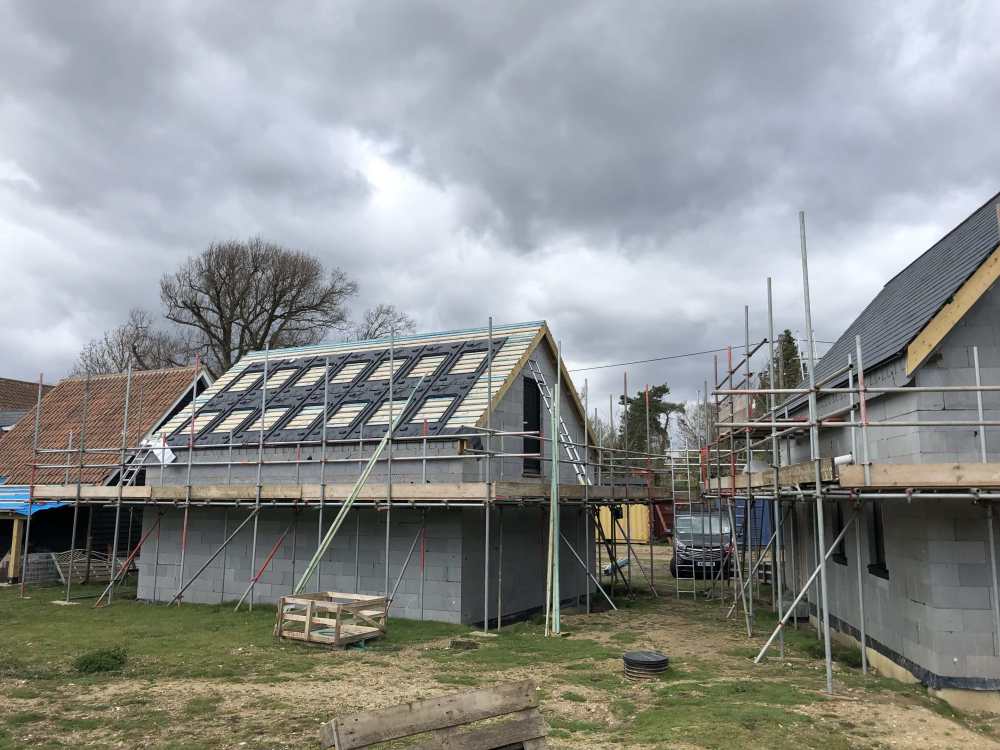
Thank you. I can’t take much credit the lads that did the roofing were excellent. It is worth remembering if you have gable ladders your roof might be as much as 30cm larger on either side. I just popped outside and took another photo. The fascias need a bit of a clean. I will get the gutters up one day. The ICF wall still needs cladding.

-
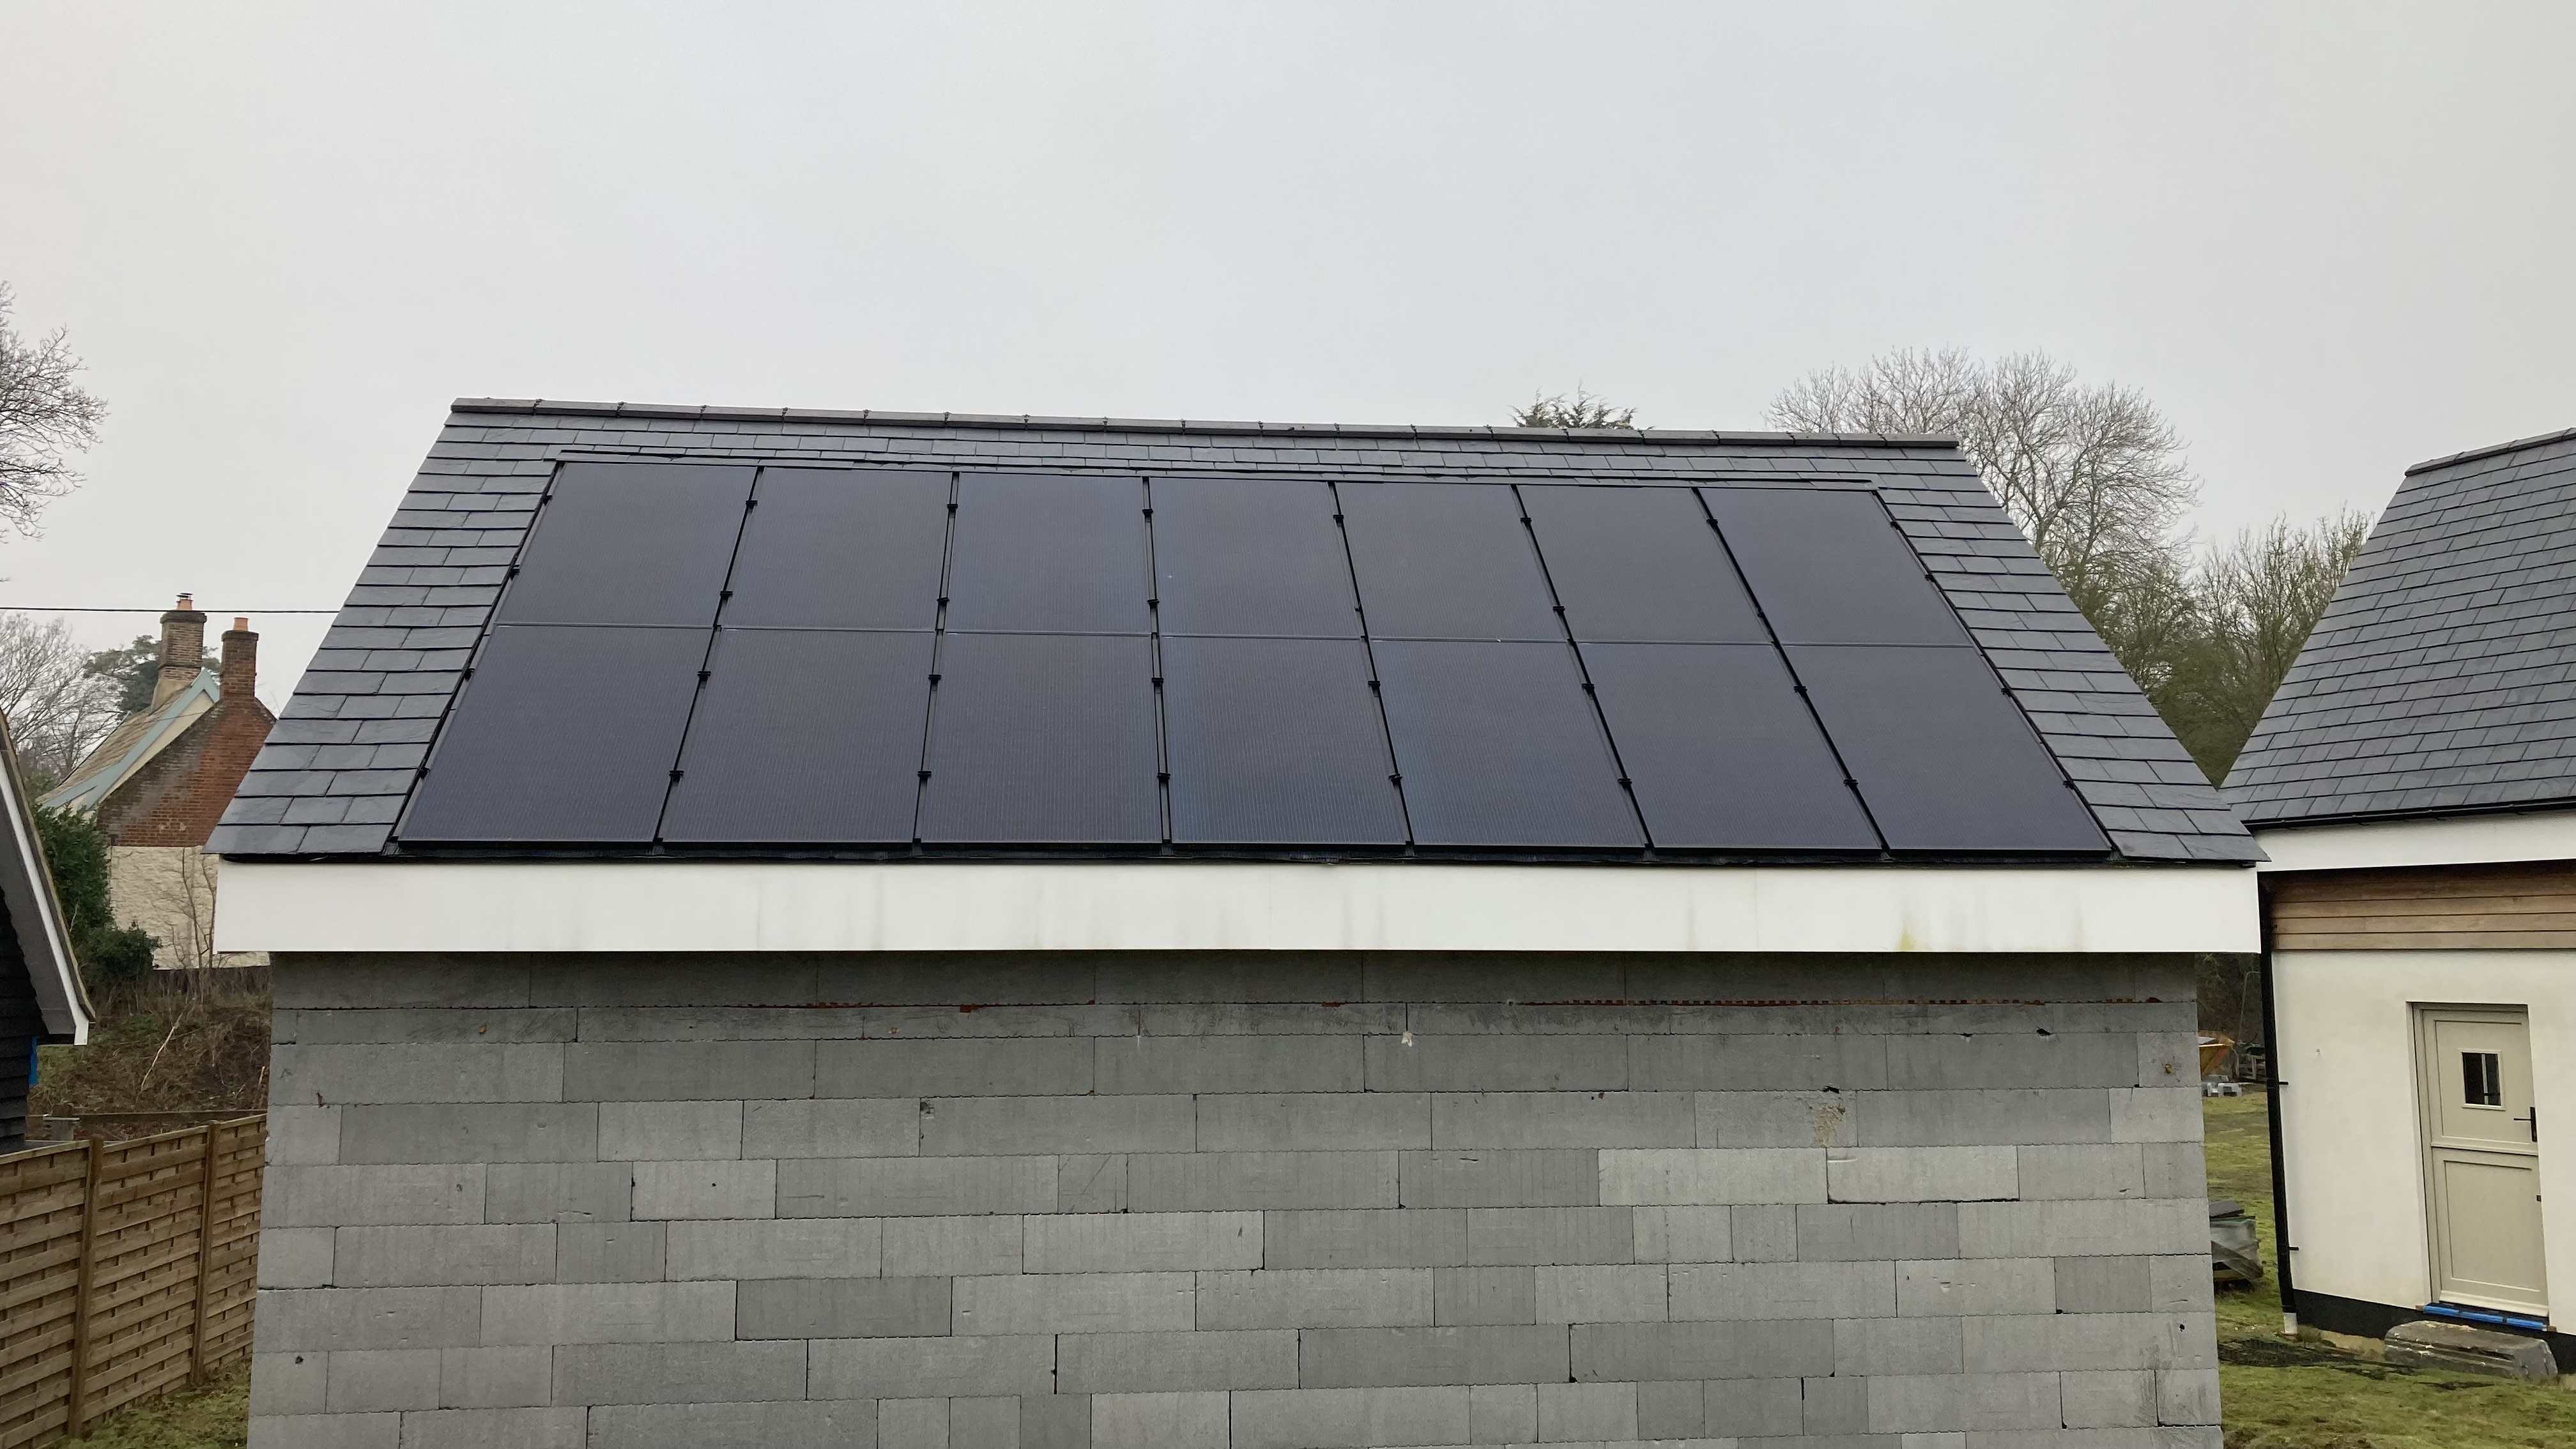
@marshian, here you go. You are welcome to visit the site if you want a closer look at the PV install. These panels are on the Cartlodge (garage), so easy to access.

-
A more close up photo. There are lots of good GSE installs on YouTube.

-
I quite enjoyed fitting the GSE trays, just a one man job. The PV panels are a little tricker, because they are so unwieldy. You need another person to hold the panel whilst you connect it up. The instructions make it seem harder than it is. @Alan Ambrose If you zoom in on the photo, you can see the extra batten requirements, not many needed. I let the roofers fix their battens then added the extra ones myself. @G and J, besides the roof access requirements, it is easy to lift up a PV panel to access the solar diverter. The panels are held on with a few clips screwed into the tray.
-
I use the Notes app on my iPad, which with iCloud can be accessed from my phone and laptop. Some of the notes are shared with my wife so that she can update them. It has a good search function and a folder system so that you can use a work breakdown structure to organise the data. You can markup pictures, do simple sketches. The Apple Pencil is great for this. I have an amazing note that is pictures of DHW manifolds, DHW schematics with links to the relevant BuildHub posts and my own hand drawn schematic with marked up photos. I will hopefully tidy it up and post it here one day. The forum has a number of tools to help manage information. I find the best way to catalogue interesting threads is to use the “Follow” thread button, but without email alerts, I use this like a bookmark. You can then more easily find topics when you need to go back to them. The “Activity” drop down allows you to filter the site just showing threads you follow using “My Activity Stream”, “Content I follow”. You can Heart individual posts, this functions like a “like”, these can then be reviewed from your profile screen, you need to click on the green reputation button, you can then see all the posts you have hearted. The other app on my iPad that has been invaluable to me is DWG Fastview, this is a free DWG viewer for looking at AutoCAD files. It is not just useful for looking at house plans, but also components like MVHR or construction details. In the app you can take precise measurements, I used it to interrogate the window CAD drawings. On the Mac, I use eDrawings another free DWG viewer. When the build starts you need to photograph everything, you can never have enough photos. It is good discipline to make albums for each stage of the build. I actually bought a drone just for documenting the build. This was especially useful for documenting the UFH pipe layout with a measurement reference in the overhead photo. I like Freeform too. It is a very powerful tool which also works across phone, iPad and laptop. I think I’d already gone deep into using Notes, before Freeform was released.
-
This is an interesting point. The GSE tray system has flexible adjustment for height, but the width is fixed. I actually had to deal with this issue because I bought 2 panels at the beginning of the build to use for on-site power whilst I waited for main electric connection. It also gave me a chance to do an actual small scale PV install with inverter, MPPT and batteries. When I came to buy the other 12 panels, the solar panels I had were already end of life and being phased out. But I was able to get the panels I needed.
-
I thought I’d just underline that point. 🙂 Questions might get ignored, but you will regret not asking. The whole premise of the forum is a place where people can discuss the topic of house building. Remember there are 1000’s of members here, all on their own unique journeys. Just try and pay back the community when you have areas where you feel well informed. 10am is usually teabreak time for me. I often think it is the best time to post.
-
Back in January, I came across a quirk in the default out of the box settings on my Panasonic ASHP, model WH-MDC05J3E5. Force defrost is set to manual. See attached photo There was some discussion at the HeatGeek Facebook group about this default setting on Panasonic ASHP. https://www.facebook.com/groups/964431597548688 The installer Andy Eaton replied to the question and said it should be set to Auto and did not know why this wasn’t the default with Panasonic. The “secon-panasonic-h-series-rev1.4” installer guide doesn’t mention this setting. The Panasonic “UK_INSTALLATION_MANUAL_H 2023v3” also doesn’t mention it. In the Service Manual it gives the following details. I noticed that my ASHP was frozen and rather than trigger the manual defrost, found these settings and set it to Auto. I’m sure there are pro’s and con’s to this option, but I think Auto will work better for my setup, perhaps with a knock on overall efficiency. I believe it is just reversing the warm water back out of the UFH. I just wanted to capture this somewhere, just in case others noticed their Panasonic freezing up and want it to Auto defrost.


-
@Alan Ambrose, pretty mundane answer, my groundworks contractor organised and procured all the materials, they were supplied from Jewson.
-
I’ve only got the experience of my build, but looks like a challenge for the groundworks team to do the 6F2 step and MOT type 1. Much easier if the sub base is just flat. They can set their laser and string line and give you a nice base for the XPS. We had MOT Type 3, finished with 50mm of sand. Maybe the ground conditions necessitate the 6F2, and I’m no ground worker, so what the drawing requires might be easy to do?