OwenF
-
Posts
56 -
Joined
-
Last visited
Everything posted by OwenF
-

sense check twin beam calculations
OwenF replied to johnhenstock83's topic in RSJs, Lintels & Steelwork
Ours is 4.2m span, internal leaf of blockwork and external leaf of Yorkshire stone. Supporting a first story gable end. Both UCs are 203x133 but internal is 25kg/m and external leaf is 30kg/m No bolts between the two were specified, surprisingly. Recall the build clarified with the SE during installation but said they weren’t needed -
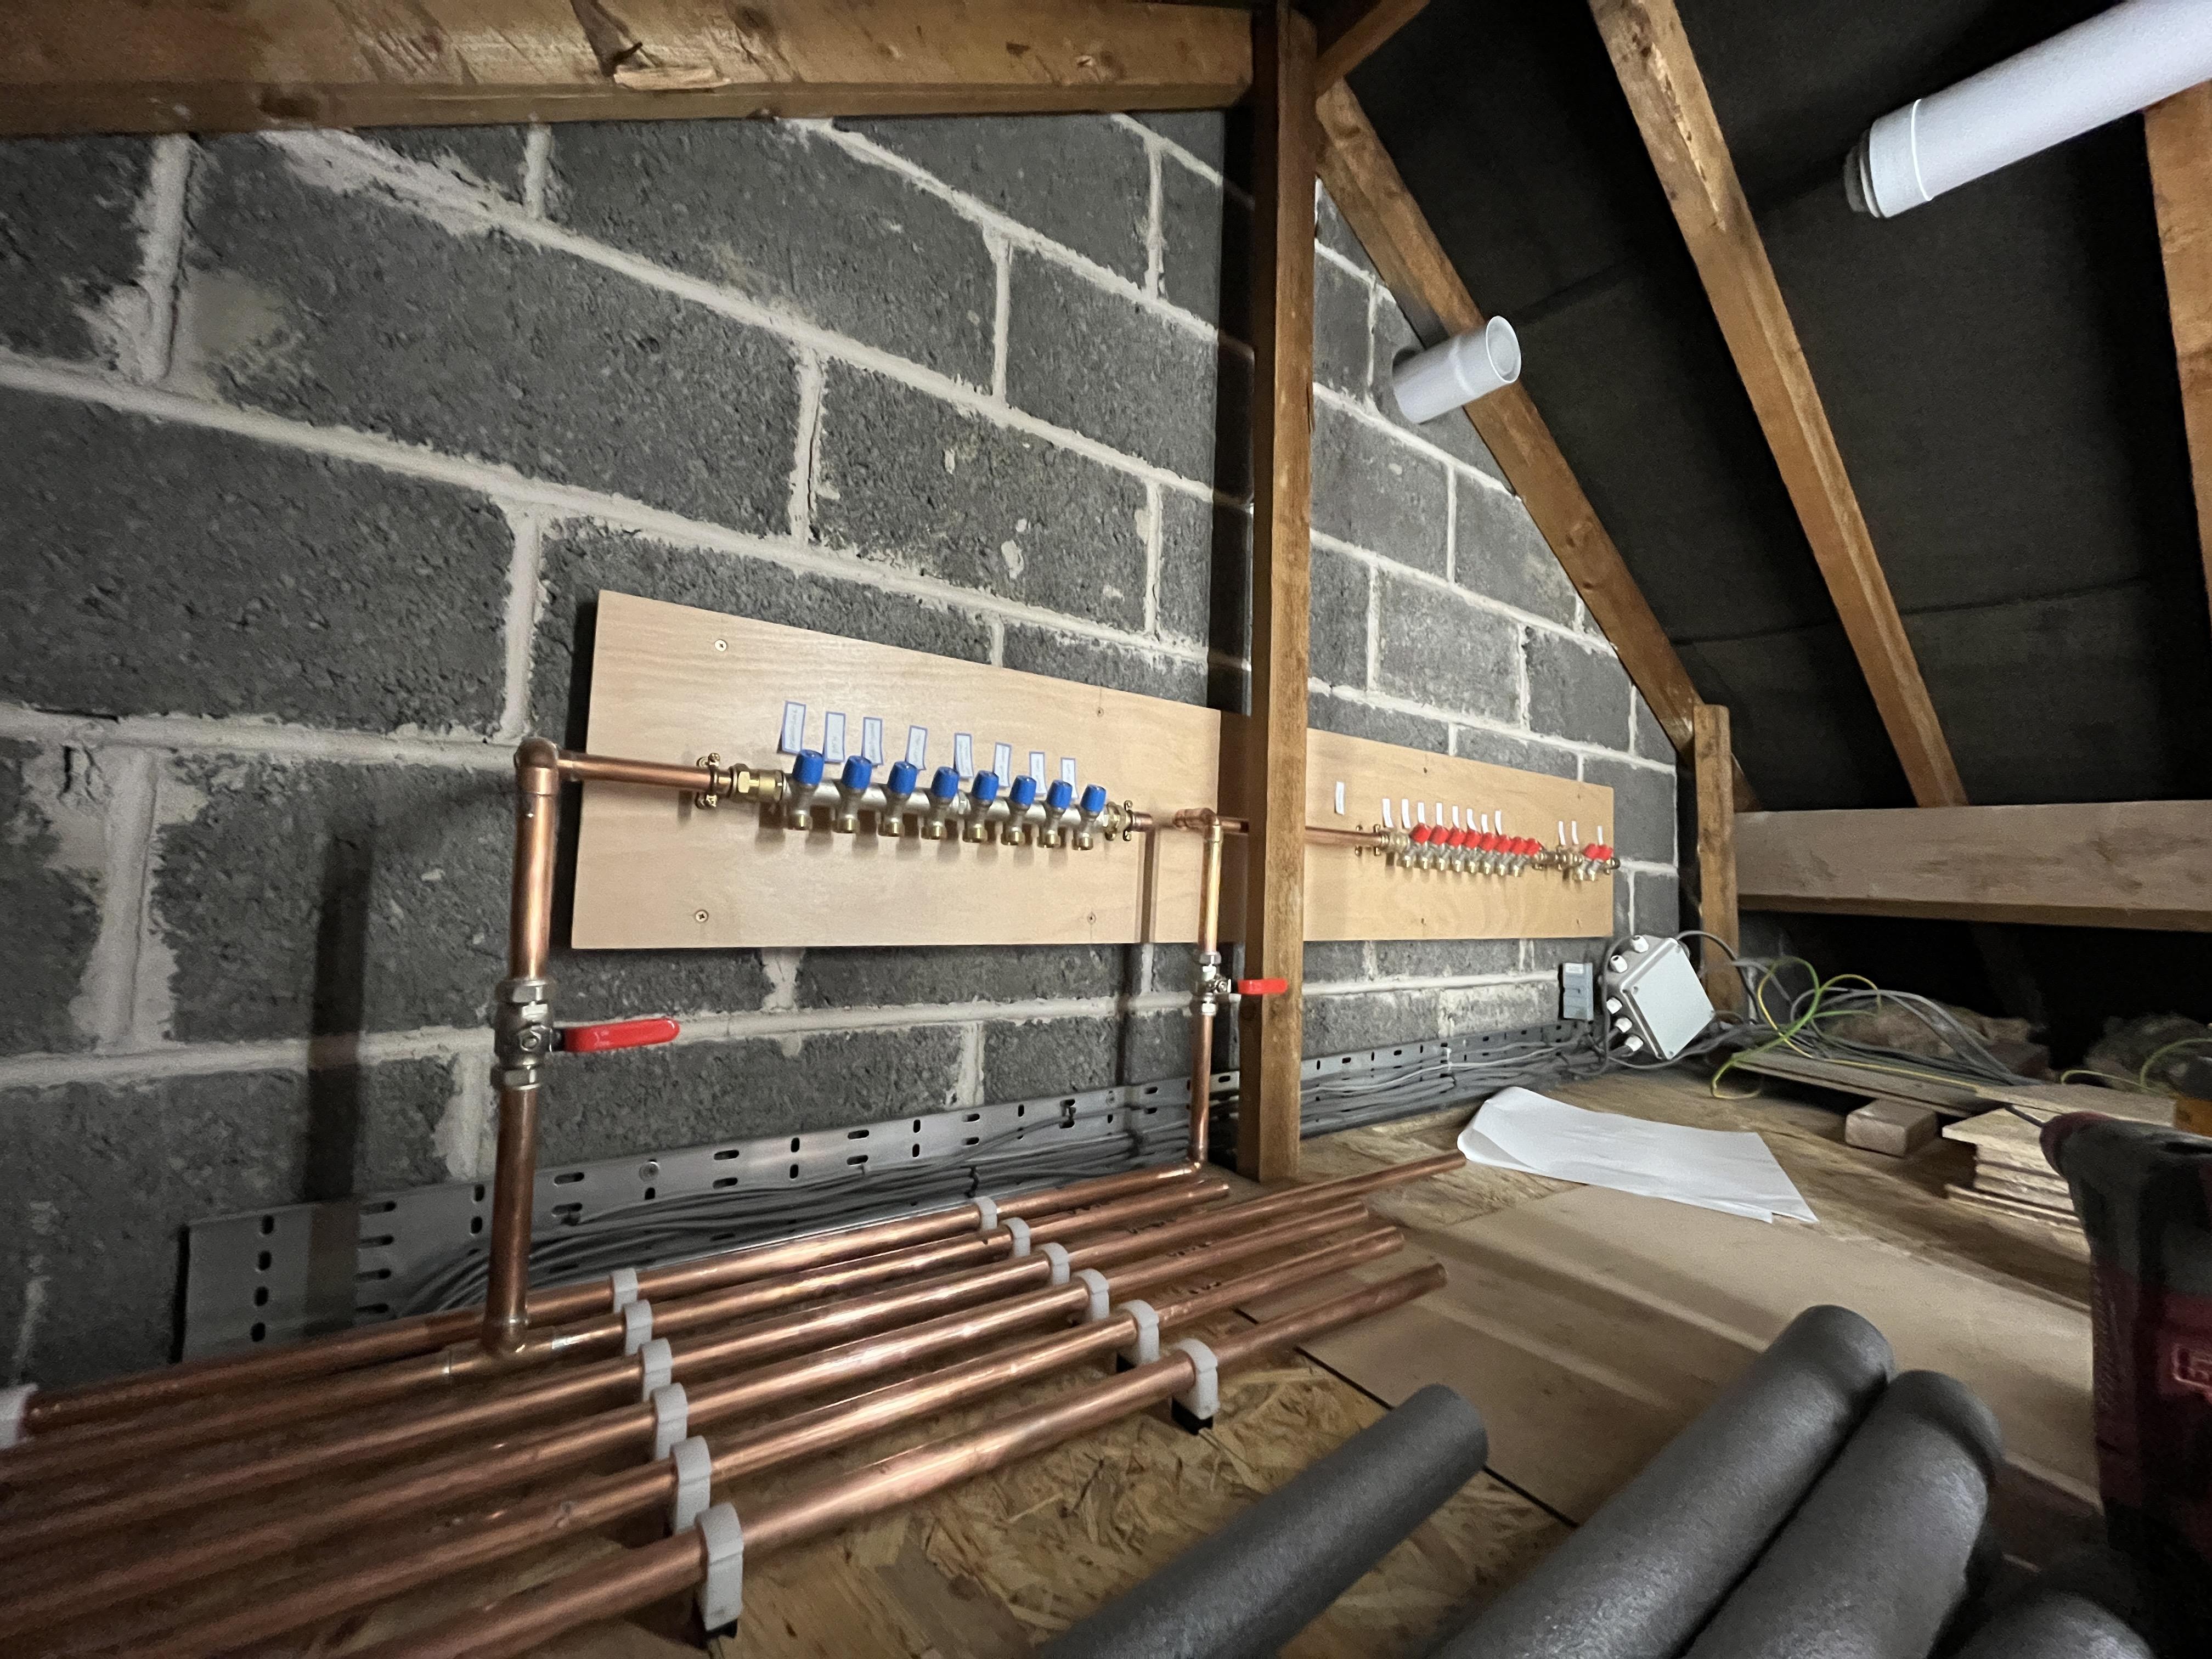
I went with these: https://www.mpmoran.co.uk/henco-4-port-manifold-with-valve-eurocone-connection-o-ring-brass-blue-frac34-quot-x-45x75x190mm-109138135 £32 inc. VAT 16mm and 12mm MLCP was significantly cheaper than JG PEX when I looked. Mind it’s probably £150 in MLCP compression fittings across 13 rads and about the same number of water outlets. Dunno how JG fittings would have compared, but it all probably balances out
-
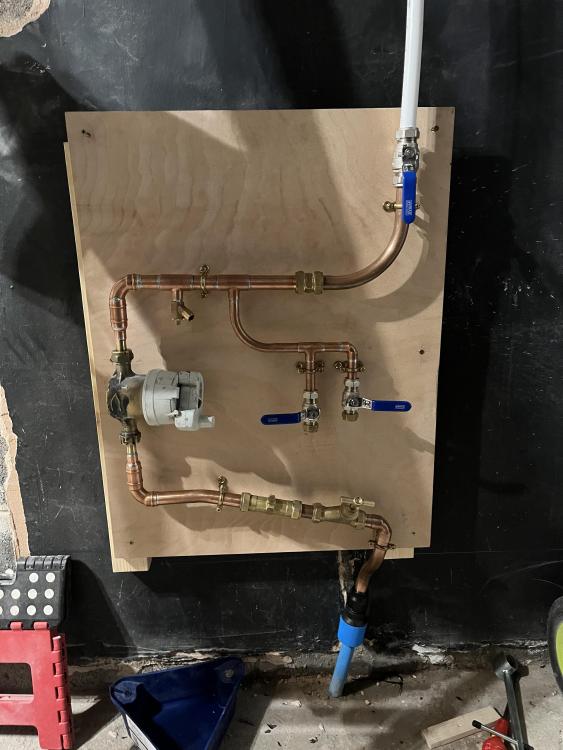
My hot and cold manifolds straddle my UVC. Below pic is prior to UVC going in, but the valve’d pipe entering the cold manifold is straight off the balanced output of the cylinder PRV (The reason for the tee at that junction is because it’s temporarily going on to the old CW pipe network that will be decommissioned) As above, I’d stick a PRV before the manifold so that all mixers are balanced. Don’t know if just tee’ing straight through to the UVC cold feed would be any better/worse hydraulically than looping round the manifold.

-
Common for basements (which I didn’t realise you had when I answered before). Net bearing pressure = gross pressure at base of foundation - pressure of soil removed. @Gus Potter thanks for adding meat on the bones to my hurried observations. Yes, I am constantly striking a balance between trying to save money upfront vs. convincing a client that money spent upfront saves in the long run. The additional context from @Alan Ambrose clarifies the original spec a lot. I didn’t realise there was a basement. Incidentally one of the annexes of BS EN1997-2 gives recommended depth of ground investigation below different foundation types. It sounds like he’s reached a reasonable compromise of SE requirements and not OTT with a bit of knowledge added at the same time!
-
Geotechnical engineer here. It’s difficult to assess validity of a spec without understanding the desk study and proposed design. That said, it doesn’t look totally unreasonable. I would probably spec this for a a small multi-plot development, so not sure the size of your house? Cable percussive seems overkill presuming foundations will be circa 2m deep max. In good ground window sample should get 5-6m. However window sampling won’t achieve enough sample for shear box testing. Needs approx. 30-40kg of suitable material (basically means enough material with a certain grading). Double this minimum amount of material for PSDs. Why is shear box necessary for sand at 5m+ depth? It’s an expensive test. An SPT in base of window sample hole, then use established correlations to get phi. Saves you £3-400 of a test, never mind the sampling. I would seriously consider replacing the CP rig with trial pits if depth isn’t a concern. Do a soakaway test in one whilst you’re at it. £5k for all that (incl. CP rig) sounds too good to be true. Does it include testing, reporting, supervision? Watch out for ‘delays’. Is it lump sum or day rate. Also lump sum never means lump sum in GI world!
-
Just want to bump this thread for any other opinions on my initial post. A follow up query on responsibility….. It seems to be the (general) case that notifying building control is the homeowners responsibility it also seems fairly well known that BC will not accept an EIC for Part P compliance. EICRs seem to be occasionally accepted in mitigating circumstances. The usual route is for electricians to notify works via a Part P registered scheme. So, if a qualified electrician were to carry out notifiable works but NOT notify BC are they not leaving the homeowner in an impossible situation?? EIC not acceptable Homeowner not able to notify via scheme I can only imagine some electricians are carrying out notifiable works with the uninitiated homeowner none the wiser they’re lacking compliance paperwork (I.e. me before I researched the matter!!)
-
FWIW, I’m currently in this process myself. I too have been let down by an electrician and am pursuing doing the work myself. A couple of points in no particular order • only notifiable electrics need BC involvement. New circuits, consumer units and bathroom/outside are the three. If you’re doing it as part of another BC job (new build etc) then it seems they want to know about any electrics being done • strictly they have to be notified BEFORE works start. This means involving them part way through (I.e. after first fix) is problematic [i’m in this dilemma myself and don’t know the outcome yet 😬] • they will try to dissuade you. The BC person I spoke to on the phone didn’t know how it works and tried to convince me it wasn’t possible. The Regulations clearly give homeowner installation as an option. They just make it very difficult. • the fees are confusing. One fee it’s the BC charge for notifiable electrics (mine was around £2-300). Then they charge you a ‘third party contractor fee’. Mine was about £250+VAT. This is on top of the BC charge. sounds like your electrician maybe doesn’t want the work tbh. Incidentally NAPIT are (one of?) the only scheme that has a third party certification. But I get the impression no-one is willing to use it. absolutely bewilders me that that the option for a homeowner to do compliant work and have it checked is so difficult. Yet people who bodge stuff and keep it quiet just get away with it…..like some qualified electricians!
-
I’m in England. I have paid the fee for them to test and inspect (subject to my clarifications in the OP) Incidentally, the reason I pursued this route is because my father did the same with his kitchen, so I know it’s possible. Back when he did it the P regulations said BC had to do it at their cost! They seemed to have cottoned on and now charge the homeowner.
-
Morning, I'm hoping for some advice from this forum, as elsewhere tends to have much less balanced opinions than here. I am undertaking a garage conversion, for which I have submitted a Building Notice (more on this in a moment). Around 1 year prior to submitting the notice and starting work on the conversion, I paid an electrician to upgrade my consumer unit (including running new tails). Now I naively assumed that this work would be self-certified and notified to BC. I received an EIC from the electrician and assumed all above board. (Yes, I didn't know I needed a compliance certificate at the time). Fast forward to my Building Notice and I insisted to BC that I want to do my own installation of circuits within conversion and kitchen as part of my rennovations. They tried to dissuade me, but I said I was happy to pay the (two!) fees for their electricians to test and certify my work. I have now paid these fees. However, looking further into it I've realised that my consumer unit upgrade has likely NOT been notified to BC. In fact, I cannot find the electrician I used on the Competent Person Register or by searching with NAPIT/NICEIC directly. This suggests its unlikely he can self-notify. My suspicion is he either thought, or took advantage of the fact I mentioned I would be doing the garage conversion. To make matters worse I am wholly not convinced by the routing of the tails internally, given my IWI plans. AND he only installed a 10-way board when I asked for 14-way. Fobbed me off when I questioned it. Generally very unhappy about the whole affair.😠 So, I am now in a situation where any BC inspection of my electrical work in the garage/kitchen would likely flag the rather new looking consumer unit in the room. I am worried that I'm now in a very diificult situation. My options seem to be: 1) do the first fix new circuits & get BC round for inspection. Hope they don't notice/don't care about the CU. If they do, I explain my situation and pray for sympathy (unlikely). 2) accept bringing the CU into the scope of BC inspection. This I cannot fathom, as the CU is and has been energised for well over a year. Surely if it were to be in their scope i'd have to de-energise until such time as first and second fixx + testing had been completed by their electricians? This options feels least favourable, unless anyone can advise how this would work in practice? 3) enquire with local electricians holding the NAPIT third-party certification and see what they'd be willing to inspect & test. This being on the basis that IF they certified and notifed my work to BC, I would avoid difficult conversation with BC. Issue with this is they 1) might not agree to certify my work and 2) might not agree to certify the previous electricians work. Is there any other options i'm missing, or have any advice? Thanks in advance
-
Heat loss over time (Vented Cylinder)
OwenF replied to marshian's topic in Boilers & Hot Water Tanks
If your heat loss is 4.6kW at design outdoor temperature, you might consider better minimum modulation than 3kW. Currently the only one I’m aware of capable is the Viessmann V200 (modulates to 1.9kW) I’ve literally just had a V100 11kW installed (house demand is ~9kW) and in the last 24hours with outside temp of 11 degC it’s been on minimum modulation. I’ve heard many people say that sub-10kW heat loss should be heat pump territory. Gas boilers just can’t operate efficiently at super low heat demand. At 4.6kW I’d be expected a boiler to be constantly on/off except on the coldest days. p.s. I agonised over heat pump vs boiler and decided outlay was too high. I’d rather not think whether I’ve made the wrong decision! -
Heat loss over time (Vented Cylinder)
OwenF replied to marshian's topic in Boilers & Hot Water Tanks
I guess I can’t argue with your experience/perception that this is a significant source of losses. However, an alternative observation is that nearly every DHW system is plumbed exactly the same way. So if you are experiencing it, so is everyone else. I think the typical mitigation here is to insulate (as far as possible) the pipe runs at least 1m from your cylinder. Perhaps consider more cylinder insulation. You mention changing the boiler in future. Make sure you get one capable of priority hot water, then any negligible losses back to circuit (if any!) will be moot as PDHW is quick reheat -
Airtight walls & fixing stuff to them
OwenF replied to WWilts's topic in New House & Self Build Design
@ruggers what did you go for in the end? Did you add insulation internally with membrane & battens for services? I struggled to find any real examples of internal insulation to cavity walls, than also consider stringent airtightness detailing. -
Heat loss over time (Vented Cylinder)
OwenF replied to marshian's topic in Boilers & Hot Water Tanks
I’m struggling to wrap my head around the perceived issue, but initial thoughts are that CH for ‘at rest’ position generally is not desirable as it doesn’t allow the pump to overrun in event all TRVs close (assuming no automatic bypass). I switched my 3-port valve, but that was to retrofit PDHW using a relay demand box. This has same outcome of having CH on the NO side of the valve. I had two non-TRV towel rails to ensure path for pump overrun. -
Talk me out of this idea or not (buying a property for holiday rental)
OwenF replied to ProDave's topic in Housing Politics
Couldn’t tell from your original post if this amount was something you’d had for a while or from a recent sale [Edit: re-read OP and see it is a house sale]. However worth noting that the £85k FSCS protection is temporarily increased to £1m after ‘life events’ e.g. house sales. Cant remember how long it lasts (maybe 6-12 months) but is there to give you time to redistribute as you describe. Might be a comfort? -
@IGP May I ask. Did you tape the breather membrane to the brick (looks like you did but only part way through in image) did you then also insulate walls internally? If so, presumably that just got applied over that breather lapped onto the wall?
-
I’m not sure myself, hence asking for opinions. You say you sealed your bare block before you started. Was that a liquid membrane all over or just plugging gaps? I guess where I think air movement happens behind the VCL is, for example, between the suspended floor void and the vented attic. The wall insulation will be outside of the airtightness layer in my strategy (which I understand is a fairly textbook approach), yet is exposed to both those ventilated spaces. This technical guidance is heavy going https://www.passivhaustrust.org.uk/guidance_detail.php?gId=55 but it seems to imply that any ventilation of insulation will result in reduced performance. maybe I’m overlooking some nuance that exists across the myriad of possible build ups. Specifically, it seems attention to ensure no physical air gaps (E.g. insulation compressed between wall and VCL) goes a way to mitigating this ‘thermal bypass’ effect. sounds like the method I’m proposing doesn’t ring alarm bells to anyone as a catastrophe in the making, which is reassuring.
-
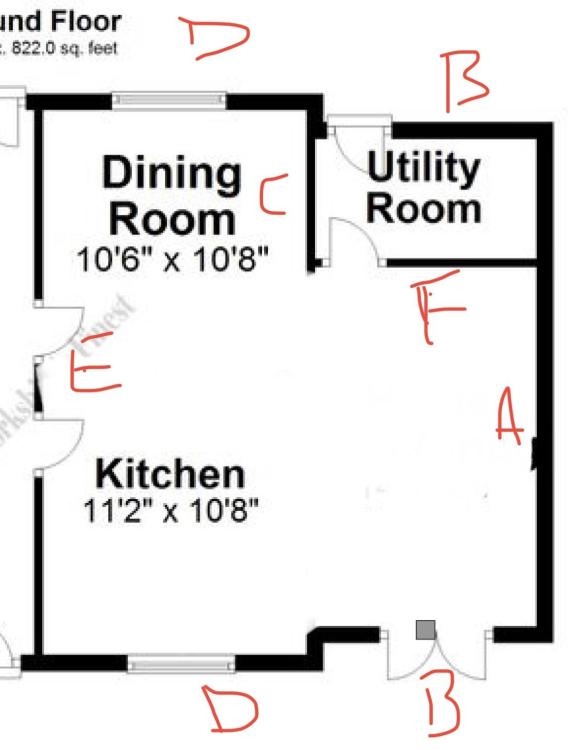
@ProDave thanks for feedback. All existing PB will be removed. Wet plaster retained on internal wall except for where membrane gets lapped in (re-plastered after) Good point re: Wall D. I hadn’t planned to IWI that wall, but yes clearly need to remove the ventilated PB tent. Perhaps I need to think again about either adding insulation-in-studs like Walls A/B. Or at least wet plaster D so the air layer continues all the way to internal wall E. the GF/FF ceiling void is a tricky one. I actually have a different thread on that
-
Good morning, After a recent question about a specific airtightness detail, I’m now debating the entire strategy I’ve adopted for my renovation🫣 Not ideal given I’m part way through it! Layout below has existing wall buildup (out to in) as follows: Walls A & B (previous garage external) sandstone 50/100mm cavity (unfilled) block Wall C (remainder of wall dividing kitchen/garage) block 50mm cavity 50mm EPS block Walls D (external) sandstone 50mm cavity 50mm EPS block dotdab PB Wall E (internal) single block wet plaster both sides EWI is discounted due to irregular sandstone exterior Cavity fill installers won’t touch it because of irregular cavity So I was left with IWI and came up with what I thought was a decent strategy: Walls A & B (final build up) sandstone 50/100mm cavity (unfilled) block 90mm PIR between 38x98 CLS @ 400c-c VCL/airtightness layer (Intello or similar) 25x38mm battens for service void Wall C same as above but only on utility side and reduce PIR to 50mm (this is just to mitigate wall area directly exposed to cavity) on ‘dining’ side there is 50mm EPS behind block so felt IWI would reduce floor area too much for limited benefit VCL/air layer will continue round from utility side Walls D no IWI but continue VCL/air layer from Wall C Wall E Lap VCL/air membrane coming from walls D and re-plaster join. Wall F will be new internal timber stud wall This all felt ok, as I was placing VCL on warm side of insulation. VCL also doubling as an airtight layer means reducing drafts into the habitable space. But the chink in the armour I might’ve missed is potential for air movement in the IWI (I think it’s called thermal bypass). Seems like this could undo or severely reduce any gains from the IWI. Would anyone be able to give feedback on this strategy or comment on the significance of air movement behind the air layer in my case? P.S. all floor is suspended timber. To be filled with 100mm glass wool with breather membrane beneath and VCL above (taped to walls). Equally ceiling on RHS is cold roof insulated between joists (300mm). VCL below (taped to walls) & battened for service void. thanks
-
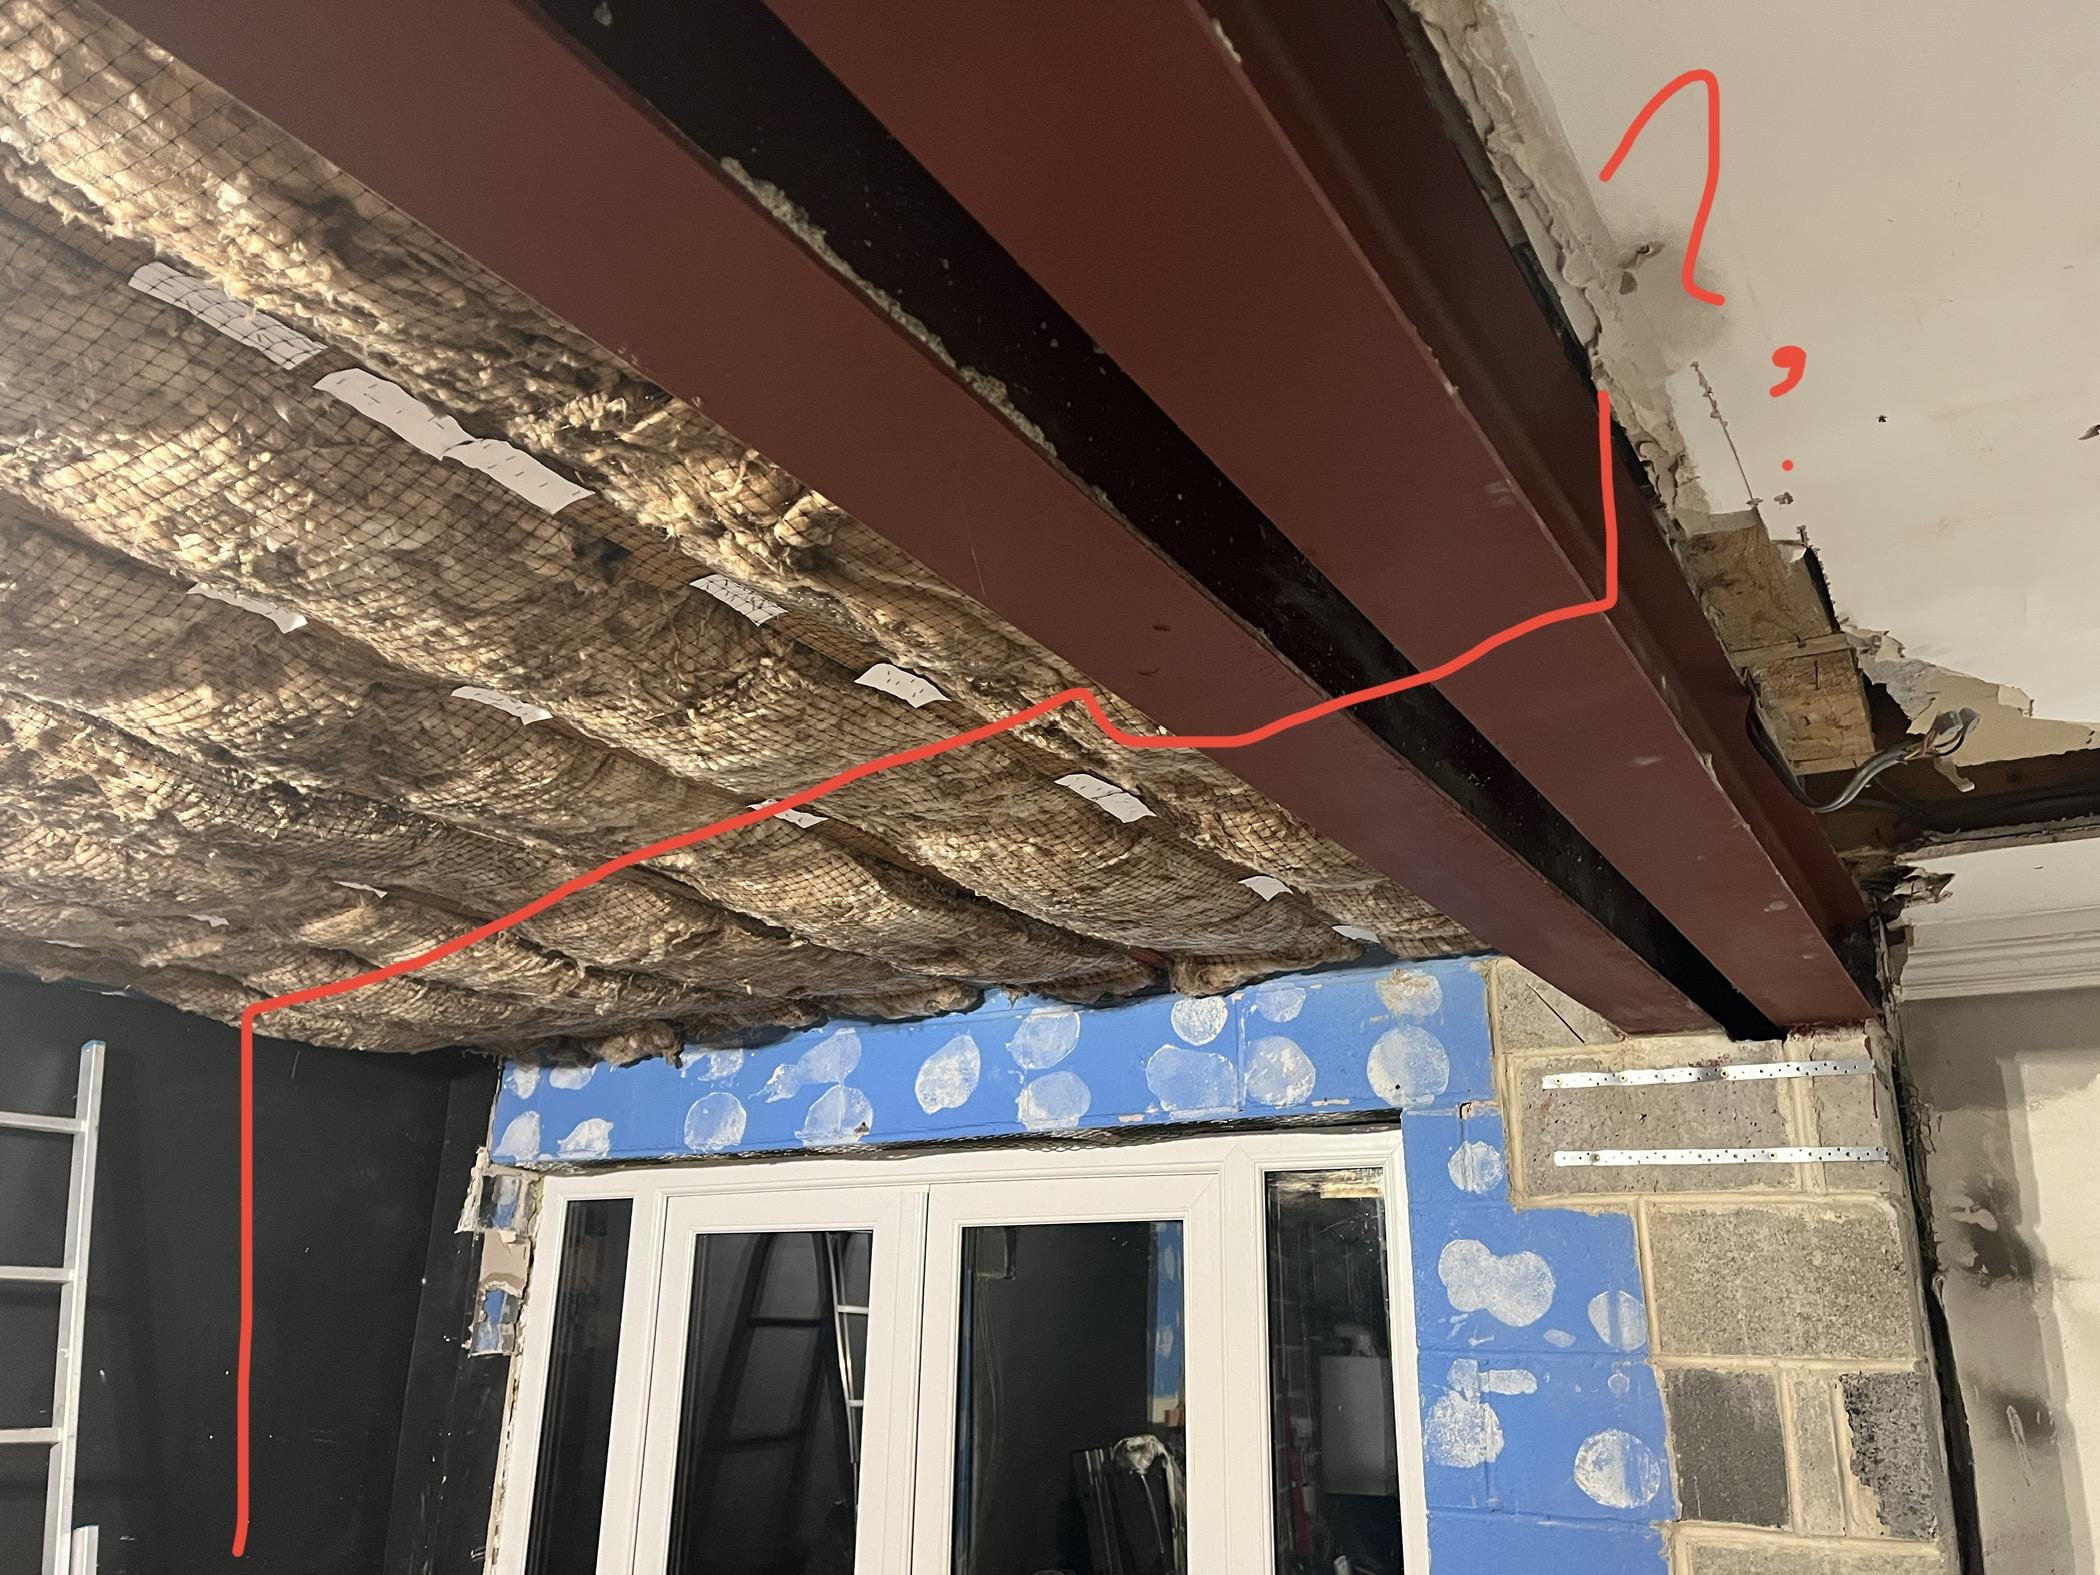
I am in the situation where I am converting a garage with a pitched cold roof above. However I’ve also removed the ‘external’ wall that separated the garage and kitchen. I’m taking the opportunity to improve insulation with IWI in the garage and want to also improve airtightness. I’m happy with the floor-wall, wall-ceiling & wall-window details for VCL/airtightness layer with the garage itself. However I’m not sure what to do when I get to the original house. e.g. Crude line drawn on photo below showing continuous airtightness layer coming up external garage wall on left, under insulation in garage ceiling, under steels (to be insulated). then I arrive at kitchen ceiling with bedroom above. What happens when you have to terminate an airtightness layer in a refurb where not all rooms are being tackled? all I can think to do is apply liquid membrane between joists in GF/FF void to underside of FF chipboard & around joist entries into blockwork. Then tape/seal the membrane from the garage onto the liquid one. My air leakage path becomes up into the bedroom which sounds not great given kitchen has lots of moisture. Or carry the membrane right across kitchen ceiling and terminate midway into the house. Also seems wrong.

-
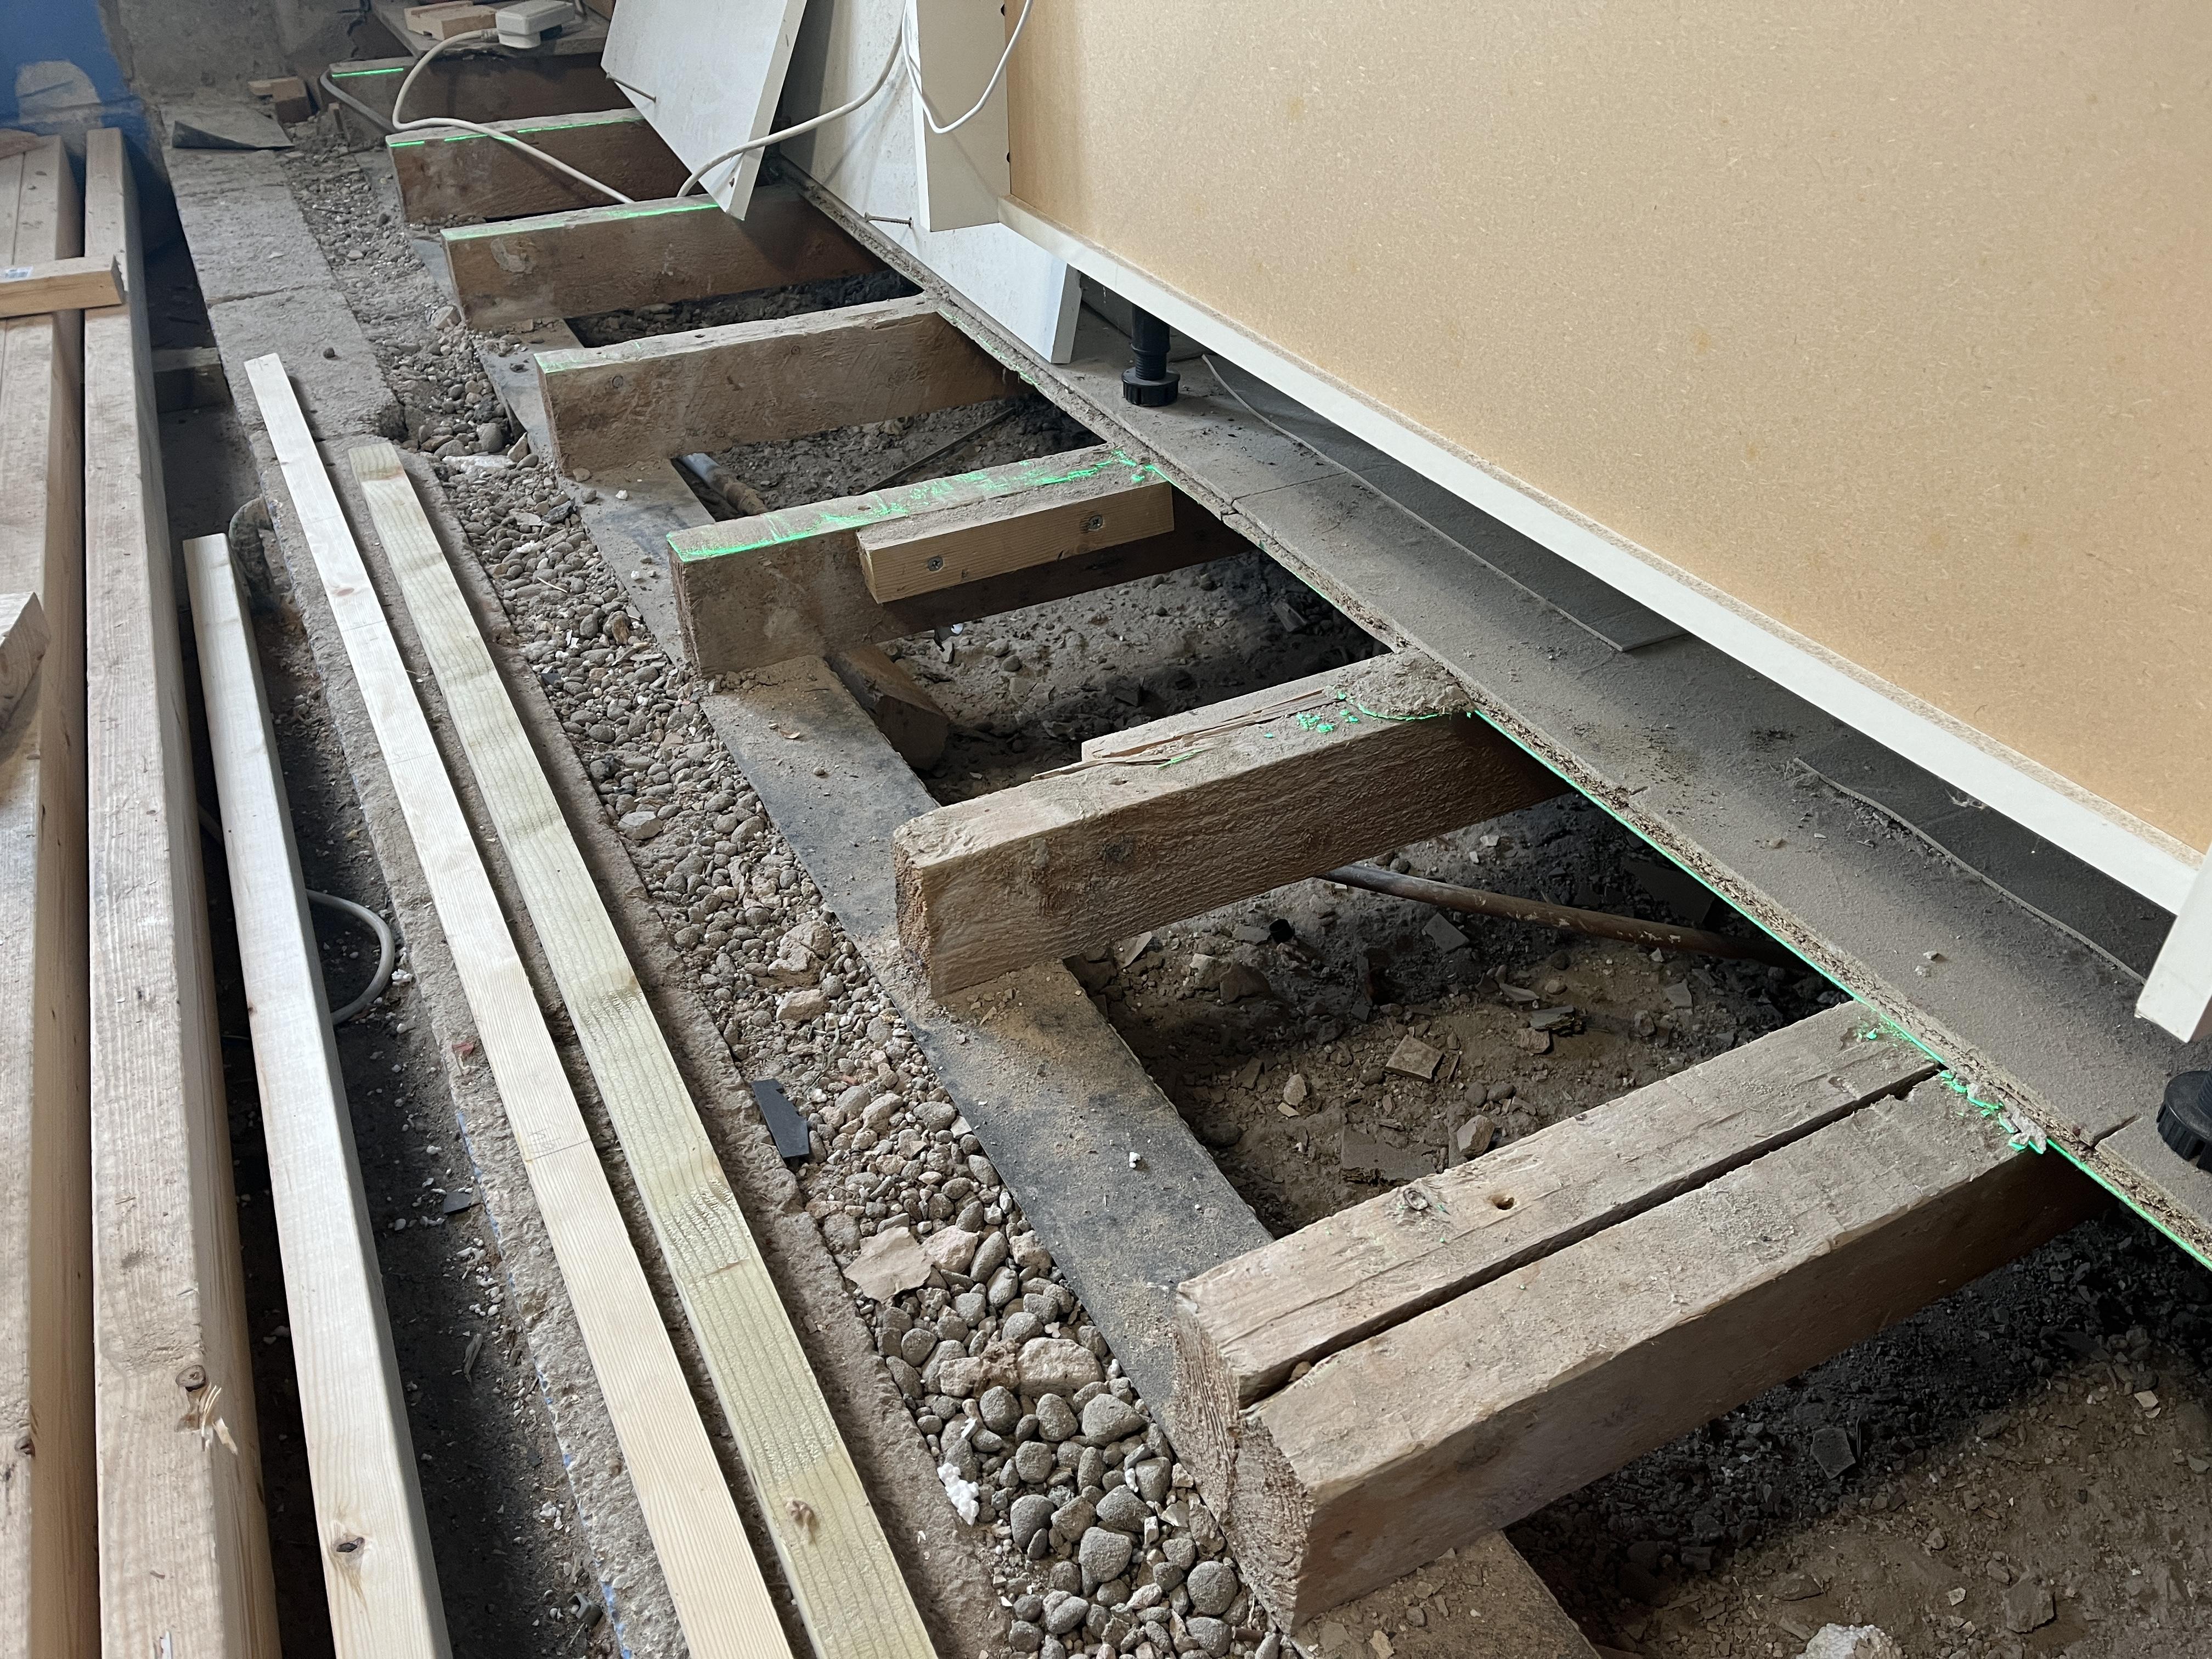
Good point. And I’ve just realised if I was really bothered I could rip the board width down to coincide with the offset at the lap and re-stagger the boards (albeit loosing the T&G so probs not worth it) I notice NHBC say max overlap of 100mm beyond wall (for a single skin). I presume this is to avoid the free end deflecting up and interfering with floor. I’m technically bearing on a 300mm wide wall. I guess I won’t have problems. Again, if worried I could remove outer block at joist locations to keep bearing to 100mm perhaps overthinking it
-
I’ve taken down a cavity wall that separated the kitchen & attached garage. Planning what to do with bringing new joists in garage to meet existing. Image below shows existing joists bearing onto what was the inner leaf. New joists will be coming from ledger plate off to the left. Originally thought I’d lap them ~100mm beyond the inner leaf. This is going to throw off chipboard ends landing on a joist part way through the room. would butt ending old and new be crazy? Bearing in mind that new would have 150mm bearing on the old outer (garage) leaf?

-
@Conor @Dreadnaught @Russdl thanks for feedback. I don’t have MVHR (just poor mans variety PIV) so don’t think downdraft/ recirculating is for me. I’ll keep looking at the industrial grille, plenum and remote tan solution. Our hob will be on peninsular and have agonised over whether wall would be better for extract options. Ironically, the peninsula makes exhaust up through GF loft tile vent much simpler!
-
@Dreadnaught & @Conor sorry to resurrect an old thread but did you ever succeed with your ceiling mounted solution? I’ve struggled to find ceiling mounted grills/plenums (without motor) that aren’t super expensive all-in-ones. Found these which seem reasonably priced. But not sure how ‘pretty’ they look in domestic setting, nor how effective they are: https://www.justfans.co.uk/kitchen-extract-grille-with-grease-filter-450-150-cef-p-1454.html
-
Hello everyone. Have posted a couple of times but thought I’d introduce myself after lurking for a while. As per title, I am about 2 months proper into a garage conversion/ kitchen renovation that for some daft reason started with baby on the way in April! The project: bought our house in 2021 and previous owner had ‘converted’ attached single garage into a den. It involved dot & dab PB (painted black) and a single 400x600 radiator for the uninsulated space. Oh and garage door replaced with patio doors and carpet straight on the slab. We decided to do it proper and have Building Regs sign-off, which then quickly evolved into knocking through the cavity wall into existing kitchen and taking down internal stud into dining room, for a large open plan. I’’m embarking on nearly everything myself, including electrics via Building Notice & BC inspection route (god help me). I’m aiming for good standard of insulation (IWI) and airtightness on new refurb elements. Services being upgraded at same time. Recent success is replacement of a very dodgy cold rising main that had been plastered and painted over, with new manifold (will be within shallow depth cupboard in future utility). I’m very thankful to this forum for ideas and guidance so far! I lost my dad 2 years ago shortly after we bought the house (I’m only 37). DIY is a deep interest we shared (from remote controlled cars, to woodwork and electronics) but I never got to share a project of this scale with him. I’m hoping sharing with strangers can be the next best thing.

- 1 reply
-
- 1
-

-
Not sure how much this helps, but I had a similar decision to make - garage conversion combined with kitchen renovation. Over half the downstairs is going back to block so thought how to improve heating and water supply whilst I’m at it. Really fancied UFH in new kitchen but moved away mainly due to cost and somewhat due to complexity. v200 boiler with variable mixing valves was looking to be eye watering £, plus cost of overlay system onto suspended floor. New plan currently in motion involves: - new V100 in loft above old garage (for lower modulation than current boiler) - DHW cylinder relocated to loft next to new boiler (gains space from airing cupboard, give back to bathroom) - cold, DHW & hot return manifolds in loft next to cylinder. Pipe from manifolds to each room in either 16mm & 12mm MLCP - 2no. UFH manifolds in old airing cupboard (upstairs) & under stairs cupboards used as radiator manifolds. Location of each puts them central for all rads upstairs/ downstairs. Flow & return from boiler will run approx 10m from boiler to manifolds. The main benefit (I hope!) of my strategy is that the majority of work I can do whilst the kitchen/garage is upheaved. However the manifolds mean I can commission just what gets done, then add to the system at a later date when I get to other rooms (if necessary chucking spare pipe under the floor for later) Design has mostly been ‘by inspection’. I’ve done whole house heatloss and gradually upgrading radiators for dt25-ish MWT to room. Each radial leg from radiator manifolds will be in 16mm MLCP. Given the manifolds will be centrally located each leg will be similar length. Im hoping this means balancing at the manifold will be easy-peasy… joke of it all is that the new v100, cylinder move and manifolds x5 cost probably as much as just doing UFH. I’m justifying I have a better whole-house upgrade for similar cost.