oliwoodings
-
Posts
130 -
Joined
-
Last visited
Everything posted by oliwoodings
-
There are some great videos on YouTube of how to do it - honestly it was easy, especially if you don't have any details like upstands, rooflights etc. It's really hard to get it wrong, I found it no more difficult than any of the other jobs in the build. The main mistakes that can be made seem to be: - doing it when it's too cold for the adhesive - letting the roof deck get wet before laying the roof - it needs to be bone dry or the water based adhesive won't bond properly - not letting the perimeter contact adhesive tack-off enough, which can result in little bubbles under the EPDM. None of these will necessarily result in the roof actually failing though - at the end of the day it's a big thick sheet of rubber! Some people don't even bother using contact adhesive, they just loose-lay... I found the hardest part is actually just getting the roll of rubber up onto the roof in the first place!! I ended up building what can only be described as a DIY multi-tiered squat rack up the side of the building and then lifted it up in stages with a length of 2x4 through the roll.
-
Mine is divided into two rooms, so the max span is actually 3.5m! I used 6m 2x7s for the joists with them resting on the interior partition wall.
-
Welcome! That's a big space, I just finished ours at 6x5m but it's split into two separate rooms. At 33m^2, I'm guessing you know you'll need to comply with building regs etc? Any reason you aren't doing the roof yourself? EPDM is incredibly DIY accessible, I did it mostly solo.
-
What's the other dimension of your garden room? If it's less than 5.5m, then why are you choosing to span the longer dimension? EDIT: nevermind just seen your intro post - 6x5.5m, that's a huge space!!
-
Help designing our home network
oliwoodings replied to MechanicalBuilder's topic in Networks, AV, Security & Automation
If you're running cable then go for wired PoE APs instead of a wireless mesh. You will usually get better coverage, bandwidth, reliability and it can be cheaper. Run CAT6 to the ceiling voids of each major room in the house. You don't have to actually use it all at this time. Wherever you end up needing an AP, you just pop a hole in the ceiling, mount the AP, and hook it up at the other end under the stairs. If you're hoping for a fttp connection in the future, think about how you'll get the cable into the property. Some people like to try and preemptively install a duct so it can be pulled through under the walls without breaching airtightness etc (although I think ISPs can be fussy about what they allow for this). -
Fixing Centrers for Plasterboard (Timber Frame)
oliwoodings replied to benben5555's topic in Plastering & Rendering
Some prior discussion here: Use 15mm plasterboard on 600 centres, especially for ceilings. You'll want to hire a lift for the ceilings. -
If you're new to decorating, tape is your best option in my opinion. Don't cheap out on it, get the branded good stuff - frogtape is my preference, and I personally always go for the 36mm over the 24mm. The extra width helps get extra straight lines and does that little bit more to prevent accidents. You've also got different types - if the surface is fragile/fresh paint, use the yellow stuff. Make sure you plan taping into your schedule. Done properly it can take a good hour to prep an average size bedroom with doorway, window, other detailing etc. After applying frogtape, make sure to rub over the tape firmly to get a good seal. If you just plonk it on the paint will wick underneath still. Some people even recommend rubbing over it with a damp cloth although I never noticed any difference personally. When painting, don't push loads and loads of paint against the tape, you just increase the chances of it wicking underneath. Remove the tape before the paint fully hardens to get a nice crisp line - max 48 hours after the last coat usually. And go slow, pulling at an angle away from the edge. One final thing, I noticed from your pics the door and window frames could do with a clean. Make sure you do this before decorating, much easier than after! You can get uPVC cleaning stuff that works a treat.
-
Garden Room - 'substantially non-combustable'
oliwoodings replied to having a go's topic in Garages & Workshops
You ultimately can't tell conclusively without consulting your local BCO and asking what their own interpretation of 'suitably non-combustable' would be in your situation specifically. In general, having the external cladding as either cement board cladding/sheet steel/rendered is enough, especially if it's only bordering garden fences (i.e. isn't next to other people's houses), which is usually the norm for garden buildings. But they may also be fussy about the internal wall finishing as well. For my own, I didn't bother asking our BCO and just went with cement board cladding all round (Hardie VL). Slight gamble? Yes. Likelihood of building control giving a shit? Practically zero.- 8 replies
-
- 1
-

-
- building regulations
- garden room
- (and 2 more)
-
Ceiling Speakers Recommendations
oliwoodings replied to richo106's topic in Networks, AV, Security & Automation
Fair. I intentionally put some devices in their own vpc of shame if I don't trust them (i.e. chinesium shite). -
Ceiling Speakers Recommendations
oliwoodings replied to richo106's topic in Networks, AV, Security & Automation
Depending on your hardware, couldn't you just create a separate wireless network and vpc just for the fussy lil robot? I know it's trivial on my ubiquiti gear for example. -
Only the 'no neutral ones', and the current is miniscule
-
The smart switches which don't require a neutral work by still sending tiny amounts of current to live even when the switch is off (in order to complete the circuit) and use that to charge a capacitor which powers the ZigBee gubbins.
-
Garden Building and Soaked Door Corners
oliwoodings replied to RobertW's topic in Garages & Workshops
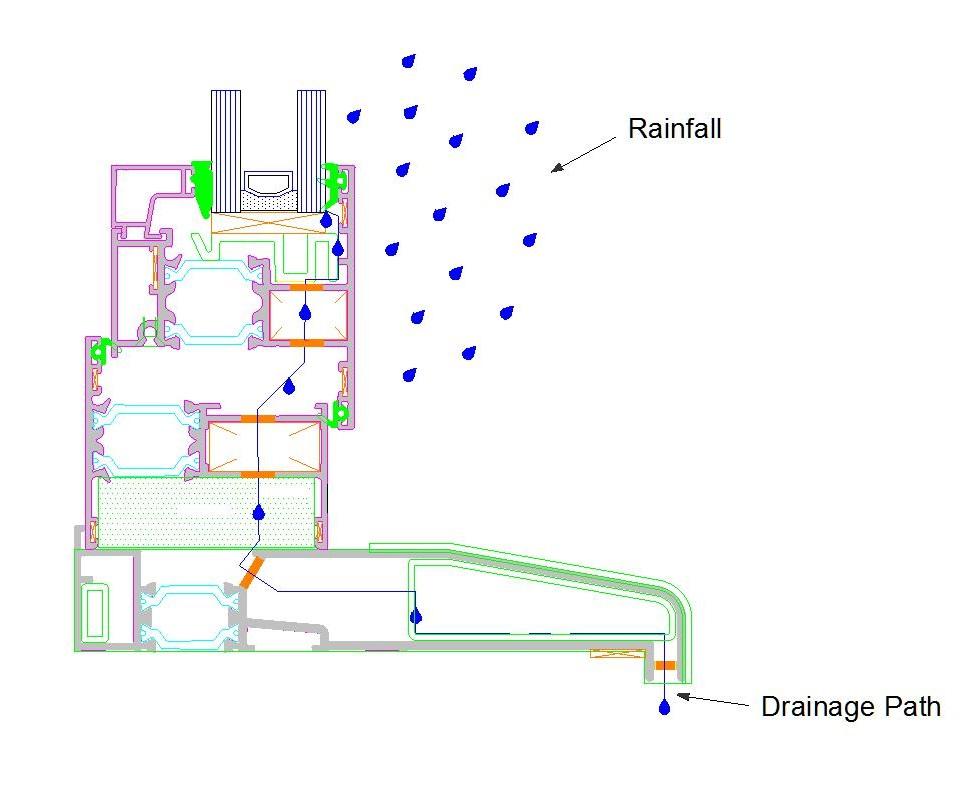
That's exactly my thinking, I don't see how water can drain anywhere unless there are front drainage holes, but I don't see any in the pictures. @RobertW why don't you get the builders back to sort their dodgy job out? -
Garden Building and Soaked Door Corners
oliwoodings replied to RobertW's topic in Garages & Workshops
Is the door frame sitting on top of the slate, or is the slate butting up against the side of the frame? The choice to not have a cill seems really odd - how is water meant to drain out of the frame? If you're not aware, no matter how well a pvc door is made and installed, water can still end up entering the frame. To handle it, the frame has drainage holes which leads down to the cill. It then either drains over the top of the cill or through it and out the bottom. Something like this: With your setup, I don't see how any water that enters the frame can drain out. That, plus capillary action on the cladding, seems like a likely cause.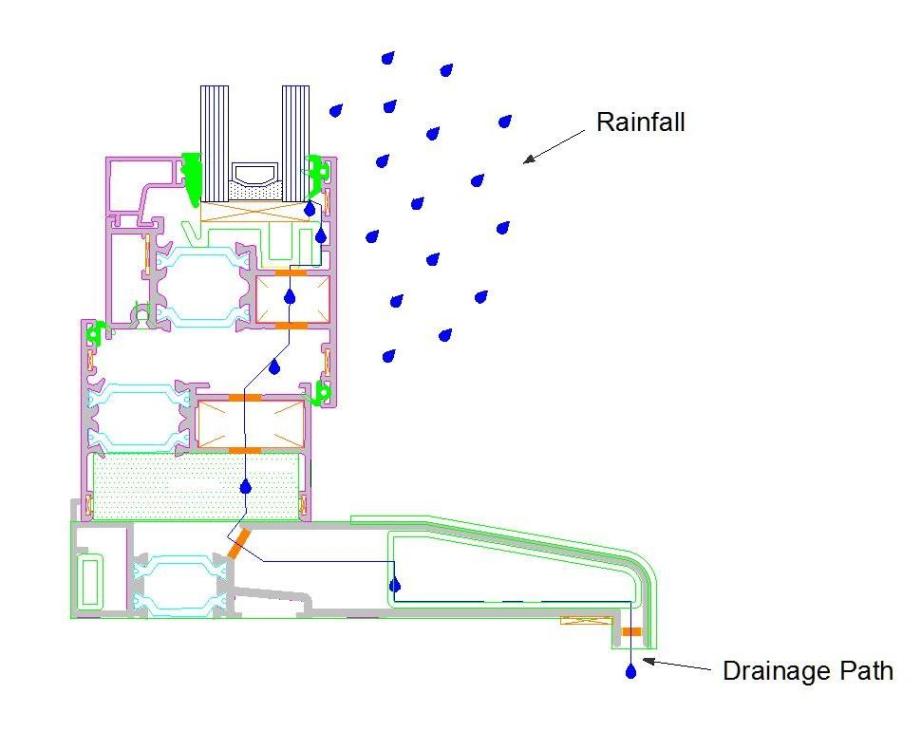
-
Make sure you give the hose a good firm tug, be rough with it. I get the impression from other posters on here that won't be too much of a struggle for ye.
-
To get the pipe out you need to remove the little blue clips, then depress the ring. Kinda like JG speedfit. Works every time for me with no need to cut the pipe.
-
They do it electric only - the ss80e: https://www.plumbnation.co.uk/smiths-space-saver-ss80e-electric-plinth-heater-with-stainless-steel-grille-777-17354
-
My mum has one of the smiths ss80 in her IKEA kitchen, works very well. Seemed a bit annoying to install thought with only 8cm to play with, hope your plumber has nimble hands!
-
I think it might be worth you for a minute going back and listing out your actual requirements for the performance of the space, and prioritise them in order. There are quite a few contradictions in the way you are going about this, from my perspective. If your husband is keeping precious plants which are sensitive to draughts, won't they also be sensitive to temperature? If you have knowingly not mitigated moisture entry, but can't tolerate draughts because of the plants, then you'll get damp & mould problems. If you've got damp and mould problems, plasterboarding is probably not a good idea.
-
If you aren't going to heat the room, and knowingly haven't fully mitigated moisture ingress, what's the point in the insulation you've already put in and why bother plasterboarding? If it's simply for storage, ensure good ventilation to remove moisture and then just board internally with something cheap like sheets of 12mm ply or 18mm osb.
-
Vinyl onto osb. Will the texture show through?
oliwoodings replied to saveasteading's topic in General Flooring
If there's any vertical movement in the osb where it butts up (sounds like there is) then the lvt joints will break up over time. -
Any online supplier for non-standard sized MDF skirting?
oliwoodings replied to markharro's topic in General Joinery
Fair point, depends how much is being done and dimensions of the room I guess. -
Any online supplier for non-standard sized MDF skirting?
oliwoodings replied to markharro's topic in General Joinery
If you're after square edge could you not just rip down full sheets yourself? -
Didn't need foam in my case, hole was snug enough. Just siliconed each side.
-
I ran 10mm swa for my garden building which my electrician then hooked up each end for me. To get into the house we did a hole in the wall at a 45 degree angle to reduce the required bend radius, and lined it up so it came out inside pointing right at the side of the CU where it was glanded. Very easy for any competent electrician to handle.