Iceverge
-
Posts
4485 -
Joined
-
Last visited
-
Days Won
32
Everything posted by Iceverge
-

Damp Bungalow
Iceverge replied to Potatoman's topic in Mechanical Ventilation with Heat Recovery (MVHR)
Suck out if your can. Replacing bathroom fans with dMEV like John said is the easiest and cheapest. You probably have loft space for a centeralised MEV system or maybe even a MVHR if you want to go all in. -
150mm Composite deck screed alternative
Iceverge replied to bmj1's topic in General Structural Issues
I feel being trickle fed details here is limiting how much we can help. Can you please give us a size and scale of the building. I had in my head it was a 4x4m prayer room initially but portal frames etc suggest it may be 40m X 40m. How much work has been done. What's under the floor? A house? Offices? A car park? Heating it from 6am until 11pm means a lot of energy so investment in the fabric is vital. This means insulation airtightness and mechanics ventilation. What's the approach here? Have the structural details been finalized? Direct electric UFH is of course 100% efficient like any reistive heater but heat pumps can often be "300%" efficient. It might not be an ideal fit for your building though depending on your insulation and the ability to control ventilation through public use of doors etc. Like I say more details = better advice. -
OSB3 as VLC in warm wall construction over oak frame
Iceverge replied to David Cooke's topic in New House & Self Build Design
That would work fine. U value won't meet regs though. What kind of rain screen are you planning on ? The vapour permeability of the OSB is a bit mute when you have foil faced PIR outside of it but it will work as an air control layer which is much more important than vapour control. With a 125x50 TF external to the oak frame you're building 2 houses though but that always seems to be the issue with oak frames. I think @Post and beam used SIPS. As an idea you could spec an I-Joist structure to balloon frame over the oak with an external airtight layer like @IanR. With the Oak taking most of the structural loads it hopefully could be quite minimal. Full fill with cellulose then. -
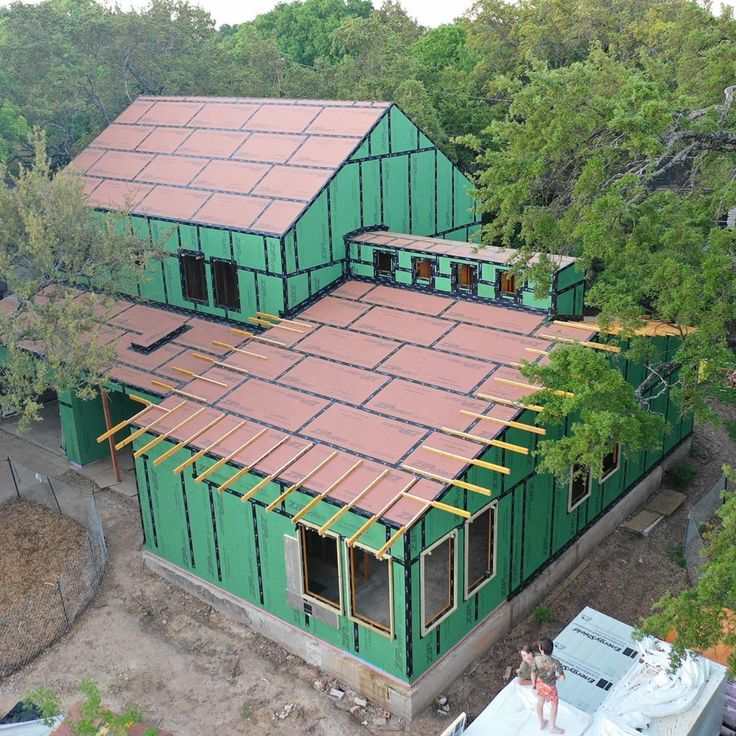
Have a close look at the picture above. It's what I suggested for the roof. ( Although you could do the whole house) It's from the "monopoly framing" system by Matt Risinger on YouTube. It's a really great concept for air sealing and dealing with thermal bridging in complex house shapes, it's not mine. I rarely have original thoughts! The timber frame is built with no bits sticking out. Then air sealed externally. In this case taping the sheathing. Then any overhangs are added and finally a layer of PIR or maybe Rockwool/woodfiber. Finally the external cladding. Air sealing from outside is dead easy on a timber frame building like this. 10 times easier than doing it inside. Likewise an unbroken layer of external insulation is simple to do and really performs excellently. I would be happy to tape 11mm OSB as an airtight layer so long as you could avoid rain until it was covered.
-
We had a separate DPC on the external leaf 150mm above external ground level. There's no need for a tray here. Just let the EPS beads fill to the bottom of the cavity.
-
Just saw now. Will have a look shortly.
-
I would get this right before going anywhere near a heat pump. I would rather chew my leg off than put PIR in a cavity wall or between roof timbers. Why the combo of EWI and cavity in the new build? I would do one or the other. Why so little EWI? The insuation is a small cost vs the install and render. Wait.........do hear a greasy haired white toothed kingspan salesman boarding a plane..........I think he's off to Marbella for a jaunt on the kooltherm sales he pawned off to you via your architect......
- 43 replies
-
- 2
-

-

-
- mvhr
- ashp and dhw
- (and 2 more)
-
Wooden subfloor with 4 inch joists and rockwool
Iceverge replied to Rocket Ron's topic in Heat Insulation
Then you'll have a breeze blowing around the sides of the PIR freezing your floor. Or you'll have a breeze blowing around your bank vault where your bullion used to be that you had to liquidate to spend on gapotape. -
Get the best match you can. Dry lay them. See if you can tell the difference. If you can rip up the rest of the old tiles and finish it with the new tiles.
-
Tape them up and all is well!
-
You can use airtight tape. Just cut it into lots of little strips.
-
You could substitute in some walk on glazing.
-
Lol. I did actually stick them in the kitchen oven pre zinc coat . Cautious of off gassing pre top coat and fearing the wrath of my family I just stuck them into a cardboard box with a small fan heater (closely supervised!!!!) for 15mins. Seemed to do the trick, they only need to be warm and dry.
-
If it's galvanized you may need to etch prime it to get a key for the paint. It'll peal off otherwise.
-
Wooden subfloor with 4 inch joists and rockwool
Iceverge replied to Rocket Ron's topic in Heat Insulation
Fine until the foam shrinks and the PIR falls out. There was a case of this on Greenbuildingforum a while back . -
Wooden subfloor with 4 inch joists and rockwool
Iceverge replied to Rocket Ron's topic in Heat Insulation
I had no issues but then I am near a provider. (Ecocel) I've thought about this before. I-joists ripped up the middle would work well. Nail them sideways onto the joists. You could drop OSB/PLY/Hardboard to rest on the flanges to carry the insulation. This would be a great option if done from above. However very tricky from below. I toyed many times with the idea of strips of rigid insulation sandwiched onto studs. Turns out it already exists. However on a renovation of an old property the tiny gain you would have is never worth the hassle.when you do the heat loss sums. It just might get you across the line in a passivhaus project or something.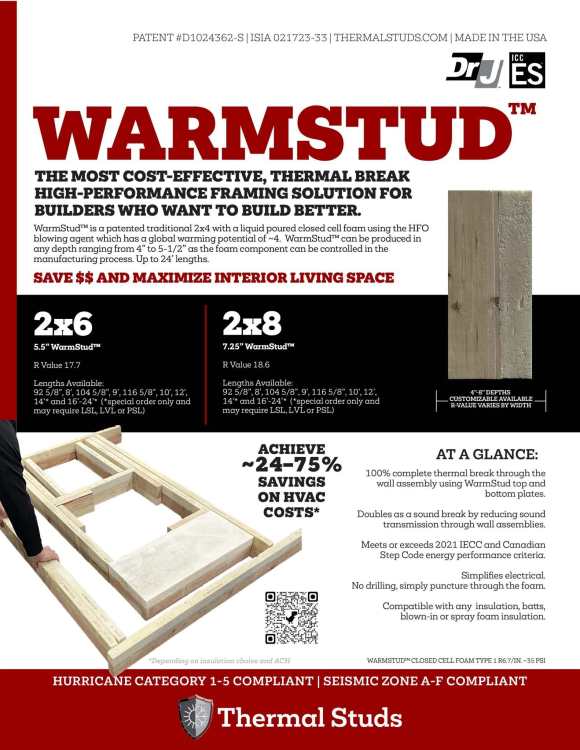
-
If it's mild steel I made some brackets recently. Gave them a run of a wire brush on the angle grinder. Then some brake cleaner as a degreaser. Then put them in the oven to get them up to skin temp and dry them out properly. Then 3 coats of zinc primer. Then 3 coats of an enamel oxide brushed on. They're in a fairly corrosive environment so I hope they'll last ok.


-
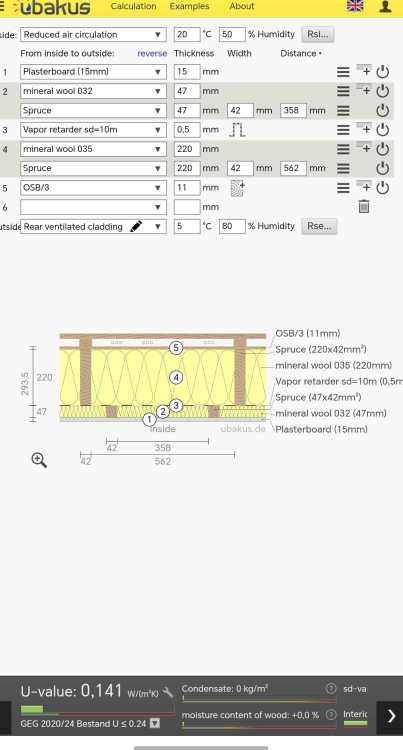
The kingspan salesman gets another trip to Tenerife. 🥺 I'm guessing the spec for the insulation came from your architect? Who i expect in turn copied and pasted it directly out of the Kingspan book of details that "someone" dropped on their desk. Before committing to this I very much suggest you have a look at some other methods that will be easier to build, much cheaper, and perform better. My suggestion would be something like this. Better still ditch the mineral wool and use blown cellulose fibers.
-
Wooden subfloor with 4 inch joists and rockwool
Iceverge replied to Rocket Ron's topic in Heat Insulation
None of the above! Screw timbers ( thickness space dependant, more is better) under the existing joists. Staple a good breather membrane like VP400 underneath. Tape all joints and seal to the walls. Screw 75*25mm battens or similar underneath to keep the membrane in place. Then blow the cavities full of cellulose insulation.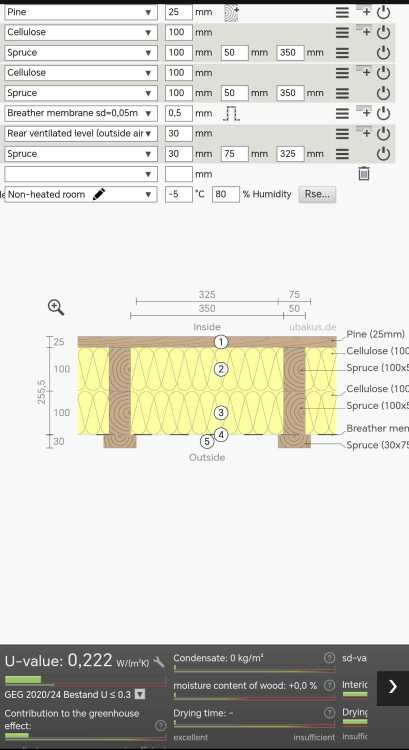
-
Yes, keep the gap behind the ply facing. To stop screws penetrating the airtight layer. Also it may allow you to run wires more tidily to plant even if you've still got everything else surface mounted. No. A screw in a hole is airtight from the purposes of house building. We didn't make 0.2 as above but 0.31 and we didn't tape any staples or screws. Keep your Ply facing spaced off the airtight layer for this reason with a service cavity. Have a tube of sealant and caulk the holes on blower door test day.
-
Can you shift your demand times or change to a supplier with TOU tarriffs that match your demand.
-
Hahah, I'm going to have to apply for an extension for my house to fit my ego after that! Beware I'm probably far more disappointing in person than my ~online dating~ build hub profile suggests. I do like EPS, but mineral wool batts in the wall would be fine too..... However..... Are you dead set on cavity walls? They work well in simple structures however not having full planning drawings for yours I don't know if something else might be a better fit. Can you post your full (deidentified) planning drawings, to let the collective masses decide here how to best make this project work for you.
- 77 replies
-
- 1
-
-
- flat roof
- condensation
- (and 2 more)
-
It's worth investing if there's a leak there. Is the rafter wobbly in any way? It might be worth propping it if it is.
-
Rebuilding after demolishing question
Iceverge replied to dustyb's topic in General Self Build & DIY Discussion
No problem. I'll give you 50p but I must subtract the cost of the stamp from that.