Iceverge
-
Posts
4462 -
Joined
-
Last visited
-
Days Won
32
Everything posted by Iceverge
-
You're right. I saw a number (5MW) and gone with that . That is rather larger than the average on futher digging. 1000 is a better number than the one I picked.
-
What do the economics look like? Farming is absolutely marginal even without the inefficiencies of a operating around a field of solar panels. Subsidies form a large part of farm incomes. Would these remain if there was solar panels ? Also farmers hate them, partially because we're ( I'm a part timer) stupid and hate change, partially because they make us redundant and partially because we don't like our neighbour we see in the he field next door and at the market being replaced by panels. I'm guessing solar on a large scale is a subsidy game too, (ignoring the long term climate thing) . Oil is only $70/barrel at the moment.
-
About 4 times as large as Electric Mountain in Wales. It could store the energy of about 300 normal wind turbines running flat out for 24hrs. It could power London for about 8hrs.
-
Agreed too many NIMBYs. There's lots of people who are healthy, have access to information, are in no immediate personal need of economic development and have lots of time on their hands. (People who need a house or a job don't complain, when people used to work until 65 and die at 70 it didn't happen). Farming can take place with PV but it's limited as the crops are effectively solar powered themselves. Grazing sheep at very low stocking levels is possible for example. I think locating PV on the south slope of the hills that have turbines would be an appropriate use of grid infrastructure. Of course it's beneficial to have it near the population. I think intermittent targeted power rationing for those who complain the most would be appropriate.
-

How to fit this lintel?
Iceverge replied to Unforgiven's topic in General Self Build & DIY Discussion
Outside picture too please. -
No need to do this is have thought. Just build the walls say 1-2 courses above the first floor height, partially chase them for your services. Paint on airtight paint , fix ledger, fit first floor. Carry on as normal. Thinking about it, drilling concrete, cleaning the hols and inserting resin fixings is a ball ache. Would it be easier to build in m10x180mm bolts to a mortar bed with 50mm washers in the cavity side. And leave 80mm protruding inside Drill 20mm holes in the ledger for some shuffle room and bolt in place.
-
How to fix this leak from a hot-water tank?
Iceverge replied to David001's topic in Boilers & Hot Water Tanks
Pics of this plastic collar please. I'm guessing it's a screw in bushing reducer to take the thread down to an appropriate size. You may be able to screw it out and replace it. If you want to have a go as is by all means a do but be careful with applying hemp liberally to the thread as it may crack the plastic. The T&P valve provides a safety blow off in the situation the tank overheats or over pressurises. You can clean the brass threads relatively aggressively with a wire brush. By the way I'm not a plumber so beware internet stranger advice!!! -
Yup, airtight paint would give you the option of bringing the airtight layer up and well clear of the floor construction to meet the wet plaster later on. Airtight sealant would work but you might find it tricky to plaster right to the line of the sealant. Dilute the airtight paint 5:1 with water as a primer before applying the top layer . You could always use airtight paint entirely behind the ledger before you attached it to the wall. Don't forget to put some mastic or sealant in the holes the bolts go into the wall too and to airtight paint the chase behind the ledger.
-
How to fix this leak from a hot-water tank?
Iceverge replied to David001's topic in Boilers & Hot Water Tanks
You'll need hemp too. Scrape the exposed threads with a hacksaw blade to get it rough enough to get the hemp to stick. And apply the plumbers mate as you go. It'll end up the same consistency as hair matted in butter. It's a fiddly job the first time you do it. There's a balance to getting the fixture tight enough but not too tight to crack the tank. Beware that if it goes wrong today ( Saturday) you might be without hot water for a few days. -
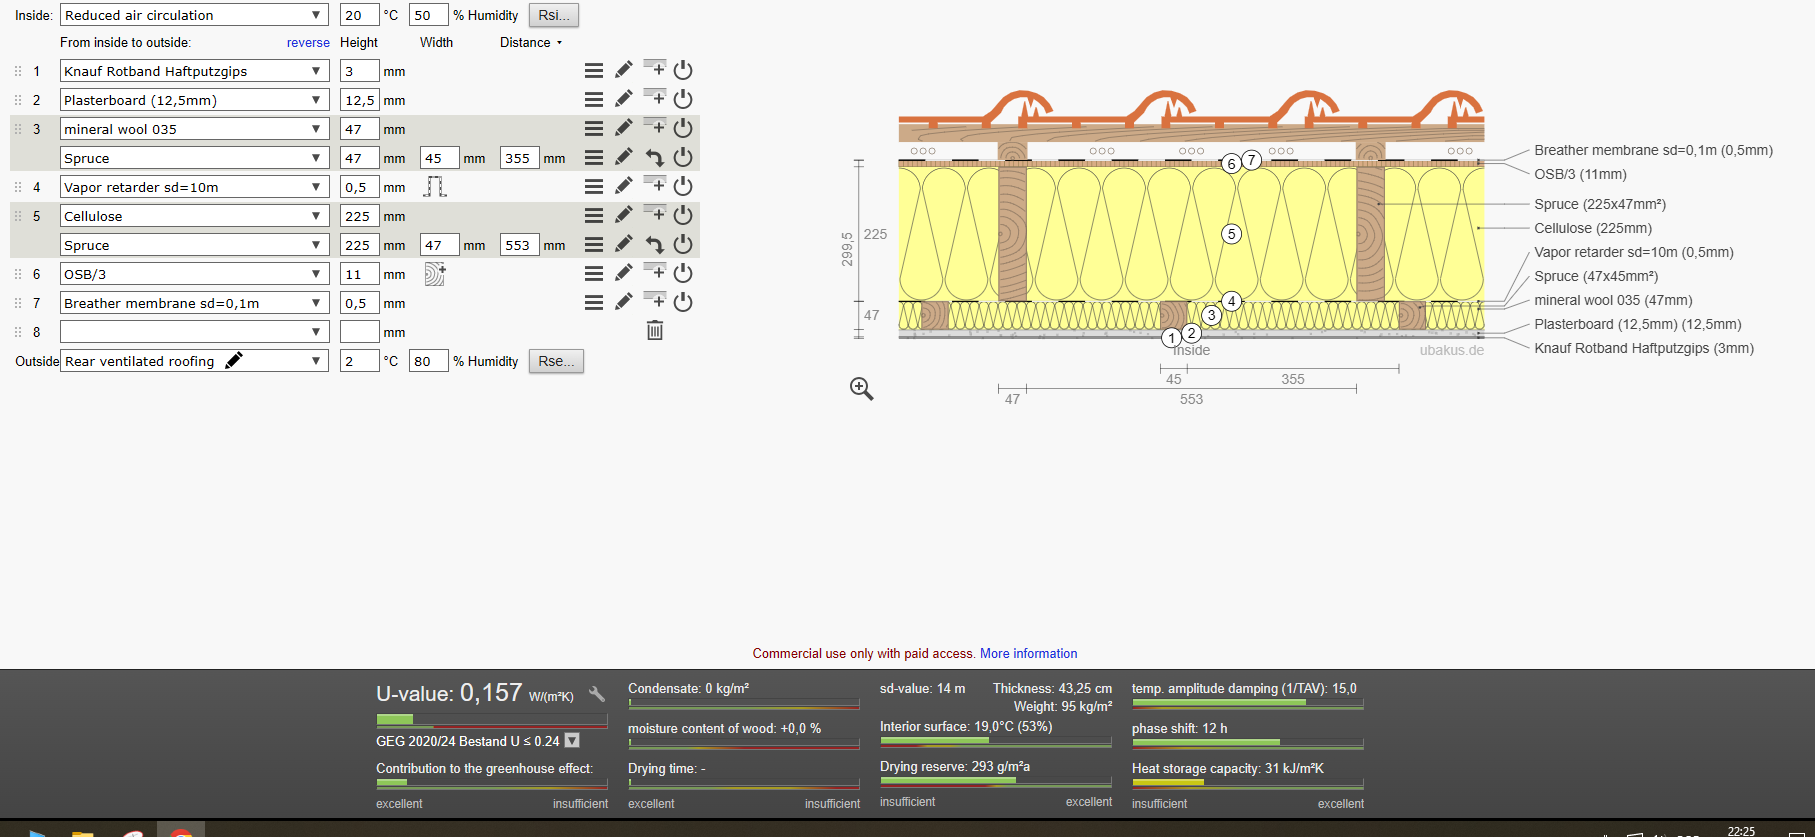
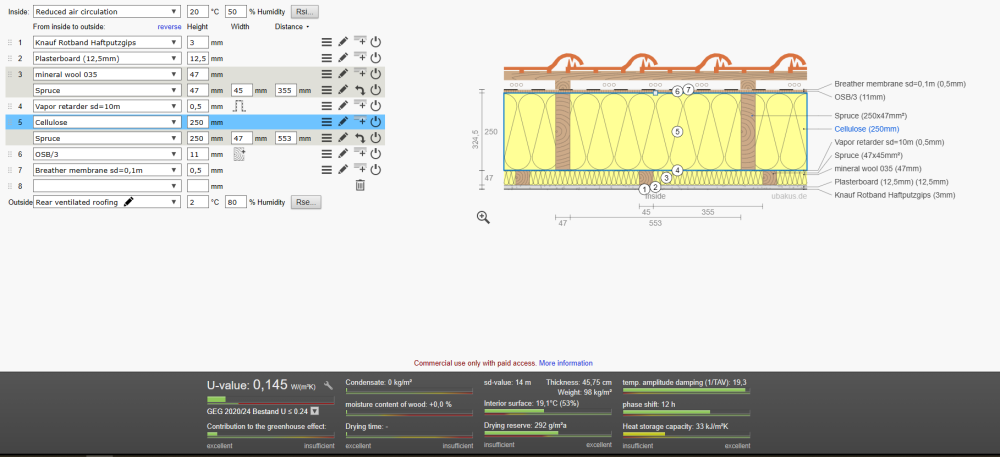
Playing with the AI (as I do a Saturday evening. A glulam beam 100x320mm should be ok to cover the longest ridge span of 6.7m. A 14m long one for the longest ridge would be about £700-£800. And weight about 200kg. A similar RSJ would be £1000 and weight 3 times as much and have awful thermal bridging and onsite workability charactistics in comparison. However it might be able to be bolted together easier. 225x47mm timber should be fine for the rafters. or you can play with different rafter and service cavities sizes etc . This is a low cost high performance option that i like. You could do a plain I joist with a 22mm uninsulated service cavity too, More material cost but cheaper labour. Or

-
Excellent plan for your sparky but I'd worry about the cantilever effect of having the ledger off the wall. Some calcs might be prudent I think. You could always pre chase the routes for cables behind the ledger and drill an angled hole through the ledger to take the cables. The area just behind the ledger should be fine. You could always carefully not bother and just slop some airtight paint above and below it afterwards.
-
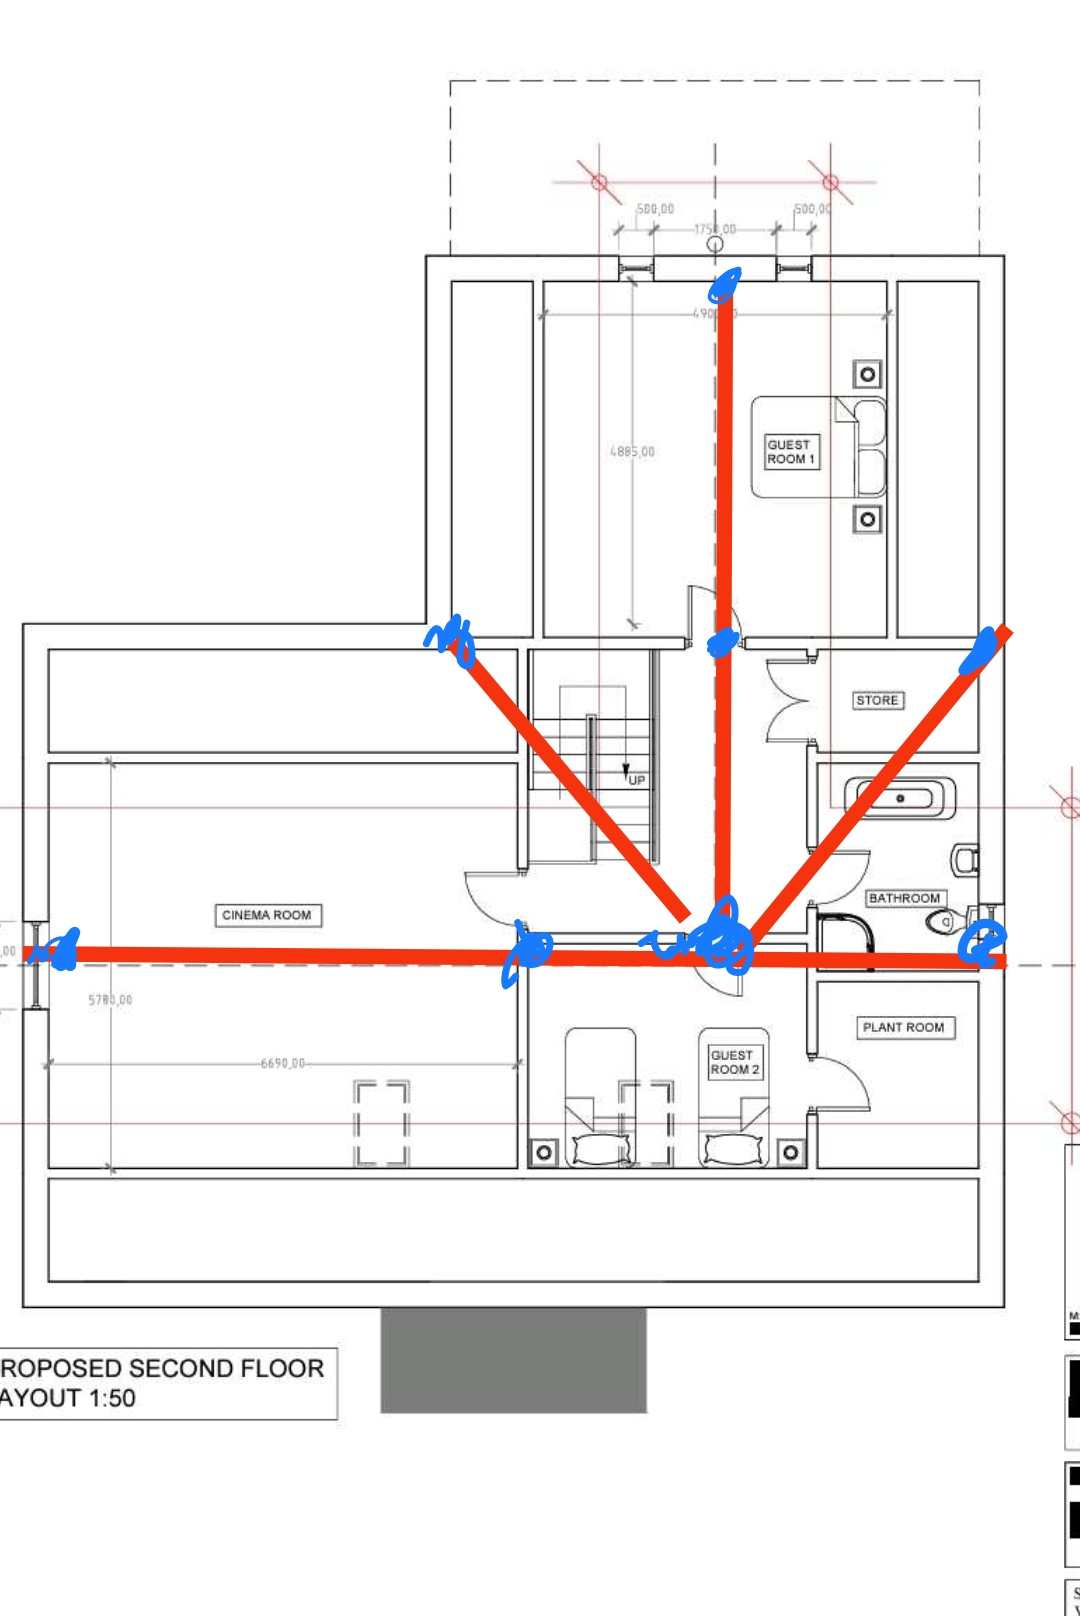
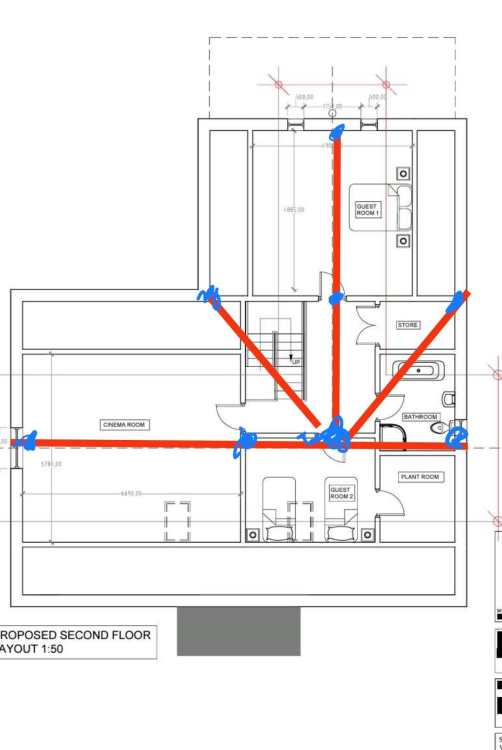
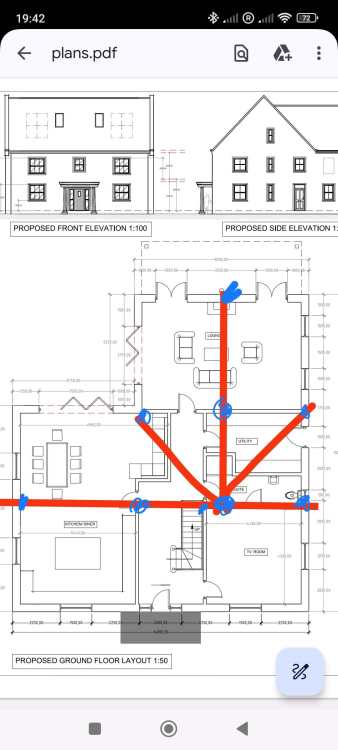
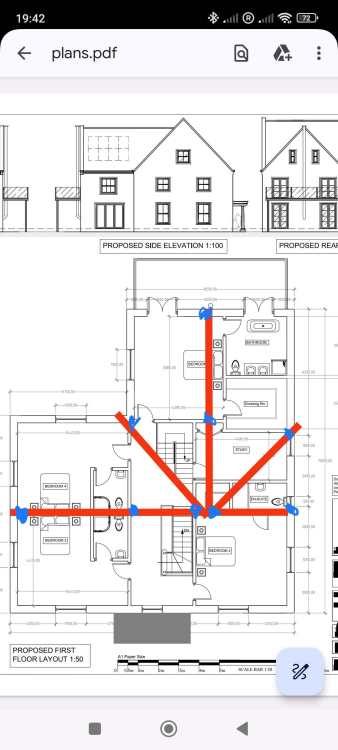
Your roof will obviously be supported by a wall plate on the external walls and internally the valley rafters and ridges. ( I like gluelam beams, please use gluelams cause dey so pretty 😍. Hang all the normal rafters from these . Effectively you need a path to transfer the load vertically The external walls are easy peazy. The ridges and valleys (red) you just need to able to draw vertical lines to get the load down. I've made blue dots where I think this could happen. You may need to add a lintel over an internal door but it's not rocket science. DISCLAIMER. I'm not a structural engineer any roof collapsing and tumbling on your bed at 3am instantly pulverising you and your beloved is absolutely someone else's fault .
-
New member - stuck for what to do next to warm the house
Iceverge replied to Sparrowhawk's topic in Introduce Yourself
I'm semi convinced that a unit just dumping air into a hall or large room and extracting from somewhere else would work so long as you opened internal doors occasionally. Air mixes pretty well. For airborne noise air pathways are key. Do you have any stud walls routing up to the floor void? Then add mass. Doesn't matter where it goes really, above, below, between, all gravy. Sand above the plasterboard would do the same thing as expensive mass loaded vinyl. Don't loose hope. A good company will turn up. I'm a big fan of quality uPVC. If it was twice the price more people would use it . 3G is good but quality sealing and latches are far more important. Great thread and well done on the work. Keep us posted. -
How to fix this leak from a hot-water tank?
Iceverge replied to David001's topic in Boilers & Hot Water Tanks
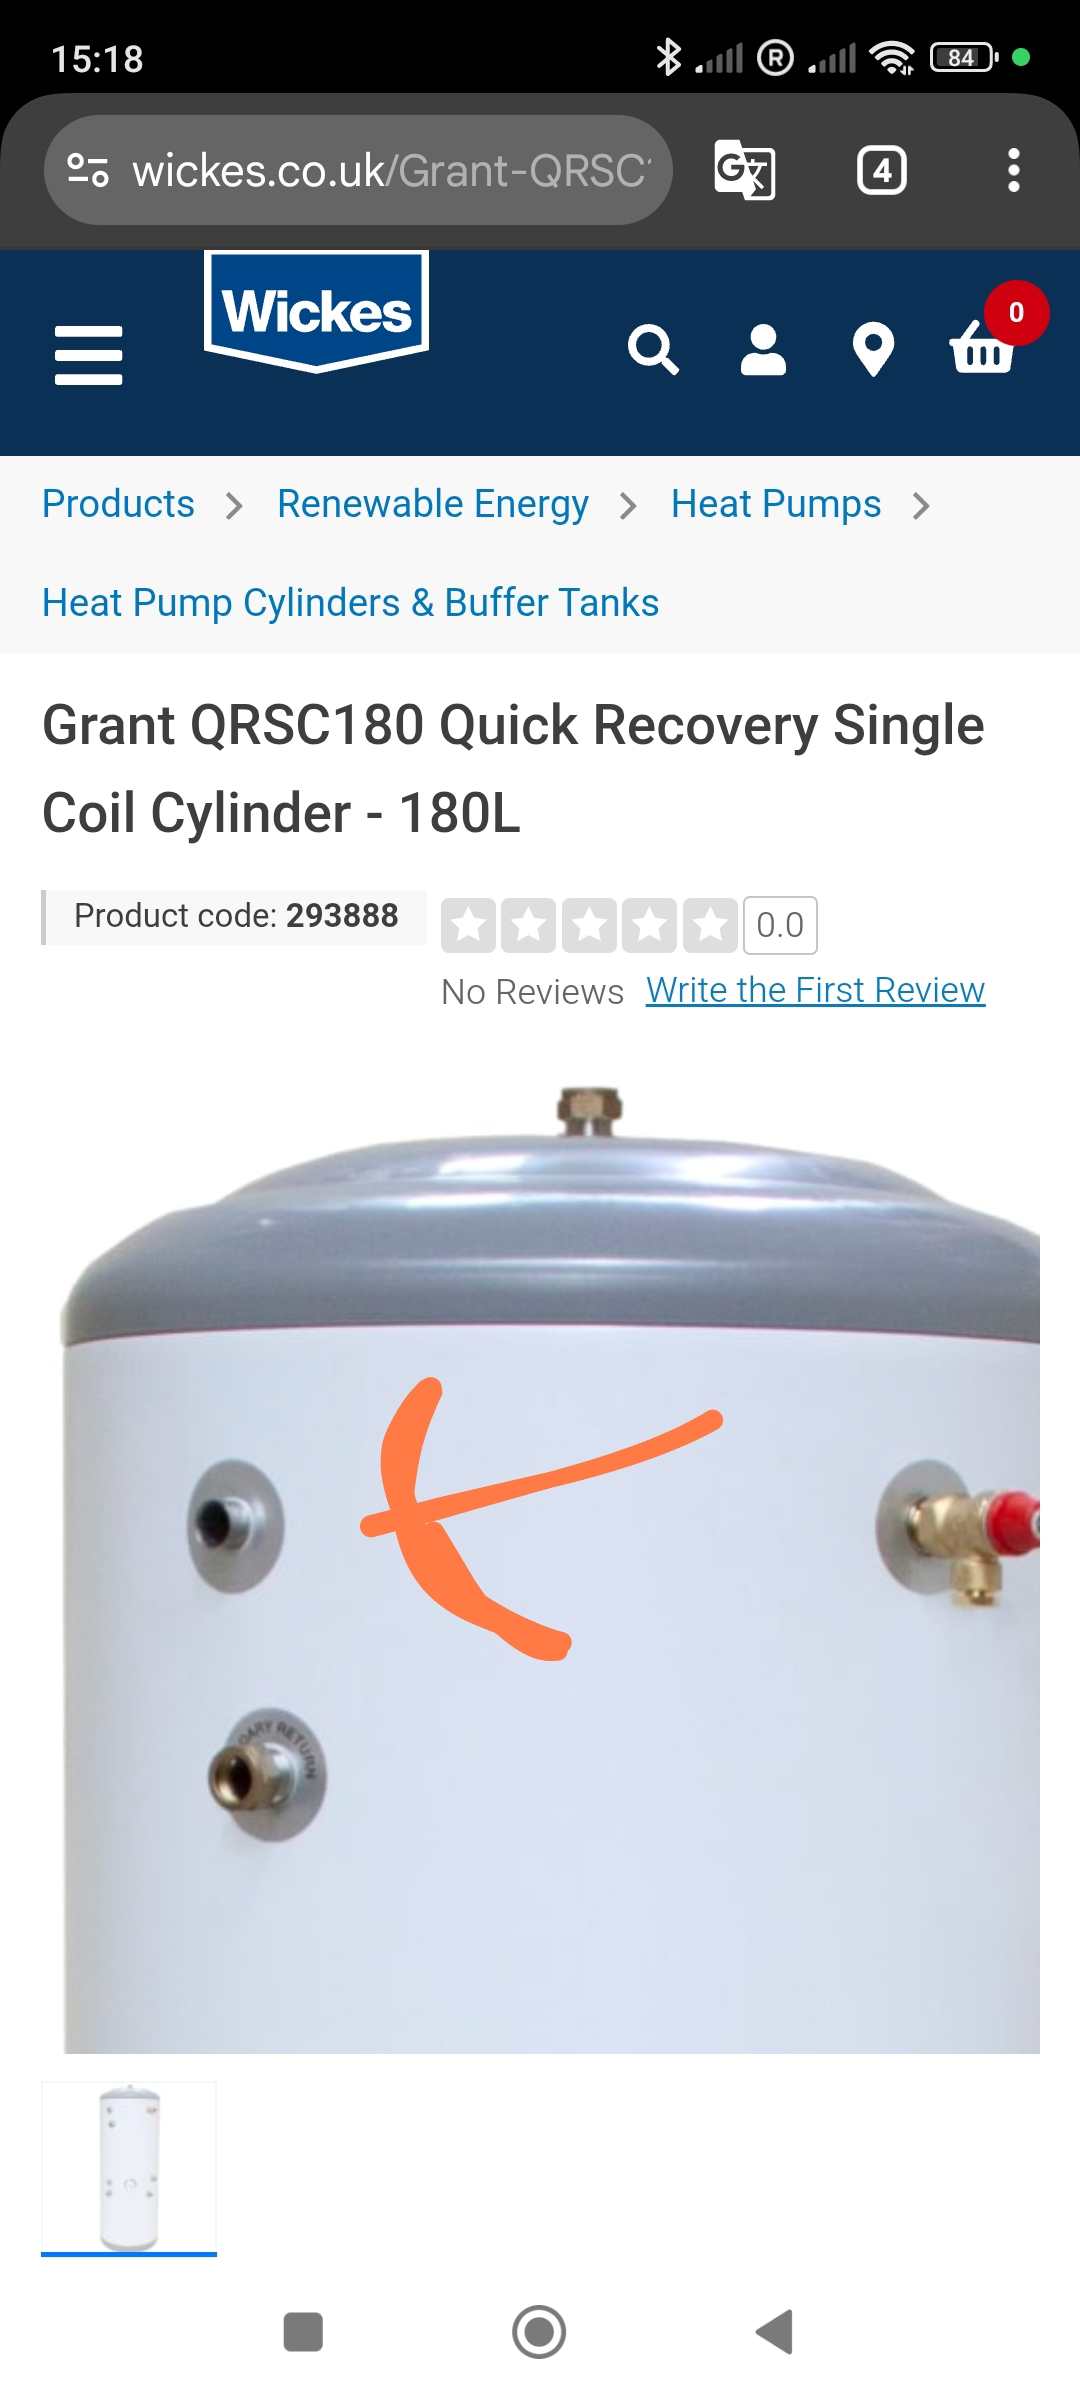
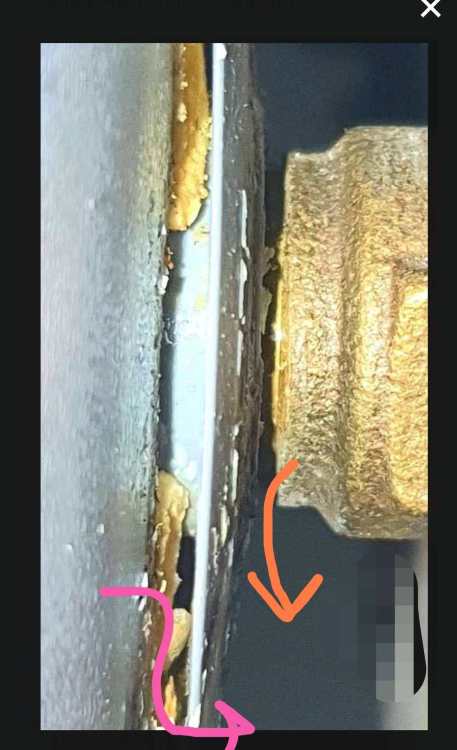
That very much looks like a male thread protruding from the tank. This means that the brass fittings ( I think it's a T&P valve) is female so should be pretty straightforward to clean threads . However .......from the Brochure of your particular brand of tank it appears to come with that brass fittings already in place. This could unfortunately serve as something to manhandle and bash during transit and installation so there is a lightly hood that it will have cracked the tanks. Can you determine from the above joint where the leak is coming from? Is it following the line of the orange or pink arrow?
-
How to fix this leak from a hot-water tank?
Iceverge replied to David001's topic in Boilers & Hot Water Tanks
Have a look at this video. A mandatory annual check I think in the UK. It should explain the T&P valves in there somewhere. Most tanks have male threads as part of the cylinder. These project through a layer of polyurethane foam (insulant) and a lightweight metal skin ( only there to protect the insulation) . Insulation and outer skin will have nothing to do with your leak. If you screw off the offending fitting then you may be able to clean it and reassemble with appropriate sealing. Yes you will need to drain the tank down to do this. If you're not confident it might be worth summoning a plumber as the fitting wouldn't be too hard to overtighten and crack the tank. Likewise the G3 requirements of an UVC are technically pros only in the UK as far as I know.
-
How to fix this leak from a hot-water tank?
Iceverge replied to David001's topic in Boilers & Hot Water Tanks
You need to establish what's leaking first of all. If it's beside the threads of the fitting it's pretty straightforward. Remove the fitting , clean all h Threads with a wire brush and use some hemp and plumbers compound to re attach. If it's the tank leaking you probably need to replace it unless you're good at brazing. Have you checked the pressure and temp relief valves are working ok recently? This could be a symptom of an over pressurising tank. -
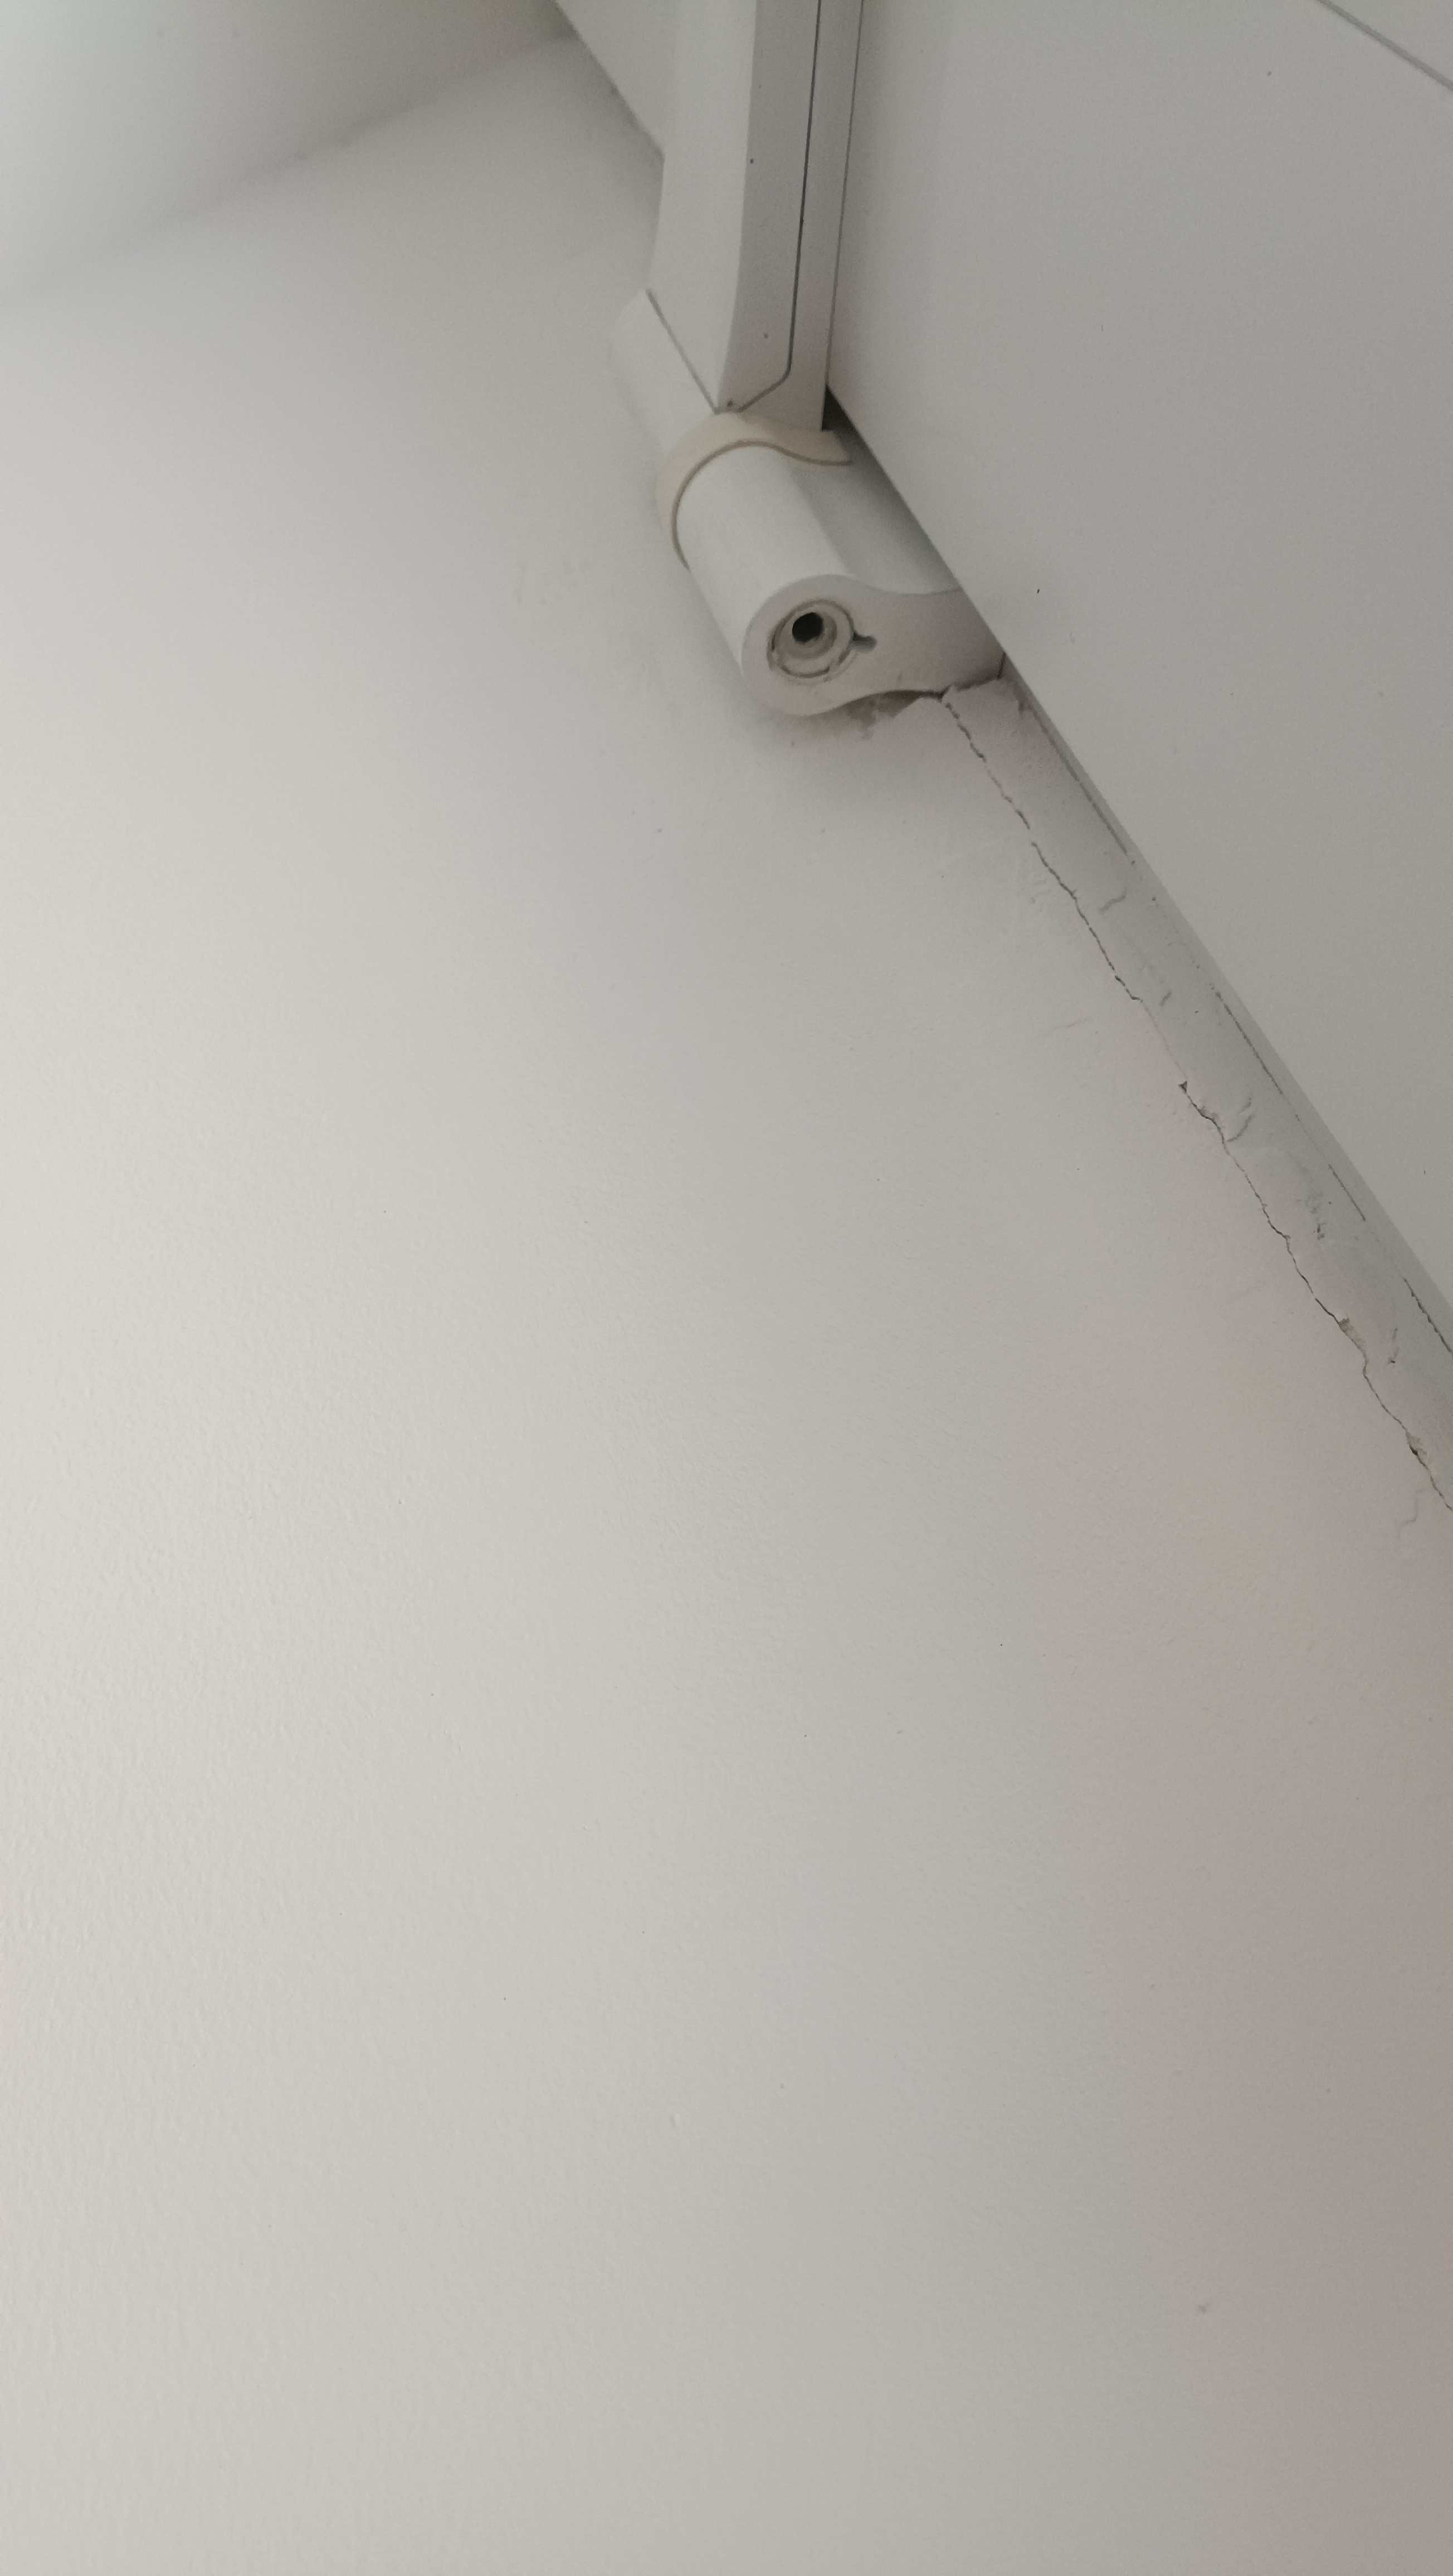
That's the bottom of the hinges on our door. A hex head goes in and adjusts the door on a cam so you can plumb it up

-
There's a chance the door is warped. Run a long straight edge across the diagonals and check the clearance underneath is consistent. Of it's just hanging wonky pop the top off the hinges and use an Allen key to "cam" them into the correct position.
-
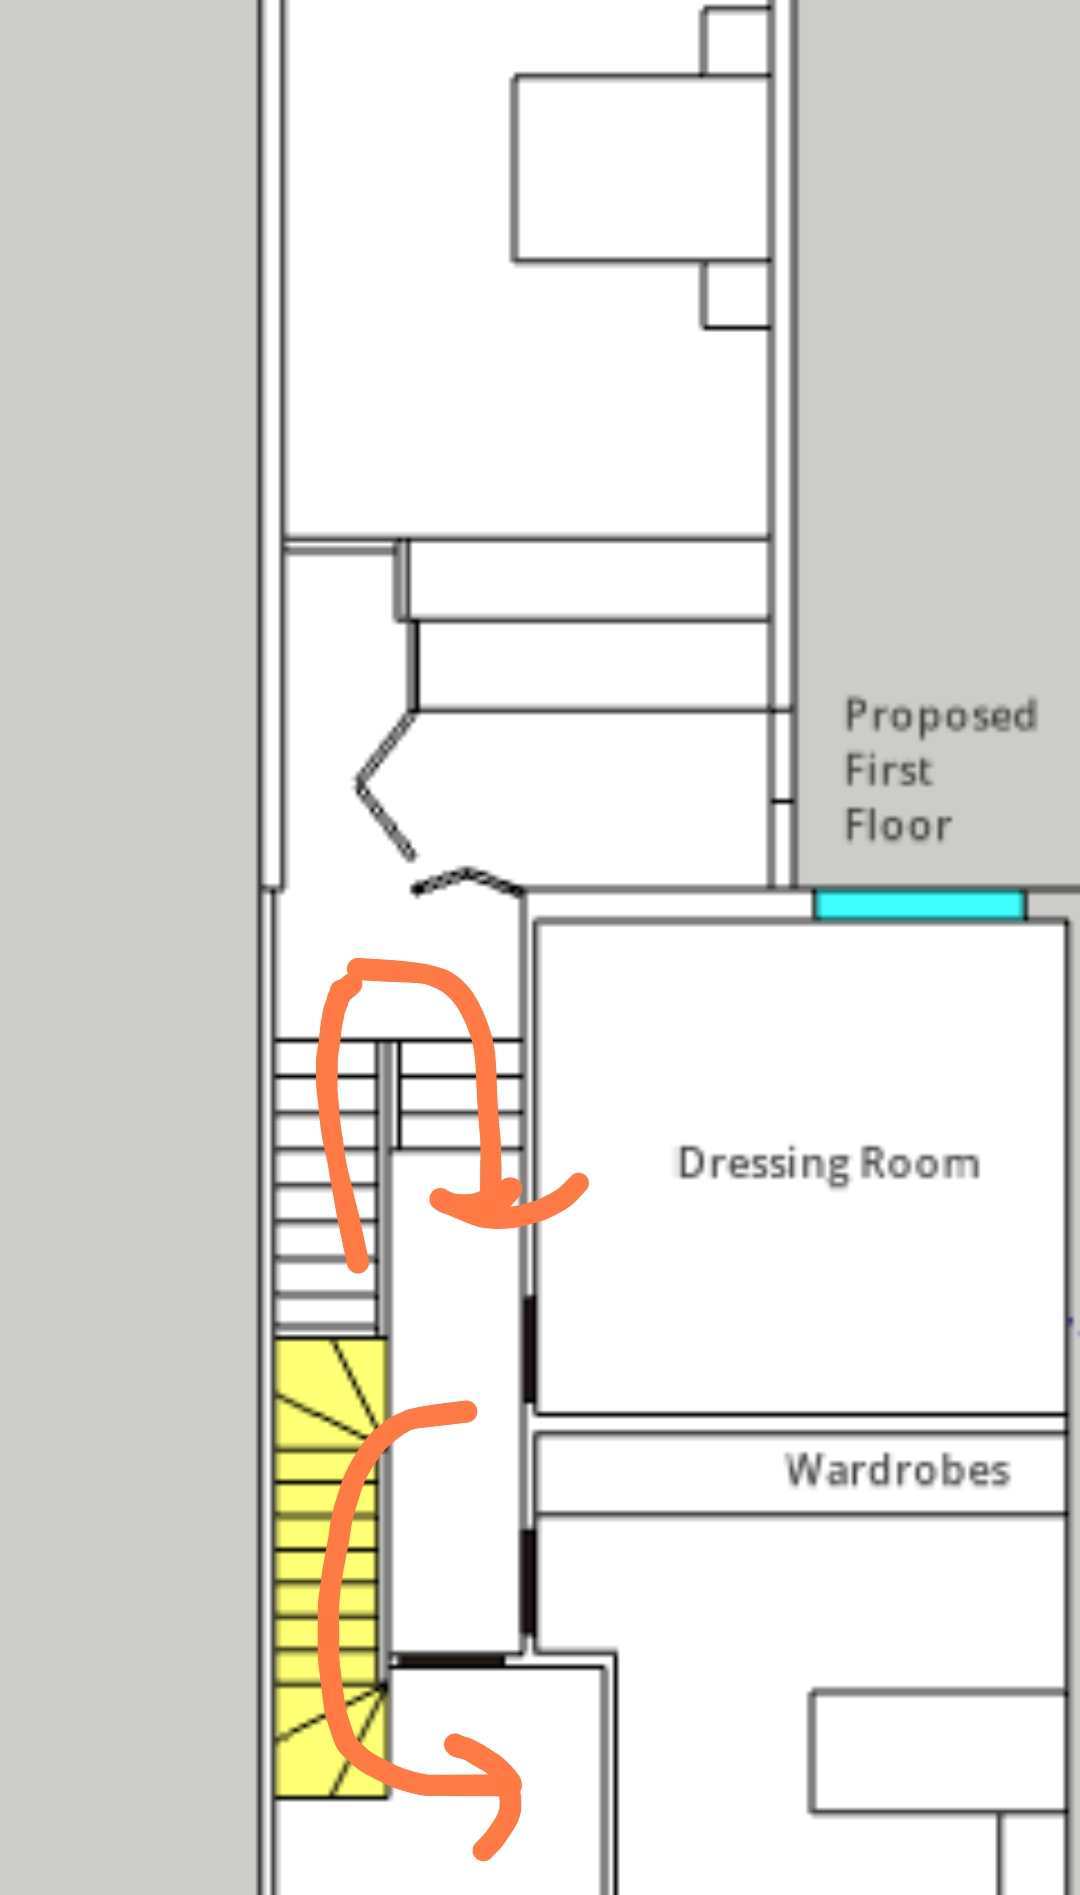
Anything less than 170mm joists will require the floor to be built out of a mix of Unobtainum and Exoticainium and constructed by a team of F1 engineers or nano robots. Can you provide an accurate Sectional drawing of the building and I'll have a go at those stairs. You seem to be making loads of compromises based on where you want the bed and window to go. A headboard backing into a 1000mm knee wall is fine unless you like jumping on the pillows like a loon. You'd be surprised how little time people actually spend admiring the view from lying in bed. More lightly from a nice desk or chair or even the bog.
-
Am I correct in thinking this is "Up" for both stairways? It'd be much easier to package if you stacked them rising the same direction.

-
That's closer to art deco in my view. I'm not a fan of zinc roofs, expensive and the oil canning you get in real life makes them look shoddy in my opinion.
-
Cool a design brief. Maybe a pro like @ETC will be along shortly. I googled Arts and crafts and have spent a total of 10 minutes studying it. Are you sure this is the style you are after? The standout features for me are: They look like they're made from a child's box of wooden building blocks. Triangles, rectangles and semicircles all prominent. Materially they're true to the crafts movement, Zinc roofing, metal railings and huge prominent glass walls are a nono. This follows that clay tiles or thatch for the roof. Stone, brick or render for the walls or even mock tudor style and stout heavily timbered windows. Features like steeply sloped roofs rising from low all the ways to the apex are common as well as, round towers, elaborate chimneys and prominent off central gables. Symmetry isn't that usual. Wilder cottage style gardens are normal, often bordering right up to the house. Here are some modern examples that i like. Of course these awkward shapes would be an expensive nightmare to build to high levels of water protection, insulation and airtightness but that is a difference argument altogether.
- 61 replies
-
- 1
-

-
- design
- grand design
- (and 4 more)
-
There is two real reasons that all the neighbours objected. 1. It's higher and appears more massive than their houses. 2. It's an ugly Frankenstein. with bad proportions and an ungodly mess of materials. You are the guy turning up to the classic car meeting in a Monster truck covered in LEDs and blaring speakers. You need to read the room before you apply again and try to fit in rather than bending the world to fit your will. You could fight it legally but I'm guessing those houses are full of bored spouses who would love a cause to rally behind and have the lawyers and cash to delay you for 10 years. For the millionth time demolish and build fresh. This is a multi million £ house. Incorporate a basement and drop the ridge height to about 8.5m to match the house to the left of yours. Give you architect some more breathing space and see what they come up with.
- 61 replies
-
- 1
-
-
- design
- grand design
- (and 4 more)
-
Can you provide a ground floor plan too, if you're routing soil pipes internally you can route support posts internally. Likewise around the stairs opening, I'm sure space for a post could be found here. Do you have any sectional drawings? I get that your head room is tight but is it "that" tight? 200mm spaced joists screams wrong solution to me. I'll 'd be inclined to stay from the party wall if it's only single skin. You might do more harm than good.
-
With neighbours like that who needs enemies.