Iceverge
-
Posts
4381 -
Joined
-
Last visited
-
Days Won
31
Everything posted by Iceverge
-
I have measured and discovered that my measuring apparatus is banjaxed. Inside temp 20 deg. Exhaust temp 20 deg. Inlet temp 20 deg. Outside temp 20 deg, in Ireland, in the night, in October. Lol. I must make a purchase.
-
Ok, I'm enthused again. Off to do some measuring. Will report back.
-
Right, that's firmly into the couldn't be arsed bin. I have the passivhaus cert and the DEAP (Irish SAP) cert but I was just curious.
-
Is it unrealistic to expect to calculate an overall efficiency in that case using only a cheapo anemometer/thermometer.
-
As per the title, I'm curious to find out the actual efficiency. In use I have measured the supply temperature at 20.7deg and extract at 21.1deg. Flow rate is approx 100m3/hr. Is this enough information or do I need exhaust and intake temp too? It's a counter flow heat exchanger. I don't know the pressure drop across the unit or ducting.
-
400mm. Can't remember why I choose this. I think it was the width of my rake.
-
Here I what I would do next time.
-
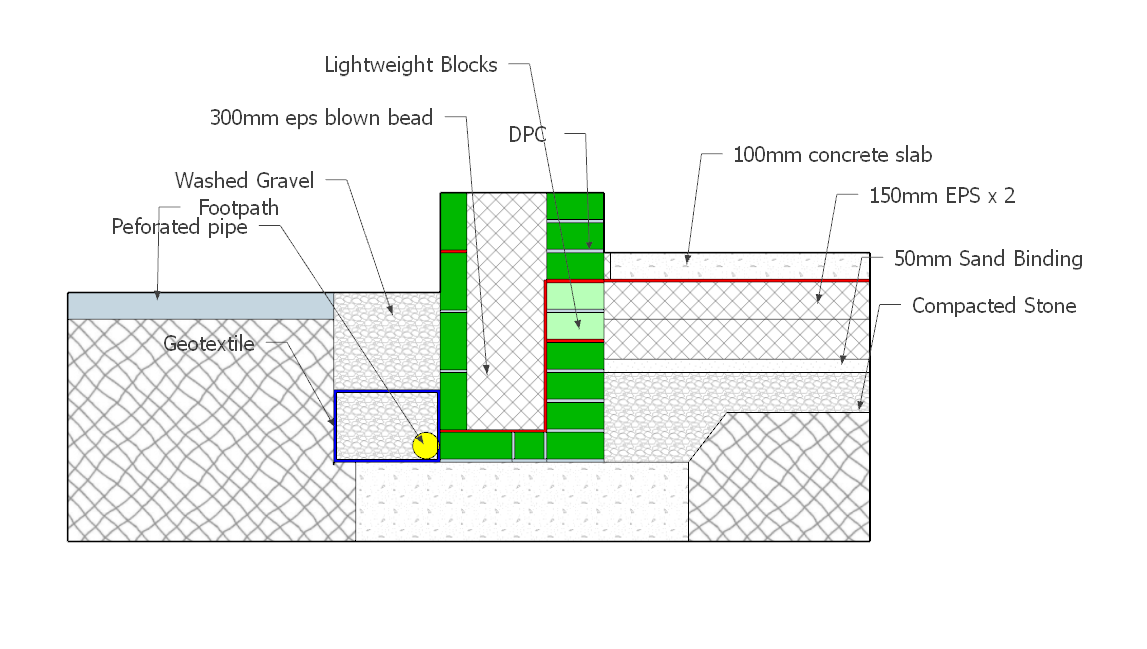
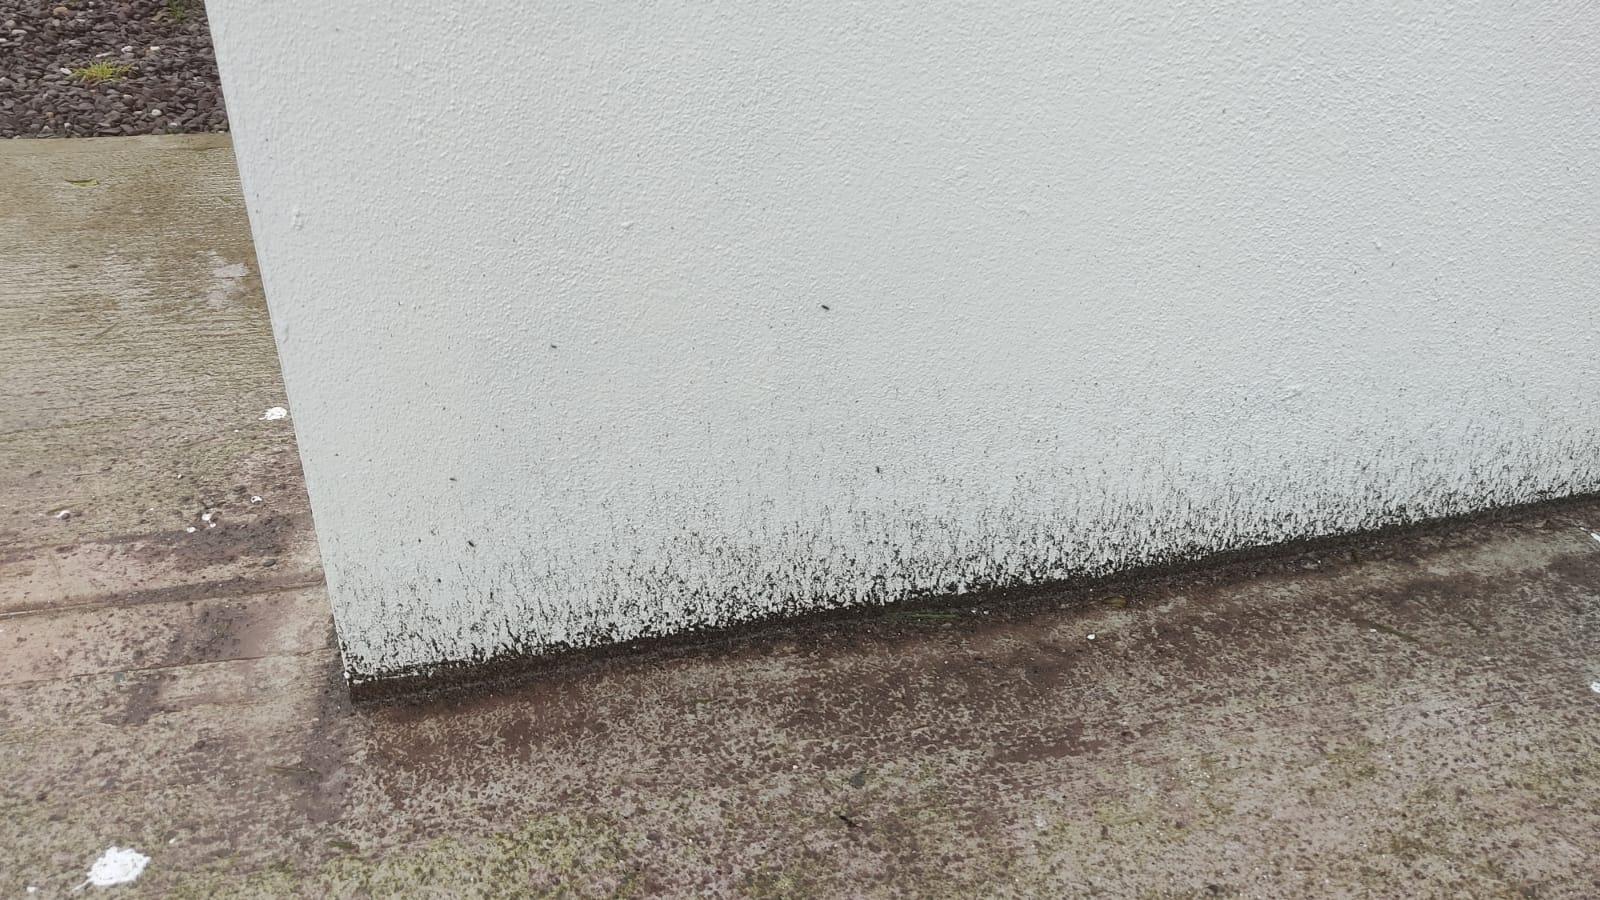
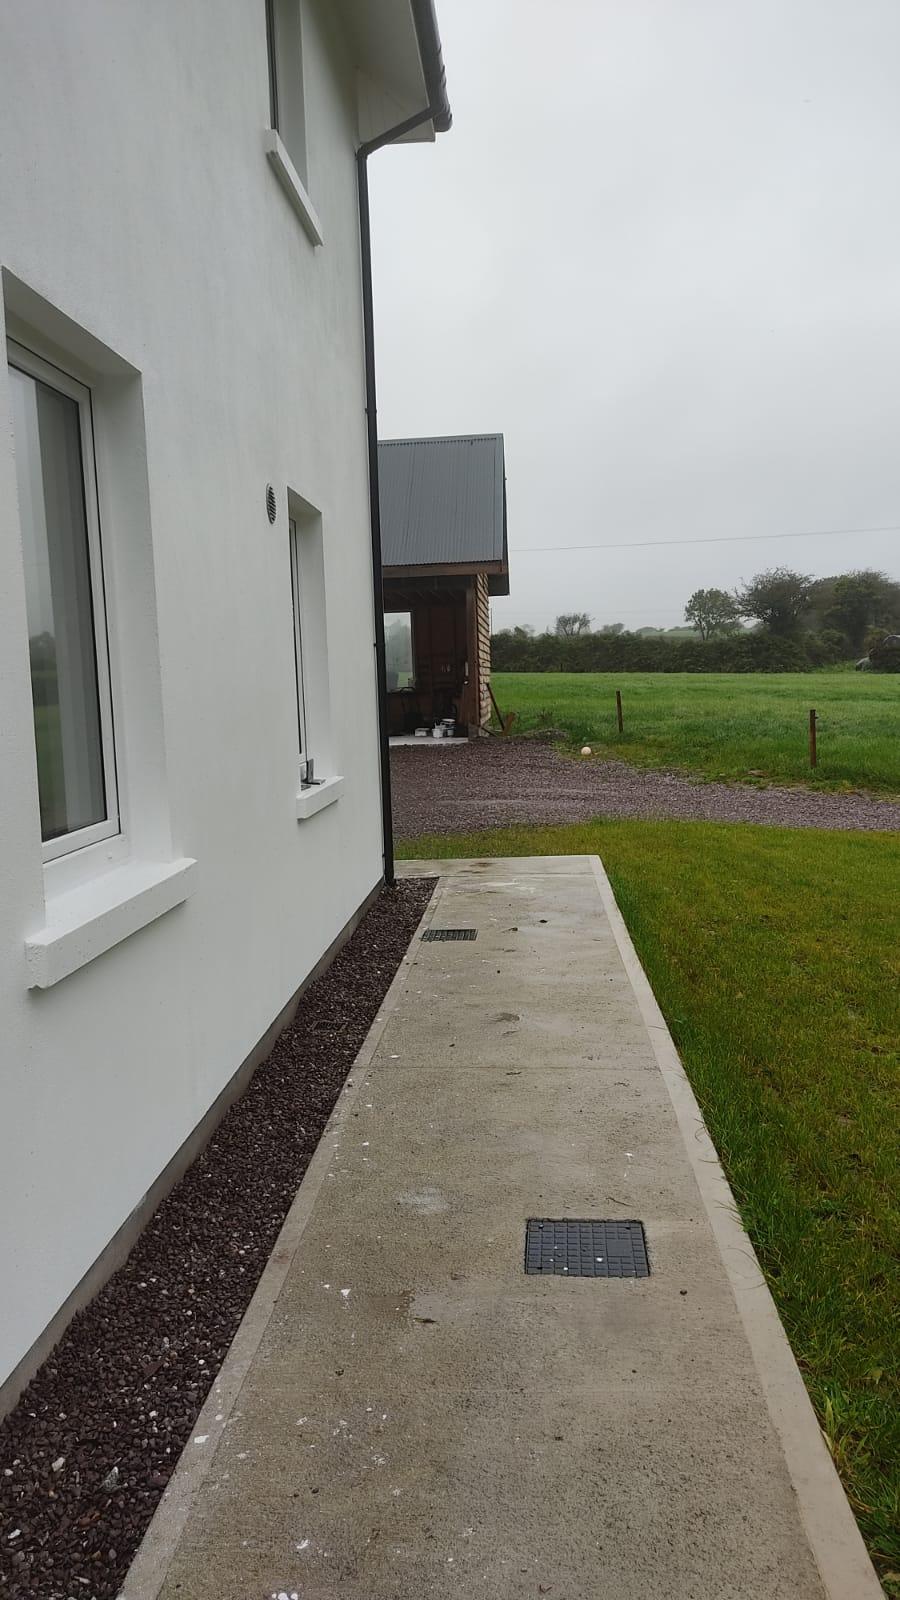
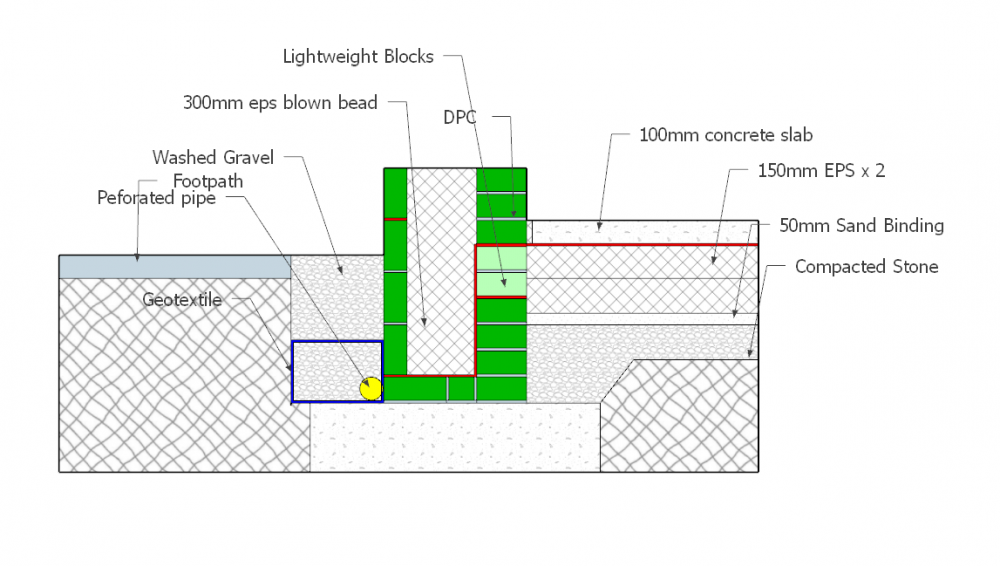
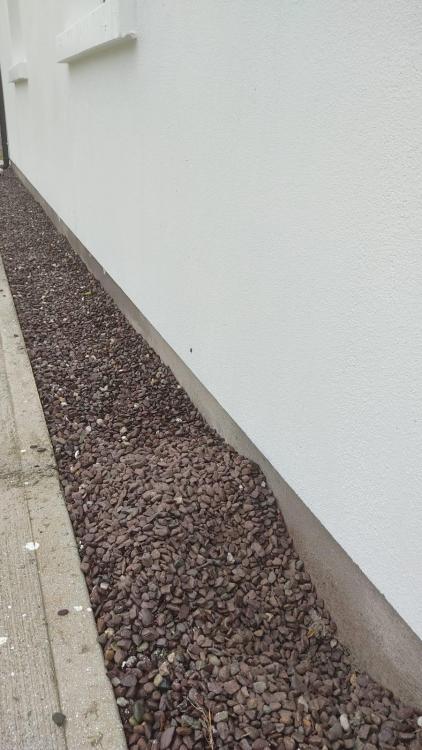
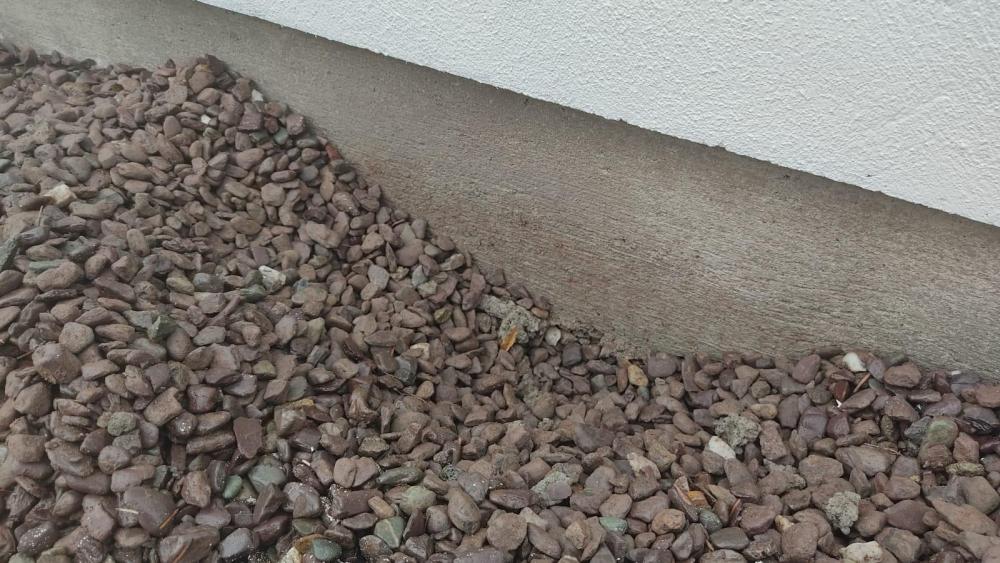
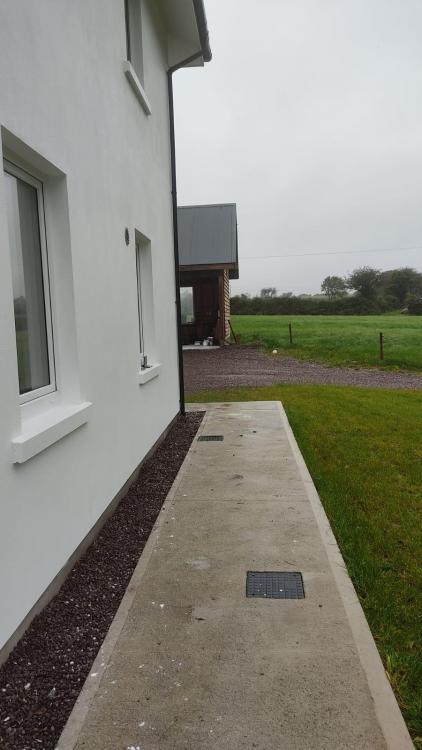
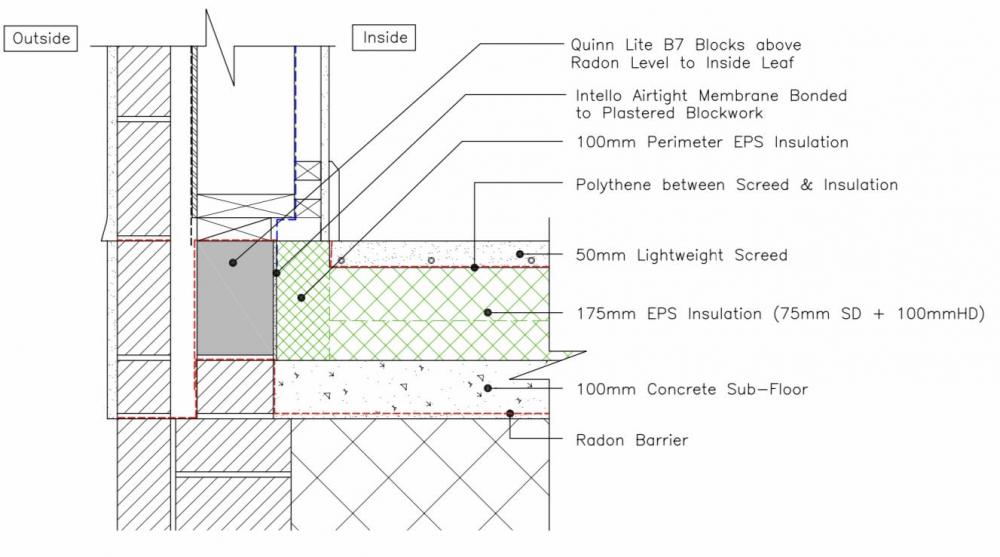
This changes things a bit. What is the width of the ventilated cavity and the render board? Yes, and you rely entirely on a good DPM/DPC to prevent your floor + insulation from becoming wet. As you've witnessed no doubt, building is a very tough environment and guaranteeing no holes in a membrane is all but impossible. A french drain (assuming it can always drain to a lower plain) guarantees that the saturation level of the soil under you house is never higher than the bottom of the french drain. It means that the DPM in effect doesn't need to be prefect. In older buildings with a working French drain and no DPM the floors stayed dry. In your case with a suspended floor (block and beam) it is less of a issue than a ground bearing slab but will still help to keep your rising blockwork + insulation keep dry. Below is our as built foundation detail. (There's a couple of things I'd change) Below I have attached a couple of picture taken just now of our arrangement. It's been raining a lot today and last night but you can see (maybe) where I've scraped away the stones in the second picture the wall is dry. It's difficult to make out as some silt in the gravel has discoloured the wall. I am inferring from this that the wall inside must be dry also although it is below DPC. Note there's no splashing of the wall either. The final picture is of the porch area (porch yet to be built). There is nasty splash marks on the wall and the blocks adjoining the footpath are wet. This is probably the case for most walls with adjoining footpaths. I've been told that it looks nice too but that was never my aim. (forgive the messy painting, I'll see that I give myself a flogging!) It does give the footpaths a nice extra bit of elbow room with no extra concrete although they were trickier to lay.

-
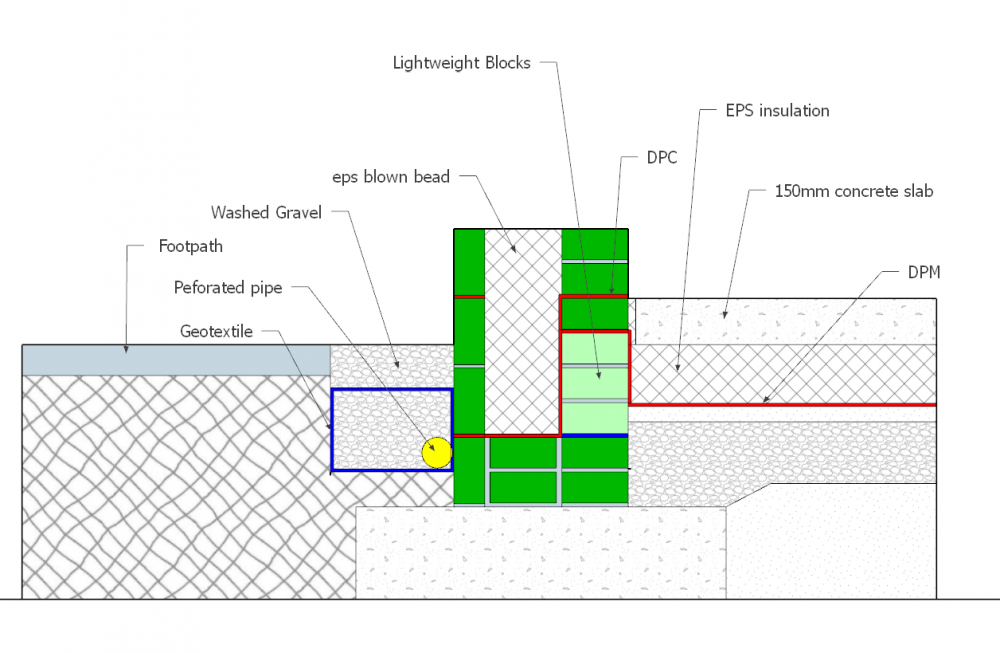
I have attached a photo of a more typical detail, with a wider internal upstand. Why only 140mm timber frame? Wider is better. In any case I would have the render board overhang the eps externally or omit the eps entirely. Your breather membrane should always direct any moisture drips down and out. It will direct them behind the EPS here. EPS will absorb moisture if the ground becomes saturated. A french drain topped by pebbles is your best plan in any case. I put one in our new cavity wall house. Remember just because you can’t see water on the surface it may still saturate the ground just below. Don’t give it a chance to get into your foundations or floor if the DPC ever fails. It must have an easy option to drain away from the house and footings. A geotextile membrane is permeable to allow water to pass through but retain the fines in soil. This prevents mud and silt from clogging any drainage systems or mixing of permeable aggregate and soil making them unstable. What is your intention for it here?
-
You'll need insulated plasterboard for this.
-
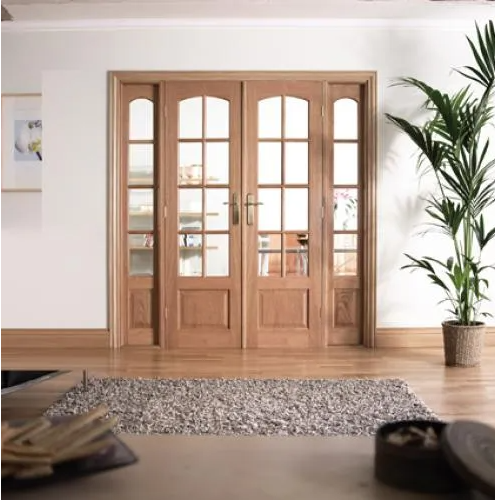
Plenty of options for something period. One option I found. https://www.vibrantdoors.co.uk/door/vbw8hwd-w8-hardwood-room-divider Before you commit to anything make a little model of the spaces. I'm sure your architect can do this also. You'll be able to assess the light throughout the rooms then.
-
That marine ply won't hold up a large window. The Denby Dale one was able to because they made a box. The sides supported the bottom. I think you're overthinking this. With a 110mm cavity you're short of bregs not to mind PH. With low insulation levels thermal bridging isn't as much of an issue. I would pursue whatever kind of window installation the builder knows and is comfortable with and will definitely keep out water. The only low hanging fruit on your build is airtightness. Concentrate on this and your house will be warm.
-
Have you considered knocking the chimney and the wall between the kitchen and the living room and making your kitchen larger this way. Much cheaper than an extension. You could put external insulation down to the footings and out. This should bring the floor inside your thermal envelope. No need to dig. As an alternative consider floor coverings that aren't cold to the touch like tile and stone. Use LVT, lino, carpet, laminate or wood instead. Don't be too hasty on this. ASHP isn't a panacea. Concentrate on minimum heat demand first. Tricky and expensive to combine all. I would discount solar thermal and a wet stove. Their day has passed. Good plan. Probably should be the first thing you do before you insulate. My mantra for proceeding. 1. Sort any bulk water issues. 2. Ventilation (preferably continuous mechanical, ideally with heat recovery) 3. Airtightness (cheap and hugely effective) 4. Improve u values. (Including windows) 5. Consider your heating system. 6. Renewables (PV) If you are determined to have a wood burner, get a small one. ( They make the house colder when not in use and like asbestos leave plenty of nasties in the internal air) Put it in a central area. Use a proper insulated flue and run it hard when in use. Don't connect it to the water. Just open a few doors to heat the house. If logburning is a lifestyle you enjoy and are committed to it long term @Thedreamer has a nice setup with an EASHP.
-
Have you read the blog post I put up? It's quite good. Here is a sketch of the detail. Cheap, easy to build, airtight, thermally sound.


-
 On a calm night. Close all the exterior windows and doors. Open all internal doors wide open. Turn off any other heating and log burner. Put a cheap 2kW electric radiator in the centre of the house. Allow the temperature to stabilise overnight. Take an average internal temperature and an external temperature in the morning. From here you will have a pretty good idea of your heat loss. If your external temp is 10 and internal 15. You will use 2000W/5deg or 400W/degree. Assuming worst case of -5 degrees 25*400w= 10000W or 10 kW Add a little safety factor for a windy night, say 25% and you should be able to get by with a 12.5kW heat pump minimum (excluding DHW) Remember oversizing heatpumps is generally a good thing as they will return a higher COP and defrost less often.
 -
I too am interested in this if anyone has more info. Solar thermal is dead from what i understand. Do you have any more information on their logic here? Did they mention whether they were thinking about mineral wool, eps beads or closed cell foam? How wide is your cavity? think of this as a nice benefit if it works.your priority is a comfortable house. They might well be the case. Can you quantify your heat load now? On a very cold day how much energy do you use per hr to keep warm? Before you go throwing thousands and thousands at the heat lump (lol) suppliers you need to know what your house heating profile is as one of our other members found out recently they’ll happily sell you a pig in a poke.
-
Should be fine,. inward opening or outward. how wide is the profile?
-
If you don’t support the bottom of the window it will sag over time and your windows won’t operate well. We used precast sills built into the external skin with 20mm pertruding into the to cavity for the windows to rest on. I have seen and heard of many methods but letting it float over the cavity held up by the straps won’t be a great long term idea. By the way the middle of the insulation layer is the best place thermally however as long as the windows are somewhere in the insulation layer you’ll be ok. have you decided on what type of windows you are going to use?
-
Corrugated Metal Roof - how did you ventilate your panels
Iceverge replied to Tom's Barn's topic in Roofing, Tiling & Slating
Don’t disregard your joiners advice but run it by your SE before making any such changes. Metal roofs are quite light so it will probably be fine to increase to 600mm or greater. For my garage I fully taped a breather membrane pulled taut, battened and counterbattened with 25*50mm. If i was to do it again i would increase to 25*75 counterbattens i think as they would be less likely to split with the broad roofing screws. FWIW I’ve always loved the sound of rain on a tin roof. -
Condensation will form on the underside of the roof and it will drip onto your kingspan and probably make its way through the roof onto your plasterboard. We have some old outbuildings and the underside of every single metal roof gets condensation. The only one that doesn’t drip has chicken wire strewn between the purlins to hold up some cheap roofing felt. You’ll need to take the roof off and put up felt. Over the battens will work fine. On another note the fleece “non drip” roofing doesn’t work very welll here in Ireland. For me roofing felt every time. I wouldn’t put PIR in the roof either for a list of reasons as long as my arm. Use mineral wool batts or cellulose , airtight membrane, insulated service cavity and plasterboard.
-
https://www.edmondodonoghue.com/build-it-better-window-door-detailing/ Here’s a good blog post describing it.
-
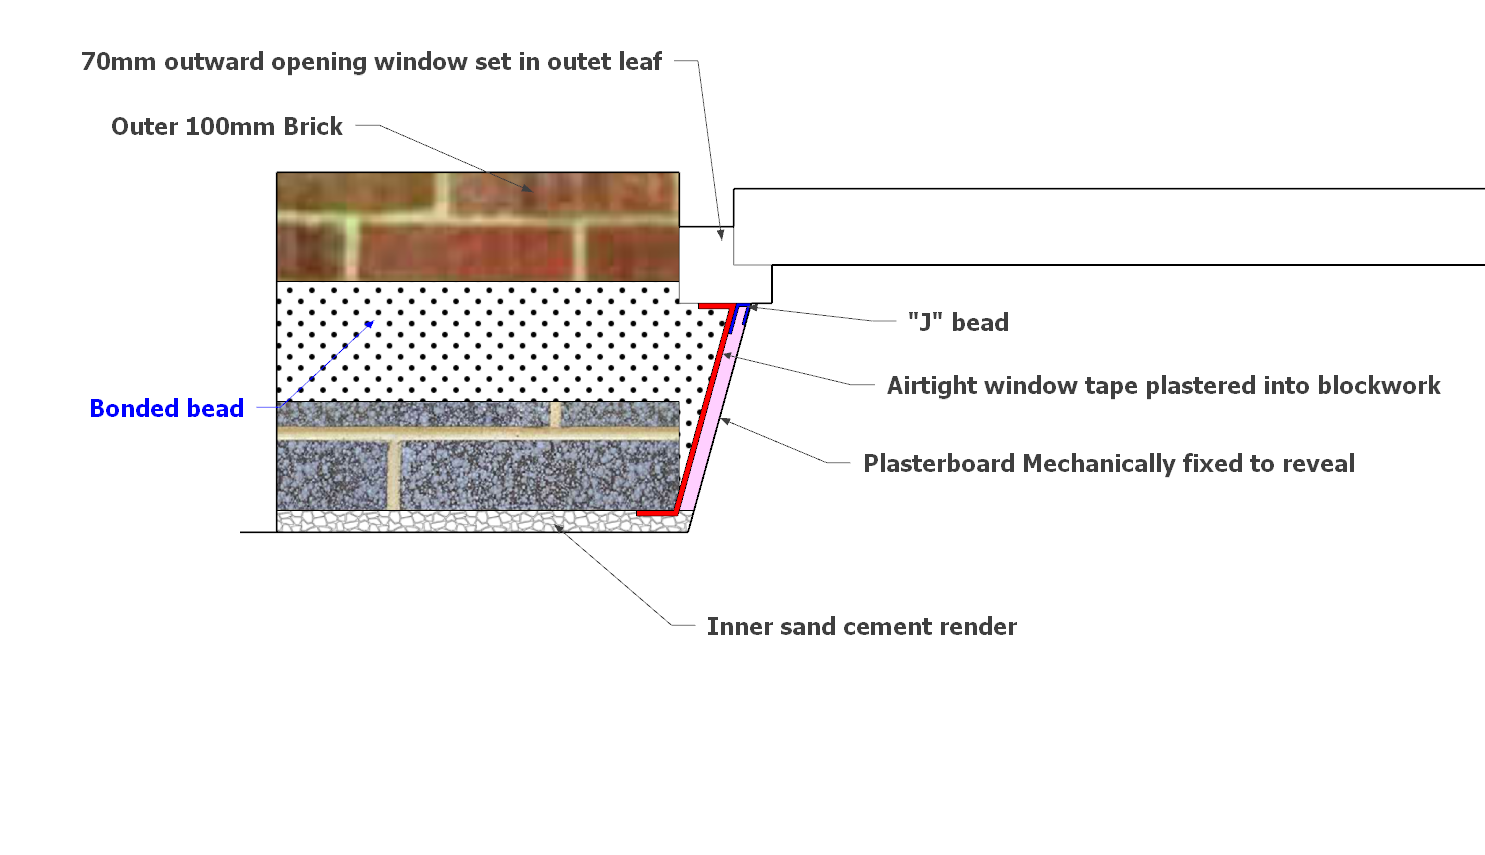
That’s the Denby dale detail from green building store. 300mm cavity. They made boxes for the windows out of marine ply. I think some delaminated so they refined the detail by treating the edges with something for future designs. I made and used 18mm OSB ones after the windows had been installed, 250mm cavity. I suggest you don’t need them, however you will need something to rest the bottom of the windows on. Are you using precast sills? When the window installers are done you can tape the windows to the interior wall and plaster over. https://www.siga.swiss/ie_en/products/fentrim/fentrim-20 or similar. Then screw a J bead to the frame and install plasterboard as your reveals. The EPS beads will push the tape to the plasterboard giving you fully insulated reveals.
-
How to reduce thermal bridge / draughts with RSJ beam
Iceverge replied to WWilts's topic in Heat Insulation
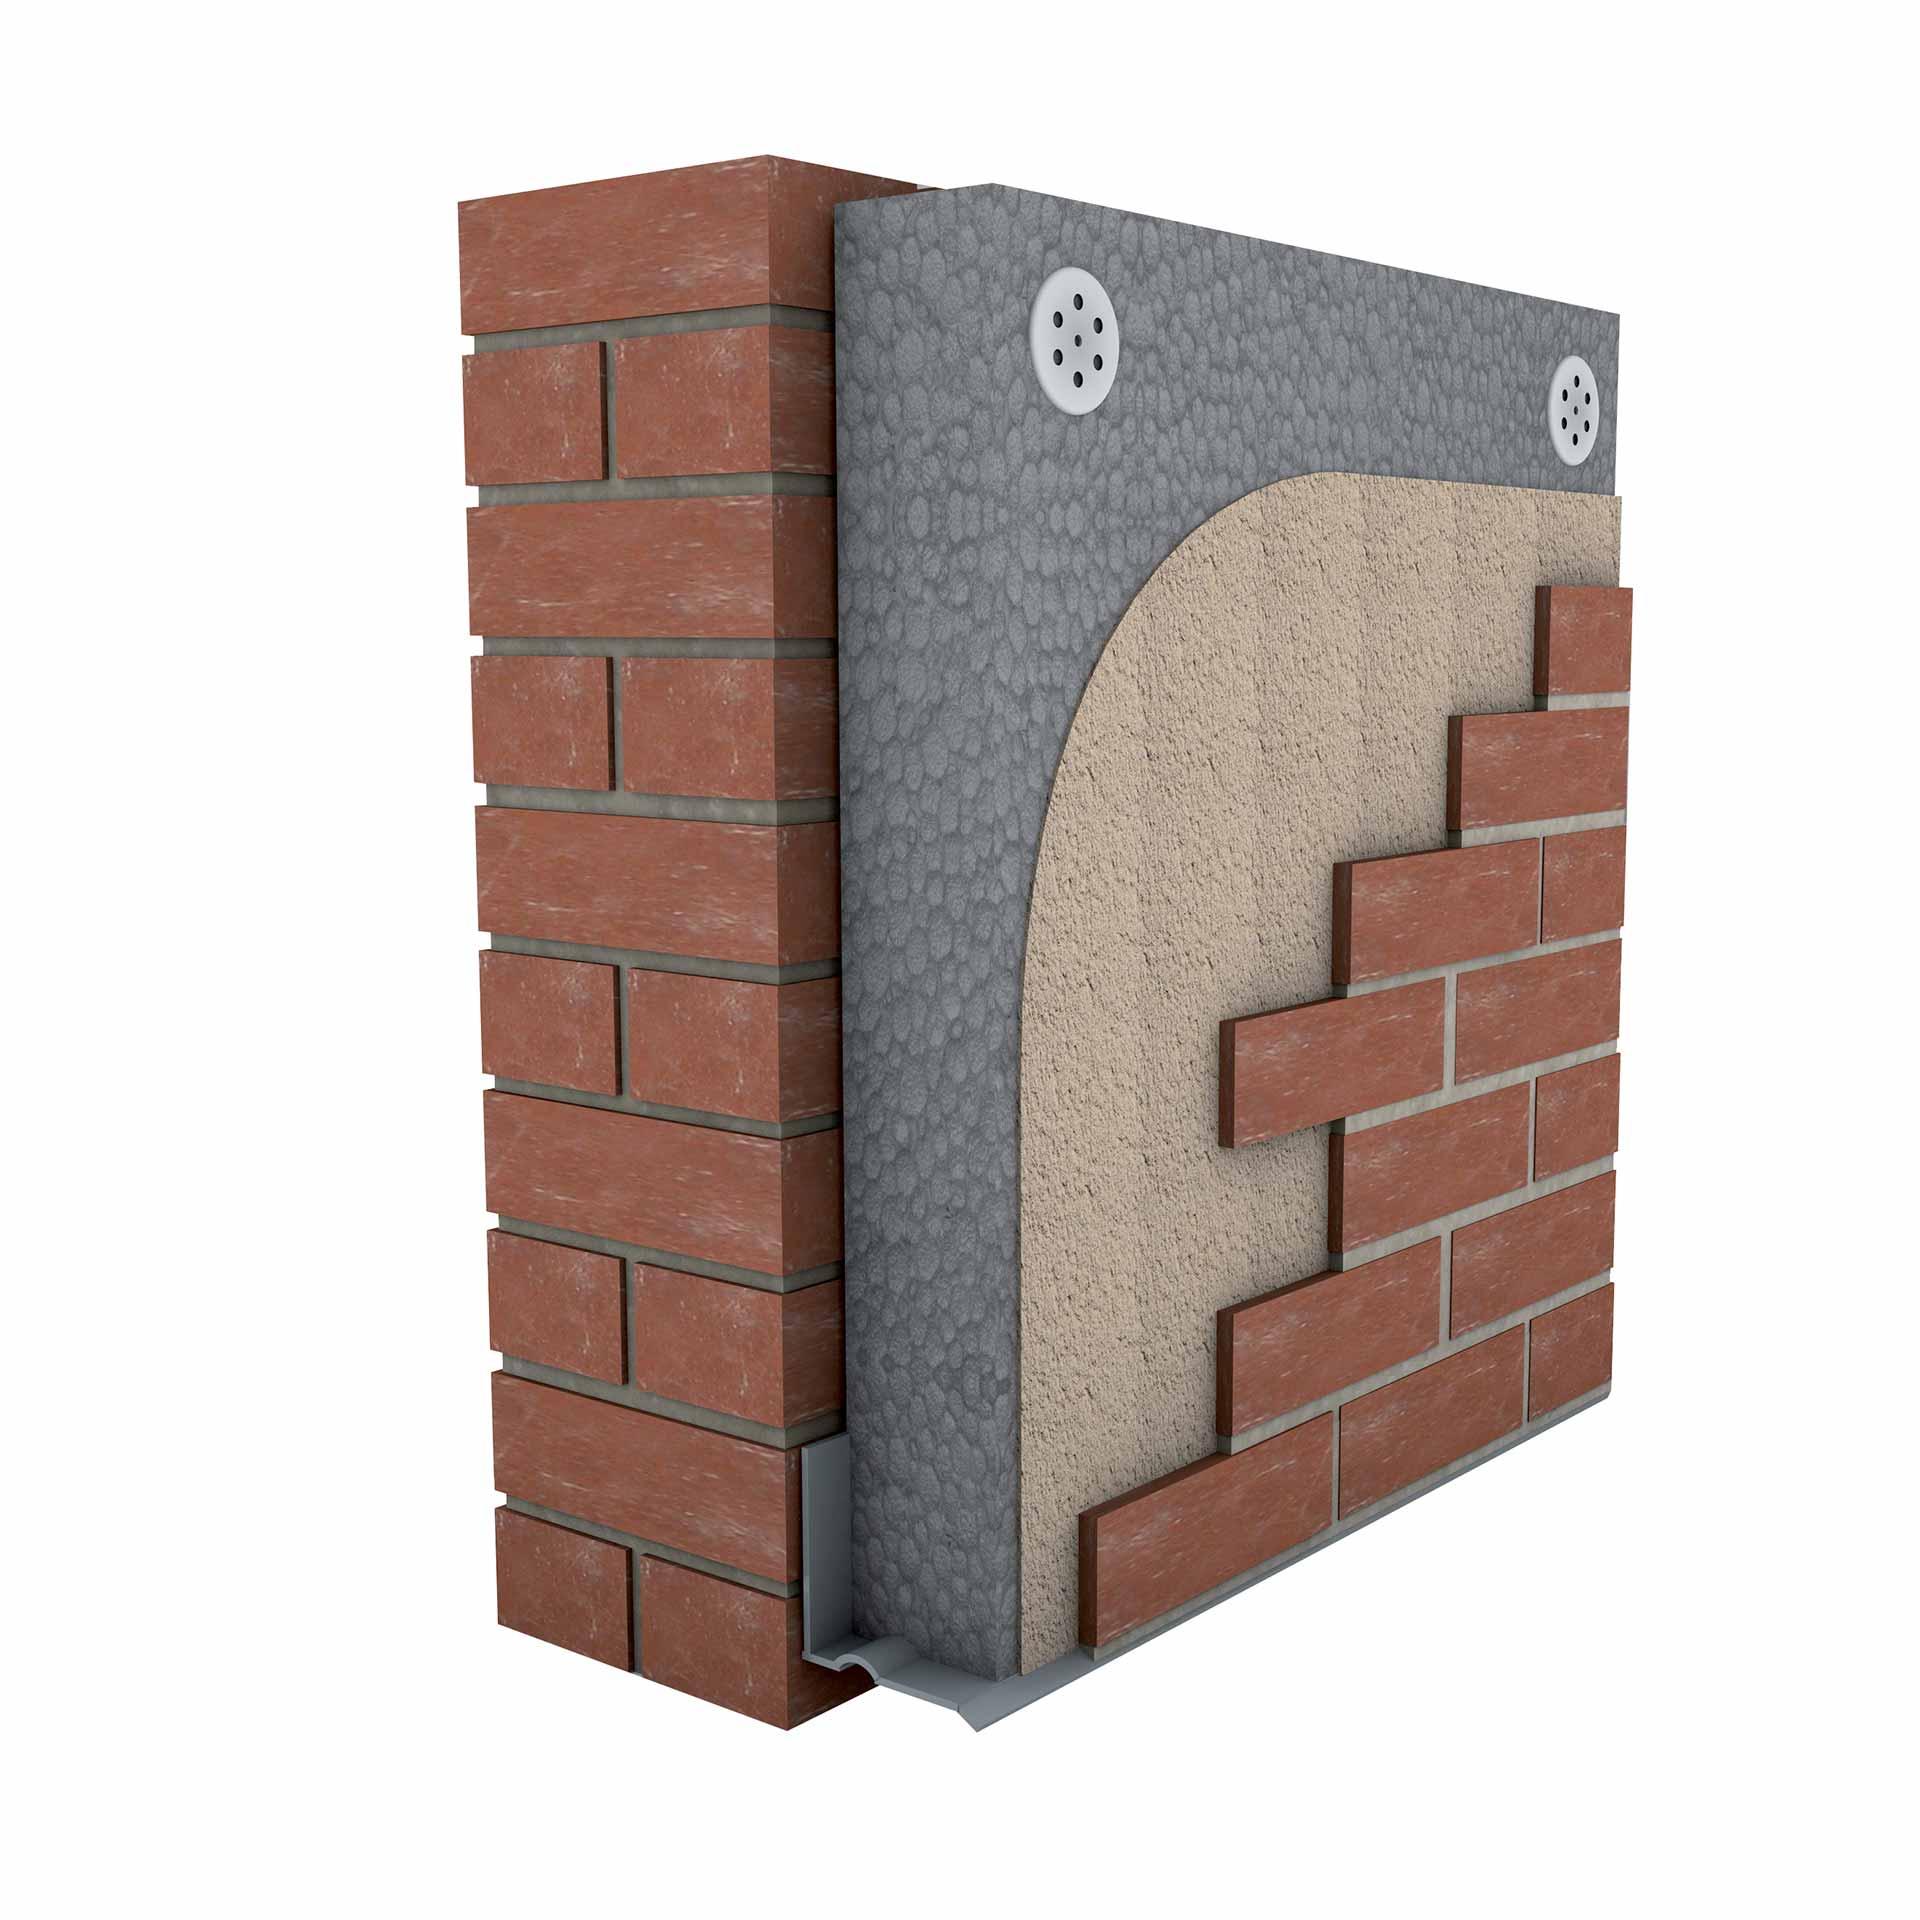
No big deal. This is a pic of the weber installation, others are available.
-
How to reduce thermal bridge / draughts with RSJ beam
Iceverge replied to WWilts's topic in Heat Insulation
Externally insulate this wall
-
Airtight/VCL ideas for cantilever posijoist roof
Iceverge replied to Adam2's topic in Heat Insulation
It doesn't look like it's beyond the point of changing your mind from the photos. Is there something else prohibiting it not in the pictures? I'm sorry but I don't understand what you mean here. Would you care to share a drawing of your PIR plan please? I can't figure out where you intend to put the earthwool.