Rishard
-
Posts
177 -
Joined
-
Last visited
Everything posted by Rishard
-
@saveasteading love the look of this roof. Who did you use for supply of the panels? Also, what make up did you use below it? Cheers
-
Glazing a Green Oak Framed entrance structure
Rishard replied to peekay's topic in Windows & Glazing
+1 to external glazing. I’ve built several oak frames this way. It’s a bit of a hybrid as the cover boards which sandwich the glass to the oak frame are separate pieces of oak which on a traditional ‘oak frame’ is a bit false but I’ve not seen a better system out there. If the cover boards are rough sawn then it looks best. We use expanding foam tapes to seal the frame to the glass and glass to the cover boards. These are weatherproof and adjust with the shrinkage of the oak. Oak frames are harder to airtightness seal and have some fairly substantial thermal bridges but it can be done. Oakwrights system is good. -
Resurrecting this thread. I’ve had a price from vartryengineering. It was quoted a while ago but came in at €1.33 each. Did anyone find a cost effective alternative at all?
-
UFH pipes in concrete slab, on insulation or tied to mesh
Rishard replied to Chanmenie's topic in Foundations
Where did you decide to tie your UFH pipes in the end? -
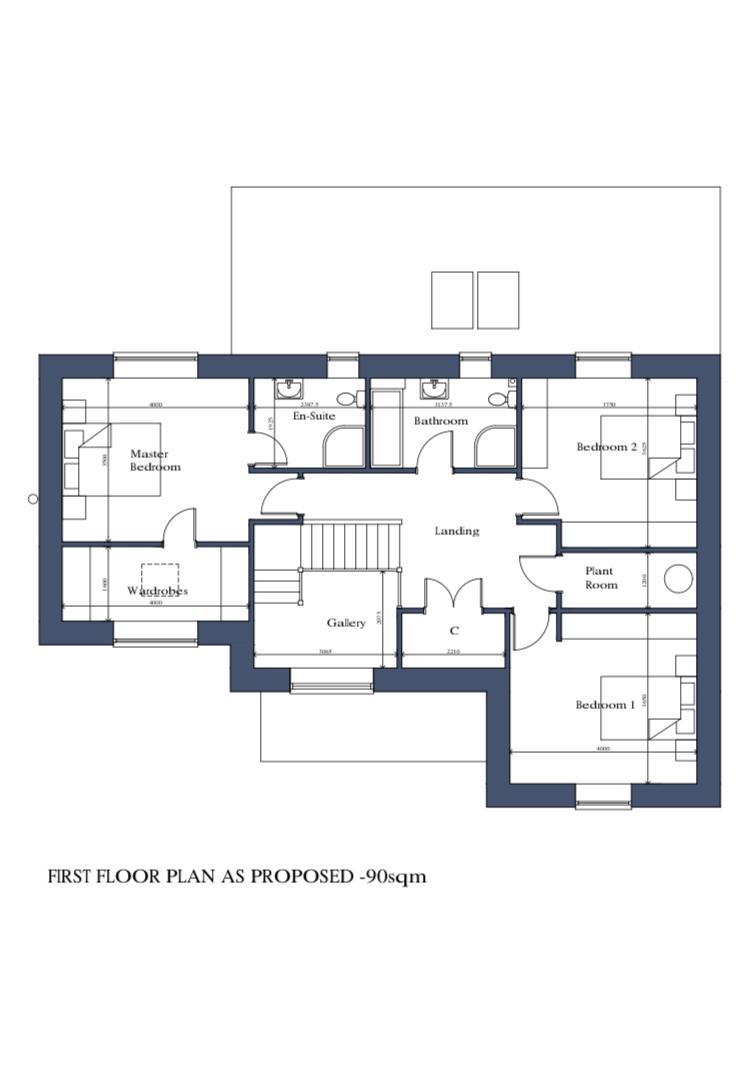
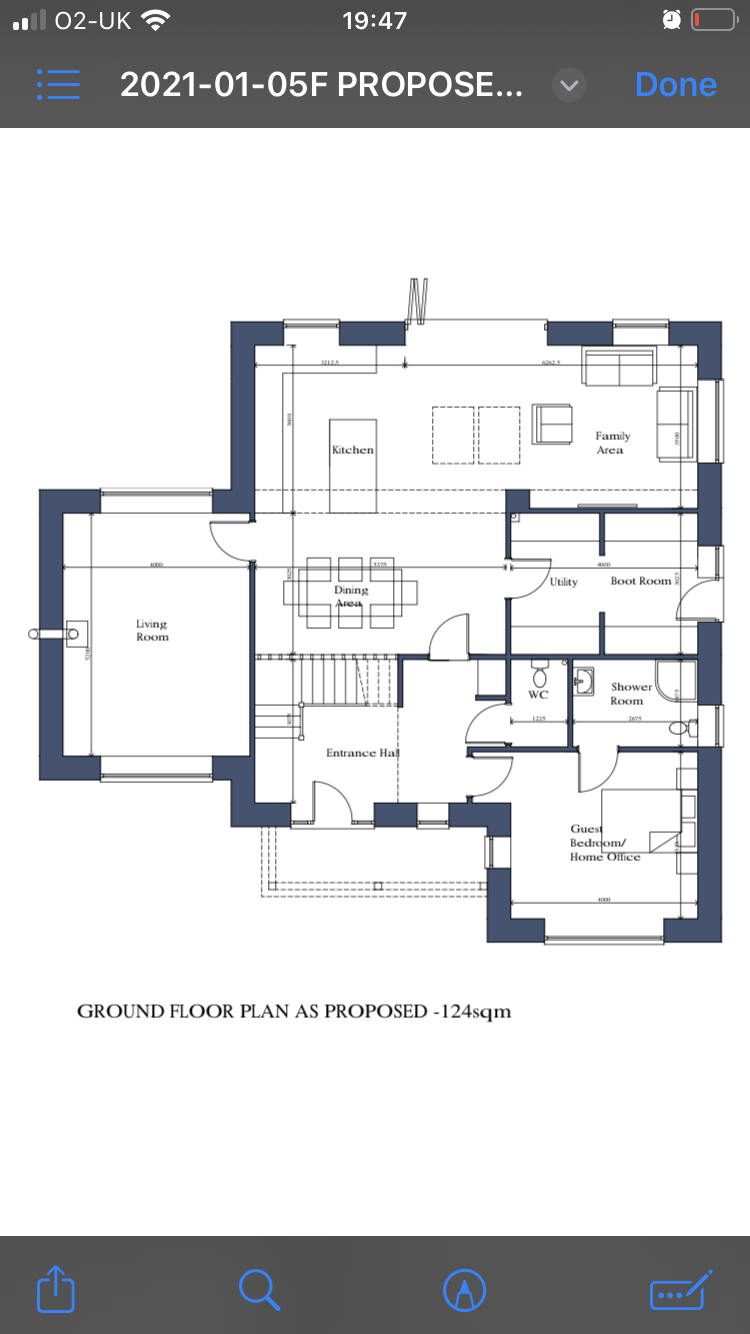
That’s helpful information. Ideally the guest shower room would have wet room plumbing for the shower. I still need to look in to how to achieve this. Is it just w/c’s that want a direct route to IC? Are basin wastes ok going into a Y in a pipe run? Same with kitchen sink, can that be in the run that connects to the stack which runs upstairs? Swept bend at base of the stack joining a Y coming from kitchen sink to IC?
-
I forgot to mention, I’m using pozi joists for this build. Which have a 200mm clear space between the cords which I can as planing on using to service the master en-suite. The w/c would have a basin, just not on the plan. Could the guest shower room not link to the drain run coming from the w/c? I have plenty of fall to the main drain so can set my bends very low below the slab if it helps. I don’t like the idea of drilling holes through the wall to connect up externally. Ideally most should come up through the slab.
-
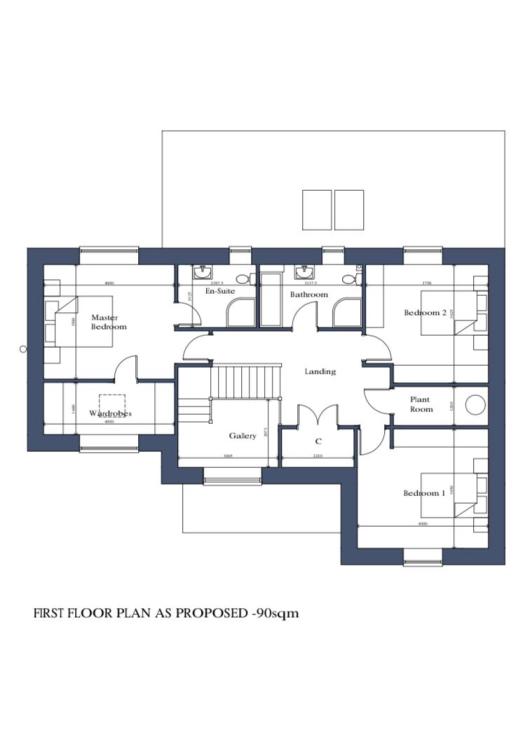
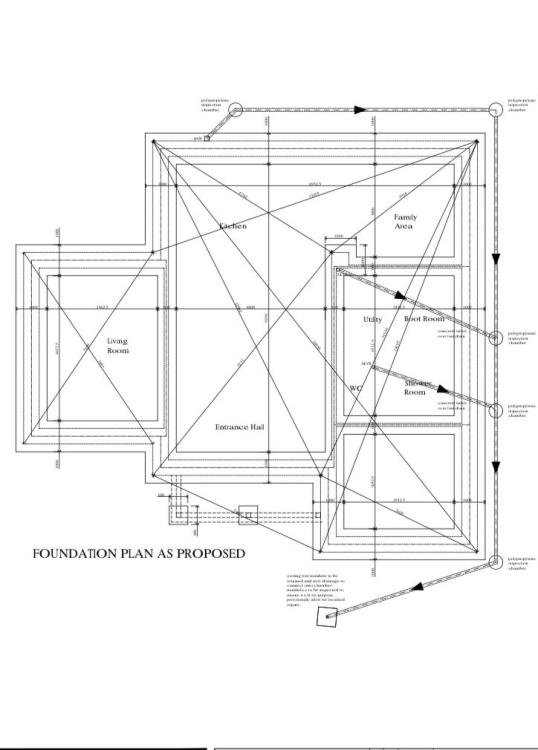
I’m just about to set out some of my 110mm soil pipes. On the architects plans we have picked the shortest route to the outside of the building which seems sensible. I have a kitchen waste at the rear of the build which on plan is going around the outside of the house to join the other soil pipes. My first question is, Would it make sense to try come through the building to join the other soil pipes as a more direct route? Or is this a plumbing no no for some reason? My second question is, The 2 soil pipes which are in the utility and wc/shower room. I’m imagining a swept bend coming up to a vertical pipe through the slab. Is this the point where all the shower room and w/c connections are made or should I have 1 for the w/c and 1 for the shower room as they are separate rooms? Which of these pipes needs a rodding eye if any? I gather the stack which runs up the utility to upstairs will be ok to have an AAV in an accessible place, is this correct? Thanks in advance I have attached floor plans and foundation plans.

-
Most cost effective way to get to passive standard using block
Rishard replied to CalvinHobbes's topic in Heat Insulation
Great, so it is 100w used per hour to achieve the desired temperature. It’s good to clarify. When you put it together as 2.4kWh over a 24 hour period it becomes more of a worth while saving. Apologies for my basic understanding, I’m getting there. Believe it or not I have had phpp done for my house. 1. He did explain a good amount with me but I wouldn’t know how to work out how many cold days a year from it…. 2. current electricity 0.30 kWh 3. 20 years + 4. Not till it’s built but probably not much longer. I do care about its performance over its lifespan. This will be my family home so will have to live with the decisions… -
Most cost effective way to get to passive standard using block
Rishard replied to CalvinHobbes's topic in Heat Insulation
Is this a 100w difference in heating per hour? I’m costing out insulation to fill the cavity, it’s a similar cost to concrete by volume. Obviously I don’t want to fill with concrete but I’m trying to grasp where the cost savings sit. Say I add 50mm pir to the inner face, that’s £400. Again, not going to break the bank but the question is, will it save me money in the long term? -
Most cost effective way to get to passive standard using block
Rishard replied to CalvinHobbes's topic in Heat Insulation
Returning to this one, am I right in thinking xps insulation for the cavity is better than eps? The green building store said the xps held its insulating properties when in wetter environments. I’m hoping mine won’t be getting wet but it’s worth hearing other opinions. -
Most cost effective way to get to passive standard using block
Rishard replied to CalvinHobbes's topic in Heat Insulation
Joes detail which is taken from the golcar house has a dpm wrapped around the top block to try avoid it being ‘wet’ as you describe. -
Most cost effective way to get to passive standard using block
Rishard replied to CalvinHobbes's topic in Heat Insulation
My perimeter is 50m so assume it’s closer to what iceverge suggested. Although I’m not the best at working these things out…. Yet -
Most cost effective way to get to passive standard using block
Rishard replied to CalvinHobbes's topic in Heat Insulation
It’s very helpful to see the small increments in improvement and its relative impact on the watts. If I use 60m of insulating blocks for 2 courses it still comes in at under half the cost of the marmox blocks. Would the £600 difference pay itself off in energy saved? If not then I may be happy with using detail 4 and move on to other decisions. -
Most cost effective way to get to passive standard using block
Rishard replied to CalvinHobbes's topic in Heat Insulation
So if this detail fails SAP then it only leaves marmox blocks right? Does this mean everyone is going to be doing this detail? -
Most cost effective way to get to passive standard using block
Rishard replied to CalvinHobbes's topic in Heat Insulation
I know Marmox blocks are great for this kind of issue. In your drawing are they laid on the inner skin? They’re pretty dear, I know that much. -
Most cost effective way to get to passive standard using block
Rishard replied to CalvinHobbes's topic in Heat Insulation
So I’m using 200mm pir insulation and have a suspended slab which loads onto the internal skin. It’s great to see some of your calculations, I wish it was something I was capable of or had access too. So from what you have said, there is little benefit in laying aerated blocks anything more than say 1 or 2 courses below my slab? Would you say to cavity fill with insulation down the whole 900mm to foundation top or would laying it down to say 600mm be adequate. My floor build up is, top down, 150mm slab, 200mm pir, 160mm void formers in some areas( ‘ground heave’) 150mm hardcore. -
Most cost effective way to get to passive standard using block
Rishard replied to CalvinHobbes's topic in Heat Insulation
Morning, you’re right regarding pressure on the cavity. I have my SE looking at this today to see if the insulation in the cavity is up to it or if we maybe need to use a block on its back to help be or partially fill the cavity up to a point. Regarding the 50mm pir down to foundation, if the slab is suspended, like on the drawing, does the cavity insulation below dpc do a similar thing or is the 50mm pir reducing the heat loss up the insulating block to underside of slab? Mine will be a heated slab. -
Most cost effective way to get to passive standard using block
Rishard replied to CalvinHobbes's topic in Heat Insulation
I am building using this same method of insulating blocks for the inner leaf below dpc on my block-cavity-block house. My concrete footing is currently 900mm below ffl. Is there any merit in using the insulating blocks all the way down to the footing or just say 2 courses below ffl? Likewise with the xps insulation in the cavity. Is it better to go the full 900mm down with the xps or just the same 2 courses as the insulating blocks do you think? -
How much insulation have you laid over b&b? Ta
-
Timber frame double garage with doors on eave side
Rishard replied to jayc89's topic in Garages & Workshops
Most oak timber frame car ports are built this way. I just built one this way for my own garage. I’m a carpenter so built it all, I did get a quote from an oak frame supplier for the same design though. No doubt it could be built from a softwood such as larch in similar section sizes to an oak frame if you were set on it being timber frame. -
Rooms above garage - Thermal envelope?
Rishard replied to SuperJohnG's topic in New House & Self Build Design
Morning, I’m just going through a similar process with a separate double garage with room above, timber frame. I have the option to carry the airtight membrane under the joists which form the garage ceiling. I have a pitched roof with 2x gables. Would I be best joining the membrane to the external membrane on the timber frame gables as you say? Also, I can detail the rafter eaves so the membrane can carry on up past my joist ends to meet my roof membrane, would this be best rather than turning it in on the joists like a Tony tray? My roof pitch is 45* and the wall plate is on top of my joist ends over load bearing walls. I intend to split my rafters at the joist end point so I can have some ‘dummy’ oak rafter feet as the below garage is oak frame. I have done this detail on a few oak buildings but the airtightness hasn’t always been a priority. This being my own garage, it is, alongside good insulation ect. The point where I split the rafters would be where I can connect up ceiling to roof membrane. -
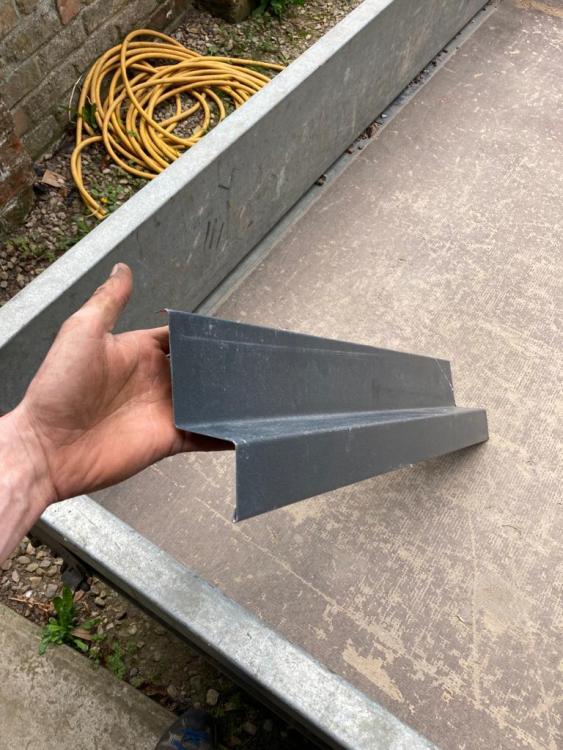
I’ve seen it done in a few ways. Sail the cladding over the face brickwork. This avoids needing flashing (depending on cladding type) I’ve also used plinth bricks which need lead flashing to partially cover. This method looks more traditional however the plinth bricks can be quite expensive. I’ve also used aluminium flashings pre bent to replace both brick and lead and creates a modern looking detail. The aluminium lengths were round hot £30 for 3m bent to any detail supplied and plasticoated. My local brick company supply plinth bricks at £3.50ea + vat…
-
We have similar issues with trees we have removed from the site dictating trench depths. We had a fairly basic and cost effective soil survey done with samples we provided. These provide very useful information for the behaviour of your soil. Our engineer designed the trenches based very much of the nhbc guidelines. The nhbc guidelines seem to be the measuring stick to which all bco’s use. Our bco is very well informed about trees and also soils in our local area. At the end of the day, they have to approve what you will use so its always worth discussing options with them.
-
Is it flush to the top surface of the boards? Is it likely to be a place for dirt to gather?
-
I was in the understanding that thicker was better, acting more like a night storage heater. I guess it all depends how well insulated the house is and how reactive you want the heating to be? It seems most with thicker slabs and good insulation are heating overnight where more mass is preferable?