Leaderboard


Popular Content
Showing content with the highest reputation on 06/07/16 in all areas
-
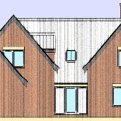
(I know, I know...the photos didn't paste in and I will have to do them one at a time...I'll get 'round to it I promise...managed the first dozen, more to come) Part One-Wind And Watertight For Under £6k I'm new to blogging and probably have nothing much in terms of knowledge to impart but some of you might be interested in building on a low budget so here goes. After many years on the waiting list we got offered a plot on the famous West Highland Way about 3 miles north of the starting point in Milngavie, just north of Glasgow. For £4k we get a 20 year ground lease around 100ft square, ground rent is £90 per month and of course membership of the community group that collectively owns the whole estate. See more about Carbeth Hutters here http://www.carbethhu...o.uk/index.html we needed planning permission and Carbeth is itself a conservation area so we kept to the hutters spirit of ingenuity and self-everything and splashed out on some graph paper from the local stationers. We made several models from foam board (thanks JS Harris) and finally paid the fee and waited... I'll add the plans when I find them but permission was granted and we stated work digging the footings by hand. Oh I should say at this point so far we have not paid for one trades person nor used any machines other than a Makita saw and drill and a Hitachi gas nail gun. Many thanks to Dominic Stevens and this website for teaching me all I needed to know about the mysteries of marking out http://www.irishvernacular.com/ In May we braved the rain and pressed on building 14 (dodgy bricklaying) piers one big one using cobble stones the rest using concrete blocks from a reclaimed mono bloc driveway. Our near £2500 load of timber arrived and it was time to see if the 'water in a tube' method of levelling the piers was accurate or not...first big confidence builder-it was bang on level across a 4m span I really wish I had bought OSB flooring as the chipboard got soaked a dozen times...its fine now but we have a few swollen joints that will need attention before final floor goes down. Lots of wet days and rain dripping of noses but a nail gun is a great stress buster for us Social Work types and the wall panels and trusses were complete...time for a big hut raising weekend! The June weather was kind and we got a lot of work done but the tarps had to go back on as the floor was still getting soaked... Magic, frame complete Roof is almost there and again we had 8 volunteers over the weekend...including schoolboy nephews who kept wandering off with tools! Then end of June saw the EPDM roof being stuck on with the stickiest of glues but close to water proof at last. On the odd evening we managed to get the windows in... Got some nice doors from Gumtree for £40 so in they go and by the end of June we are almost there Insulation and building paper on Oh and Gumtree found us some kitchen bargains so shipped then up as its nice and dry inside now *smiley face* Cladding And Lighting Weather was sh#t all July so had to bash on through the rain... Sparrow Fart recommended the Hitachi nail gun and as I'm on my fourth box that's 7000 nails so far! 90% Finished...90% To Go... Nearly there...hearth and fire needed to go in as it was getting too cold to work... Got a reclaimed dance floor 57m for £250 so that went down too. Finished off the ceiling joins with some 5mm ply, looks okay. Finally got the dry toilet finished but not *commissioned* it yet. Put some furnishings in for a trial run. Just some plumbing, wiring and joinery to go. Oh and the view from daughters window... Diy Plans-Graph Paper And Pencil I am putting these images up simply to show that you do not have to employ professional help to submit planning applications. For most of you serious self builders designing the house of your dreams I suspect that this will be the only way to go but my little project is different from the norm in many ways. Firstly Stirling Council (in fact the single planning assistant that deals with the Carbeth community huts) is hugely helpful and happy to talk on the phone and comment via email. Secondly reading through previous applications I noticed that some drawn on foolscap (with imperial measurements) passed first time and the more professional architect drawn submissions had lengthy correspondence in the file. I went with the spirit of the old hutters and splashed out on some graph paper and a sharp pencil. I kept what I could vague so as to allow a bit of flexibility as the build progressed. Eight weeks to the day after submission we got a green light with four simple conditions. Having read some of your experiences out there I feel your pain and hope that ion the future this minefield of a system can be improved and made more consistent…I’m not holding my breath though… Attached Files Planning drawings 1-2.pdf (2.12MB) downloads: 75 Planning drawings 3-4.pdf (2.14MB) downloads: 29 Planning drawing 5.pdf (1.05MB) downloads: 26 Carbeth site plan hut no 3 Jan 15.pdf (254.28K) downloads: 28 Interior Fit Out And Decoration The low tech approach continues as does the re-use and recycle theme. Bought a load of Michelin road maps from the charity shop to make my feature wall background and topped then off with a few nice ones I picked up in Poland during the summer. Probably spent about 20 quid in all. Went to the local mental health wood recycling project (boy, they are not cheap!) and spend 15 quid on an old scaffolding board to make this kitchen unit. Might add some hooks underneath and a couple of shelves on the map wall to complete this corner. I might have mentioned before that around my office Monday is the day that the Council bin lorries come around for bulk uplift. The area is all tenement flats and there is no room for bulk trash in the back court so the local arrangement is you put it on a street corner before each Monday morning. It does make for an Aladdin's cave of goodies and there is a fair bit of 'help yourself' going on before the bin lorry arrives. in fact plenty of stuff is labelled, like a TV with remote control taped and a sign 'saying perfect working order'. Anyhow I helped myself to this worktop and slotted it in next to the beech free standing units from Gumtree to make a little sink unit. Looks okay I think...the rest of the worktop was cut up and kept the wood burner going to keep us warm during the freezing weather outside. Dry Toilet And No Smell Whatsoever Apologies for the pic of the loo, warts and all so to speak... This is the 'seperate' plastic toilet from Sweden that has a front funnel and back void. The thinking is to seperate the solid and liquid waste as it is the combination Of both together that causes the smells we don't like. Urine runs to a soak away and the solids and toilet paper (and sawdust which helps the drying process and Erm...helps the appearance should you peer into the pit!)end up in the bucket below. There is a small fan running constantly which you can just see on the floor behind the urine waste tube. The fan is powered from our 12v battery and draws next to no power at around 0.1 amps. This provides an airflow which removes odours and aids the drying process for the solid waste. Once the bucket is full it can be sealed with a tight fitting lid and left for 18 months when it will be safe to use as compost. Some folk toss it on the fire but not sure I fancy that job. Still needs a lick of paint but all in all very pleased this all works as promised in the literature. As the blog title says there is no smell at all and its really a pleasant smallest room. Balcony, Wood Store, Somewhere Nice To Sit Decided simple was best and to crack on with the decking out front. Rescued some fallen trees from nearby and rested them against a quickly assembled frame of 6*2 treated joists. This gave us a nice deck to work on the roof from... Always keep a tidy site Ebuilders...you don't want a wayward screw sticking into the foot of one of you volunteer helpers who come to play with trainers on! Bit of good luck, we had one 4.8 length of decking left over so fashioned up three nice steps to the front door. Lucky for us 800mm wide was just right. Finishing Touches If you wait long enough, what you want will come along in Gumtree. Seller said they were £100 per metre and I can believe that. 4m of them in the back of the car and the suspension was riding low! Anyhow, had no confidence in grouting these the normal way so borrowed a piping bag from SWMBO and took my time squeezing it into each gap so it was just proud. Ran a pencil around the gaps and hey ho it looks great. Now just some stove paint to buy and a few dozen more jobs before its finished... Exterior views1 point
-
Anywhere from a 2.5t to a 5t should do the vast majority of the jobs you will have to do.1 point
-
The bigger backlit version is my preference, too, as I think it will be easier to read where I'm going to put it (on the utility room wall, where the thermostat receivers, ASHP command unit etc are located) and I like the idea of hard-wiring it to the supply, just for neatness. Price is an odd thing for things like this, as when you're knocking stuff together you sort of get used to things being much cheaper than an equivalent commercial device, even if you can buy a commercial device that will do the job. I think I added up the cost of the excess PV power diverter I made and it came to around £25, that's for a unit where the power sensing is done outside, at the incomer, with a radio link to both the power switch for the Sunamp PV and to a plug-in power display that receives the data and has a display showing whether the house in importing or exporting, and what the instantaneous power is. I tend to think that spending more than £30 on any little gadget like this is getting to be too much!1 point
-
Or we both done it wrong!!!1 point
-
I've done something right then!1 point
-
Yes, they are placed centrally to gauge the depth of concrete. They are left in the foundation (you can't get them out once it sets). A useful tip is to mark on the outside of the trench where they are. As the concrete is poured they can disappear from view.1 point
-
One of my many thought about but not started projects was to do the doorway into the roof eaves from my son's bedroom as the TARDIS and then kit it out in there as a playroom / games room. Unsurprisingly it never happened! Yet another is an outside wc clad the same at the top of the garden slope. Gravity feeding into a biogas set up along with garden waste and solar thermal heating. I give you the..... T.U.R.D.I.S1 point
-
Some answers are in my previous two posts. Check through and come back with anything I've missed. The junction between the tiles and floor covering is done in CT1, NOT silicone. CT1 doesn't have a short life like silicone and doesn't go black / mouldy.1 point
-
Yup. No problems whatsoever on the last lot of MB stuff I fitted. Normal 32mm traps straight on . If you have any long runs of waste pipe from basins, particularly if they drop vertically, then use one of these. Stops the gurgling and absolutely necessary if there is a bath sharing the same waste pipe before it gets to the 110mm soil pipe.1 point