Jump to content

Mini Split Air to Air Heat pump


Jenki

3524 views

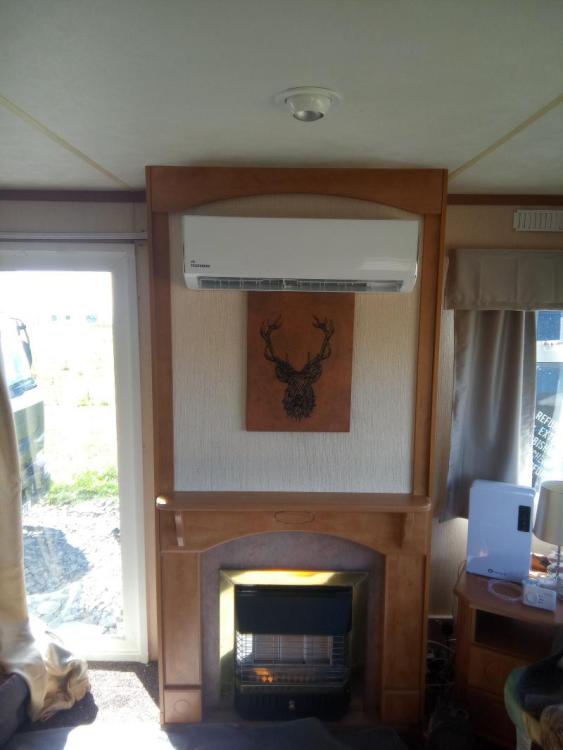
A short blog to show my Mini spilt Air2Air install, in the Windy Roost Static.

I looked at installing a wood burning stove, but we have zero trees on site, so when I looked at the costs of twin wall flue, terminals, flashing, creating a heat shield and making the caravan tidy plus the hassle of getting wood / coal, the costs were adding up.

A quick question on here - Build hub, some options were suggested and I decided to go with the a cheap Air 2 Air heat pump from Appliances direct. 

The unit is a Telefunken 12K BTU split unit. cost around £375 but did not included the pipe to connect from indoor to outdoor unit.

I got 5M twin insulated copper pipe with the flair nuts from ebay for £56. 


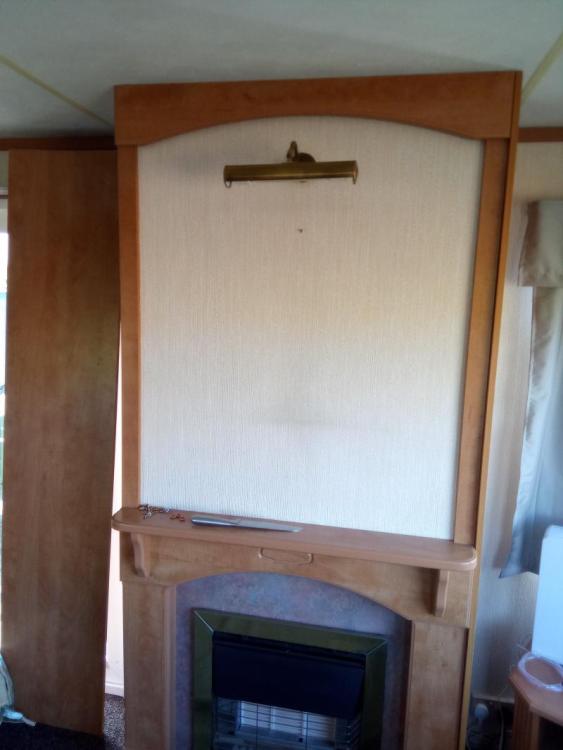
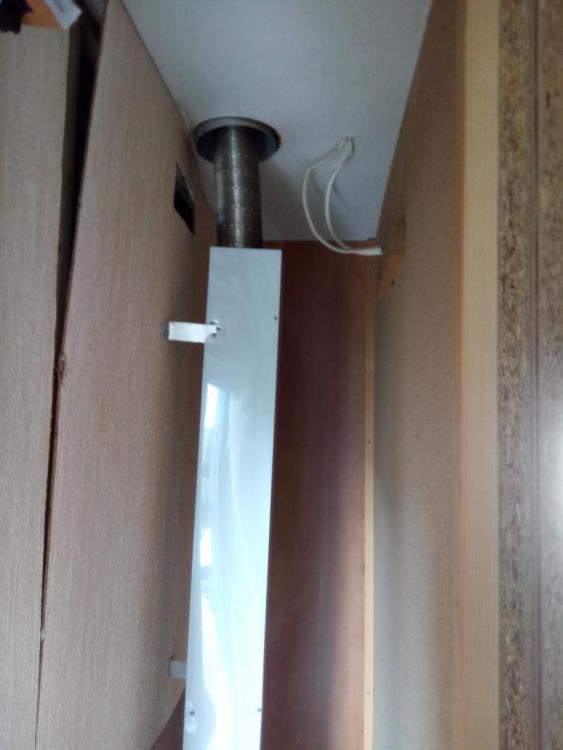
Our Static has a gas fire - useless, and a chimney breast made from chipboard, the side panel just screws off to access the flue. This was the perfect place for the indoor unit, as it would be a neat install and the rear will allow for the pipes to be hidden, also I could use the hole in the floor to route the pipes/ drain and power for the remote unit.


minisplit4.thumb.jpg.beaad08bd7167675ae75f18c58133052.jpg minisplit5.thumb.jpg.dd7ed60ff41f88720e6469ada00d3575.jpg


I removed the light fitting, screwed the bracket on the timber, and drilled a 80mm hole, for the pipes / drain and power.  Then its a case of posting all the pipes/ drain and power cables through the hole, really straight forward, the indoor unit then just clips into place.


The indoor unit comes pre wired with a 13A plug top, and you need to run a 3core and earth cable from the indoor unit to the outdoor unit. this is Live, Neutral and a control / switch cable.

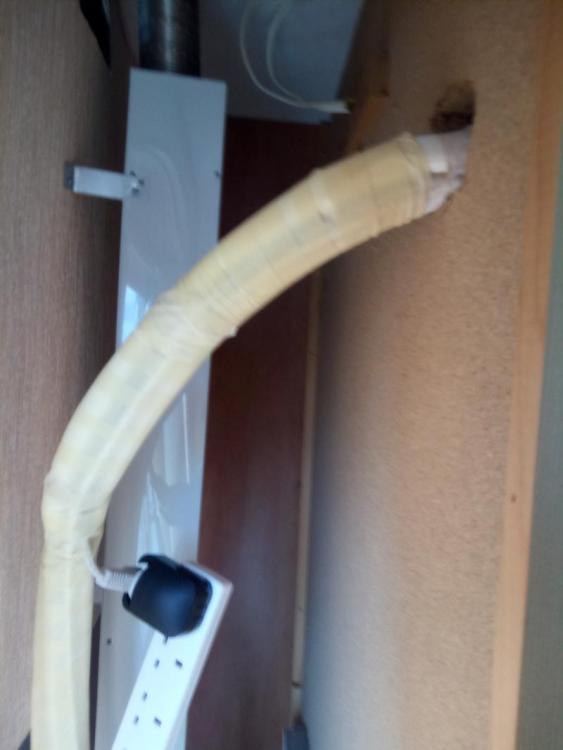
Next to the chimney is a double plug socket, so I wasn't messing around running new cables, I just drilled an 8mm hole in the side of the chimney breast and used 2M extension lead to plug the unit in. I used some zip ties to secure the extension lead and plug to the pipes (these were put on after the photo below). and that was the internal work complete. zero mess, and no rework / decoration required.


minisplit6.thumb.jpg.29964c4293bf70222028a180cd003014.jpg   minisplit7.thumb.jpg.3ec75798f30e34738c24df4dfe5120c4.jpg


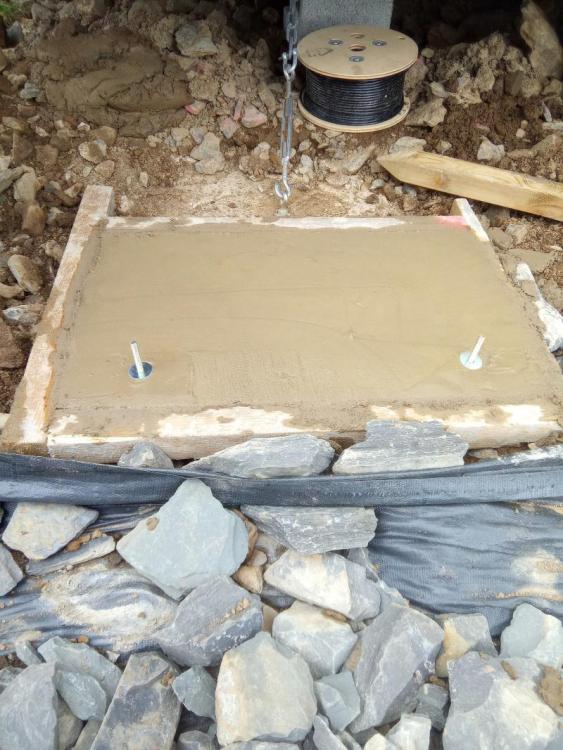
The outdoor unit was going to sit directly outside, behind the chimney breast, the ground outside was not level but it is bedrock, so a made a simple frame and made level concrete pad, and cast some hook bolts into the concrete.

minisplit3.thumb.jpg.fe48f197915920862c41d2e8158ec607.jpg


For initial research I spoke with a Local (ish) refrigeration engineer, and he said he would connect for £120. but was telling me there is nothing to it, and if I was doing everything else then maybe I do it all???

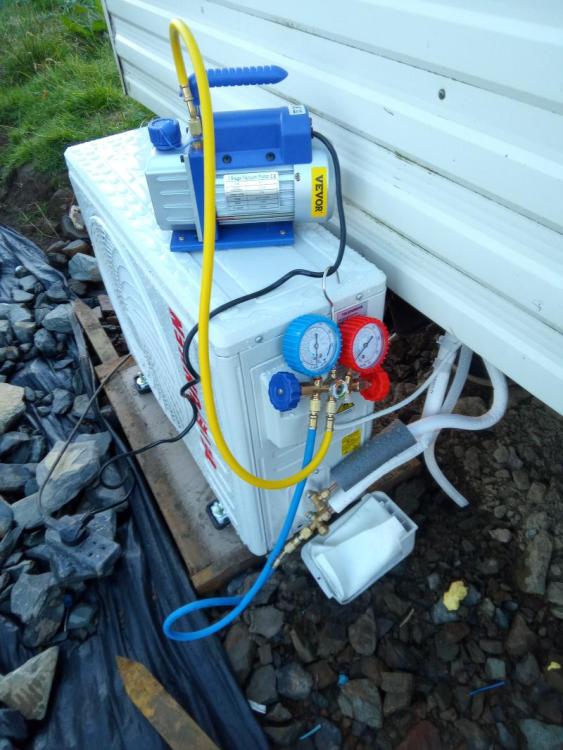
I found an American You tube guide which was helpful on the pipework side.  (linked below)  Basically, the unit comes pre charged with gas, so you are not filling  with gas etc. the main issue is removing the air from the two pipes you install. This is done with a vacuum pump. (some more expensive units come with pipes and they are pre-vacuumed with quick connectors)


I found a vacuum pump and gauge set for sale on Vevor for £79 so £41 cheaper than the refrigeration engineer.  I bought one, and an adaptor. I'm not suggesting anyone does this without an F - Gas Engineer, but the main issues are leaks, if when you connect the pipes up and they leak you are going to loose the gas, and the unit wont work. 


To Purge the pipes


Step 1 connect your pump to the centre of the two gauges with a hose

Step 2 connect  a second hose to one of the gauges and the other end to the one way valve on the outdoor unit

Step 3 Open the valve on the corresponding gauge from step 2.

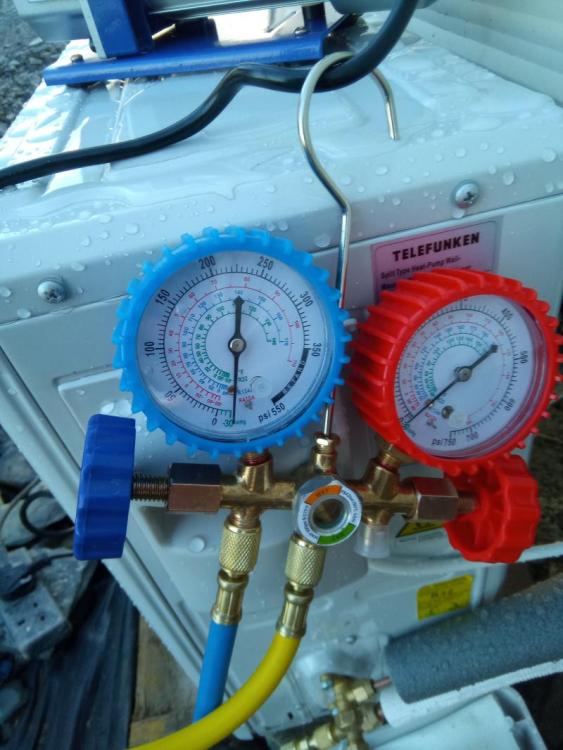
Step 4 Run the vacuum pump for 15mins  to remove the air, and you check the gauge is reading negative. (-30 blue gauge in pic below)

Step 5 turn off the pump and wait 15mins, and check the gauge is still negative. (-30) - this proves there is no leaks

Step 6 close the valve you opened in step 3.

Step 7 Open the 5mm Allen screws on both valves to the gas fill the internal unit.

That is disconnect the pump plug the indoor unit in and you ready to go.


minisplit2.thumb.jpg.49724be07b5273084f1bc5328c43393a.jpg  minisplit1.thumb.jpg.e013820c2bf0f05b902449a4e7360bfc.jpg


Notes: I used expanding foam in the hole at the rear of the fire. We have no intentions of using the fire as it is /was rubbish.  Also the indoor unit should not be near a source of heat.

The total install time was around 4 hours. and total cost £530

More importantly my caravan has warm air.   lets see what its like in winter.🤞


  • Like 5

21 Comments


Recommended Comments

Excellent work. It should give a COP of 4 for heating according to the interweb. 


I'll be watching with interest for updates as it's on my (maybe) Todo list for our place. 

Link to comment
8 hours ago, SteamyTea said:

Good stuff.

Have you tried it on cooling mode yet?

its a single glazed static caravan, near the Highlands coast in  August, I don't need cooling 🤣, in all serious, it has been getting very warm due to solar gain in the afternoon, so I will try it out then, although this goes against the grain as I try to keep as much heat in as possible.

8 hours ago, Iceverge said:

Excellent work. It should give a COP of 4 for heating according to the interweb. 


I'll be watching with interest for updates as it's on my (maybe) Todo list for our place. 

Initial thoughts on the heat is it it works well, takes about 5/8 mins from calling for heat until the inside units fires up and starts emitting warm air.  its fairly quiet, but caravans are small so your never very far away from the indoor unit. similar noise to a cooling fan.


Its made me think I might run some insulated pipes and power to future proof the house build.


Link to comment

Really good info, well done. All you need now is to replace the gas fire with a flat screen TV and flame effect screen saver 🤣

Link to comment

Not overly sure about the extension lead and the very nasty plug top converter running something that is a heating appliance !! Can you access that easily to at least remove the euro plug and hard wire an extension to it ..? Would be much better and safer than a euro into a converter into an extension into a socket … @ProDave you agree ..?

Link to comment

Yes you definitely want to improve the power connections.  I would have fitted a Switched Fused Connection Unit to power that.  Static caravans are notorious for tiny cheap and nasty consumer units so unlikely you would be able to add a new dedicated circuit so the best would probably be a spur from the ring final to the FCU.  Does the outdoor unit also have a similar power feed? If so that wants improving as well.

Link to comment
3 hours ago, ProDave said:

Yes you definitely want to improve the power connections.  I would have fitted a Switched Fused Connection Unit to power that.  Static caravans are notorious for tiny cheap and nasty consumer units so unlikely you would be able to add a new dedicated circuit so the best would probably be a spur from the ring final to the FCU.  Does the outdoor unit also have a similar power feed? If so that wants improving as well.

Agree with the crap plug, but its part of the warranty. The other end is hard wired to the control board. - else I would have removed.

The outdoor unit is connected via 4 core (well actually 5 core as I had some external 5 core), cable from the indoor unit control panel to the outside unit.


I've checked that the socket I have used is part of the ring and not a spur- IMHO a FCU is not required. Its accepted practice to install ovens and hobs / tumble dryers etc all heating appliances up to 3KW on plug tops, so don't see the issue using the socket.  

The socket is rated at 13A, and as long as I don't plug anything into the spare socket no problems.  the fuse in the plug top protects the cable to the appliance and the breaker in CU protects the ring cables.  So all is acceptable and conforms to BS7671. 


Link to comment

Just thought i'd give an autumnal update on the unit.


The heat output is fantastic. Does what it needs. We're out busy most of the Day - building, digging blah blah. But we put it on in the morning, and of late several hours at night.  And so glad went this option. You set the temperature and off it goes. we realised that when it hits the temp, rather than shut off, it then starts to cool, I assume to prevent overheat. In our static, this is not required. So initially we turned the unit off, and back on when the temp dropped. But lately we have just let it get on with it, and ultimately it does the job.

Only slight gripe, is it would be good to be able to programme a time to turn on in  the am. But several months in. It still dees a thumbs up.

Link to comment

Thought I'd round this off with a bit of info on running costs. 

The last few days have been fairly Windy in the static, and the heating has been used a lot. I bought a plug in WiFi energy meter to have a look at the power usage.  Below is the screen shot.

It seems to use between 5 and 45 watts in standby. The unit was in standby when this screenshot was taken. And using 7.03W. I'm quite happy.

We run the unit to set temp of 20 Deg and leave the internal doors open In the static to try to get the rest of the van warm.

Appreciate anyone's thoughts on this.

Screenshot_20221116-132118.thumb.jpeg.39852ed4f5fe2cb5120c6e4a2bd40649.jpeg

Edited by Jenki
  • Like 2
Link to comment
2 hours ago, Jenki said:

I bought a plug in WiFi energy meter

Who makes that and can you grab live data in it into a file.

Edited by SteamyTea
  • Like 1
Link to comment

I'm a huge fan of A2A since getting a couple of mini splits in my outbuilding. I've been meaning to thank you for your blog post because I started looking into the possibility of using A2A to heat our garage extension right after reading your post back in August. The clincher was the ensuing heatwave which made the room-in-roof unbearably hot. A Solar PV array has since gone up there and now the magic combo - Sun shines, room gets hot stays cool, is a dream come true.


2 hours ago, Jenki said:

It seems to use between 5 and 45 watts in standby.


If it averages out at around the 7W you were metering, then that's nearly 25% of the total energy use this month. Seems a little high.


But then again if it does the magic work of keeping everything up at 20oC for les than 25p a day then it's very hard to complain. I'm seeing consumption of around 2.5kWh per day for keeping around 60m2 cosy but I leave it on 24/7 so similar to yours at around 0.1kW/h


Your system seems to be in what my Daikin units call "auto" mode. This switches between heating and cooling to achieve the desired set-point. Mine additionally has discrete cooling and heating modes which means the units turn off once the set-point is reached. This allows a little bit of under/overshoot but saves a small amount of energy. It also widens the available range for the set-point.

  • Like 1
Link to comment
39 minutes ago, SteamyTea said:

Who makes that and can you grab live data in it into a file.

I'm going to have to talk you through how to set up Tuya convert, MQTT and Node-Red on your Rpi.

Grab one of these 

41FftwUBCPL._SL1500_.thumb.jpg.e79e053316572466696e28065fc2f80b.jpg

And we'll get started.

Link to comment
1 minute ago, Radian said:

going to have to talk you through how to set up Tuya convert, MQTT and Node-Red on your Rpi.

Shall order a couple when I get home.

Sure I can safely modify them to be wired directly into the storage heaters and immersion heaters as they are a gnats under 3 kW each.

Link to comment
14 minutes ago, SteamyTea said:

Shall order a couple when I get home.

Sure I can safely modify them to be wired directly into the storage heaters and immersion heaters as they are a gnats under 3 kW each.

Let's move this out of @Jenki's blog to here:


Link to comment
3 hours ago, Radian said:

Mine additionally has discrete cooling and heating modes which means the units turn off once the set-point is reached. This allows a little bit of under/overshoot but saves a small amount of energy. It also widens the available range for the set-point.

Not sure mine has this. I would prefer as it's the only negative I have with this unit. 

I bought 2 more units(slightly different model from appliances direct) for my cabin builds I'll be installing next week.

This is the plug I bought.

https://amzn.eu/d/8EGmaj2


Link to comment
2 hours ago, Jenki said:

Not sure mine has this. I would prefer as it's the only negative I have with this unit. 

Worth checking. Imagine that you wanted to set a low minimum temperature, say 10oC for frost protection. You don't want the unit to actively cool to this temperature. In this case a "heating only" mode becomes essential. In fact, the minimum setpoint when cooling is involved, becomes much higher i.e. 18oC in my case. But for comfort, I guess full auto is acceptable to just trim the temperature.

Link to comment

Hello @Jenki , thank you for doing this write up, great job!


Just wondered if you could advise on the vac pump / fittings, as there's so many google results with a wide range of price. Thanks in advance! 👍

Link to comment

Hi. I got my vac pump from vevor, but you do need an adapter from the hose to the valve. The video I linked on you tube tells you the size you need 👍

Link to comment

Cheers @Jenki , very much appreciated. I had a look on the Vevor website and can't see any vacuum pumps at all 🙃


I'll look at the youtube video for hoses...I did see that, but partly guessed as he's american, they might use different sizes.

Link to comment
5 minutes ago, SteamyTea said:

It must be worth getting a vacuum pump then you can check the few bit you have to connect up.

Yep, that's what I'm going to do.

Link to comment

Create an account or sign in to comment

You need to be a member in order to leave a comment

Create an account

Sign up for a new account in our community. It's easy!

Register a new account

Sign in

Already have an account? Sign in here.

Sign In Now
×
×
  • Create New...