Jump to content

Yaffles

  • entries
    16
  • comments
    153
  • views
    2196

We have rooflights! (and some tricky joinery to do)


Weebles

6642 views

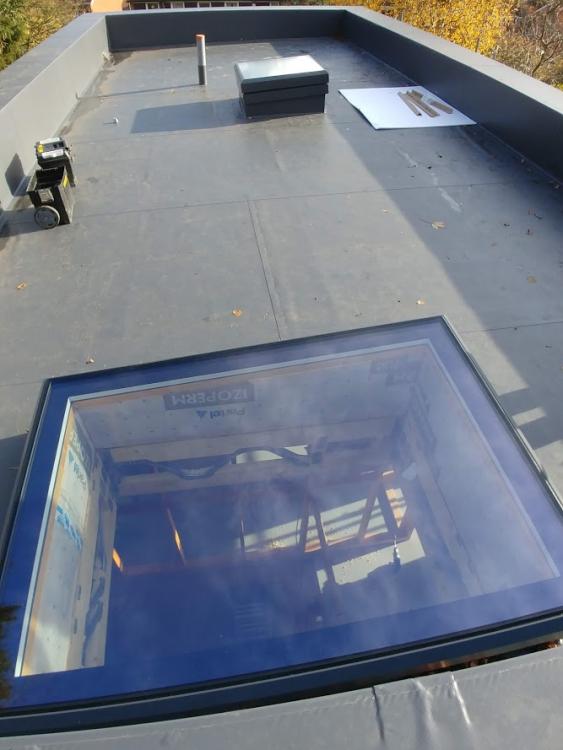
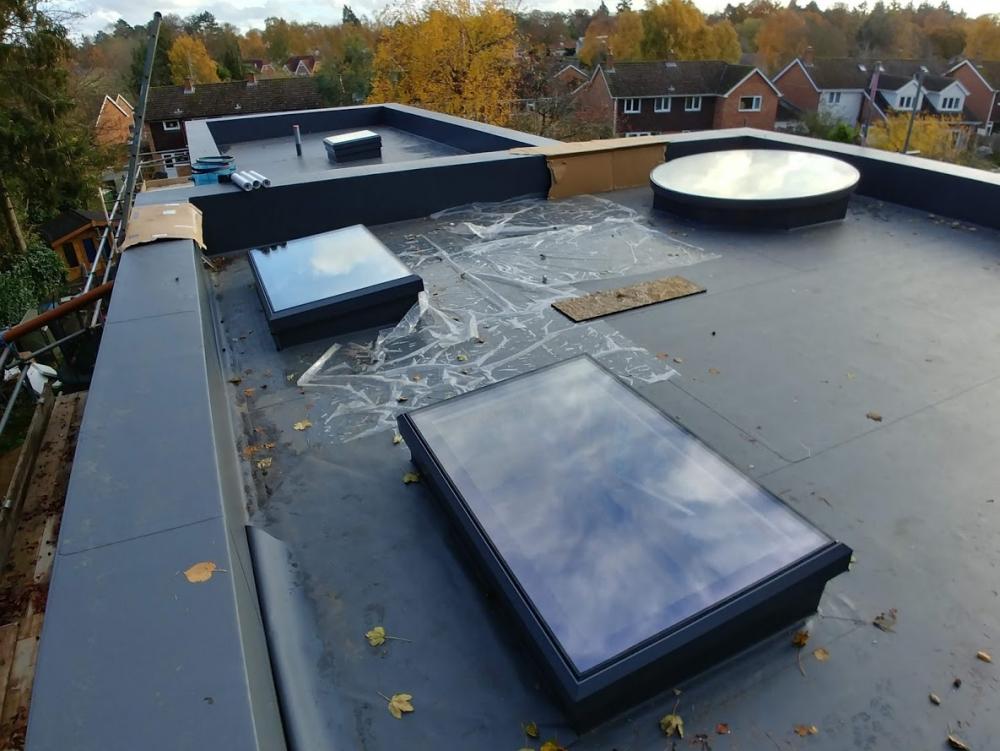
Today our roof lights were installed.  We are pleased with the finished product and how they fit.  The blue sky and sunshine helps of course.

Almost helped take the edge off the unexpected contract lift costs (£1380 in the end, but we have managed to avoid the additional VAT and we got him to lift some roof trusses off the scaffolding which saved a job).

Their man on site today admitted that it had taken a long time to get to this point.  Not wrong!

The photos will hopefully do them justice.
 

5hcDszf95qNRsuAs4Zklnwhvyk7JyeSF_In_z00opxAI8yMvduNXaQL3n7Ks8NlJeCXjMKak0ec8rsGMfcW9SxMLHVi3_2Qjj3Z6oqpIPR6ydygo_psAP3ZLUcqySglUNJ6bB47uz2CeyK_USxxUZ3OqjE1lyfM7p-l7YmggqxUTryQGb7kXEwZhUQbBo4f9vbOnZq6Vs3OBHIBta1ShM6frsABhyvGqhNh8sWevvcpbVcARVe4tpqshfI-RL0F0nf6Qy5DFQVM1i_QfdhcKYFm73nt4xe-O2tP3DFGJlWwDXjtzd4naneS2ylfj90rBPWvUx-0A5WtZygu4ysDrIClUG2zG-pedqL3bKwSYTL47lNTt_jrncR8jd4ilBz0aEOi2D4N9Rwvvyyxvg5j-NgKXg1QAoZ-K7csPNkwlrSPughJn5FYRG5q3_ygoF3eaUBG2H0CU5NRv-btkbVw172WC5zrwsw9QG94Kn77JudI9xx2nlgNzwXWYeblWgBd2qMfDcyC2Ldq74R2OMw6PQrQHvf1Fo4e3duOuQ90r6A9yW6tt8ywE3Jr4qiJ5007p3ZMHftUbybI2Pp03VZ7xieCm0MPBE3JQiiisp-_TqU6d0jsjtDxj1Sid_U_aLuR1XgPJMDtChQjWCI6vHMqMRl8WbcRUxUuaplhUsYN6fXBO8g=w1186-h889-no


hUeH0uaAyJ1VcmO77PQnOZBsi9SKShUJc3Y2vnhpZ5nwyNlRLMTqoI40AuglwEY1lguMwNQa-VvaG1O_btR3x3l1hpyUV2p06DuFMitDQgz9USWXqOzR3SNoZZZEgMAl2iM6tSLi1Vnnjdh6uO_ui1BM-itXyxMdk6PZIW_bBMwaMjYNyyTEily3BUM4fmO0XoPyrtrQIzzcPN6cGl9htlieOLi9OmTD51wli57PnOpdTji_OAkzY0xwD7t4pGkZYJ6-yvsYUDlrzxPkS3b5WxYcejKx6pn6ohncUwS8Bct_jzNk45TMsuc70HUbwDpfuJmIgoqG-l2PL6AJrZMms_TIFD7PW3dO_gp8oibu2cLa0QCJCXGuteDEu6BvYW3-Uw1_81kmdxucGnGMsHR2sS0WljN8ZMzcVCbHaL7VwggcI4tGOCT1rwRYO4JZRQawA0V2A5oaLZAnhdBKTCAj0bRFsFGGQIR1BQ6xCSU4fne7ZJyj4SSH2nQYPDOST29dQVeg5DKu-F00VKOx4uMk2Rz7yvPCMje5fgha5JRALHydPnsCLwhpkUQ9oe8_FLIW3Wlko26bUACfRcR-5_a7tT_x0K7YRBWc-r8z2zG47LT3xinTsqrH_rTRg8-c2neQKq1vnOmfDa0V-bYhuyGPAHhmZrkUvmTB4f8PBlW_6B7DlQ=w667-h889-no


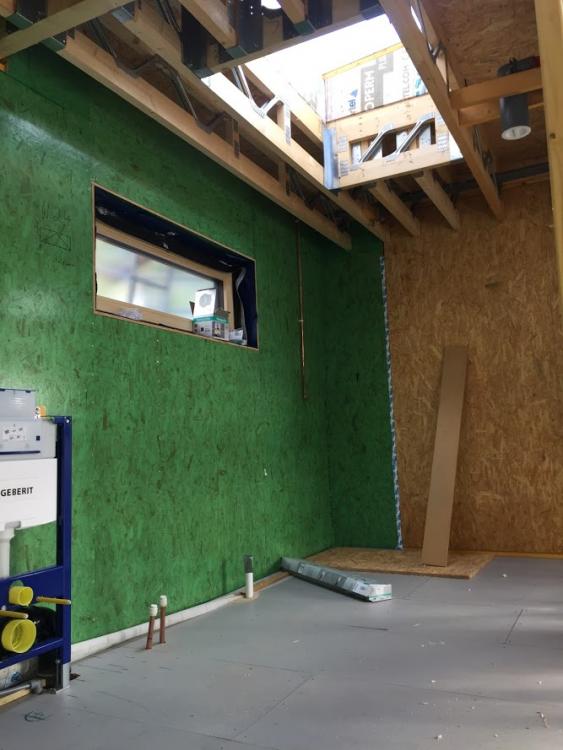
Already they make such a difference to the light inside the house.


8E1hBdJtJMYPfP1D82OBJmq95X9GmmLnExwIyT15SKNkAxfn6CbTCZdkSKNoHdDCABFiuUDJkK-lK9W_8oy8C3fh9AgCNIbyP-s8ryvOPw_H4cZkTaqVKUecOOjqJhdjpYtI02lVgCEcfFk7gYDt-ZXcuWAmK0dd3R9aecTzDXEsOKDLJPRO3Km5FLzsRlMt4trKl3XL5kqUhi7K87Mqa5sDWY8CF1SCg9u1XJkW8UKvjEpqzwj1IjfPgJpUoW05aIdZMDyIZc8qQeii9exwMYUs_UXjFUHqImRdjbphbPTdqk9HMl8ANapljOcgcBomaHLzuFqKuh4HnQ_wIKcBJ709kSsb0NeCkhowNDw4bENY92kQp94YsUqOJty1HNjLrXQEWMvPAX1QKABDh907YJJ_jX3pPA1iKZBCeO5qdtCT-3BVPUxZ1sH6hckF0CQEj25E3u4JY8w2a83rRbkFxL2swoMaaZNAy450R3WFKSnyQgA4u4nVq2yw3fOkvO1KNk92DI_Omam3rX7qZY61GsDQBES-2v60nL0PbS6NqM4nGvgHB-mIvYaDeRqCF79NOpIY9lao5s4bVHT45b-S22tSrjXcqeu35CQVtzXP8YDA48fquivQnk0a7qToi9-H_AaIa8dCNbat7i__hNnXEYBYWNSn8e2MJ1oBqLdhAdP0yA=w667-h889-no


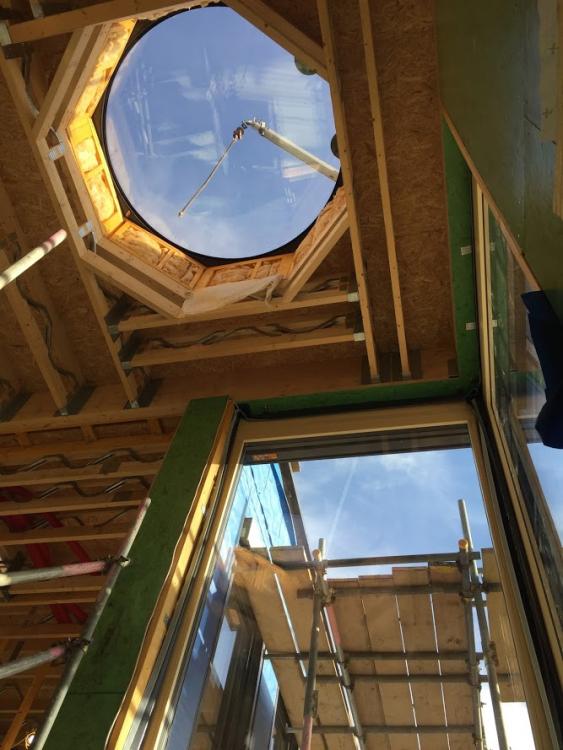
And the feature window (circular on the top, octagonal currently from inside) in the full height entrance hall is really fantastic.
 

FSGC3ZkvsnxRkcoQJYxrP_BiVY6EiETkijBM3HziqK7KEVQJRzndCue35nPuAlbjfDxuTIN-dys2BM5Ve5BsaY2yx4M2ZBFwOtFGl1JYp8I2gj1rAwADgxQ5oX2hR2EUqB4GgQ3MJG87Ms4-d0seqReWo8ceqEL0Q5y-i2XXiyG2x9z7FDxLopETU8mLdUa9Y-eoo7B9aMXkSp0FhfB-L6o3iT0n8cERt6wARrUVmUgrTfGWMdVUSJSrkenn_neO7xE2oEJ03fiAW5PkDdd8YJp9azOs5UauE_r1jE5akL5uKL_QRIrCO2Ukn5_CmCp_Yc5qEzFcwNw7vYRim5OQG5dDVgUxJmI-GSotnmMqasOfEAEduLORJCr7ox8oK-ixtRjRMxrIjm4-i_66vk4KbfmP7q4p41oIfDV6HQcqdjl_59pIBEO_jMBxeMcy4QwaZ7dEoG_lsLydI13hsULDyK6kCXoQYoTwsOwe0-2OYhqqQSptVsANByF5T6-QTqhxy5fE9SPQHTeEse3PxAfNA6YbRGLlAiszqokrhmK1v6pKykJv88c16MObvp1-76ODaPE2KoigTtcc0KoF6Tem2-cVJUUOnDp18TsGVKXlkupJxnXOEmpd8ZZVjvfqQHpc1Yek49OO5tKRvYHohQe-GlfFQSNGHVlvvWkvZBSejjPtcQ=w667-h889-no


Any thoughts on how to get the internals finished on this octagonal light?  I was wanting to make it circular (and the window company advises this so that we don't get any issues with condensation on the visible frame (which would be covered by the insulation if we did make it circular).  

  • Like 4

47 Comments


Recommended Comments


Are you fussed what it looks like from above? Looking through the roof light from above you'll see all the timber supports that are supporting the tube. What you want is a nice, neat, octagonal board to infill the hole! :)


How deep is it btw, roughly?

Edited by Onoff
Link to comment

@OnoffRoughly 600mm deep we think though can’t get up there now. Scaffold tower will be the access up there.

dont want to see too much from above so was intending to make the support for the tube as thin as poss.  


@JSHarris take your point about relying on skim finish vs a neat ply finish


Link to comment

Out of interest I had a random water jetter near the OP price this up.


To supply x2 8'x4' sheets of MDF/ply and cut into 24 identical ribs.....around £300+VAT. Customer collects.


So...I reckon this can be done out of "planks" cut and screwed to form the octagon.

Link to comment

Hey @Weebles that's the magic of this place...some generous and thoughtful suggestions to give you plenty to mull over.

Hats off to @Onoff for his visuals and work. Choice is yours now, we just want to see the photos as it goes because it looks like a lovely space.

Link to comment

4"x2" for the hex bits, some ply sheets to space nom 600 apart, then whatever bends around the inside. Screw sheet material to (green) boards:


tube4.JPG.0951b5d27a3a27917f6d39d2815c3a29.JPG

Edited by Onoff
Link to comment

I’m looking at this slightly differently ..! You’re going to get a “join” somewhere so if you were to get a local GRP company to make up a 1/4 segment you could have them make 4 identical ones and bond them together and lift it in. Only issue may be that from the looks of it the roof light appears to have a very slight slope ..?? 

Link to comment
1 hour ago, PeterW said:

I’m looking at this slightly differently ..! You’re going to get a “join” somewhere so if you were to get a local GRP company to make up a 1/4 segment you could have them make 4 identical ones and bond them together and lift it in. Only issue may be that from the looks of it the roof light appears to have a very slight slope ..?? 


Do the flexible 1/4" mdf in two layers. First one goes on and yes, the joint might appear as a bit of a "V" on plan. Second layer goes on with the joint offset to thd first as it'll be sitting on pure "curve". Would be perfect. Then x2 1/4" layers of flexi pb. The spread would love it...and probably get dizzy doing it! :)

Link to comment
8 hours ago, Onoff said:

4"x2" for the hex bits, some ply sheets to space nom 600 apart, then whatever bends around the inside. Screw sheet material to (green) boards:


tube4.JPG.0951b5d27a3a27917f6d39d2815c3a29.JPG


I don't like the gap between the red of the boards and grey of the hex frame. You'd only see it from above....paint the frame black? 

Link to comment

I'm with @PeterW regarding the join(s).  I spent ages trying to make a hovercraft duct that was round, using an external mould, thinking that this would both provide the right shape and act to restrain the board in a curve, but there were always bulges at the join.  as soon as I switched to using an internal mould those problems went away, as a few ratchet straps around the outside made it easy to snug the whole thing really tightly down to the disc forms inside, which automatically pulled the join straight and tight.

Link to comment
2 hours ago, Onoff said:

Do the flexible 1/4" mdf in two layers.


That gets even remotely damp and you will have blown MDF.... 

Link to comment

Hi @Onoff @Tennentslager @Weebles! I'm here, been so busy with other things recently I've not been on much. One thing I would say, definitely use the 6mm ply. I did one by cutting the plasterboard and one with the ply - the result on the ply is far superior. Our plasterer who skimmed both was wary about the ply in case the plaster didn't bond right, but a year later, it's been fine. He put on mesh and PVA. The Plasterboard one was a lot of edges and very hard to get a smooth curve - we might get it plastered again on top to try get it perfect, but plenty other things to be finishing (yup!). 

Link to comment

Thanks all. Currently all thoughts / actions on hold as have been drilling holes out of the plant room (through the thermal envelope) ready for render company (on site today).  Will return to this when get some space in my head.....

Link to comment

Things take a while when you are self building don't they?

So, back to this circular rooflight internal finishes joinery.  I thought you'd all like an update, particularly @Onoff who I was expecting on site back in November ?


Here is what has been done.


Firstly, there was a slight thermal bridging issue with the metal frame for the roof light being inside the thermal envelope.  Got some drips earlier in the year when plaster was drying out and condensing up there.  Not a huge amount we could do easily but I have at least stuck some aerogel (left over and lying around) on those areas.  Those are the silver triangle pieces.  Hopefully there will be less moisture (than plaster drying out) when we are living in it.


n2cnb0p4MtCh7IHo3_XXRIqCLIDt3rJipjcb81HfTwrFdedRe7Y5gS1XNxVvEegLCXiw4E8CsphgWY2DMrBpy_UxQFp39pyIqUpz80VkLDMRR5-L97ylhP8w0LaUmRwWcnUURO5UvQKJXDFY5cD_TE5ajzsDcCRmDc0mcUhTLxKzhav1OcDBBe_ydAqHL2knUwJD6WNDwEQdHZ3FLaFGYh5AbFvzEi2EPoKLQ7VQVBIPpmOkM8qcwUodyTpO1LU8-6XlrYSv77UBRGLrJ9ybUVgLPkgqX6z2NXYOs5n8nd4unwarqrLgCXR8TOg0YCOe4nq32TgZT5rb-_S98EYbUnd7ZQCtE_itZaTQLf3tfKwKvvb9VbRFVn8HGZJGChFC2EQI7xIHiZ2mLvLybVA4DkPC3XIGR-mcUJOcHNX-IJ8zvpdhkXWKlSq2Fc46hWpgDpE9f8e5ZEOx2PYqANvY4u7-QdOnJ2FmBsJe5qjN1PaOt-CjinB45vdXObUspxzlQYphpycMCtUvvO25RBc6mXe47eIXfcI3RCD1dua8WkE-H75hMft6lYu4t7yivuKbd03evQ27eeppZ_kw4yerFIbPpetJKMwQDFGyJxkGZBoudIuX9fzVFrqhiQT1hZ5CQ4f-s0rqSvDmfsj_pfUEHve8g33ELDCV=w1250-h937-no


Back in Jan the tackers said they would have no problem with that rooflight meaning that HWMBO was left with stud wall construction only.  And this week was the week for them to do it.


They turned up with a flexi 6mm board (that they also said was moisture resistant).  They used some plasterboard to batten out slightly from the square bits of the hexagon, some 25mm battens a little bit further out and then some creative battening across the corners and then they bent the 6mm board into shape and fixed it.


yqChz-yRBQIAqNz8tpj1FKoBt0pcs-G914Ai5xc1oNRZMO3jdlIQpugDe9YIobSWNHo3Xn2g0W2Ut_ACS4Cdk5X9-maVH_Wxv7eeGcaCUg56Un5kSHmVKgpWWZVjpwovWvUGS4VY85z6trPk4Bm0agugQQwDLD5gz6ySxC0gH_9B781Jb1p55rCj0700sC4P3Vf9w054bDi-17ieS37JS4iDtYc0UbQpr38kicQXeYf7CEo4E-20EpZ3wW-VnQlYKotDpcsmqYMdEPiO1p23dNzbw8jdTuJ5PRI05cWSsKK2mnt7IUe9Fybuy_ae-oUyUwgnUzg1G1AaEXdvxQfOhjtLbdCHdeE_t8d194eTjep-JaC245ZkUB7V8mNR9glT9lJWIlN-cR_qQOF2CoZLbN_R2GZPud3IJzXp-AoqxpjqNwYrnPWnj5RUUOzui_gcQ9d2KNT5h3j7AfaayECif0D002bRH2qI42Vb1kPjgBwbBMw96l9CLWyYN04HI-BHf-HGyLNIPOSSpoR31GXXKiC_GgW3Y0GEb_HdzoixNMWNJozyVkgBbB6oFHsz97-SRn8Gxg3zLTw528OfhgPtYdgbQn5YckzTadXh0UWLbT7stnJ9A71FzSm56z2Dq6cyHEPviNqm1zjAztR0Q1cO9sipp-k9UAt6=w1250-h937-no


Today they did the top bit (no photo, too dark when I got home).  But they have left the plasterboard about half an inch short of the glass and made sure that the black edge is covered (in case the finished skim isn't quite circular - otherwise the absolutely circular black edging would show it).  I'll post again after the plasterer has been in on Monday - hopefully he'll have no issue with it.  But so far so good.


Did have to hire a huge tower scaffold though.  Ours only goes up about 3m and they needed the platform for this work at over 5m.  Its still pretty hairy standing on a step ladder on top of the platform but even I can reach the roof light from the top.  Bodes well for painting. :) 

  • Like 4
Link to comment
7 minutes ago, Weebles said:

Its still pretty hairy standing on a step ladder on top of the platform


Cardinal sin according to the PASMA course I've just done.


I'd never do anything like that...


;)

Link to comment
On 11/04/2019 at 22:16, Weebles said:

particularly @Onoff who I was expecting on site back in November ?


Suspiciously like my CAD drawing...glad I could help ;)


Looking crisp, proper eye drawing feature that ?


  • Like 1
Link to comment

I love the result.


Quote

Its still pretty hairy standing on a step ladder on top of the platform but even I can reach the roof light from the top. 

But that is a mad thing to do.

Link to comment

Thanks for all the positive comments.  ? It’s nice to have something to feel good about (momentarily) whilst we feel bad about lack of progress elsewhere.


All plastered now. It’s not bad at all. The eagle eyed (like HWMBO) might say it’s not quite circular. But it’s good enough for me. Going to take a while before we paint. The 6mm Flexi plasterboard needs PVA prior to plaster so will take longer to dry out. 


Off hired the tower scaffold. Will get it back for painting. Will get a higher platform to avoid the step ladder issue ?


Meanwhile back to mist coating with my Aldi sprayer. Bring on the long weekend......


777EC6E2-9288-46B5-B7B6-777EEC377028.jpeg

92E8A2CE-9234-4EA5-B269-060C74B5517C.jpeg

  • Like 1
Link to comment
27 minutes ago, Weebles said:

The eagle eyed (like HWMBO) might say it’s not quite circular. But it’s good enough for me.


The darker something is the more imperfections that'll show. Get a nice bright white on that and you'll lose even more imperfections that you see at present. 

  • Thanks 1
Link to comment

Create an account or sign in to comment

You need to be a member in order to leave a comment

Create an account

Sign up for a new account in our community. It's easy!

Register a new account

Sign in

Already have an account? Sign in here.

Sign In Now
×
×
  • Create New...