
Weebles
-
Posts
399 -
Joined
-
Last visited
-
Days Won
1
Everything posted by Weebles
-
Update: Bearings arrived yesterday (3 day delivery - excellent service from Bearing King) and last night after work both fans were fitted with new bearings (2 in each). Unit put back together and now back on the wall, in full working order. Thanks again for great posts to help us DIY fix this. No hideous noises. Runs smoothly and quietly again.
-
Thanks all for the comments. Plenty to think about. Not least the cost - benefit debate.
-
Sorry, I don’t know what the original design was for in terms of sqm. I looked back over the quote but it doesn’t specify. And, yes, you are right to say that checking the cowl annually is a good idea. I didn’t realise that and discovered it was gunked up because it had got rather hot in the plant room as I guess everything was struggling a bit……
-
We have a BPC supplied Vent Axia Kinetic High Flow. Installed by us to an BPC design. And commissioned by us using the BuildHub anemometer (no questions asked from BCO). Very pleased with its performance. Bearings in one fan just failed though (see separate post today) but hopefully we are on the way to fixing it ourselves. It is just over 5 years since we switched it on. Have cleaned it annually and regularly changed the filters. Also worth noting the the outside intake got incredibly gummed up with “cack” (it’s near trees) so we are more diligent on checking that now. Had to buy a replacement Airflow hood as the rubber seal had perished. Now trying to source a spare seal as the supplier doesn’t sell the rubber seal on its own.

-
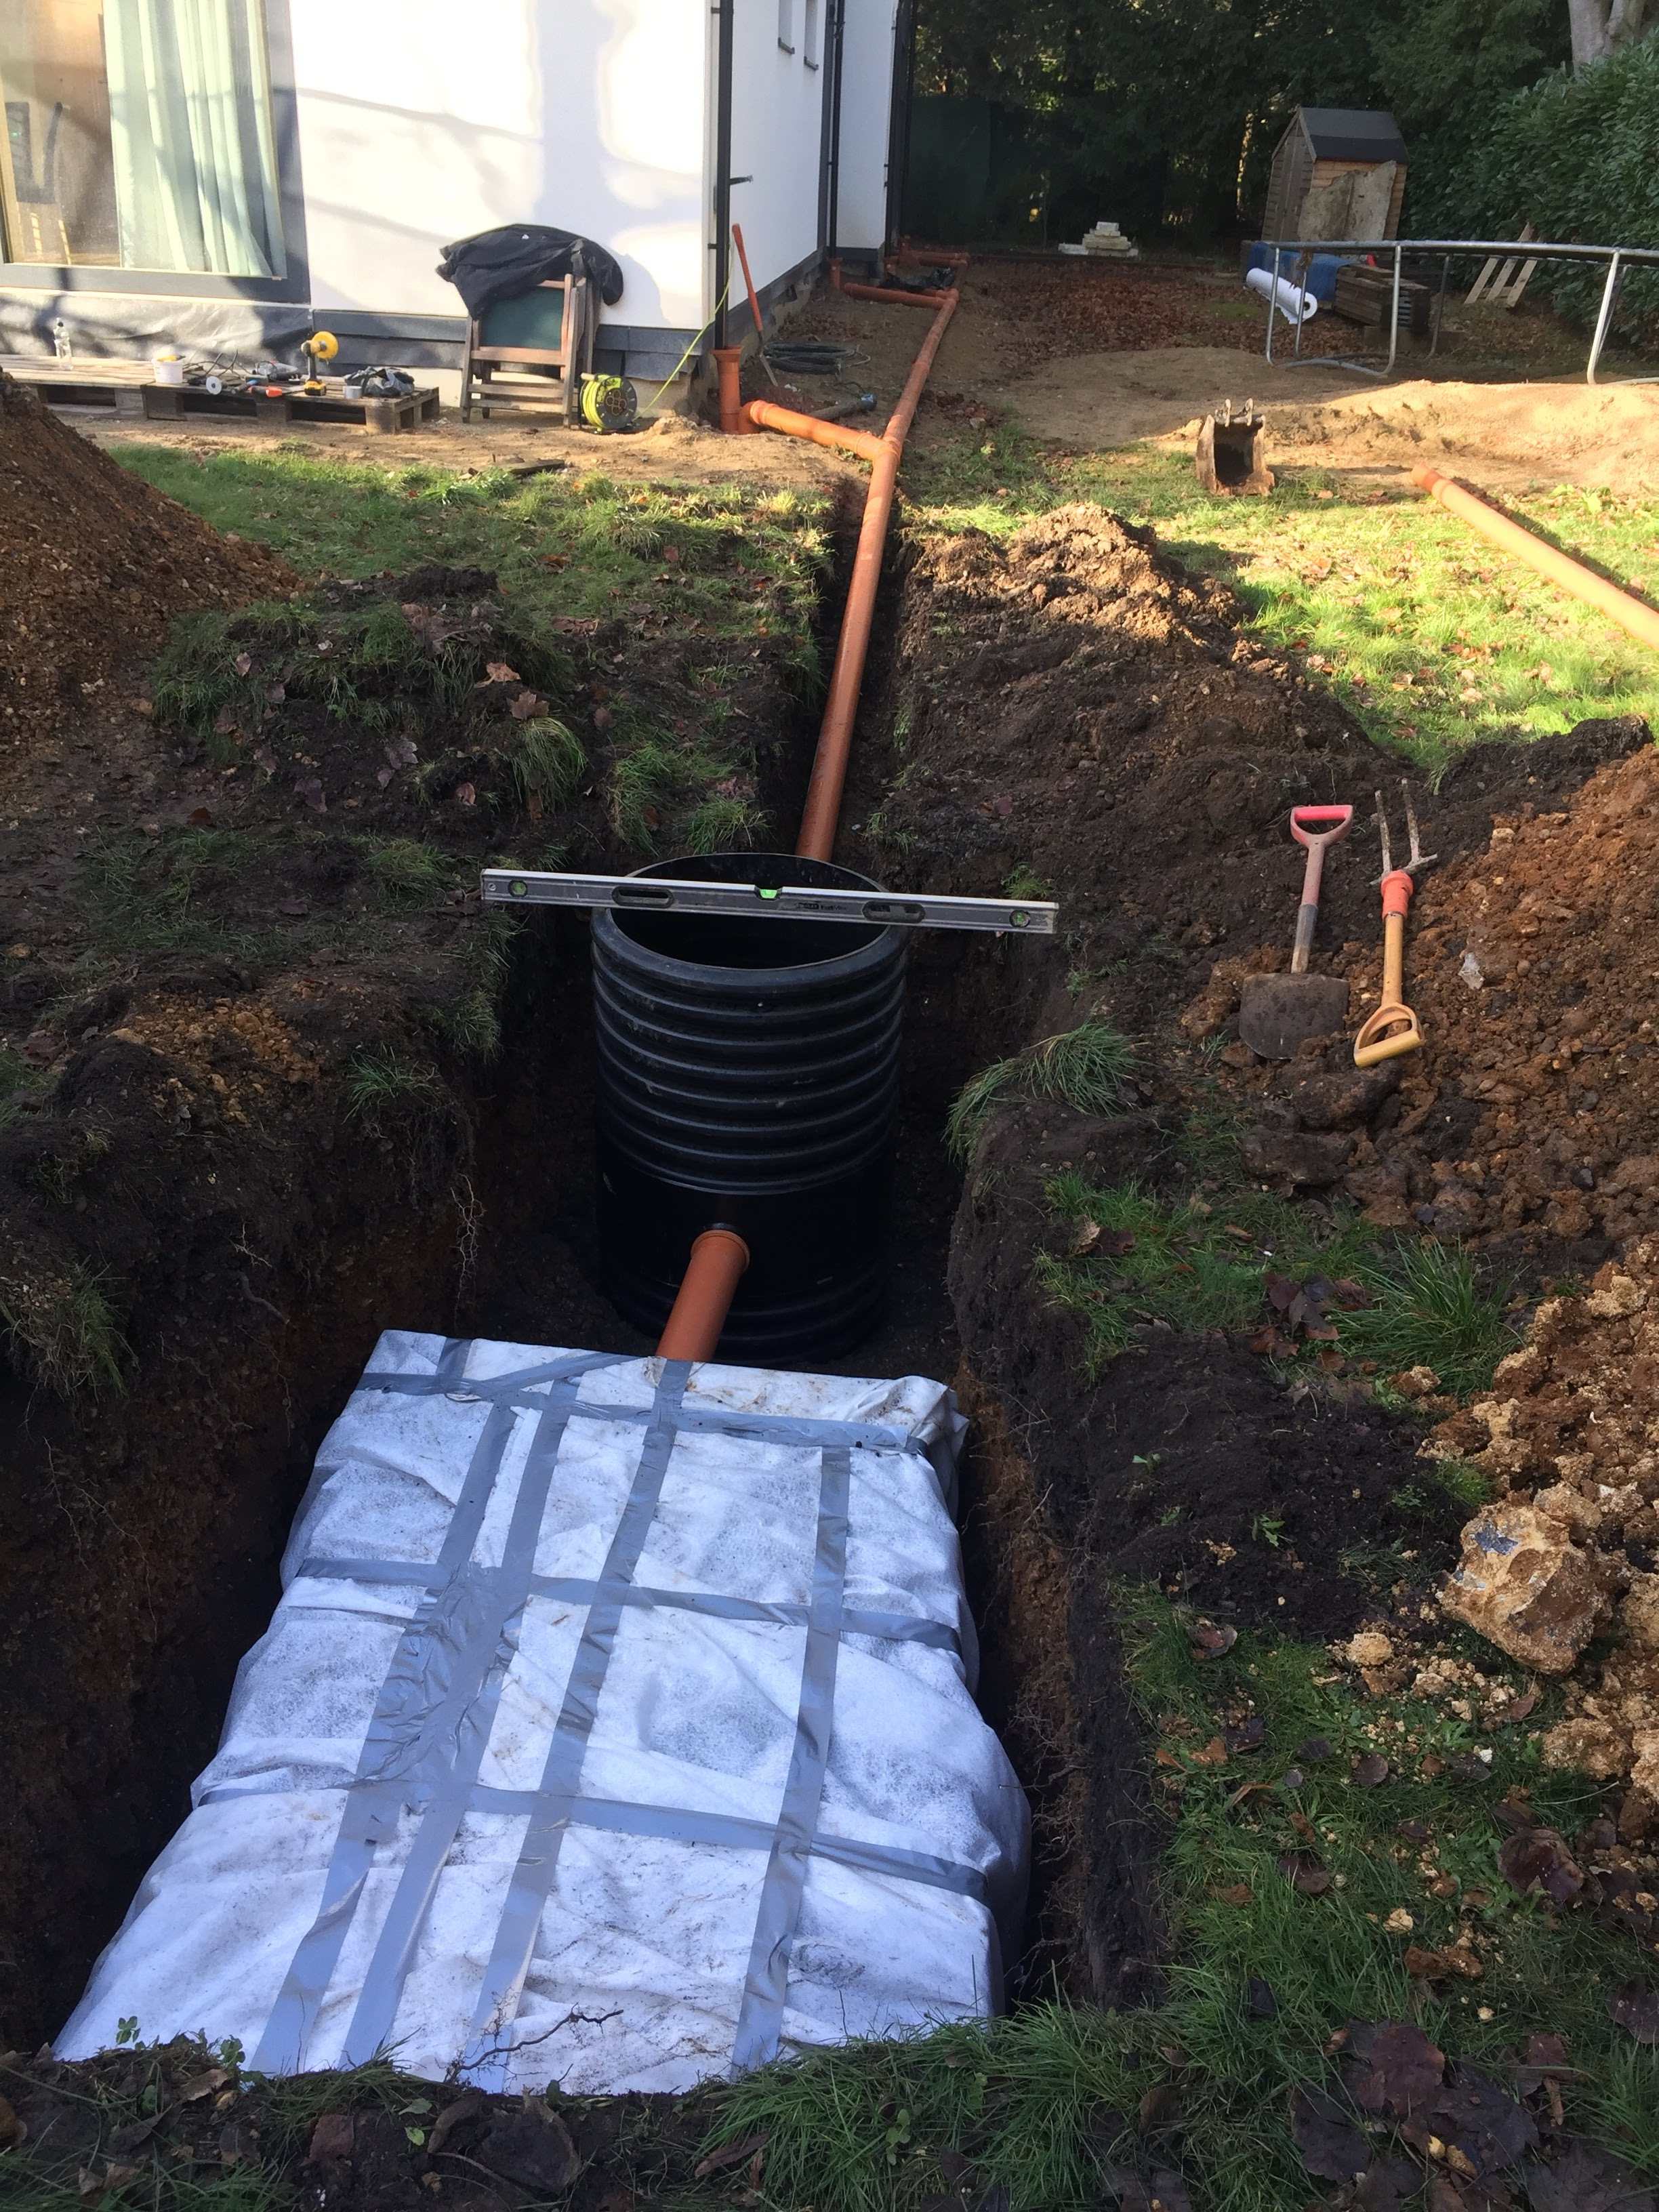
When we did the house drainage we had no money so we just drained our flat roof to a new soakaway. Now, we can afford a rainwater tank and with water bills going up and more dry spells and the garden still not finished we have an opportunity to fit an underground rainwater storage tank to serve the garden only. Here’s what the drain looks like. There’s not enough space to fit a tank “in series” (ie before the circular catchpit) as we have a bit of a paved path in place now. But can we fit it “in parallel” ie spur off the pipe before the catchpit and then flow the overflow from the rainwater storage tank (sited to the left in the photo) back into that pipe before the catchpit? Is this a crazy thing to do? We would have to expose all this again too as it’s buried under an area that is going to be turfed properly this year so this is the last chance. Was thinking a pump to a tap too. has anyone done anything like this?

-
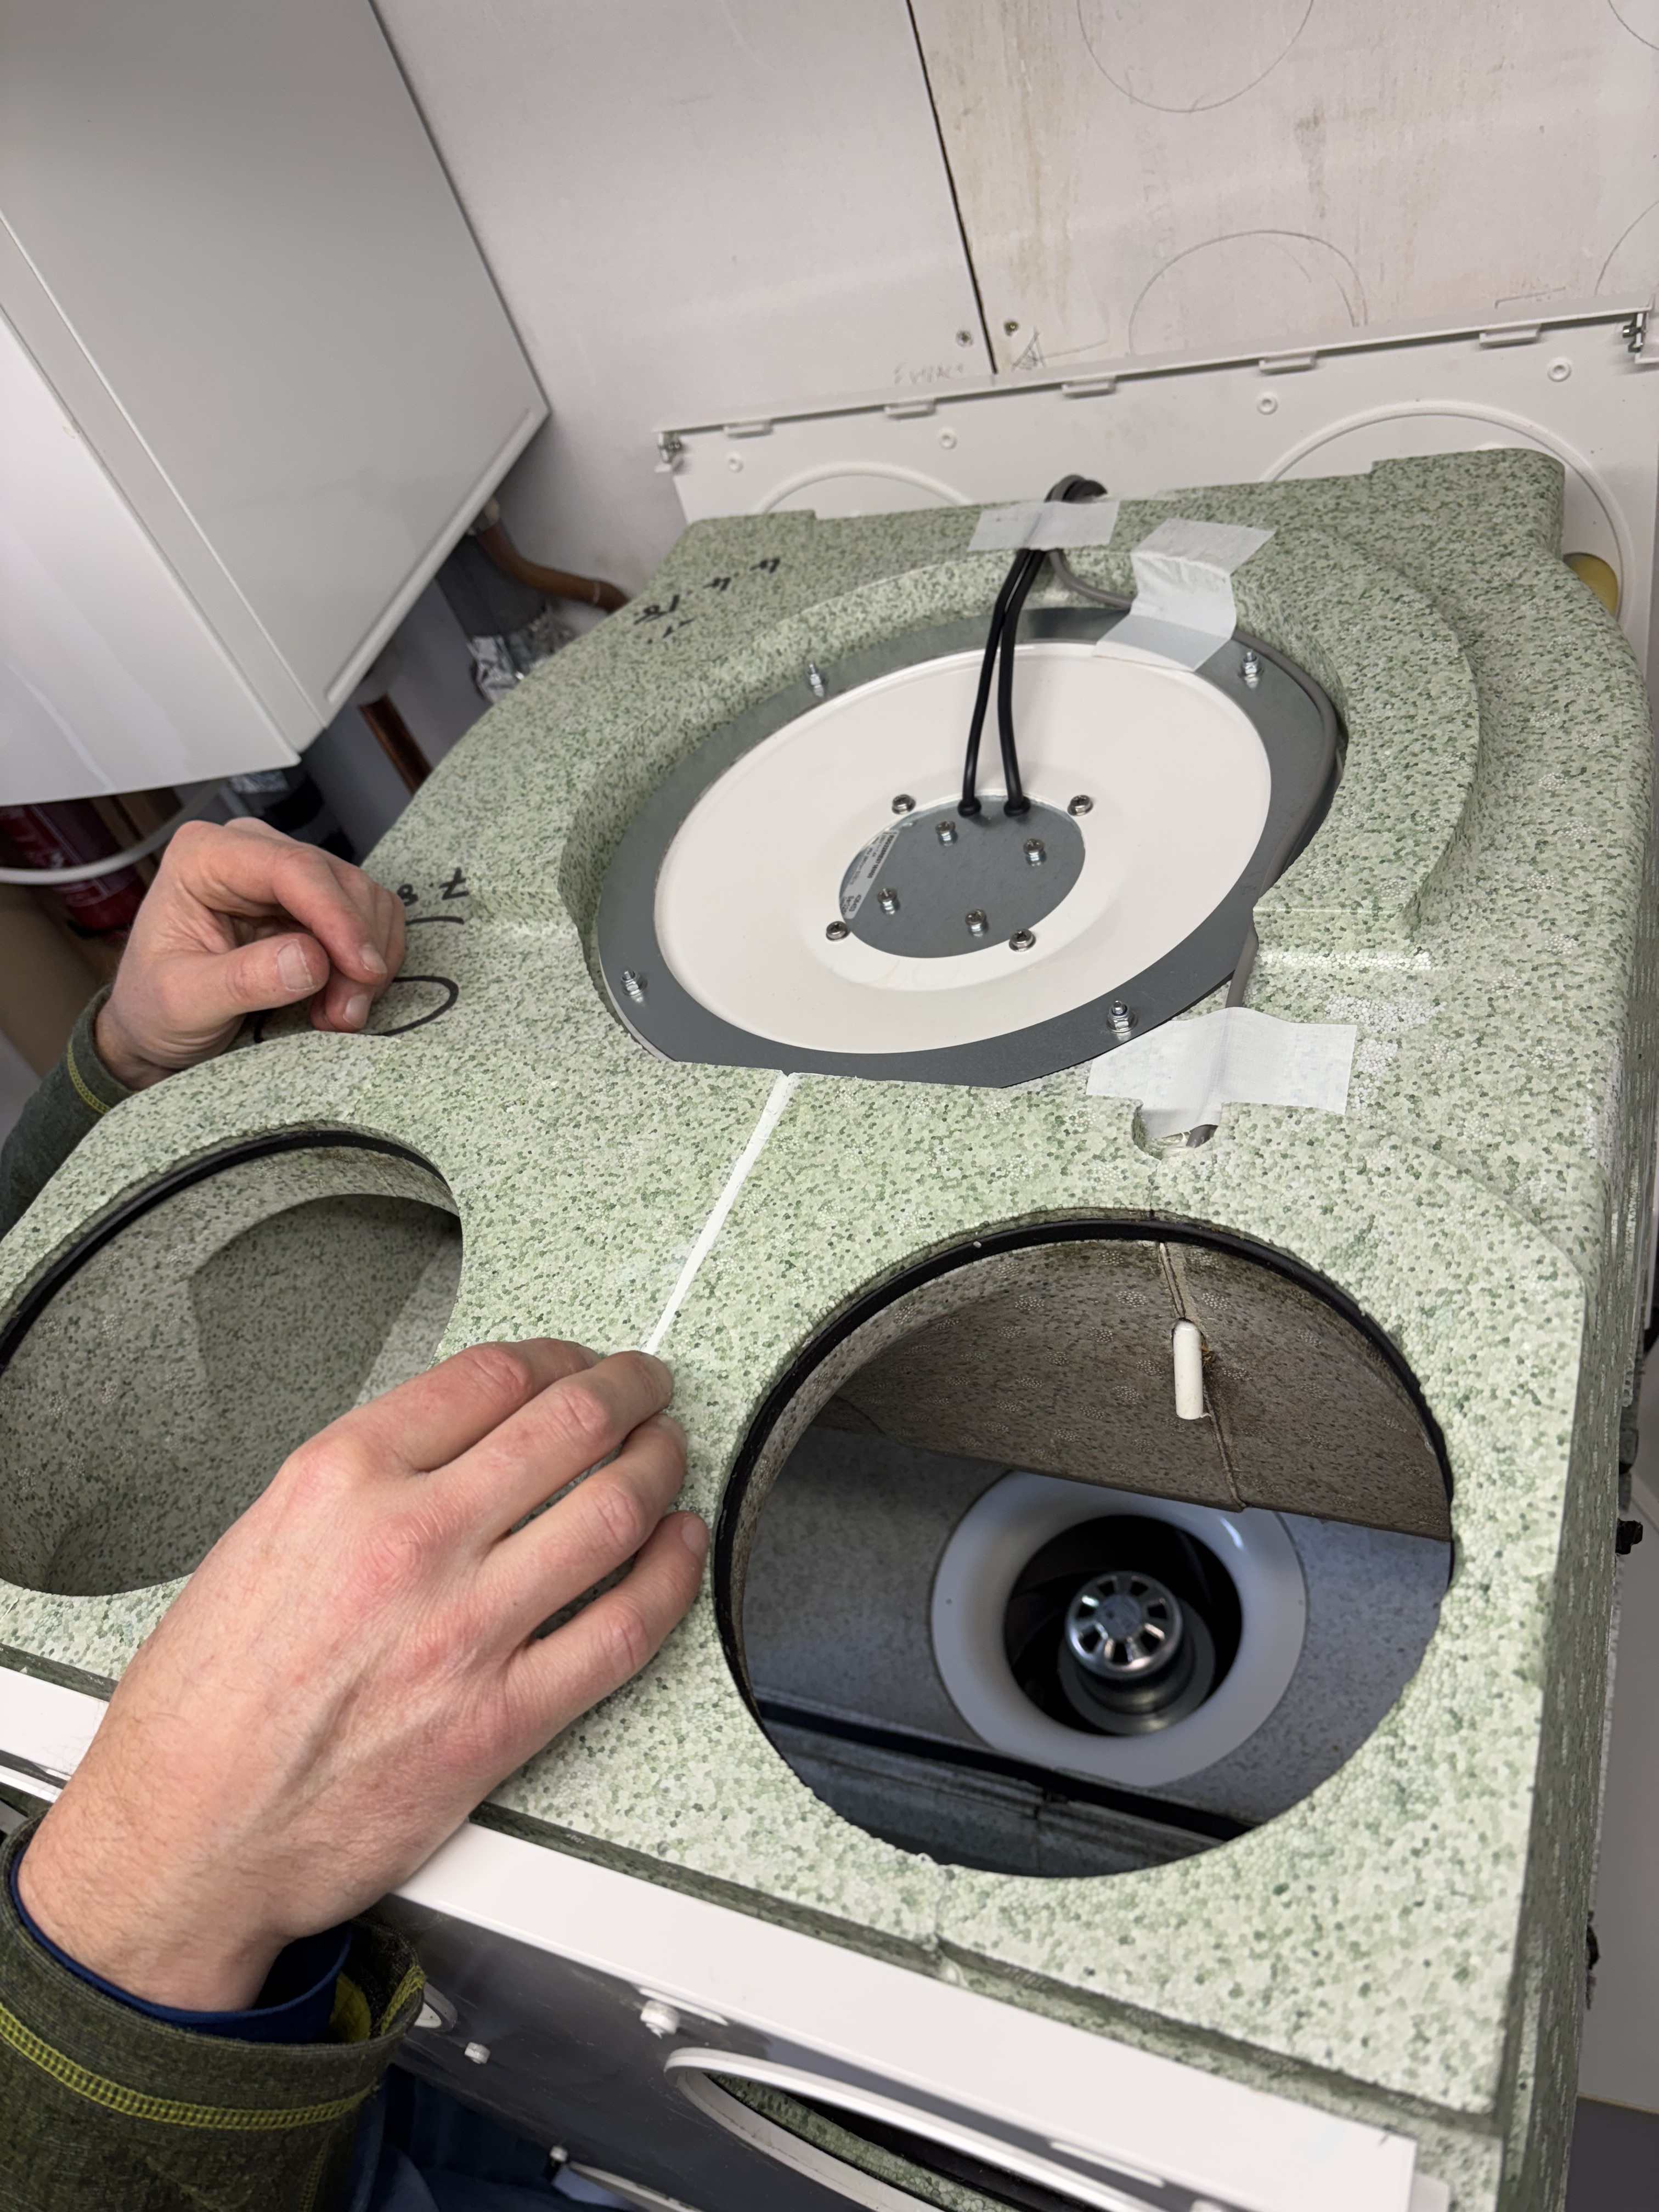
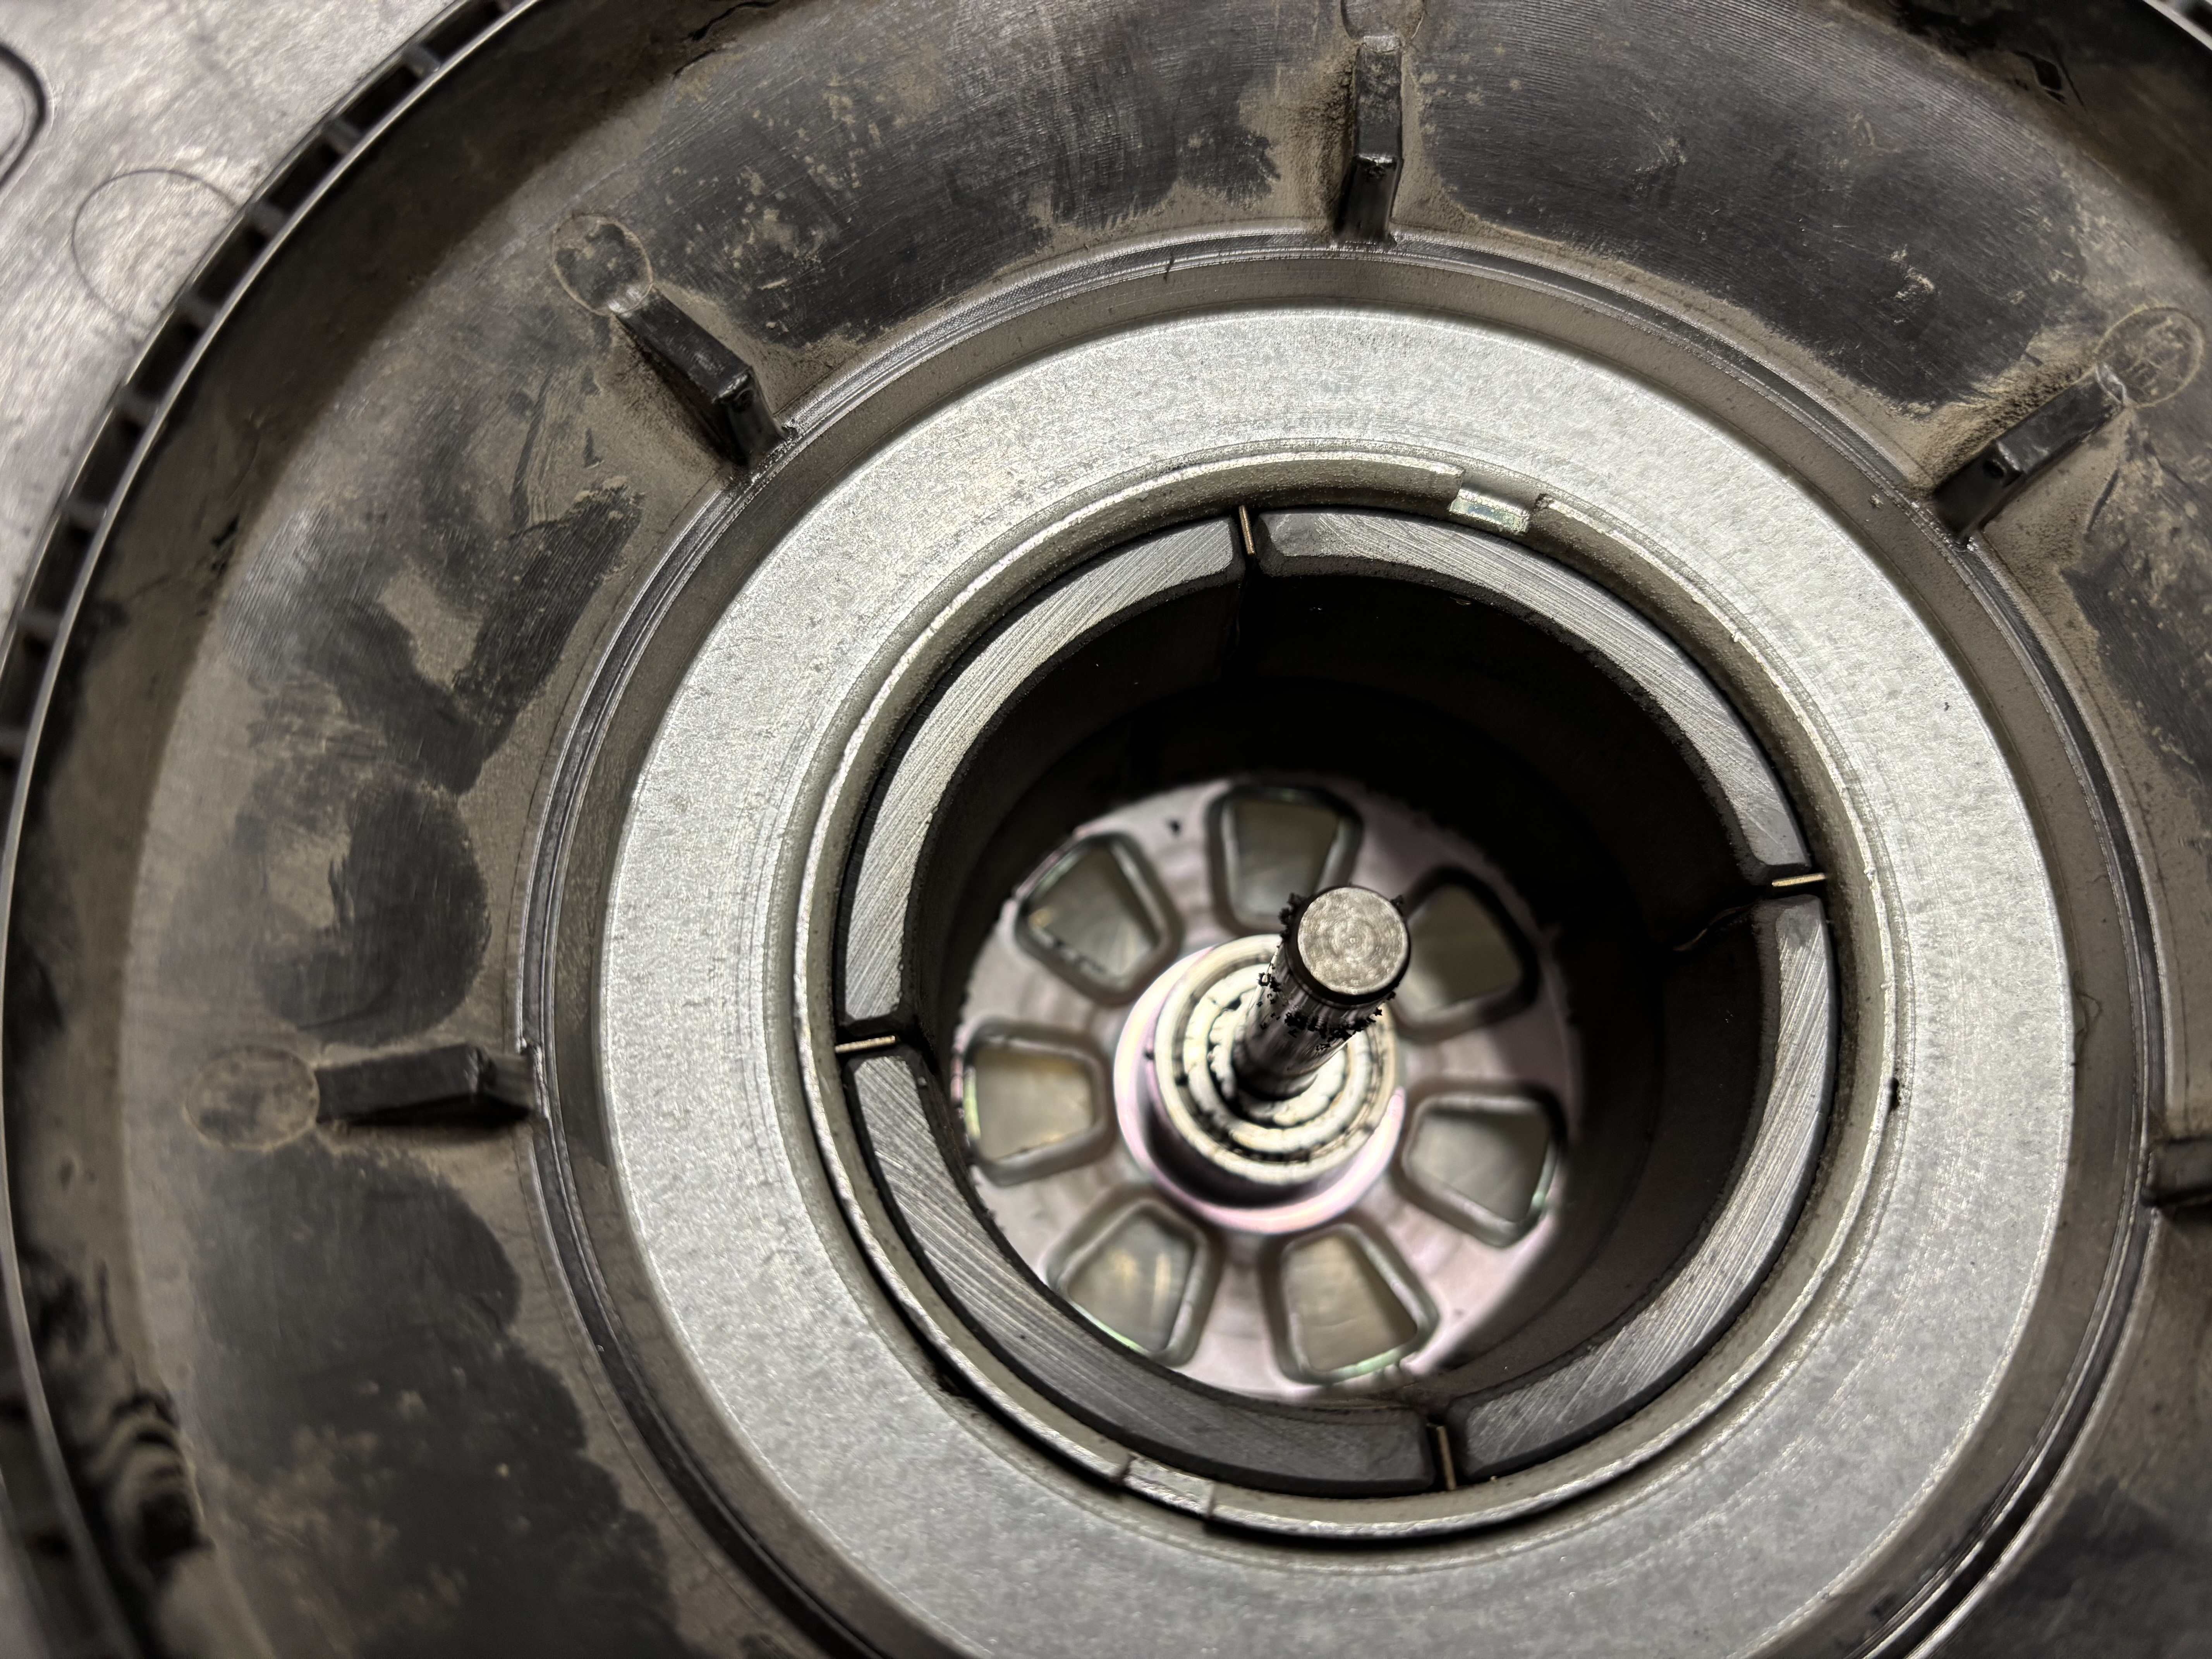
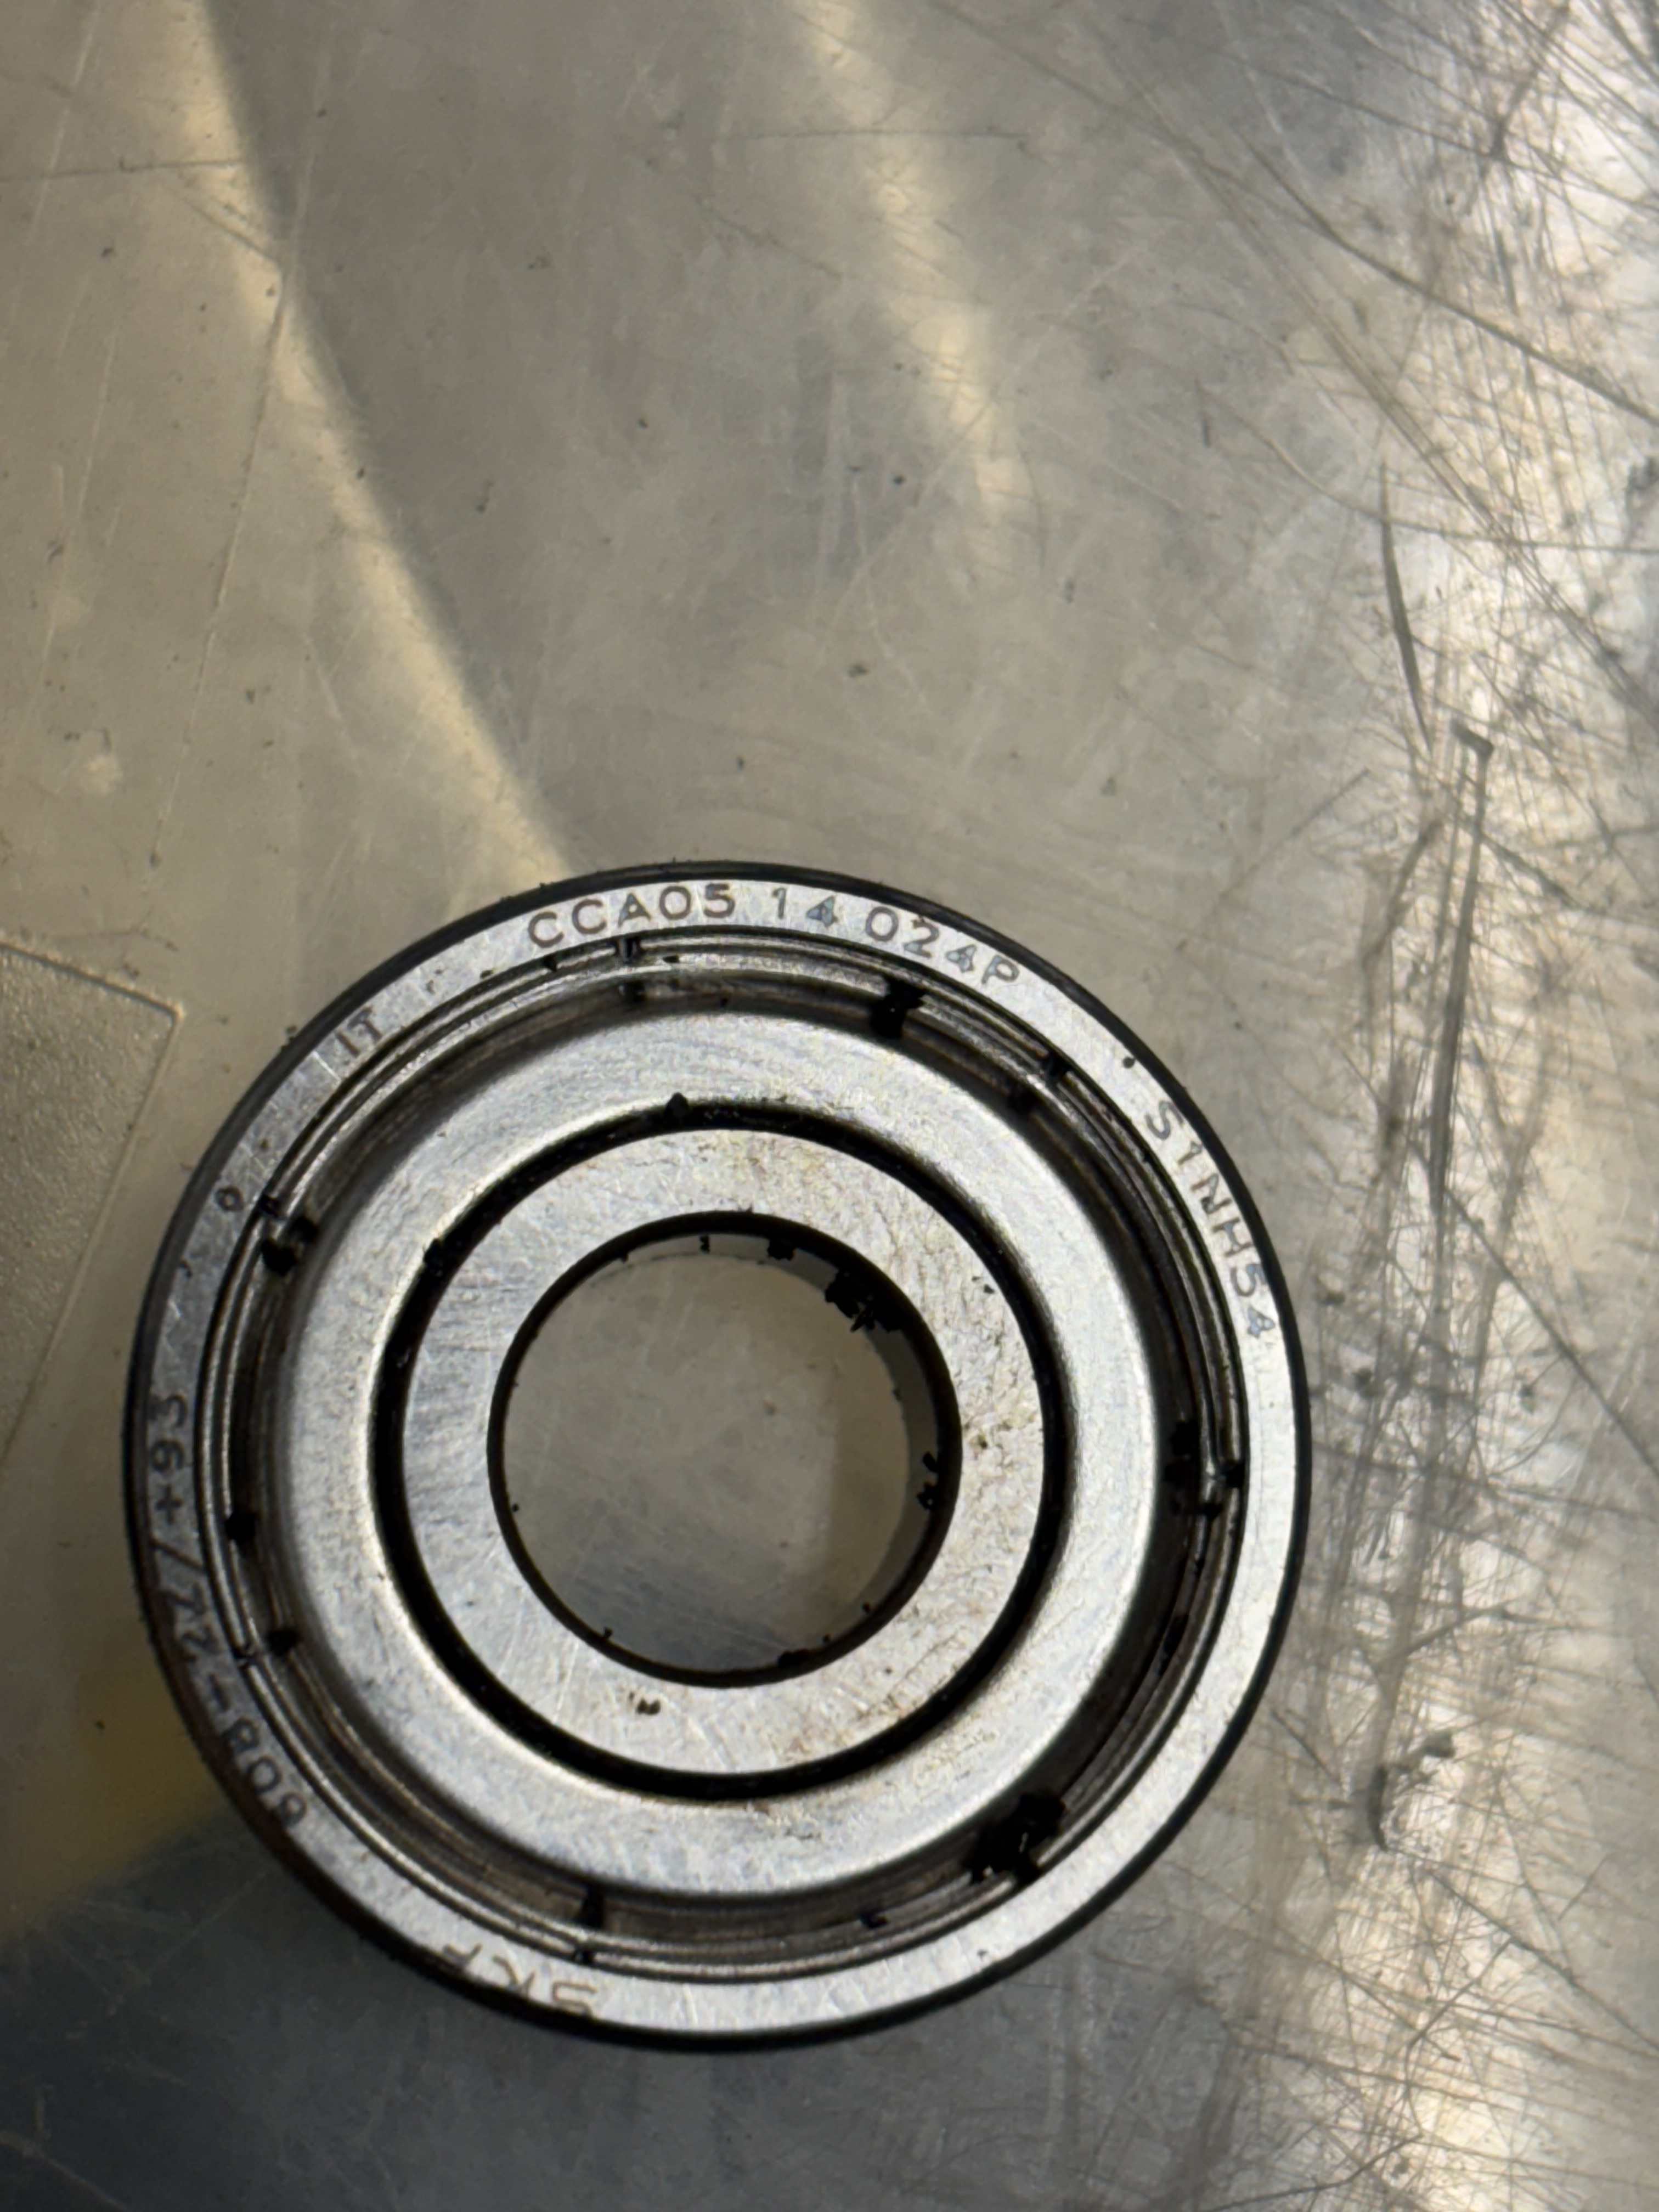
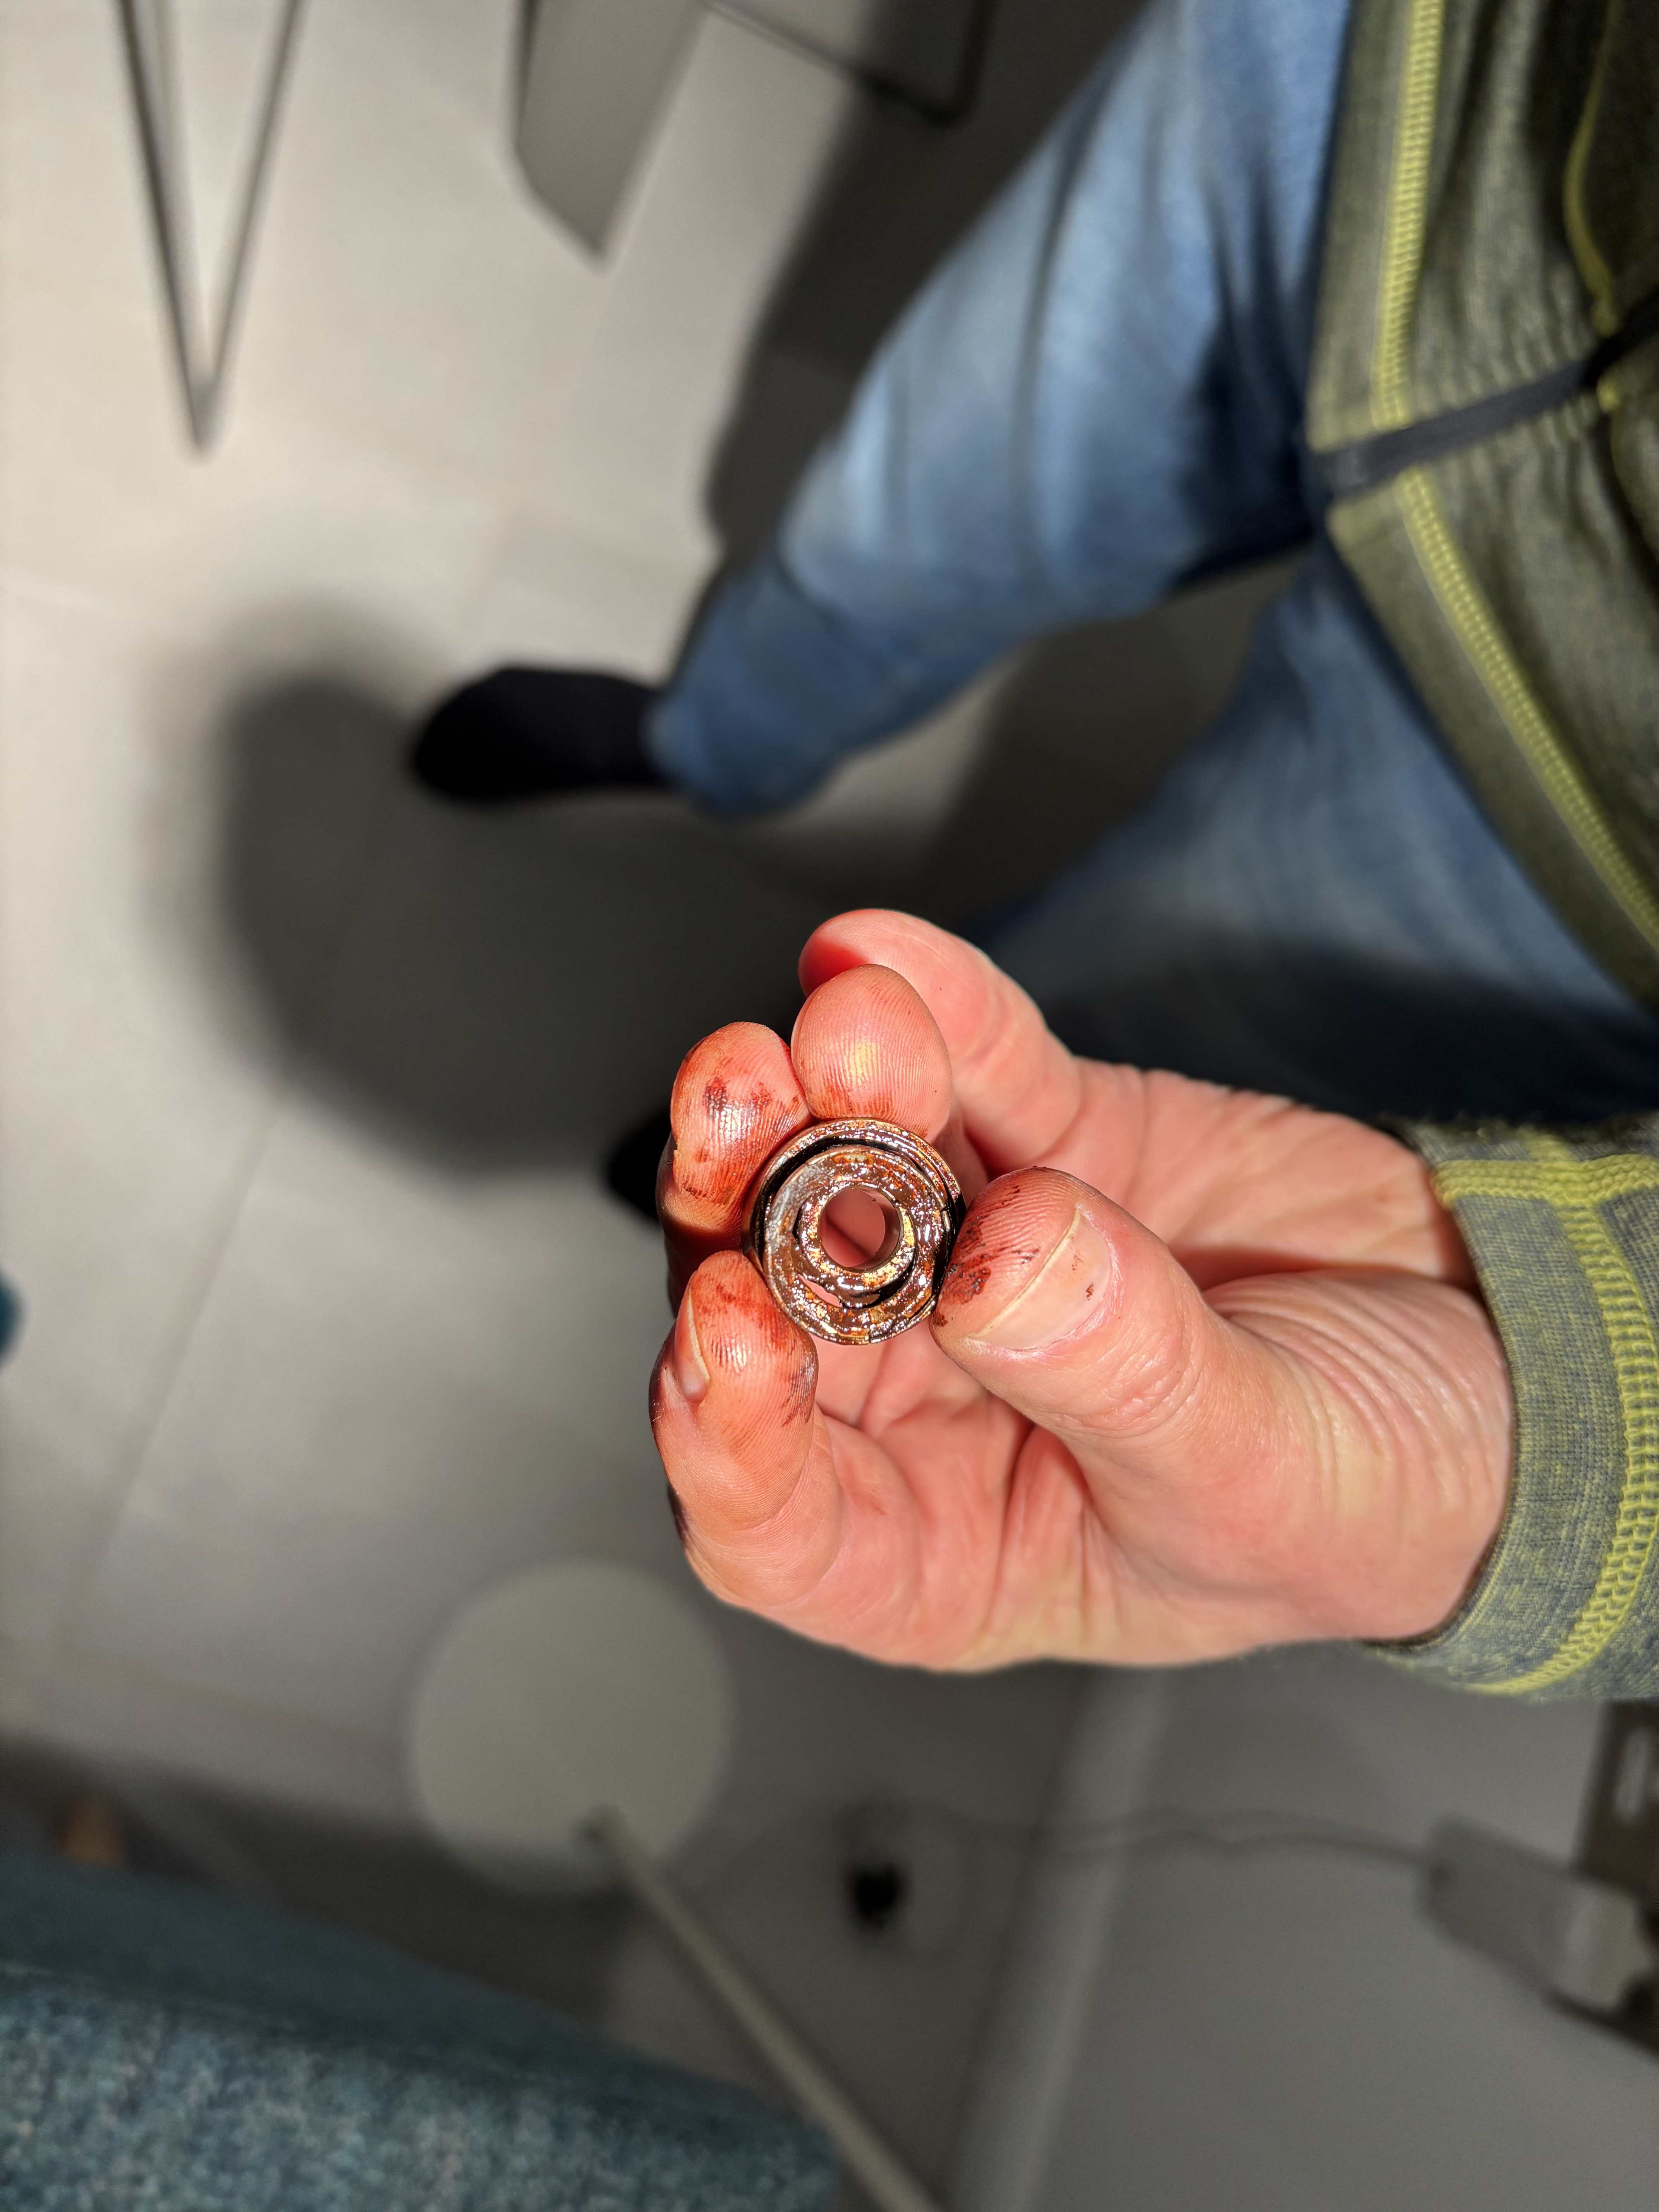
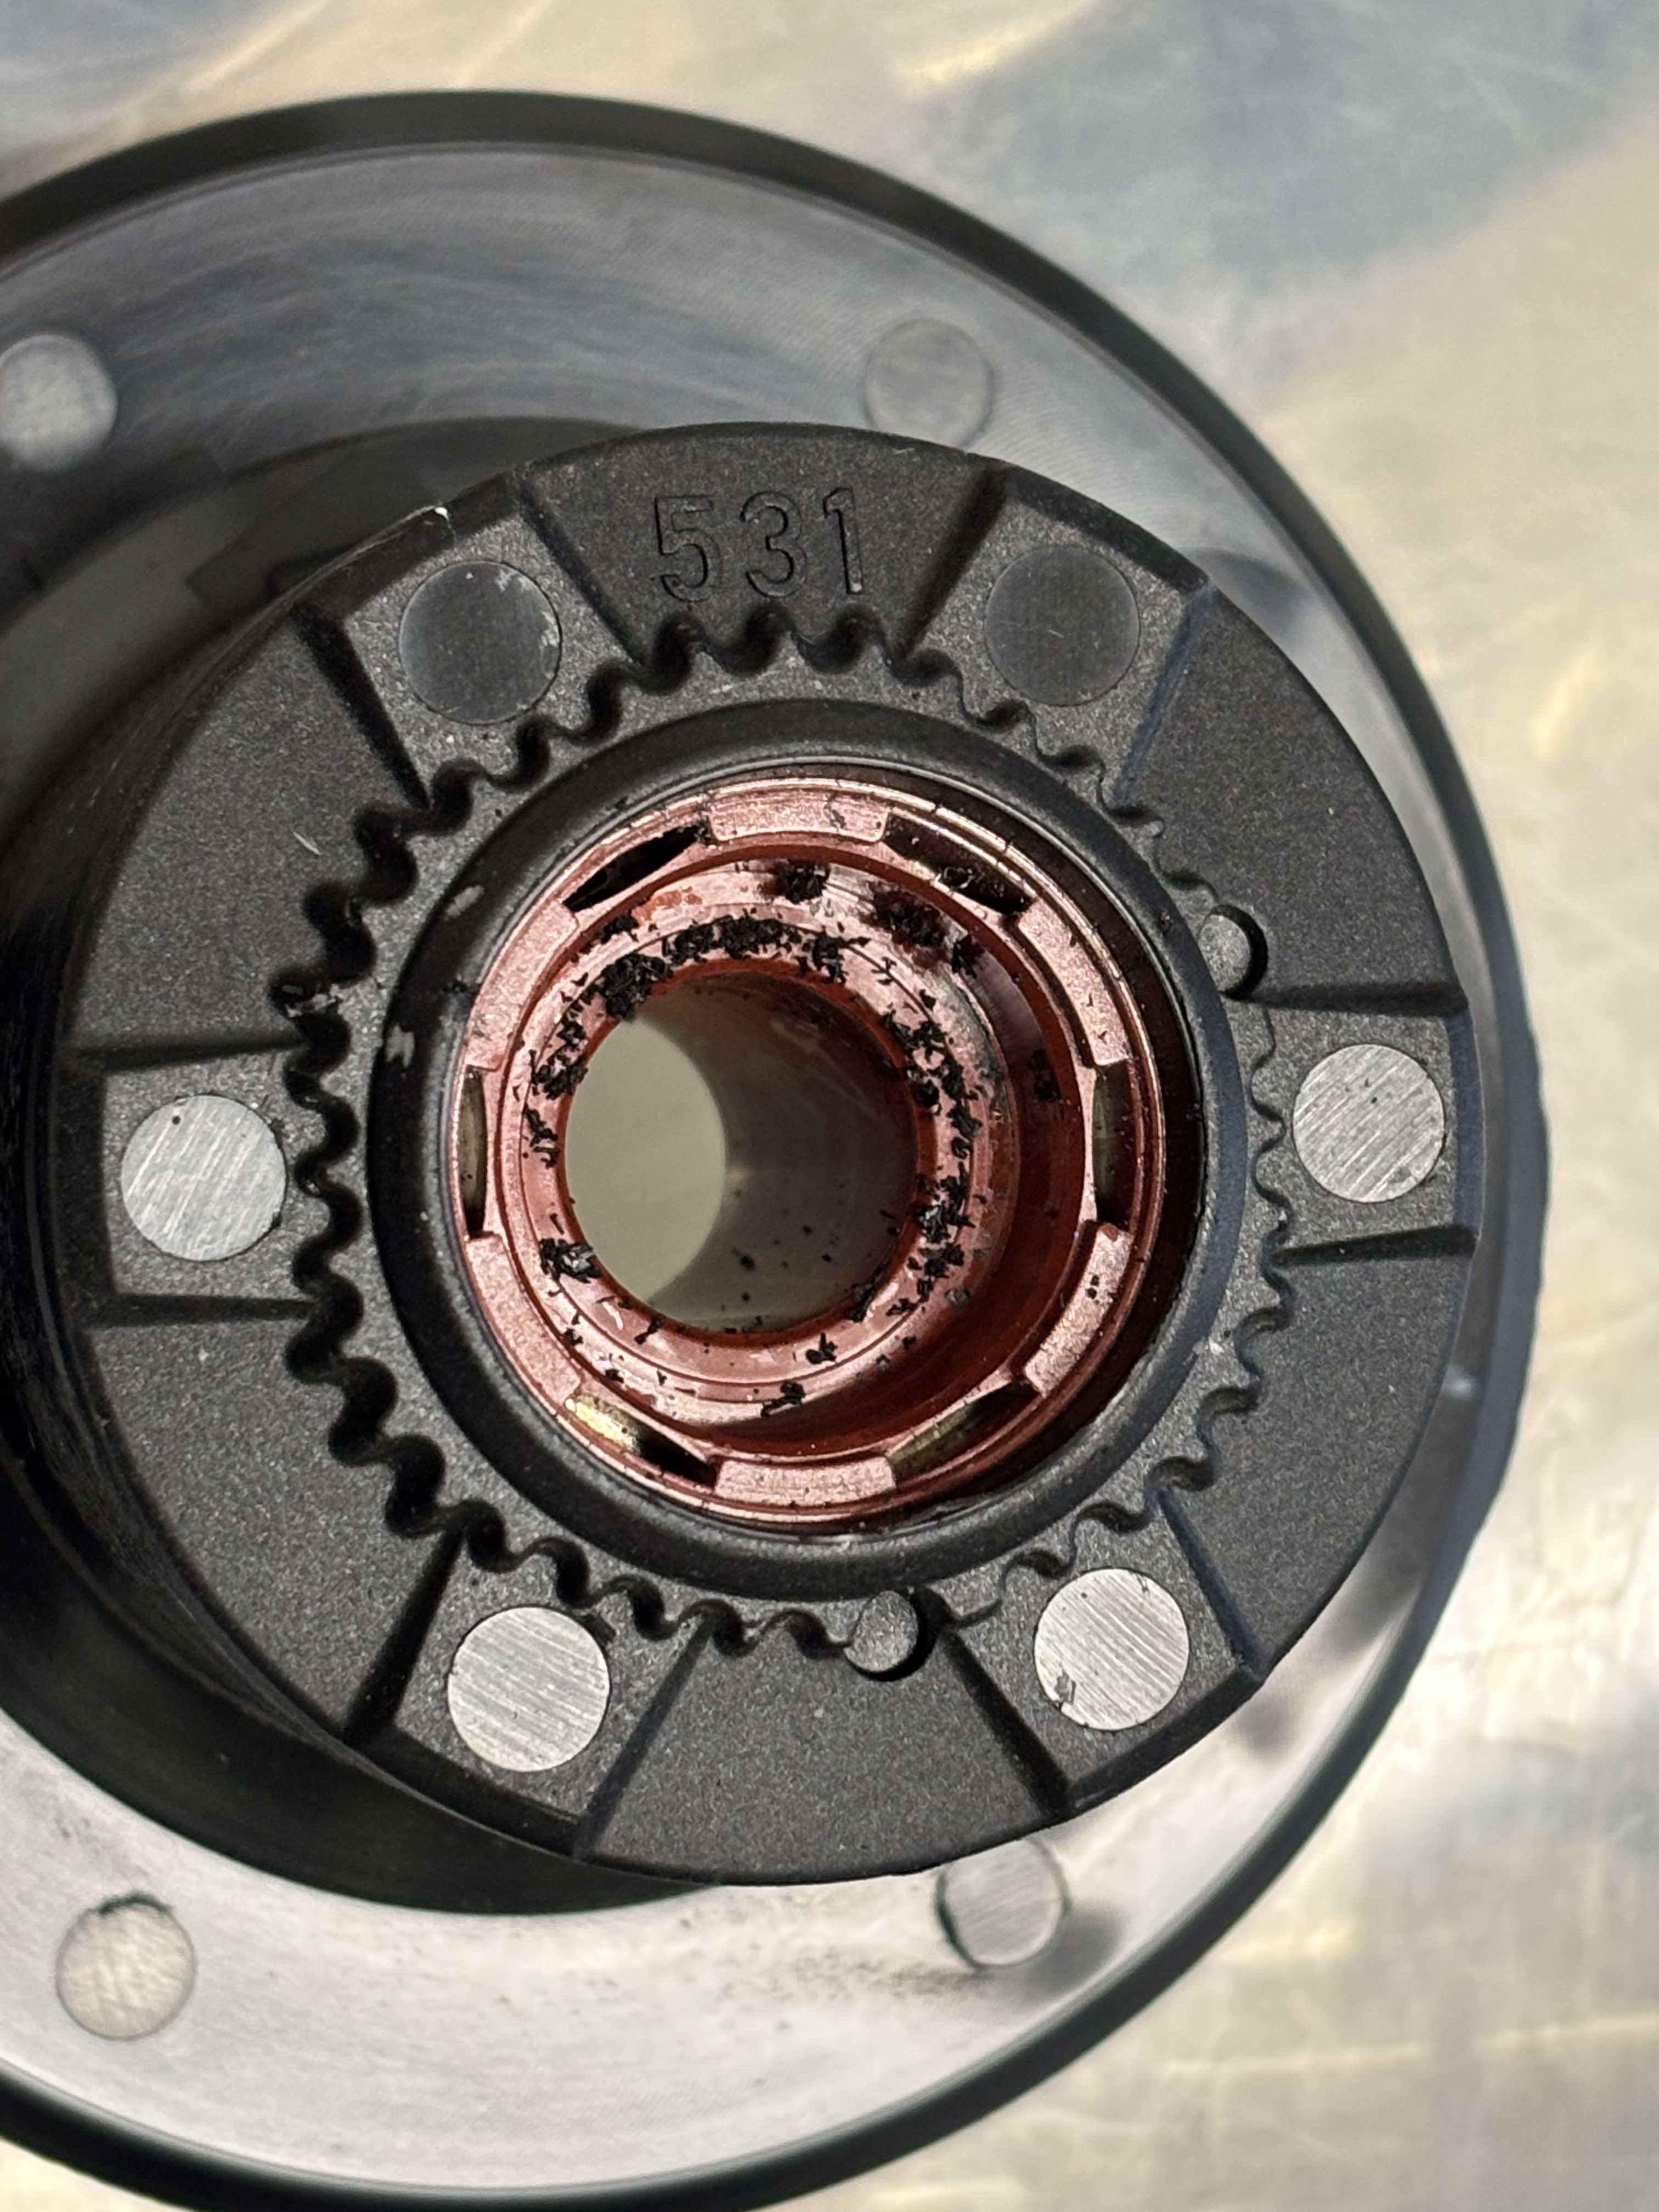
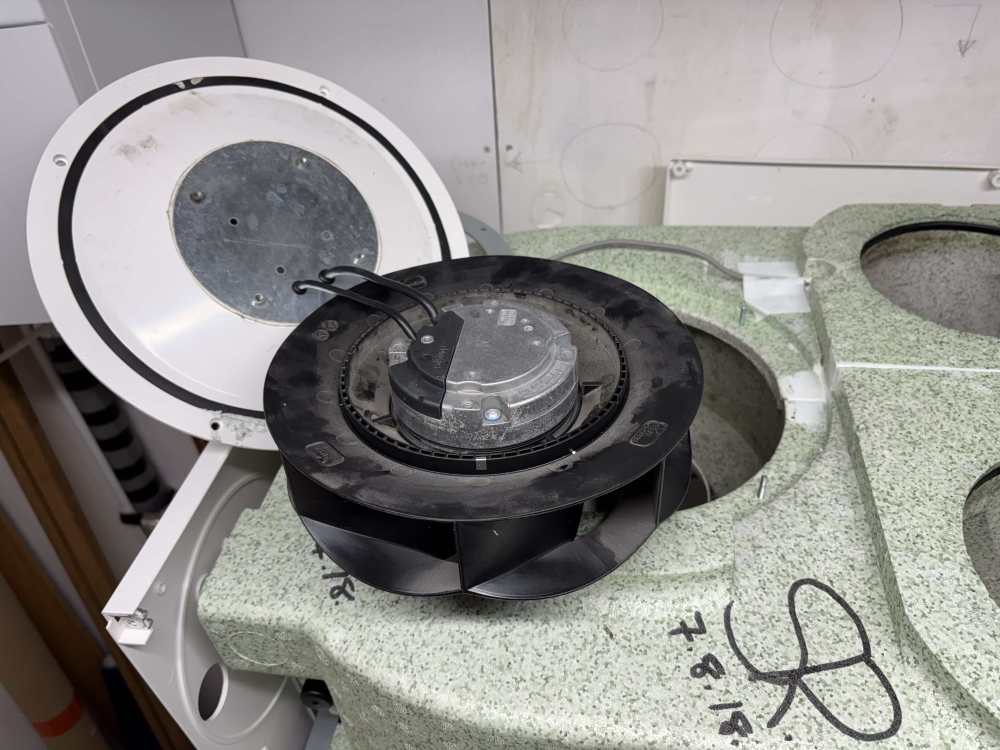
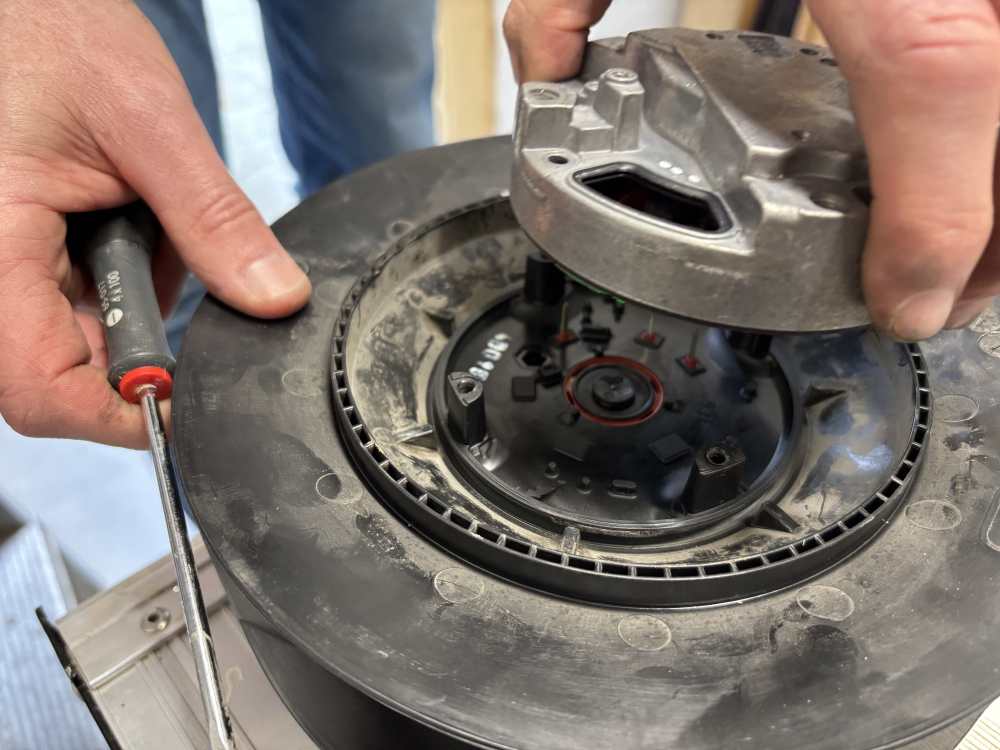
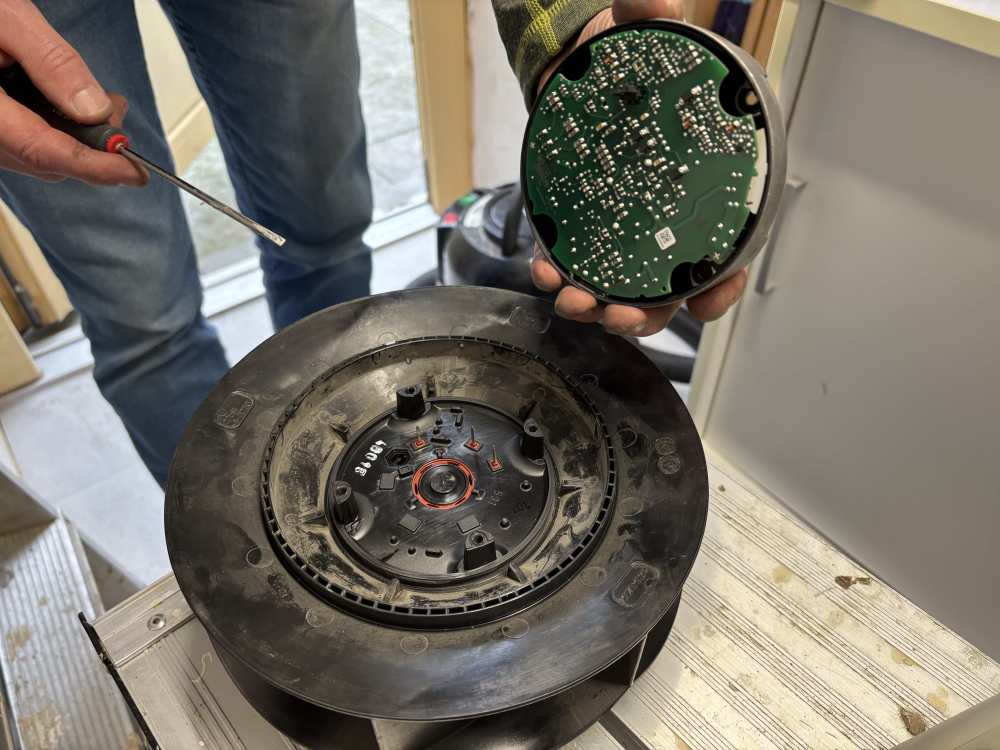
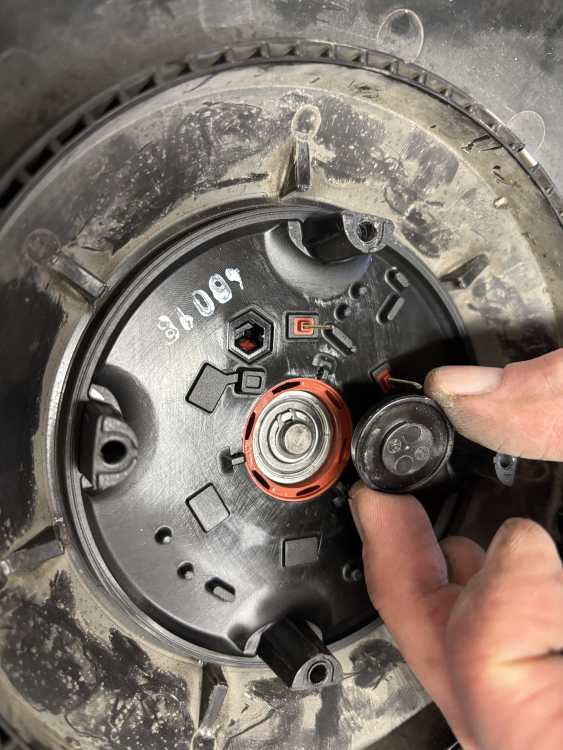
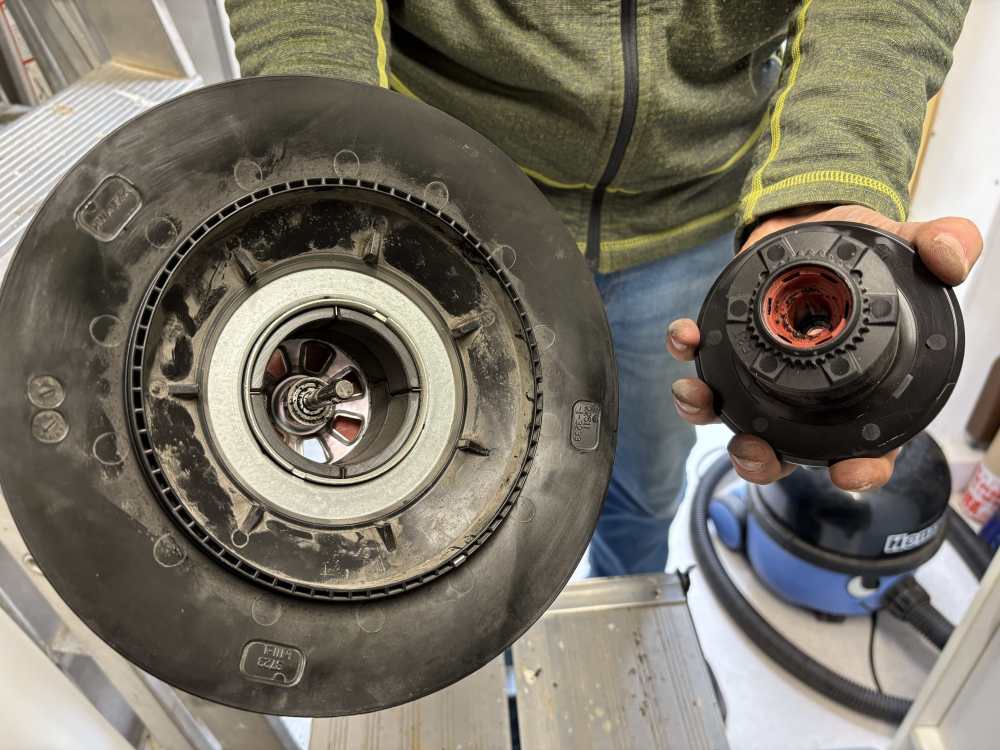
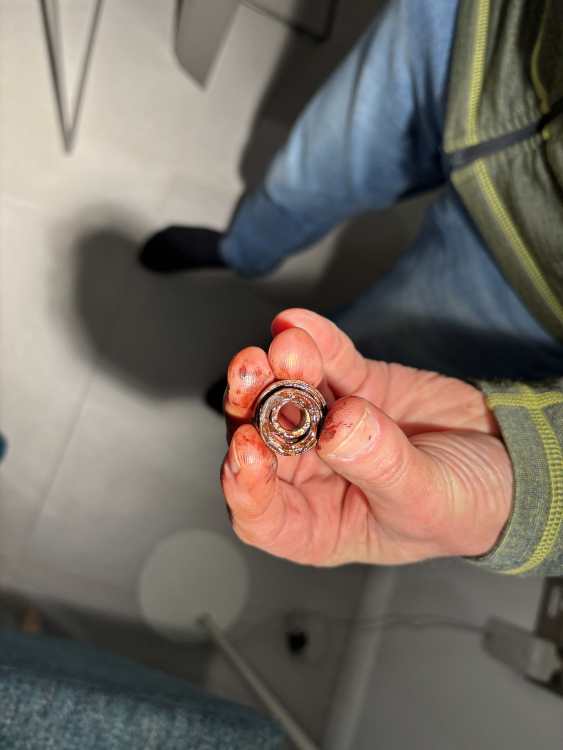
Following the 2 excellent posts by @DOIGAN and @Stones I’m posting this as our Vent Axia model (408451) is different again and it might help someone else to be able to order the bearings before starting to take apart the unit. We are half way through. Bearings now on order 608-2Z from Bearing King (thanks for the recommendation). We heard a noise (humming, but way louder than normal) and had a weird smell (like burning but not quite, though could be the failed fan in the network switch - both problems turned up on the same day). Thanks to googling “MVHR weird noise” this site came up! You can’t get to the fans without taking off the side panel. You can’t take off the side panel without taking it off the wall. And to do that you have to disconnect all the extract / intake ducts. The photos below start from once we got to this point. We identified which fan had the problem. When spinning them both one of them stopped a lot quicker. Was an effort just to get the fan housing out due to it being stuck in with lots of sealant. But here it is, finally out. Prised out with a flathead screwdriver. Then we removed the black rubber bit on the top. That took some prising out too once the screws were out. Then we pulled the section housing the circuit board off. Again, it didn’t come away easily. Then we popped the black button bit off The next bit was surprisingly hard as @Stones had said - the c-clip was really hard to remove. We used a couple of screwdrivers to force it open and a third to pop it up, and it bounced around the plant room fortunately landing at our feet. The first bearing took some effort to get out but it looks alright - we will still replace it as maybe the dirt around it is early signs that it’s done. Part number easily seen. 608-2Z Then the magnet holding this section in was so strong it took a fair force from the other end to get it out and see the other bearing. This bearing was so hard to remove. Others have said they just popped out. Not ours. But this might be why…. So we’ve done as much as we can today. Hopefully the bearings will get here soon so we can rebuild it all whilst we sort of remember how to… For interest, just out of 5 year warranty period, installed in 2018/2019 and powered up for the first time in November 2019. Huge thanks to previous posts without which we’d not have known where to start and would have been buying an expensive replacement fan or, worse still, paying a Vent Axia engineer to replace the fan. Hope this helps someone with this model as it does look a bit different inside. Will update when we put it back together again.


-
It is the entire flat roof of the house, so over 160 sqm in total - not going to get that re-done. But am starting to wonder if it would be cheaper to go to another warranty provider and start the whole thing again. I have already been in contact with them on this and they recommend an insurance backed guarantee from QANW. I have asked Protek if they will accept this. No response yet. I fear we are going down a similar route and the roofing contractor has so far been more than reasonable and is roped into this mess now because we chose Protek. I have asked Protek exactly what the require and there is definitely no willingness on their side to budge. Their wording is below and they say they need this from both the materials supplier and from the roofing contractor. Looks like I will be relying on the goodwill of my roofing contractors insurance company to provide an insurance backed guarantee like @willbish Very frustrating all round. Protek is one to avoid in my view. Flat Roof Insurance Backed Guarantee Requirement The Policyholder shall provide an insurance backed guarantee covering the workmanship and materials for all flat roof coverings and roof void ventilation works. The guarantee issued by the insurance company shall: i) Independently insurance back the original guarantor’s company guarantee and provide cover in the event the original guarantor ceases to trade; ii) Have a minimum cover period of 10 years or more; iii) Cover both workmanship and materials of the flat roof covering and roof void ventilation works; iv) Confirm the transferability of the guarantee to future owners.
-
For those considering warranties, we are having awful trouble getting our self-build signed off with Protek. The flat roof is causing the issue. This has been going on for a year now and is stopping us re-mortgaging so we are still paying self-build finance rates. So if you have a flat roof in your design then think twice about Protek, or at least check that your contractor and materials supplier can provide the insurance backed guarantees that Protek requires to provide a warranty. A materials warranty (backed by PI insurance) and a contractors warranty are not sufficient. They want the contractor to cover the materials (which they can't) and both to be insurance backed, which they aren't as standard. Sika is our materials provider and the roof was installed by one of its registered contractors.
-
We also have no heating upstairs except electric ufh (used in winter) and towel rails (rarely used) in the bathrooms. It drops to around 15-16 degrees in the bedrooms in mid winter. We get some circulation of air via the MVHR and rising heat from downstairs but we notice that the room on the end of the house with three external walls (and a bit of external floor as there is a small cantilevered section) is a bit cooler than the rest of the upstairs (furthest away from the stairwell too). Not a problem but your layout is something to be aware of. Personally I find that room a little chilly sometimes. We have triple glazing and passive house standards.
-
Thanks everyone so far. Some of the new drive will be going on the same location as the old drive (which probably has a decent compacted layer underneath) but other bits are going over what used to be soil areas so although they are compacted after 2 years of machinery going over them the instinct from everyone to go for a deeper build up feels right. I have asked Quote 2 his reasoning for the shallow layer and we will see. Thanks @Bitpipe for the suggestion. Will ask them to quote. Have asked a Resin Bound ltd recommended contractor (his was quote 1) and also a landscaper recommended by our gate people (quote 2). Bit wary of landscapers who believe they can do everything following a bad experience earlier this year. The feedback has shown I am right to be wary. Finishing off the project is so hard. We are working full time jobs, desperate to get it done but finding it hard to find the time to do the necessary research. Goodness knows how we ever built the house.
-
We are finally getting quotes in for a resin bound driveway. There is a difference on the build up Quote 1: 220mm "mechanically compacted limestone", 60mm tarmac, 18mm resin Quote 2: 100mm type 1 scalpings, 60mm tarmac, 20mm resin Its the difference in the build up that is making me wonder what is "right"? Any other resin driveway owners happy to share their build up please?
-
Sadly no digger on site. But today’s rain might soften it so we can dig a small pit to see how deep the problem is.
-
All great advice thank you. Yes plenty of manure round here though not cheap sadly. might plump for seed in the end but clearly got done prep to do either way. Seen this in Aldi https://www.aldi.co.uk/electric-tiller/p/805141459647600?gclid=EAIaIQobChMIx6m2vvCe8AIVi_93Ch09OQ4tEAQYASABEgKVaPD_BwE&gclsrc=aw.ds#product-reviews reckon it will get through the solid layer?
-
We have got to the grass stage and the area to be grassed / flower beds is rock solid from having diggers track over it so much. It doesn’t drain very well at all. I’ll definitely get in some topsoil but what would should we do with this rock solid stuff first before we put topsoil on top? No weeds. It’s like concrete.
-
We used postcrete to secure vertical bits of sleeper where the horizontal ones join each other. Over engineered for sure but that’s what happens when you have two (ex) engineers and a project ?
-
we do have 100% flat roof (slight pitch for water run off purposes) with roof lights. One is an access hatch so we can access the roof to clear off leaves. We have a high-ish parapet at the edge but I wouldn’t go up there if not for leaf clearing. Not cleaned the roof lights in 2 years. Seem ok (no self cleaning glass here). solar heating is an issue and we had an external film applied last year so we’ll see if that helps this summer as @Bitpipe notes we had a leak (I did a blog entry I think). Roof membrane was not the problem. Poor window design and installation was. Now resolved. Thankfully.
-
Top 3 MVHR brands?
Weebles replied to ashthekid's topic in Mechanical Ventilation with Heat Recovery (MVHR)
+ 1 to @Bitpipe comments. Fitted ourselves as per design from BPC. If you have any steel beams you may need to consider access through them for services. We planned for some MVHR ducts and plumbing but not sufficient space for all the MVHR ducts. Had to avoid the beam with a huge detour via the roof void resulting in longer runs than planned. Works fine - was just another problem to solve. -
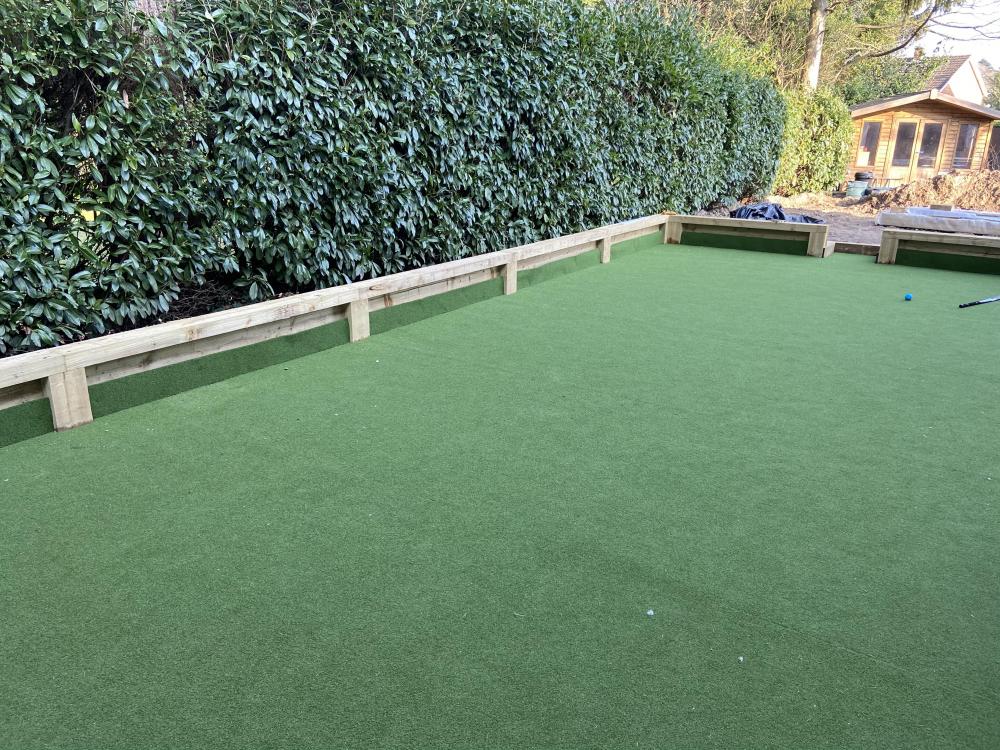
We’ve just laid a proper astro playing surface (2 hockey playing kids). Sleepers worked well around the edge. I’ve also seen brick edging look good (with the astro screwed onto battens). Or a piece of treated timber if you don’t want the height of a sleeper. If you are sand dressing it the weight of the sand will help keep it in place . We were advised to screw to battens though we ended up with the astro covered gravel boards holding it down. before and after shots below. we’ve gone for a high edge but the theory is the same I guess.

-
Gravel stabiliser grids - any experience?
Weebles replied to Weebles's topic in Landscaping, Decking & Patios
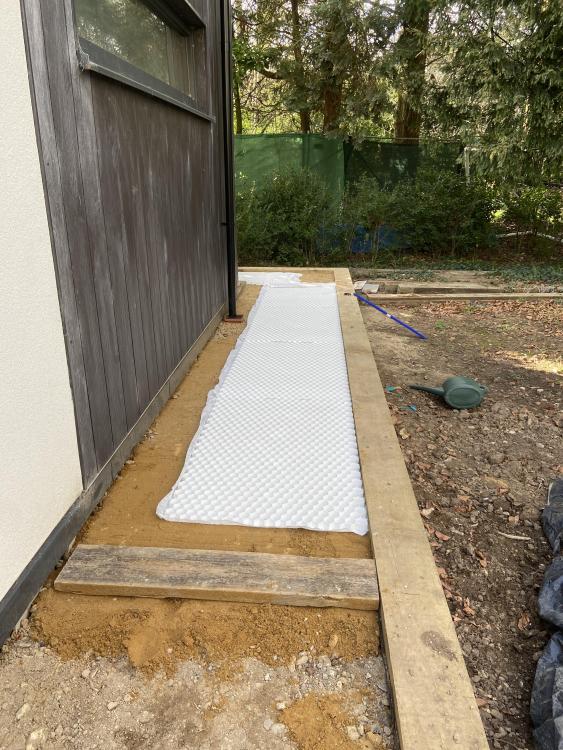
Update post Easter weekend project pros - easy to cut to size (I used a jigsaw) - weed membrane already on with plenty of overlap for adjoining pieces - very quick to fill with gravel once laid cons - cost is a factor though we have saved on gravel and the hard surface is great - took longer than expected to lay the grids, levelling being the real issue. In one area the path is “bouncy”. I reckon I had a dip in the sand layer there. Probably a boot print. - need to be careful of grid as can’t walk on it without gravel in it. I cracked one of the honeycomb sections by kneeling in it to put the next section in. Not the end of the world unless it’s a driveway (though the grids for that are stronger) final surface still has loose gravel as you need to leave a min 10mm above the grid. But it’s a solid surface underneath and when you walk on it it doesn’t give like a usual gravel path. i used 6mm basalt chippings. Really easy to smooth into the grid as so small. They dry dark grey but look black when wet. Once I’ve cleaned the trim at the bottom of the exterior walls it might look better. pleased with end result. I’d use again.

-
its not the unloading that’s the problem, it’s the plastic lunch boxes etc that the drip dry on the worktop above looking a mess. And the stuff that sits around whilst it runs it’s 3 hour cycle. Occasionally I just want a clear work surface. and we have to run it 2 or 3 times a day when we have overnight guests and there’s 8-10 of us in the house. Not a problem at the mo obviously.
-
It’s not a brilliant close up but you can see it. Can send some install pics if you are interested. We ordered it and fixed it ourselves.

-
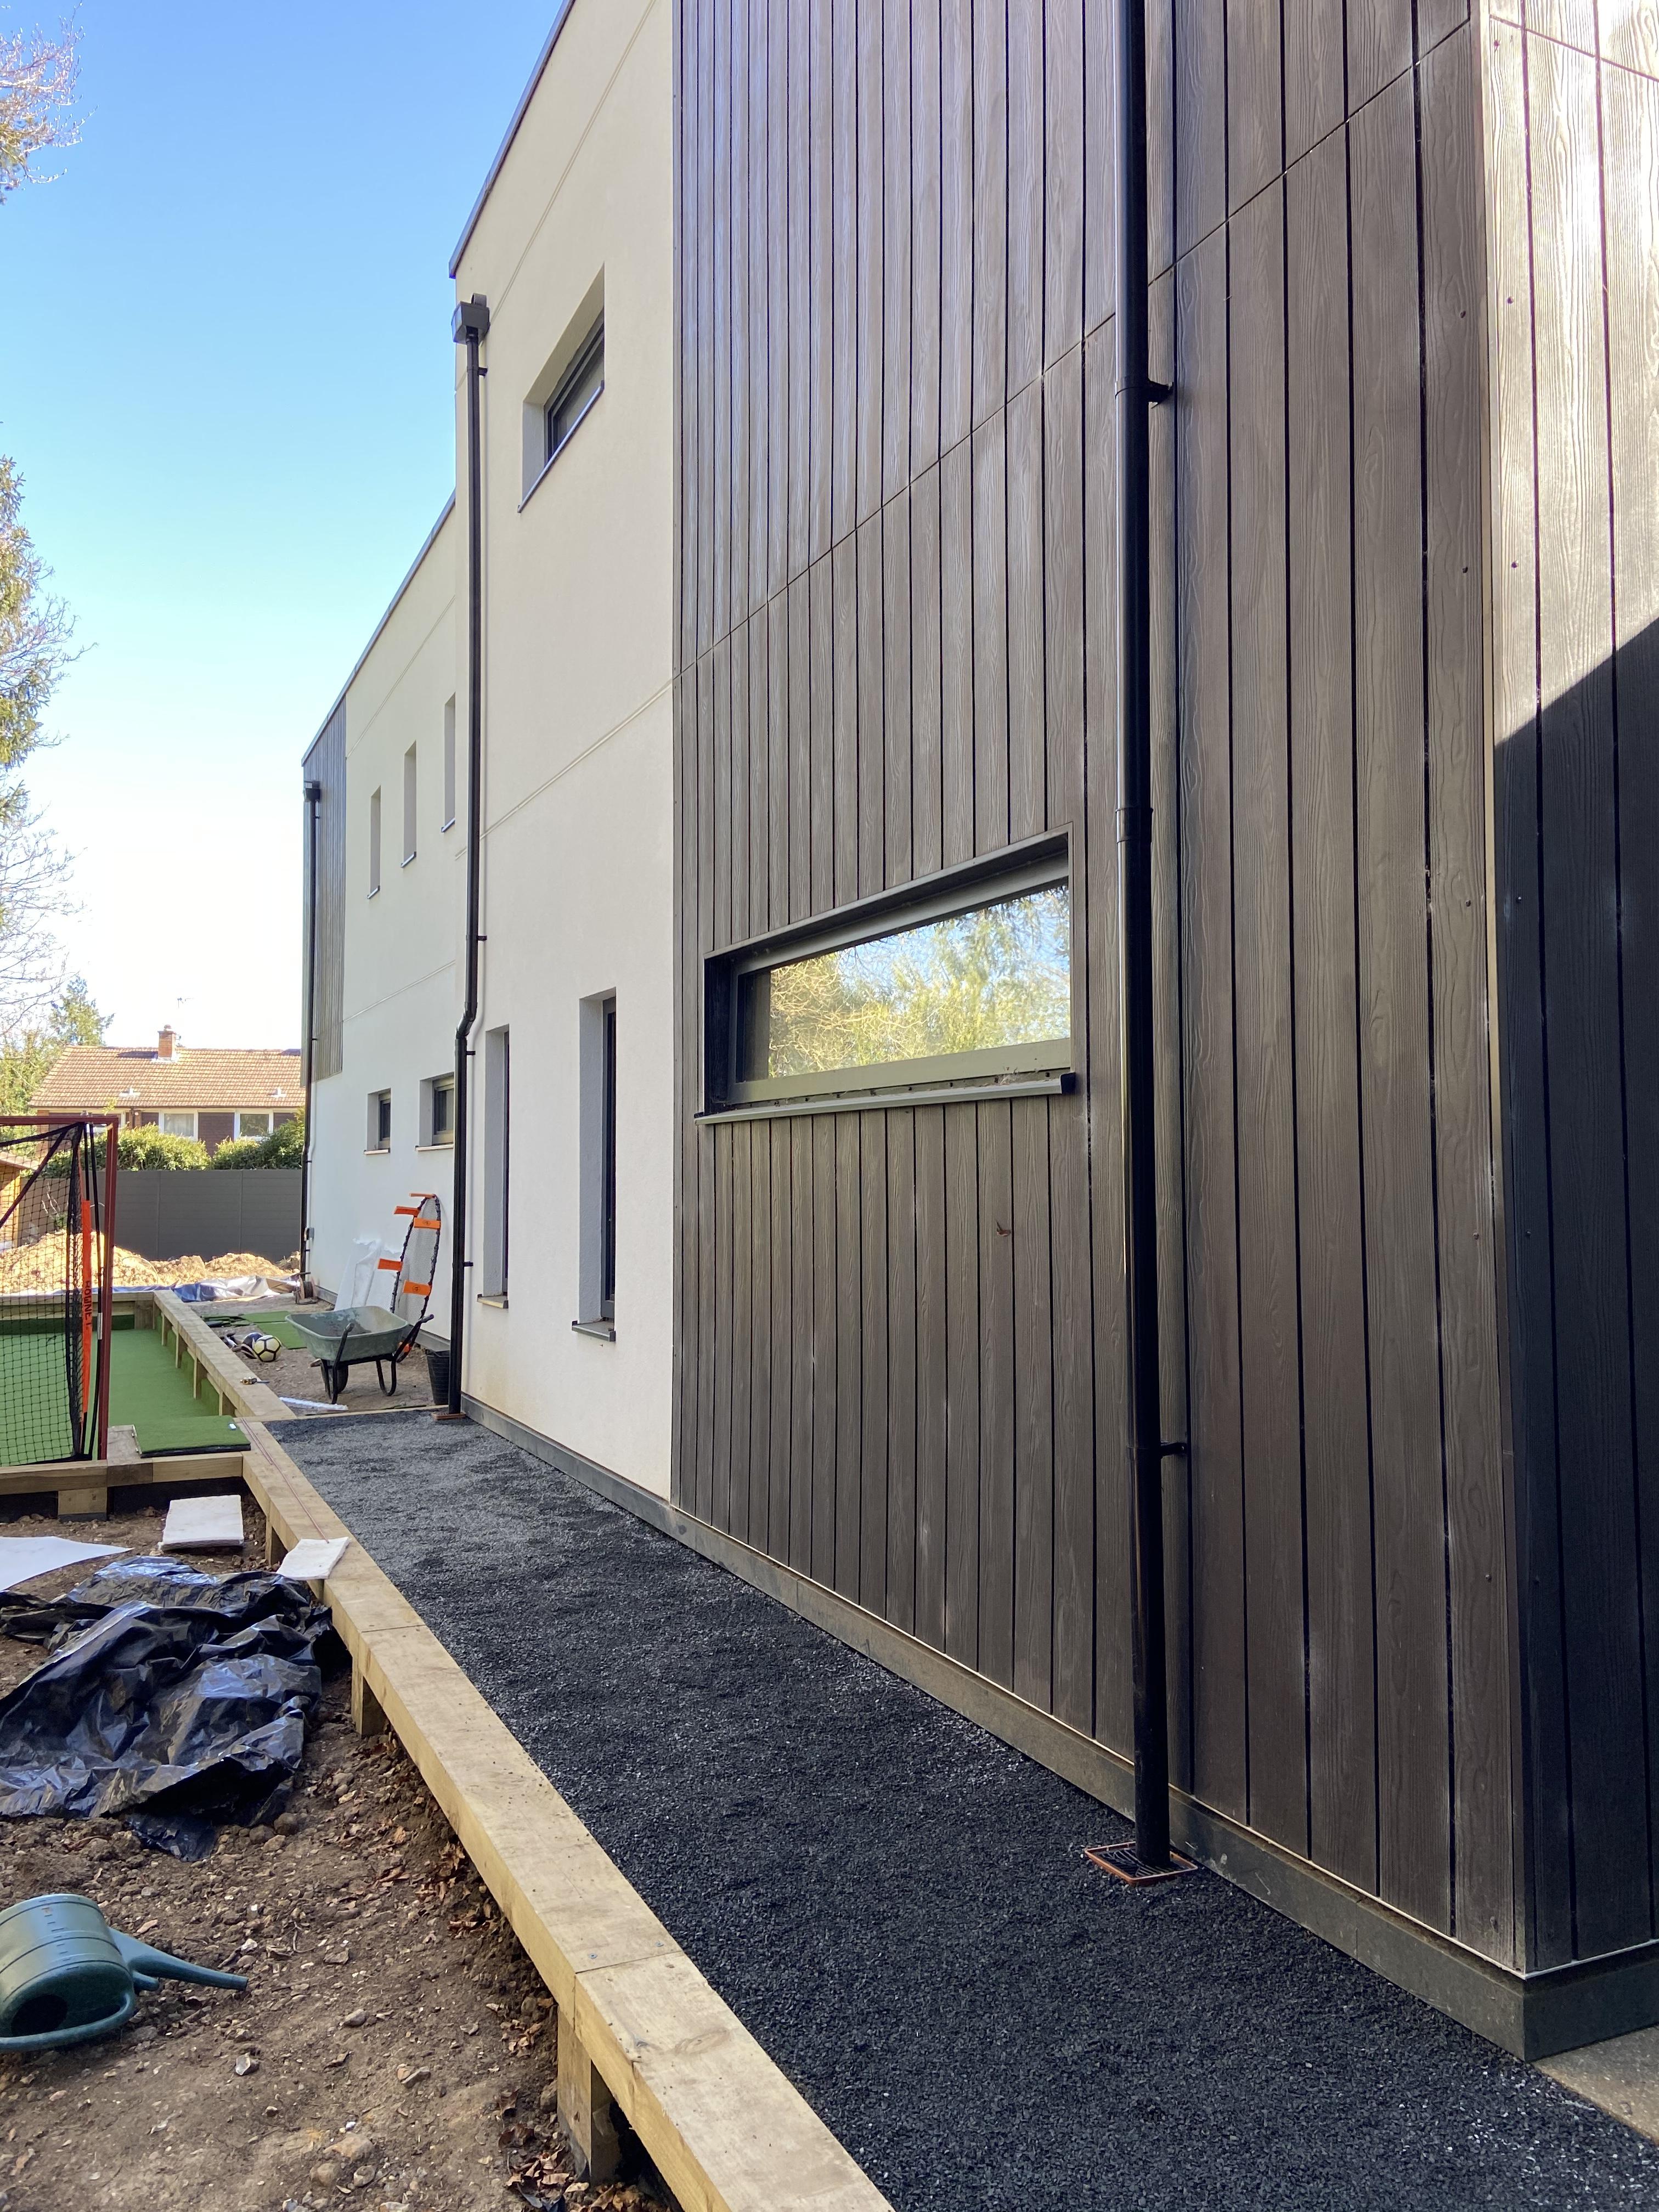
Would do again Timber frame build with render / cladding exterior Passive standard - means low energy costs even though we don't have solar panels Triple glazing - so quiet No heating upstairs apart from UFH in ensuites External electric blinds - a godsend to keep house cooler in summer Aluminium trim around base of house for a finished bottom "edge" - looks smart Larder (but would do it a bit better as it isn't perfect - gets too warm still despite being accessed via an insulated external door, and on a north facing wall with no sunshine). But it is useful extra storage, hidden away and I do like that. MVHR Still might do Solar panels (cabling to the roof is there just in case) Wish we'd done Two dishwashers Some way of cooling the house via the MVHR ducts. Got way too hot last year (though have since fitted solar film to some glazing so will see if there is any improvement this summer) Insect screen on door to patio Wouldn't bother with next time Huge architecturally pleasing windows in upstairs bedrooms. Requiring juliet balconies or safety locks. Complete waste of money - could have set them 300mm off the floor or higher, had a similar visual effect from the outside, would've been cheaper and easier in every way.
-
Gravel stabiliser grids - any experience?
Weebles replied to Weebles's topic in Landscaping, Decking & Patios
Found another supplier. StablePAVE. Their eco one (black or translucent) is working out cheapest. I only have 15 sqm to do. Will look tomorrow at my build up. Bit more crushed concrete needed which I'm shifting by hand /wheelbarrow from elsewhere on site. Then need to whack it. And a layer of sand. Seems simple enough but bet it won't be. Things never are ? -
Gravel stabiliser grids - any experience?
Weebles replied to Weebles's topic in Landscaping, Decking & Patios
Am thinking about a black basalt. Apparently it has to be angular gravel and 10mm max so thought this would do the trick. https://www.stonewarehouse.co.uk/gravel-chippings/gravel/black-basalt-gravel-6mm Got some pebbles from them recently. They are nice, but the sizing was a bit random (15mm - 30mm pebbles and at least half were significantly larger, even in both dimensions) so thought best to err on the small side. Need to sort of match a grey porcelain slab which will be adjacent. Looks like it is possible to pour resin on top of some grids (Core Drive) which gives food for thought for a driveway. https://www.garden-builders.co.uk/copy-of-core-gravel Was looking at white grids though clearly that won't work with a black basalt so well so maybe grey or black. What are you thinking? -
Gravel stabiliser grids - any experience?
Weebles replied to Weebles's topic in Landscaping, Decking & Patios
We are also considering it for the driveway too. Going to try a path first as an experiment. Hoping for some recommendations...... Am leaning towards Nidagravel at the moment. Its 29mm deep but suggests over-filling by 20mm to allow for settlement. Slightly cheaper than Corepath. Gravelgrid looks the cheapest though (an add on from Stonewarehouse so you have to buy your gravel from there too). 40mm deep though so more gravel needed. Easter weekend project so will post photos.